In questo articolo
The steps below walk you through all the setup of the environment required to run the Banana Excel add-in from a local installation and not from the Office store.
In order to do that, you will have to:
- Download all the add-in files.
- Save them to specific folders on your computer.
- Add a trusted add-in catalog in Excel.
- Load the add-in in Excel.
- Set the server URL in the add-in.
Minimum requirements:
- Banana Accounting Plus or Banana Accounting 9.
- Microsoft Excel 2016 for Windows or macOS.
Get Banana Accounting Plus
Install Banana Accounting Plus for Windows or Mac on your pc.
Start Banana Accounting web server
In order to use the add-in you have to start the Banana web server first:
- Start Banana Accounting Plus.
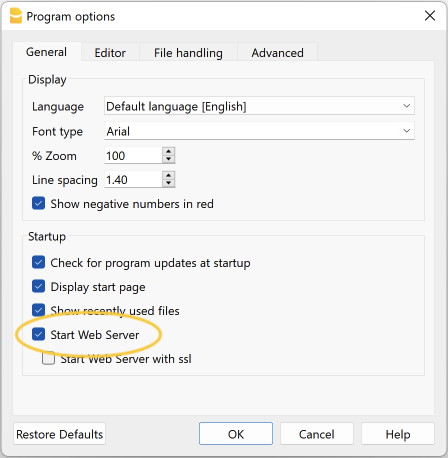
- On menu bar click Tools > Program options and select the General tab.
- Check the Start Web Server option. The web server with ssl is not needed.
- Click Ok.
Download the add-in files
The next step is to download all the required files of the add-in.
- Download the BananaAccountingExcelAddin.zip file.
- Extract the content:
- BananaAccountingExcelAddin: folder containing all the add-in files.
- BananaAccountingExcelManifest: manifest file of the add-in.

Install the add-in files
The files extracted from the zip must be copied to specific directories.
Add-in files for Windows
Banana Accounting Plus:
On Windows you need to copy the BananaAccountingExcelAddin folder in the directory C:\Users\{user_name}\AppData\Roaming\Banana.ch\BananaPlus\10.0\WWW.
- In the search box insert %AppData% and press enter. The AppData\Roaming folder will open.
- Navigate through the folders Banana.ch\BananaPlus\10.0.
- If it doesn't exists yet, create a folder named WWW (all in capital letters).
- Copy in the WWW folder the BananaAccountingExcelAddin folder extracted from the zip file.

Banana Accounting 9:
On Windows you need to copy the BananaAccountingExcelAddin folder in the directory C:\Users\{user_name}\AppData\Local\Banana.ch\Banana\9.0\WWW.
- In the search box insert %LocalAppData% and press enter. The AppData\Local folder will open.
- Navigate through the folders Banana.ch\Banana\9.0.
- If it doesn't exists yet, create a folder named WWW (all in capital letters).
- Copy in the WWW folder the BananaAccountingExcelAddin folder extracted from the zip file.

Add-in files for macOS
Banana Accounting Plus:
On macOS you need to copy the BananaAccountingExcelAddin folder in the directory /Users/{user_name}/Library/Application Support/Banana.ch/BananaPlus/10.0/WWW.
- Open the Finder.
- From the menu select Go and then Go to folder.
- Insert here the path /Users/{user_name}/Library/Application Support/Banana.ch/BananaPlus/10.0 and click Go.
- If it doesn't exists yet, create a folder named WWW (all in capital letters).
- Copy in the WWW folder the BananaAccountingExcelAddin folder extracted from the zip file.
Banana Accounting 9:
On macOS you need to copy the BananaAccountingExcelAddin folder in the directory /Users/{user_name}/Library/Application Support/Banana.ch/Banana/9.0/WWW.
- Open the Finder.
- From the menu select Go and then Go to folder.
- Insert here the path /Users/{user_name}/Library/Application Support/Banana.ch/Banana/9.0 and click Go.
- If it doesn't exists yet, create a folder named WWW (all in capital letters).
- Copy in the WWW folder the BananaAccountingExcelAddin folder extracted from the zip file.
Install the Manifest file
Each Office add-in has its own manifest file. The manifest is an XML file that defines various settings, including description and links to all the add-in files.
Manifest file must be copied to a specific directory.
Manifest directory for Windows
On Windows you need to create a directory to save the manifest of the add-in.
The directory needs to be a shared directory.
- Create a folder for the add-ins manifests on a network share:
- Create a folder on your local drive (for example, C:\Shared\OfficeManifest).
- Right click on the folder, select properties.
- Click on Sharing tab.
- Click on Advanced Sharing...
- Check the Share this folder box.
- Click Apply and then Ok.
- Copy here the BananaAccountingExcelManifest file extracted from the zip file.

- Tell Excel to use the Manifests directory as trusted app catalog:
- Launch Excel and open a blank spreadsheet.
- Choose the File tab, and then choose Options.
- Choose Trust Center, and then choose the Trust Center Settings button.
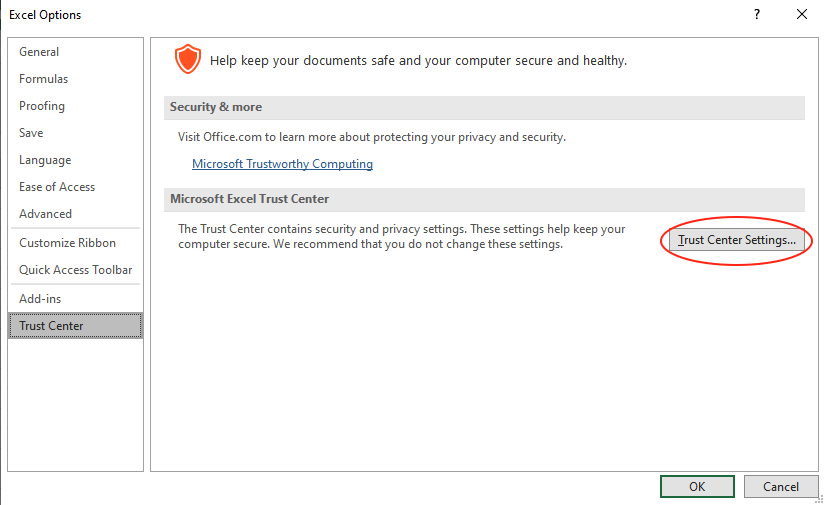
- Choose Trusted Add-in Catalogs.
- In the Catalog URL box, enter the path to the network share you created, and then choose Add Catalog.
To see the path of the network share folder: right click on the shared folder → Properties → Sharing → Network Path.
You can copy the path from here.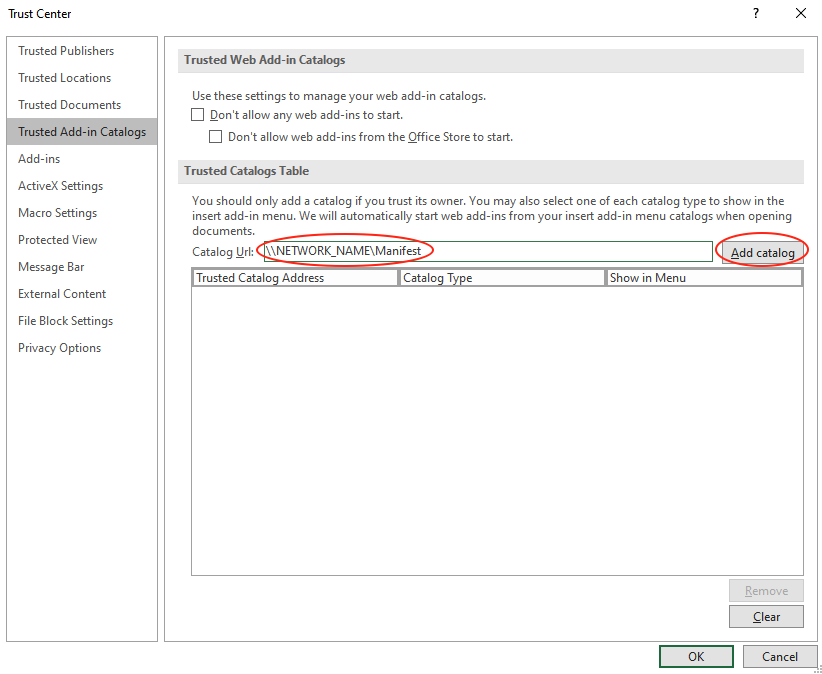
- Select the Show in Menu check box, and then choose OK.
A message appears to inform you that your settings will be applied the next time you start Office.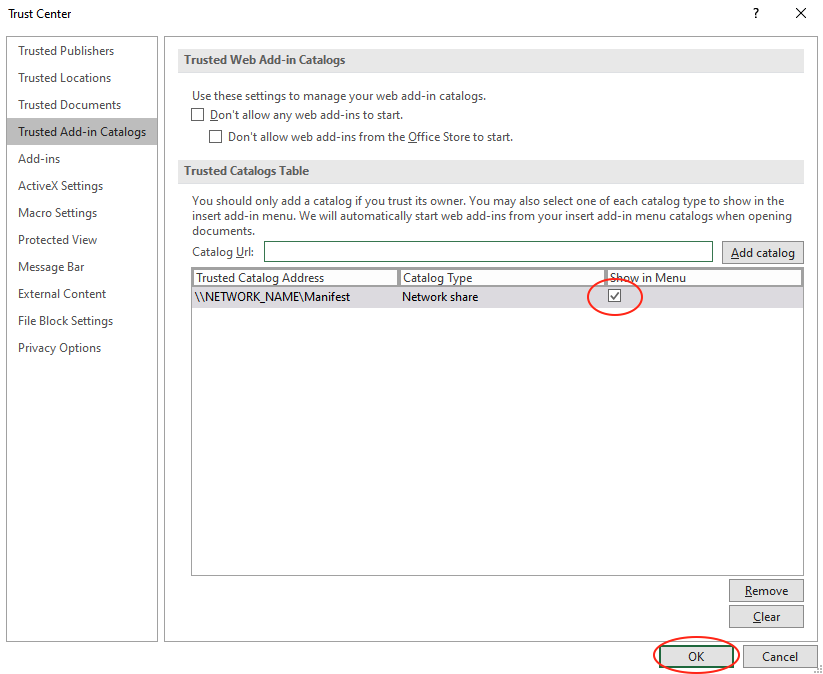
- Close Excel and restart it.
Manifest directory for macOS
On Mac you need to create a folder to save the manifest file of the add-in.
- Open Finder and from the menu select Go > Go to folder.
- Enter the filepath /Users/<username>/Library/Containers/com.microsoft.Excel/Data/Documents/wef
If the wef folder doesn't exist on your computer, create it.
Note: <username> is your name on the device. - In the wef folder copy the BananaAccountingExcelManifest file extracted from the zip file.
Other filepaths based on the application:
- For Excel: /Users/<username>/Library/Containers/com.microsoft.Excel/Data/Documents/wef
- For Word: /Users/<username>/Library/Containers/com.microsoft.Word/Data/Documents/wef
- For PowerPoint: /Users/<username>/Library/Containers/com.microsoft.Powerpoint/Data/Documents/wef
Load the add-in in Excel
Once all the setup and installations are done, it is possible to run and use the add-in.
- Open Microsoft Excel.
- Click on Home tab.
- Click on the Add-ins button.
- Click on More Add-ins.
- Click on the Shared folder.
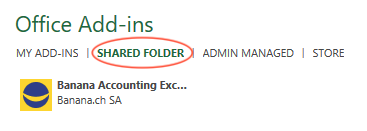
- Select the Banana Accounting Excel add-in.
- Click Add.
The add-in is added
Set the server URL setting
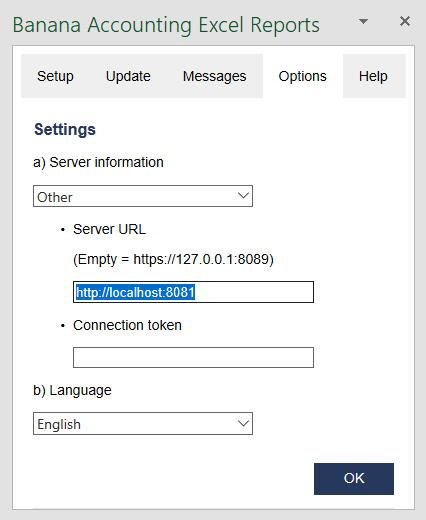
In the add-in make sure to change the server URL to http://localhost:8081.
- Start+Excel and the Banana Accounting add-in.
- Click on the Options tab of the Add-in.
- From the server information select Other.
- In the Server URL field, insert http://localhost:8081
- Click+OK to confirm and save the changes.
Other Resources
For more and detailed information about the developing of the Office Add-ins, please visit https://github.com/BananaAccounting/General/tree/master/OfficeAddIns.
Introduction to Excel 2016 Add-ins
Office 2016 Add-ins are extentions of Word, Excel, PowerPoint, and Outlook.
Add-ins are composed of:
- Manifest file.
An XML file that defines various settings, including description and links to all the add-in files.
It is used by Word, Excel, PowerPoint, and Outlook to locate the Add-in resources.
The manifest file can reside on a local directory or is published on the Office Store. - Webpage files.
Files that compose the web app (HTML pages, JavaScript code and images).
All the files need to reside on a web server.
Add-in Examples
These examples have been made available for programmers that want to create specialized add-ins to retrieve information from Banana Accounting.
You need to insall the add-ins on a web server.
- for Excel:
- Account Card report to create an Excel worksheet with details of an account.
- Retrieve Table report to create an Excel worksheet with a full table taken from the accounting.
- for Word:
- Account Card report to create a Word document with details of an account.