导入
自动完成导入发生业务的规则
该功能可以大幅减少输入发生业务的时间和错误。会改变您做账的方式,因为一旦设置了规则,它就是完成导入发生业务的程序,包含所有必要的信息 (对应方、增值税代码、成本中心等)。
优点
- 可以在几秒钟内完成业务的录入,没有错误和疏漏。
- 通过应用规则对话框的预览,一切尽在您的控制之中。
- 规则使您更容易将任务委托给其他人。
使用自动完成规则的要求:
学习功能
使用该功能的客户很热情,他们向我们证明,在需要了解工作原理的规则,以及如何最好地使用它们的初始阶段之后,很大幅度的减少了他们的会计工作。
我们很乐意提供以下文档,可以通过实例进行练习:
规则 = 知识库
我们从客户那里观察到,这些规则除了方便操作外,还会成为一个知识库,将不同业务必须记录在账户中的逻辑组合在一起。 除了快速安全地完成会计业务外,它们还可以:
- 轻松检查某些交易的记录方式。不再需要滚动浏览以前的操作来记住它们是如何完成的。
- 向必须进行记账的人解释如何记录各种交易。
- 为审计师定义如何记录某些交易。

自动结转到新一年的规定
当创建一个新的年份时,经常性业务表的内容会延续到新的年份文件中,因此知识库保持不变。因此,对于那些每年重复出现一次或仅有几次,但需要特别注意的操作,也值得使用这些规则。
How the rules for completing imported transactions work in 3 steps
The following explains the procedure for how Rules work and how they are applied.
The process can be summarized in three steps:
- Import bank transactions into the Transactions table.
- Create the rules.
- Apply the rules for the automatic completion of transactions.
1. Import bank transactions
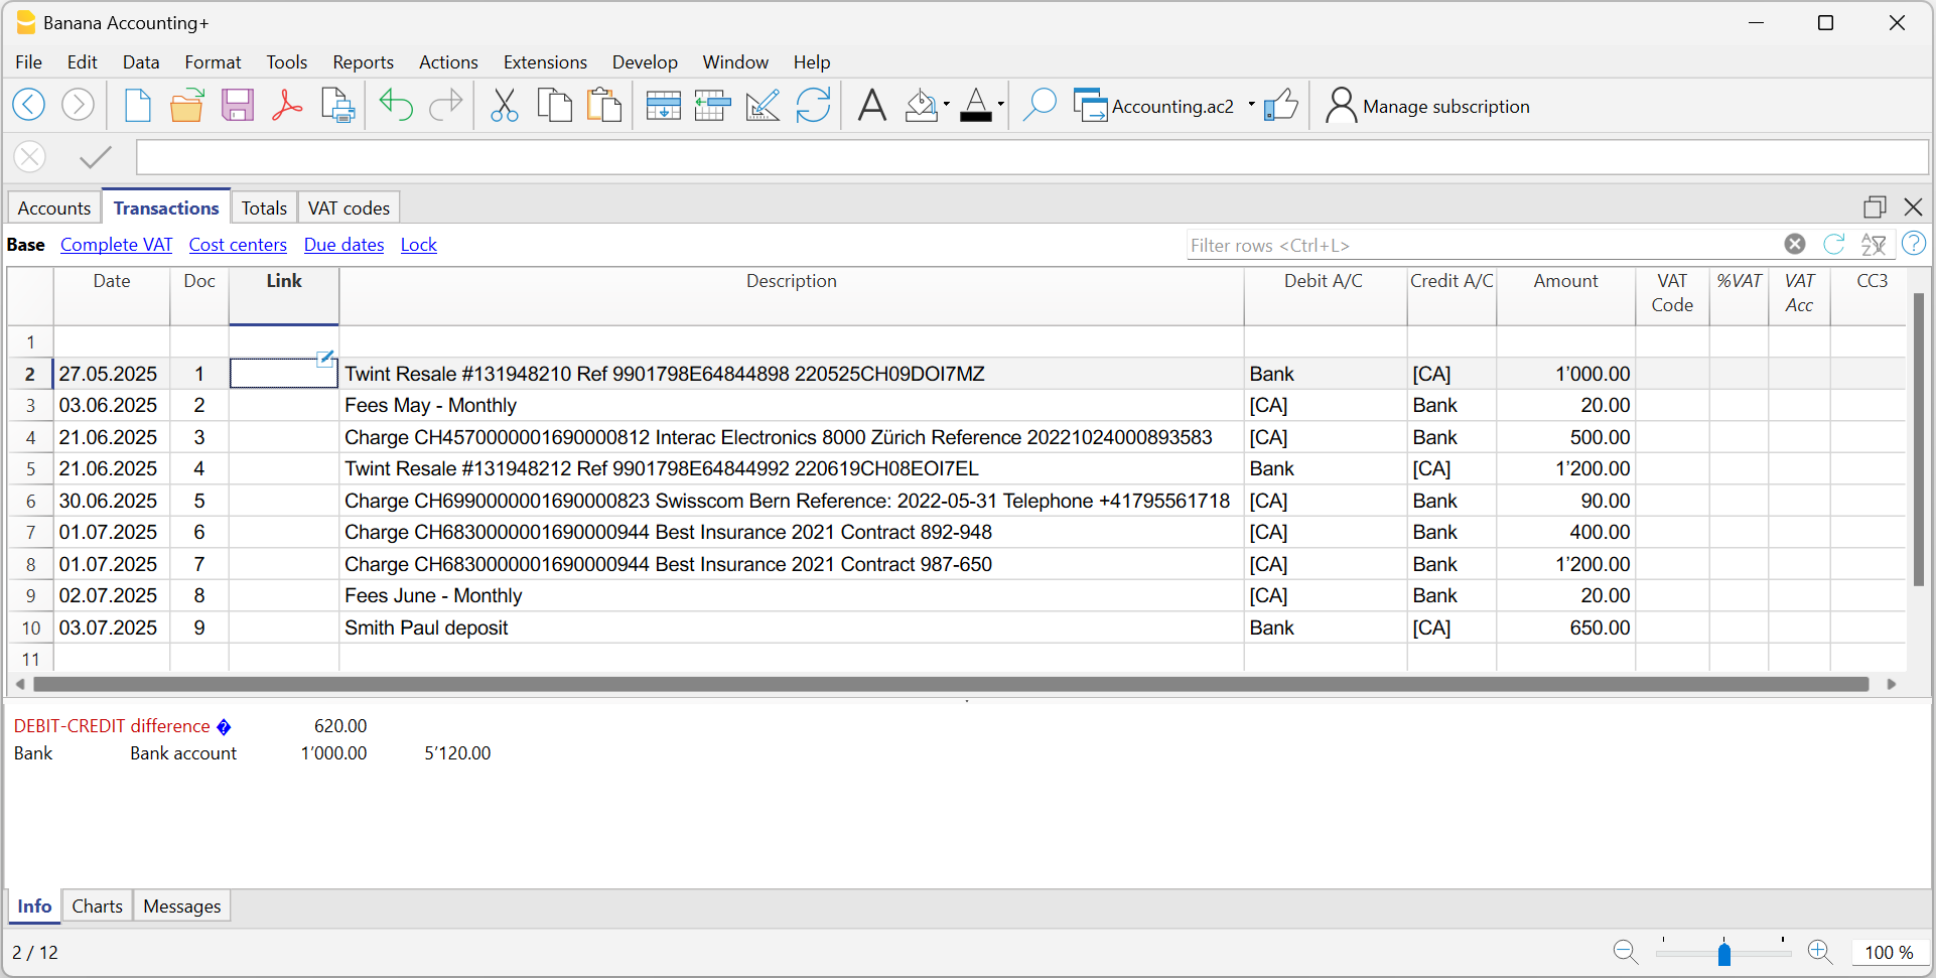
When bank transactions are imported, the program inserts a temporary counteraccount [CA]. Typically, the completion of contra accounts must be done manually for each entry.

In the example figure, in the Transactions table, it can be seen that:
- (1) - The cells have the same temporary contra account, related to sales via Twint.
- (2) - The cell has a temporary contra account related to monthly expenses for May.
- (3) - The cell has a temporary contra account related to Swisscom telephone expenses.
- (4) - The cell has a temporary contra account related to insurance costs, policy number 892-948.
- (5) - The cell has a temporary contra account related to insurance costs, policy number 987-650.
2. Creating the Rules
The Rules are used to automatically complete all temporary contra accounts of imported transactions, adding VAT codes, cost centers, links, and more.
The rules are template transactions that are already complete, found in the Recurring transactions table, where:
- The Description column contains the text (one or more keywords) that the imported transaction must include.
- The Debit Account and Credit Account columns contain the Contra account that will replace the temporary one.
We have created a system that provides different methods for creating the Rules:
- Rules from the Apply Rules dialog
- Rules from the Transactions table
- Rules from the Recurring transactions table
Regardless of the method used, the created Rules are saved in the Recurring Transactions table.

In the example, in the Recurring Transactions table, a Rule has been created for the following transactions:
- (1) - For the "Twint" transactions, the rule replaces the temporary contra account with the "Sales" account. The VAT code has also been added.
- (2) - For the "Interac Electronics" transaction, the rule replaces the temporary contra account with the "Goods" account. The VAT code has also been added.
- (3) - For the "Swisscom" transaction, the rule replaces the temporary contra account with the "Admin" account.
- (4) - For the "Best insurance" transaction with policy number "892-948", the rule replaces the temporary contra account with the "Insurance Health" account.
- (5) - For the "Best insurance" transaction with policy number "987-650", the rule replaces the temporary contra account with the "Insurance Car" account.
Important: where there is a contract number, a policy number, a customer number, etc., it is recommended to add a "+" in front of the rule. The + allows the rule to search for individual words (or sequences of numbers) regardless of their position within the description of the imported transaction.
3. Applying the Rules for Automatic Completion (Result)
In the Transactions table, the program completes the imported transactions by adding the contra account, VAT code, etc., regardless of the method used for creating the Rules.

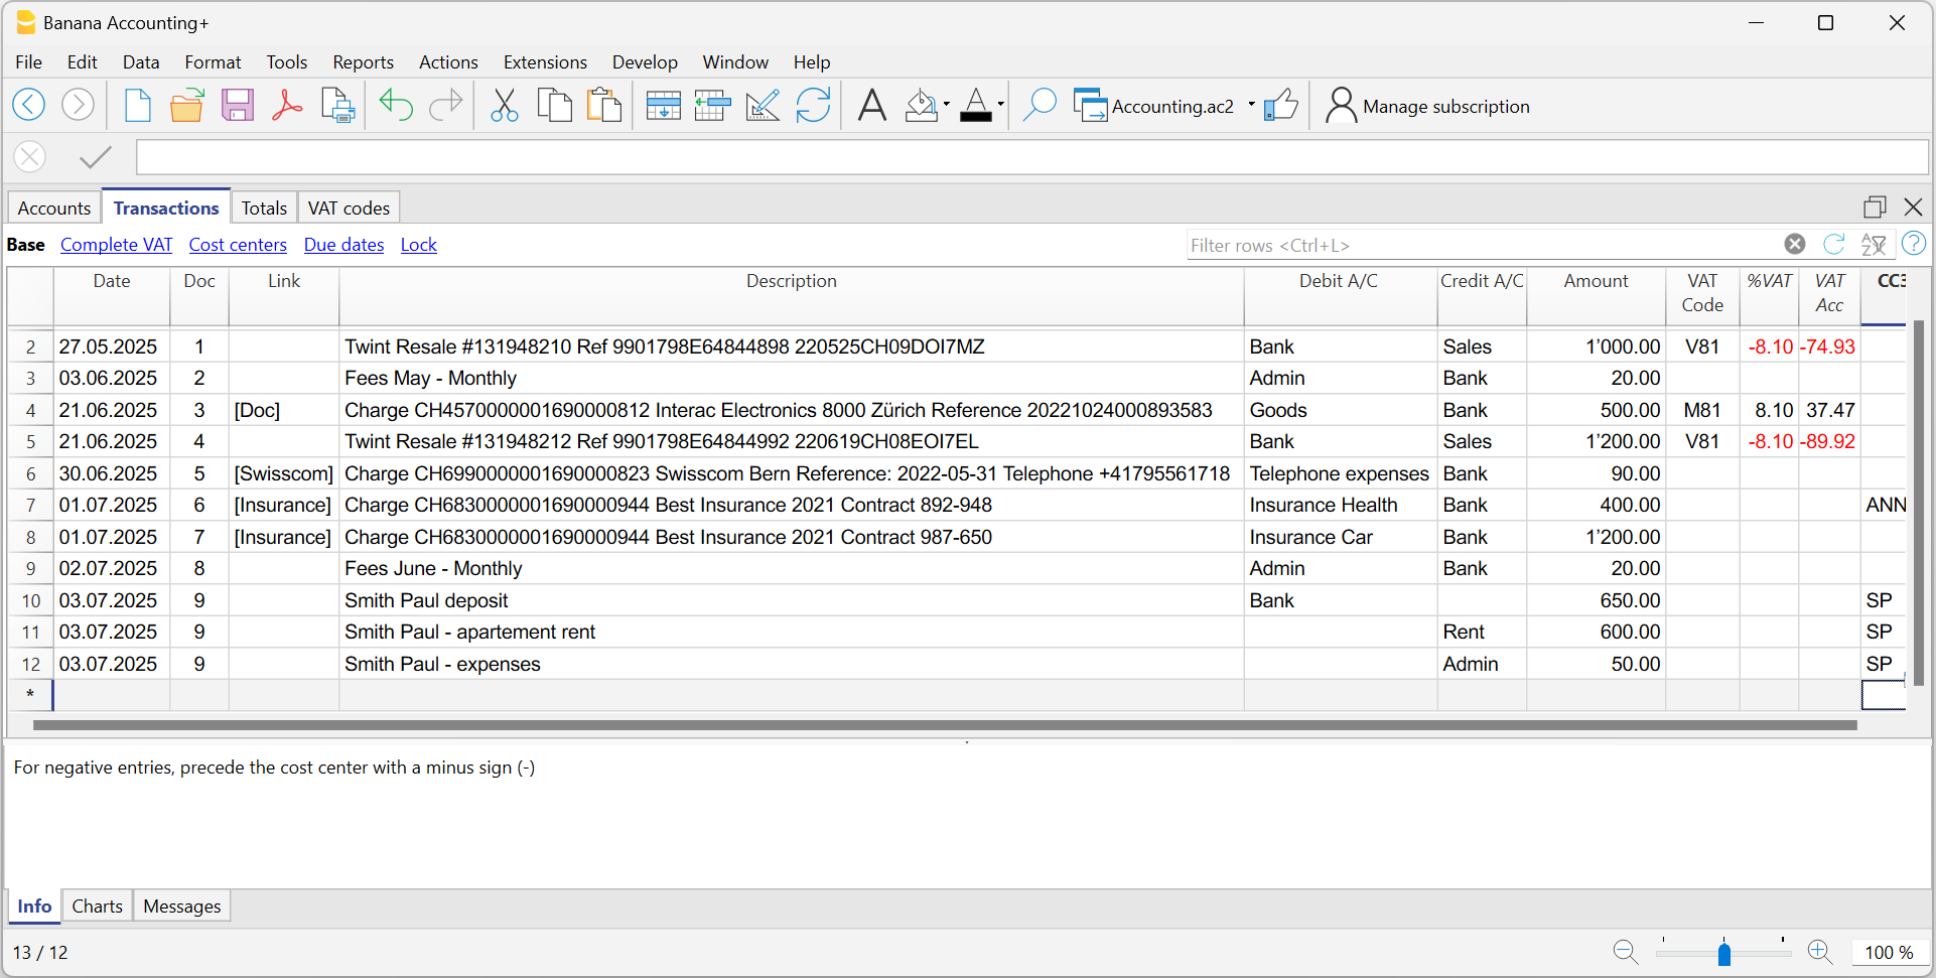
In the example, in the Transactions table, the imported transactions have been automatically completed:
- (1) - For the "Twint" transactions, the temporary contra account has been replaced with the "Sales" account and completed with the VAT code.
- (2) - For the "Interac Electronics" transaction, the temporary contra account has been replaced with the "Goods" account and completed with the VAT code.
- (3) - For the "Swisscom" transaction, the temporary contra account has been replaced with the "Admin" account.
- (4) - For the "Best insurance" transaction with policy number "892-948", the temporary contra account has been replaced with the "Insurance Health" account.
- (5) - For the "Best insurance" transaction with policy number "987-650", the temporary contra account has been replaced with the "Insurance Car" account.
Additionally, the program recognizes the transactions with the VAT code and completes all the columns related to VAT (VAT account and amounts).
Create Rules from the Apply Rules Dialog
One of the methods for creating Rules is from the Apply Rules dialog. The main advantages are as follows:
- You can see all imported transactions.
- The imported transactions are divided into incoming and outgoing transactions, with Rules and without Rules.
- For each group of identical transactions, the Rule being applied is shown in bold.
- Rules that are duplicated or in conflict are highlighted.
- You can add new rules and modify or delete existing ones.
- By changing the conditions of a Rule (description, amount, account), you can immediately see the list of transactions that comply with it.
- You can decide which rules to activate and which to deactivate.
Below is the complete procedure for creating Rules from the Apply Rules dialog.
1. Give the command Import into accounting
Before accessing the Apply Rules dialog, you must first import bank, postal, or other transactions as follows:
- Use the command from the Actions menu > Import into accounting > Transactions
- Select the appropriate format and indicate the path where the file with your bank statement data is located
- In the dialog that opens:
- Enter the account related to the statement from which you are importing the transactions (bank, postal service, etc.).
- Specify the start and end dates for the period of the transactions to import.
- Indicate the temporary contra account if you want it to be different from the default "[CA]".
You can use any account, and if you write it in square brackets, it will not be accounted for. - Activate the Apply Rules option (available only with the Advanced plan of Banana Accounting Plus).
- Confirm with OK.

2. Dialogue Apply Rules
The program opens the Apply Rules dialog.
In this dialog, you will find:
- The temporary contra account you entered previously or the default one "[CA]".
- The bank account entered, where all transactions imported from your bank or postal account are recorded.
- The imported transactions from the bank account, divided into:
- Incoming transactions without rules (Money In without rules).
- Outgoing transactions without rules (Money Out without rules).
- Incoming transactions with rules (Money In with rules).
- Outgoing transactions with rules (Money Out with rules).

3. Create new rules
To create new Rules:
- Position yourself on one of the transactions for which you want to create a rule.
- Go to the right-hand side until you see "...".
- Click on Add New Rule.

The Add Rule - Edit Rule dialogue appears.
In this dialog, you need to enter:
- In the Description, the text (keyword) that the program uses to find the matching Rule in the imported transactions.
Example:- Best Insurance Contract 892-948
applies to lines that contain exactly the specified text. - +Best Insurance Contract 892-948
applies to lines that contain the words "Best Insurance" and "892-948" in any position.
- Best Insurance Contract 892-948
- The contra account, used to replace the temporary contra account.
- Any other information (Cost centers, VAT codes, etc.).
Important: where there is a contract number, a policy number, a customer number, etc., it is recommended to add a "+" in front of the rule. The + allows the rule to search for individual words (or sequences of numbers) regardless of their position within the description of the imported transaction.
The program shows the transactions found based on the entered conditions to which the new rule will be applied. In the example, we have a single transaction.
- Confirm with OK.

4. Confirm Apply Rules
In the Apply Rules dialog, you will see:
- The row of the created Rule ("NEW") where the data of the temporary counteraccount [CA] and the other information entered in the rule are indicated.
- Below are the lines of the transactions to which the rule has been applied.
You can decide when to execute the Apply Rules command:
- You can apply the rules selectively and continue working on the others.
- You can exit the dialog and return later.
- You can cancel the operation of applying the rules and repeat it later.
- The Apply Rules command also saves any changes you made to the rules.
By clicking on the buttons:
- Apply Rules:
- The program adds the new Rules to the Recurring transactions table.
- The program completes the transactions in the Transactions table.
- The dialog remains open so you can add the rules to the other transactions.
- OK
- Confirms the applied rules and closes the dialog.
- Confirms the applied rules and closes the dialog.

Undo changes made
Once the dialogue is closed, you will see the completed transactions in the Transactions table.
If you wish, you can undo the changes you have made:
- Menu Edit > Undo edit
- With the Cancel button (green arrow).
To also cancel the import of the data, you need to repeat the Cancel command a second time.
Complete other transactions with Temporary contra account
After importing bank transactions, the aim is to complete all transactions so that there are no more transactions with Temporary contra accounts [CA].
You can manually complete the remaining transactions. This is useful for special cases that do not tend to repeat.
You can create new rules by chosing one of the following methods:
Adding information to completed transactions with rules
It is possible to add supplementary information to the Rules through the Recurring Transactions table.
Auto-completion rules from the Apply Rules dialogue
The Apply Rules window offers an excellent level of control over changes to accounting transactions because it shows a preview of existing rules, with an indication of which transactions match each one and which transactions do not yet match any rules. You then have the option of creating new rules, modifying or deleting existing ones.
▶ Video: Rules for completing imported transactions (Apply Rules dialogue)
The dialogue may be displayed:
- From the Import Transactions dialogue, when the Apply Rules option is checked
Rules are only applied to imported rows
- From the Actions menu > Recurring transactions > Apply rules...
Rules are applied to the entire contents of the Transactions table
The Apply Rules dialogue, coupled with the import of banking data, becomes a crucial tool for setting up all repetitive records. In this dialogue window, when faced with multiple repetitive transactions of the same type, it suffices to set the rule for just one of the transactions, and the rules are automatically applied to all other transactions in the dialogue, eliminating the need to set the rule again.
Once the rules are confirmed, all transactions are listed in the Transactions table, ensuring consistency and accuracy in records of the same type, and speed in accounting for all transactions.

This dialogue box is divided into three sections:
Apply rules to transactions with...
- Temporary contra account:
This field is mandatory.
It filters all imported transactions that contain that specific contra account, e.g. [CA], which was indicated in the Import transactions dialogue. - Account:
Filters all imported transactions that contain a specific account, usually a bank account or [A], which has been indicated in the Import Transactions Dialogue.
The rule-based auto-completion system assumes that once the transactions have been completed, there is no longer any transaction containing the temporary contra account.
Imported data corresponding to rules or not
The window shows all transactions that have temporary contra accounts indicated above (e.g. [CA]). These are grouped in four main sections:
- Incoming transactions with rules
Transactions with positive change of account (credit) and with indication of the rule to which they correspond - Outgoing transactions with rules
Transactions with negative account variation (debit) and with indication of the rule to which they correspond - Incoming transactions without rules
Transactions with positive change of account (credit) and not belonging to any rule - Outgoing transactions without rules
Transactions with negative account variation (debit) and not belonging to any rule
Contextual commands
From the row of a transaction without a rule, a simple click or the three dots (...) to the right, or a right click anywhere on the row, opens a menu allowing you to:
- Add/Edit Rule
- Cancel an existing rule
- Change an overlapping rule

The commands at the bottom of the dialogue
- Expand All/Collapse All: displays or hides the elements of the Transactions.
- Display unused rules: checking this option displays all rules defined in the Recurring transactions table; if the option is not checked, the programme only displays rules that have matches.
- Display rows without rules: if this option is checked, all imported transactions are displayed; if the option is not checked, the programme only shows transactions that match a rule.
- Remove accounts between [ ]: in multi-row transactions, the import account is placed in square brackets [ ] in the detail rows. If this option is activated, the programme removes the import account from the detail rows.
Rules with transactions on multiple rows can only be defined in the Recurring transactions table. - OK: this button applies the active rules and closes the window.
- The temporary contra account is replaced in all transactions that have a match with a rule.
- New or changed rules are also saved in the Recurring Transactions table.
- Cancel: this button closes the window without applying the rules.
- If there have been changes to one or more rules, you will be asked for confirmation before closing the window.
- With this button you cannot undo the Apply Rules command; to do so, you must close this window and use the Undo command from the Edit menu.
- Apply Rules: this button applies the rules without closing the window.
- The temporary contra account is replaced in all transactions that have a match with a rule.
- Rules that are added or changed are saved in the Recurring transactions table.
- If you wish to undo changes, you must close the window and use the Undo command from the Edit menu.
Tips on how to use the Apply Rules window
The most effective way to work with the Apply Rules window is as follows:
- Check that the transactions matching rules are correct.
- Use the Apply Rules button to update the Transactions table with the selected rules.
- Add new rules for the remaining transactions and check that they are applied correctly.
- Use the Apply Rules button again.
- Repeat steps 3 and 4 until all recurring transactions are associated with rules.
Recurring transactions table
Rules are saved and may be edited in the Recurring transactions table.
You can complete or add rules also with transactions on multiple rows in the Recurring transactions table.
As time goes by, you will see that more and more imported transactions will have matches with rules; the more rules you add, the more your accounting work will be reduced.
Apply Rules dialog – Add Rule
From the Apply rules dialogue you may access the Add/Edit rule section as follows:
- By right-clicking on one of the transactions or rules:
- For transactions that already have a rule, you can choose Edit Rule or Delete Rule.
- For transactions that do not have a rule, you can choose Add New Rule.
Add New Rule example
The following example in the dialogue below is an outgoing transaction of the payment of a health insurance.
To add a new rule:
- Right-click on the movement row and choose Add New Rule.
- The dialogue Add rule appears.
- Fill in the fields available.
- Confirm with OK.

Add New Rule dialogue
The Add New Rule dialogue shows the data of the selected transaction from which you are creating the rule.
- Complete the rule with the matching parameters (conditions) and the rule completion parameters.
- All rules are saved in the Recurring Transactions table (rules for completion), where you can also:
- Edit, add and delete rules.
- Add any other column for completion, which is not available in this dialogue (e.g. Notes or DocLink columns).
- Colour the row if you want to highlight the imported transaction.
- Add transactions on multiple rows (SplitRule).

The Rule
- Rule type.
The programme, depending on the type of transaction, if in credit or debit on the bank account, sets the rule as Money in or Money out transaction. - Rule title.
It is optional, it is displayed in the Apply Rule dialogue.
Conditions
These are the elements that are used to check whether there is a match for each individual transaction.
- A match is given if all conditions are found.
- If a match is given, the entry is listed among the transactions with rule.
The description
In the description, enter the text to be searched in the text of the imported transaction. If the text is found the transaction will be considered suitable for applying the rule, if the other conditions are then met.
- Exact word or phrase
- If you write only Best Insurance 982-948 as a condition of the rule, only transactions containing those words in that exact order will be considered matches.
- If you write only Insurance, as a condition of the rule, all entries containing this exact word will be considered matches.
- All words (starting with the "+ "sign)
- If you write +Best Insurance 982-948 as a condition of the rule, all records containing these exact words, in any position, will be considered matches.
All words must be present in the description of the transaction.
The position of the words in the sentence is not relevant.
The "+" sign is not considered in the search.
- If you write +Best Insurance 982-948 as a condition of the rule, all records containing these exact words, in any position, will be considered matches.
- List of words (using |)
- If you enter "coffee|restaurant", the program searches for imported transactions that contain the word "coffee" or "restaurant".
- This mode is useful for identifying multiple categories without having to create separate searches.
- Upper and lower case
When searching for input text, no case difference is made.
The text you enter is applied to both upper and lower case text.
Amount
If you indicate an amount in the rule, only transactions with the same amount, as well as a match in the Description, will be considered as matches.
If you do not indicate any amount, any transaction of any amount that meets all other criteria will be treated as a match.
Account
In this field you will already find by default the account from which you imported the transactions. If you leave the account field empty, all transactions, imported from any account, that meet all other criteria will be considered as matches.
Actions
These are the elements used to complete the transaction row if a match is given.
If the contra account or other items to be completed are not present, you can abort the Apply rules command, add the missing account, and call up the Actions > Recurring transactions > Apply rules... command.
Contra account
Enter the account in your chart of accounts that is to be matched in the rule. In this example, the correct contra account is the Health Insurance account.
VAT
You can already enter in the rule the VAT code that the programme must add to each movement considered as a match.
CC1, CC2, CC3
You can already enter in the rule the Cost Centres that the programme must add to each movement considered as a match.
By confirming with the OK button, the new rule is saved. You will return to the previous window where the imported movements with and without rules are displayed again.
Matching Transactions
This table shows all imported transactions selected in the Apply Rules dialogue, which fall under this rule.
Buttons
- The Delete button, cancels the rule.
- The OK button, saves the rule data.
Be aware though that, until you do not give the command Apply Rules, the new rules won't be saved in the Recurring transactions table.
Rules from Transactions table
One of the methods provided for creating Rules is from the Transactions table. The main advantages are as follows:
- You work directly in the Transactions table that you already use regularly. You are already familiar with the table.
- You see all the columns.
- You create Rules simply by completing the imported transactions.
You complete the transactions manually only the first time when creating the Rules. For subsequent imports, the program applies the already created Rules to the new imported transactions. - Speed in creating Rules.
Select the rows with completed transactions and, with a single click, create all the rules in the Recurring Transactions table. You only need to modify the description of each rule to ensure a precise match for future transactions. - You do not need to insert Rules through additional dialogs.
- You do not need to manually enter all the Rule data in the Recurring Transactions table.
Below is the complete procedure for creating Rules from the Transactions table.
Import transactions
In the Transactions table, import transactions from bank, postal, or credit card statements.
Complete the imported transactions
For each imported transaction, enter the counterpart, VAT code, cost center, or other information.
When you import a transaction that needs to be recorded on multiple lines, the program inserts a single entry with the total amount and a temporary counterpart [CA].
Proceed as follows:
- Remove the temporary counterpart account [CA] from the transaction.
- Insert new rows following the transaction. For each row, enter the complete transaction with description, counterpart, amount, any VAT code, and cost center.
Create Rules
Starting from the completed transactions, you can create Rules:
- Select from the Transactions table the entries to which you want to apply Rules.
- Right-click on a transaction without rules > Create rules from selection.
Alternatively, go to the Actions menu > Recurring Transactions > Create rules from selection.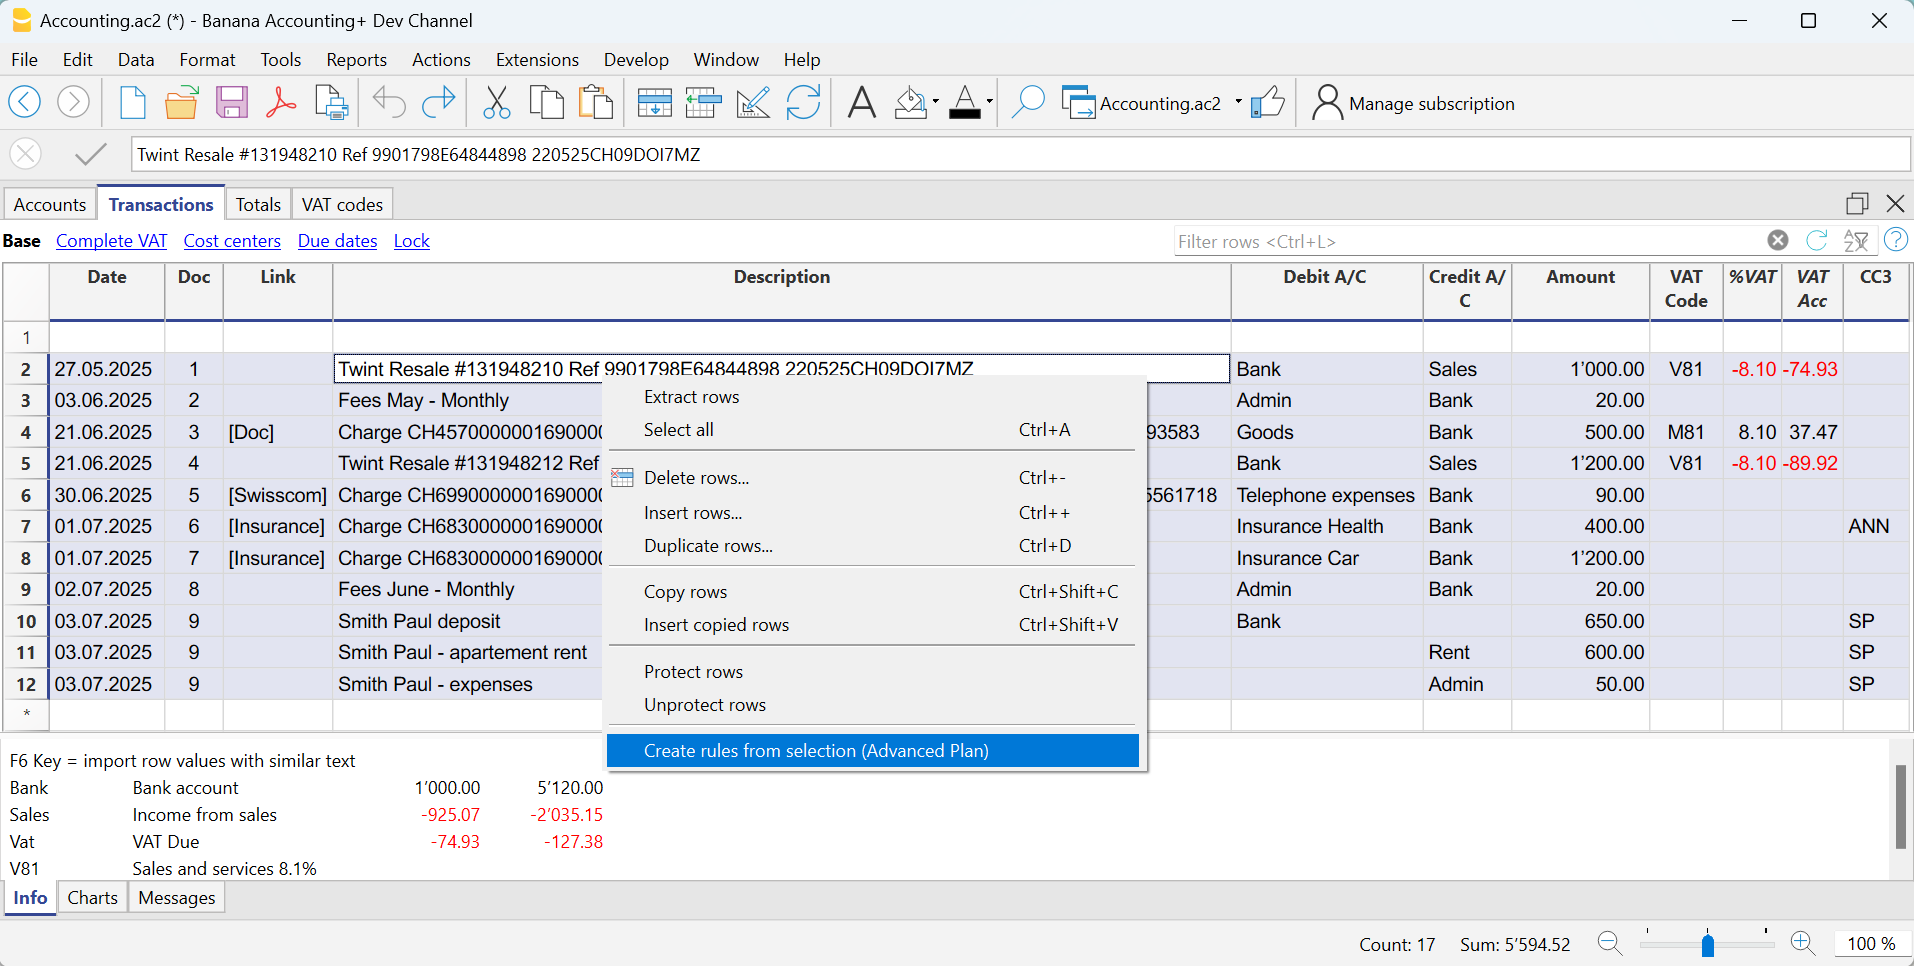
All selected transactions are transferred to the Recurring Transactions table, exactly as they were completed in the Transactions table.
How to complete the Rules
In the Recurring Transactions table, you need to complete the Rules:
- Edit the Description column.
Modify the text of the description to search for in the transactions from the imported bank statement. Initially, the program automatically uses the description found in the imported transaction.
Replace this text with one or more keywords so that the program can find matches in the description of the imported transaction (e.g., +Best Insurance).
See also Condition on Description - Debit and Credit Account Columns
The Debit and Credit columns show the counterpart and the imported bank account.- First, check whether the indicated counterpart is already the desired one; if not, update it accordingly.
- The main import account, used to identify matching transactions, must not be marked as a commented account (account enclosed in square brackets).
If the account matches the bank's main account from which the transactions are imported and is marked as a commented account, the brackets must be removed, otherwise the rule will not be applied correctly.
This may happen with detailed transactions imported from the statement for which no specific rules exist yet. - Alternatively, you can remove the main import account and leave only the counterpart. In this case, the rule will be applied based on the Description column (match with the transaction description) and will be valid for all imported bank accounts.
- For multi-line transactions, edit the Doc column.
In the first row of the transaction, enter empty square brackets [] in the counterpart column.
In subsequent rows, enter !RuleSplit in the Doc column (see rows 7,8,9 in the image below).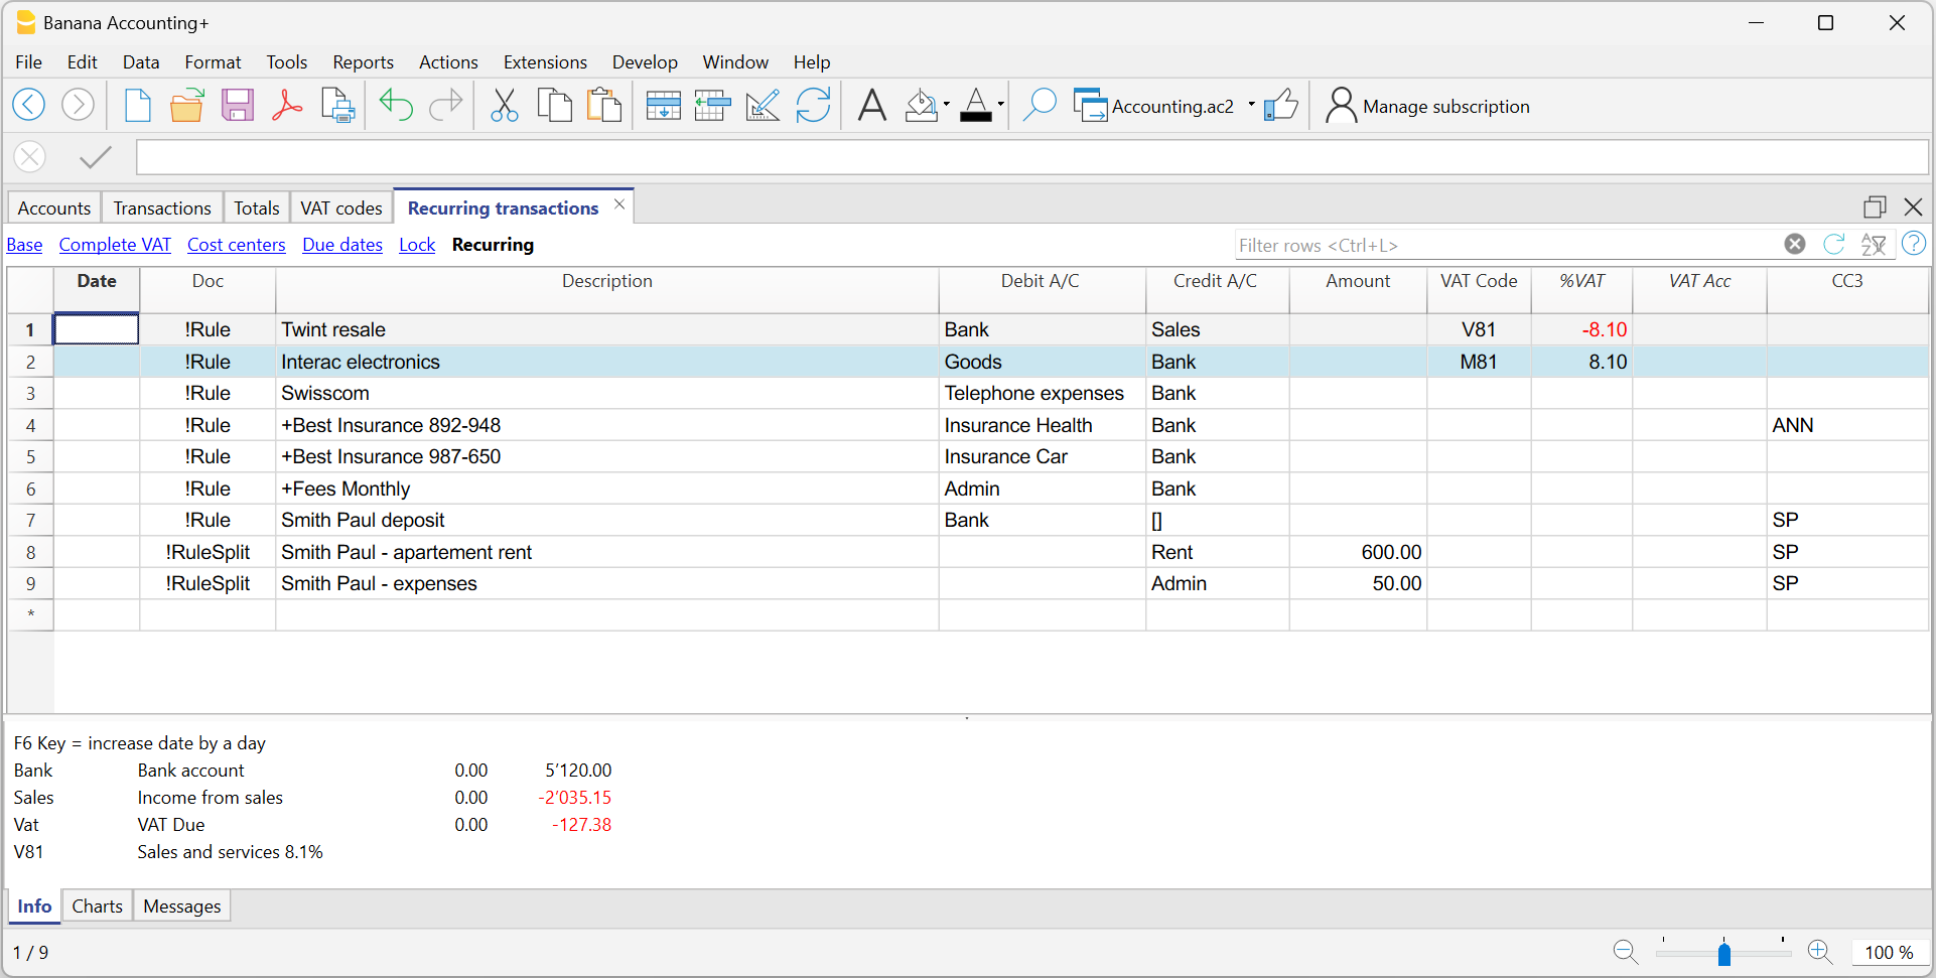
The explained procedure only needs to be performed the first time to set up the Rules. For future imports, the Rules found are applied automatically. You only need to complete the new imported transactions without a rule using the same procedure.
To find all imported transactions in the Transactions table that do not have a rule, you can use the Row filter function, entering the text "[CA]".
Recurring Transactions table Rules
The rules can be accessed via the command Actions > Recurring Transactions > Transactions table.
- Rule rows are those that contain !Rule or !RuleSplit in the Doc column.
- In rule rows, the columns have a different meaning:
- Condition Columns
Contain the values to be compared to determine whether the rule should be applied.
The condition columns are: Doc, Date, Description, Account Debit/Credit, Amount. - Action / Substitution Columns
Contain the values that will be applied and complete the imported transactions.
All columns that are not used as condition columns are considered substitution columns.
- Condition Columns

Condition columns
Condition columns (or search columns) contain the data used to search for matches in the imported transactions.
- Doc column (required)
- Must contain !Rule or !RuleSplit
- !Rule indicates it is a rule.
- !RuleSplit indicates that the rule above must also create split transactions.
- Must contain !Rule or !RuleSplit
- Description column (required)
- The Description column must contain the text to be searched in the description of imported transactions.
- When a description begins with text in square brackets, it is used as the rule name. The rule name is optional and can be used to better identify rules.
- Account column (recommended)
- In double-entry accounting: use the Debit column (to filter incoming transactions) or the Credit column (to filter outgoing transactions).
- In income and expense accounting: use the Account column.
- This is usually the bank account from which the transactions are imported.
- Date column (optional)
- Limits the application of the rule to a specific period of the transactions.
- Amount column (optional)
- Limits the application of the rule to a specific amount or range of amounts.
- In income and expense accounting: use the Income (incoming transactions) or Expense (outgoing transactions) column.
Substitution Columns
Substitution columns must be filled in with additional information.
- DocLink column
- Contra Account column
Enter the contra account that replaces the temporary contra account [CA] or the temporary contra selected in the Apply Rules dialog.- In double-entry accounting: use the Credit column (for incoming transactions) or the Debit column (for outgoing transactions).
- In income and expense accounting: use the Category column.
- VAT Code column
Enter the VAT code to be applied to the imported transaction.
The program automatically completes all VAT-related columns. - Cost Centers (CC1, CC2, CC3) columns
Specify the cost center to assign to the imported transaction. - Notes column
Enter any additional information to be included in the imported transaction. - Other columns
All columns that are not condition columns, except ExternalReference, are considered substitution columns.
ExternalReference is a reserved column used by the bank import to identify each transaction and prevent duplicates.
The DocLink column
In this column, it is not possible to insert a specific link to a document because each transaction will have its own document. However, you can add an annotation in square brackets (e.g., "[Doc]") to distinguish the rows that need to be associated with a digital document.
Once the transactions are imported, it may be necessary to link them to accounting documents. To speed up this process, it is recommended to proceed as follows:
- In the DocLink column of the Recurring Transactions table, use text enclosed in square brackets [ ].
- Within the square brackets, enter the text that should be searched for in the name of the supporting document file.

- In the Transactions table, the transactions are imported with the text in square brackets in the Link column.

- In the Transactions table, use the Row Filter function and enter the text "!link![ ]". This will display all the rows in the Link column that contain square brackets where a link to the supporting document needs to be added.
- When editing the Link column in the Transactions table, the program will show, in the auto-completion, the files of supporting documents that have not yet been linked to a transaction and contain the text entered between the square brackets.
For example, if you enter "[invoice]," the program will display all the unlinked files containing the text "invoice" in the cell.
It is possible that after importing transactions with the Rules, some transactions may need to be manually completed with additional information.
To quickly find the transactions that need to be completed, you can use one of the following methods:
- Using the Notes Column
To quickly locate the transactions that need to be completed, we recommend adding temporary search texts that can be used to filter the transactions. For example:- In the Notes column of the Recurring Transactions table, or in any other column of the Rule row (except for those predefined for the Rule), enter a hashtag, such as #city.
- In the Row Filter function of the Transactions table, enter the same hashtag. This will display the rows that you need to complete.
- Coloring Rule Rows
You can color the Rule rows in the Recurring Transactions table. The row color will be transferred to the Transactions table and used to highlight the transactions to which the rule is applied.
To identify only the colored rows, you can use the Row Filter function by entering the text "!_co!"

Split row transactions
Normally, when you import transactions from a bank statement with the Rule, a single counterpart account is recorded. If the total amount of the counterpart needs to be split across multiple counterpart accounts, you can create a multi-row Rule.
For example:
- You regularly receive a payment of 550 that must be recorded on three different accounts and therefore on three rows:
- (550) rent collection (no contra-account, as this involves recording the global amount split over three rows)
- (500) flat rent (contra account rent)
- (50) extra expenses (contra-account for extra expenses) .
To create a multi-row Rule:
- The first row corresponds to the total amount collected.
- In the Doc column, enter the text !Rule.
- In the Description column, enter the text to search for in the imported transactions.
- In the counterpart column, enter square brackets [].
In the following rows: - In the Doc column, enter the text !RuleSplit.
- In the Description column, enter the text to search for in the imported transactions.
- In the counterpart column, enter the counterpart accounts.
- In all other columns, input the values that should be included in the additional rows. In this example, we have added the tenant’s Cost Center.
In the following example, you can see the tenant’s Cost Center.
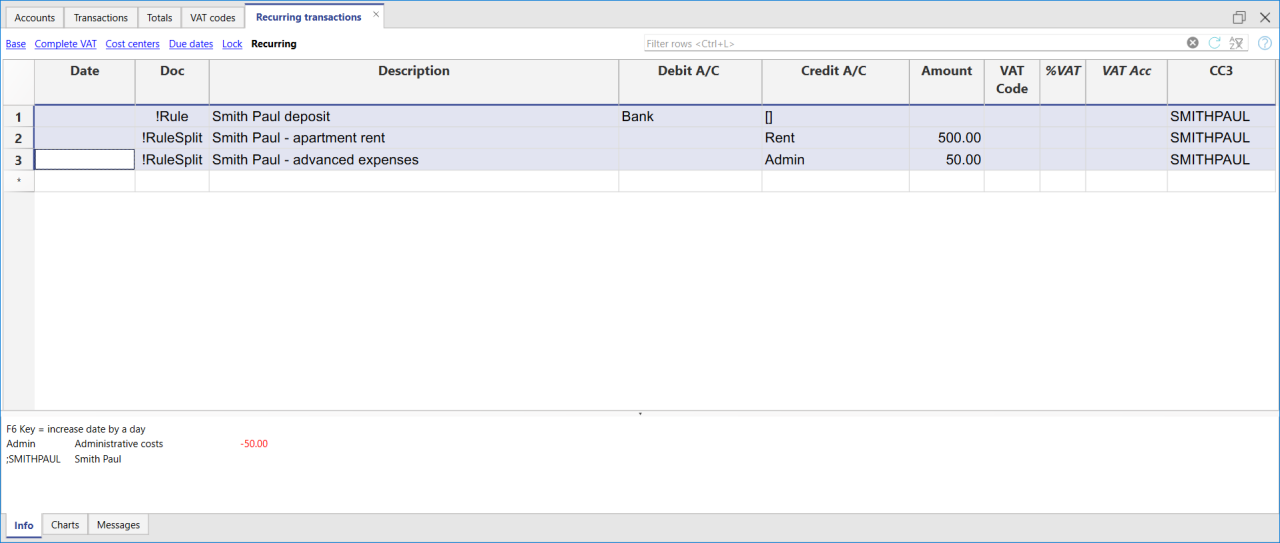
In the example of a multi-row rent transaction, it is assumed that the collected amount is always 550. If the collected amount is different from 550, the transaction will need to be completed manually.
Modifying rules in the Recurring Transactions Table
All completion Rules saved in the Recurring Transactions table, even if they were created from the Apply Rules dialog, can be modified, deleted, or new ones can be created in anticipation of a future import without a Rule.
Set a different description from the imported one
All imported transactions display the description from the bank statement in the Description column of the Transactions table. Typically, these descriptions are very detailed.
It is not possible to automatically change this description at the time of import.
If you wish to change the imported description, you can use the Notes column in the Recurring Transactions table.
Note: if the Notes column is already used for your own annotations, it cannot be used to modify the description.
If the Notes column is not being used, proceed as follows:
- Display the Recurring Transactions table.
- Make the Notes column visible by going to the menu Data > Columns set up > check the Notes column.
- In the Notes column, enter the description text that you want to appear in the Transactions table (Description column).
Repeat this step for each desired transaction.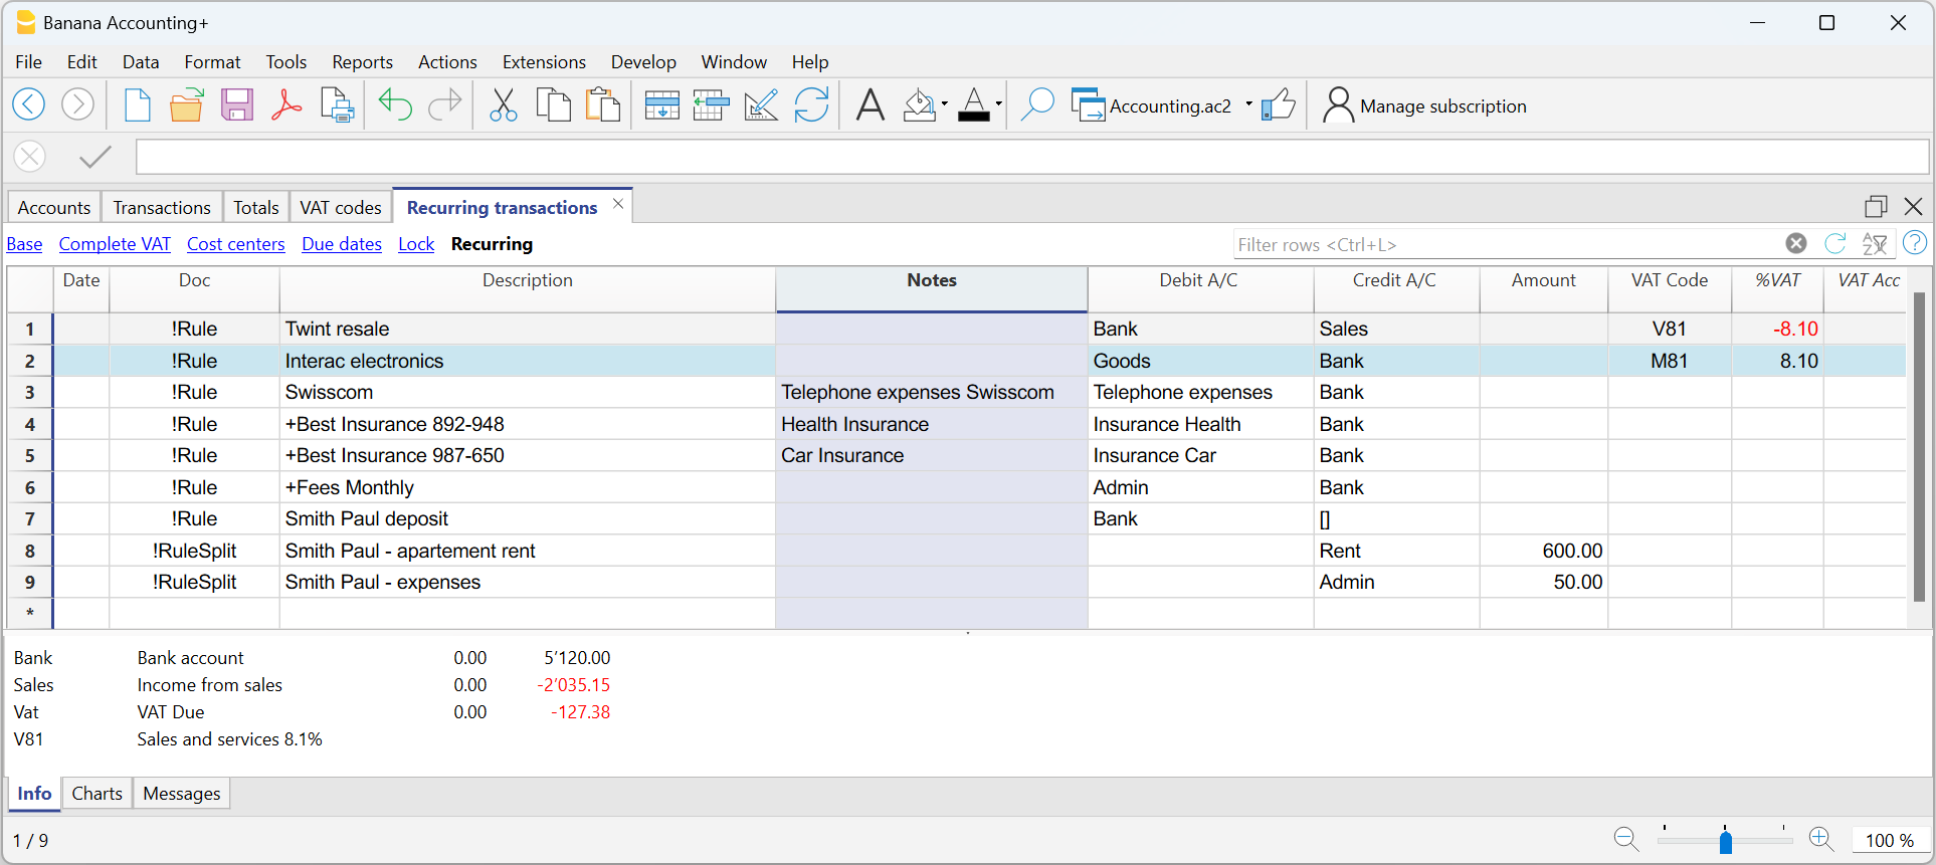
Import the transactions - After importing into the Transactions table, make the Notes column visible (menu Data > Columns setup > check the Notes column)
The Notes column will display the notes defined in the Recurring Transactions table.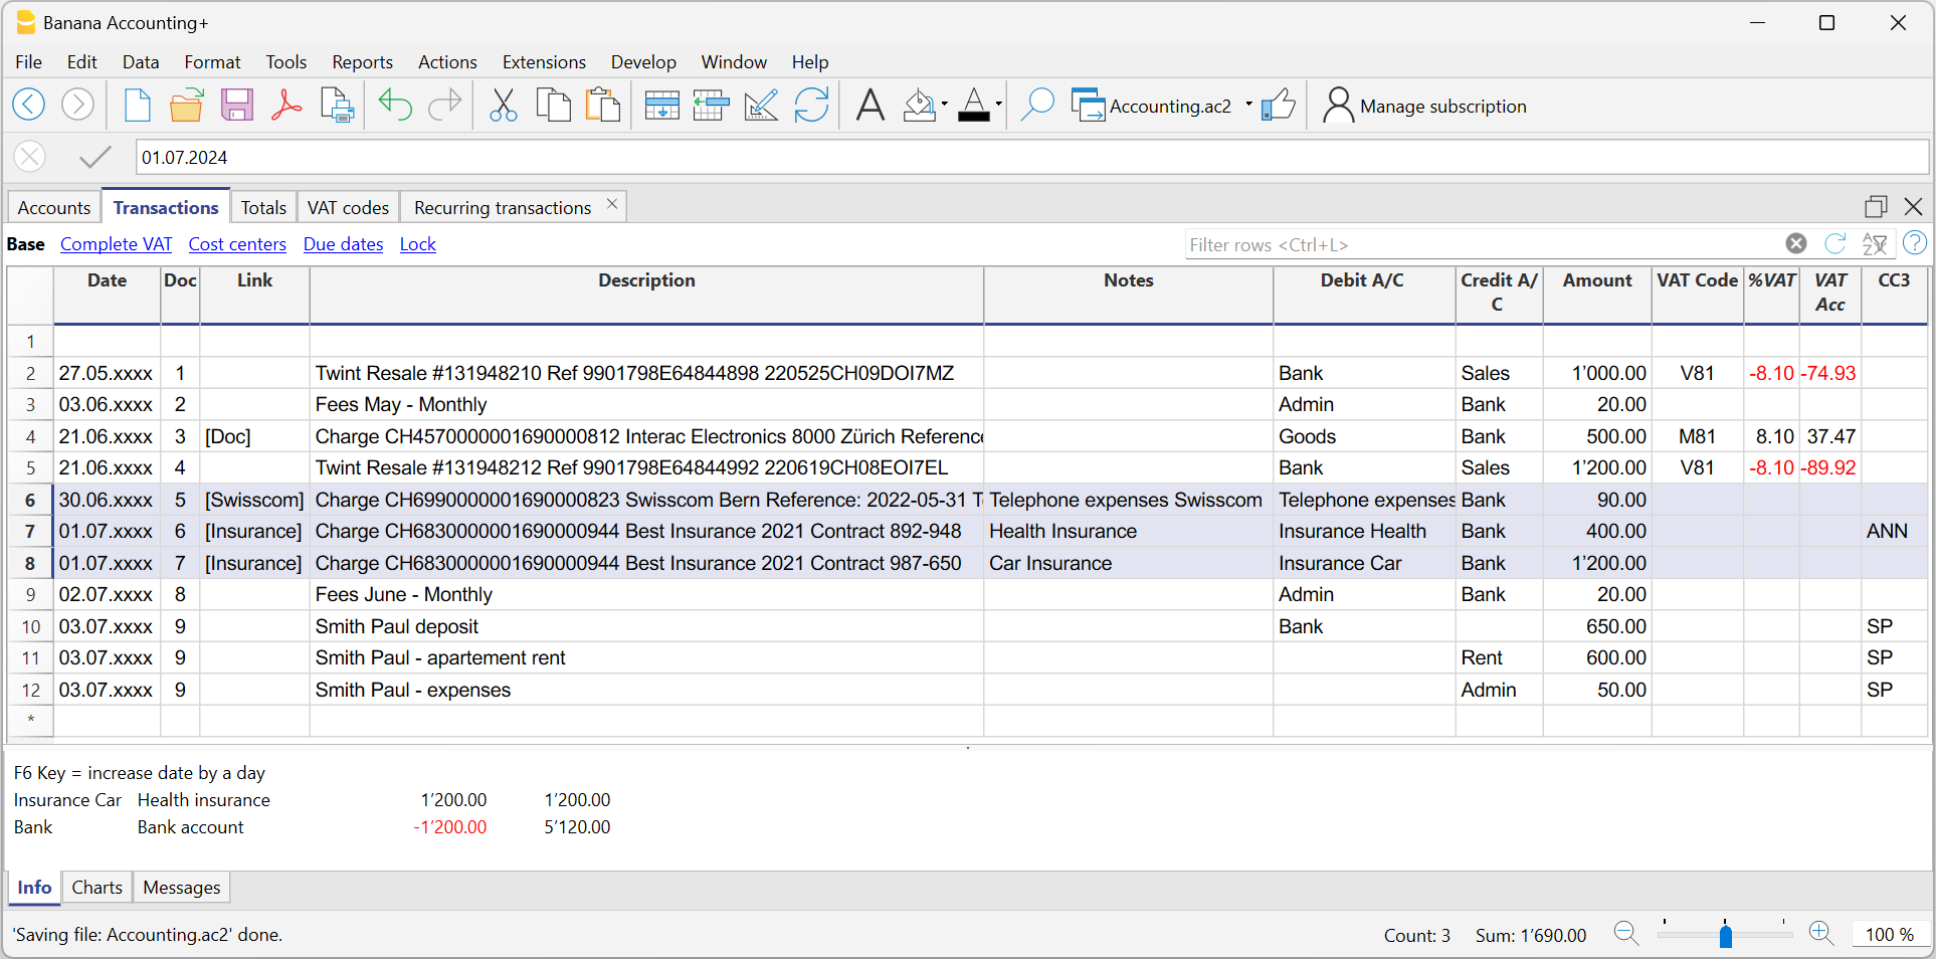
- For each transaction, copy the content from the Notes column and paste it into the Description column.
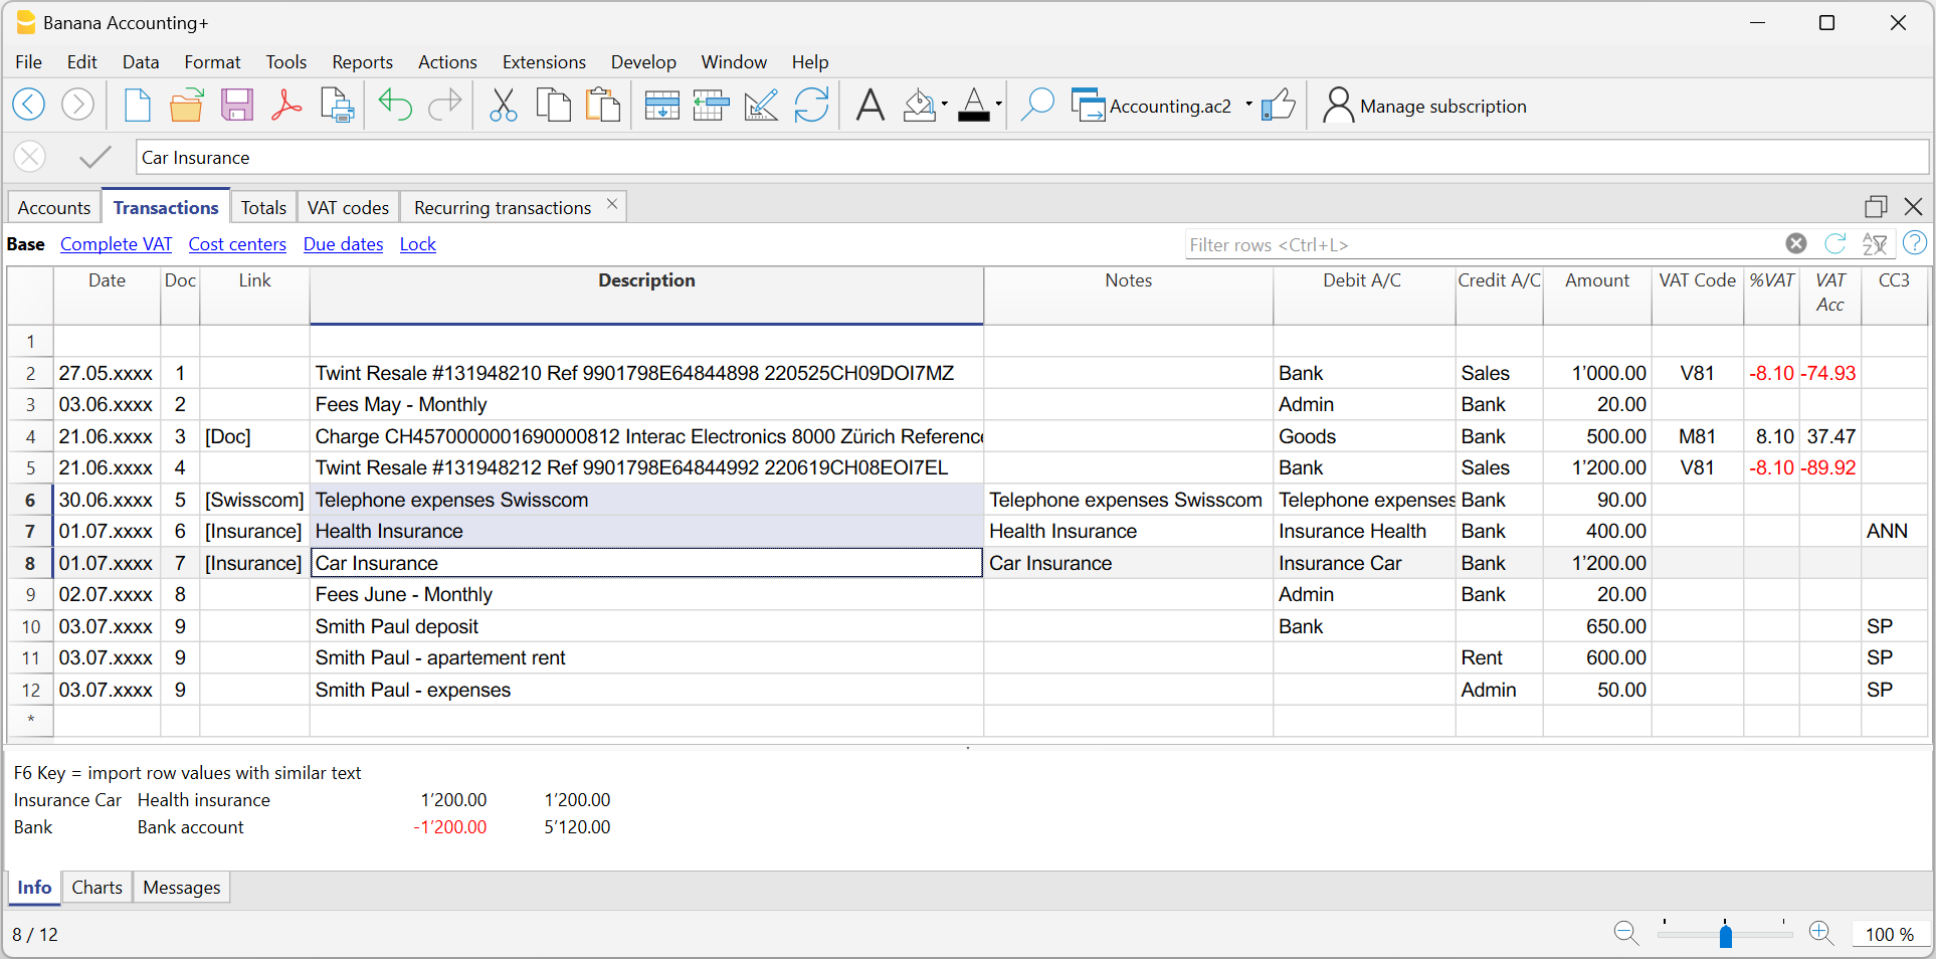
- For each transaction, copy the content from the Notes column and paste it into the Description column.
In the Recurring Transactions table, it is not possible to directly add custom columns.
To use a custom column in the Recurring Transactions table, you need to add the custom column to the Transactions table.
Once the column is added to the Transactions table, it will also be visible in the Recurring Transactions table and can be used to set a different description from the imported one.
Therefore, the insertion procedure is the same as described in the section Set a Different Description from the Imported One - Notes Column.
Create a new year with rules
When you create a new year using the command Actions > Create New Year, the existing Rules in the Recurring Transactions table are automatically carried over to the new year's file.
Accounting with the same rules
If you manage several similar accounting files (for example for clients with similar characteristics), it can be useful to reuse rules that have already been created, avoiding rewriting them every time.
When the accounting files have the same chart of accounts, or at least a compatible structure, you can copy the Recurring transactions from one file to another.
How to copy the rules
- Open the source file (the one that contains the rules to be reused).
- Display the Recurring transactions table using the command
Actions > Recurring transactions > Recurring transactions table. - Select the rows you want to copy.
- Use the Copy rows command, Edit > Copy rows.
- Open the destination file and display the Recurring transactions table.
- Paste the rules using the command Edit > Insert copied rows in the Recurring transactions table.
You can also create a dedicated accounting file, used as a rule library.
In this way, when you create a new accounting file, you can easily copy the necessary set of rules and paste it into the destination file.
Rule conditions
The rule conditions are criteria that define when a completion rule should be automatically applied to a transaction.
They are set during the creation or editing of a rule in the Apply Rules dialog, or directly in the Recurring Transactions table.
The conditions may refer to the Description, Account, Amount, and Date.
A rule is applied only if all the set conditions are met. If even a single condition is not fulfilled, the rule will not be executed. Empty conditions are ignored.
Condition on Description
Enter a word or short phrase as a keyword to identify transactions to be automated, based on the text shown in the Description column of the bank statement.
Banana Accounting automatically compares the description text of each transaction with the one specified in the rule and, if it finds a match, applies the associated rule.
To achieve more effective results, it is advisable to use only a few representative keywords (for example, the supplier or service name), so that the rule matches multiple similar transactions.
The search texts can be entered in several ways:
- Exact word or phrase
- For example, if you enter "Best Insurance 982-948", the program searches imported transactions that contain exactly "Best Insurance 982-948".
- If you only enter "Insurance", the program searches imported transactions that contain the word "Insurance".
- All words in any order (+ at the beginning)
- If you enter "+Best Insurance 892-948", the program searches imported transactions that contain the words "Best", "Insurance", and the number "892-948" in any order.
- All words must be present in the transaction description, but the order is not relevant.
- The "+" symbol is not considered in the search.
Important: where there is a contract number, a policy number, a customer number, etc., it is recommended to add a "+" in front of the rule. The + allows the rule to search for individual words (or sequences of numbers) regardless of their position within the description of the imported transaction.
- List of words (using |)
- If you enter "coffee|restaurant", the program searches imported transactions that contain the word "coffee" or "restaurant".
This method is useful to identify multiple categories without creating separate searches.
- If you enter "coffee|restaurant", the program searches imported transactions that contain the word "coffee" or "restaurant".
- Uppercase and lowercase
- The search does not distinguish between uppercase and lowercase letters. The entered text will be applied regardless of case.
All text entered in the Description is displayed in the Description column of the Recurring Transactions table.
- The search does not distinguish between uppercase and lowercase letters. The entered text will be applied regardless of case.
Warning: Do NOT use the entire text from the bank statement as the description, because it is unique for that transaction.
Condition on Account
- Enter the account from which the transactions are imported (bank, post, etc.).
- The program records in Debit or Credit depending on the imported transaction.
- The program automatically posts to Debit or Credit based on the transaction type.
- If the Account field is left empty, the rule applies to all accounts that meet the description condition.
Condition on Amount (or Currency Amount)
- Allows applying a rule only when the transaction has a specific amount.
- Alternatively, if the exact amount is not known, you can define a range of amounts by specifying a minimum, maximum, or a specific interval in which to apply the rule.
- Available from version 10.2.3 of Banana Accounting Plus (Dev Channel)
- The condition must:
- start with the symbol !
- be enclosed in square brackets [ ]
- use the unformatted amount, that is, without thousand separators and with a period as decimal separator
(other formats are not recognized) - The operators that can be used are greater >, less <, greater or equal >=, less or equal <=, not equal <>
- Example: to select transactions with amount greater or equal to CHF 1'000.00:
[!>=1000.00]

The image shows the Apply Rules dialog where you can select the Amount field and define a number range (in this example, account 1510 Furniture and Fixtures is applied to transactions with the description equal to 'Office supply purchase' and amount greater or equal to CHF 1'000).
Using this filter is useful when assigning different counterpart accounts based on the transaction amount.
Examples of conditions applicable to the Amount column
| Syntax | Meaning |
| [!=1000.00] | transactions with the exact amount of CHF 1'000.00 |
| [!>1000.00] | transactions with amount greater than CHF 1'000.00 |
| [!>=1000.00] | transactions with amount greater or equal to CHF 1'000.00 |
| [!<1000.00] | transactions with amount less than CHF 1'000.00 |
| [!<=1000.00] | transactions with amount less or equal to CHF 1'000.00 |
| [!>=1000.00 !<=2000.00] | transactions with amounts between CHF 1'000 and CHF 2'000 |
| [! |!100.00 |!<150.00] | transactions with amount exactly CHF 100.00 or CHF 150.00 |
Condition on Date
Starting from version 10.2.3 of Banana Accounting Plus (Dev Channel) you can apply a rule to transactions that fall within a specific period (for example, only transactions from January).
How to proceed:
- Add a new rule as explained on the page Apply Rules Dialog - Add Rule
- Select the Date field
- Enter the filter condition in the Comment field.
The condition must:- start with the symbol !
- be enclosed in square brackets [ ]
- use the date in ISO format YYYY-MM-DD
(other formats are not recognized)
- Example: to select transactions with dates equal or before April 1st, 2025:
[!<2025-04-01]

The image shows the Apply Rules dialog where you can select the Date field and define a date range (in this example, it is applied to transactions before April 1st, 2025).
Using this filter is helpful when differentiating processes by month, quarter or year — for example, if a specific VAT code applies until a certain date and a different one after that, such as when switching to a new VAT method.
Examples of conditions applicable to the Date column
| Syntax | Meaning |
| [!=2025-03-31] | transactions with date 31.03.2025 |
| [!>2025-03-31] | transactions with date after 31.03.2025 |
| [!>=2025-03-31] | transactions with date on or after 31.03.2025 |
| [!<2025-03-31] | transactions with date before 31.03.2025 |
| [!<=2025-03-31] | transactions with date on or before 31.03.2025 |
| [!>=2025-03-31 !<=2025-06-30] | transactions in the range from 31.03.2025 to 30.06.2025 |
| [! |!2025-03-15 |!<2025-03-18] | transactions with date 15.03.2025 or 18.03.2025 |
How to define conditions in the Recurring Transactions table
Conditions can be entered directly in the Recurring Transactions table using the same syntax explained in the previous sections.

Rule weight and conflict resolution
The weight of an autocomplete rule is determined by the number of conditions defined in the rule itself. The greater the number of specified conditions, the greater the weight assigned to the rule.
When multiple rules apply to the same transaction, Banana Accounting selects the rule with the highest weight, considering it more specific. This makes it possible to define generic rules and more detailed rules; in the event of a conflict, the more specific rule is always applied.
For example, the Recurring transactions table may contain the following rules:
| Date | Doc | Description | DebitAcc | CreditAcc |
| !Rule | Credit | 1100 Debtors | ||
| !Rule | Credit Fratelli Bernasconi | 1030 | 1150 Customer Bernasconi |
If a transaction with the description "Credit Fratelli Bernasconi" is imported into account 1030, both rules apply. However, the second rule has a higher weight because it contains an additional condition on the DebitAcc field. Since it is more specific, it is applied with priority over the first rule.
经常性业务
经常性业务表
在经常性业务表中,您可以输入每月重复的所有业务。为了避免总是重复书写相同的文本,可以把发生业务组存储在经常性业务表 (操作菜单) 。这些组用代码标识,只要输入相应的代码就可以检索并输入到发生业务表中。
当定位在发生业务表的记账凭证号列时,程序会提出按代码分组的经常性业务列表。如果选择了其中的一个代码:
- 程序输入具有相同代码的重复行。
- 程序使用日期和之前输入的其它值来完成输入的行。
- 程序在记账凭证号列输入渐进数字 (基于之前输入的值) 。
输入经常性业务
对于重复性的操作,可以创建因果代码来自动恢复数据。
- 您需要把应定期检索的业务行输入到经常性业务表中 (或从发生业务表中复制) 。
- 每个经常性业务都会分配一个代码。
- 在记账凭证号列中输入与经常性业务组相关的代码。
具有相同组代码的行将被一起检索 (多行发生业务) 。

渐进的文件编号 “记账凭证号”
如果在检索经常性业务时,您希望有一个与自动检索不同的记账凭证号,则需要在记账凭证号列中创建一个含有“记账凭证号”代码的行, 并在摘要列中创建您所需的文本。对于以下行,将使用摘要列中指定的文本。
- "0" 当不需要自动编号时。
- "1" 渐进编号。
- "现金-1" 渐进编号的前缀 "现金 -" (现金 - 2,现金 - 3) 。
该程序将文本末尾所示的数字替换为下一渐进数字。 - 如果您希望程序建议只有一行一代码,摘要前必须加上:
- 一个 "*"号:显示只有此行,不显示其它相同代码的行。
- 一个 "**" 号显示只有此行,但是不要检索此行 (仅标题行) 。
- 一个 "\*" 允许用户以星号开始摘要,而不被解释为一个命令。
经常性业务表不允许保存自己的视图设置,但可以接收发生业务表中各列的视图和设置。
把经常性业务检索到发生业务表中
- 输入日期和其它应保持不变的列。
- 在记账凭证号列中,选择经常性业务表中定义的代码之一,然后按确定键:
- 程序用相同的代码输入所有的业务,重复数据列和其它已经输入的值。
- 在记账凭证号列,将插入一个渐进的数字或记账凭证号列中指定的数字。
- 或者在记账凭证号列指明代码,按 F6 键。
复制发生业务行至经常性业务表
为了把发生业务表内的行复制到经常性业务表中:
- 在发生业务表中,选定需要被复制的行。
- 编辑菜单 -> 复制行。
- 进入到经常性业务表。
- 编辑菜单 -> 插入已复制的行。
格式化列和视图
经常性业务表使用与发生业务表相同的格式和视图。
对于经常性业务表,不可能使有单独的格式。
但是,可以在发生业务表中添加一个新视图,设置一个新的列格式,并在经常性业务表中使用相同的视图。
Automatic transactions with recurring deadlines
Automatic transactions are useful for facilitating the recording of repetitive entries, such as subscriptions, insurances or taxes. By using automatic transactions, you only have to enter the entry of interest once, set a few parameters such as the start date, the frequency and the end date and then Banana Accounting Plus will inform you when an automatic transaction is ready to be created and will create it for you.
In Banana Accounting Plus, there are two ways to create automatic transactions:
- From the Recurring Transactions table
- From the Manage Automatic Transactions dialogue.
Requirements
- This feature is available in the latest release of Banana Accounting+ Dev Channel.
- It requires the Advanced plan. If you do not have this plan, you can request a promotional code valid for 1 month via the contact form.
- You need to add the End Date and Repeat columns to your accounting file.
- This feature is in Beta Test; we kindly ask you to test it and report any problem.
Adding the End Date and Repeat columns to your accounting file
To be able to activate the commands for automatic transactions, the End Date and Repeat columns must be added; without these columns the commands will not be displayed.
- Open your accounting file or create a new accounting from the File menu > New command.
- Select the command from the Tools menu > Add/Remove Functionalities...
- The Add/Remove Functionality dialogue will appear with the list of available functionalities.
- Select the option Add End Date and Repeat columns in Transactions table.
If this option is not available, check the Banana version and the plan you are using, as described in the Requirements section. - Click on the OK button.

Creating an automatic transaction from the Recurring Transactions table
- Select the command from the Actions menu > Recurring transactions > Create automatic transaction.
- The Recurring transactions table will appear with a new row, showing the date of the day in the Date column and the text !Auto in the Doc column, which serves to identify the automatic transaction.
- Update the Date column with the date of the first occurrence you wish to schedule.
- Display the End Date and Repeat columns with the command from the Data menu > Columns setup...
Make sure to check the Visible box for both the End Date and Repeat columns.
If these columns are missing, you can add them as described in the Adding the End Date and Repeat columns paragraph.
Note: The new columns are added to the Transactions table, but are only used in the Recurring Transactions table, visible in the Recurring view. - Add the desired repetition to the Repeat column. For example, if you want a quarterly repetition, enter the text 3MS in the Repeat column.
- If the automatic transaction has an expiry date, set it in the End Date column.
- Complete the Description, Debit Account, Credit Account and Amount columns.
- Select the command from the Actions menu > Recurring transactions > Manage automatic transactions to display the scheduled transactions.
Note: If you use the command from the Actions menu > Recurring transactions > Create automatic transaction from an existing transactions in the Transactions table, the Description, Amount and Accounts columns will show the text of the original transaction.
The Create automatic transaction command is also available in the context menu of the Transactions table (right-click on a transaction, and choose the Create automatic transaction command).
Creating an automatic transaction from the Manage automatic transactions dialogue
- Select the command from the Actions menu > Recurring transactions > Manage automatic transactions.
- The Manage automatic transactions dialogue will appear.
- Click on New automatic transaction button at the bottom of the dialogue.
- Complete the necessary fields:
- Start date
Date from which the first automatic transaction will start. When the transactions are generated, this date will be updated with the date of the last automatic transaction created. - End Date
- Repeat
- Description
- Account
- Contra-account
- Amount
- CC1, CC2, CC3
- Name or description (optional)
- Start date
- Click on the OK button.
Auto-completion rules for income and expenses accounting
In Income and Expenses Accounting and the Cash manager, the functionality for Completing Imported transactions works in the same way as for Completing transactions in Double-entry Accounting.
The main difference is as follows:
- In the Income / Expenses accounting, the columns Account and Category are used.
- The Account column refers to the bank account.
- The Category column is where the category is specified. It represents the counterpart account entered automatically.
- The Income and Expense columns are where the amount for the transaction is indicated.
- In double-entry accounting, the Debit Account and Credit Account columns, along with the Amount column, are used.
Therefore, even with income and expense accounting, it is possible to create rules using one of the following methods:
- Rules from the Apply Rules dialog.
- Rules from the Transactions table.
- Rules from the Recurring Transactions table.
The Recurring transactions table in Income / Expenses accounting
In the Recurring Transactions table, all imported transactions to which Rules have been applied are saved:
- The columns associated with the amount are the Income and Expenses columns.
- If no amount is specified, the rule will be applied to both outgoing and incoming transactions.
