Microsoft Excel Tools for Banana Accounting
Excel Reports Add-in (Beta)
With this add-in there will no longer need to make "copy and paste" of the values each time you update your accounting file.
You create worksheets with formulas, charts, formatting and more in Excel, and the add-in will retrieve for you the data from the accounting file.
Just click on the update button and your Excel worksheet will be automatically filled with the new values from Banana Accounting, and the results of formulas and charts will be updated accordingly.
See Documentation Banana Accounting Excel Add-in.
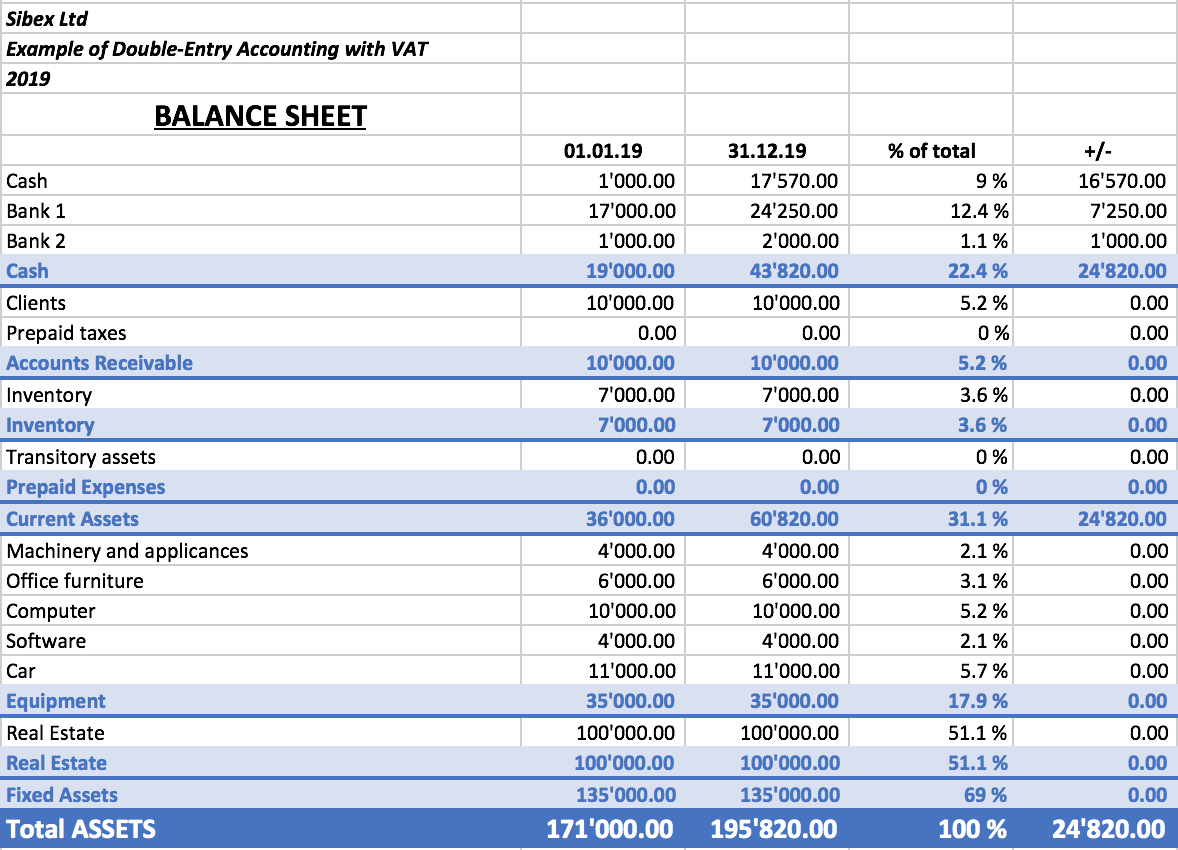
Example of a Balance sheet report created with the Excel Reports add-in
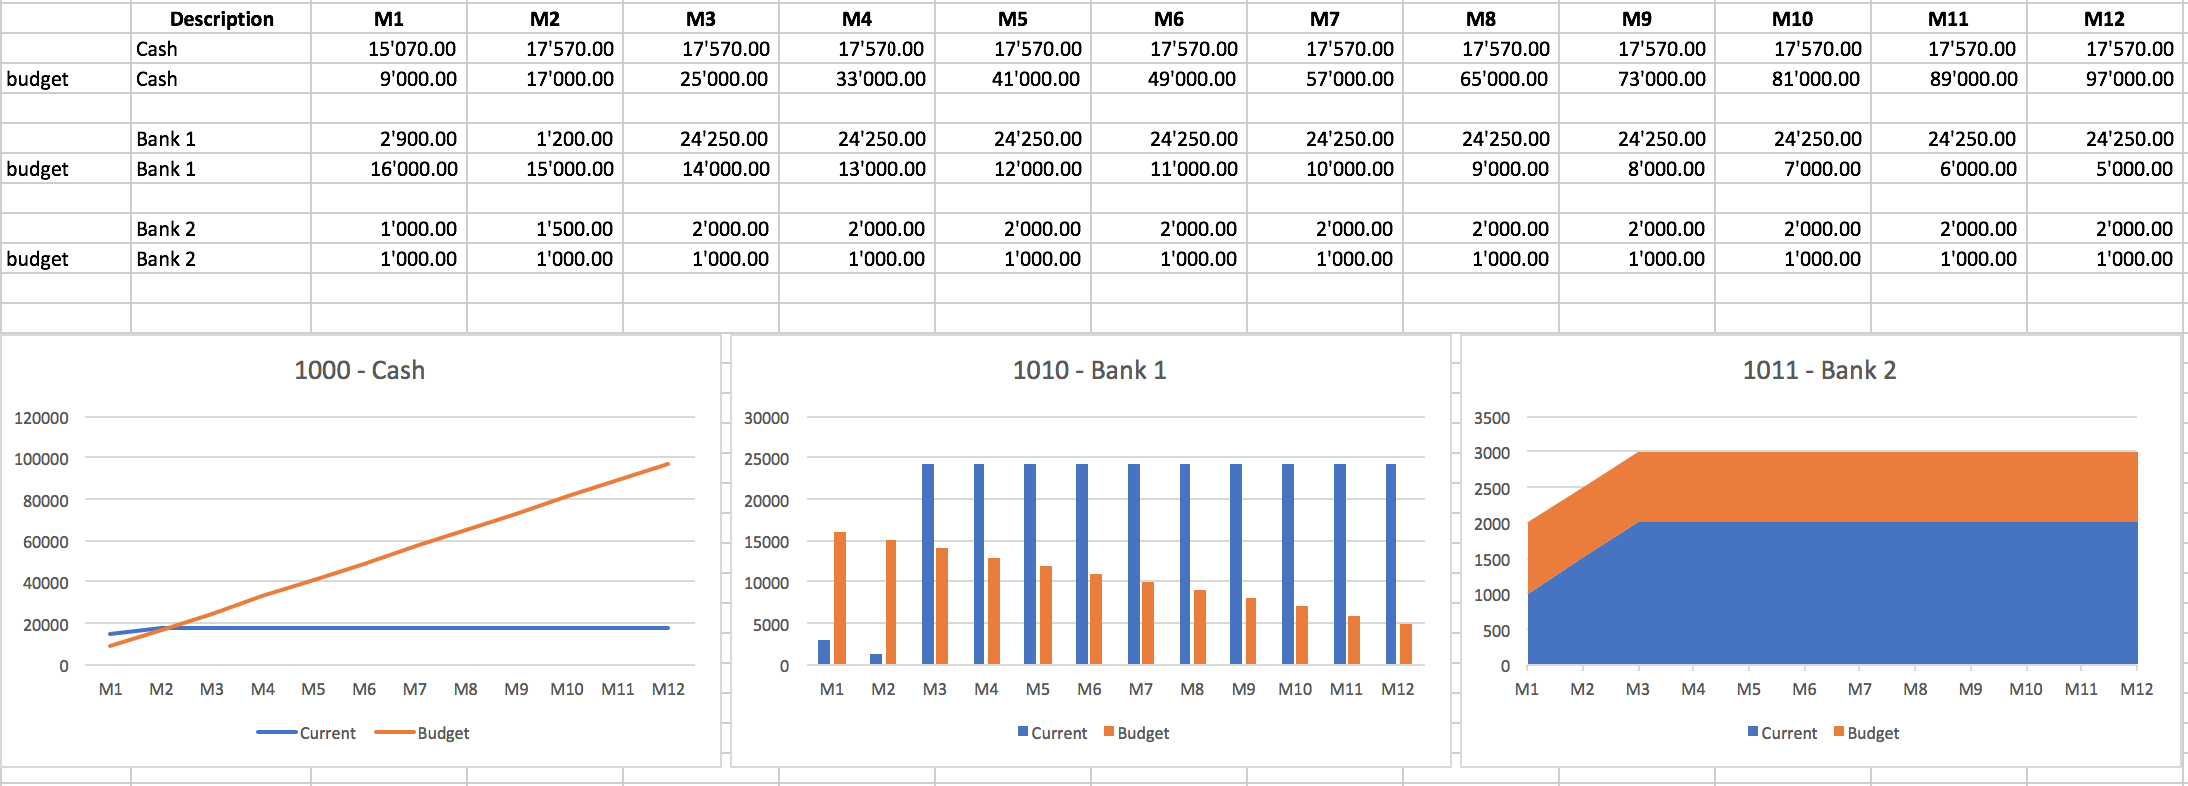
Example of a report with charts created with the Excel Reports add-in
Characteristics
- This add-in is hosted on our server.
Once you have installed the manifest on your computer, your will automatically use the last version. - The add-in are secure.
Unlike Excel-macros the Add-in are secure and cannot compromise your computer. - The add-in is currently in Beta Test.
- Please check everything and report any problem.
- You can use for free, but It is also possible that it will be made available with a cost.
Installation Banana Accounting Excel Add-In
The steps below walk you through all the setup to run the Banana Office Add-ins for Microsoft Office 2016 or more recent.
Minimum requirements:
- Banana Accounting Plus or Banana Accounting 9.
- Microsoft Office 2016 or more recent (Word, Excel, PowerPoint, Outlook).
Get Banana Accounting
- Download Banana Accounting for Windows or Mac.
- Install it on your pc.
Activate Banana Accounting web server
- Start Banana Accounting.
- On Menu bar click Tools → Program options and select the Interface tab
- Check the Start Web Server and Start Web Server with ssl options.
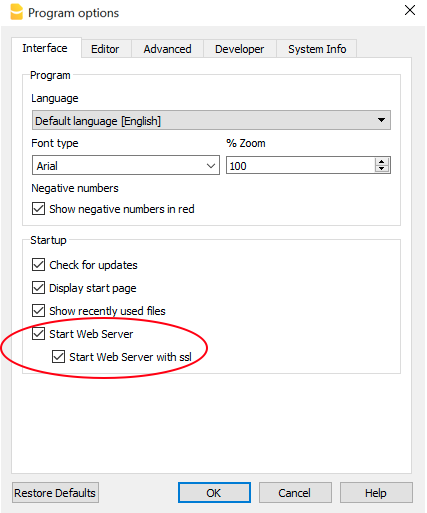
- Click OK.
Load the Add-in
- Open Excel.
- Click on Insert tab.
- Click on the Get Add-ins icon to open the Office Add-ins store.

- In the Office store page search for "Banana" add-in.
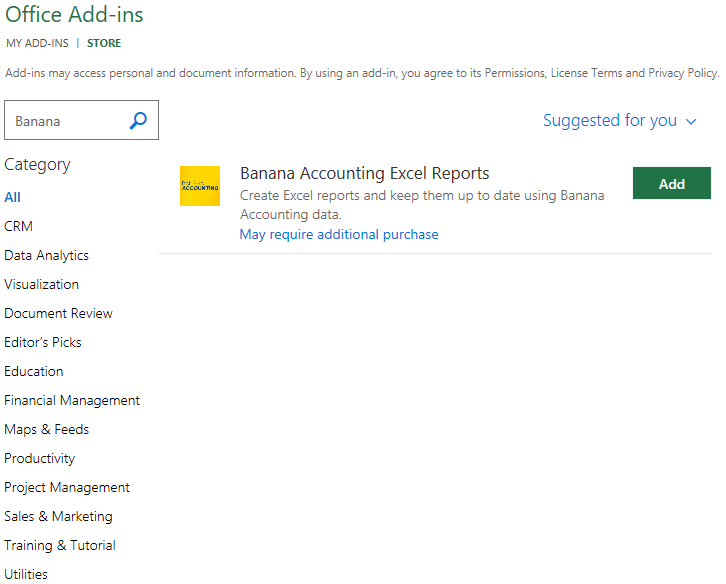
- Click on the Add button to add the Banana Accounting Excel Reports add-in.
- As soon as the add-in is added in Excel, on the Home tab of the main ribbon is loaded the Banana Accounting add-in command.
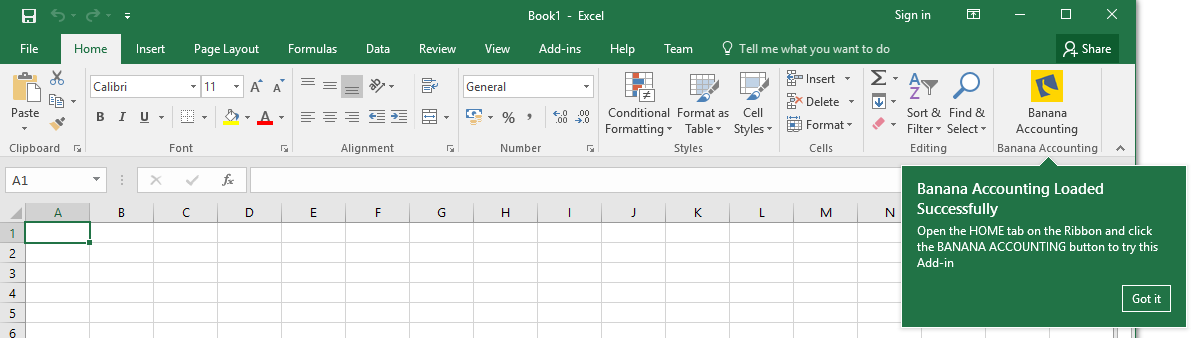
- Click on the Banana Accounting icon to use the add-in.
Once the add-in has been added from the Office store it is saved into My Add-ins section.
To load an add-in previously added from the office store:
- Click on Insert tab.
- Click on the My Add-ins icon.

- Select the Banana Accounting add-in.
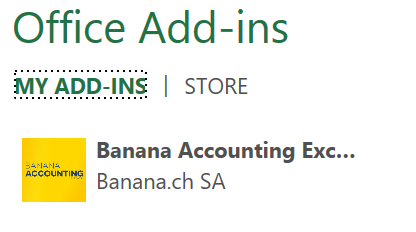
- Click on the Add button.
Windows users
For Windows users, please also follow the Troubleshooting for Windows guide to complete the installation of the add-in.
macOS users
For macOS users, please also follow the Troubleshooting for macOS guide to complete the installation of the add-in.
Troubleshooting Excel add-in for Windows
The guide below walk you through the Windows troubleshooting step by step.
- Download and install the latest version of Banana Accounting Plus for Windows.
- Update Windows and Excel.
- Open Excel and check you are logged in with your Microsoft account (File → Account → User Information).
- Start Banana Accounting web server:
- Open Banana Accounting Plus.
- Click on menu Tools > Program Options.
- Select the tab Interface.
- Check the options Start Web Server.

- Edit the BananaPlus web server configuration file:
- Click on menu Tools > Program Options.
- Select the tab Advanced.
- Click on System info button

- Select the entry Web Server > Settings file path
- Click on Open path... button

- Open the file httpconfig.ini
- Right click > Open with > Notepad.
- In the file look for the following properties and edit as indicated:
- accessControlAllowOrigin
Modify the value of property accessControlAllowOrigin to "*" (accessControlAllowOrigin=* ) - accessToken
Modify the value of property accessToken with a password of your choice (e.g. "accessToken=MyPasswordX" )
It is used to have more security when using the Banana Web Server. For more information visit Web Server Security. - authenticationMode (starting from Banana Accounting version 10.2.12)
Modify the value of property authenticationMode to "fixed-token" (authenticationMode=fixed-token).
This is required when using a personal accessToken
- accessControlAllowOrigin
- Save the file and restart BananaPlus
- Add a local loopback exemption to Microsoft Edge Web Viewer (see Microsoft documentation , Add-ins and Edge for more information):
- In the search box enter cmd.

- On the right side select Run as administrator.

- Confirm with Yes.

- Copy and paste the following command:
CheckNetIsolation LoopbackExempt -a -n="microsoft.win32webviewhost_cw5n1h2txyewy"
- Press enter to run the command.
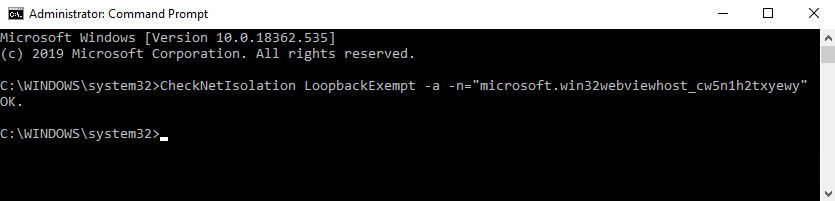
- Close the command prompt.
- In the search box enter cmd.
- Change the server URL on the Add-in settings:
- Start Excel Add-in.
- Click the Options tab.
- As Server informaion select Other, and complete as following:
- Server URL
Enter http://localhost:8081 - Connection token
If you have configured the accessToken password during the Setup of the Banana Web Server (Windows), you have to enter the password here.
- Click OK to confirm and save the changes.
- On the Setup tab of the add-in refresh the files list.
Note: in case you don't want to use the Excel add-in anymore, you can remove the local loopback exemption at any time with the command:
CheckNetIsolation LoopbackExempt -d -n="microsoft.win32webviewhost_cw5n1h2txyewy"
Messages
- Error Loading Add-in
You may get this error while trying to install the add-in from the Store. This is due to an authentication issue. To get this solved you need to:- Logout of Microsoft Excel.
- Restart Excel and sign in again.
- Restart Excel.
- Load the add-in.
- Cannot connect to local web server. Incorrect URL server or Banana Accounting/web server are not running.
The connection between Banana Accounting and Excel add-in did not occur. Please follow step by step the Troubleshooting for Windows guide on this page. - No file is open in Banana Accounting.
Banana Accounting is working but no file is open. Open at least one file in Banana Accounting. - File not selected.
No file is selected from the files list. Refresh the files list and select one of them.
Troubleshooting Excel add-in for macOS
The guide below walk you through the macOS troubleshooting step by step.
- Download and install the latest version of Banana Accounting Plus for Mac.
- Start Banana Accounting Plus web servers:
- Open Banana Accounting Plus.
- Click on menu Tools > Program Options.
- Select the tab Interface.
- Check the options Start Web Server and Start Web Server with ssl.
- Edit the BananaPlus web server configuration file:
- Click on menu Tools > Program Options.
- Select the tab Advanced.
- Click on System info button

- Select the entry Web Server > Settings file path
- Click on Open path... button

- Open the file httpconfig.ini
- Right click > Open with > Notepad.
- In the file look for the following properties and edit as indicated:
- accessControlAllowOrigin
Modify the value of property accessControlAllowOrigin to "*" (accessControlAllowOrigin=* ) - accessToken
Modify the value of property accessToken with a password of your choice (e.g. "accessToken=MyPasswordX" )
It is used to have more security when using the Banana Web Server. For more information visit Web Server Security. - authenticationMode (starting from Banana Accounting version 10.2.12)
Modify the value of property authenticationMode to "fixed-token" (authenticationMode=fixed-token).
This is required when using a personal accessToken
- accessControlAllowOrigin
- Save the file and restart BananaPlus
- Open Safari and insert the url https://127.0.0.1:8089
- When the dialog appears, insert your system password and click on Always allow button.
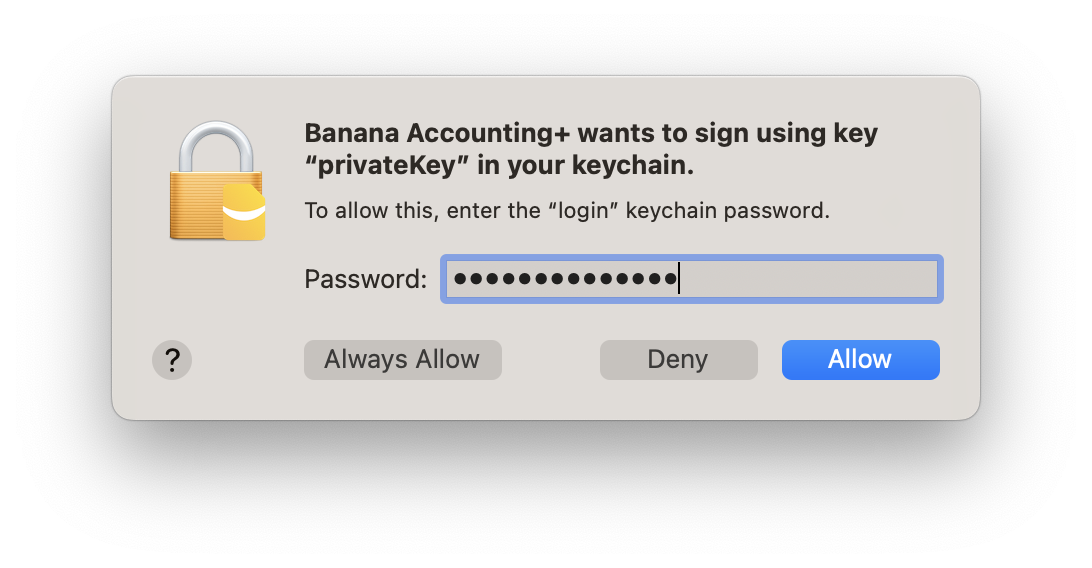
- Open macOS Keychain Access application (Applications > Utilities) and search for the banana.localhost certificate.

- Double click on the banana.localhost certificate, expand the Trust section and for "Secure Socket Layer (SSL)" select "Always Trust".
Close the dialog and enter your system password to confirm the changes.
- Close and reopen the macOS Keychain Access application, the banana.localhost certificare appears now with a blue plus icon.

- Start Excel 2016 and load the Add-in.
- Click on the Refresh file list button.
Messages
- Cannot connect to local web server. Incorrect URL server or Banana Accounting/web server are not running.
The connection between Banana Accounting and Excel add-in did not occur. Please follow step by step the Troubleshooting for macOS guide on this page. - No file is open in Banana Accounting.
Banana Accounting is working but no file is open. Open at least one file in Banana Accounting. - File not selected.
No file is selected from the files list. Refresh the files list and select one of them.
Documentation Excel Add-in
Introduction
With this add-in you can create Excel sheet that are filled with Banana Accounting data. Once you have added transactions to the accounting file you just need to click on the Update Button of the add-in and your spreadsheet content will be updated with the new data.
Your existing formatting and formula will be preserved.
- Create an Excel sheet with headers information
This information allows the add-in to retrieve data from Banana Accounting.
There are information relative to the file, column and account or group to be retrieved.
The add-in help you add the necessary information to retrieve the data. - Click on the Update button
The add-in will retrieve the values from Banana Accounting software.
It mantains the format or formula you enter.
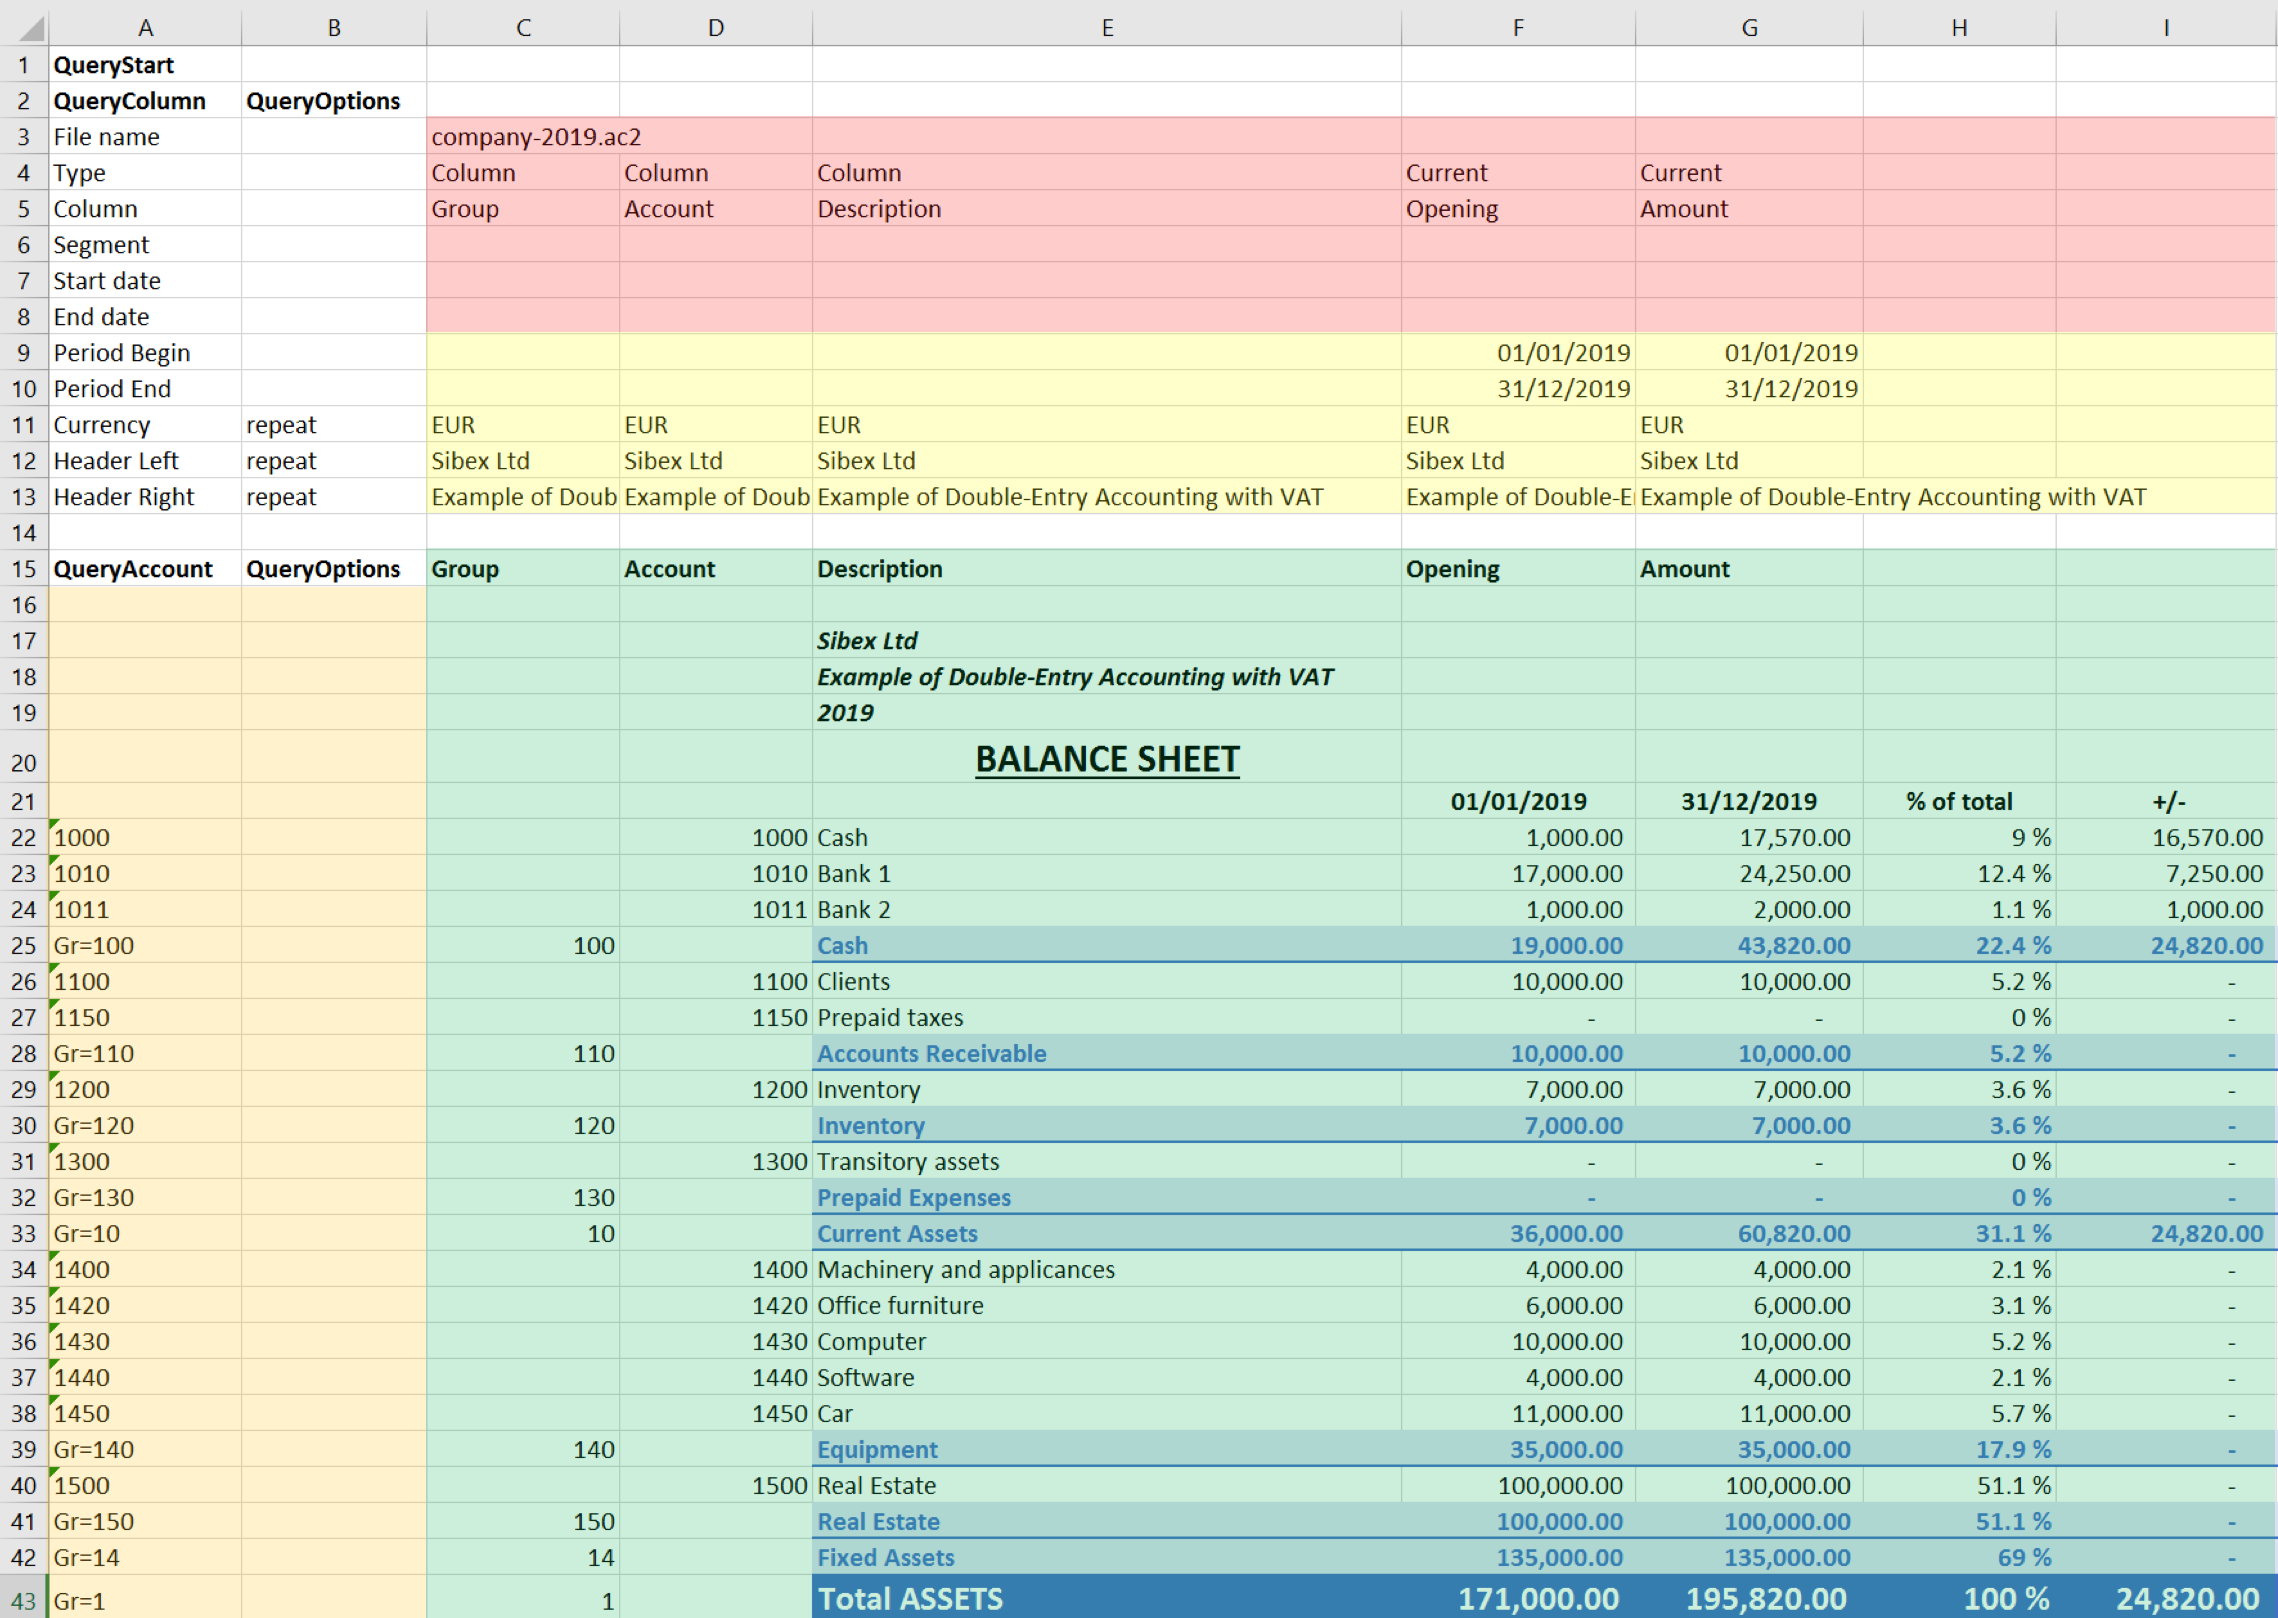
Example of a Balance sheet report created with the Banana Accounting Excel add-in
In the example above we can see:
- The data part
Here is where the data is synchronized, based on the QueryAccount and QueryColumns.- Accounting data (Green)
Filled with the information coming from Banana Accounting - Header data (Yellow)
- Accounting data (Green)
- QueryColumns (Red)
The file name, columns names and type to retrieve.
If the column is empty no data in this column will be retrieved. You can use the columns to enter formula. - QueryAccounts (Orange)
The accounts or groups to retrieve.
If the row is empty no data in this row will be retrieved. You can use the row for entering formula o text that is not overwritten.
By clicking on the update button the Data part is updated with the new data of the accounting file, and all the previously settings like fonts, colors, formulas will remain.
Download and installation
See documentation on how to Download and install the Add-in
Example files:
- File Excel already with columns setup.
- Banana Accounting file used for the example excel file.
Add-in Command
As soon as the add-in is added in Excel, on the Home tab of the main ribbon is loaded the Banana Accounting add-in command.
Banana Accounting Add-in command
When the Banana Accounting button is clicked, it loads the start screen of the add-in. The start screen provides additional information describing the functionalities of the add-in.
Click on the Let's Begin! button to start using the add-in.
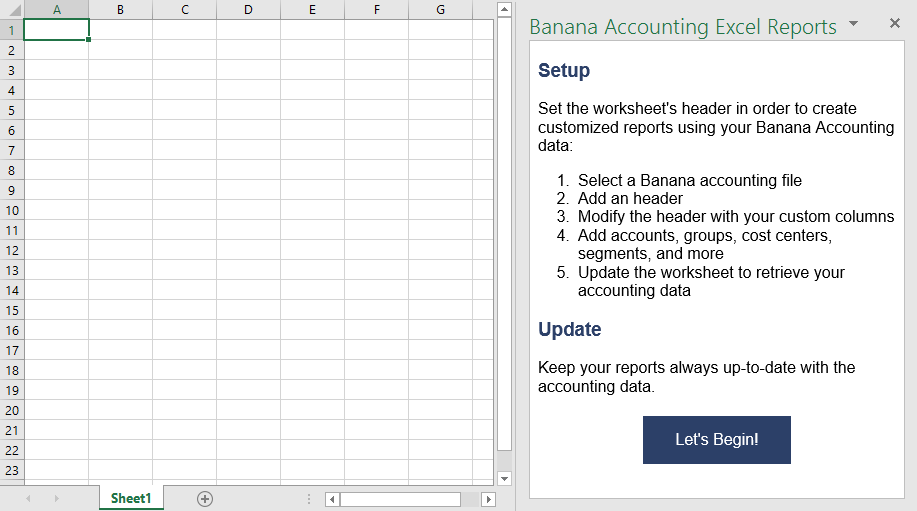
Banana Accounting Add-in start screen
Add-in general overview
The add-in is a task pane add-in type. This means that the add-in is loaded in a pane on the right side of the Excel worksheet.
It is composed by three tabs, each of them has one specific task:
- The Setup tab contains all the tools needed to add information to your sheet so that the add-in can fill the data part with the accounting data. Typically it is used every time you want to create something new, like for example the very first time you use this add-in.
- The Update tab is used to update the content of the Excel worksheet with the accounting data. It is used after the header section and some accounts/groups has been added.
- The Messages tab shows some messages about the add-in and the operations it does. For example when you update the sheet a message is displayed telling you that the update is completed.
- The Options tab is used to set some settings like the language and the server's Url.
Update of the worksheet
The Update tab is composed only of one button: Update current worksheet.
When clicked, this will start the updating process of the current Excel worksheet. Combining Header, QueryAccount and QueryOptions information, the add-in retrieves all the data directly from the Banana Accounting file and writes them in the Excel worksheet.
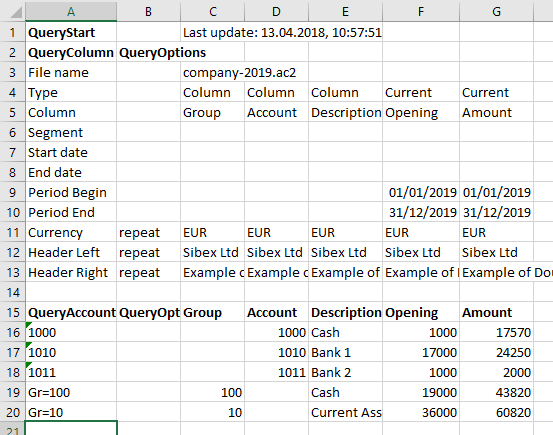
Retrieve data from Banana Accounting and update the worksheet
Setup of the worksheet
These features will add the necessary information to the current worksheet to retrieve data from Banana Accounting.
In the Setup tab there are four sections:
- Accounting file selection
- Set Header
- Set QueryColumns
- Set QueryAccounts
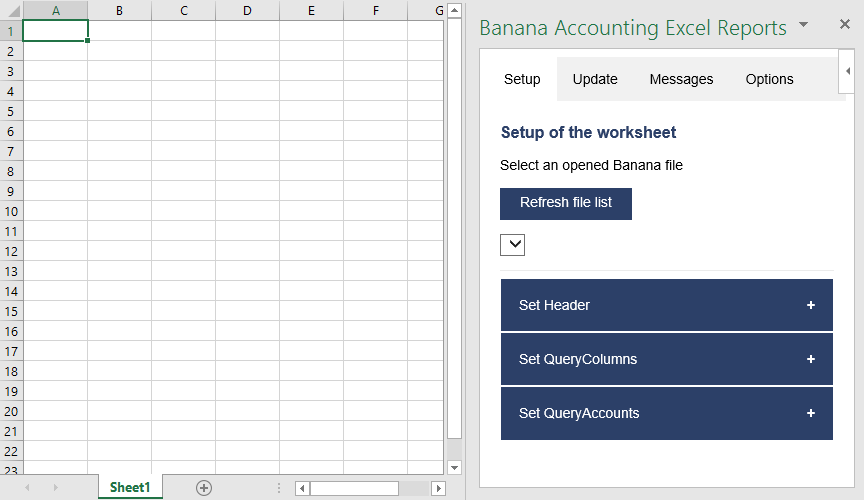
Setup of the worksheet tab
Select an opened Banana file
The first section of the setup page lists all the currently opened Banana Accounting files.
When the Refresh file list button is clicked, the add-in checks for all the opened Banana Accounting files and lists them.
Click the button, select a file, then go to the next setup section.
If you cannot see any file on the list and an error message is displayed, please follow the Troubleshooting for Windows or the Troubleshooting for macOS documentations.
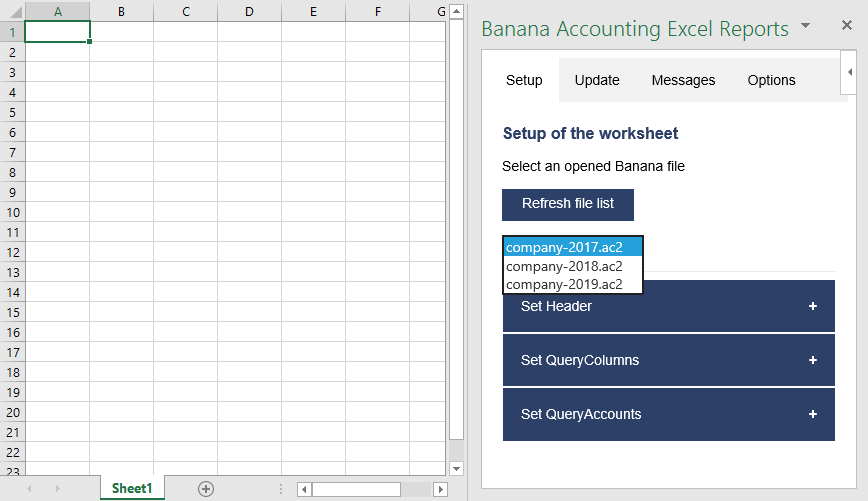
Example of file selection
Set Header
The second section of the setup page inserts, on the top of the current worksheet, the header that allows the user to insert information that will be used by the add-in to retrieve data from the accounting file.
Add an header
The first step is to select from the list a type of header. There are two options:
- Predefined header with columns to insert an header with default values for columns and options
- Empty header to insert a blank header. In this case you must manually add columns and options values.
When the button Add Header is clicked, the selected type of header is inserted in the worksheet. It is then possible to modify it by changing the values of QueryColumns and QueryOptions.
Add header options
The second step is to define some options for the Currency, Header Left and Header Right values using the QueryOptions column. The options are:
- Repeat to repeat the values in each column
- Do not repeat to avoid repeated values. Only when the file name changes the values are entered again.
When the button Add options is clicked, the selected options will be inserted in the related cells.
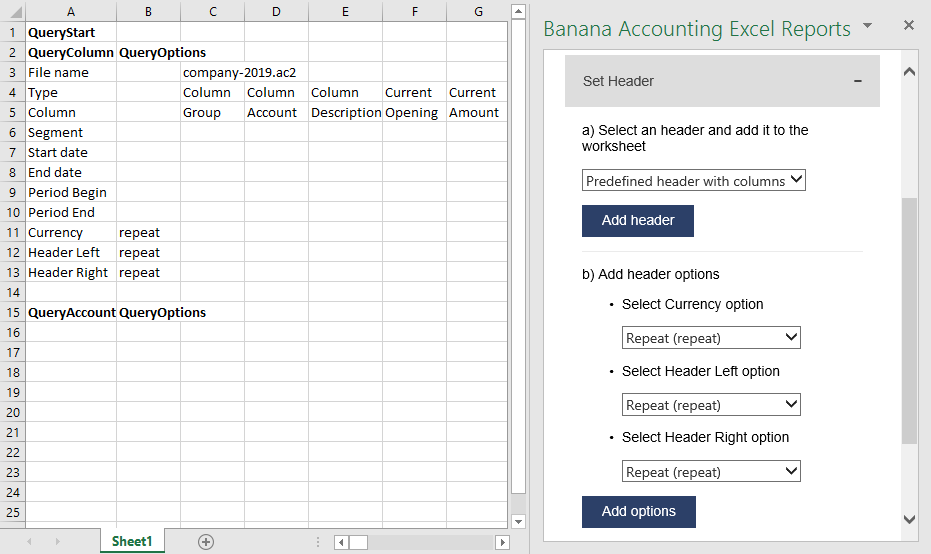
Example of predefined header
Set QueryColumns
This section guides step by step the user to modify the header by adding QueryColumns to the worksheet.
The QueryColumns information allows the user to define exactly which data the add-in has to retrieve from the accounting file and in which column of the worksheet insert them.
Each QueryColumn consists of six information:
- The Column of the worksheet is used to define in which column of the worksheet all the QueryColumns values will be inserted.
- The File name is used to define the accounting file to use when retrieving data.
- The Type value is used to define the type of data of the accounting file.
- The Column value is used to define the accounting file data for the given type.
- The Segments (OPTIONAL) is used to have a more detailed classification of the costs. It is optional, if not specified none segments are added.
- The Periods (OPTIONAL) is used to define a period of the accounting. It is optional, if not specified all accounting period is automatically used.
When the button Add values to column is clicked, all the information are automatically added to the selected column of the worksheet.
You must repeat this process for each column you want to add to the worksheet.
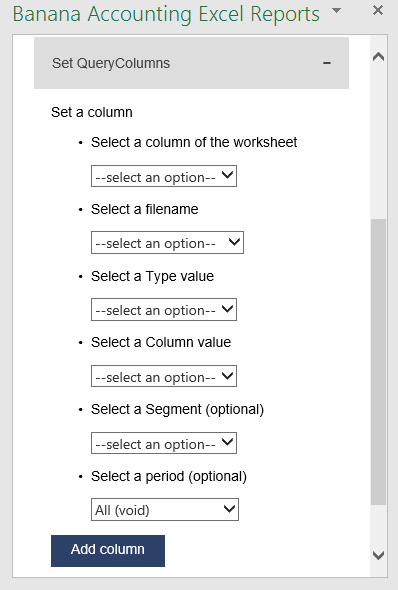
Set QueryColumns section
Select a column of the worksheet
Use this to define in which column of the worksheet all the values of the QueryColumns are inserted. Possible values are:
- Current selected to use the colum of the cell selected on the worksheet (ex. if the cell D8 is selected, D column will be used).
- From C to Z.
The list shows only columns from C to Z, but it is also possible to use columns until AZ by adding them manually.
Select a filename
Use this to define the file name for a QueryColumn. When a file name is specified it is used until a new file name is inserted.
The possible values are:
- Current to use the selected file from the list on the top.
- Current (void) to use the previously inserted file but let the cell empty. It works only if in previous columns there is a specified file name.
- 1 previous year (p1) to use the previous year file of the last file inserted (example: if current year is "2019.ac2", p1 refers to "2018.ac2").
- 2 previous years (p2) to use two previous years file of the last file inserted(example: if current is "2019.ac2", p2 refers to "2017.ac2").
- 3 previous years (p3) to use three previous years file of the last file inserted(example: if current is "2019.ac2", p3 refers to "2016.ac2").
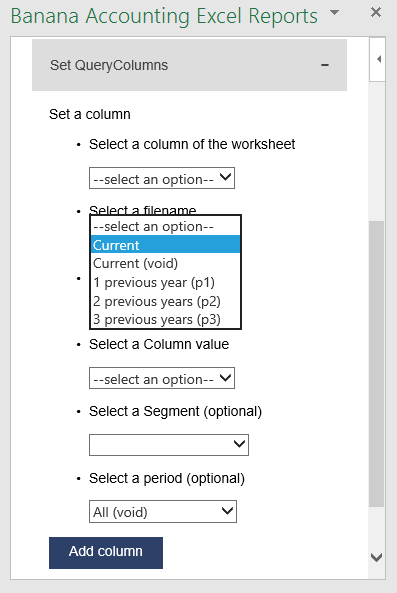
Filename selection
Notes:
- Remember to always open in Banana Accounting all the files specified in the header.
- The p1, p2 and p3 abbreviations always refer to the last file specified in the header.
- Use p1, p2 and p3 only if in the accounting file is used the File and accounting properties → Options → File from previous year.
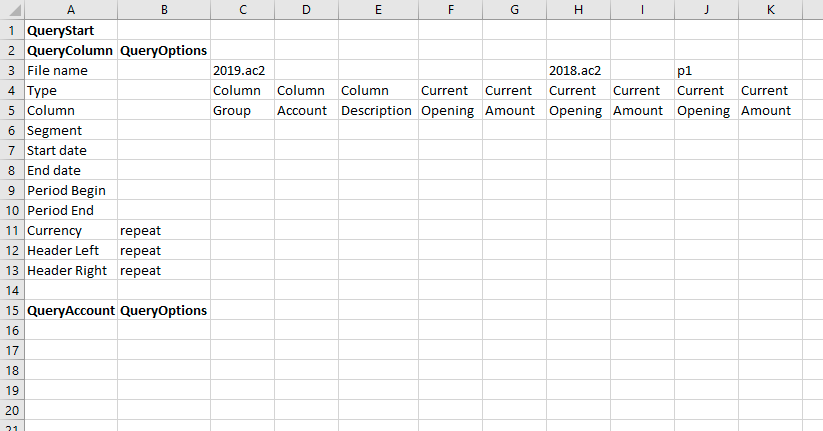
Example of more file insertion
On the image above we can see there are three different files defined, each of them using different columns.
- The columns from C to G refer to the 2019.ac2 file.
- The columns from H to I refer to the 2018.ac2 file.
- The coumns from J to K refer to the previous year file of the 2018.ac2 file. This file must be specified in the File and accounting properties → Options → File from previous year of the 2018.ac2 file.
Select a Type and a Column value
Use Type and Column rows to define the data you want to retrieve from the accounting file.
- Type specify the type of data of the accounting file.
- Column specify the data of the accounting file for the given Type.
Enter the values using the add-in or writing them directly into the worksheet cells.
List of possible Type-Columns combinations (not Case-Sensitive) you must enter into the related Type and Column rows of the header:
- column
- Group, Account, Description, Disable, FiscalNumber, BClass, Gr, Gr1, Gr2, Opening, Debit, Credit, Balance, Budget, BudgetDifference, Prior, PriorDifference, BudgetPrior, PeriodBegin, PeriodDebit, PeriodCredit, PeriodTotal, PeriodEnd, NamePrefix, FirstName, FamilyName, OrganisationName, Street, AddressExtra, POBox, PostalCode, Locality, Region, Country, CountryCode, Language, PhoneMain, PhoneMobile, Fax, EmailWork, Website, DateOfBirth, PaymentTermInDays, CreditLimit, MemberFee, BankName, BankIban, BankAccount, BankClearing, Code1
- current
- amount, amountcurrency, balance, balancecurrency, bclass, credit, creditcurrency, debit, debitcurrency, enddate, opening, openingcurrency, periodstring, rowcount, startdate, total, totalcurrency
- budget
- amount, amountcurrency, balance, balancecurrency, bclass, credit, creditcurrency, debit, debitcurrency, enddate, opening, openingcurrency, periodstring, rowcount, startdate, total, totalcurrency
- columnvat
- Group, VatCode, Description, Gr, Gr1, IsDue, AmountType, VatRate, VatRateOnGross, VatPercentNonDeductible, VatAccount
- currentvat
- taxable, amount, notdeductible, posted, rowcount
- taxable, amount, notdeductible, posted, rowcount
Below some examples of queries that can be entered in the header:
- Example 1: return from the Accounts table the value of the column description for the account specified in the QueryAccount column.
Type: column
Column: description
- Example2: return the amount of debit transactions for all the accounting period for the account specified in the QueryAccount column.
Type: current
Column: debit
- Example 3: return the opening + debit-credit from the 01.01 to 10.01.2022 for the account and segment specified in the QueryAccount column.
Type: current
Column: balance
Segment: :S1
Start date: 01.01.2022
End date: 10.01.2022
- Example 4: return the difference between debit-credit for the 6th month for the account specified in the QueryAccount colum.
Type: current
Column: total
Start date: M6
- Example 5: return the difference between debit-credit for the second quarter for the account specified in the QueryAccount column.
Type: current
Column: total
Start date: Q2
- Example 6: return from the Vat Codes table the value of the column description for the vat code specified in the QueryAccount column.
Type: columnvat
Column: description
- Example 7: return the amount of the taxable column for the vat code specified in the QueryAccount column.
Type: currentvat
Column: taxable
Select a Segment (optional)
If the selected file has segments they will appear in the list.
Use this to define a segment to have a more detailed classification of the costs.
Select a period (optional)
Use this to define the accounting period that will be used to retrieve data from the accounting file.
Possible values are:
- All (void) to use all the accounting period.
- Custom date to specify a custom period (example: Start date "04.02.2022", End date "12.03.2022").
- Month 1 (M1) ... Month 12 (M12) to specify a single month (example: M1 for 1st month, M2 for 2nd month, etc.).
- Quarter 1 (Q1) ... Quarter 4 (Q4) to specify a single quarter (example: Q1 for the 1st quarter, period from 01.01 to 31.03).
- Semester 1 (S1) ... Semester 2 (S2) to specify a single semester (example: S2 for the 2nd semester, period from 01.07 to 31.12).
- Year 1 (Y1) ... Year 10 (Y10) to specify a single year (example: Y1 for the 1st year).
Set QueryAccounts
This section provides to insert:
- QueryAccounts to specify all the desired accounts, groups, cost centers, segments or vat codes that will be used with the data specified in the header to retrieve the accounting data.
- QueryOptions (OPTIONAL) to specify an option for a specific QueryAccount. Just select a cell next to the account and insert the option. It is optional, if not specified none options are added.
Add accounts
When an option is selected, the add-in loads the appropriate check box list with all the elements taken from the selected accounting file. It is possible to choose between six options:
- Accounts to load a list of all the accounts/categories codes taken from the table Accounts/Category of the accounting file.
- Groups to load a list of all the groups codes taken from the table Accounts/Category of the accounting file.
- Cost centers to load a list of all the cost centers codes taken from the table Accounts/Category of the accounting file.
- Segments to load a list of all the segments codes taken from the table Accounts/Category of the accounting file.
- All to load a list of all the accounts/categories, groups, cost centers and segments codes taken from the table Accounts/Category of the accounting file.
- Vat codes to load a list of all the VAT codes taken from the table VAT codes of the accounting file.
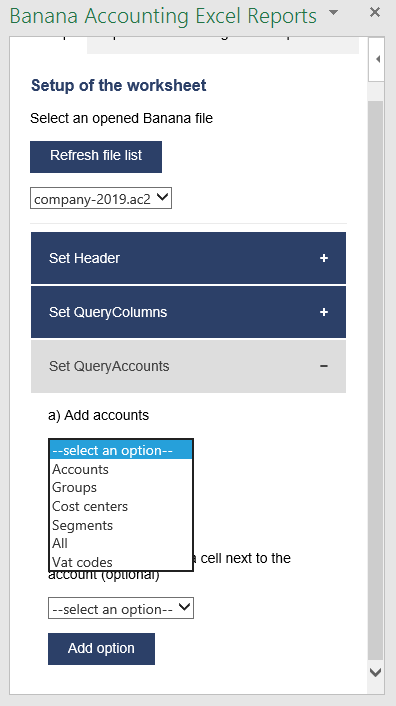
Type of account selection
For example, choosing the All option, the add-in loads a list containing all the accounts, groups, cost centers and segments respecting the order in which they appear in the accounting file.
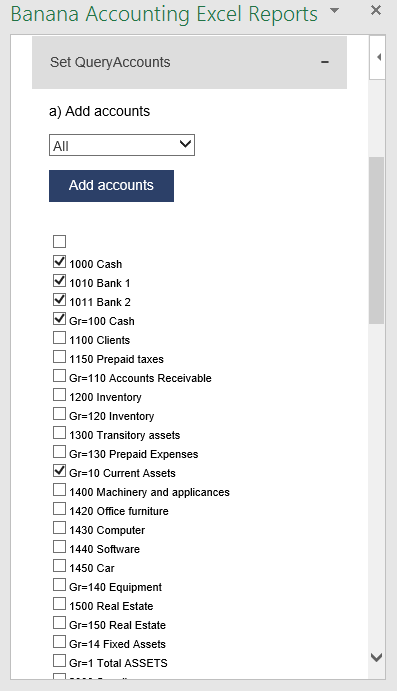
Example of accounts and groups selection
Select the desired elements and click the Add accounts button to add them to the worksheet under the QueryAccount (column A) starting from the selected cell. By default the add-in starts the insertion immediately after the QueryAccount title (row 16).
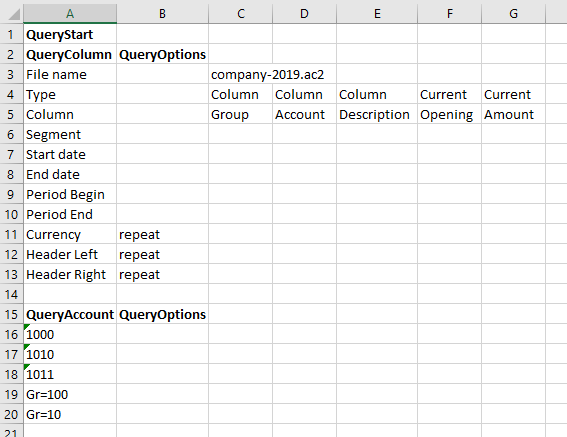
Add the selected accounts and groups to the Excel worksheet
Add option
The QueryOptions column is designed to add some options to the query. It is optional, if not specified no options are used.
The possible values are:
- invert to invert the sign of the current and budget balances.
- budget to get the budget balances of the selected QueryAccount.
- budgetinvert to get the budget balances of the selected QueryAccount and also to invert the sign.
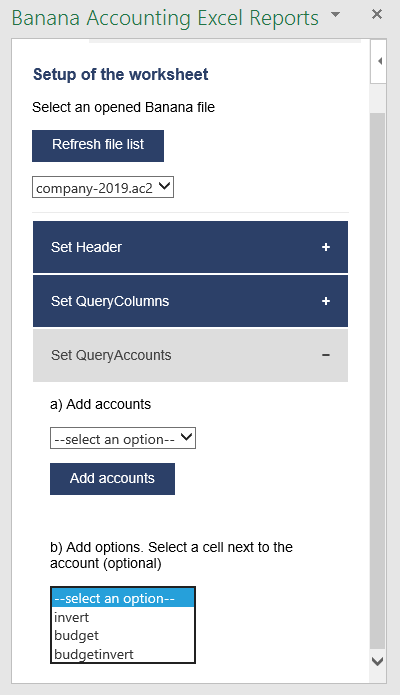
QueryAccounts options selection
Header settings
- Do not add or delete rows in the header.
- Do not add or delete columns before the column B.
- From column C forward, it is possible to add or remove columns. Columns A (QueryColumn) and B (QueryOptions) must always exist.
- Added columns can also be empty.
- If columns from AA to AZ are used, plese re-enter the file name at least on the AA column, even if it is the same used in the previous column.
To better understand how exactly the header works and how to properly modify it, below there are some explanation about the most important things.
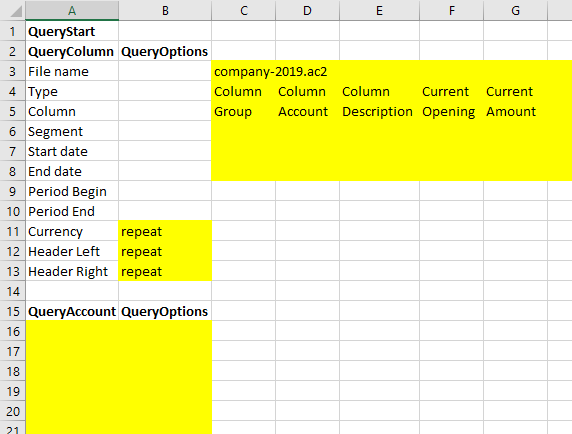
Editable header parts
On the image above we highlighted in yellow all the header's parts that can be modified by adding information when creating a report.
Everything else will be automatically filled by the add-in when the Update current worksheet button is clicked.
Period Begin
A conversion of the start date to be easily read.
This is automatically filled for each column by the add-in when the worksheet is updated.
Period End
A conversion of the end date to be easily read.
This is automatically filled for each column by the add-in when the worksheet is updated.
Currency
The accounting basic currency.
This is automatically filled for each column by the add-in when the worksheet is updated.
Header Left
One of the information property of the accounting.
This is automatically filled for each column by the add-in when the worksheet is updated.
Header Right
One of the information property of the accounting.
This is automatically filled for each column by the add-in when the worksheet is updated.
QueryAccount
As already said, in this column are listed all the chosen accounts, each on a different row.
Instead of insert an account, is also possible to add a custom regroup using a particular accounting column.
The custom regroup QueryAccount syntax is $column=value, where:
- $ indicates that a custom regroup is used.
- column is the Xml name of the column. It can be a user created column (for example "Abc") or a column that already exists in the accounting (for example the "Gr").
- value indicates the regroup.
If we insert something like "$Abc=1" in the QueryAccount cell, this means that the add-in takes and sums together all the accounts/groups balances that have the 1 value in the "Abc" column of the accounting.
Messages
The Messages tab shows some information about the add-in and the operations that it does.
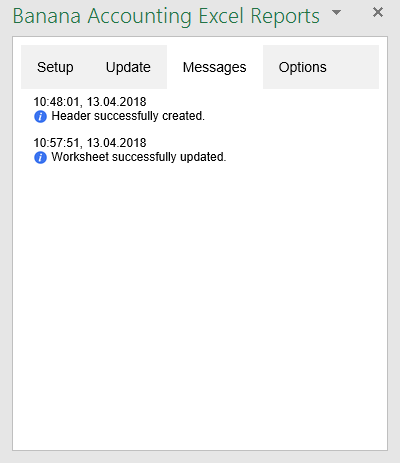
Example of messages
Settings
The Settings tab allows to change some settings of the add-in:
- the Server information.
- Define the URL of Banana Accounting Web Server.
- On Windows, select http://localhost:8081.
- On macOS, select https://127.0.0.1:8089.
- Define the URL of Banana Accounting Web Server.
- the Connection token.
- Enter the security password used when connecting to the Banana Web Server. It is necessary to set it first via Banana Web Server configuration (file httpconfig.ini > accessToken).
- the Language to define the language of the Banana Excel Add-in. Available languages are english, french, german and italian.
- the Development is used only by developers for testing purposes, and users cannot access it.
Click on the Ok button and accept to reload the add-in in order to use the new settings. The settings are saved for future use of the add-in.
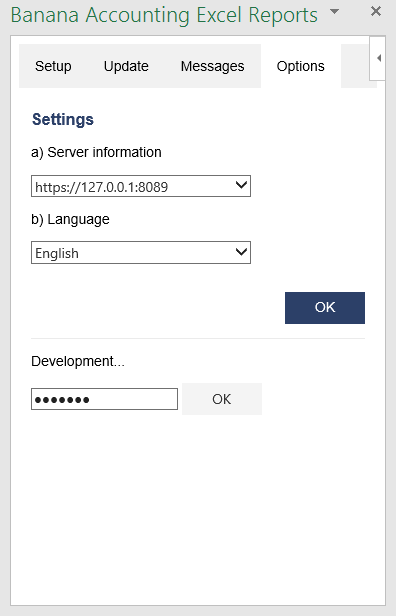
Settings tab
Release History
- 2017-06-12 First release
- 2017-07-07
- Added Add-in Commands functionality.
- Added a start screen that provides additional information describing the functionalities of the add-in.
- Added the settings tab to allow the user to change the Port of the URL.
- 2017-09-29
- Changed the name of the add-in to "Banana Accounting Excel Reports".
- Changed some texts.
- New add-in design.
- Added new functionalities that allow the user to set and insert all the required information more easily.
- Added localization language for english, french, german and italian.
- 2017-11-24
- Added new functionality that allows to set the parameters for the connection.
- 2018-04-04
- Settings options are now saved.
- Changed the appearance of the error messages.
- Changed some texts.
- Other minor changes.
Add-in Fonctions Excel de Banana Comptabilité
L'add-in gratuit Fonctions de Banana Comptabilité vous permet de récupérer et de visualiser les données comptables dans Excel à l'aide de formules simples.
Pour lire et récupérer les données de Banana Comptabilité, l'add-in se connecte au serveur Web intégré de Banana (version API V2).
Les principaux avantages sont les suivants :
- Récupère dynamiquement les données de Banana Comptabilité.
- Lorsque le fichier de comptabilité est modifié, vous pouvez instantanément mettre à jour la feuille Excel avec les nouvelles valeurs.
- Vous n'avez plus besoin de réécrire les données dans Excel via l'importation ou le copier-coller.
- Les formules sont faciles à utiliser et permettent de créer de puissantes feuilles de calcul dans Excel pour analyser et présenter les données comptables.
Prérequis
Pour utiliser l'add-in "Fonctions de Banana Comptabilité", il est nécessaire de :
- Charger et installer Banana Comptabilité Plus (version 10.1.7 ou supérieure).
- Disposer du plan Advanced de Banana Comptabilité Plus..
- Utiliser Microsoft Excel pour Windows ou Mac (version de bureau Microsoft 365, 2019 ou plus récente).
Comment commencer
Pour lire et récupérer les données de Banana Comptabilité, l'add-in utilise le serveur Web intégré de Banana (version API V2). Vous devez donc configurer le serveur Web dans Banana Comptabilité et indiquer les paramètres de connexion dans l'add-in.
- Téléchargez et installez Banana Comptabilité Plus (version 10.1.7 ou supérieure).
- Configurez le serveur Web de Banana.
- Lancez Banana Comptabilité Plus et activez le serveur Web.
- Téléchargez les deux fichiers comptables d'exemple et ouvrez-les avec Banana Comptabilité Plus.
- Téléchargez le fichier Excel déjà préparé et ouvrez-le.
- Installez l'add-in.
- Vérifiez les paramètres de l'add-in.
- Dans les cellules jaunes de la feuille Start, insérez les noms des fichiers de comptabilité d'exemple que vous avez téléchargés. Dans les autres feuilles, vous verrez les données récupérées de la comptabilité.
- Lorsque vous mettez à jour la comptabilité dans Banana, réinsérez les noms des fichiers dans les cellules jaunes pour recalculer toutes les formules.
Installer l'add-in Excel
- Ouvrez Excel.
- Vérifiez que vous êtes connecté à Office avec votre compte utilisateur Microsoft.
- Ouvrez Excel et, en haut à droite, cliquez sur Se connecter.
- Saisissez l'adresse e-mail et le mot de passe de votre compte utilisateur Microsoft.
- Sélectionnez Accueil > Compléments > Autres compléments (ou Fichier > Obtenir des compléments).
- Cliquez sur Store.
- Dans le store, recherchez "Banana".
- Sélectionnez l'add-in Banana Accounting Functions et cliquez sur Ajouter.
- L'add-in est ajouté à Excel, dans la section Accueil.
Vous pouvez maintenant trouver l'add-in dans la section Accueil > Compléments > Autres compléments > Mes compléments. À partir de là, si vous le souhaitez, vous pouvez également le supprimer en cliquant sur les trois points en haut à droite de l'add-in, puis sur Supprimer.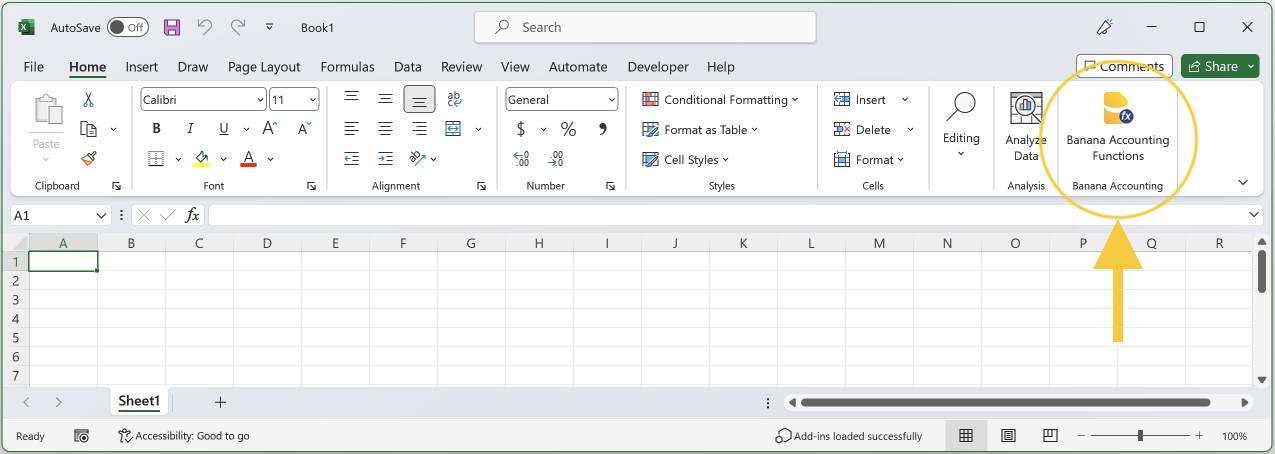
Cliquez sur l'icône de l'add-in. - Le panneau de l'add-in s'ouvre sur la droite.

Paramètres de l'add-in
Lorsque vous cliquez sur l'icône de l'add-in Fonctions de Banana Comptabilité, un panneau latéral s'ouvre. Ici, vous pouvez définir certains paramètres pour permettre à l'add-in de se connecter au serveur Web Banana (assurez-vous d'avoir configuré le serveur Web au préalable).
Les paramètres sont les suivants :
- Informations server
Définissez l'URL du serveur Web Banana :- Sous Windows, sélectionnez http://localhost:8081.
- Sous macOS, sélectionnez https://127.0.0.1:8089.
- Token d'accès
Entrez le mot de passe de sécurité utilisé pour se connecter au serveur Web Banana.
Il est nécessaire de le configurer au préalable lors de la configuration du serveur Web (fichier httpconfig.ini > accessToken).
Après avoir saisi l'URL du serveur web et le mot de passe, cliquez sur Test de connexion pour appliquer les modifications et tester la connexion avec le serveur Web Banana.
En cas de problèmes, consultez Messages d'erreur > Erreurs de l'Add-in pour plus d'informations.
Vous pouvez également changer la langue en sélectionnant celle que vous préférez parmi l'anglais, l'italien, le français et l'allemand.
Une fois les paramètres définis, vous pouvez fermer le panneau latéral de l'add-in si vous le souhaitez. Il n'est pas nécessaire de le garder ouvert pour utiliser les Fonctions de Banana Comptabilité.
La feuille Start
Le fichier Excel d'exemple comporte une feuille nommée Start. Elle est utilisée pour insérer les noms des fichiers de comptabilité à partir desquels récupérer les données.
Comment utiliser la feuille Start :
- Dans les cellules jaunes, entrez les noms des fichiers de comptabilité dont vous souhaitez récupérer les données.
Vous pouvez entrer le fichier de l'année en cours ainsi que les fichiers des années précédentes.
Pour recalculer, réinsérez les noms des fichiers ou double-cliquez sur les noms des fichiers et appuyez sur ENTRER - Lorsque vous entrez les noms des fichiers, une fonction vérifie la connexion avec les fichiers.
Les fichiers doivent être ouverts dans Banana.
Si la connexion est correcte, les noms des fichiers sont insérés dans les cellules appelées File0, File1 et File2. Sinon, consultez la section Messages d'erreur > Erreurs Excel pour plus d'informations. - Les cellules nommées File0, File1, et File2 sont utilisées comme référence pour les noms des fichiers de comptabilité dans toutes les formules.
Cela signifie que dans les formules, vous pouvez directement utiliser File0, File1 et File2 comme noms de fichiers (File0 pour l'année en cours, File1 pour l'année précédente, File2 pour deux ans précédents).
Ajouter la feuille Start dans un fichier Excel
Si vous ne souhaitez pas utiliser le fichier Excel d'exemple, vous pouvez également ajouter la feuille Start à n'importe quel fichier Excel.
- Créez un nouveau fichier Excel vide.
- Cliquez sur l'icône de l'add-in pour ouvrir le panneau latéral.
- Cliquez sur Ajouter feuille Start.
- La feuille Start sera ajoutée au fichier Excel sur lequel vous travaillez.
Note : Si un fichier Excel contient déjà une feuille nommée Start, celle-ci sera remplacée.

Comment créer votre propre fichier Excel
- Téléchargez le fichier Excel déjà préparé et enregistrez-le sous un autre nom, ou créez un nouveau fichier Excel vide et utilisez la commande "Ajouter feuille Start" de l'add-in pour créer la feuille Start.
- Ouvrez les fichiers de votre comptabilité dans Banana.
- Dans les cellules jaunes du fichier Excel (feuille Start), remplacez les noms des fichiers d'exemple par les noms de vos fichiers comptables.
- Modifiez les autres feuilles de calcul selon vos besoins.
- Recalculez les données Excel : double-cliquez sur les cellules jaunes où vous avez inséré les noms des fichiers et appuyez immédiatement sur ENTRER. Cela recalculera toutes les formules.
Nom du fichier
La plupart des fonctions de Banana Comptabilité nécessitent comme premier paramètre le nom du fichier de comptabilité. Cela peut être :
- Une chaîne de caractères avec le nom complet du fichier entre guillemets (ex. "company-2024.ac2").
- La référence à une cellule contenant le nom du fichier.
Il est préférable d'utiliser la référence à une cellule contenant le nom du fichier. De cette manière, vous pouvez utiliser le même fichier Excel pour différentes années. Il vous suffira de saisir le nouveau nom du fichier dans une seule cellule, sans avoir à changer le nom dans chaque formule que vous avez insérée.
Meilleure méthode, comme configurée dans le fichier Excel d'exemple (feuille Start)
- Le nom du fichier de l'année en cours est référencé par la cellule nommée File0.
- Le nom du fichier de l'année précédente est référencé par la cellule nommée File1.
- Le nom du fichier de deux années précédentes est référencé par la cellule nommée File2.
Les cellules nommées File0, File1 et File2 contiennent la fonction BA.FileName. Cette fonction vérifie si le fichier est ouvert dans Banana :
- Si le fichier est ouvert dans Banana et que l'add-in peut se connecter au serveur web, la fonction renvoie le nom du fichier. Toutes les autres fonctions renvoient les valeurs extraites de la comptabilité.
- Si le fichier n'est pas ouvert dans Banana ou si l'add-in ne peut pas se connecter au serveur web, la fonction ne renvoie rien. Toutes les autres fonctions ne renvoient aucune valeur (pour plus d'informations, consultez la section Messages d'erreur > Erreurs Excel).
De nombreuses fonctions utilisent la période comme paramètre optionnel. Cela peut être :
- Une chaîne vide ou absente.
Dans ce cas, les dates de début et de fin de la comptabilité, définies dans Fichier > Propriétés fichier > Comptabilité > Comptabilité, sont utilisées. - Une date de début et de fin de période au format "aaaa-mm-jj/aaaa-mm-jj" (ex. "2024-01-01/2024-01-31").
Pour créer une période à partir de deux dates dans Excel, utilisez la fonction BA.CreatePeriod. - Une abréviation.
En utilisant une abréviation, vous pouvez utiliser le même fichier Excel avec des fichiers comptables de différentes périodes.- M + numéro du mois (ex. "M1", "M2", ...)
- Q + numéro du trimestre (ex. "Q1", "Q2", ...)
- Y + numéro de l'année (ex. "Y1", "Y2", ...)
Fonctions Banana Comptabilité
Les fonctions Banana Comptabilité sont des formules à utiliser dans Excel. Les formules sont composées comme suit :
- Elles commencent par BA.
- Suivi du nom de la fonction (en anglais).
- Puis entre parenthèses, les paramètres de la fonction.
Les paramètres peuvent être insérés comme référence à d'autres cellules ou écrits manuellement entre guillemets (ex. "1000", "2024-01-01/2024-01-31").
Les paramètres entre crochets sont facultatifs (ex. "[period]").
Lorsque vous commencez à taper "=BA." dans une cellule, toutes les fonctions disponibles de Banana s'affichent.
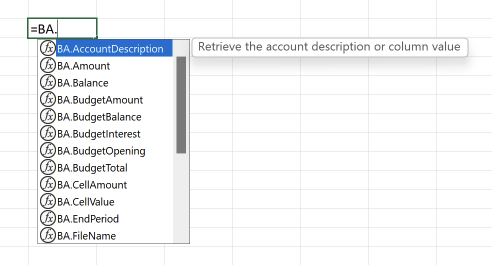
Sélectionnez la fonction que vous souhaitez utiliser, saisissez les paramètres requis par la fonction, puis appuyez sur ENTRER

Dans la cellule, vous verrez la valeur renvoyée par la fonction.

BA.FunctionsVersion()
Retourne la date de la version actuelle publiée du module add-in
BA.FileName(fileName)
Retourne le nom du fichier ou une chaîne vide si le fichier spécifié est incorrect ou introuvable.
Paramètres:
- fileName: nom du fichier comptable.
Exemples:
- =BA.FileName(C3)
- =BA.FileName("company-2024.ac2")
Vous devez utiliser les cellules qui contiennent le résultat de cette fonction comme paramètre pour le nom de fichier de toutes les autres fonctions qui retournent des données comptables.
Si elle retourne une chaîne vide, un seul appel au serveur web est effectué.
BA.CreatePeriod(startDate, endDate)
Prend deux dates et crée la chaîne de période selon le format utilisé par Banana "yyyy-mm-dd/yyyy-mm-dd".
Paramètres:
- startDate: date de début de période.
- endDate: date de fin de période.
Les deux dates doivent être une référence aux cellules qui contiennent les dates.
Alternativement, vous pouvez utiliser la fonction Excel DATEVALUE qui convertit une date entrée sous forme de texte en un numéro sériel qu'Excel reconnaît comme une date.
Exemples:
- =BA.CreatePeriod(D4, D5)
Returns "2023-01-01/2023-12-31" - =BA.CreatePeriod(DATEVALUE("01.01.2023"), DATEVALUE("31.12.2023"))
Returns "2023-01-01/2023-12-31"
BA.StartPeriod(fileName, [period])
Retourne la date de début de période.
Paramètres:
- fileName: nom du fichier de comptabilité.
- period (optionnel): la période de laquelle prendre la date de début.
Exemples:
- =BA.StartPeriod(File0)
Start date of the accounting period. - =BA.StartPeriod(File0, "M1")
Start date of the first month. - =BA.StartPeriod(File0, "Q2")
Start date of the second quarter.
BA.EndPeriod(fileName, [period])
Retourne la date de fin de période.
Paramètres:
- fileName: nom du fichier de comptabilité.
- period (optionnel): la période de laquelle prendre la date de fin.
Exemples:
- =BA.EndPeriod(File0)
End date of the accounting period. - =BA.EndPeriod(File0, "M1")
End date of the first month. - =BA.EndPeriod(File0, "Q2")
End date of the second quarter.
BA.Info(fileName, sectionXml, idXml)
Retourne des informations concernant le fichier et les propriétés du fichier.
Pour voir ces informations dans Banana : menu Outils > Infos fichier, Vue Complète.
Parameters:
- fileName: nom du fichier de comptabilité.
- sectionXml: cpeut être une valeur spécifiée dans la colonne "Section Xml" de la table "Infos fichier".
- idXml: peut être une valeur spécifiée dans la colonne "ID Xml" de la table "Infos fichier".
Exemples :
- =BA.Info(File0, "Base", "HeaderLeft")
- =BA.Info(File0, "Base", "HeaderRight")
- =BA.Info(File0, "AccountingDataBase", "Company")
- =BA.Info(File0, "AccountingDataBase", "OpeningDate")
- =BA.Info(File0, "AccountingDataBase", "BasicCurrency")
BA.AccountDescription(fileName, account, [column])
Retourne la description du compte ou du groupe spécifié dans le tableau Comptes.
Paramètres :
- fileName: nom du fichier de comptabilité.
- account: compte ou groupe dans le tableau Comptes.
- column (optionnel): vous pouvez retourner une autre colonne (nom XML) à la place de la colonne Libellé.
Exemples :
- =BA.AccountDescription(File0, "1000")
Description of account 1000 - =BA.AccountDescription(File0, "Gr=10")
Description of group 10 - =BA.AccountDescription(File0, "1000", "Gr1")
Content of column Gr1 of account 1000 - =BA.AccountDescription(File0, "1000", "Notes")
Content of column Notes of account 1000
BA.Amount(fileName, account, [period])
Retourne le montant normalisé basé sur la BClass.
Fonctionne uniquement pour la comptabilité en partie double. Pour la comptabilité des recettes et des dépenses, utilisez BA.Balance ou BA.Total.
- Pour les comptes de BClass 1 ou 2, il retourne le solde (valeur à un instant précis).
- Pour les comptes de BClass 3 ou 4, il retourne le total (valeur pour la durée).
- Pour les comptes de BClass 2 et 4, le montant est inversé.
Pour utiliser cette fonction avec les groupes, il est nécessaire d'assigner une BClass au groupe (tableau Comptes)
Paramètres :
- fileName: nom du fichier de comptabilité.
- account: compte, groupe, centre de coût ou segment dans le tableau Comptes.
- period (optionnel): la période.
Exemples :
- =BA.Amount(File0, "1000")
- =BA.Amount(File0, "1000", "2024-01-01/2024-12-31")
- =BA.Amount(File0, "1000", "M1")
BA.Balance(fileName, account, [period])
Retourne le solde à la fin de la période pour le compte, centre de coût, groupe ou segment indiqué.
Le résultat de BA.Balance est la somme de BA.Opening + BA.Total.
Il est utilisé pour récupérer les données comptables des comptes du bilan (Actifs, Passifs).
Paramètres :
- fileName: nom du fichier de comptabilité.
- account: compte, centre de coût, groupe ou segment dans le tableau Comptes.
- Numéros de compte uniques (ex. "1000").
- Plusieurs comptes additionnés ensemble, insérez les comptes séparés par "|" (ex. "1000|1001").
- Vous pouvez également insérer des centres de coût et des segments.
- Pour insérer un groupe, utilisez "Gr=" suivi du groupe.
- Pour plus d'informations, consultez la description de la fonction Javascript pour currentBalance (en anglais).
- period (optionnel) : la période.
Exemples:
- =BA.Balance(File0, "1000")
Solde du compte 1000 - =BA.Balance(File0, "1000", "2020-01-01/2020-12-31")
Solde du compte 1000 pour la période spécifiée - =BA.Balance(File0, "1000|1010")
Les soldes des comptes 1000 et 1010 sont additionnés - =BA.Balance(File0, "10*|20*")
Tous les comptes commençant par 10 ou par 20 sont additionnés - =BA.Balance(File0, "Gr=10")
Solde du groupe 10 - =BA.Balance(File0, "Gr=10|20")
Les soldes des groupes 10 et 20 sont additionnés - =BA.Balance(File0, ".P1")
Solde du centre de coût .P1 - =BA.Balance(File0, ";C01|;C02")
Les soldes des centres de coût ;C01 et ;C02 sont additionnés - =BA.Balance(File0, ":S1|S2")
Segment :S1 et :S2 - =BA.Balance(File0, "1000:S1:T1")
Solde du compte 1000 avec le segment S1ou ::T1 - =BA.Balance(File0, "1000:{}")
Solde du compte 1000 avec le segment non assigné
BA.Opening(fileName, account, [period])
Retourne le solde de début de période pour le compte indiqué.
Paramètres :
- fileName: nom du fichier de comptabilité.
- account: compte, centre de coût, groupe ou segment dans le tableau Comptes.
- period (optionnel) : la période.
Exemples:
- =BA.Opening(File0, "1000")
Solde de début du compte 1000 - =BA.Opening(File0, "1000", "M1")
Solde de début du compte 1000 pour la période du premier mois - =BA.Opening(File0, "1000", "Q2")
Solde de début du compte 1000 pour la période du deuxième trimestre
BA.Total(fileName, account, [period])
Retourne les mouvements pour la période indiquée (différence "Débit - Crédit").
Devrait être utilisé pour les comptes de résultat (coûts et revenus).
Paramètres :
- fileName: nom du fichier de comptabilité.
- account: compte, centre de coût, groupe ou segment dans le tableau Comptes.
- period (optionnel) : la période.
Exemples:
- =BA.Total(File0, "4100")
Mouvements du compte 4100 pour toute la période comptable - =BA.Total(File0, "Gr=3", "M1")
Mouvements du groupe 3 pour la période du premier mois - =BA.Total(File0, "Gr=4", "Q2")
Mouvements du groupe 4 pour la période du deuxième trimestre
BA.Interest(fileName, account, interestRate, [period])
Calcule l'intérêt pour le compte et la période indiqués.
Paramètres :
- fileName: nom du fichier de comptabilité.
- account: peut être n'importe quel compte comme indiqué dans la fonction BA.Balance.
- interestRate: l'intérêt en pourcentage :
- > 0 calcule l'intérêt des montants au Débit
- < 0 calcule l'intérêt des montants au Crédit
- period (optionnel) : la période.
Exemples:
- =BA.Interest(File0, "1000", "5")
Intérêt de 5% du compte 1000 - =BA.Interest(File0, "1000","5", "M1")
Intérêt de 5% du compte 1000 pour la période M1 - =BA.Interest(File0, "2000", "-5")
Intérêt de -5% du compte 2000 - =BA.Interest(File0, "2000", "-5", "M1")
Intérêt de -5% du compte 2000 pour la période M1
BA.VatBalance(fileName, vatCode, vatValue, [period])
Retourne les soldes concernant le code TVA indiqué (ou plusieurs codes TVA).
Paramètres :
- fileName: nom du fichier de comptabilité.
- vatCode: le code TVA.
- vatValue: peut être “taxable”, “amount”, “notdeductible”, “posted”.
- period (optionnel) : la période.
Exemples:
- =BA.VatBalance(File0, "V10", "taxable")
- =BA.VatBalance(File0, "V10|V20", "posted")
- =BA.VatBalance(File1, "V10", "taxable")
BA.VatDescription(fileName, vatCode, [column])
Retourne la description du code TVA spécifié dans la table des Codes TVA.
Paramètres :
- fileName: nom du fichier de comptabilité.
- vatCode: code TVA.
- column (optionnel) : vous pouvez indiquer de retourner une autre colonne à la place de la colonne Libellé.
Exemples:
- =BA.VatDescription(File0, "V10")
Description du code V10 - =BA.VatDescription(File0, "V10", "VatRate")
Taux de TVA du code V10
BA.BudgetAmount(fileName, account, [period])
Comme BA.Amount mais utilise les données du budget au lieu des données comptables.
BA.BudgetBalance(fileName, account, [period])
Comme BA.Balance mais utilise les données du budget au lieu des données comptables.
BA.BudgetOpening(fileName, account, [period])
Comme BA.Opening mais utilise les données du budget au lieu des données comptables.
BA.BudgetTotal(fileName, account, [period])
Comme BA.Total mais utilise les données du budget au lieu des données comptables.
BA.BudgetInterest(fileName, account, interestRate, [period])
Comme BA.Interest mais utilise les données du budget au lieu des données comptables.
BA.CellValue(fileName, table, rowColumn, column)
Retourne le contenu de la cellule d'un tableau en tant que texte.
Paramètres :
- fileName: nom du fichier de comptabilité.
- table: le nom XML du tableau (Accounts, Categories, Transactions, Budget, Totals, VatCodes,...)....).
- rowColumn: la ligne du tableau.
- column: le nom XML de la colonne (Group, Account, Description, Notes,...).
Exemples:
- =BA.CellValue(File0, "Accounts", 2, "Description")
Tableau Comptes, ligne 2, colonne Libellé - =BA.CellValue(File0, "Accounts", "Account=1000", "Description")
Tableau Comptes, ligne où le compte=1000, colonne Libellé - =BA.CellValue(File0, "Accounts", "Group=10", "Description")
Tableau Comptes, ligne où le groupe=10, colonne Libellé
BA.CellAmount(fileName, table, rowColumn, column)
Retourne le contenu de la cellule d'un tableau en tant que montant.
Paramètres :
- fileName: nom du fichier de comptabilité.
- table: le nom XML du tableau (Accounts, Categories, Transactions, Budget, Totals, VatCodes,...).
- rowColumn: la ligne du tableau.
- column: le nom XML de la colonne (Group, Account, Description, Notes,...).
Exemples:
- =BA.CellAmount(File0, "Accounts", 2, "Opening")
Tableau Comptes, ligne 2, colonne Ouverture - =BA.CellAmount(File0, "Accounts", "Account=1000", "Balance")
Tableau Comptes, ligne où le compte est 1000, colonne Solde - =BA.CellAmount(File0, "Accounts", "Account="&$A4, "Balance")
Tableau Comptes, ligne où le compte est la valeur $A4 (référence de cellule dans Excel), colonne Solde - =BA.CellAmount(File0, "Accounts", "Group=10", "Balance")
Tableau Comptes, ligne où le groupe est 10, colonne Solde
Messages d'erreur
Erreurs Excel
Lorsque vous entrez les noms des fichiers de comptabilité dans les cellules jaunes, les messages suivants peuvent apparaître à côté de chaque cellule jaune :
- Banana non ouvert, fichier non ouvert ou serveur Web non actif.
Cela signifie que le serveur Web Banana ne parvient pas à trouver le fichier indiqué.- Assurez-vous de saisir correctement le nom du fichier.
- Assurez-vous que Banana Comptabilité Plus est ouvert et que le serveur Web est actif.
- Assurez-vous d'ouvrir dans Banana le fichier que vous avez indiqué.
Erreurs de l'Add-in
Dans certains cas, des messages en rouge peuvent apparaître en bas de l'add-in. Les messages sont les suivants :
- Téléchargez et installez Banana Comptabilité+ (version 10.1.7 ou supérieure)
Cela signifie que l'add-in ne peut pas être utilisé avec des versions antérieures de Banana Comptabilité à celle indiquée - Connexion au serveur Web Banana échouée. Version de Banana non supportée, Banana n'est pas ouvert, le serveur Web n'est pas actif ou les paramètres du serveur du module complémentaire sont incorrects.
Cela signifie que la connexion avec le serveur Web Banana ne fonctionne pas. Les causes peuvent être variées comme indiqué.- Assurez-vous d'utiliser la version 10.1.7 (ou supérieure) de Banana Comptabilité Plus.
Téléchargez et installez la dernière version de Banana Comptabilité Plus. - Assurez-vous que Banana Comptabilité Plus est lancé.
- Assurez-vous que le serveur Web Banana est actif et correctement configuré. Voir la configuration du serveur Web :
- Assurez-vous que les noms de fichiers saisis dans les cellules jaunes d'Excel sont corrects.
- Assurez-vous que les fichiers indiqués sont ouverts dans Banana.
- Assurez-vous de configurer correctement les informations du serveur dans les paramètres de l'add-in :
- Assurez-vous d'utiliser la version 10.1.7 (ou supérieure) de Banana Comptabilité Plus.
- Connexion non autorisée. Jeton d'accès manquant ou incorrect.
Cela signifie que le mot de passe du jeton d'accès manque ou est incorrect, et donc la connexion avec le serveur Web Banana ne peut pas être établie.- Lors de la configuration du serveur Web Banana, définissez le mot de passe dans le champ "accessToken" du fichier "httpconfig.ini". Voir la configuration du serveur Web :
- Dans les paramètres de l'add-in, sous Paramètres > Jeton d'accès, vous devez saisir le même mot de passe.
Historique des versions
- 2023-07-21 Première version.
- 2023-09-20
- Ajout d'une commande pour tester la connexion avec le serveur Web Banana.
- Lors de la sélection d'une langue, le panneau est maintenant rechargé immédiatement.
- Ajout d'une commande pour créer une feuille de démarrage (Start).
Office Scripts in Excel
With Banana Accounting Plus you can use Office Scripts in Excel (the successor of VBA Scripts) to retrieve and display the data of your accounting in Excel.
To read and retrieve data from Banana Accounting with Office Scripts, we use the integrated Banana Web Server.
Prerequisites
To use Office Scripts you need to:
- Download and install Banana Accounting Plus.
- Have the Advanced plan of Banana Accounting Plus.
- Have Excel for Windows (version 2210 or higher) or Excel for Mac.
- Use OneDrive for Business.
Office Scripts files
Office Scripts are written using the TypeScript language. They are stored as .osts files in your Microsoft OneDrive, separately from the Excel file.
For more information visit Office Scripts file storage and ownership.
Configure Banana Accounting Web Server
To read and retrieve data from Banana Accounting with Office Scripts we use the Banana integrated Web Server.
IMPORTANT: To properly configure the Banana Web Server, follow the guide for your operating system:
How to start
- Open Banana Accounting Plus and Configure Banana the Web Server
- Open an accounting file.
- Open an empty Excel file or download the example file from here.
- Select the Automate tab and click on New Script.

- The Code Editor opens on right side of the Excel window.
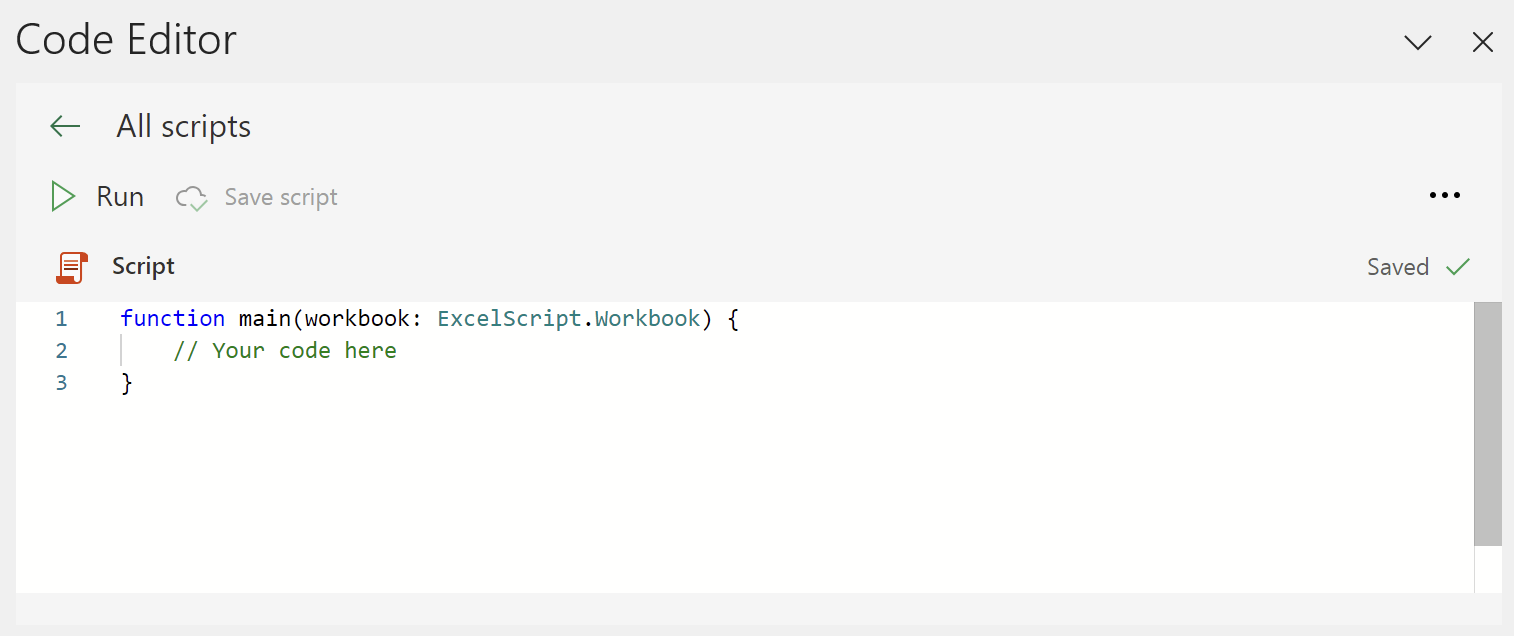
- Enter an example code in the Code Editor. If you want to try all the examples, you have to create a new script for each example.
- In the Code Editor delete all the code.
- Copy the code from one of the examples below.
- Paste the copied code in the Code Editor.
- Rename the script as you want.
- Click on Save script .
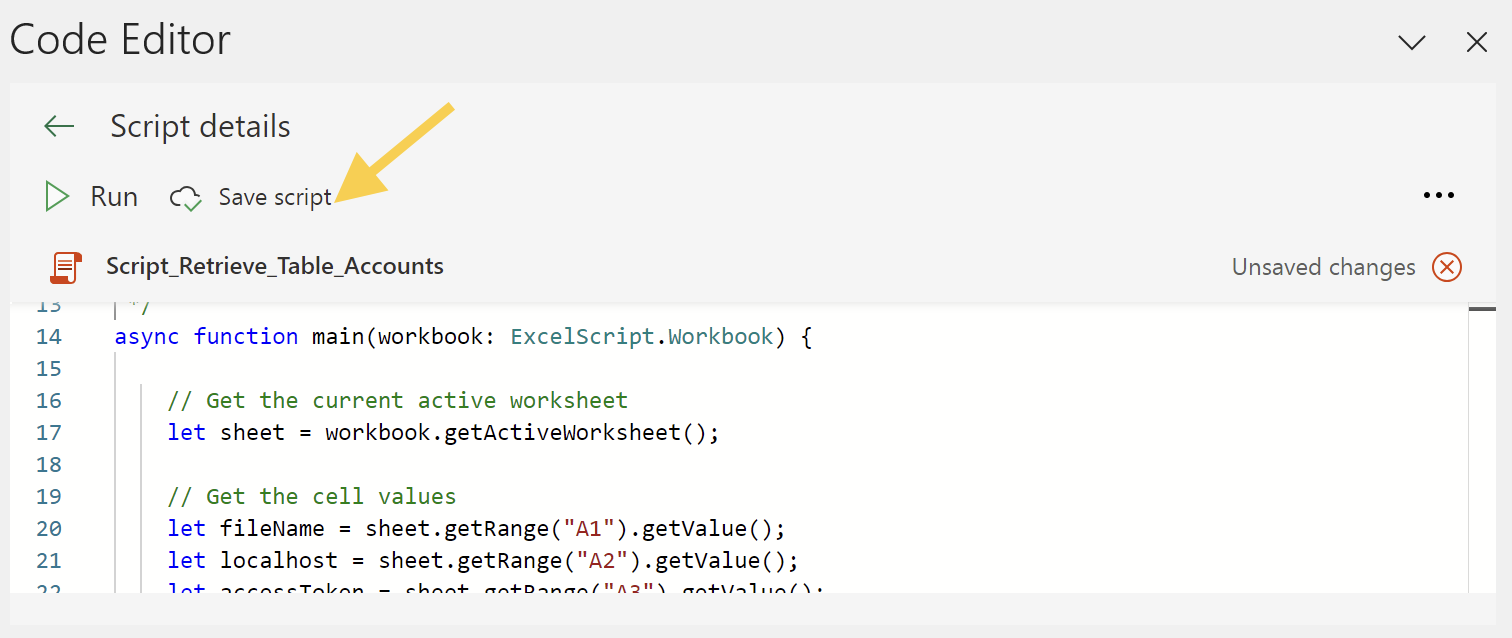
- Click on Run to run the script.
Note: before running the scripts, set the file name and the server settings.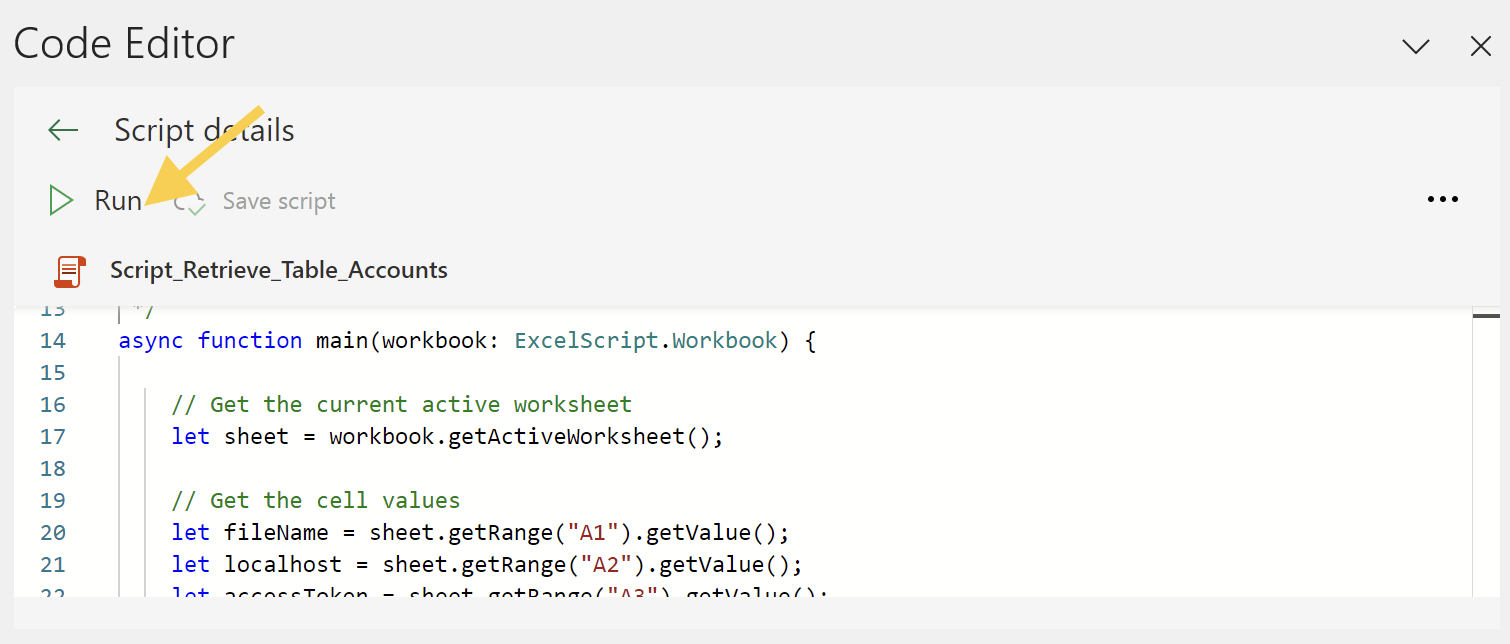
File Name and Server settings
Define the accounting file name and the server settings (yellow cells). In the Excel file:
- In cell B1, enter the accounting file name (e.g. "company-2024.ac2").
- In cell B2, enter the webserver URL:
- If you are on Windows, enter "http://localhost:8081".
- If you are on macOS, enter "https://127.0.0.1:8089".
- In cell B3, enter the same Access Token key you defined in the httpconfig.ini file during the Configuration Banana Accounting Web Server.
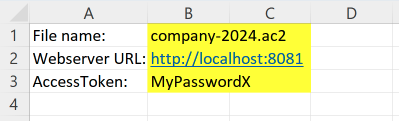
In these examples, we use the B1, B2 and B3 cells to also show how to get a value from a specific cell and use it inside of the Office Script code.
let fileName = sheet.getRange("B1").getValue();
let localhost = sheet.getRange("B2").getValue();
let accessToken = sheet.getRange("B3").getValue();
But if you want, you can also enter the file name, the Web Server URL and the Access Token key directly in your Office Script code, without using the B1, B2, and B3 cells.
let fileName = "company-2024.ac2";
let localhost = "http://localhost:8081";
let accessToken = "MyPasswordX";
Example 1: Retrieve data from the table Accounts
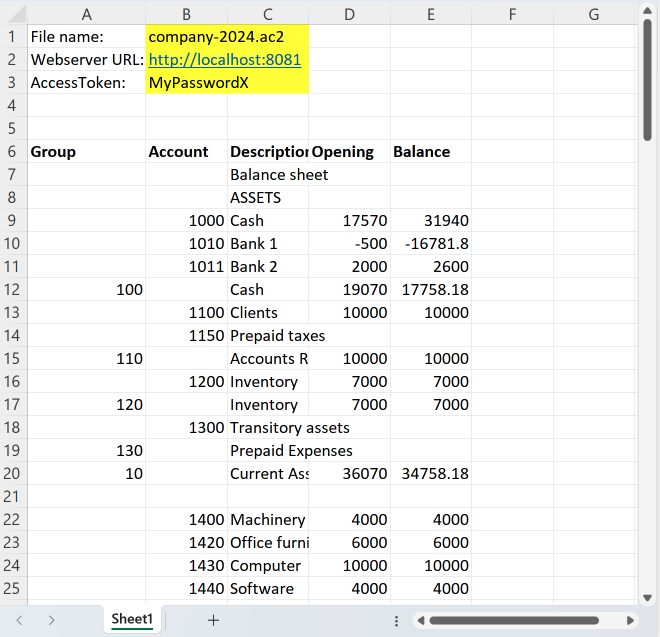
This example shows how to retrieve and display the data from the table Accounts.
If the worksheet you are working already contains data, these will be overwritten. Make sure you are in an empty sheet.
To use this script:
- Copy the following script code.
- Paste the script in the Code Editor.
- Save and Run the script.
Note: before running the scripts, set the file name and the server settings.
When you run the script:
- The data of the table Accounts are displayed on the current worksheet.
- If the worksheet you are working already contains data, these will be overwritten.
Script code:
/**
 * This example retrieves all the Accounts table.
 *
 * In order to connect to the Banana Web Server, define some information:
 * - Cell B1 the accounting file name
 * - Cell B2 the localhost web server url
 * - Cell B3 the accessToken security password
 *
 * You can get these information from cells of the worksheet or you can define them in the script.
 * In this example we get the information from the cells B1, B2, B3.
 */
async function main(workbook: ExcelScript.Workbook) {
  // Get the current active worksheet
  let sheet = workbook.getActiveWorksheet();
  // Get the cell values
  let fileName = sheet.getRange("B1").getValue();
  let localhost = sheet.getRange("B2").getValue();
  let accessToken = sheet.getRange("B3").getValue();
  // Retrieve JSON data of table Accounts from Banana Web Server.
  let fetchResult = await fetch(localhost + '/v1/doc/' + fileName + '/table/Accounts?view=Base&format=json&acstkn=' + accessToken);
  // Convert the returned data to the expected JSON structure.
  let json: JSONData = await fetchResult.json();
  // Display the content in a readable format.
  console.log(JSON.stringify(json));
  // Write columns headers texts on the row 6
  let row = 6;
  let col = sheet.getRange('A' + row);
  col.setValue([['Group']]);
  col.getFormat().getFont().setBold(true);
  col = sheet.getRange('B' + row);
  col.setValue([['Account']]);
  col.getFormat().getFont().setBold(true);
  col = sheet.getRange('C' + row);
  col.setValue([['Description']]);
  col.getFormat().getFont().setBold(true);
  col = sheet.getRange('D' + row);
  col.setValue([['Opening']]);
  col.getFormat().getFont().setBold(true);
  col = sheet.getRange('E' + row);
  col.setValue([['Balance']]);
  col.getFormat().getFont().setBold(true);
  // Write table Accounts data from the row 7
  row = 7;
  for (let i in json) {
    let col = sheet.getRange('A' + row);
    col.setValue(json[i].Group);
    col = sheet.getRange('B' + row);
    col.setValue(json[i].Account);
    col = sheet.getRange('C' + row);
    col.setValue(json[i].Description);
    col = sheet.getRange('D' + row);
    col.setValue(json[i].Opening);
    col = sheet.getRange('E' + row);
    col.setValue(json[i].Balance);
    // increase row
    row++;
  }
}
// Json structure of table Accounts
interface JSONData {
  Section: string;
  Group: string;
  Account: string;
  Description: string;
  BClass: number;
  Gr: string;
  Opening: number;
  Balance: number;
}
/* Complete list of columns
SysCod,Links,Section,Group,Account,Description,Notes,Disable,VatCode,GrVat,VatNumber,FiscalNumber,BClass,Gr,Gr1,Gr2,Opening,Debit,Credit,Balance,Budget,BudgetDifference,Prior,PriorDifference,BudgetPrior,PeriodBegin,PeriodDebit,PeriodCredit,PeriodTotal,PeriodEnd,NamePrefix,FirstName,FamilyName,OrganisationName,Street,AddressExtra,POBox,PostalCode,Locality,Region,Country,CountryCode,LanguageCode,PhoneMain,PhoneMobile,Fax,EmailWork,Website,DateOfBirth,PaymentTermInDays,CreditLimit,MemberFee,BankName,BankIban,BankAccount,BankClearing,Code1
*/
After running the script, the result is the following:
Example 2: Retrieve Transactions from the Journal
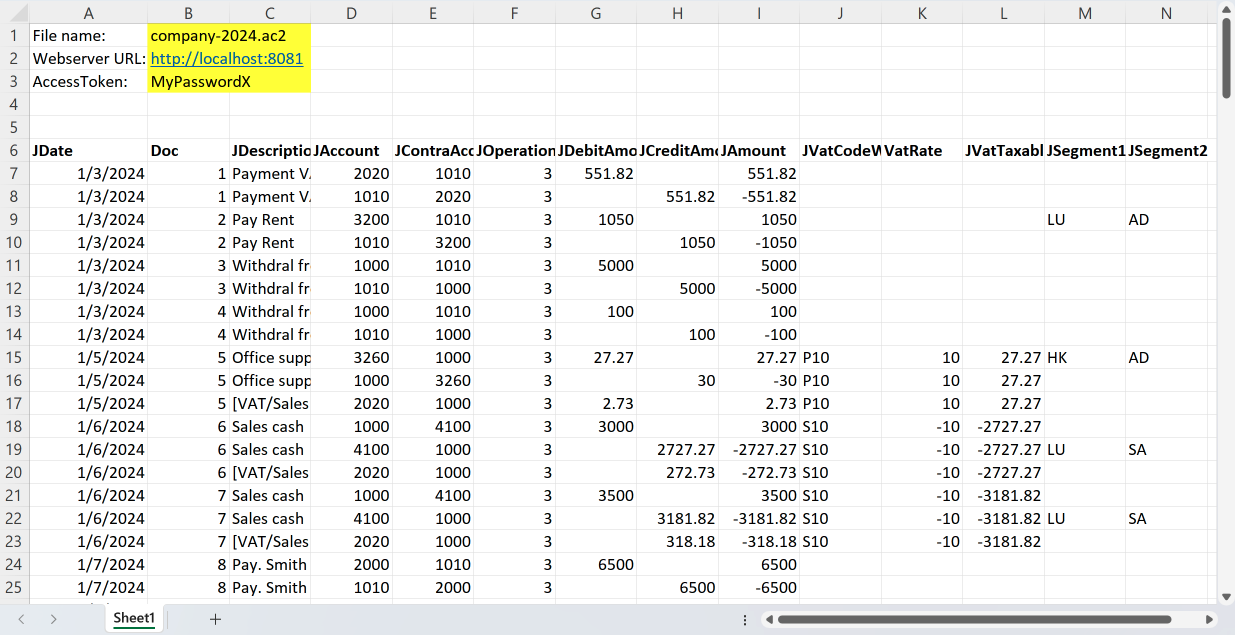
This example shows how to use the Banana Journal to get all the data, and from that retrieve only the Transactions rows.
The Banana Accounting Journal contains the Transactions Data with one row for each account. It can be useful for creating pivot tables.
If the worksheet you are working already contains data, these will be overwritten. Make sure you are in an empty sheet.
To use this script:
- Copy the following script code.
- Paste the script in the Code Editor.
- Save and Run the script.
Note: before running the scripts, set the file name and the server settings.
When you run the script:
- The transactions rows of the Journal are displayed.
- If the worksheet you are working already contains data, these will be overwritten.
Script code:
/**
 * This example retrieves all the Transactions rows from the Journal
 *
 * In order to connect to the Banana Web Server, define some information:
 * - Cell B1 the accounting file name
 * - Cell B2 the localhost web server url
 * - Cell B3 the accessToken security password
 *
 * You can get these information from cells of the worksheet or you can define them in the script.
 * In this example we get the information from the cells B1, B2, B3.
 */
async function main(workbook: ExcelScript.Workbook) {
  // Get the current active worksheet
  let sheet = workbook.getActiveWorksheet();
  // Get the cell values
  let fileName = sheet.getRange("B1").getValue();
  let localhost = sheet.getRange("B2").getValue();
  let accessToken = sheet.getRange("B3").getValue();
  // Retrieve JSON data of the journal from Banana Web Server
  let fetchResult = await fetch(localhost + '/v1/doc/' + fileName + '/journal?format=json&acstkn=' + accessToken);
  // Convert the returned data to the expected JSON structure.
  let json: JSONData = await fetchResult.json();
  // Display the content in a readable format.
  console.log(JSON.stringify(json));
  // Write columns headers texts on the row 6
  let row = 6;
  let col = sheet.getRange('A' + row);
  col.setValue([['JDate']]);
  col.getFormat().getFont().setBold(true);
  //col.getFormat().getFont().setColor("black");
  //col.getFormat().getFill().setColor("yellow");
  col = sheet.getRange('B' + row);
  col.setValue([['Doc']]);
  col.getFormat().getFont().setBold(true);
  col = sheet.getRange('C' + row);
  col.setValue([['JDescription']]);
  col.getFormat().getFont().setBold(true);
  col = sheet.getRange('D' + row);
  col.setValue([['JAccount']]);
  col.getFormat().getFont().setBold(true);
  col = sheet.getRange('E' + row);
  col.setValue([['JContraAccount']]);
  col.getFormat().getFont().setBold(true);
  col = sheet.getRange('F' + row);
  col.setValue([['JOperationType']]);
  col.getFormat().getFont().setBold(true);
  col = sheet.getRange('G' + row);
  col.setValue([['JDebitAmount']]);
  col.getFormat().getFont().setBold(true);
  col = sheet.getRange('H' + row);
  col.setValue([['JCreditAmount']]);
  col.getFormat().getFont().setBold(true);
  col = sheet.getRange('I' + row);
  col.setValue([['JAmount']]);
  col.getFormat().getFont().setBold(true);
  col = sheet.getRange('J' + row);
  col.setValue([['JVatCodeWithoutSign']]);
  col.getFormat().getFont().setBold(true);
  col = sheet.getRange('K' + row);
  col.setValue([['VatRate']]);
  col.getFormat().getFont().setBold(true);
  col = sheet.getRange('L' + row);
  col.setValue([['JVatTaxable']]);
  col.getFormat().getFont().setBold(true);
  col = sheet.getRange('M' + row);
  col.setValue([['JSegment1']]);
  col.getFormat().getFont().setBold(true);
  col = sheet.getRange('N' + row);
  col.setValue([['JSegment2']]);
  col.getFormat().getFont().setBold(true);
  // Write the transactions rows data from the row 7
  row = 7;
  for (let i in json) {
    if (json[i].JOperationType === "3") {  // JOperationType=3 are rows from table Transactions
      let col = sheet.getRange('A' + row);
      col.setValue(json[i].JDate);
      col = sheet.getRange('B' + row);
      col.setValue(json[i].Doc);
      col = sheet.getRange('C' + row);
      col.setValue(json[i].JDescription);
      col = sheet.getRange('D' + row);
      col.setValue(json[i].JAccount);
      col = sheet.getRange('E' + row);
      col.setValue(json[i].JContraAccount);
      col = sheet.getRange('F' + row);
      col.setValue(json[i].JOperationType);
      col = sheet.getRange('G' + row);
      col.setValue(json[i].JDebitAmount);
      col = sheet.getRange('H' + row);
      col.setValue(json[i].JCreditAmount);
      col = sheet.getRange('I' + row);
      col.setValue(json[i].JAmount);
      col = sheet.getRange('J' + row);
      col.setValue(json[i].JVatCodeWithoutSign);
      col = sheet.getRange('K' + row);
      col.setValue(json[i].VatRate);
      col = sheet.getRange('L' + row);
      col.setValue(json[i].JVatTaxable);
      col = sheet.getRange('M' + row);
      col.setValue(json[i].JSegment1);
      col = sheet.getRange('N' + row);
      col.setValue(json[i].JSegment2);
      // increase row
      row++;
    }
  }
}
// JSON structure of the Journal
interface JSONData {
  JDate: string;
  Doc: string;
  JDescription: string;
  JAccount: string;
  JContraAccount: string;
  JOperationType: number;
  JDebitAmount: number;
  JCreditAmount: number;
  JAmount: number;
  JVatCodeWithoutSign: string;
  VatRate: number;
  JVatTaxable: number;
  JSegment1: string;
  JSegment2: string;
}
/* Complete list of journal
    SysCod, Section, Date, DateDocument, DateValue, Doc, DocProtocol, DocType, DocOriginal, DocInvoice, InvoicePrinted, DocLink, ExternalReference, Description, Notes, AccountDebit, AccountDebitDes, AccountCredit, AccountCreditDes, Amount, Balance, VatCode, VatAmountType, VatExtraInfo, VatRate, VatRateEffective, VatTaxable, VatAmount, VatAccount, VatAccountDes, VatPercentNonDeductible, VatNonDeductible, VatPosted, VatNumber, Cc1, Cc1Des, Cc2, Cc2Des, Cc3, Cc3Des, Segment, DateExpiration, DateExpected, DatePayment, LockNumber, LockAmount, LockProgressive, LockLine, JDate, JDescription, JTableOrigin, JRowOrigin, JRepeatNumber, JGroup, JGr, JAccount, JAccountComplete, JAccountDescription, JAccountClass, JAccountSection, JAccountType, JOriginType, JOriginFile, JOperationType, JAccountGr, JAccountGrPath, JAccountGrDescription, JAccountCurrency, JAmountAccountCurrency, JAmount, JTransactionCurrency, JAmountTransactionCurrency, JTransactionCurrencyConversionRate, JAmountSection, JVatIsVatOperation, JVatCodeWithoutSign, JVatCodeDescription, JVatCodeWithMinus, JVatNegative, JVatTaxable, JContraAccount, JCContraAccountDes, JContraAccountType, JContraAccountGroup, JCC1, JCC2, JCC3, JSegment1, JSegment2, JSegment3, JSegment4, JSegment5, JSegment6, JSegment7, JSegment8, JSegment9, JSegment10, JDebitAmountAccountCurrency, JCreditAmountAccountCurrency, JBalanceAccountCurrency, JDebitAmount, JCreditAmount, JBalance, JInvoiceDocType, JInvoiceAccountId, JInvoiceCurrency, JInvoiceStatus, JInvoiceDueDate, JInvoiceDaysPastDue, JInvoiceLastReminder, JInvoiceLastReminderDate, JInvoiceIssueDate, JInvoiceExpectedDate, JInvoicePaymentDate, JInvoiceDuePeriod, JInvoiceRowCustomerSupplier, ProbableIndexGroup, VatTwinAccount, DateEnd, Repeat, Variant, ForNewYear, ItemsId, Quantity, ReferenceUnit, UnitPrice, FormulaBegin, Formula, AmountTotal
*/
After running the script, the result is the following:
Example 3: Create a new accounting file using data from Excel Sheets
For following this example you can download a Excel file that content some data of transactions and accounts.
Download Excel file with transaction and accounts
In this example we want to:
- Create a new Banana Accounting file using the web server Create a new file functionality.
- Take some transactions data from Excel.
For this example, transactions in Excel are entered as shown in the following image: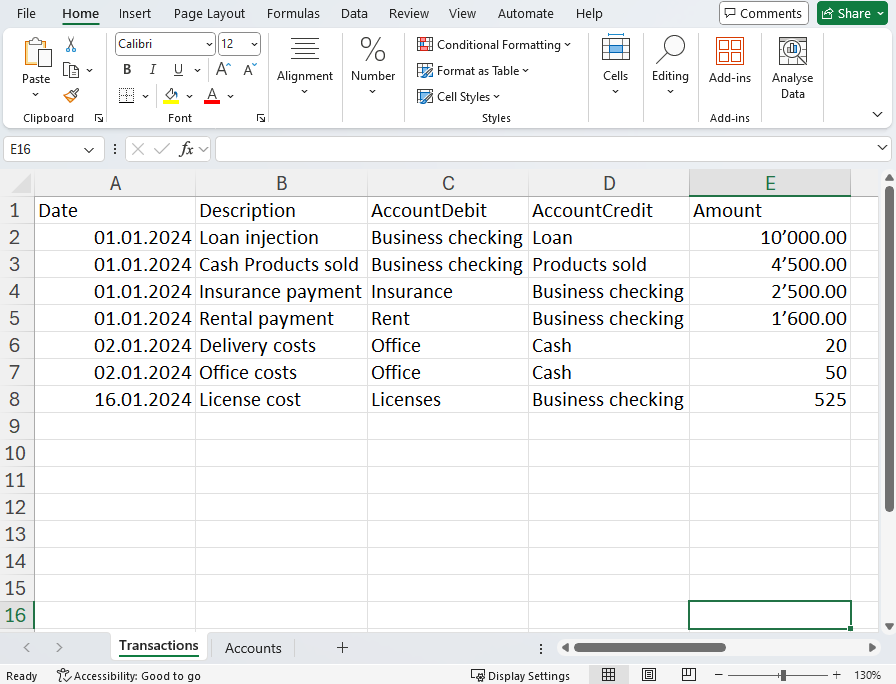
- Take some accounts and descriptions data from Excel.
Accounts can be numbers or texts.
The BClass columns set the type of account (1=assets, 2=liabilities, 3=expenses, 4=revenues).
For this example, accounts in Excel are entered as shown in the following image.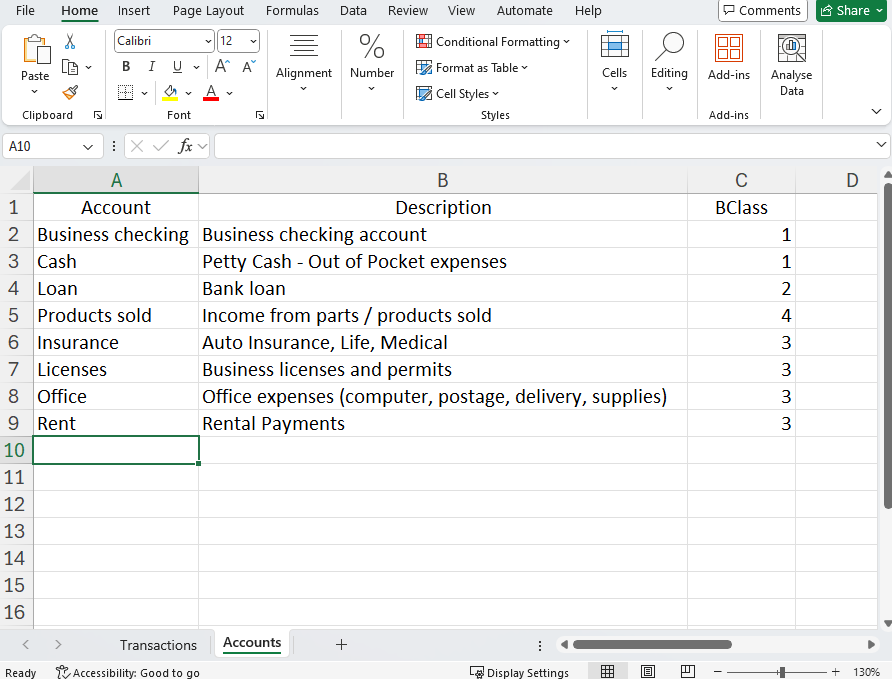
- Create a specific JSON used by the Document change API to add the the data in the accounting file.
We use the add Rows operation to append the transactions to the Transactions table and accounts to the Accounts table.
To use this script:
- Open Banana Accounting Plus and Configure Banana the Web Server.
- Copy the following script code.
- Paste the script in the Code Editor.
- Save and Run the script.
When you run the script:
- The script creates a new Banana Accounting file.
- The Excel transactions rows are added to the Transactions table in the accounting file.
- The Excel accounts rows are added to the Accounts table in the accounting file.
Script code:
async function main(workbook: ExcelScript.Workbook) {
    // Get the specific sheet
    const sheetTransactions = workbook.getWorksheet("Transactions");
    const sheetAccount = workbook.getWorksheet("Accounts");
    // Get the range of cells used in the sheet
    const usedRangeTransactions = sheetTransactions.getUsedRange();
    const usedRangeAccounts = sheetAccount.getUsedRange();
    // Get the last used row of the sheet
    const lastRowTransactions = usedRangeTransactions.getLastRow().getRowIndex();
    const lastRowAccounts = usedRangeAccounts.getLastRow().getRowIndex();
    // TRANSACTIONS
    const dateRange = sheetTransactions.getRange(`A2:A${lastRowTransactions + 1}`).getValues(); // From line 2 (skip header)
    const descriptionRange = sheetTransactions.getRange(`B2:B${lastRowTransactions + 1}`).getValues();
    const accountDebitRange = sheetTransactions.getRange(`C2:C${lastRowTransactions + 1}`).getValues();
    const accountCreditRange = sheetTransactions.getRange(`D2:D${lastRowTransactions + 1}`).getValues();
    const amountRange = sheetTransactions.getRange(`E2:E${lastRowTransactions + 1}`).getValues();
    // ACCOUNTS
    const accountRange = sheetAccount.getRange(`A2:A${lastRowAccounts + 1}`).getValues();
    const descRange = sheetAccount.getRange(`B2:B${lastRowAccounts + 1}`).getValues();
    const bclassRange = sheetAccount.getRange(`C2:C${lastRowAccounts + 1}`).getValues();
    // Initialize JSON structure.
    // The JSON is used by the documentChange to add rows in Transactions table
    // https://www.banana.ch/doc/en/node/9841#example_adding_a_row
    var jsonData = {
        "format": "documentChange",
        "error": "",
        "data": [
            {
                "document": {
                    "dataUnits": [
                        {
                            "data": {
                                "rowLists": [
                                    {
                                        "rows": []
                                    }
                                ]
                            },
                            "nameXml": "Transactions"
                        },
                        {
                            "data": {
                                "rowLists": [
                                    {
                                        "rows": []
                                    }
                                ]
                            },
                            "nameXml": "Accounts"
                        }
                    ]
                }
            }
        ]
    };
    // TRANSACTIONS: Iteration on each row of the columns.
    for (let i = 0; i < dateRange.length; i++) {
        let dateValue = dateRange[i][0]; // Value of column A (Date)
        let descriptionValue = descriptionRange[i][0]; // Value of column B (Description)
        let accountDebitValue = accountDebitRange[i][0]; // Value of column C (AccountDebit)
        let accountCreditValue = accountCreditRange[i][0]; // Value of column D (AccountCredit)
        let amountValue = amountRange[i][0]; // Value of column E (Amount)
        // adds "fields" object to "rows"
        jsonData.data[0].document.dataUnits[0].data.rowLists[0].rows.push({
            "fields": {
                "Date": formatDateToYyyyMmDd(Number(dateValue)),
                "Description": descriptionValue,
                "AccountDebit": accountDebitValue,
                "AccountCredit": accountCreditValue,
                "Amount": amountValue.toString()
            },
            "operation": {
                "name": "add"
            }
        });
    }
    // ACCOUNTS: Iteration on each row of the columns.
    for (let i = 0; i < accountRange.length; i++) {
        let accountValue = accountRange[i][0]; // Value of column A (Account)
        let descValue = descRange[i][0]; // Value of column B (Description)
        let bclassValue = bclassRange[i][0]; // Value of column C (BClass)
        // adds "fields" object to "rows"
        jsonData.data[0].document.dataUnits[1].data.rowLists[0].rows.push({
            "fields": {
                "Section": "",
                "Group": "",
                "Account": accountValue.toString(),
                "Description": descValue.toString(),
                "BClass": bclassValue.toString(),
                "Gr": ""
            },
            "operation": {
                "name": "add"
            }
        });
    }
    let jsonString = JSON.stringify(jsonData);
    //console.log(jsonString);
    createAc2(JSON.parse(jsonString));
}
async function createAc2(jsonData: JSON) {
    // Web server url
    let _LOCALHOST = "http://localhost:8081"; //for macOS use "https://127.0.0.1:8089";
    // Web server password
    let _PASSWORD = "MyPasswordX";
    // Request to Banana web server
    let url = _LOCALHOST + "/v2/doc?show&acstkn=" + _PASSWORD;
    // Accounting type parameters
    let fileTypeGroup = 100; // Double entry accounting
    let fileTypeNumber = 100; // without VAT
    let fileDecimals = 2;
    try {
        // Body of the request
        const httpBody = {
            fileType: {
                accountingType: {
                    docGroup: fileTypeGroup,
                    docApp: fileTypeNumber,
                    decimals: fileDecimals
                }
            },
            data: jsonData,
        }
        const response = await fetch(url, {
            method: 'POST',
            headers: {
                'Content-Type': 'application/json'
            },
            body: JSON.stringify(httpBody)
        });
        //const responseData: string = await response.text();
        //console.log(responseData);
    } catch (error) {
        console.log(error);
    }
}
// Convert Date type of Excel in yyyy-mm-dd string format
function formatDateToYyyyMmDd(date: number): string {
    let dateString = new Date(Math.round((date - 25569) * 86400 * 1000)).toISOString().split("T")[0];
    return dateString;
}
Accounting type parameters "_DOC_GROUP" and "_DOC_APP" define the type of accounting to create. For more information please visit the @doctype Attributes page.
Useful resources
Create a Banana Accounting File Using Excel Office Script
This page explains:
- How to create a Banana Accounting file with double registration without VAT starting from Excel data using the Excel Office Script module.
- How to use the http POST protocol with Banana APIs to transfer the current and budget transactions, the chart of accounts into Banana Accounting Plus from the Excel file.
- How to create financial statement and income statement reports in Banana with this data.
Prerequisites
For use these functions you need to have:
- Download and install Banana Accounting Plus.
- Have the Advanced plan of Banana Accounting Plus.
- Have Excel for Windows (version 2210 or higher) or Excel for Mac.
- Use OneDrive for Business.
- Configure the webserver in Banana Accounting Plus based on your operating system.
Note
- The entered budget and transaction data must be considered over the period defined in the FileInfo in order to be calculated and evaluated
Steps to Integrate Excel Office Script
After checking the prerequisites for this use case, you can follow the next steps:
- Download the example Excel with data.
- Create a new Office Script file in Excel, copy and paste the example code into the code editor in Office Script.
- Open Banana Accounting Plus.
- Make sure that the Webserver is working.
- Save and Run the code in Office Script.
- See the results in the Banana Accounting Plus.
The Office Script will do the following:
- Create a Banana Accounting Json Document Change Object
- For each Excel Sheet:
- Read the content of the Excel Sheet.
- Add the data to the Json Document Change Object.
- Send the Json Document Change Object to the Banana Web Server using the http POST method.
The Banana Accounting software will create a new file and display within the software.
The structure of the Excel file
The file is divided into several sheets, each corresponding to the data structure and Table in the Banana Accounting file.
- FileInfo: Banana Accounting File Properties.
- Accounts: Accounts Table.
- Transactions: Transactions Table.
- Budget: Budget Table.
All the data you enter into Excel sheets are used to create a basic Json structure (documentchange) that must pass into Banana Accounting Plus.
FileInfo
In this sheet, you will enter basic business data. This information is essential to ensure that all entries are consistent and properly contextualized. Here you will be able to specify:
- Company: The company name, that is the name and legal form.
- Opening and closure date: The date the accounts were opened and closed, that are related to period that you want evalueted your accounting.
- Basis currency: The currency to be used.
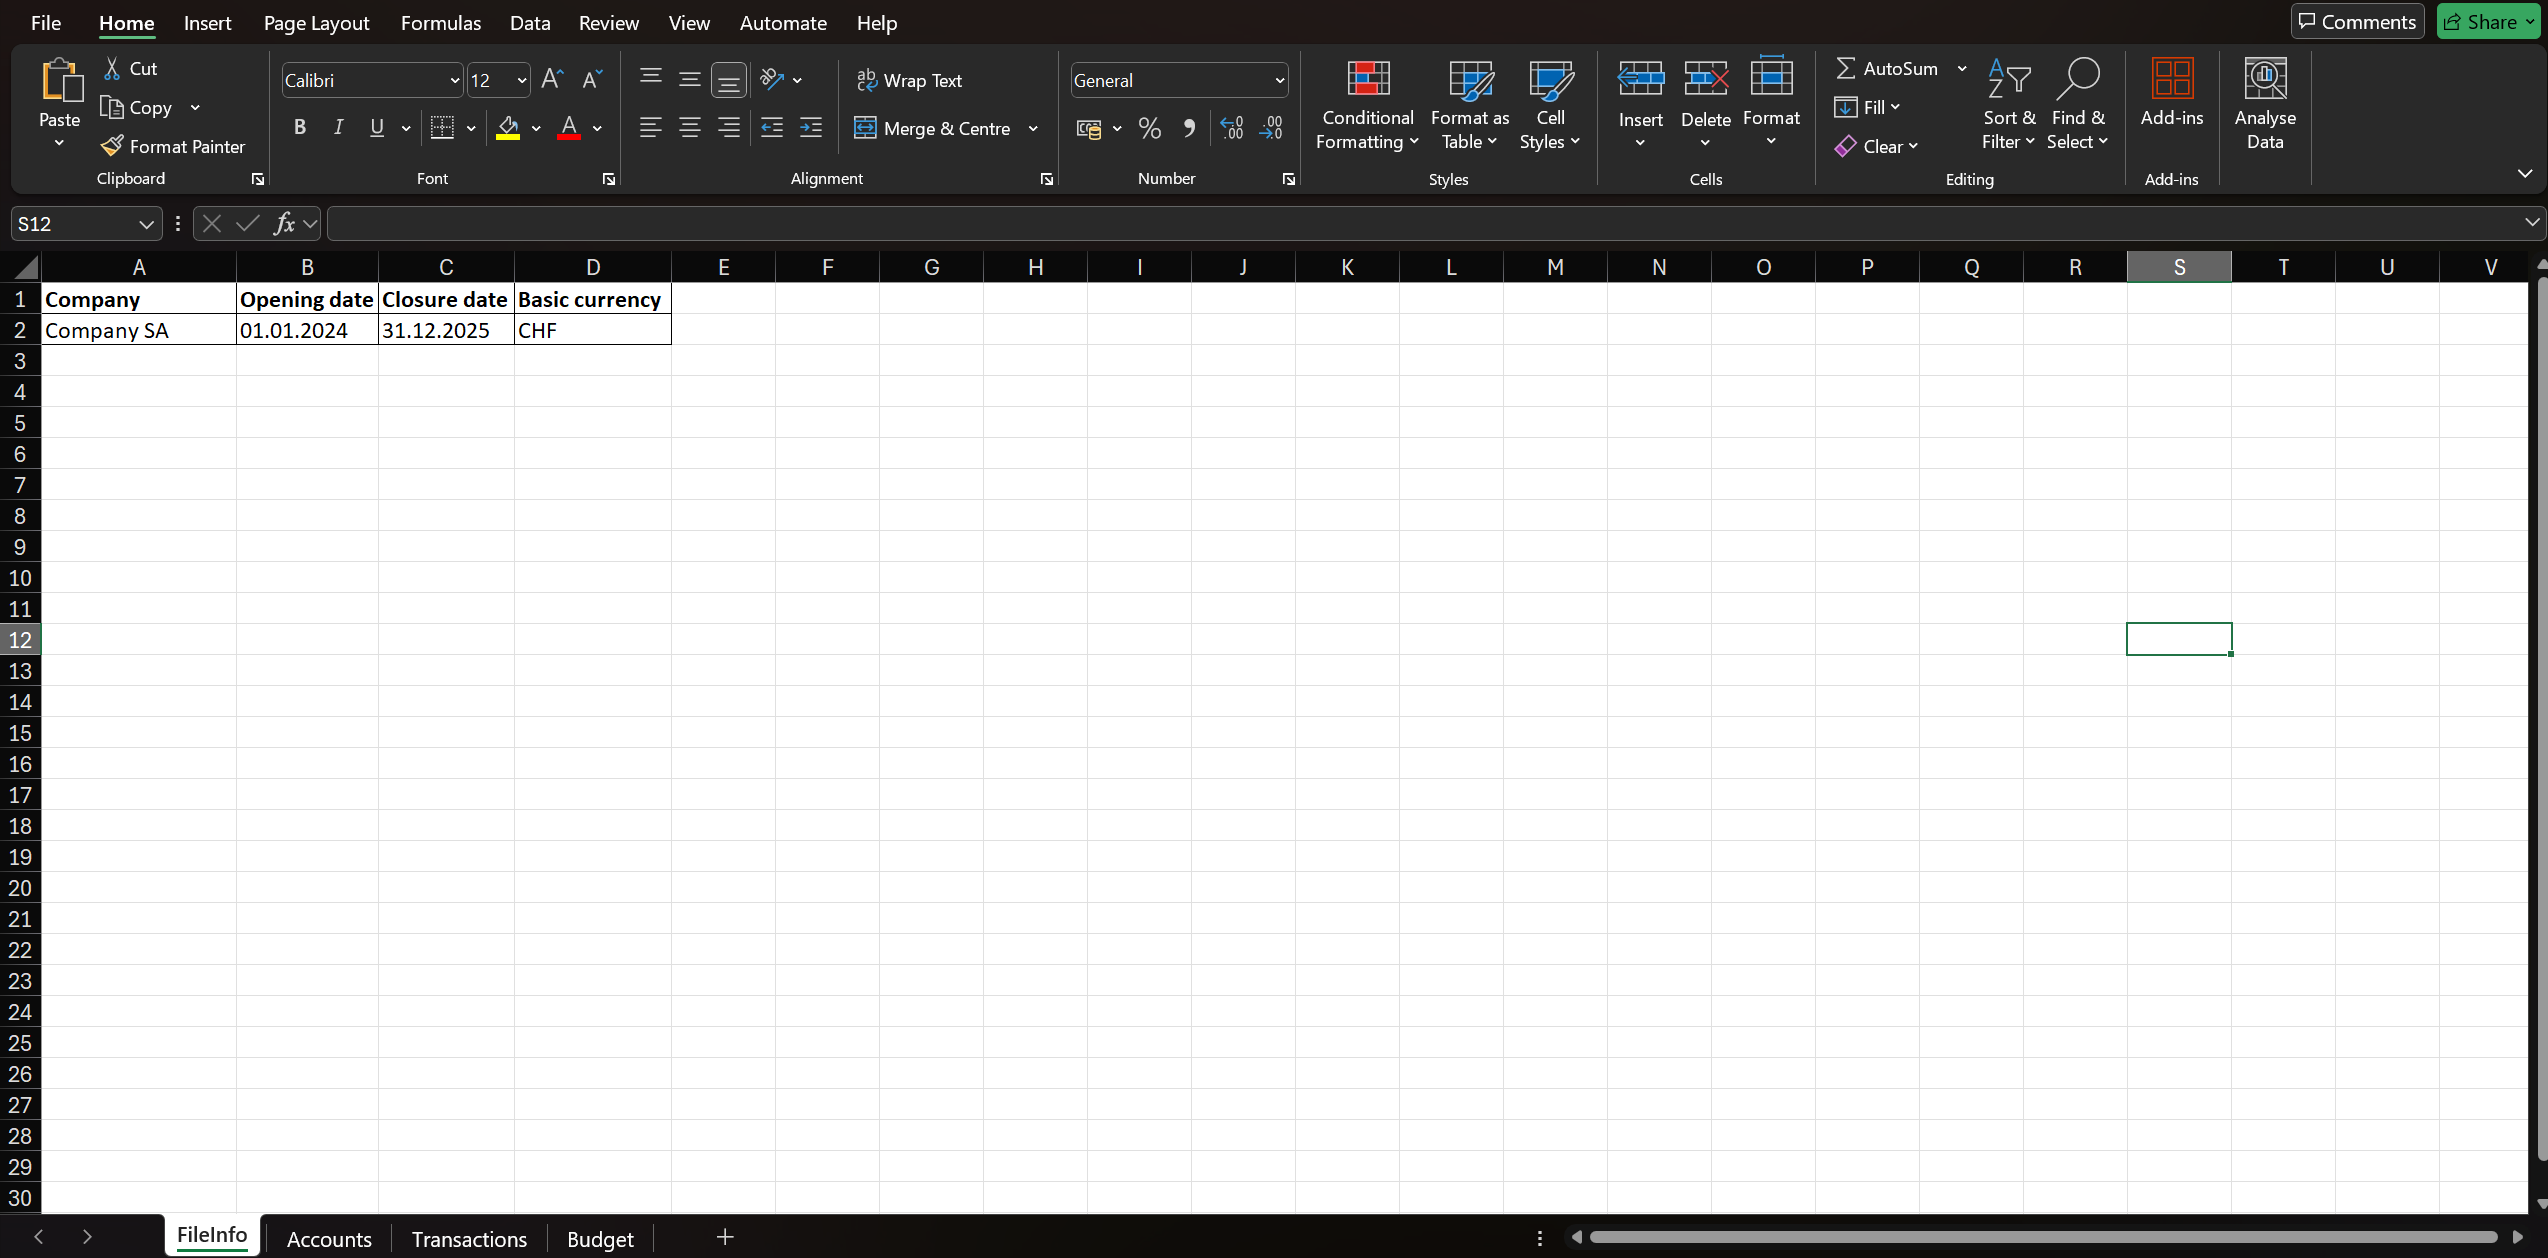
Accounts
This sheet is dedicated to creating the chart of accounts. Here you will be able to define:
- The account names and codes.
- The type of account.
- The groupings required for summing account groups.
- For example, you will be able to sum all accounts receivable to get the total assets, thus facilitating the preparation of the fiancial statement and income statement.
The columns of the sheet Accounts in Excel file refer the same table in Banana Accounting Plus.
The accounting sheet contains the main data for constructing the chart of accounts based on the document change structure and later creating the Financial statement and Income Statement reports, with the same columns that find in Banana Accounting Plus:
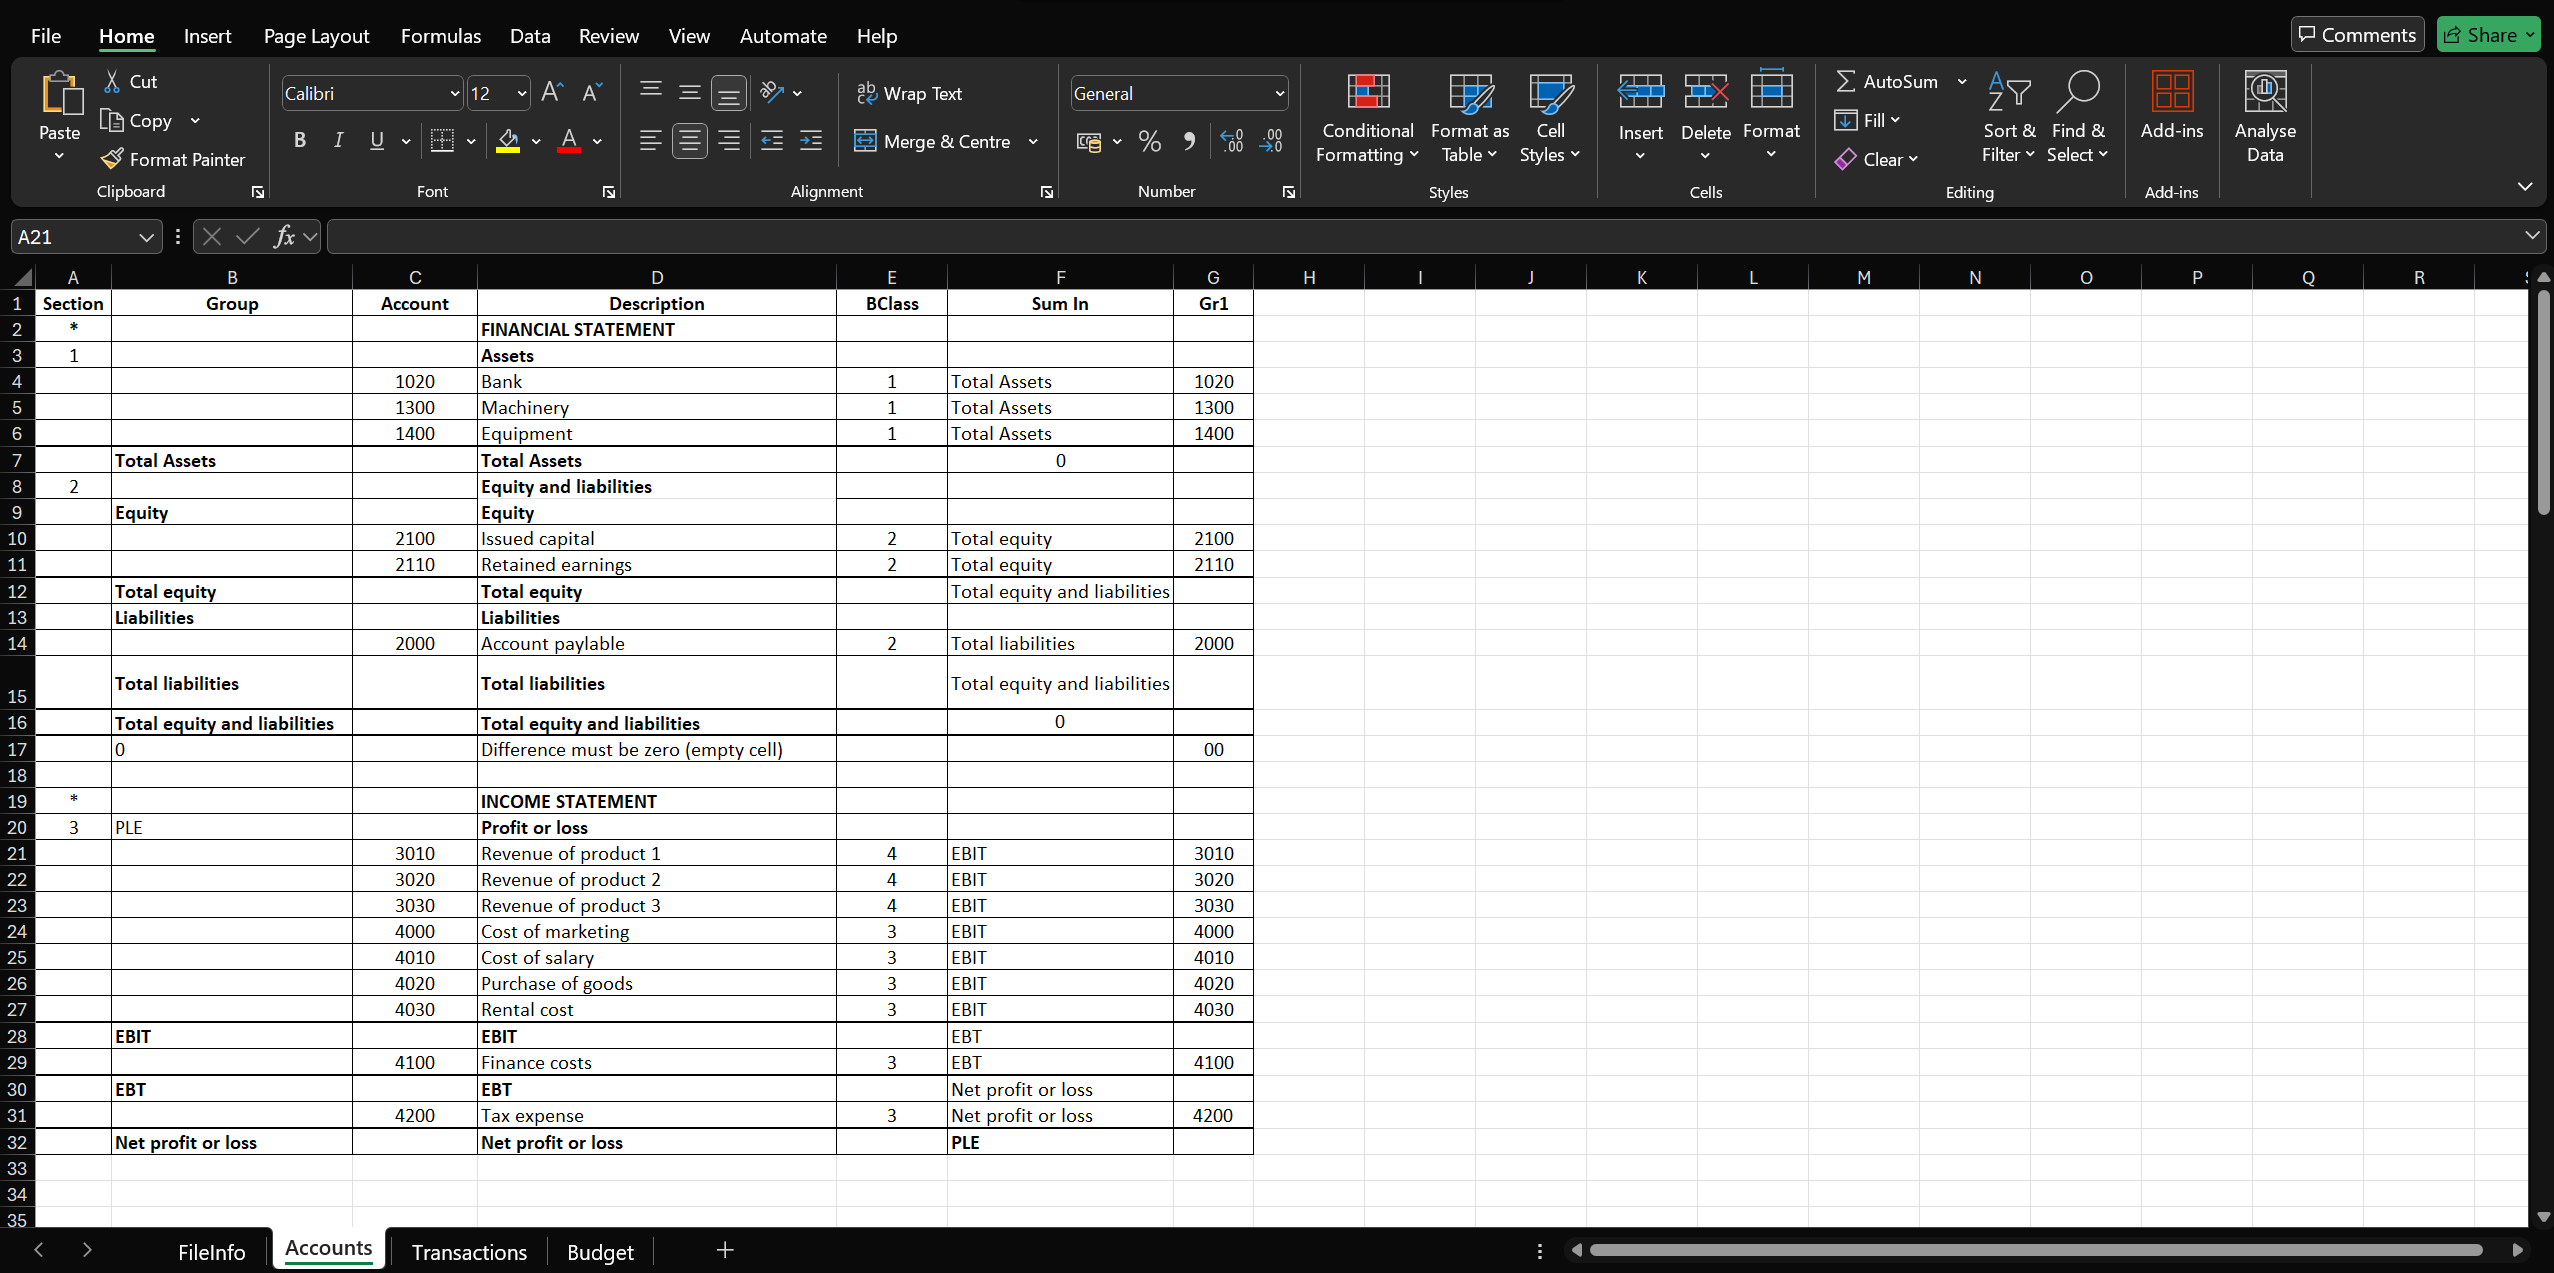
Transactions
In this sheet, you will record:
- All accounting transactions for the current year.
The entries will include key data such as:
- Date: The date of the transaction.
- Description: Transaction description.
- AccountDebit: Debit account.
- AccountCredit: Credit account.
- Amount: Amount of your transaction.
This will enable you to keep track of financial transactions in a detailed and organized manner.
The sheets of Transactions and Budget have the same columns, but refer to different table.
To understand and learn more about the use of these columns you can look at this link Transactions.
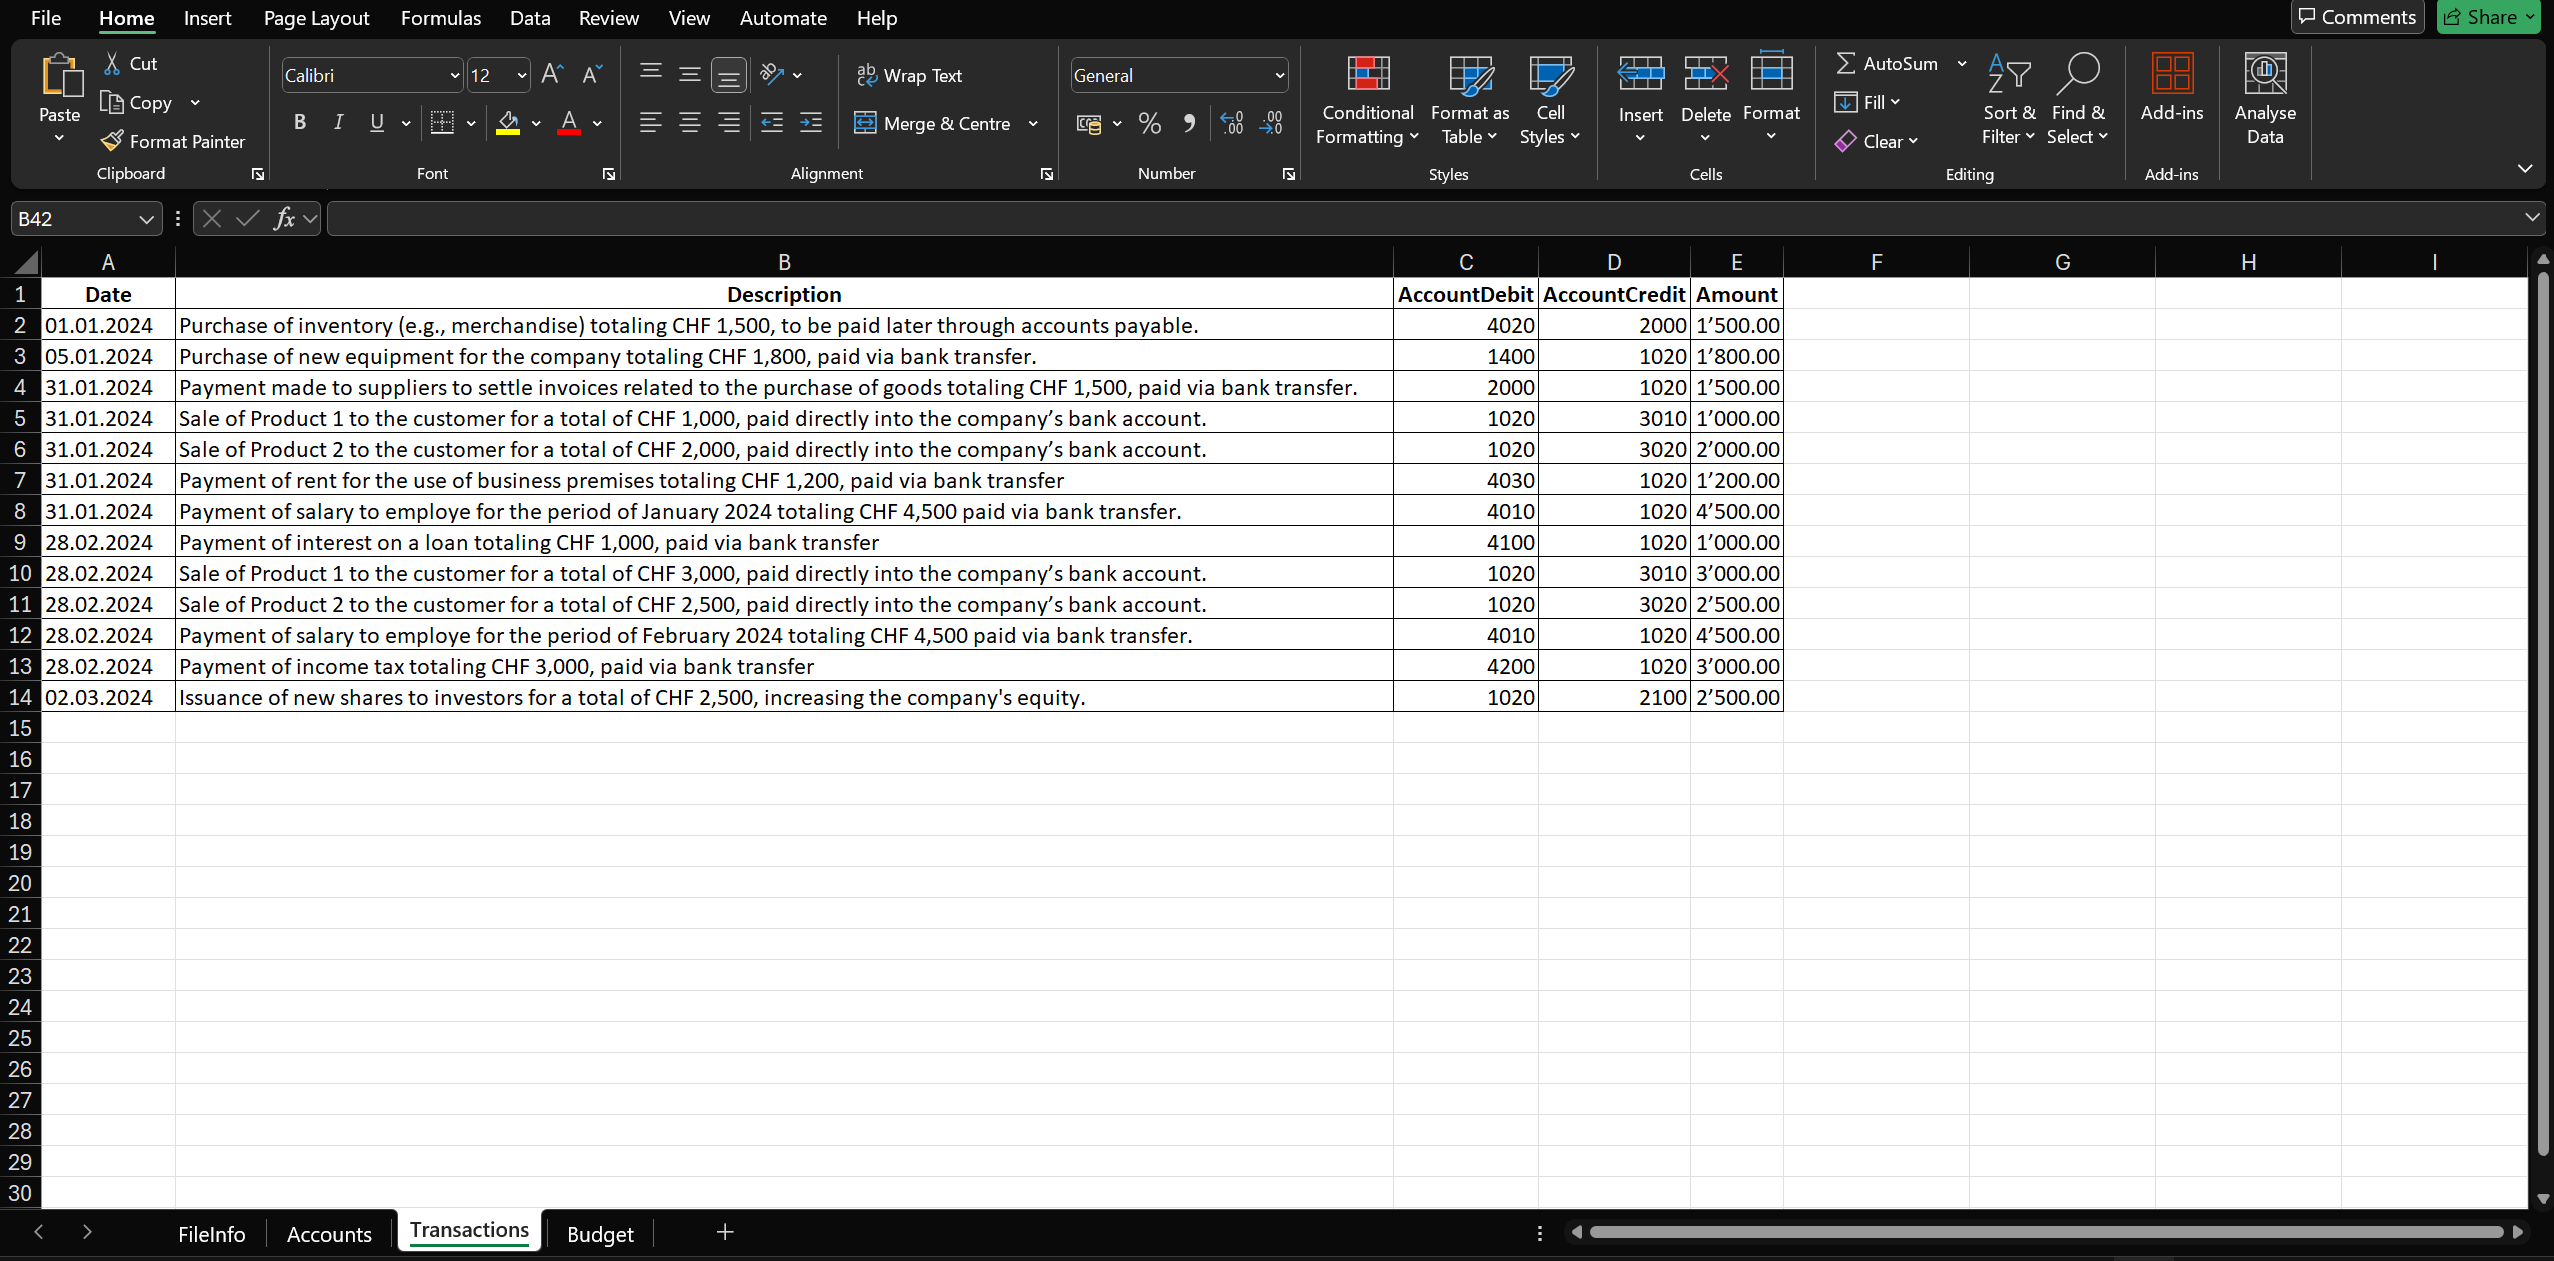
Budget
The entries will include key data such as:
- Date: The date of the budget transaction.
- Description: Budget transaction description.
- AccountDebit: Debit account.
- AccountCredit: Credit account.
- Amount: Amount of your budget transaction.
Finally, the Budget sheet is dedicated to planning future expenses.
Here you will be able:
- To enter the projected expenses you intend to incur, taking into account the closing date indicated on the FileInfo sheet.
- Monitor and manage the company budget proactively.
These data even though they have the same columns as transactions will be recorded in the Budget table for future forecasting.
For further study: Budget Table
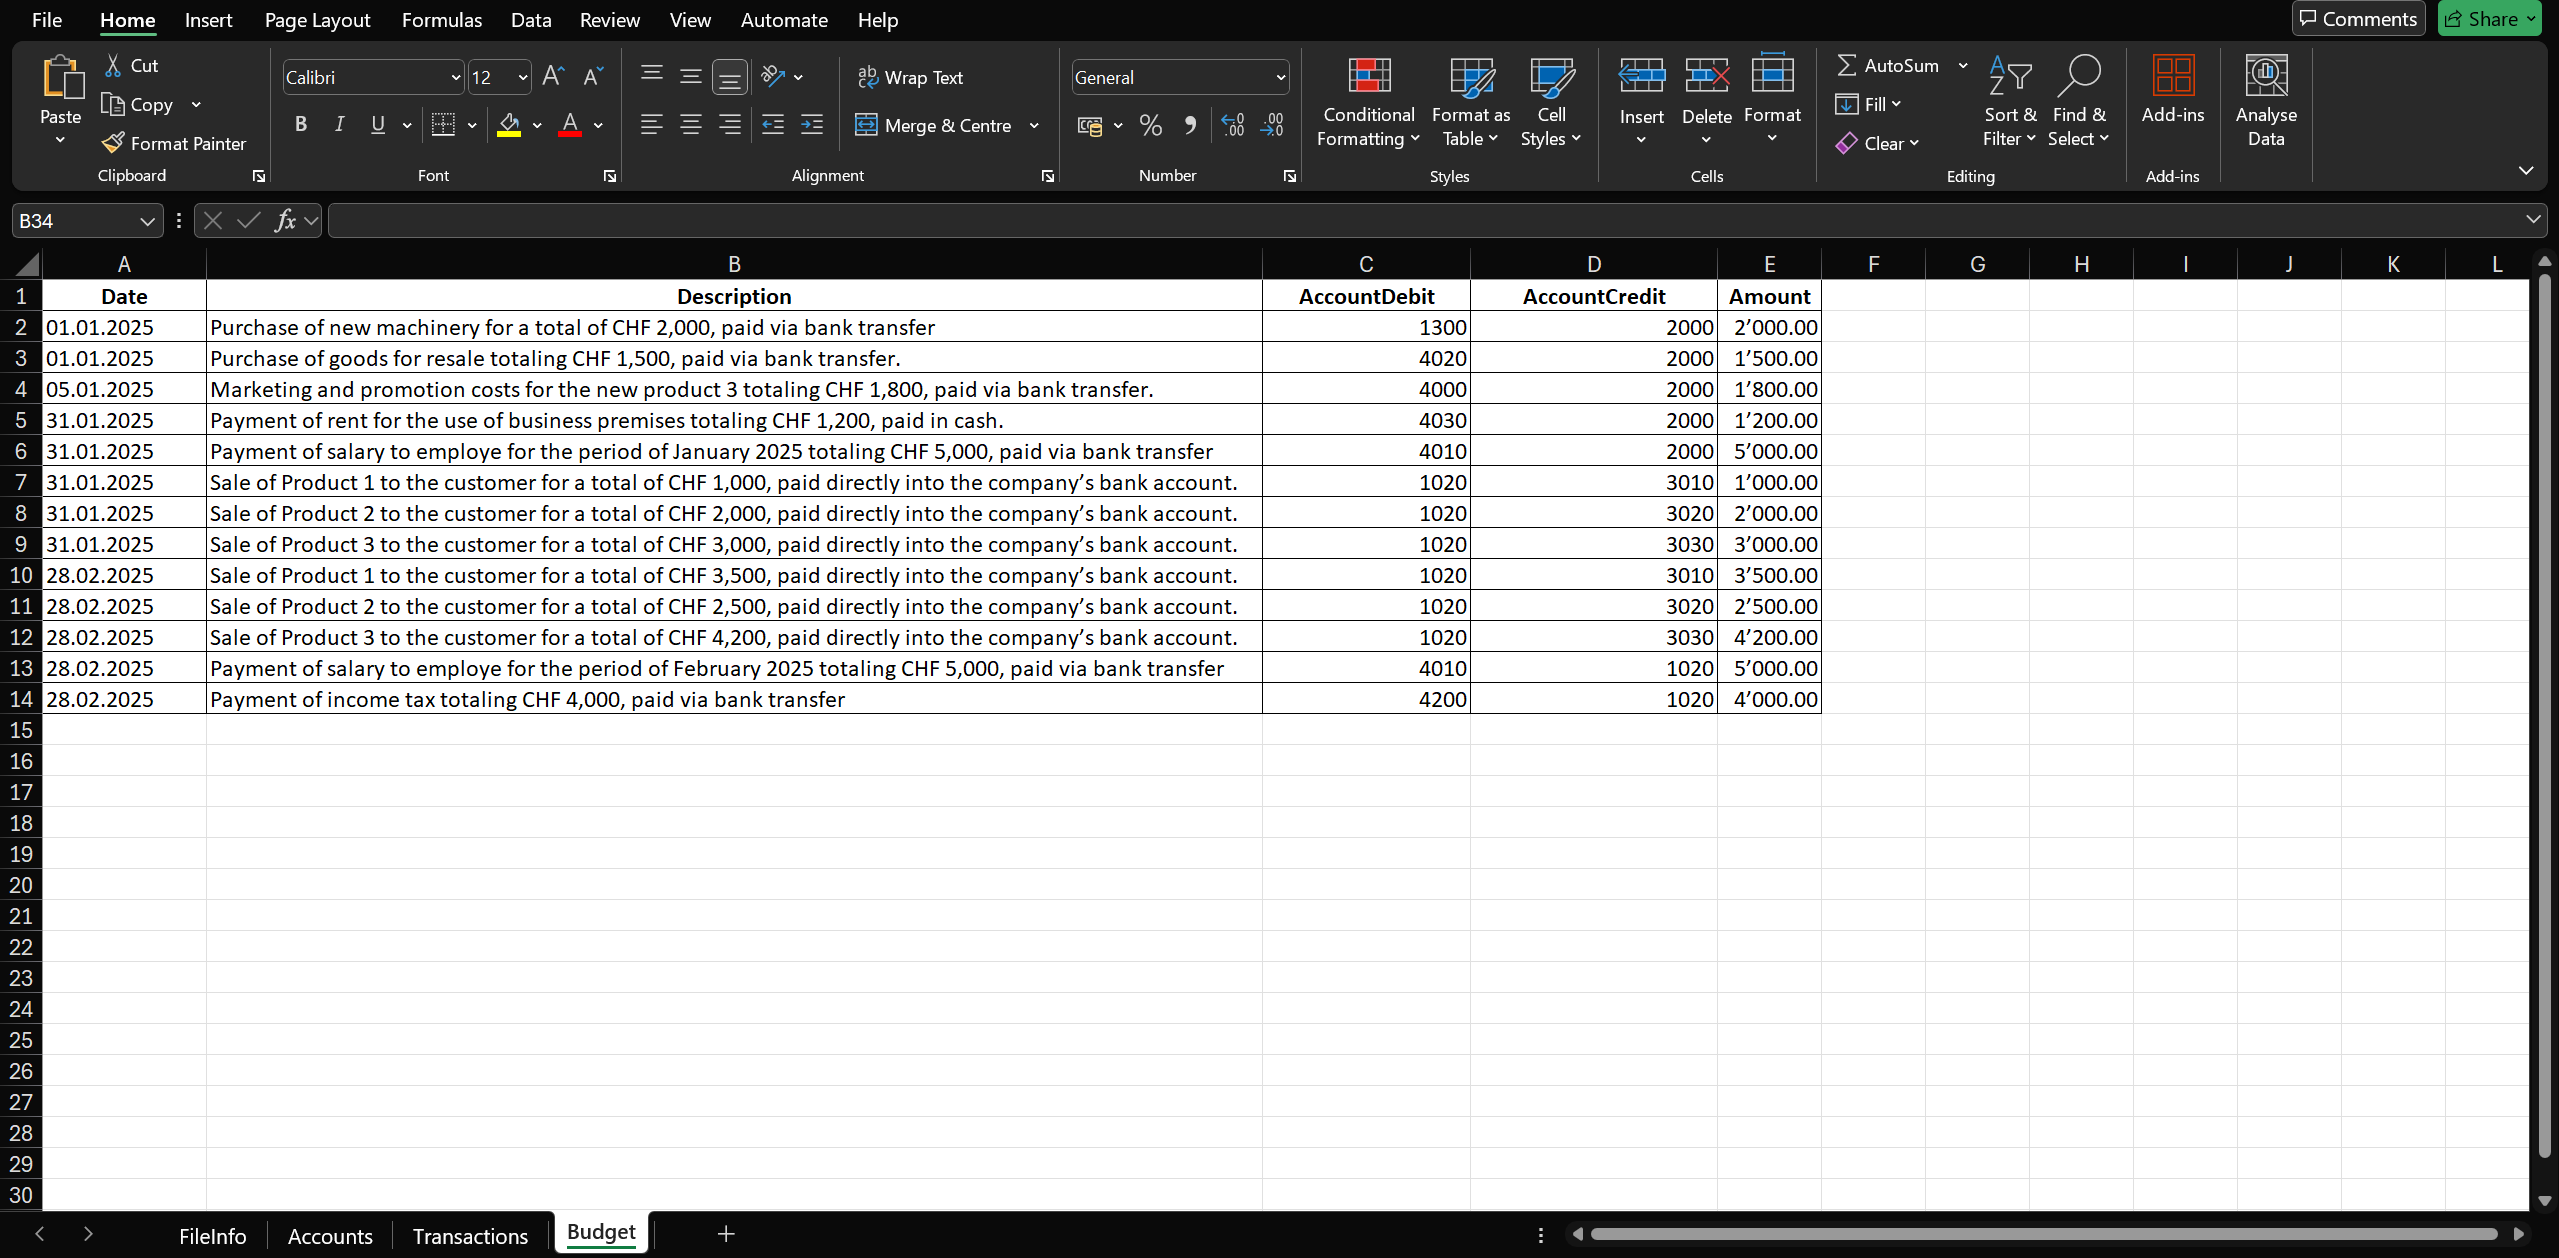
Script code in Office Script
The code is structured as:
- The function main.
- An Office Script for Excel must include a main function with the ExcelScript.Workbook as its first parameter.
- When you execute a function, the Office Script calls the main function by providing the workbook as first parameter.
- ExcelScript.Workbook should always be first parameter.
- The function is defined async because the script needs to interact with APIs (forsend data).
Using async allows you to handle these calls without blocking the execution of the rest of the script.
- Initialization in the jsonData variable based JSON who are structured as DocumentChange that have an array of dataUnits objects defined by the following properties:
- FileInfo.
- Transactions.
- Budget.
- Accounts.
- For each sheet:
- There is the initialization of the parameters of the range that are used to read the cells.
- There are the reading the rows containing the data needed to build the DocumentChange and inserting them into the rows object array of variable jsonData.
- To send the data contained in the jsonData variable to Banana Accounting Plus using the function createAc2(jsonData: JSON).
- The body of request:
- jsonData
represents the data of Documentchange that need to create a file accounting in Banana Accounting. - fileType
that define the which type of accounting you want to create in Banana Accounting.- docGroup: if you set the number 100 you create a file with double-entry accounting.
- docApp: if you set the number 100 you create a file without VAT.
- decimals: is the number of decimal digits (default value is 2).
- jsonData
- HTTP method:
- POST.
- Header:
- 'Content-Type': 'application/json'.
- Is defined to Async:
- The script needs to interact with APIs.
- Errors:
- To verify the success of the Banana API call, I print an error message if a problem occurs.
- Endpoint:
- http://<_PASSWORD>/v2/doc?show&acstkn=<_LOCALHOST >
- The _PASSWORD variable must be replaced with your own token password used to configure the Banana Accounting Plus webserver as described in Integrated Web Server
- The _LOCALHOST variable must be replaced with your compatible with your operating system if it is Windows or if is Mac, have a different localhost.
- The body of request:
- Formatting the date with the function formatDateToYyyyMmDd(date: number | string | number | boolean): string
- date: Office Script when reading a cell, there are different types of data and it is not possible to impose which input format arrives for reading, so to avoid possible errors it has been integrated as possible data: boolean, number and string.
- The date is first verified as a number, because at the time of reading the cell the data is in number and subsequently if it is a number it is converted to a string with a calculation because the format being read is a number and the destination format in Banana accepts the string format.
Note
- You can add rows to create more records or change data of row without modifying the code.
- If you move, delete, or add new columns, you must update the column references in the code accordingly.
- Adding Rows:
You can add a row in the Transactions sheet (or any other sheet) following the existing column order without any code changes.
Adding Columns:
If you add a column in the Transactions sheet to include a new field, you must adapt the code to reflect this change in the document structure.
The structure of Json data that rapresent the Document Change Object
The Office Scipt will generate a DocumentChange Json object with the following properties:
- FileInfo: refers to the FileInfo table of Banana Accounting.
- Accounts: refers to the Accounts table of Banana Accounting.
- Transactions: refers to the Transactions table of Banana Accounting.
- Budget: refers to the Budget table of Banana Accounting.
These properties of the DocumentChange object are technically called nameXml and refer to the data structured, that in this is the tables of Banana Accounting.
These properties are directly connected to the structure of the Banana Accounting and are used to pass data to the corresponding table.
For further details and references, please see the Structure of DocumentChange and DocumentChange JSON.
Code
async function main(workbook: ExcelScript.Workbook) {
    // Initialize JSON structure.
    // The JSON is used by the documentChange to add rows in Transactions, Budget and Accounts table.
    // The data of property FileInfo in JSON is related of the properties in the Accounting File
    // https://www.banana.ch/doc/en/node/9841#example_adding_a_row
    var jsonData = {
        "format": "documentChange",
        "error": "",
        "data": [
            {
                "document": {
                    "dataUnits": [
                        {
                            "nameXml": "FileInfo",
                            "data": {
                                "rowLists": [
                                    {
                                        "nameXml": "Base",
                                        "rows": []
                                    }
                                ]
                            }
                        },
                        {
                            "data": {
                                "rowLists": [
                                    {
                                        "rows": []
                                    }
                                ]
                            },
                            "nameXml": "Transactions"
                        },
                        {
                            "data": {
                                "rowLists": [
                                    {
                                        "rows": []
                                    }
                                ]
                            },
                            "nameXml": "Budget"
                        },
                        {
                            "data": {
                                "rowLists": [
                                    {
                                        "rows": []
                                    }
                                ]
                            },
                            "nameXml": "Accounts"
                        }
                    ]
                }
            }
        ]
    };
    //FILE INFO
    // Get the specific sheet
    const sheetFileInfo = workbook.getWorksheet("FileInfo");
    // Get the range of cells used in the sheet
    const usedRangeFileInfo = sheetFileInfo.getUsedRange();
    const columnRangeFileInfo = sheetFileInfo.getUsedRange().getRow(0).getColumnCount();
    // Get the last used row of the sheet
    const lastRowFileInfo = usedRangeFileInfo.getLastRow().getRowIndex();
    // Get data range of File Info
    const companyRange = sheetFileInfo.getRange(`A2:A${lastRowFileInfo + 1}`).getValues();
    const openingDateRange = sheetFileInfo.getRange(`B2:B${lastRowFileInfo + 1}`).getValues();
    const closingRange = sheetFileInfo.getRange(`C2:C${lastRowFileInfo + 1}`).getValues();
    const basicCurrencyRange = sheetFileInfo.getRange(`D2:D${lastRowFileInfo + 1}`).getValues();
    // iteration on each row of the columns.
    let companyValue = companyRange[0][0];
    let openingDateValue = openingDateRange[0][0];
    let closureDateValue = closingRange[0][0];
    let basisCurrencyValue = basicCurrencyRange[0][0];
    jsonData.data[0].document.dataUnits[0].data.rowLists[0].rows.push({
        "fields": {
            "SectionXml": "AccountingDataBase",
            "IdXml": "Company",
            "ValueXml": companyValue.toString()
        },
        "operation": {
            "name": "modify"
        }
    });
    jsonData.data[0].document.dataUnits[0].data.rowLists[0].rows.push({
        "fields": {
            "SectionXml": "AccountingDataBase",
            "IdXml": "OpeningDate",
            "ValueXml": formatDateToYyyyMmDd(openingDateValue)
        },
        "operation": {
            "name": "modify"
        }
    });
    jsonData.data[0].document.dataUnits[0].data.rowLists[0].rows.push({
        "fields": {
            "SectionXml": "AccountingDataBase",
            "IdXml": "ClosureDate",
            "ValueXml": formatDateToYyyyMmDd(closureDateValue)
        },
        "operation": {
            "name": "modify"
        }
    });
    jsonData.data[0].document.dataUnits[0].data.rowLists[0].rows.push({
        "fields": {
            "SectionXml": "AccountingDataBase",
            "IdXml": "BasicCurrency",
            "ValueXml": basisCurrencyValue.toLocaleString()
        },
        "operation": {
            "name": "modify"
        }
    });
    // TRANSACTIONS
    // Get the specific sheet
    const sheetTransactions = workbook.getWorksheet("Transactions");
    // Get the range of cells used in the sheet
    const usedRangeTransactions = sheetTransactions.getUsedRange();
    // Get the last used row of the sheet
    const lastRowTransactions = usedRangeTransactions.getLastRow().getRowIndex();
    // Get data range of Transactions
    const dateRange = sheetTransactions.getRange(`A2:A${lastRowTransactions + 1}`).getValues();
    const descriptionRange = sheetTransactions.getRange(`B2:B${lastRowTransactions + 1}`).getValues();
    const accountDebitRange = sheetTransactions.getRange(`C2:C${lastRowTransactions + 1}`).getValues();
    const accountCreditRange = sheetTransactions.getRange(`D2:D${lastRowTransactions + 1}`).getValues();
    const amountRange = sheetTransactions.getRange(`E2:E${lastRowTransactions + 1}`).getValues();
    //Iteration on each row of the columns.
    for (let i = 0; i < dateRange.length; i++) {
        let dateValue = dateRange[i][0]; // Value of column A (Date)
        let descriptionValue = descriptionRange[i][0]; // Value of column B (Description)
        let accountDebitValue = accountDebitRange[i][0]; // Value of column C (AccountDebit)
        let accountCreditValue = accountCreditRange[i][0]; // Value of column D (AccountCredit)
        let amountValue = amountRange[i][0]; // Value of column E (Amount)
        // adds "fields" object to "rows"
        jsonData.data[0].document.dataUnits[1].data.rowLists[0].rows.push({
            "fields": {
                "Date": formatDateToYyyyMmDd(dateValue),
                "Description": descriptionValue.toString(),
                "AccountDebit": accountDebitValue.toString(),
                "AccountCredit": accountCreditValue.toString(),
                "Amount": amountValue.toString()
            },
            "operation": {
                "name": "add"
            }
        });
    }
    //BUDGET
    // Get the specific sheet
    const sheetBudget = workbook.getWorksheet("Budget");
    // Get the range of cells used in the sheet
    const usedRangeBudget = sheetBudget.getUsedRange();
    // Get the last used row of the sheet
    const lastRowBudget = usedRangeBudget.getLastRow().getRowIndex();
    // Get data range of BUDGET
    const dateRangeBudget = sheetBudget.getRange(`A2:A${lastRowBudget + 1}`).getValues();
    const descriptionRangeBudget = sheetBudget.getRange(`B2:B${lastRowBudget + 1}`).getValues();
    const accountDebitRangeBudget = sheetBudget.getRange(`C2:C${lastRowBudget + 1}`).getValues();
    const accountCreditRangeBudget = sheetBudget.getRange(`D2:D${lastRowBudget + 1}`).getValues();
    const amountRangeBudget = sheetBudget.getRange(`E2:E${lastRowBudget + 1}`).getValues();
    // iteration on each row of the columns.
    for (let i = 0; i < dateRangeBudget.length; i++) {
        let dateValueBudget = dateRangeBudget[i][0]; // Value of column A (Date)
        let descriptionValueBudget = descriptionRangeBudget[i][0]; // Value of column B (Description)
        let accountDebitValueBudget = accountDebitRangeBudget[i][0]; // Value of column C (AccountDebit)
        let accountCreditValueBudget = accountCreditRangeBudget[i][0]; // Value of column D (AccountCredit)
        let amountValueBuget = amountRangeBudget[i][0]; // Value of column E (Amount)
        jsonData.data[0].document.dataUnits[2].data.rowLists[0].rows.push({
            "fields": {
                "Date": formatDateToYyyyMmDd(dateValueBudget),
                "Description": descriptionValueBudget.toString(),
                "AccountDebit": accountDebitValueBudget.toString(),
                "AccountCredit": accountCreditValueBudget.toString(),
                "Amount": amountValueBuget.toString()
            },
            "operation": {
                "name": "add"
            }
        });
    }
    // ACCOUNTS
    // Get the specific sheet
    const sheetAccount = workbook.getWorksheet("Accounts");
    // Get the range of cells used in the sheet
    const usedRangeAccounts = sheetAccount.getUsedRange();
    // Get the last used row of the sheet
    const lastRowAccounts = usedRangeAccounts.getLastRow().getRowIndex();
    // Get data range of ACCOUNTS
    const sectionRange = sheetAccount.getRange(`A2:A${lastRowAccounts + 1}`).getValues();
    const groupRange = sheetAccount.getRange(`B2:B${lastRowAccounts + 1}`).getValues();
    const accountRange = sheetAccount.getRange(`C2:C${lastRowAccounts + 1}`).getValues();
    const descRange = sheetAccount.getRange(`D2:D${lastRowAccounts + 1}`).getValues();
    const bclassRange = sheetAccount.getRange(`E2:E${lastRowAccounts + 1}`).getValues();
    const sumInRange = sheetAccount.getRange(`F2:F${lastRowAccounts + 1}`).getValues();
    const grRange = sheetAccount.getRange(`G2:G${lastRowAccounts + 1}`).getValues();
    // Iteration on each row of the columns.
    for (let i = 0; i < accountRange.length; i++) {
        let sectionValue = sectionRange[i][0]; // Value of column A (section)
        let groupValue = groupRange[i][0]; // Value of column B (Group)
        let accountValue = accountRange[i][0]; // Value of column C (Account)
        let descValue = descRange[i][0]; // Value of column D (Description)
        let bclassValue = bclassRange[i][0]; // Value of column E (BClass)
        let sumInValue = sumInRange[i][0]; // Value of column F (Sum In)
        let gr1Value = grRange[i][0]; // Value of column G (Gr1)
        // adds "fields" object to "rows"
        jsonData.data[0].document.dataUnits[3].data.rowLists[0].rows.push({
            "fields": {
                "Section": sectionValue.toString(),
                "Group": groupValue.toString(),
                "Account": accountValue.toString(),
                "Description": descValue.toString(),
                "BClass": bclassValue.toString(),
                "Gr": sumInValue.toString(),
                "Gr1": gr1Value.toString()
            },
            "operation": {
                "name": "add"
            }
        });
    }

    let jsonString = JSON.stringify(jsonData);
    createAc2(JSON.parse(jsonString));

}
async function createAc2(jsonData: JSON) {
    // Web server url
    let _LOCALHOST = "http://localhost:8081"; //for macOS use "https://127.0.0.1:8089";
    // Replace with your Webserver password
    let _PASSWORD = "My_Password";
    // Request to Banana web server
    let url = _LOCALHOST + "/v2/doc?show&acstkn=" + _PASSWORD;
    // Accounting type parameters
    let fileTypeGroup = 100; // Double entry accounting
    let fileTypeNumber = 100; // without VAT
    let fileDecimals = 2;
    try {
        // Body of the request
        const httpBody = {
            fileType: {
                accountingType: {
                    docGroup: fileTypeGroup,
                    docApp: fileTypeNumber,
                    decimals: fileDecimals
                }
            },
            data: jsonData,
        }
        const response = await fetch(url, {
            method: 'POST',
            headers: {
                'Content-Type': 'application/json'
            },
            body: JSON.stringify(httpBody)
        });
    } catch (error) {
        console.log(error);
    }
}
// Convert Date type of Excel in yyyy-mm-dd string format
function formatDateToYyyyMmDd(date: number | string | number | boolean): string {
    if(typeof date == 'number'){
        let dateString = new Date(Math.round((date - 25569) * 86400 * 1000)).toISOString().split("T")[0];
        return dateString;
    }

}
Results in Banana Accounting Plus
If you don't see the Budget data, use the command with the Shift + F9 keys (Windows and Mac) or Cmd + 9 (Mac) for recalcute the data in Banana Accounting.
Output of accounts base
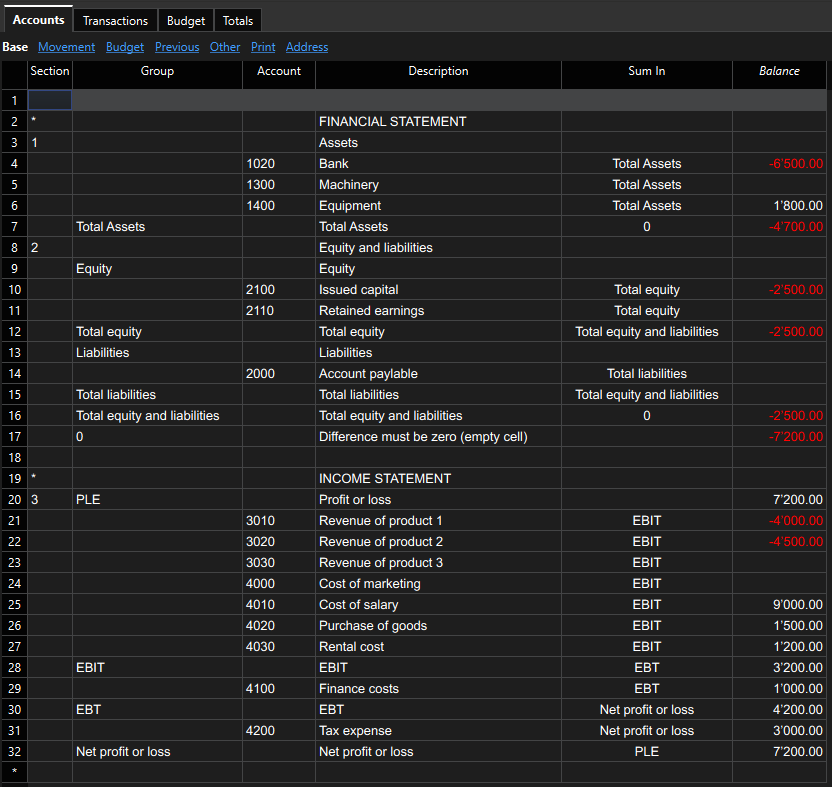
Output of accounts of budgeting
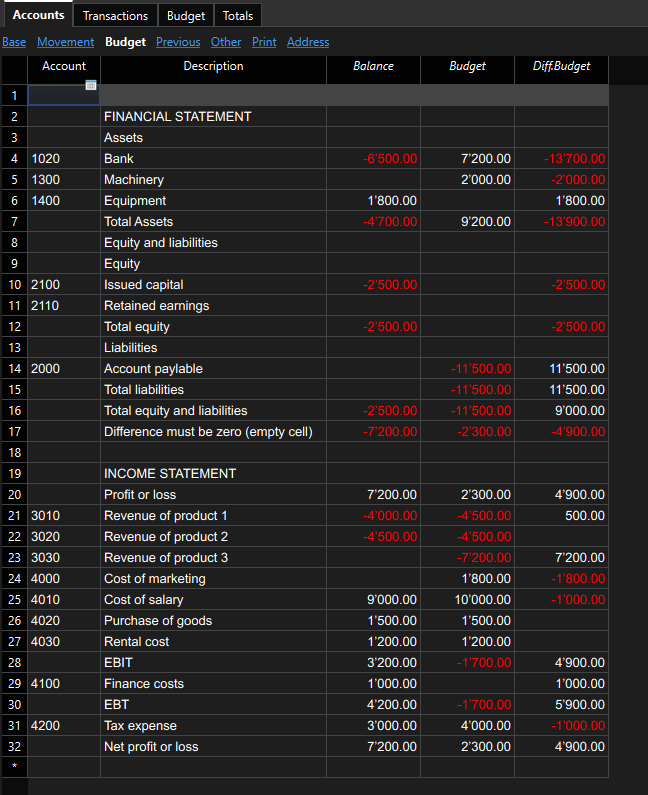
Output of transactions of budgeting
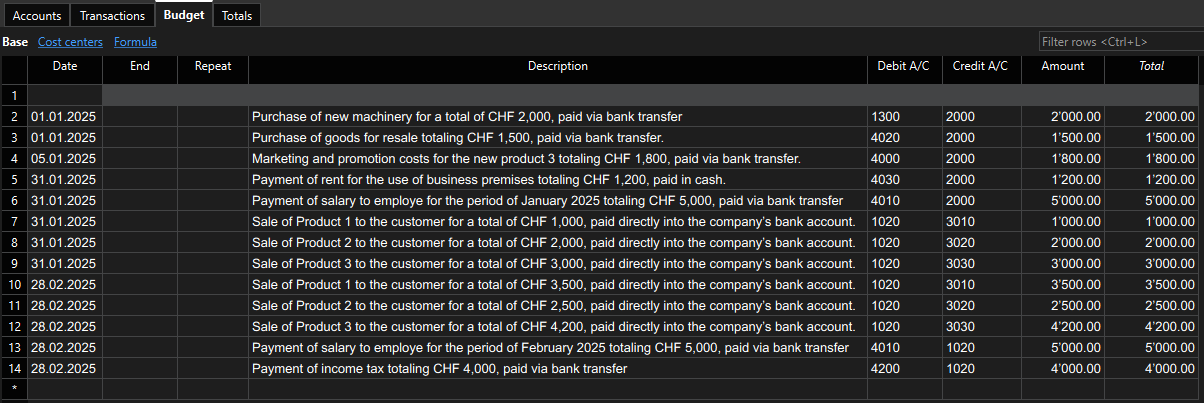
Output of transactions
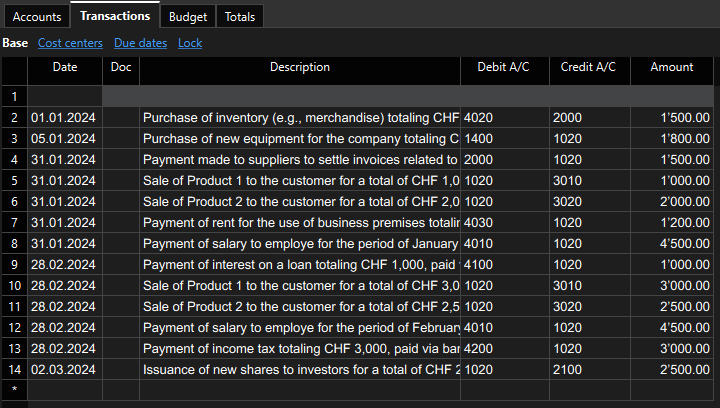
Create a report Financial statement and Income statement
- When you pass all the data in Banana Accounting Plus, you can print the report in base of your configuration in the table Accounts.
- You can use a Enhanced Balance Sheet with groups report for printing, which integrates transaction and budget data as described in this image.
Procedure to create a report with Enhanced Balance Sheet with Groups
- Open the file that you have created.
- menu Reports → Enhanced balance sheet with groups → select Columns → in the section Balance sheet and Profit and loss statement → select Current and Budget → click Ok.
- You can see a tutorial of how to create and customize the Balance Sheet and Profit & Loss Statement.
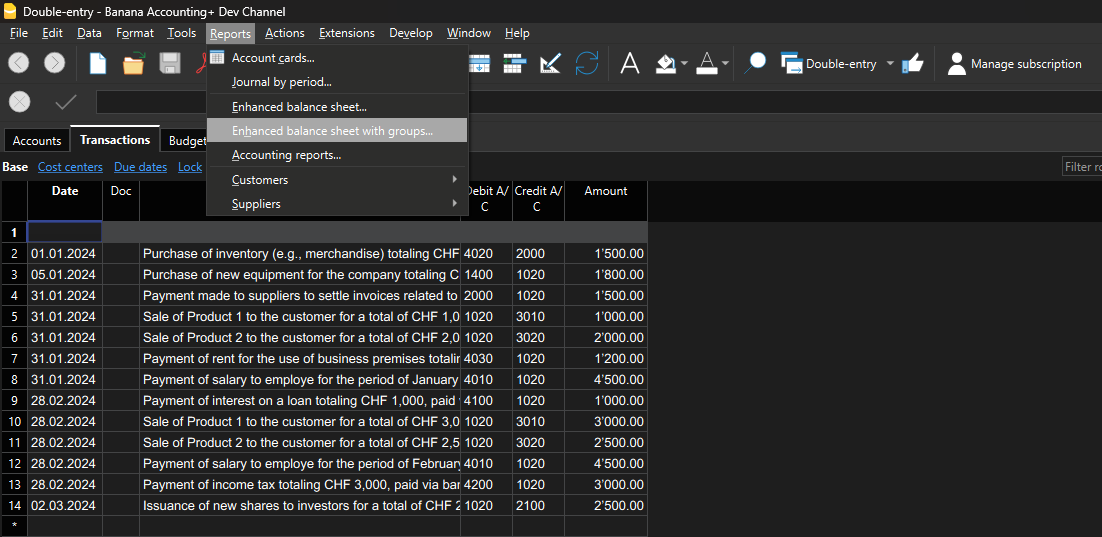
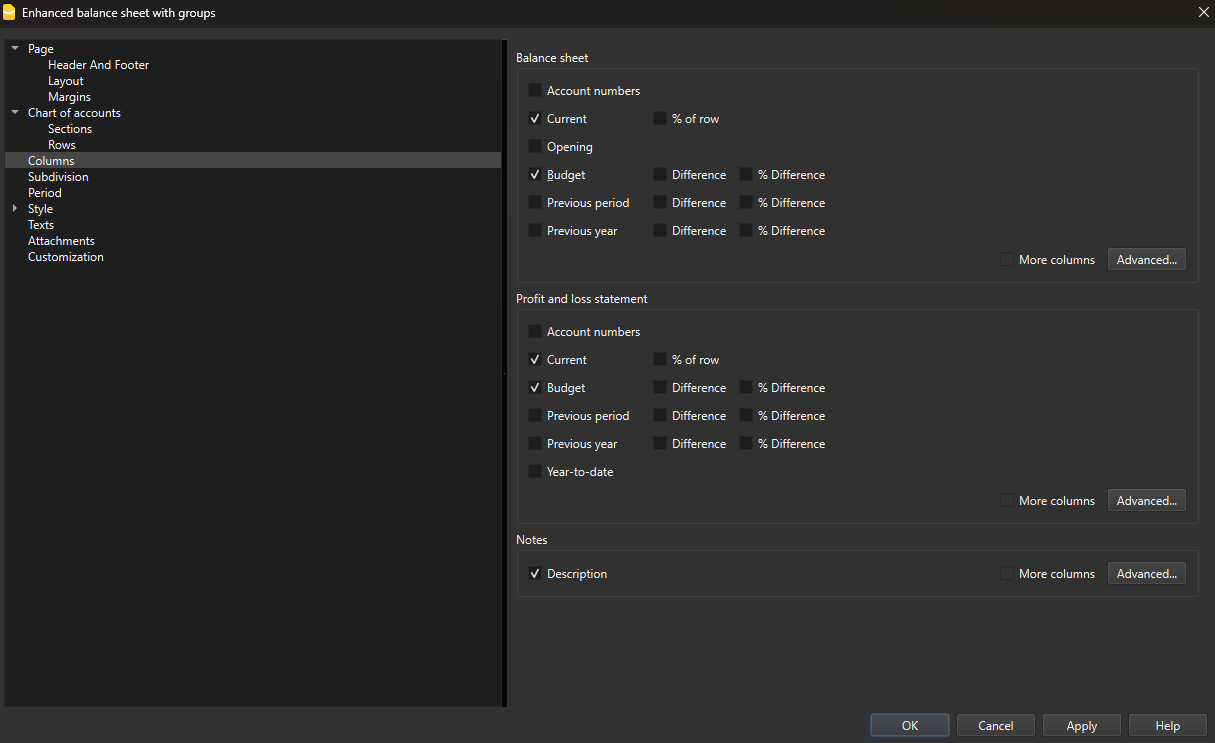
Report of Financial statement
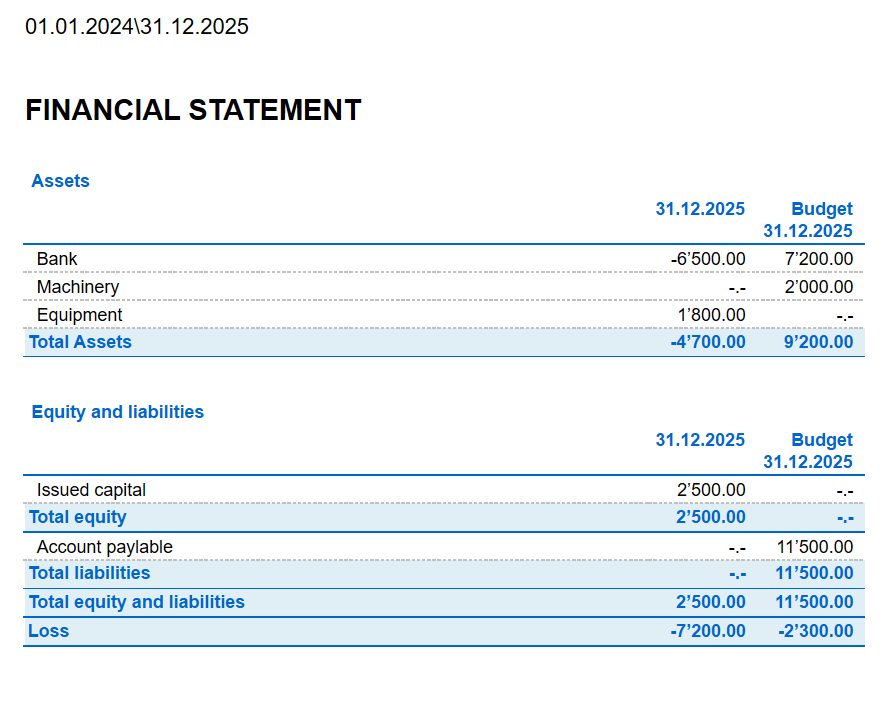
Report of Income statement
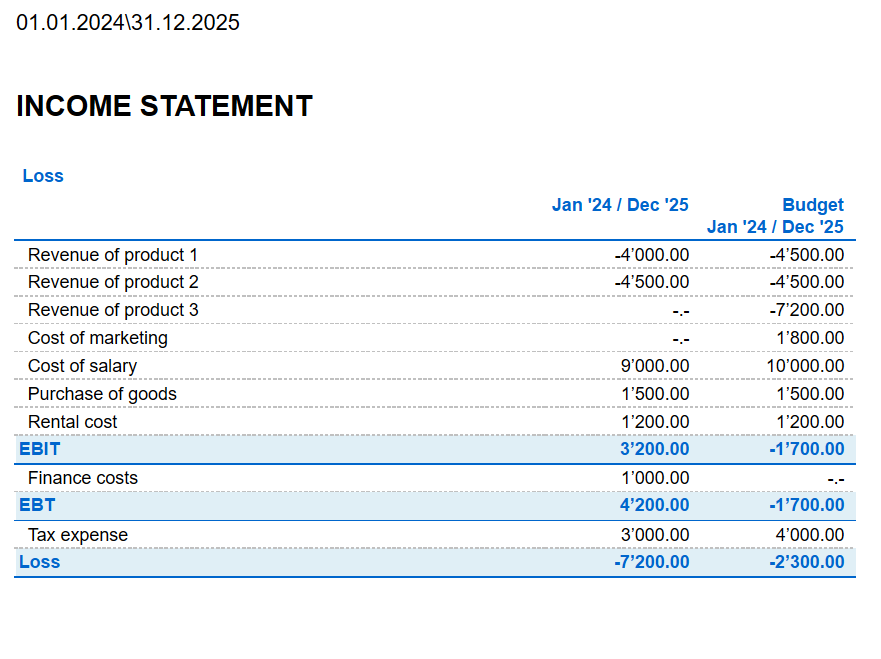
Excel VBA Functions (outdated)
With Excel VBA Functions your accounting data is available in Excel. No more need to copy and paste or to export and import.
You add new transactions and your Excel Sheets are instantly updated and calculated. For Apple/Mac this feature is not available.
Excel VBA Functions uses VBA Macros. This technology has been replaced by the more recent Excel Add-in.
We invite you to use the Excel Report Add-in (Beta).
Example costs divided among co-owners or customers
The Excel VBA Functions functions are used to retrieve from Banana in Excel the current accounts balances.
The costs are then divided among customers using normal Excel Formulas.
You could use the example to create a division of the apartment costs.
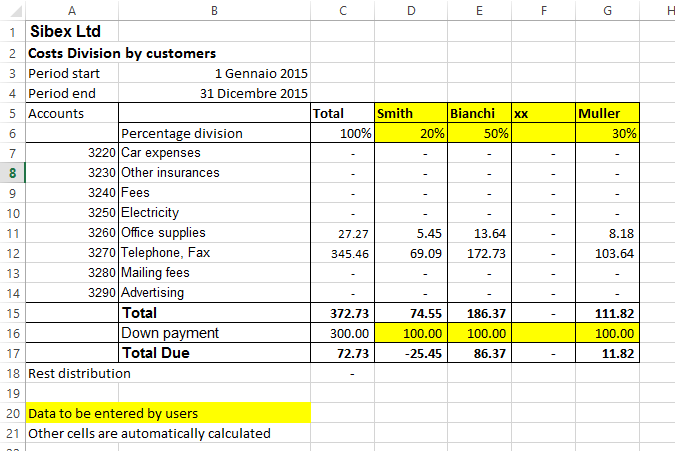
Example with the current and last year difference
In this example we take the data from the two years and create a graphic.
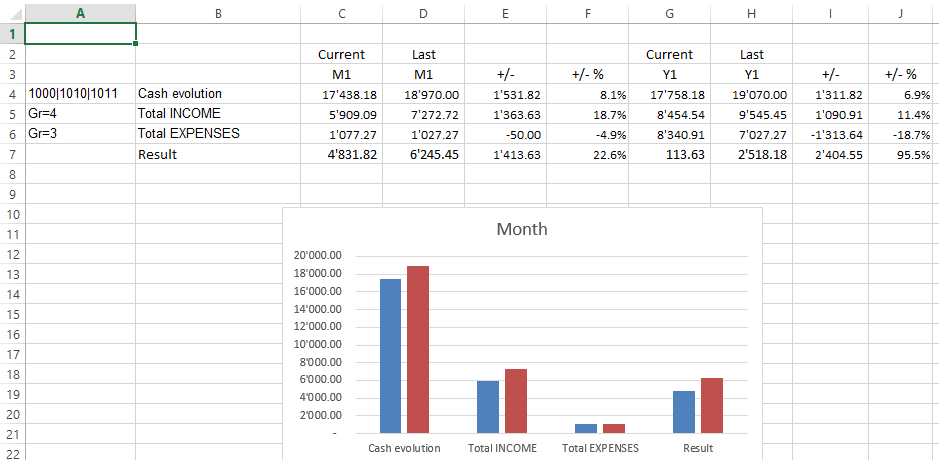
Example with segments subdivision
The amount of the segments are diveded also by segments.
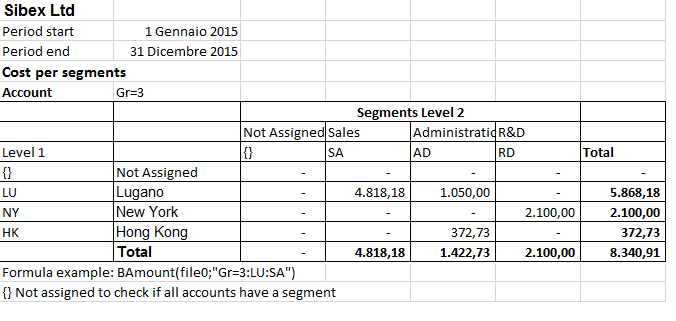
Introduction to Banana Excel VBA Functions User defined functions
Introduction
Excel VBA Functions are Excel User defined functions that allow to synchronize in real time your Excel spreadsheet with the data from Banana Accounting.
You update you accounting file, adding new transactions, and instantly you get your Excel Sheets updated.
Excel has the ability to integrate documents and data that are made available throught the internet protocol. Banana includes a web server, and a RESTful API, that can be accessed through http protocol. Excel VBA Functions uses the Banana integrated web server to retrive data on real time.
Using Excel formula
Banana Excel VBA Functions are functions, with the name that start witht the "B", that you can use within the cell to retrive accounting data.
Here some example:
// return the opening balance of the account 1000 for all the period
=BOpening("1000")
// return the description of the account 1000
=BAccountDescription("1000")
// return the end balance of the group 10
=BBalance("Gr=10")
// return the opening of the account 5000 for the period 3. month
=BOpening("2000", "2017-03-01/2017-03-31")
// return the total debit minus credit of the account 5000 for 3. month of the year
=BTotal("5000", "M3")
// return the total debit minus credit of the group 50 for 3. quarter of the year
=BTotal("Gr=50", "Q3")
The advantage of the Excel Sync functions :
- You can dynamically retrieve the take data from Banana Accounting.
- No more need to retype data in Excel (or import, copy and paste)
- When the accounting file is changed, the spreadsheet is populated with the new values
- Easy to use formulas that let you calculate values for periods and create powerful spreadsheets for evaluating, presenting accounting data or creating graphics.
Tecnical details
Banana Excel VBA Functions are Excel User defined functions (UDF), small Visual Basic Programs that extend Excel allowing to insert formula within the cell.
- Banana Excel VBA Functions requires a recent version of Excel, and due to the Excel Mac limitations works only on Windows versions.
- In order to use the Excel VBA Functions UDF you need an Excel file with the extension *.xlsm.
- The Banana Excel VBA Functions UDF are provided according the Apache License (open source software. See: /www.apache.org/licenses/LICENSE-2.0
- Development and latest version of the function are available on github.com/BananaAccounting/General/
- Banana Excel VBA Functions UDF make use of the Banana web server.
- You can extend the Excel VBA Functions by adding other functionalities.
For more information on the formula used see the Banana API regarding the Accounting functions
Using the examples
- Download the Excel spreadsheet with examples files.
- Unzip the content
- Start Banana Accounting
- Activate the Webserver (Tools -> Program options -> Interface -> Start web server)
- Open the Banana accounting files "company_2019.ac2" and "company_2020.ac2"
- Open the "BananaSync.xlsm" file and activate the Macro
If the macro are automatically disabled by Excel you should change your macro security setting
Eventually follow this instructions to show the developer tab in the ribbon - Recalculate the Spreadsheet with the Macro “RecalculateAll” (Ctrl+R)
Excel does not react
If you open a file and Banana or the Banana Web Server are not running, Excel will wait until it can contact the Banana Web server.
Start the Banana and the Banana Web Server.
How to create your spreadsheet
- Save as the "BananaSync.xlsm" file with another name
- Open your accounting files in Banana Accounting
- In your Excel spreadsheet, replace the file name (yellow highlighted cells) with your accounting file name
- Change the spreadsheet according to your needs
- Recalculate with the "Recalculate" button or the "Ctrl+R" shortcut
Functions use
Argument file name
Most Excel VBA Functions functions require, as first parameters, a name of a Banana Accounting file.
- The file must be openened in Banana.
- You use only the file name without the directory.
DO NOT use the file name directly in the fuctions. Instead use a reference to a cell, that contains the file name.
- You can use the same spreadsheed also for differrent years. You only need to change the file name in on cell.
- If Banana Accounting is not open of the Banana webserver is not active you don't have to wait.
The best way is the one used in the example file.
- The file name of the current year is taken from the cell named "File0" .
- The cell File0 contains a function =BFileName(DisableConnection).
This function checks if the file is open in Banana.- If the file is not open the content of the cell is set to an empty string.
The other Banana Sync functions will not make any call to Banana, to retrive data. - If the file is open it will insert the name of the file.
- If the file is not open the content of the cell is set to an empty string.
- The cell B6 contain the name of the file to be used. Insert the file name in cell B6.
=BFileNameF(File0, DisableConnection). - The file name of the current year is taken from the cell named "File0" .
- The file name of the last year is taken from the cell named "File1" .
Argument period
Many functions use the optional argument period. This can be:
- An empty string. The start and end date of the accounting are used.
- A start date and end date in the form of yyyy-mm-dd/yyyy-mm-dd
example “2015-01-01/2015-01-31”
In order to create a period from two Excel dates use the function BCreatePeriod. - An abbreviation
With the abbreviation you can easily use the same spreadsheet for accounting file of different periods.
The start and the end date will be determined based on the date of the accounting file- M + the month number M1, M2, ..
- Q + the quarter number Q1, Q2,
- Y + the year number Y1, Y2, ....
BananaSync Functions description
Most function are available
- Without the parameter FileName.
In this case the File0 (Current Year) is used - With the paramenter FileName.
- The function is the same but end with "F"
BAccountDescription(account[, column]) and BAccountDescriptionF(fileName, account[, column])
Retrieve the account description of the specified account or group.
With the column parameter you can indicate to retrieve another column instead of the Description column.
Examples:
=BAccountDescription("1000")           // Description of account 1000 current year
=BAccountDescription("Gr=10")          // Description of Group 10 current year
=BAccountDescription("1000", "Gr1")    // Contet of column "Gr1" relative to the account 1000 current year
// Last year
=BAccountDescriptionF(File1, "1000") // Desctiption of account 1000
=BAccountDescriptionF(File1, "Gr=10")       // Description of Group 10
BAmount(account, [,period ]) and BAmountF(fileName, account, [,period ])
Retrieve the normalized amount based on the BClass.
Only work for double entry accounting only. For Income and expenses accounting use BBalance or BTotal.
- for accounts of BClass 1 or 2 it return the balance (value at a specific instant).
- for accounts of BClass 3 or 4 it return the total (value for the duration).
- For accounts of BClass 2 and 4 the amount is inverted.
You can use this functions also with groups provided you assign a BClass also to a group.
BBalance( account [, period]) and BBalanceF(fileName account [, period])
Retrieve the Balance at the end of the period of the indicate account, cost center, groups, segments
The BBalance result is the sum of the BOpening + BTotal
It is used for retrieving accounting data for the Balance Sheet accounts (Assets, Liabilities)
- Single account number ("1000")
- Several accounts summed toghether.
Enter the accounts numbers separated by the character “|” ("1000|1001). - You can specify normal accounts, cost centers or segments.
- You can also use wild cards and also use “Gr=” followed by the accounting group.
- For more information see the Javascript function description for currentBalance
- Example
BBalance( "1000")              // Balance of account 1000
BBalance( "1000|1010")         // Balance of account 1000 and 1010 are summed together
BBalance( "10*|20*")           // All account that start with 10 or with 20 are summed toghether
BBalance( "Gr=10")             // Group 10
BBalance( "Gr=10| Gr=20")      // Group 10 or  29
BBalance( ".P1")               // Cost center .P1
BBalance( ";C01|;C02")         // Cost center ;C01 and C2
BBalance( ":S1|S2")            // Segment :S1  and :S2
BBalance( "1000:S1:T1")        // Account 1000 with segment :S1 or ::T1
BBalance( "1000:{}")           // Account 1000 with segment not assigned
BBalance( "1000:S1|S2:T1|T2")  // Account 1000 with segment :S1 or ::S2 and ::T1 and ::T
BBalance( "1000&&JCC1=P1")     // Account 1000 and cost center .P1
// Last year
BBalanceF(File1, "1000")        // Balance of account 1000 (last year)
BBalanceF(File1, "1000|1010")   // Balance of account 1000 and 1010 are summed together (last year)
BBalanceGet( account, cmd, valueName [,period ]) and BBalanceGetF(fileName, account, cmd, valueName [,period ])
This function allows to easily access all other data made available by the REST API as “balance”, “budget”
Examples:
=BAmount( “1000”, “balance”, “currencyamount”)
=BAmount( “1000”, “balance”, “count”)
=BAmount( “1000”, “balance”, “debit”)
// Last year
=BAmount( File0, “1000”, “budget”, “debit”)
BBudgetAmount(account [, period]) and BBudgetAmountF(fileName account [, period])
Same as BAmount but use the budget data instead of the accounting data.
BBudgetBalance(account [, period]) and BBudgetBalanceF(fileName account [, period])
Same as BBalance but use the budget data instead of the accounting data.
BBudgetInterest( account, interestRate [, period]) and BBudgetInterestF(filename, account, interestRate [, period])
Same as BInterest but use the budget data instead of the accounting data.
BBudgetOpening(account [, period]) and BBudgetOpeningF(fileName account [, period])
Same as the BOpening but use the budget data instead of the accounting data.
BBudgetTotal(account [, period]) and BBudgetTotalF(fileName account [, period])
Same as the BTotal but use the budget data instead of the accounting data.
BCellAmount( table, rowColumn, column) and BCellAmountF(fileName, table, rowColumn, column)
Retrieve the content of a table cell as an amount.
Examples:
=BCellAmount(“Accounts”, 2, “Opening”)
=BCellAmount(“Accounts”, “Account=1000”, “Balance”)
=BCellAmount(“Accounts”, “Group=10”, “Balance”)
// Last year
=BCellAmountF(File1, “Accounts”, 2, “Opening”)
BCellValue( table, rowColumn, column) and BCellValueF(fileName, table, rowColumn, column)
Retrieve the content of a table cell as a text.
Examples:
=BCellValue(“Accounts”, 2, “Description”)
=BCellValue(“Accounts”, “Account=1000”, “Description”)
=BCellValue(“Accounts”, “Group=10”, “Description”)
// Last year
=BCellValueF(File1, “Accounts”, 2, “Description”)
BCreatePeriod( startDate, endDate)
Take two cell dates and create a string period
=BCreatePeriod(D4, D5)
BDate(isoDate)
Convert an Iso Date to an Excel date.
BFileName(fileName [, disable connection])
Return the FileName or an empty string if there is no connection with the web server or if the file is not correct.
If the value of disableConnection is not void the function returns an empty string.
Use the cells that contain the result of this function as the file name parameter when using the other functions. If Banana is not open only one query is made and Excel will not wait for a long time.
BFunctionsVersion()
Return the version of the function in the date format.
BInfo( sectionXml, idXml) and BInfoF(fileName, sectionXml, idXml)
Retrieve information regarding the file properties.
Examples:
=BInfo(“Base”, “HeaderLeft”)
=BInfo(“Base”, “DateLastSaved”)
=BInfo(“AccountingDataBase”, “OpeningDate”)
=BInfo(“AccountingDataBase”, “BasicCurrency”)
// Last year
=BInfoF( File1, “Base”, “HeaderLeft”)
BInterest( account, interestRate [, period]) and BInterestF(filename, account, interestRate [, period])
Calculate the interest for this account for the specified period
account can be any account as specified in BBalance
interestRate in percentage
- > 0 calculate the interest on the debit amounts
- < 0 calculate the interest on the credit amount
BOpening( account [period]) and BOpeningF(filename, account [period])
Retrieve the Balance for balance of period start for the indicated account.
BQuery(fileName, query)
Return the result of a free defined query.
Examples:
=BQuery(File0;"startperiod?M1”)
=BQuery(File0;"startperiod?M1”)
BTotal( account [,period]) and BTotalF(filename, account [,period])
Retrieve the movement for the period.
Should be used to retrieve the data for the Profit and Loss accounts (Cost and Revenues).
BVatBalance( vatCode, vatValue [, period]) and BVatBalanceF(filename, vatCode, vatValue [, period])
Return a value regarding the specified VatCode (or multiple VatCodes).
“vatValue” can be “taxable”, “amount”, “notdeductible”, “posted”
Examples:
=BVatBalance(“V10”, “taxable”)
=BVatBalance(“V10|V20”, “posted”)
//Last year
=BVatBalanceF( File0, “V10”, “taxable”)
Additional function explanation
The retrieve the exact content of the cells
If you wanto to retrive the content of a cell you can use:
- BCellValue
The content of a cell, useful for text. - BCellAmount
The content of a cell is converted to a number so that you can use it for calculation.
With this you will retrive the exact content of a column "Balance" for the row where Account is 1000.
If the Balance is credit the amount is negative.
=BCellAmount(File0, “Accounts”, “Account=1000”, “Balance”)
Accounting Period calculation
You have different formula that allow to retrieve the amount.
- BBalance.
This is equivalent to the above. It retrieve the Balance of the whole accounting period.
But BBalance allow you to use also a period.
As a period you can use the date being, date end of an abbreviation. M3 means the first month of the accounting period.
If you use abbreviation instead of date your sheet will automatically adapt to file of different year.
BBalance( "1000")  //Balance end of year
BBalance( "1000", "2017-03-01", "2017-03-31")  //Balance end of March
BBalance( "1000", M3);   // Balance and of March if accounting period start on 1. of January
- BTotal
It retrieve the total movement (Debit - Credit) for the period.
Use BTotal to the amount for income and expenss account.
Cedit amounts are retrieved as negative numbers.
BTotal( "1000")  //Total movement end of year
BBalance( "1000", "2017-03-01", "2017-03-31")  //Total end of March
BBalance( "1000", M3);   // Total and of March if accounting period start on 1. of January
- BAmount
BAmount put the sign in positive based on the BClass of the account.
The amount retrieved depend on the BClass of the account or the group.
For Balance accounts (bclass 1 and 1) retrieve the Balance.
For Income and expenses accounts (bclass 3 and 4) retrieve the Total.
It also invert the sign in case of BClass 2 and 4.
So if you use BAmount for the Account revenues (BClass 4) you will have the total sales for the period in positive.
Your are free to use the most appropriate function.
-
BAccountDescription.
It is the same as GetCellValue but it deal automatically with accounts or groups.
Is usefull to retrieve the description of an account or group, in combination with BBalance, BTotal or BAmount.
=BAccountDescription( "1000") //Retrieve the column Description of the account 1000
=BAccountDescription( "1000", "Notes") //Retrieve the column Notes of the account 1000
=BAccountDescription( "Gr=10") //Retrieve the column Descrition of the group 10
Recalculate
The automatic recalculation does not update the data from the accounting file.
In order to have the data updated it is necessary to call the macro RecalculateAll() that call the method Application.CalculateFullRebuild
The example files contain a button “Recalculate” that call the macro RecalculateAll.
Banana host name and port
Web server data is retrieved from “localhost:8081”
You can specify a different host by entering a value in a cell named “BananaHostName”
Modify the functions or add your owns
Functions are defined in the Visual Basic module “Banana”.
If you add your function it would be better to add to your module.
To access the Visual Basic Macro Functionalities you should activate the macro.
In order to see and edit the functions your nedd to show the Developer tab in the Excel ribbon.
Use a new version of the Banana functions
In order to see and edit the functions your nedd to show the Developer tab in the Excel ribbon.
- Download on your computer the latest version
- Open your file in Excel
- Open the file "BananaSync.xlsm" in Excel
- Go to the Developer Tab
- Click on "Visual Basic"
- Copy the content of the "BananaSync.xmls - Banana (Code)"
- Paste the content in the Modules->Banana of your file.
Compatibility
Banana Excel VBA Functions functions have been tested with Excel 2013 and 2016 for Windows.
Excel for Mac is not ready yet.
In Excel for Mac is not possible to call the http.
Any contribute to solve this problem is welcome.
Release History
- 2014-07-24 First release
- 2015-02-28 Updated for new version with new functionalities
- 2015-05-12 Call to webserver now require v1
- 2015-05-12 Development moved to github
- 2015-05-25 Changed BAmoount function to use BClass
- 2015-10-04 Added BDate function
- 2015-11-12 Renamend Excel VBA Functions
- 2015-11-28
- Added example for cost division
- Started working on Mac support
- 2016-04-26 Added BCellAmount
- 2016-04-28 Fixes in some case rounding amount to zero
- 2017-02-01 New Version 2 (Functions without the file parameters)