Customise the chart of accounts
With Banana Accounting, you can freely customize the chart of accounts to analyze data by projects, departments, or specific activities: you can add or delete accounts and groups, change descriptions, and create new total and subtotal structures (grouping system), according to your operational needs. You can make these changes both at the beginning, when you choose the template to start from, and during the year.
Cost/Profit Centers and Segments are two powerful tools for classifying and organizing transactions according to different criteria, allowing you to obtain detailed reports and targeted analyses without having to create additional accounts or make the accounting structure more complex.
And if your business management evolves over time, you can easily adapt the account structure to new needs while maintaining consistency and continuity in your data.
The grouping system
The grouping or totaling system defines how Banana Accounting calculates and displays totals and subtotals in the different tables, such as the Chart of Accounts or the Categories table.
Thanks to group levels, you can organize your accounting clearly and according to your needs:
- structure accounts into logical sections (e.g. Assets, Liabilities, Revenue, Expenses),
- add new totaling groups or subgroups,
- delete or modify existing groups according to your needs.
This multi-level grouping system allows you to create fully customized balance sheet structures, adapting them to the type of activity or reporting model you want to use.
▶ Video: Grouping and totaling system
Cost and Profit Centers
Cost/Profit Centers are used to classify transactions according to specific activities or projects, for example:
- a company department (e.g. Marketing, Sales, Production),
- a project or event (e.g. Training course, Trade fair),
- specify a source of revenue or expense in detail.
Each transaction can include one or more cost centers, which allow you to:
- add multiple levels of categorization to transactions, for example:
- monitor expenses and revenue for each activity,
- obtain summary reports
- analyze the efficiency and profitability of the different areas.
It is a simple and immediate way to keep internal management under control, even in complex accounting systems.
Segments
Segments further extend analytical flexibility. They allow you to adapt the accounting structure to specific needs using different allocation criteria. All data always remains linked to the general accounting, so there is no need to duplicate information: you only need to set the categorization criteria once. Segments allow you to:
- Distinguish branches, geographical areas, or jobs,
- Separate product lines or services,
- Create cross-analyses (e.g. project + location + person responsible).
Thanks to Segments, Banana Accounting allows you to obtain:
- Balance Sheet and Income Statement divided by categories, departments, or projects,
- Comparative analyses between different activities,
- Customized reports to improve management decisions.
Change Chart of Accounts
In some cases, you may decide to adopt a new chart of accounts, for example because you become subject to VAT, because you start managing accounts in different currencies, or for other reasons. Banana Accounting provides practical tools to convert and adapt existing data in a simple and secure way.
You can maintain continuity of the accounting data by updating the account numbering and automatically carrying forward balances and transactions into the new chart of accounts.
The page Change Chart of Accounts explains how to proceed step by step, both for a conversion during the year and for starting a new accounting year with an updated structure.
El sistema de agrupación en Banana Contabilidad+
El sistema de agrupación de Banana Contabilidad Plus permite totalizar los importes de cuentas y grupos de forma fácil y rápida. El programa te ofrece la máxima flexibilidad para crear todos los niveles de totalización que necesites.
La agrupación es una herramienta muy potente para calcular los totales de manera automática.
Dónde se utiliza
- En las tablas Cuentas y Categorías para definir la estructura del Balance y del Estado de Resultados.
- En la tabla Códigos de IVA para agrupar los códigos de IVA.
- En la tabla Artículos de la Aplicación Almacén.
- En la tabla Artículos de la Aplicación Registro de bienes amortizables.
▶ Vídeo: Sistema de agrupación y totalización (inglés)
Cómo funciona
La agrupación siempre se basa en dos columnas:
- La columna Grupo, donde se indican los identificadores de los grupos, que pueden ser de texto o numéricos.
- La columna Sumar En, donde para cada fila de cuenta o grupo se indica el Grupo de totalización.
Cada fila del grupo es una fila de totalización, donde:
- Los saldos de los grupos son la suma de las filas que, en la columna Sumar En, contienen el nombre del grupo.
- El programa calcula los totales de todas las columnas que contienen importes (tipo Importe), tanto las predefinidas (Apertura, Saldo, etc.) como las añadidas manualmente.
La agrupación permite crear múltiples niveles de totalización.
Las siguientes imágenes están en inglés, pero el programa también está disponible en español.
La lógica del programa
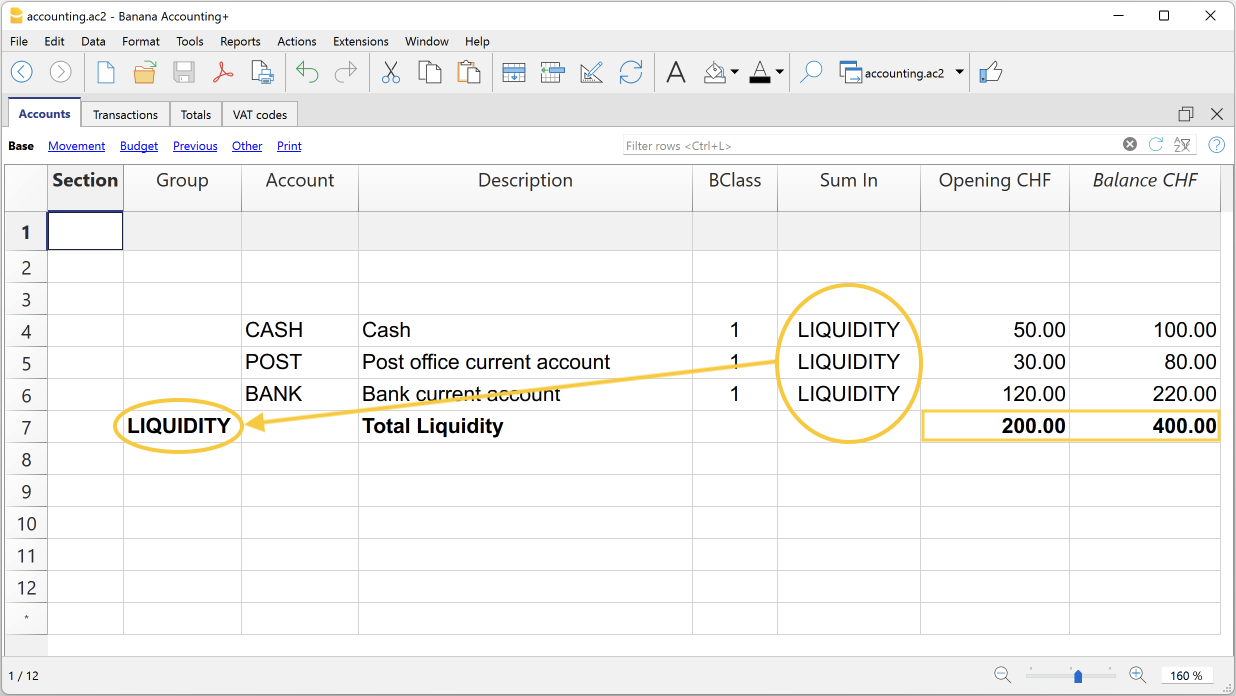
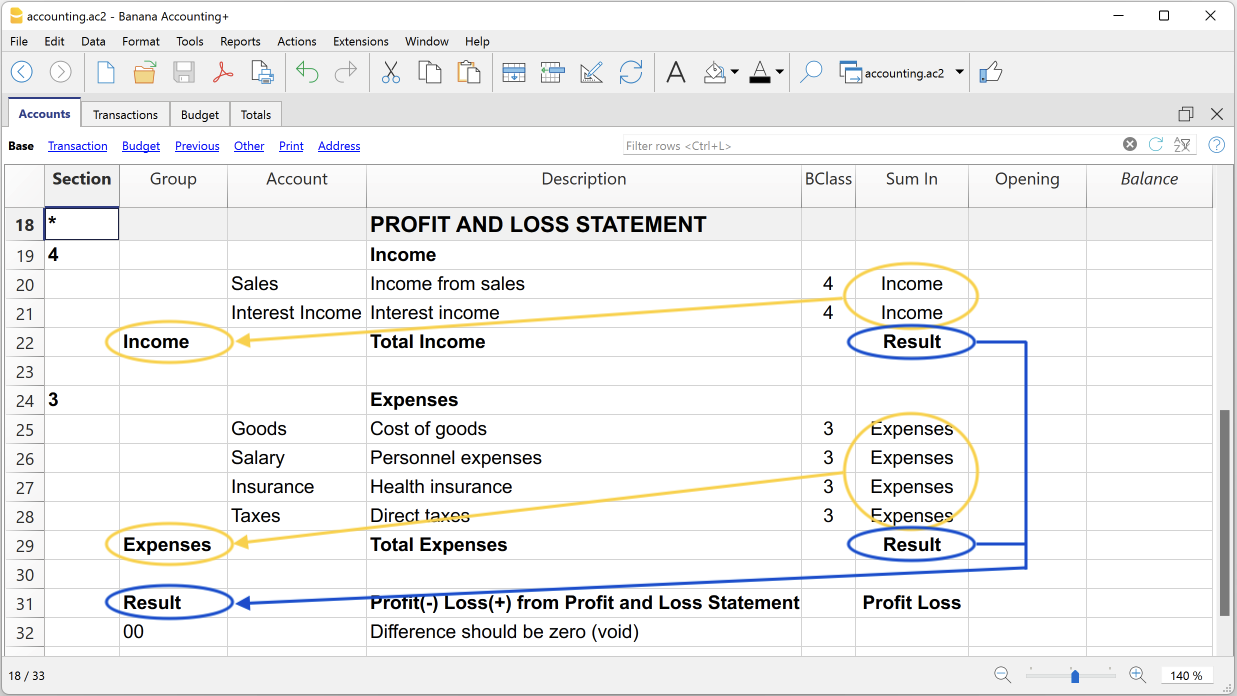
Para comprender la lógica, presentamos un ejemplo de una pequeña parte del plan de cuentas. Para las cuentas Caja, Correo y Banco creamos el grupo Liquidez:
- En la fila debajo de las cuentas de liquidez, en la columna Grupo, se introduce el nombre del grupo Liquidez.
- En la columna Descripción, se introduce la descripción del grupo.
- Para que el programa pueda actualizar los saldos del grupo Liquidez, es necesario indicar qué cuentas deben ser totalizadas.
En la columna Sumar En de las cuentas Caja, Correo y Banco, se introduce el nombre del grupo Liquidez. Los saldos del grupo se actualizan inmediatamente.
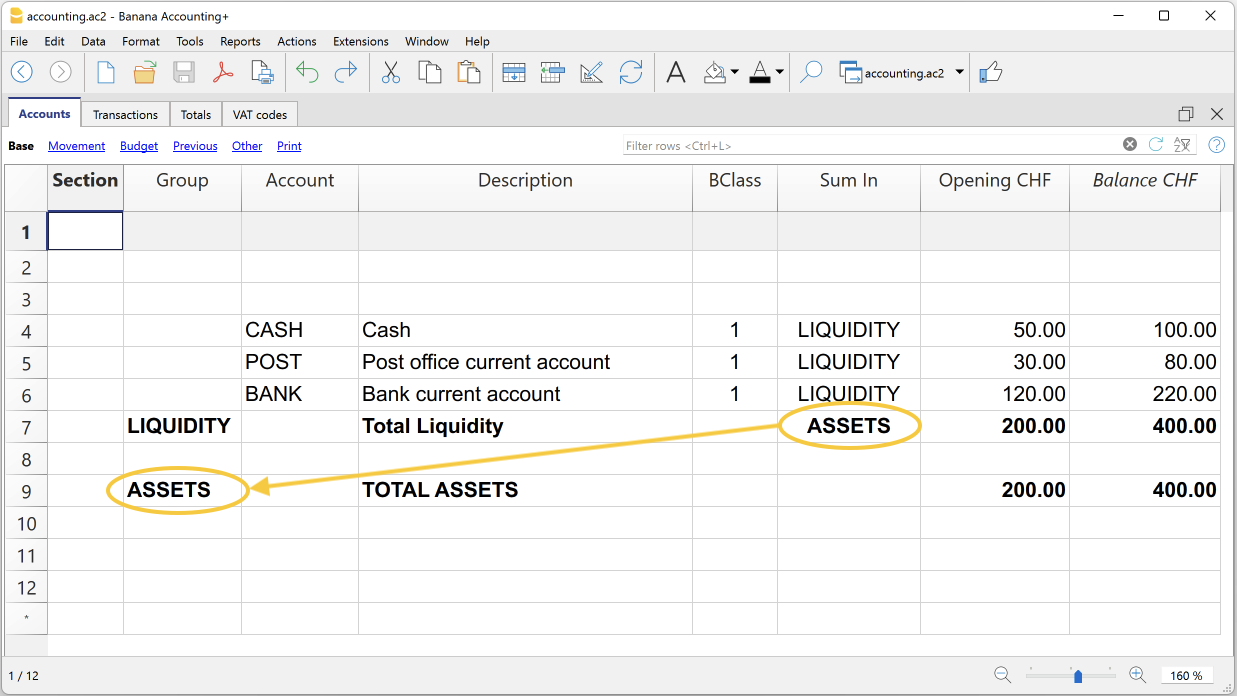
Con la misma lógica, también podemos agrupar grupos. De hecho, los grupos también pueden ser totalizados en otros grupos de nivel superior.
Supongamos que agregamos un grupo para totalizar el grupo Liquidez.
- En la fila debajo del grupo Liquidez, en la columna Grupo, se introduce el nombre del grupo Activos.
- En la columna Descripción, se introduce la descripción del grupo.
- Para que el programa pueda actualizar los saldos del grupo Activos, es necesario indicar qué grupos deben ser totalizados.
En la columna Sumar En del grupo Liquidez, se introduce el nombre del grupo Activos. Los saldos del grupo se actualizan inmediatamente.
Siguiendo esta lógica, es posible crear una estructura con grupos y subgrupos para todo el plan contable, adaptándolo a cualquier país o necesidad específica.
La misma lógica también se puede aplicar para agrupar códigos de IVA en la tabla Códigos de IVA, así como para agrupar artículos en la tabla Artículos del Almacén y del Registro de bienes amortizables.
Uso extendido del sistema de totalización
El sistema de totalización es muy flexible:
- En un grupo se pueden sumar cuentas y grupos.
- Se puede asignar un grupo de pertenencia a los títulos.
- Se puede usar cualquier tipo de numeración (numérica y/o alfabética).
- Se pueden crear hasta 100 niveles de totalización.
- La totalización del grupo es independiente del orden de las filas:
- La fila de total puede definirse antes o después de las filas de cuentas o grupos.
- La fila de total también puede definirse en una posición completamente separada de las filas de cuentas y grupos, como en el caso del subdiario de Clientes/Proveedores.
- La misma cuenta no puede ser totalizada en dos grupos simultáneamente.
- El sistema también se usa para totalizar los Centros de Costo y los Segmentos.
Control y detección de errores
Cuando se crean agrupaciones, el programa controla y señala errores, permitiendo corregirlos de inmediato.
Si en la columna Sumar En se indica un grupo inexistente, el programa muestra el error "Grupo no encontrado". En este caso, es suficiente:
- Crear el grupo en la columna Grupo.
- Revisar la contabilidad con el comando Verificar contabilidad.
- Recalcular todos los totales con el comando Recalcular totales.
Renombrar los grupos
Con el comando Renombrar se pueden cambiar automáticamente los nombres de los grupos ya existentes, sin necesidad de modificar manualmente las correspondencias en las columnas Grupo y Sumar En.
Impresiones
Al imprimir el Balance, el Estado de Resultados u otros informes que contienen agrupaciones, la impresión muestra el orden de los grupos tal como han sido configurados en las diferentes tablas.
Switch to new chart of accounts
Below is an explanation of how to proceed to:
- switch to a chart of accounts with a different numbering;
- retrieve and convert the existing accounting data, including transactions, into the new chart of accounts.
Conversion for the new year
If you want to start a new year with a new chart of accounts, there are two possible approaches.
1. Convert the previous year and then create the new year
In this case you will have two files:
- the file of the year being closed, which contains:
- the Accounts column with the old account numbers;
- the Accounts_1 column with the new account numbers;
- the file for the new year, based on the new chart of accounts.
This approach is recommended because it allows the charts of accounts of the two years to be aligned.
Furthermore, it allows you to continue making changes in the closing year and to later retrieve the opening balances in the file for the new year.
2. Create the new year and convert the new year file
The file for the year being closed remains unchanged.
For the new year, you initially get an intermediate file, with the old chart of accounts but with carried forward balances.
The conversion of the new year's file can be performed immediately or even after some transactions have already been entered.
With this method, since the previous year's file keeps the old account numbers, it will no longer be possible to retrieve later changes made in the previous year into the new year.
- Create a new accounting file
- Create a new file via the File > New menu.
- Choose a predefined chart of accounts template.
- Adapt the chart of accounts to your needs.
- Add the matching accounts in the Accounts table
- Open the Data > Columns setup menu.
- Click the Add button.
- Insert the column with the description Account_1.
For each account in the new chart, in the Account_1 column enter the corresponding number from the old chart of accounts.
- If an account remains unchanged, the Account_1 column can also be left empty.
- If multiple accounts must be grouped into a single account, indicate the numbers separated by semicolons, for example:
1000;1001
In this case, the first account must be repeated, otherwise only the last one will be considered. - If instead one account must be split into several accounts, the split must be performed manually.

Start the import
- Activate the command from the Actions > Import into accounting > Import file menu.
- With the Browse button, select the accounting file with the old chart of accounts.

- Click OK to proceed to the next window.
- Set the import options:
- enable the Convert account numbers option
- indicate that the matchings are present in the destination file.
- Start the import.

Repeat the import
If errors are reported and the operation needs to be repeated, it is essential to undo the previous import so that the destination file is empty.
Otherwise, the opening balances and transactions would be duplicated.
Splitting an account into multiple accounts
When switching to a more detailed chart of accounts, it may be necessary to split one account into several.
After the import, proceed manually as follows:
- in the chart of accounts, split the opening, budget and previous balances into several accounts;
- review each transaction of the account to be split and assign the more specific account;
- if necessary, create additional transactions to split an amount into several parts;
- proceed in the same way for the transactions in the Budget table.
Result and possible errors
If the program reports errors (missing accounts or other issues), it is often necessary to:
- undo the import;
- complete or correct the matchings;
- repeat the import operation.
Since the program works with different charts of accounts, it is not possible to automatically perform in-depth checks on the correctness of the groupings.
It is therefore recommended to manually check the result, ensuring that the totals of the balance sheet and income statement are correct.
How to reclassify the balance sheet and income statement
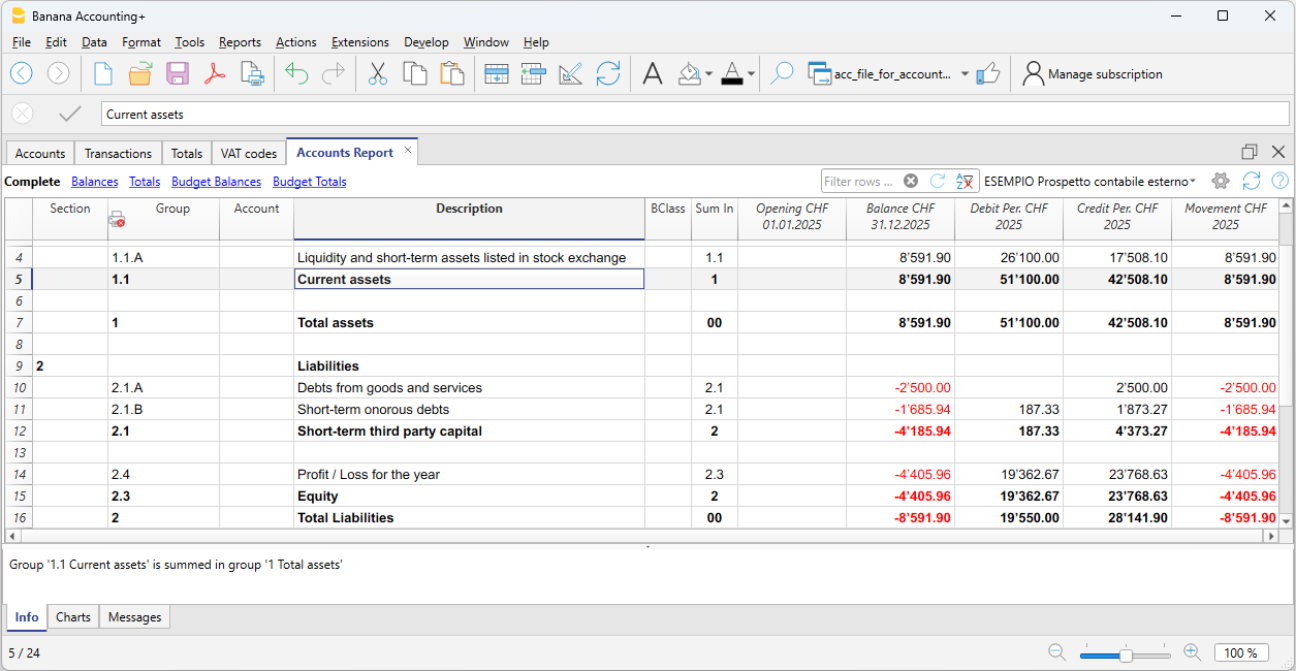
In Banana Accounting Plus, the reclassification of the balance sheet and income statement is done through the External Accounting Report, a file separate from the accounting, designed to set up a customized presentation of the data. This allows accounts to be grouped differently from the standard chart of accounts structure.
The grouping scheme defined in the External Accounting Report is linked to the accounting file to extract, total, and present the accounts according to the new desired classification. This feature is available exclusively with the Advanced plan of Banana Accounting Plus.
Create an Accounting Report File
To create an Accounting Report file:
- Menu File > New > Accounting Report
- You can choose from an existing template or start from a new one
- Once created, save the file with a name.
Below is an example of a predefined Accounting Report used to create a reclassification of the Balance Sheet according to Art. 959 of the Swiss Code of Obligations.
Everyone can choose to have their own, starting from an empty file.
- When creating your own Accounting Report, groups and totals can be freely defined.
- It is also possible to customize the Accounting Report used in this example by downloading it from our program, as indicated in the previous sections, and customize the accounts or groups for your own reclassification.

The Columns of the Accounting Report
The Accounting Report table includes the same columns found in the Accounts table, where the Accounts or Groups for Totals are set up based on a custom scheme.
In the example, groups and totals were created for the reclassification of the Balance Sheet according to Art. 959 of the Swiss Code of Obligations.

Section
This column is used to indicate the value to be used in the presentation.
For the different options, see the Documentation on sections.
Group
Indicates the group in which to totalize the accounts retrieved from the accounting and the total group.
Account (visible only in the Complete view)
The account from the accounting file to be included in the accounting report.
- If accounts are entered, only those specified accounts will be included when the Report is executed.
- If no accounts are entered, the accounts from the accounting will be included, linked via the group.
Description
Description of the grouping or account.
Sum In
In the Sum In column, the Group (total row) in which the row should be totalized is indicated.
Tot
If set to "Yes", only the total row is displayed, not the individual account rows that make it up.
See Show only group totals in the Accounting Report.
Keep
Normally, the report includes total rows that contain accounts with balances.
If set to Yes, this column ensures the row is always shown. It can be applied to both groups (totals) and accounts.
With Mov.
Applies to groups with a zero balance.
The row is displayed if there have been movements during the period.
Methods for Reclassifying the Balance Sheet and Income Statement
To reclassify the balance sheet and income statement, you must first prepare the Accounting Report file.
There are two methods to set up the Accounting Report file for the reclassification of the balance sheet and income statement:
1. Reclassify Based on the Group Column
This method allows the reclassification of the balance sheet and income statement using the Group column of the Accounting Report file.
In the Accounting Report, you create your own system of groups and subgroups
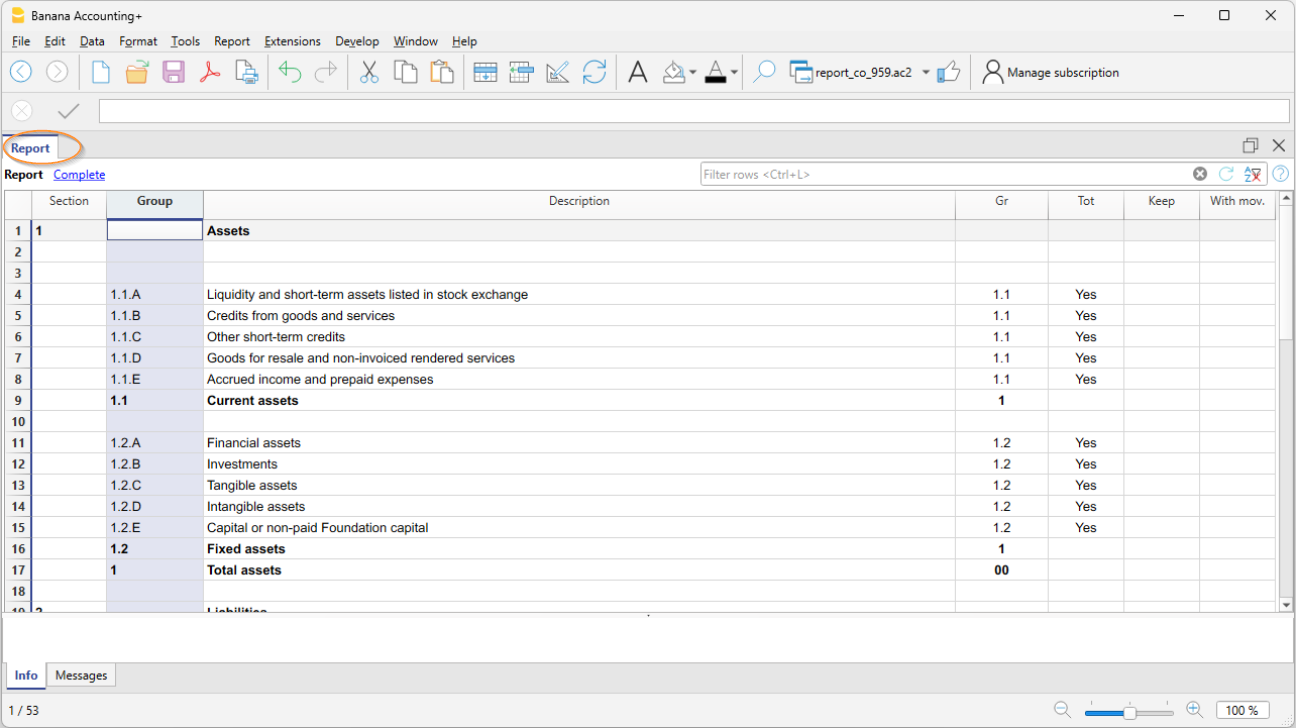
In the Section column, a number is inserted to define the title of the various sections in the printout.
- In the Group column, enter the groups that will total a series of accounts from the accounting file.
In the example, Group 1.1.A of the accounting report totals the liquidity accounts (cash, bank, post, etc.). - In the Gr column, insert the group that will totalize the individual groups listed in the previous rows.
In the example, in the Gr column, 1.1, which corresponds to Group 1.1, will totalize the Current Assets.
In the accounting file, to link with the Accounting Report, you must set the GR1 column
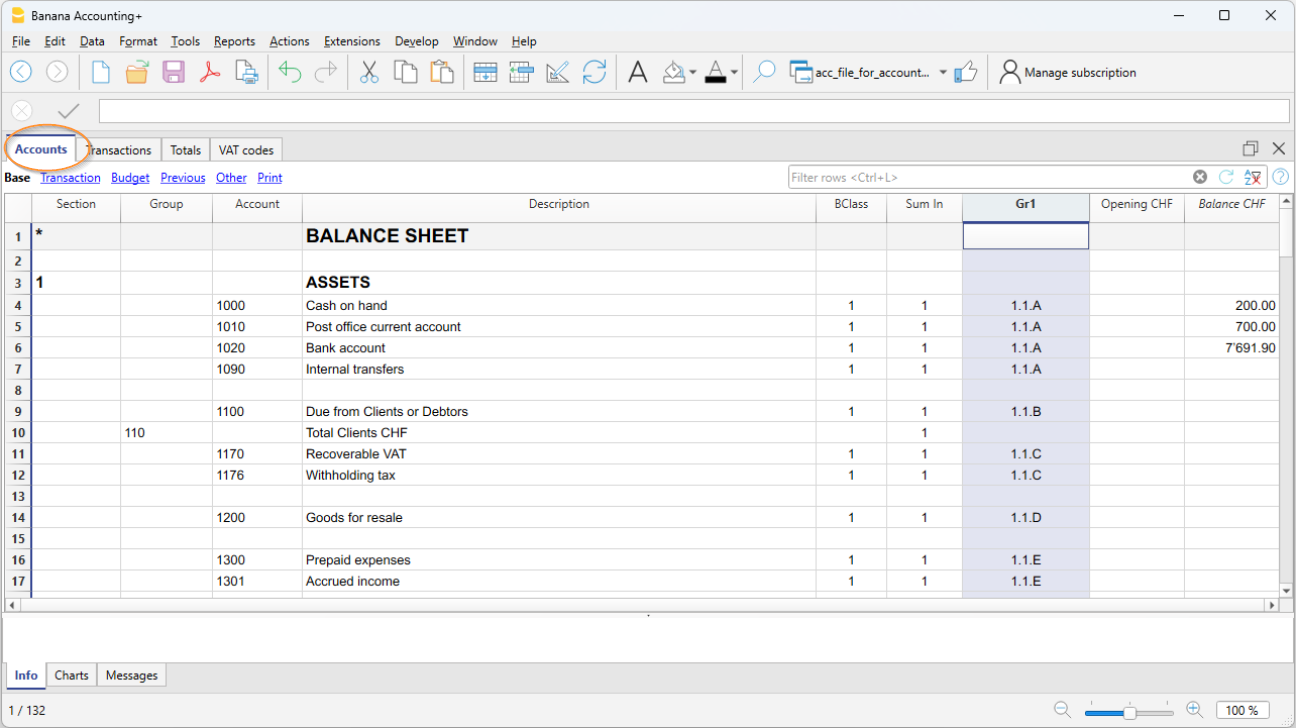
- In the Accounts table, column Gr1 or Gr2, insert the group set in the Accounting Report, in which the account should be totalized.
In the example, in the GR1 column all liquidity accounts have the group 1.1.A, which in the accounting report totalizes the Liquidity accounts.
If the Gr1 column is not visible, use the command Data > Columns setup. - Accounts without any linkage will not be included in the Report.
2. Reclassify Based on Accounts
This method is useful when you want to include only certain accounts from the accounting in the Accounting Report file
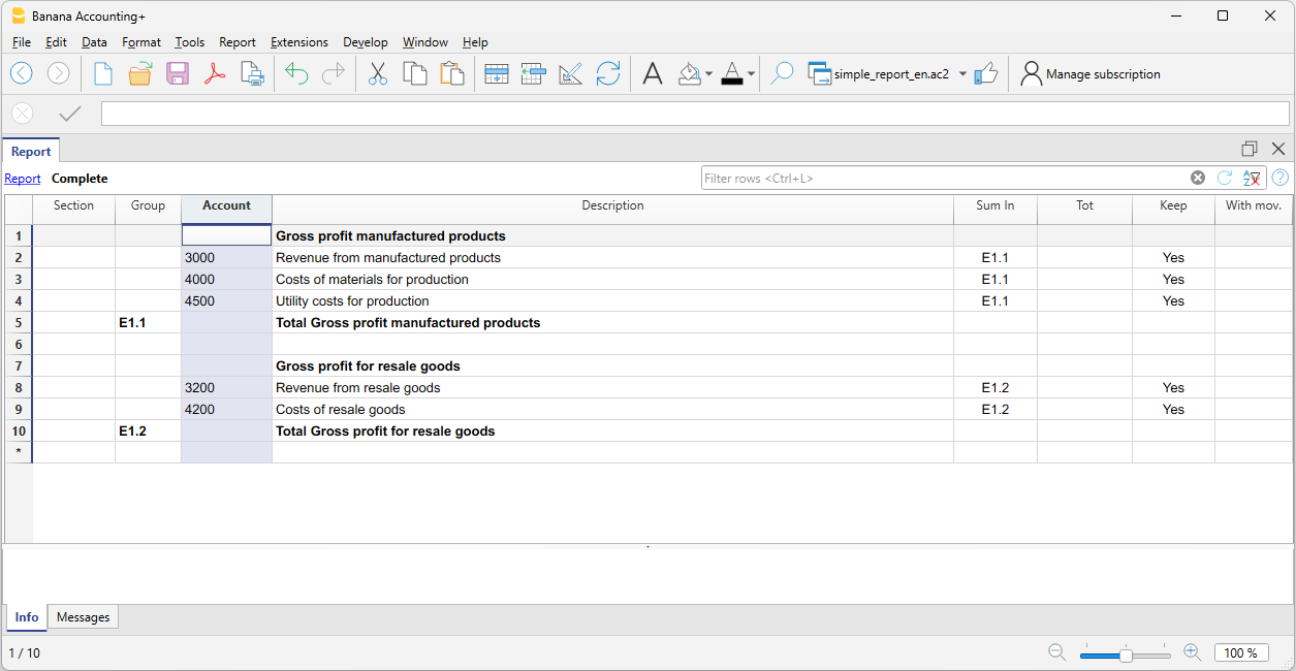
- In the Section column, a number is inserted to define the title of the various sections in the printout
- In the Group column, the groups that total each account imported from the accounting are defined
In the example, Group E1.1 of the accounting report totals accounts 3000, 4000, 4500 from the Accounting Report - In the Account column, enter the same account numbers from the accounting that you want to include in the Accounting Report
Only the specified accounts will be included in the report. - In the Description column, enter the description of the accounts
In the Sum In column, enter the totalization group (e.g. E.1, E1.2...).
Print the Accounting Report
The Accounting Report that reclassifies the balance sheet and income statement is displayed and printed from the accounting file :
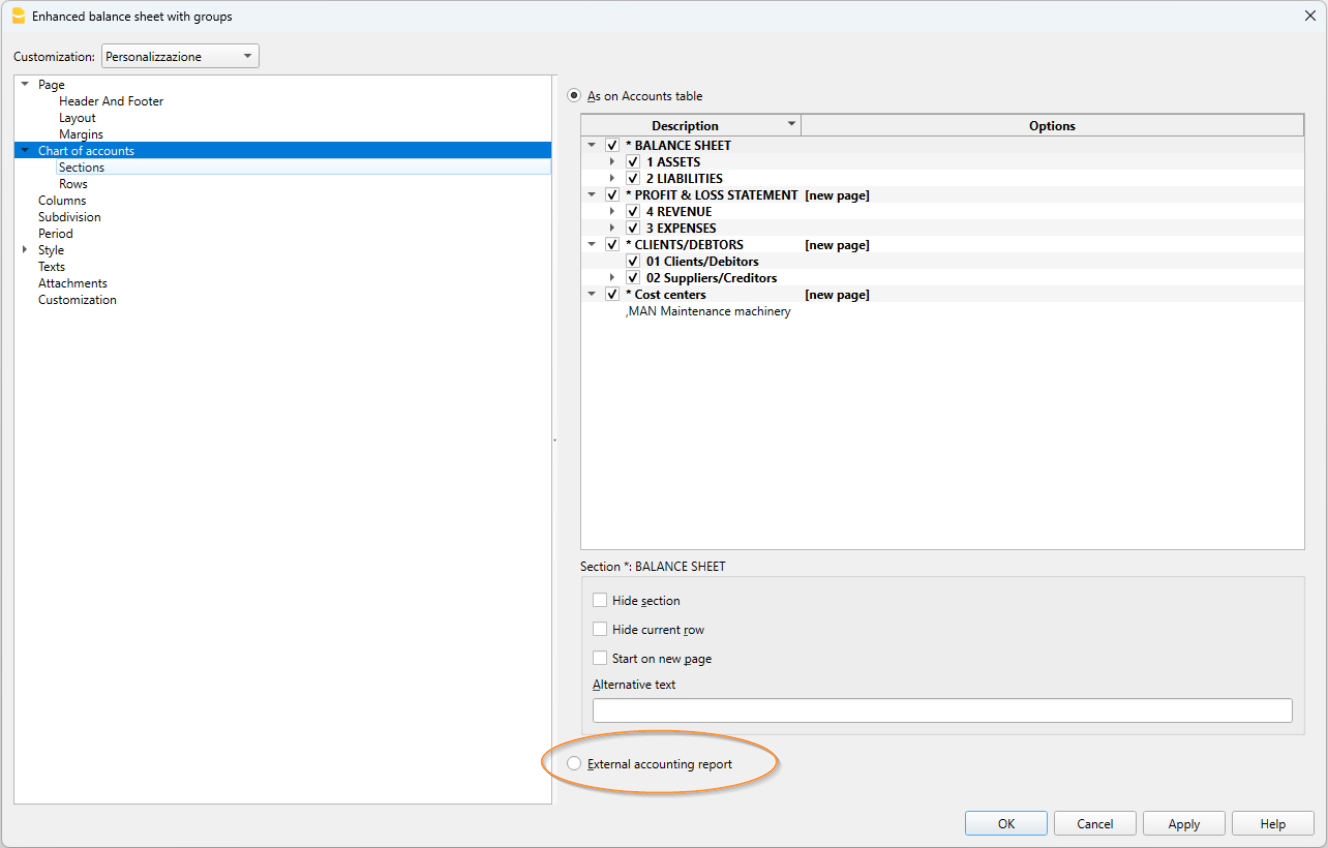
- Menu Reports > Enhanced balance sheet with groups
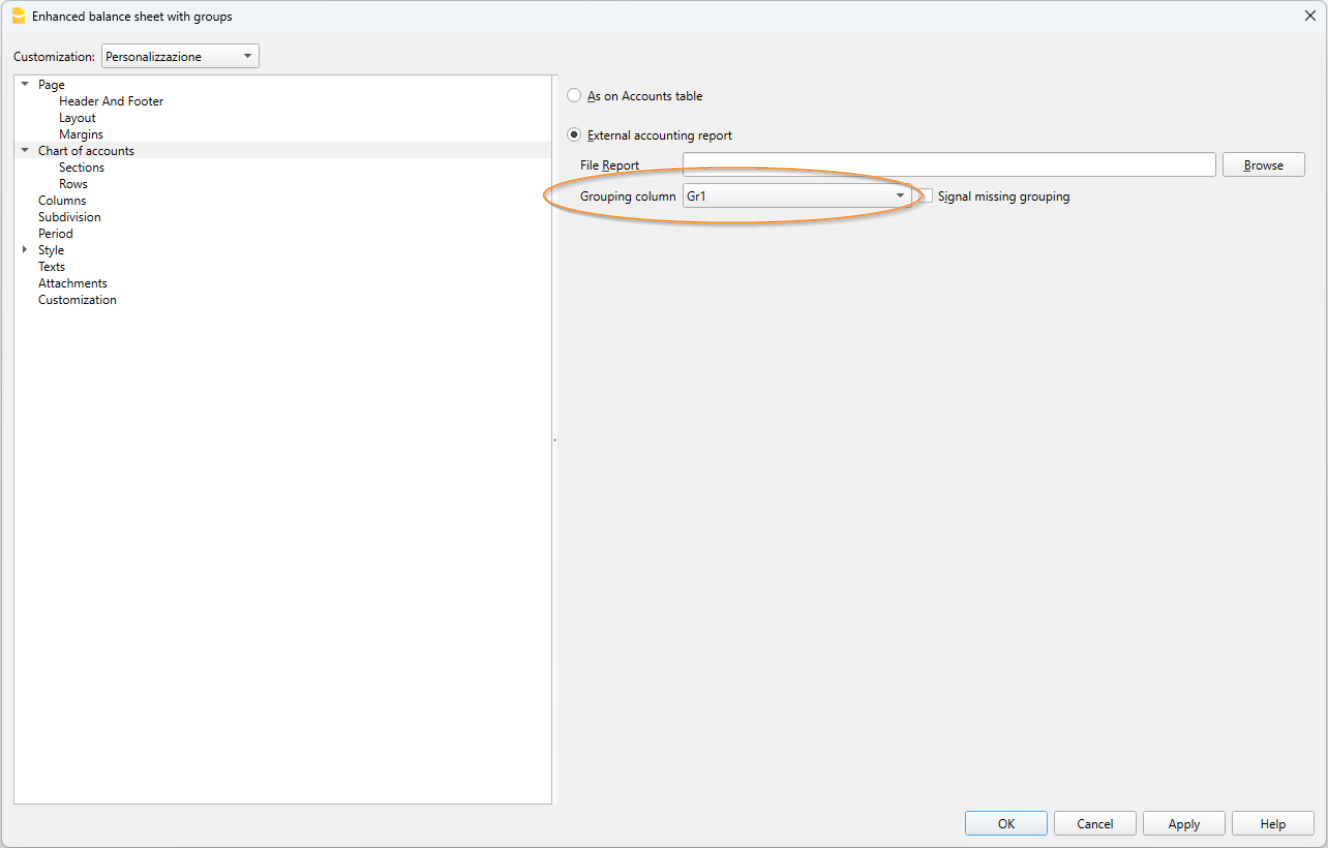
- Section Chart of Accounts > External Accounting Report
- In the dialog window, in the grouping column, select the column through which you want to apply the grouping (GR1, BClasse, VAT, etc...).
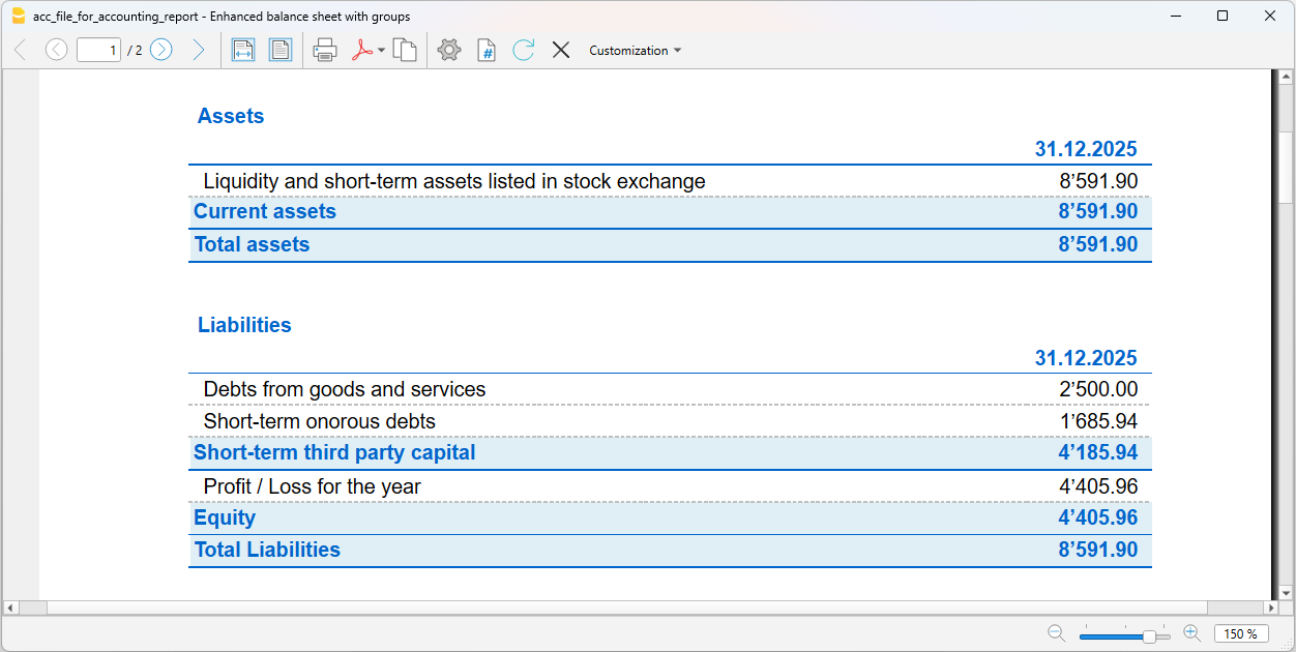
You obtain a printout like the Enhanced Balance Sheet with Groups, but with your own reclassification.
Or:
- Menu Report > Accounting Report
- In the Basic section, select the External Accounting Report option.
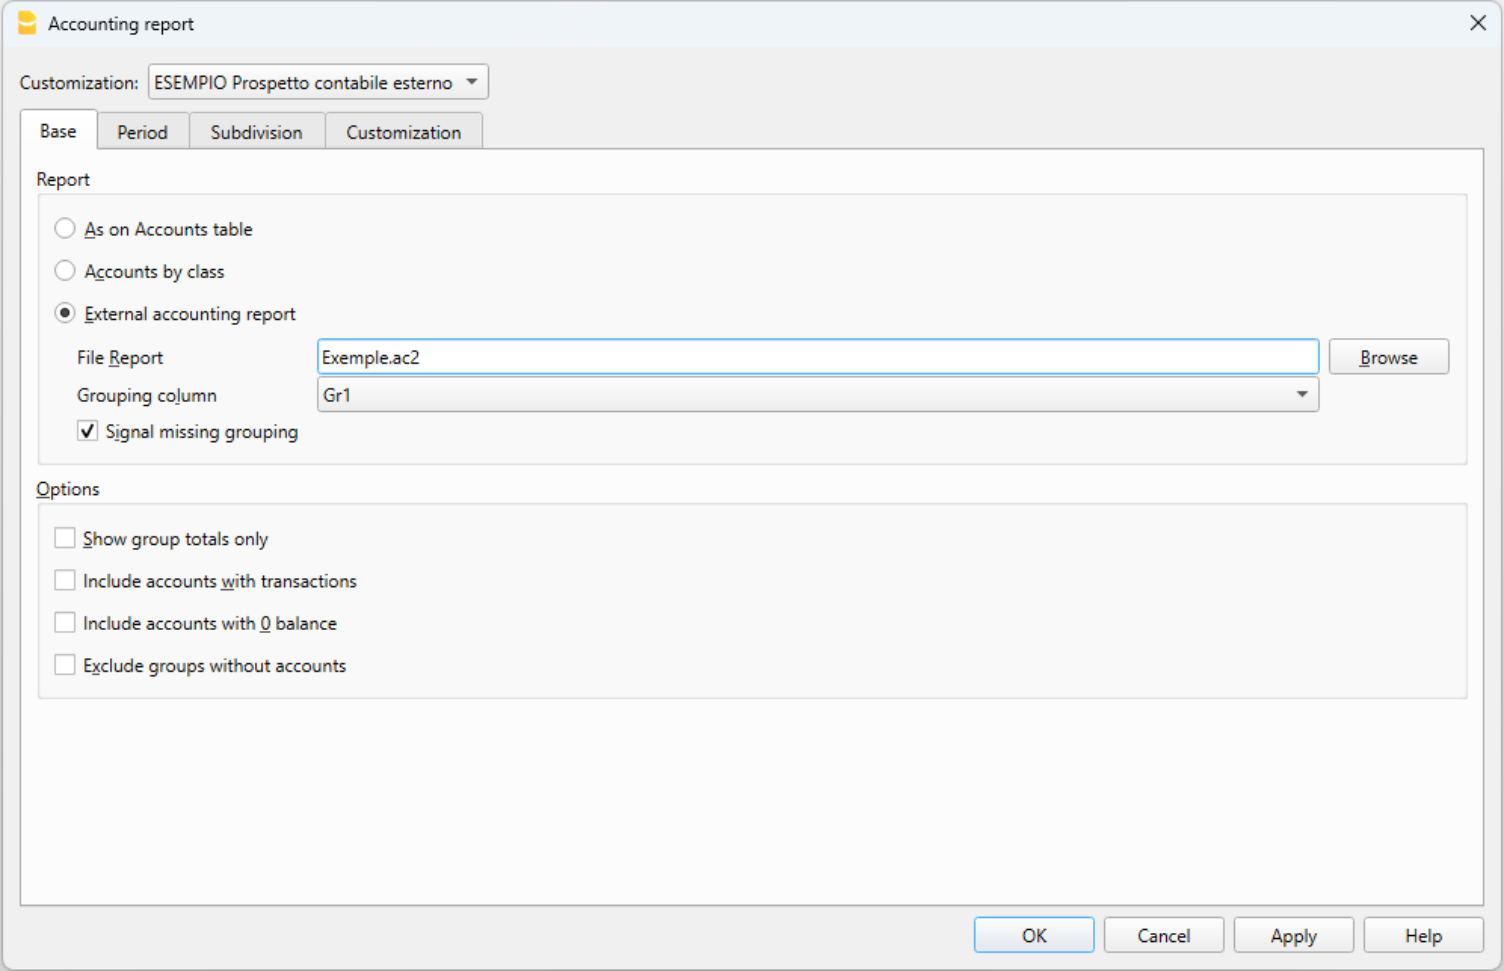
A table view is displayed, similar to the Accounts table, but with your own reclassification