Report Extensions
Account Statement Letter
Account Statement LetterInstall the extension
To install the extension:
- Open Banana Accounting Plus.
- Menu Extensions > Manage Extensions.
- In the search field enter Account Statement Letter.
- From the extensions list select Account Statement Letter.
- Select the extension and click Install.
- Click Close to close the window.
Create the report
To creare the report:
- Open an accounting file.
- From the menu File > File and accounting properties > Address, enter the sender address.
- In the Accounts table (Address view) enter the receiver address for the account.
- From the Extensions menu select the Account Statement Letter.
- Enter the account number.
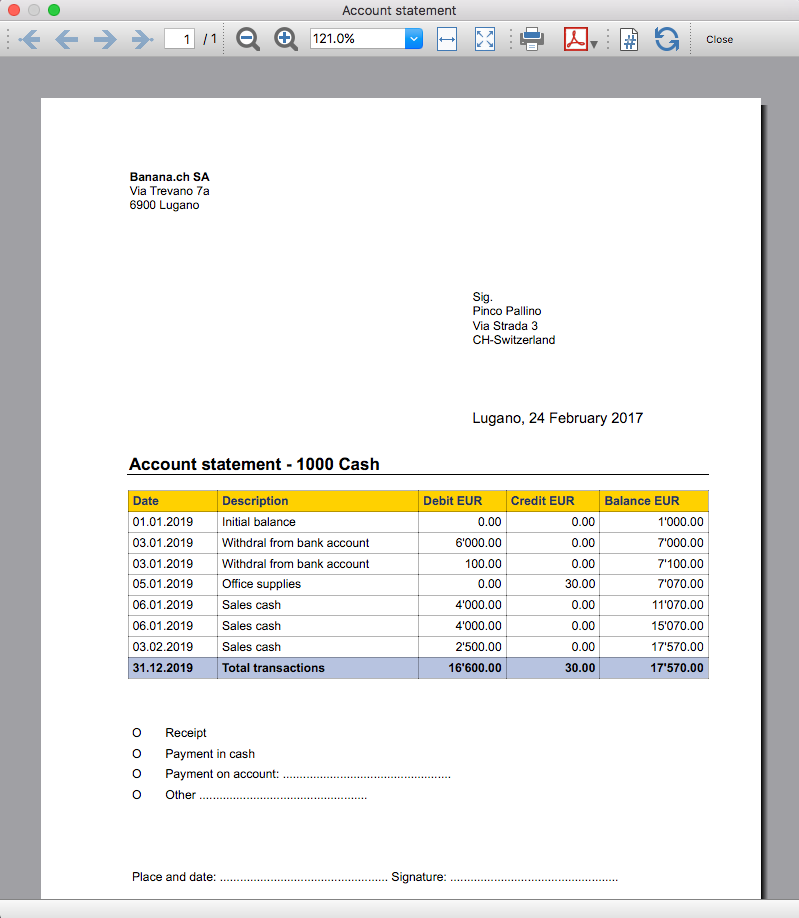
Example of account statement report:
Account balance by day within a period
Account balance by day within a periodInstall the extension
To install the extension:
- Open Banana Accounting Plus.
- Menu Extensions > Manage Extensions.
- In the search field enter Account balance by day within a period.
- From the extensions list select Account balance by day within a period.
- Select the extension and click Install.
- Click Close to close the window.
Create the report
To creare the report:
- Open an accounting file.
- From the Extensions menu select the Account balance by day within a period.
- Enter the account number.
- Select the period.
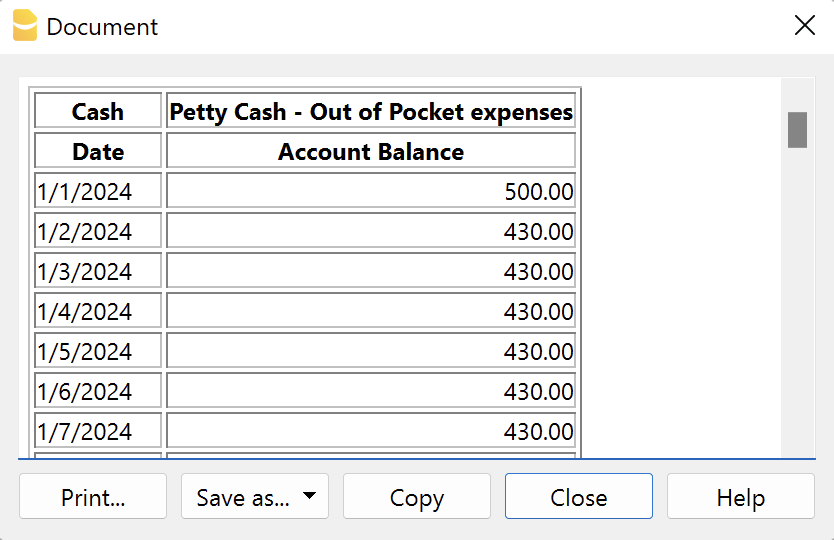
A window with results is displayed. You can copy, save and print the results.
Account balance for all days in a month
Account balance for all days in a monthInstall the extension
To install the extension:
- Open Banana Accounting Plus.
- Menu Extensions > Manage Extensions.
- In the search field enter Account balance for all days in a month.
- From the extensions list select Account balance for all days in a month.
- Select the extension and click Install.
- Click Close to close the window.
Create the report
To creare the report:
- Open an accounting file.
- From the Extensions menu select Account balance for all days in a month.
- Enter the month number.
- Enter the account number.
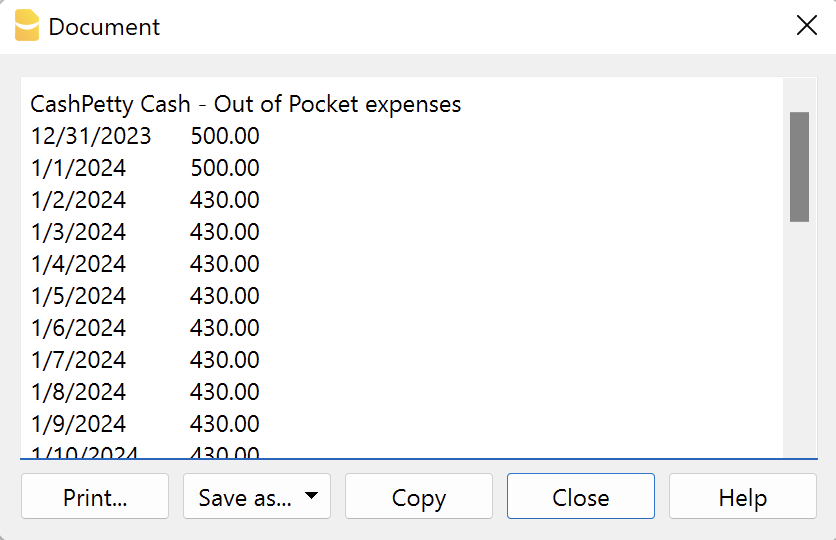
A window with results is displayed. You can copy, save and print the results.
Audit Reports [BETA]
Audit Reports [BETA]The main purpose of this extension is to provide reports that can be easily copied into excel, summarising and showing the main accounting data that are normally taken as a basis by auditors when preparing their analysis.
Useful reports for Banana users who need to send their auditor accounting data, but also for auditors who use Banana themselves, as these reports are based on the functionalities already offered by Banana and therefore facilitate and speed up the collection of accounting data.
Reports
The following reports can be generated:
- General Ledger: Shows the transactions for each account, like in the account card.
- Journal: Shows the details of each transaction.
- VAT Journal: Shows the details of each VAT transaction.
- Trial Balance: Shows the balance of all accounting items in two columns (debit and credit).
- Customers And Suppliers: Shows list of customers and suppliers and information about them.
Through a dialogue it is possible to decide the time of year to be taken into account in the reports.
Adding extra columns
Through the command "Columns Settings" additional columns can be inserted in each report, except for the trial balance, which remains as it is. To add a column to the report, simply enter its xml name in the dialogue. To add several columns, separate them with a semicolon ";" as shown in the example.

The columns you can add are the same present in the Transactions table, except for the Customers and Suppliers report, for which you find the data in the Accounts table.
If you accidentally add a column that is not contained in the tables mentioned, no error is currently raised, the column will be added but no value will be present.
Copy to Excel
Reports are easily copied to Excel, when the report preview is generated, just click on the "copy" icon and paste the copied table into an Excel sheet.

Once the whole table has been copied, you can arrange the file as you want and customise your report with Excel tools.

Messages
- Total debit and total credit are different: The total Debit and total Credit do not match, check if the same error is present in your Accounting file, if it is only present in the report send us a feedback
Lettre en texte libre (Banana+) [BETA]
Lettre en texte libre (Banana+) [BETA]L'extension présentée ci-dessous permet de créer une lettre en texte libre pour les membres enregistrés dans Banana Comptabilité Plus (tableau Comptes).
Il est indispensable que les membres soient configurés avec des centres de coût, en utilisant le centre de coût CC3.
Pour utiliser cette extension, il faut
- Télécharger et installer Banana Comptabilité+ (version 10.1.7 ou suivante).
- Avoir le Plan Advanced de Banana Comptabilité Plus.
Version Beta
L'extension est actuellement disponible en version bêta. Cela signifie que certains détails peuvent être modifiés sans préavis.
Installation et utilisation de l'extension
- Installez Banana Comptabilité Plus Dev-Channel
- Installez l'extension Lettre (Banana+) . Visitez la documentation Gérer Extensions.
- Une fois installée, l'extension sera visible dans le menu Extensions où elle pourra être exécutée.
Créer une lettre
- Introduire les données de l'association dans la section Adresse du fichier comptable.
- Dans le Menu Extensions, sélectionnez l'extension Lettre (Banana+) .
- Complétez les champs du dialogue de paramétrage et cliquez sur OK.
Dialogue paramètres
Lancez l'extension à partir du menu Extensions > Lettre (Banana Plus).
Le dialogue Paramètres de l'extension s'ouvre, où vous pouvez définir les informations nécessaires pour créer l'impression de la lettre.
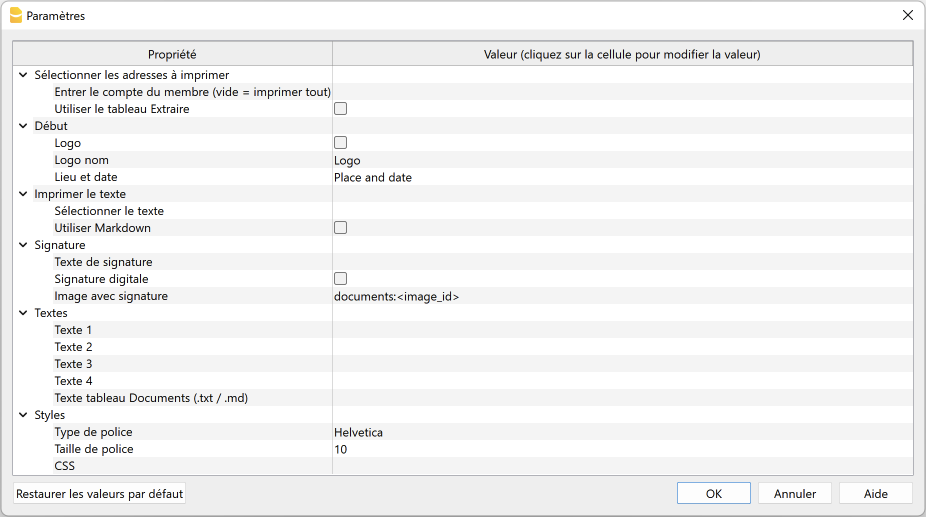
Pour la saisie des données, cliquez dans le champ de la colonne Valeur.
Les paramètres sont répartis dans les groupes suivants :
- Sélectionnez les adresses à imprimer
- Définissez les comptes membres pour lesquels créer la lettre.
- Début
- Définissez le logo pour l'en-tête, l'emplacement et la date.
- Imprimez le texte
- Définissez le texte à utiliser.
- Signature
- Définissez le texte et l'image de la signature.
- Textes
- Définissez jusqu'à quatre textes différents ou prendre un texte dans le tableau Documents.
- Styles
- Définissez le type et la taille de la police pour les textes des lettres.
Les données saisies sont utilisées pour générer le rapport, que vous pouvez ensuite enregistrer et imprimer.
Sélectionner les adresses à imprimer
Ici, vous pouvez décider pour quels membres, définis avec les centres de coûts CC3, créer la lettre.
- Saisir le compte du membre (vide = imprimer tout)
- Saisir un seul compte (par exemple "10001").
- Introduisez plusieurs comptes divisés par un "," (par exemple "10001,10002,10005").
- Si vous n'introduisez rien, une lettre sera imprimée pour tous les membres inscrits.
- Utiliser le tableau Extraire
- Utilisez les comptes extraits dans le tableau Extraire
- Il faut d'abord utiliser la commande Données > Extraire et trier lignes pour extraire les lignes contenant les comptes que l'on veut utiliser.
Début
Vous définissez ici le logo pour l'en-tête, l'emplacement et la date.
- Logo
- Inclure un logo dans l'en-tête. Le logo est défini via la commande Fichier → Configuration logo.
- Nom logo
- Saissisez le nom de la personnalisation du logo à utiliser.
- Lieu et date
- Saisissez le lieu et la date.
Imprimer texte
Vous pouvez ici choisir le texte à utiliser parmi ceux que vous avez saisis.
- Selectionnez texte
- Sélectionnez le texte que vous souhaitez utiliser dans la liste.
- Voir ci-dessous pour la saisie de texte.
- Utilisez Markdown
- Le texte sélectionné est interprété comme un texte Markdown (nécessite le plan avancé de Banana Comptabilité Plus).
Signature
Vous définissez ici le texte et l'image de la signature de la lettre.
- Texte de la signature
- Saisissez le nom et le prénom de la personne qui émet la lettre.
- Signature digitale
- Utilisez une image comme signature.
- Image avec signature
- Entrez un image à utiliser. Vous avez deux possibilités :
- documents:<nom_id> : pour utiliser une image enregistrée dans le tableau Documents, où <nom_id> représente le nom saisi dans la colonne ID du tableau (par exemple "documents:signature").
- file:document/<image> : pour utiliser une image enregistrée en dehors de Banana, mais dans le même dossier que le fichier .ac2. Il indique aussi l'extension de l'image .png ou .jpg (par exemple "file:document/signature.png").
- Entrez un image à utiliser. Vous avez deux possibilités :
Textes
Vous définissez ici les textes de la lettre. Vous pouvez saisir jusqu'à quatre textes différents ou prendre un texte dans le tableau Documents.
- Texte 1, Texte 2, Texte 3, Texte 4
- Saisissez le texte que vous souhaitez afficher dans l'impression. Le texte peut également être disposé sur plusieurs lignes.
- Les textes peuvent être de type texte ou de type Markdown.
-
Vous pouvez saisir jusqu'à quatre textes différents, puis choisir celui que vous souhaitez utiliser.
- Texte tableau Document (.txt / .md)
- Pour utiliser les textes saisis dans le Tableau documents
- Saisissez l' Id 'identifiant du document (par exemple, "Letter.txt", "Letter", "Letter.md", etc.)
- Les textes peuvent être de type texte ou de type Markdown.
- Pour les textes de type Markdown, l'Id identifiant dans le tableau Documents doit se terminer par ".md" et le nom complet, y compris le ".md" final (par exemple "Lettre.md"), doit être saisi ici.
Styles
Vous définissez ici le type et la taille de la police pour les textes des lettres.
- Type de police
- Définissez le type de police.
- La police par défaut est "Helvetica".
- Taille de la police :
- Définissez la taille de la police.
- La taille de police par défaut est '10'.
- CSS
- Facultatif.
- Vous pouvez modifier l'apparence de l'impression (formatage du texte, positionnement de l'adresse, etc.) en entrant du code CSS pour personnaliser le style.
- Voir la documentation sur la création de styles CSS (en anglais)
Tableau Extraire (commande Extraire lignes)
La fonctionnalité Extraire et trier lignes peut être utilisée pour sélectionner les comptes des membres pour lesquels l' attestation doit être créé. Ceci est utile lorsque, par exemple, vous ne souhaitez imprimer le relevé de dons que pour certains membres, sans devoir introduire la liste des comptes directement dans les paramètres de l'extension.
Si, par exemple, vous regroupez les membres en différents groupes (tableau Comptes), vous pouvez ensuite utiliser la commande Données > Extraire et trier lignes pour extraire les lignes des membres appartenant uniquement à certains groupes (dans l'exemple, les membres appartenant aux groupes S1 et S3).
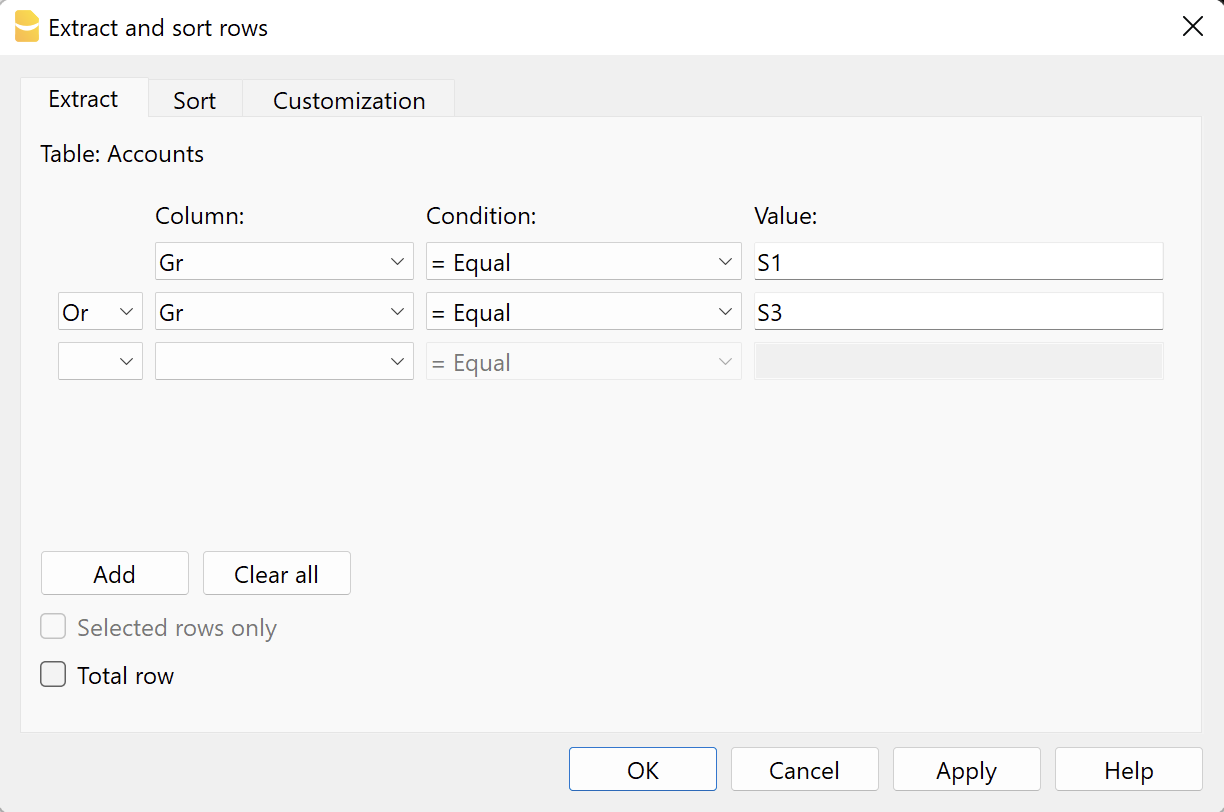
Pour utiliser les lignes extraites
- Extraire les lignes avec la commande Données > Extraire et trier les lignes.
- Lancez l'extension et dans la boîte de dialogue Paramètres, section Sélectionnez les adresses à imprimer, cochez la case Utiliser tableau Extraire
- Si les lignes n'ont pas été extraites avant le début de l'impression, un message d'avertissement s'affiche et tous les comptes membres enregistrés sont utilisés.
Texte de la lettre (texte normal)
Per inserire e utilizzare un normale testo ci sono due possibilità:
- Saisir le texte dans la boîte de dialogue Paramètres.
- Saisir le texte dans les champs Texte 1, Texte 2, Texte 3 ou Texte 4.
Il est possible d'ajouter jusqu'à quatre textes. - Sous Imprimer texte > Sélectionner texte, sélectionnez le texte à utiliser.
- Sous Imprimer texte, ne sélectionnez PAS l'option Utilisez Markdown.
- Saisir le texte dans les champs Texte 1, Texte 2, Texte 3 ou Texte 4.
- Inserire il testo nella tabella Documenti.
- Saisissez le texte dans le tableau Documents.
- Ajoutez un document en sélectionnant le type Texte normal (text/plain).
Il n'y a pas de limite, vous pouvez ajouter autant de texte que vous le souhaitez. - Dans le dialogue paramètres :
- Sous Imprimer le texte > Sélectionner le texte, sélectionnez l'option Texte tableau Documents (.txt / .md).
- Sous Textes > Texte Tableau Documents (.txt / .md), entrez l' ld identifiant du texte saisi dans le tableau Documents (par exemple 'text.txt').
Pour tous les textes :
- Avec une annotation spécifique, vous pouvez appliquer le style gras aux textes. Pour ce faire, insérez les textes souhaités entre les doubles astérisques ** .
Exemples :- **texte** = texte
- **texteA texteB** texteC = texteA texteB texteC
- Si les valeurs suivantes (en anglais) sont saisies dans les lignes de texte, elles seront remplacées par les valeurs correspondantes :
- <Account>: compte du membre
- <NamePrefix> : préfixe du membre
- <FirstName>: prénom du membre
- <FamilyName>: nom du membre
- <OrganisationName> : organizzazione del socio
- <Address>: adresse du membre
- <AddressExtra> : adresse supplémentaire
- <Region> : région/état ou province
- <Country> : nation
- <Amount>: montant des dons
Texte de la lettre ( texte Markdown)
Markdown est un langage qui permet de créer du texte formaté à l'aide d'un éditeur de texte standard et d'une syntaxe facile à écrire et à lire.
Pour utiliser Markdown, le Plan Advanced de Banana Comptabilité Plus est nécessaire.
Il existe deux façons de saisir et d'utiliser du texte Markdown.
- Saisir le texte dans les dialogue paramètres
- Saisissez le texte dans les champs Texte 1, Texte 2, Texte 3 ou Texte 4.
Il est possible d'ajouter jusqu'à quatre textes. - Sous Imprimer texte > Sélectionner texte, sélectionnez le texte à utiliser.
- Sous Imprimer texte, affichez l'option Utiliser Markdown.
- Saisissez le texte dans les champs Texte 1, Texte 2, Texte 3 ou Texte 4.
- Saisissez le texte dans le tableau Documents.
- Utilisez l'Editeur Markdown pour ajouter un document, en sélectionnant le type Texte formaté Markdown (text/markdown)..
Il n'y a pas de limites, vous pouvez ajouter autant de texte que vous le souhaitez. - Le nom du fichier dans la colonne Id doit se terminer par ".md" (par exemple "texte.md").
- Dans le dialogue paramètres :
- Sous Imprimer texte > Sélectionner texte, sélectionnez l'option Texte tableau Documents (.txt / .md).
- Sous Textes > Tableau de texte Documents (.txt / .md), entrez l Id 'identifiant du texte markdown saisi dans le tableau Documents (par exemple, "texte.md").
- Utilisez l'Editeur Markdown pour ajouter un document, en sélectionnant le type Texte formaté Markdown (text/markdown)..
Pour tous les textes :
- Si les valeurs suivantes (en anglais) sont saisies dans les lignes de texte, elles seront remplacées par les valeurs correspondantes :
- {{Account}} : compte du membre
- {{NamePrefix}} : préfixe du membre
- {{FirstName}} : prénom du membre
- {{FamilyName}} : nom de famille du membre
- {{OrganisationName}} : organisation du membre
- {{Address}} : adresse du membre
- {{AddressExtra}} : adresse supplémentaire
- {{Region}} : région/état/province
- {{Country}} : nation
- {{Currency}} : devise
- {{Amount}} : montant total des dons
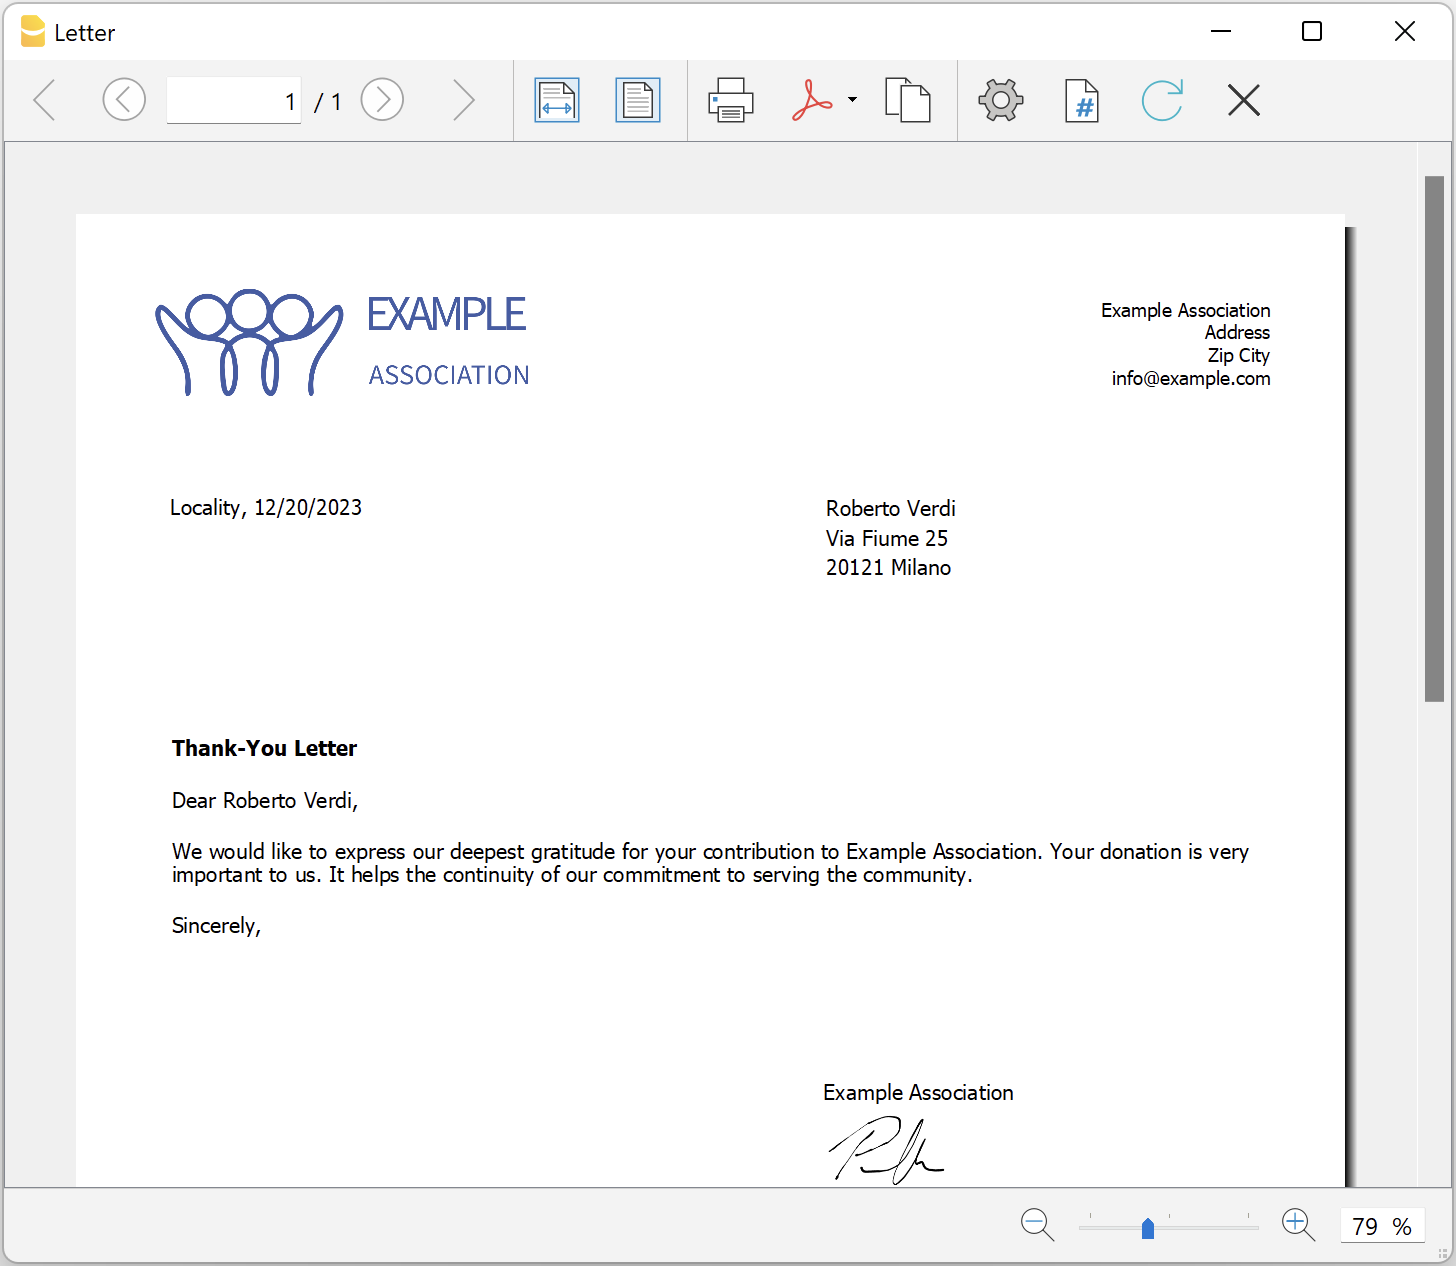
Exemples d'impression
Printing receipts from cash book transactions
Printing receipts from cash book transactionsThis extension prints payment receipts based on transactions from cash book accounting file.
Example of a payment receipt:
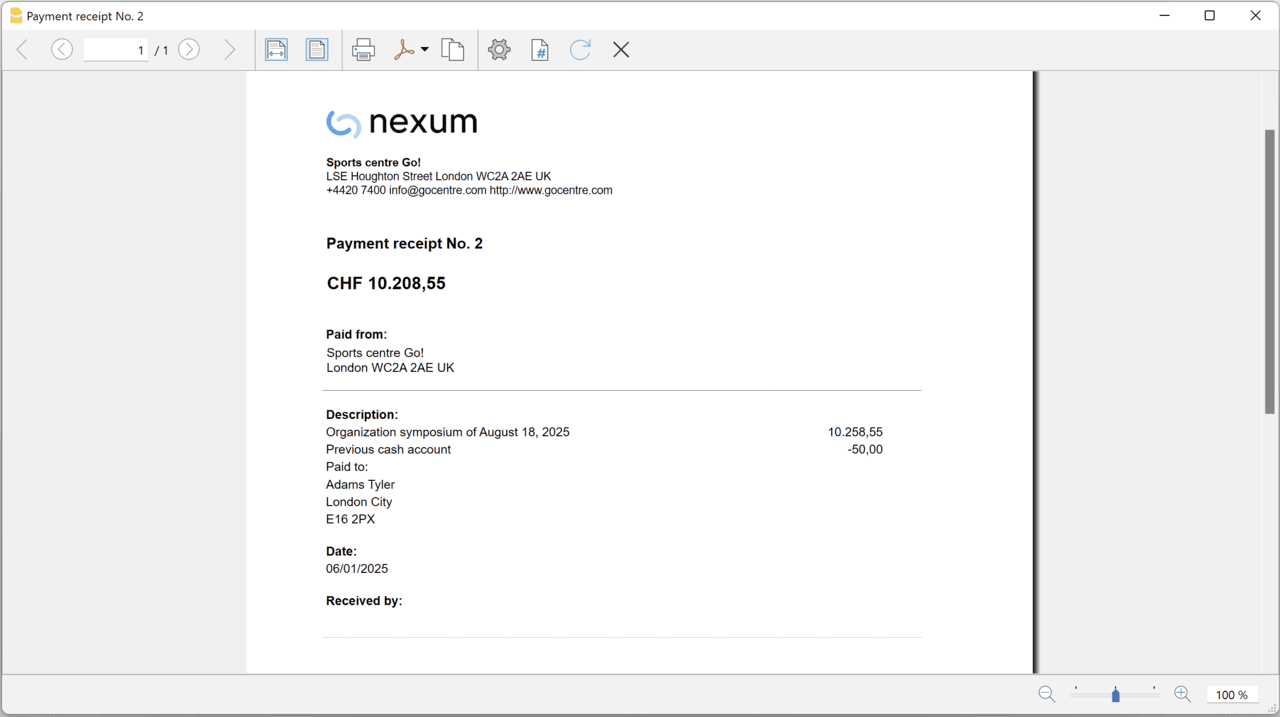
The program prints the receipt using the following logic:
- It takes all the lines with the same Doc Number, of the lines where the cursor is positioned.
- It prints the document number in the "Payment receipt No: "
- It prints the amount by summing all the amounts.
- It prints the Descriptions in different lines.
with the text of the Description column of all the transactions that have the same doc number.
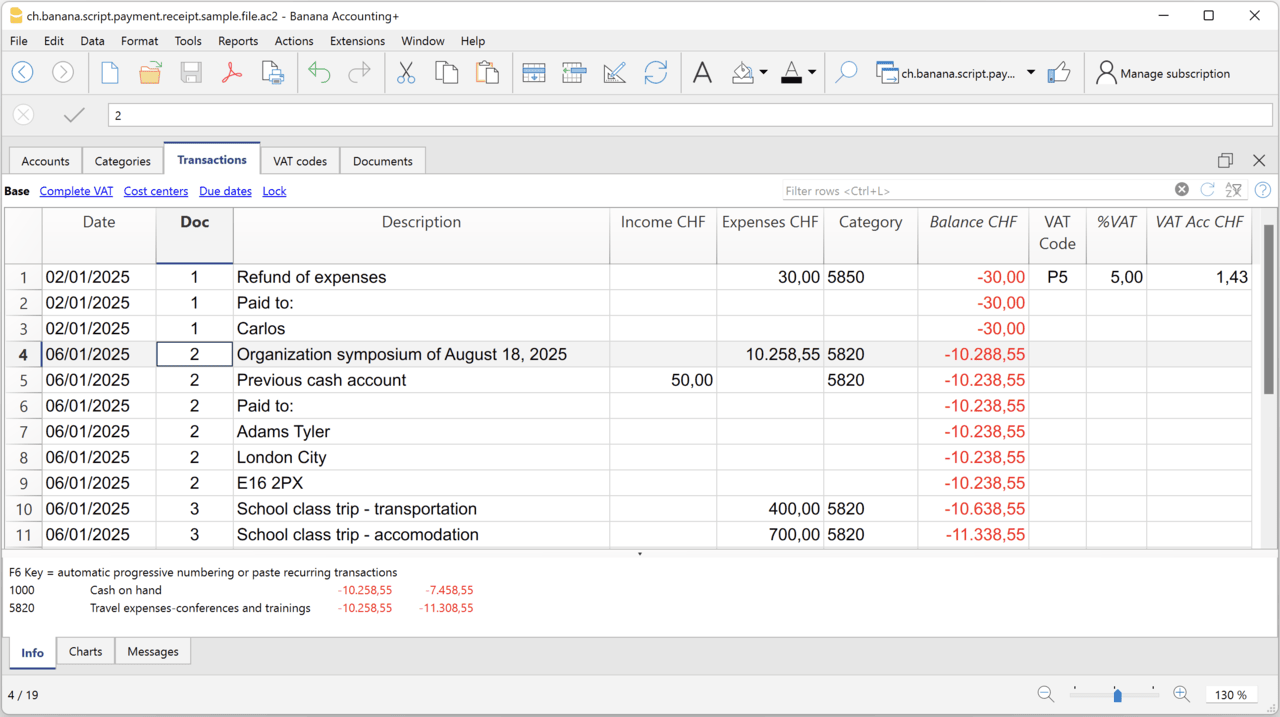
Example file
To created the receipts:
- Open a Cash Book file:
- Or download the example ch.banana.script.payment.receipt.sample.file.ac2 and open it.
- Positions on the line of the transaction group you wish to print.
- From the Extensions menu select the Printing receipts from cash book transactions.
Settings and properties
Prior to printing the receipt you can set the
Extension properties
You can set the following parameters from the menu Extensions > Manage Extensions, select the Printing receipts from cash book transactions extension and click on Settings.
- Include page header (1=yes, 0=no)
The logo and the address information can be included as header of the page. - Automatic date (1=yes, 0=no)
The date of the transaction is used. - Font type
The font type of the texts (Arial, Helvetica, Times New Roman, ...)
Address
Set your address from the menu File > File and accounting properties > Address.
Header logo
A logo for the header can be added as attachment in the Documents table.
- Add the Documents table to the Banana Accounting file.
If it is not already present you need to add the Documents table in the Banana document with the menu command Tools > Add new features > Add document table. - Add a row in the Documents table.
- In the ID column, enter "logo".
- In the Attachments column, double click on the cell and select Image, then choose the logo image you want to use.
Entering transactions
Cash book transactions are entered as usual in the Transactions table.
- Transactions are considered to belong to the same group when they have the same doc number.
- Paid to
- You can enter the text you want to display on the printout (e.g. "Paid to:").
- You can also enter text in bold by enclosing it in double asterisks ** (e.g. **Paid to:**)
- You can enter the text "#paidto" (without quotes) to let the program insert a blank line followed by the text in bold and in the language of the accounting file (it, fr, de, en, nl).
Report Balance and Profit & Loss with transactions details
Report Balance and Profit & Loss with transactions detailsThis extension creates a Balance Sheet and Profit & Loss report with transactions details for each account.
Install the extension
To install the extension:
- Open Banana Accounting Plus.
- Menu Extensions > Manage Extensions.
- In the search field enter Report Balance and Profit & Loss with transactions details.
- From the extensions list select Report Balance and Profit & Loss with transactions details.
- Select the extension and click Install.
- Click Close to close the window.
Create the report
To creare the report:
- Open an accounting file.
- From the Extensions menu select the Report Balance and Profit & Loss with transactions details.
- Select the financial report you want to print:
- Assets / Liabilities
- Income / Expenses
- All
Example of assets details: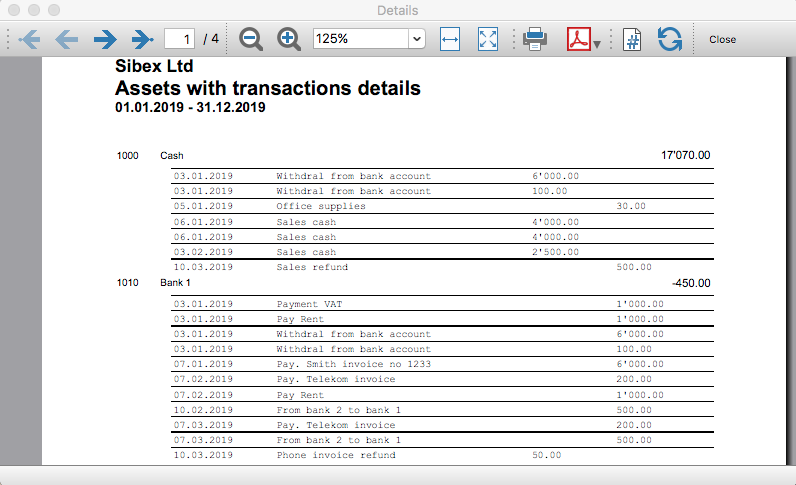
Example of liabilities details: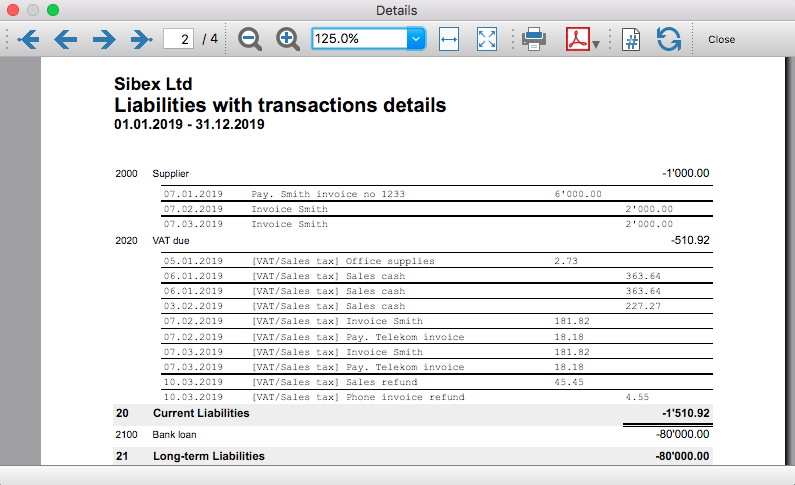
Example of income details: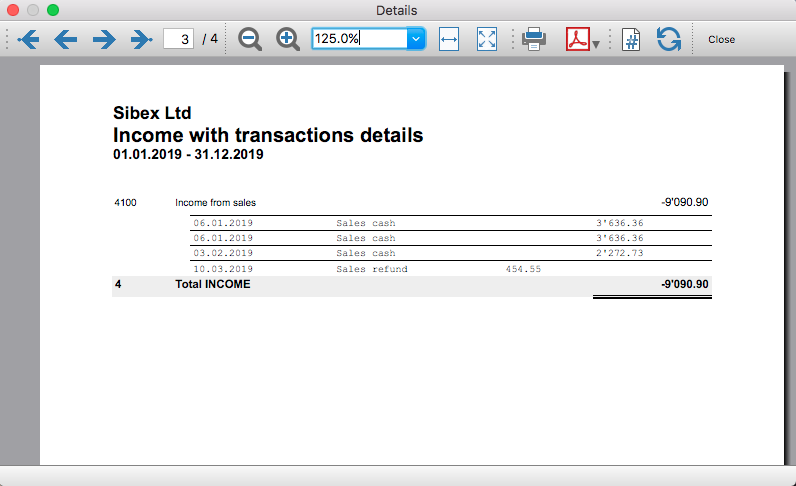
Example of expenses details: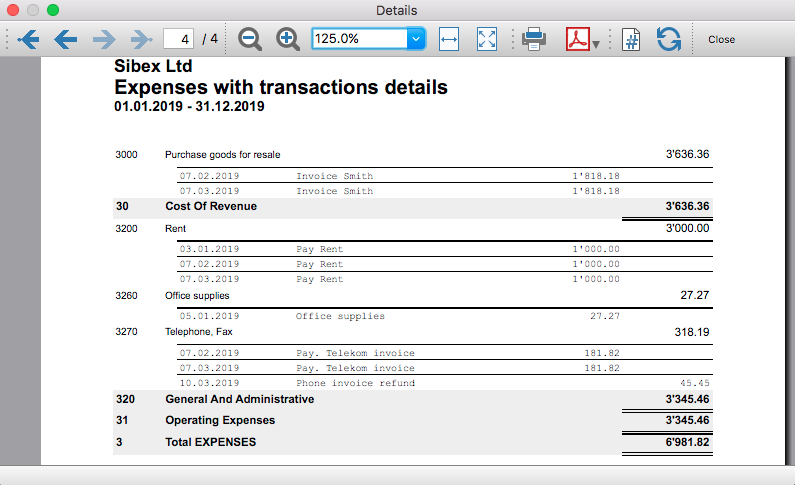
Transaction Voucher (Banana+)
Transaction Voucher (Banana+)Accounting settings
From menu File > File and accounting properties > Accounting Tab, enter the project number/name in the Header Left field.
How it works
- For each transaction of the Transactions table enter the voucher number in the Doc column.
- From the Transactions table of the accounting file select a row with the desired voucher number you want to create the report.
The voucher number is taken from the selected row where the cursor is positioned, but you can also change it manually into settings dialog. - Launch the extension from the menu Extensions > Transaction Voucher (Banana+).
- In the settings dialog window enter the required information.
- Logo
Check to include the logo in the header.
The logo is defined with the command File > Logo setup where you can also set the size, choose how to align it (left, centre, right). - Logo-Name
Enter the name of the logo customisation defined in the menu File > Logo setup, respecting upper and lower case. - Title
- Voucher number
- Paid to
- Paid in
- Cheque No.
- Payment Received by
- Paid by
- Prepared by
- Verified by
- Recommended by
- Approved by
- Logo
- All the values entered are saved and proposed the next time.
- The extension will print the information entered in the dialog plus the data of the transaction with the specified Voucher / Doc number.
Transaction Voucher (Helvetas model)
Transaction Voucher (Helvetas model)How it works
- From the Transactions table of the accounting file select a row with the desired Doc number.
- Launch the extension from the menu Extensions > Transaction Voucher (Helvetas model).
- A dialog window requesting some information will appear.
The voucher number is taken from the row selected where the cursor is positioned, but you can change it manually.
Complete all the remaining fields by entering your data and click Ok.
The values entered are saved and proposed the next time. - The extension will print the information entered in the dialog plus the data of the transactions with the specified Voucher / Doc number.
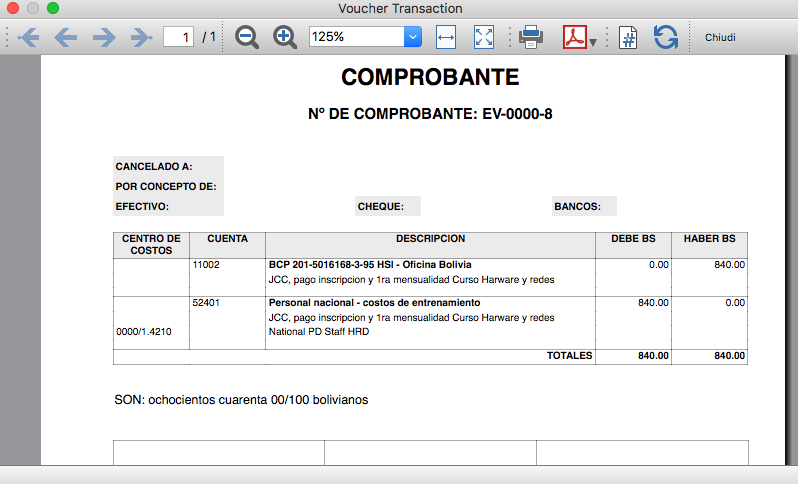
Example of Voucher report:
Transaction Voucher (Swiss Red Cross model)
Transaction Voucher (Swiss Red Cross model)Accounting settings
Two settings are required:
- the Header Left
- click menu File > File and accounting properties > Header Left.
The Header Left field must contain the project number and the project name divided by the "-" character (example: "1234 - Abc")
- click menu File > File and accounting properties > Header Left.
- add a small image/logo
- Add the Documents table to the Banana Accounting file.
If it is not already present you need to add the Documents table in the Banana document with the menu command Tools > Add new features > Add document table. - In the Id column, of the documents table insert transaction_voucher_image.
- In the Attachments column, double click on the cell, select Image and add the desired image.
- Add the Documents table to the Banana Accounting file.
How it works
- From the Transactions table of the accounting file select a row with the desired Doc number.
For example: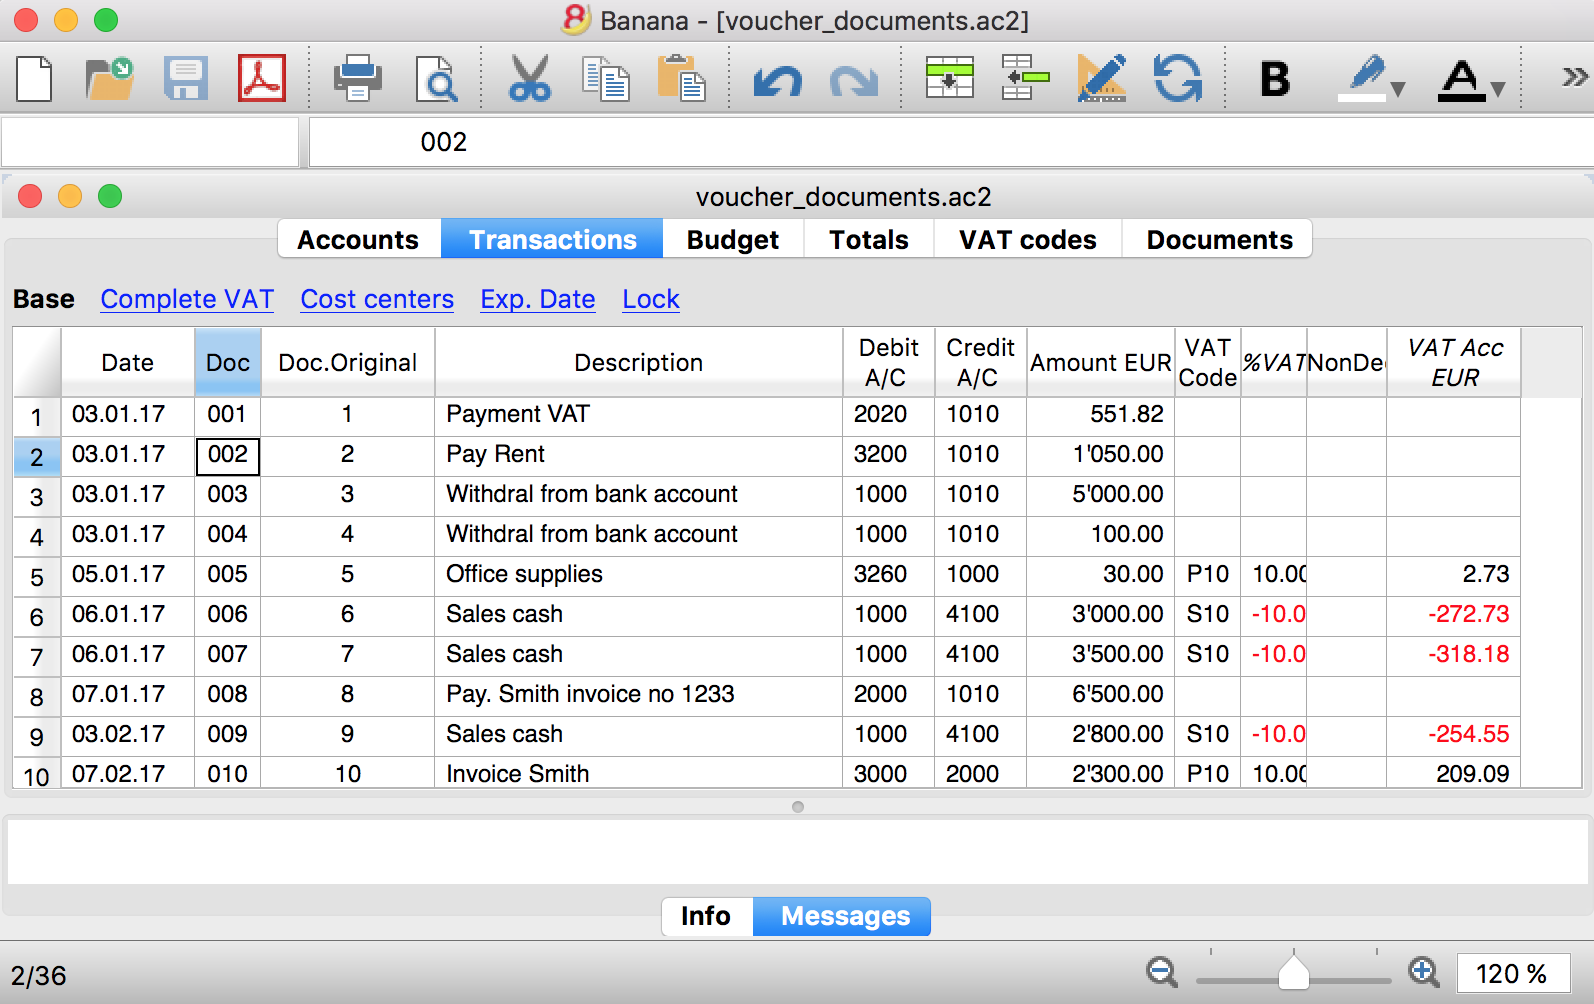
- Launch the extensions from the menu Extension > Transaction Voucher. A dialog window requesting some information will appear.
- The voucher number is taken from the row selected where the cursor is positioned, but you can change it manually.
- Complete all the remaining fields by entering your data and click Ok.
The values entered are proposed the next time.
Dialog example: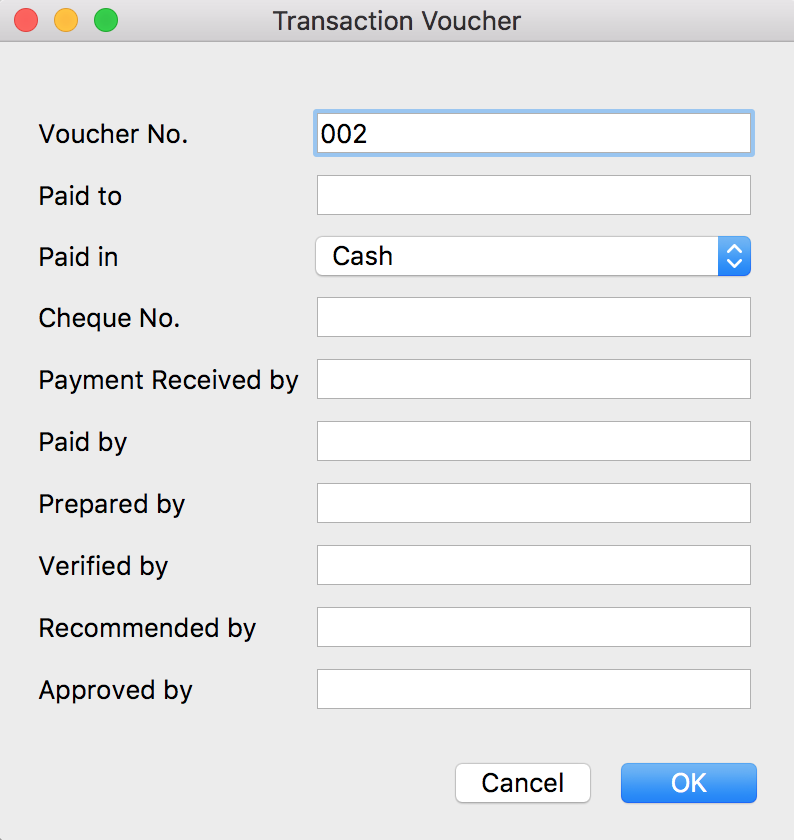
- The extension will print the information enterd in the dialog plus the data of the transactions with the specified Voucher / Doc number.
For example: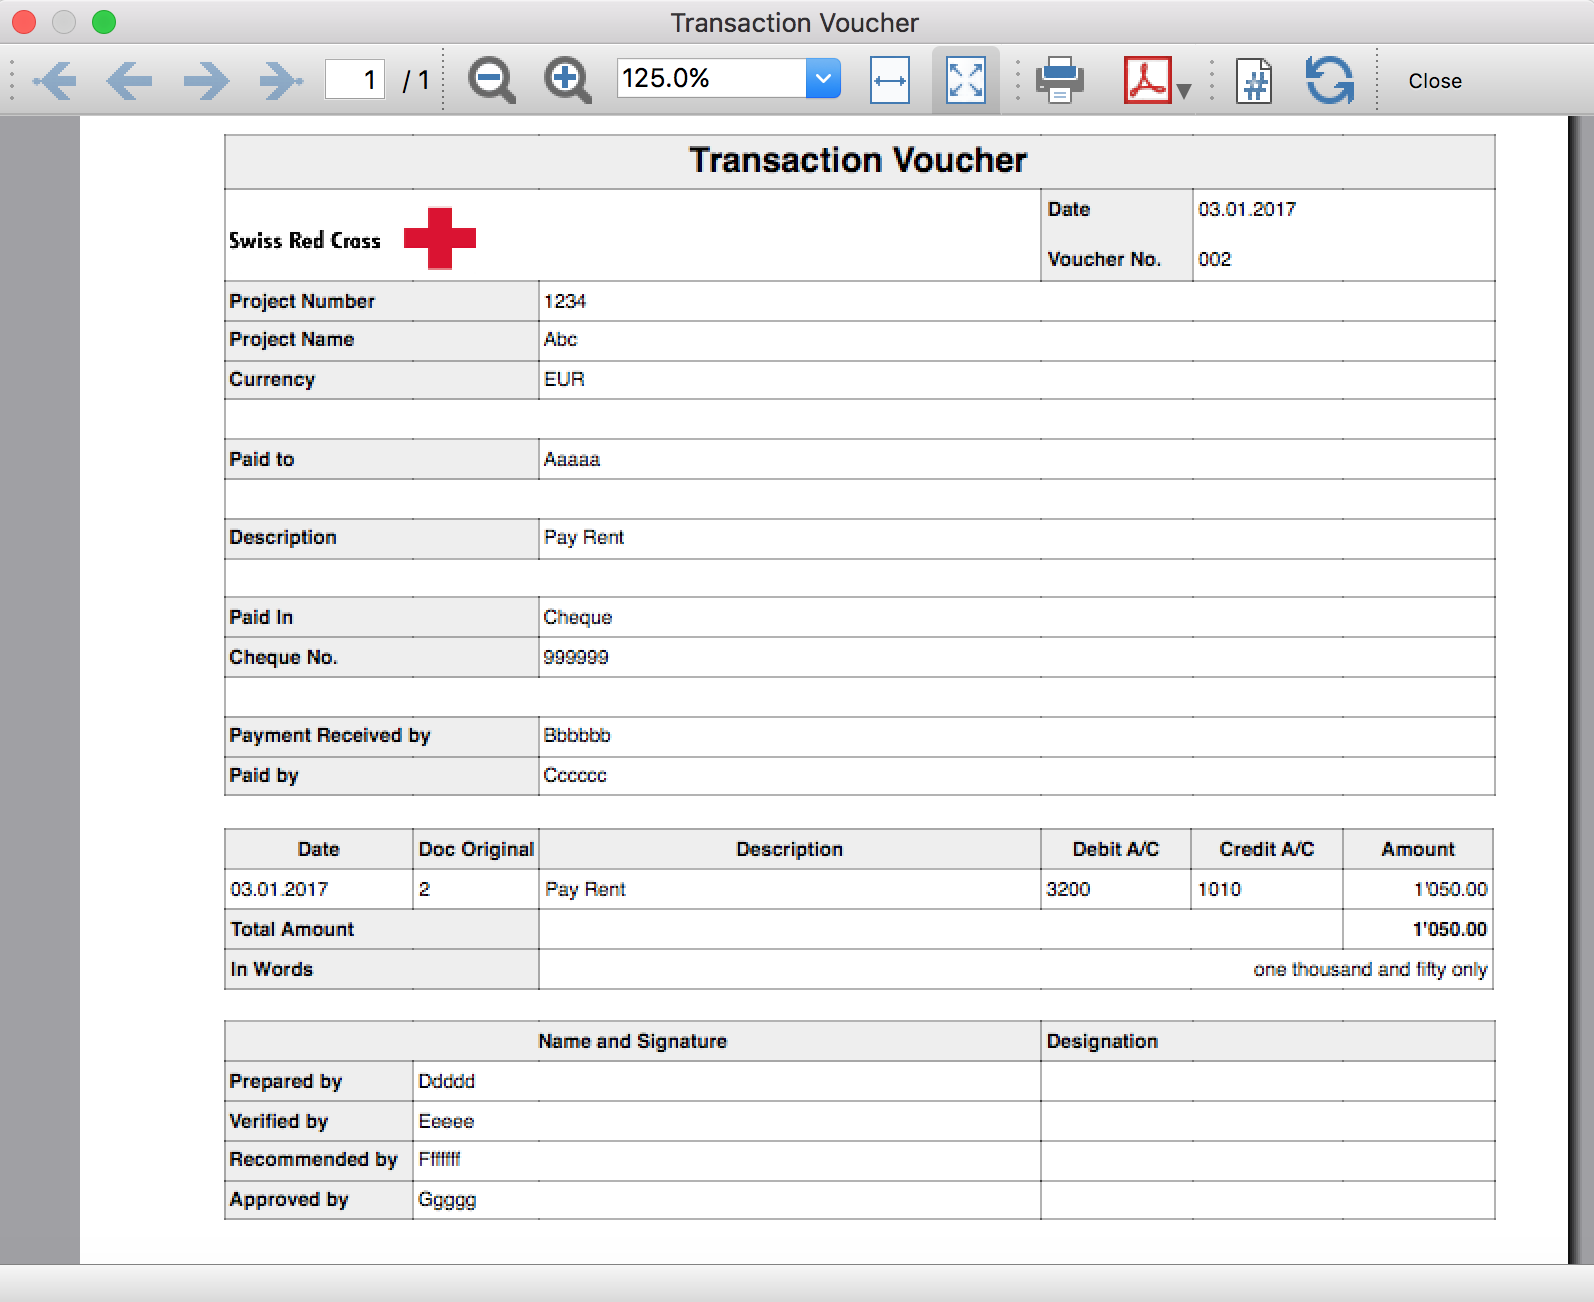
Trial Balance
Trial BalanceInstall the extension
To install the extension:
- Open Banana Accounting Plus.
- Menu Extensions > Manage Extensions.
- In the search field enter Trial Balance.
- From the extensions list select Trial Balance.
- Select the extension and click Install.
- Click Close to close the window.
Create the report
To creare the report:
- Open an accounting file.
- From the Extensions menu select the Trial Balance.
- Select the period.
For the given period, display a Trial Balance report containing:
- Balance sheet
- Profit & Loss
The details displayed are the following:
- Account
- Account description
- Debit amounts
- Credit amounts
Example of Trial Balance report: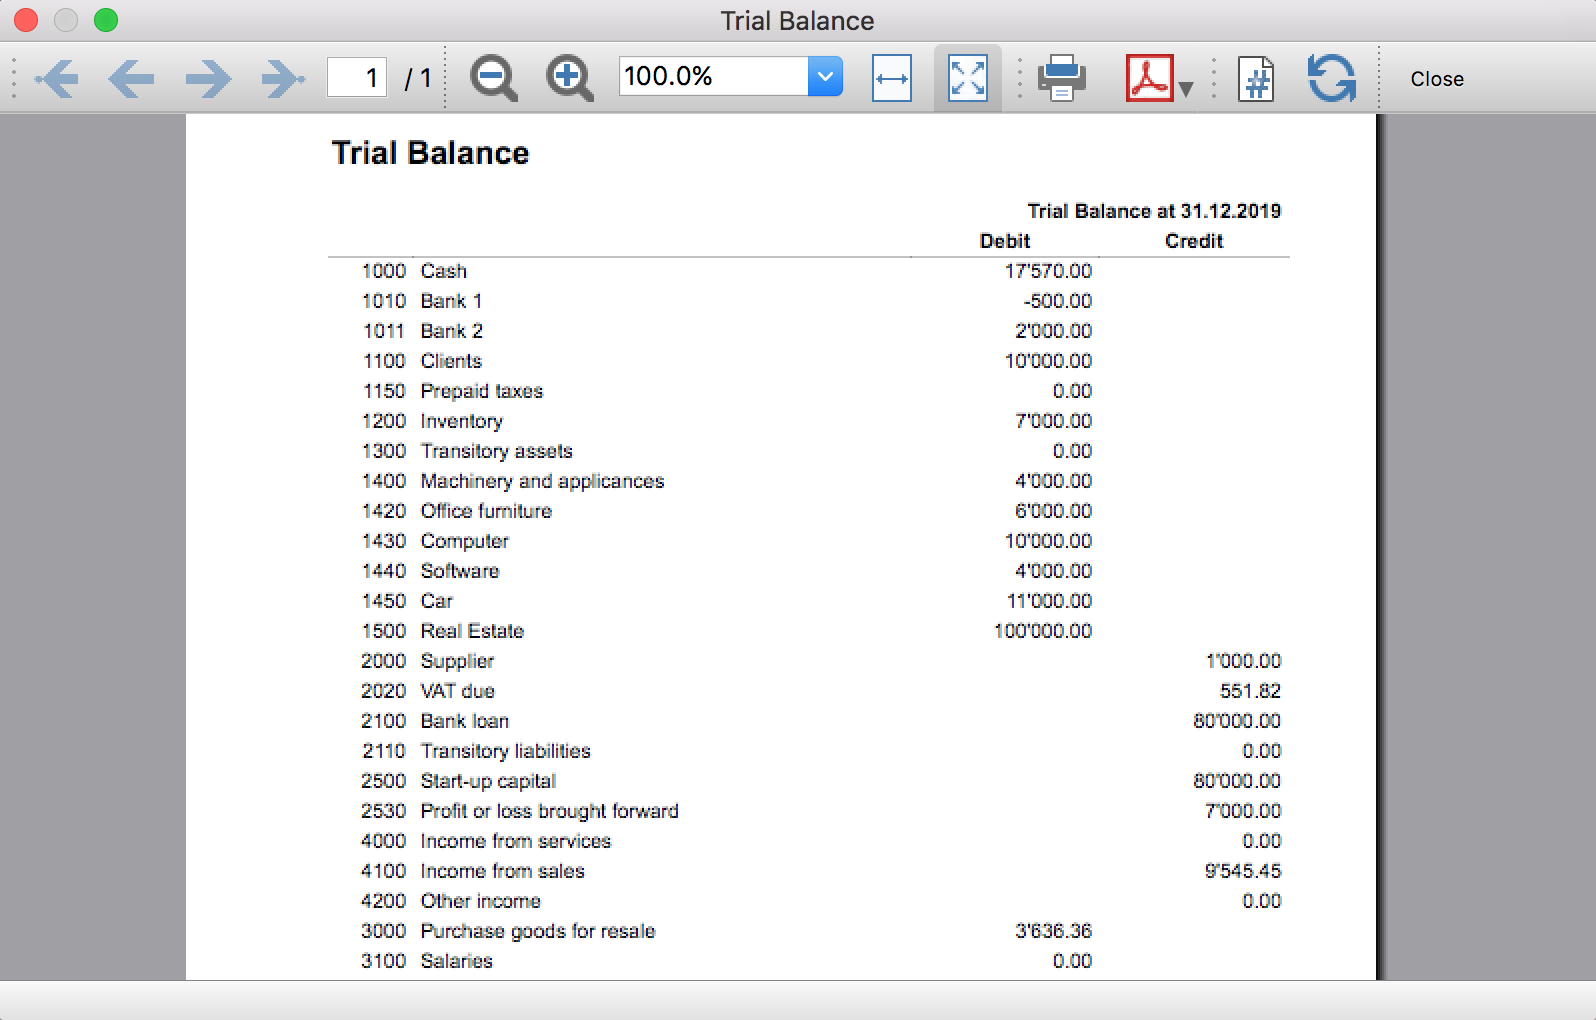
Trial Balance and Blockchain (Quarter periods)
Trial Balance and Blockchain (Quarter periods)This extension creates a report containing the table Accounts and at the end the blockchain for the selected quarter period.
Prerequisites
To use this extension you must download and install Banana Accounting Plus.
Install the extension
To install the extension:
- Open Banana Accounting Plus.
- Menu Extensions > Manage Extensions
- Select Universal as country.
- Select Online > Productivity.
- From the extensions list select Trial Balance and Blockchain (Quarter periods).
- Click Install to install the extension.
- Click Close to close the window.
Create the report
To creare the report:
- Open an accounting file.
- From the menu File > File and accounting properties, in the Header left and Header right fields enter the texts to be printed on the left and right in the page header.
- From the Extensions menu select Trial Balance and Blockchain (Quarter periods).
- In Settings dialogue select the period, set the header texts, the title and font, then click OK to create the report.
The texts of the settings dialog and column headers in the printout are fixed and are in the same language as the Banana file (defined from the menu File > File and accounting properties > Other > Current language). The languages that can be used are Italian, French, German and English.
Settings dialogue
Run the extension from the menu Extensions > Trial Balance and Blockchain (Quarter periods).
The extension Settings dialogue will open. From here you can choose some parameters to print the report.
- Period.
Select a period from the list. The periods are divided into three quarters. - Header left text.
Insert another text to be printed on the left side of the page header. - Header right text.
Insert another text to be printed on the right side of the page header. - Title.
Insert text to be printed as title of the page. - Font family.
Insert the font type. - Font size.
Insert the font size for all the page texts. - Title font size.
Insert the font size for the title.
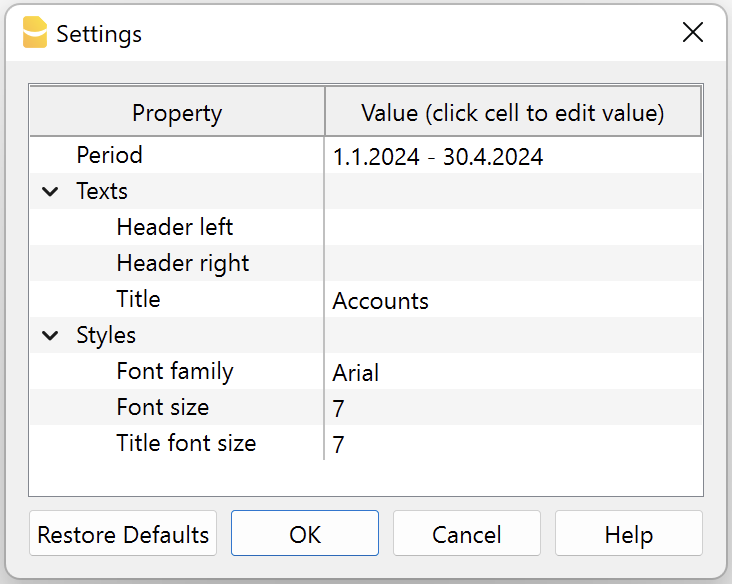
Print example
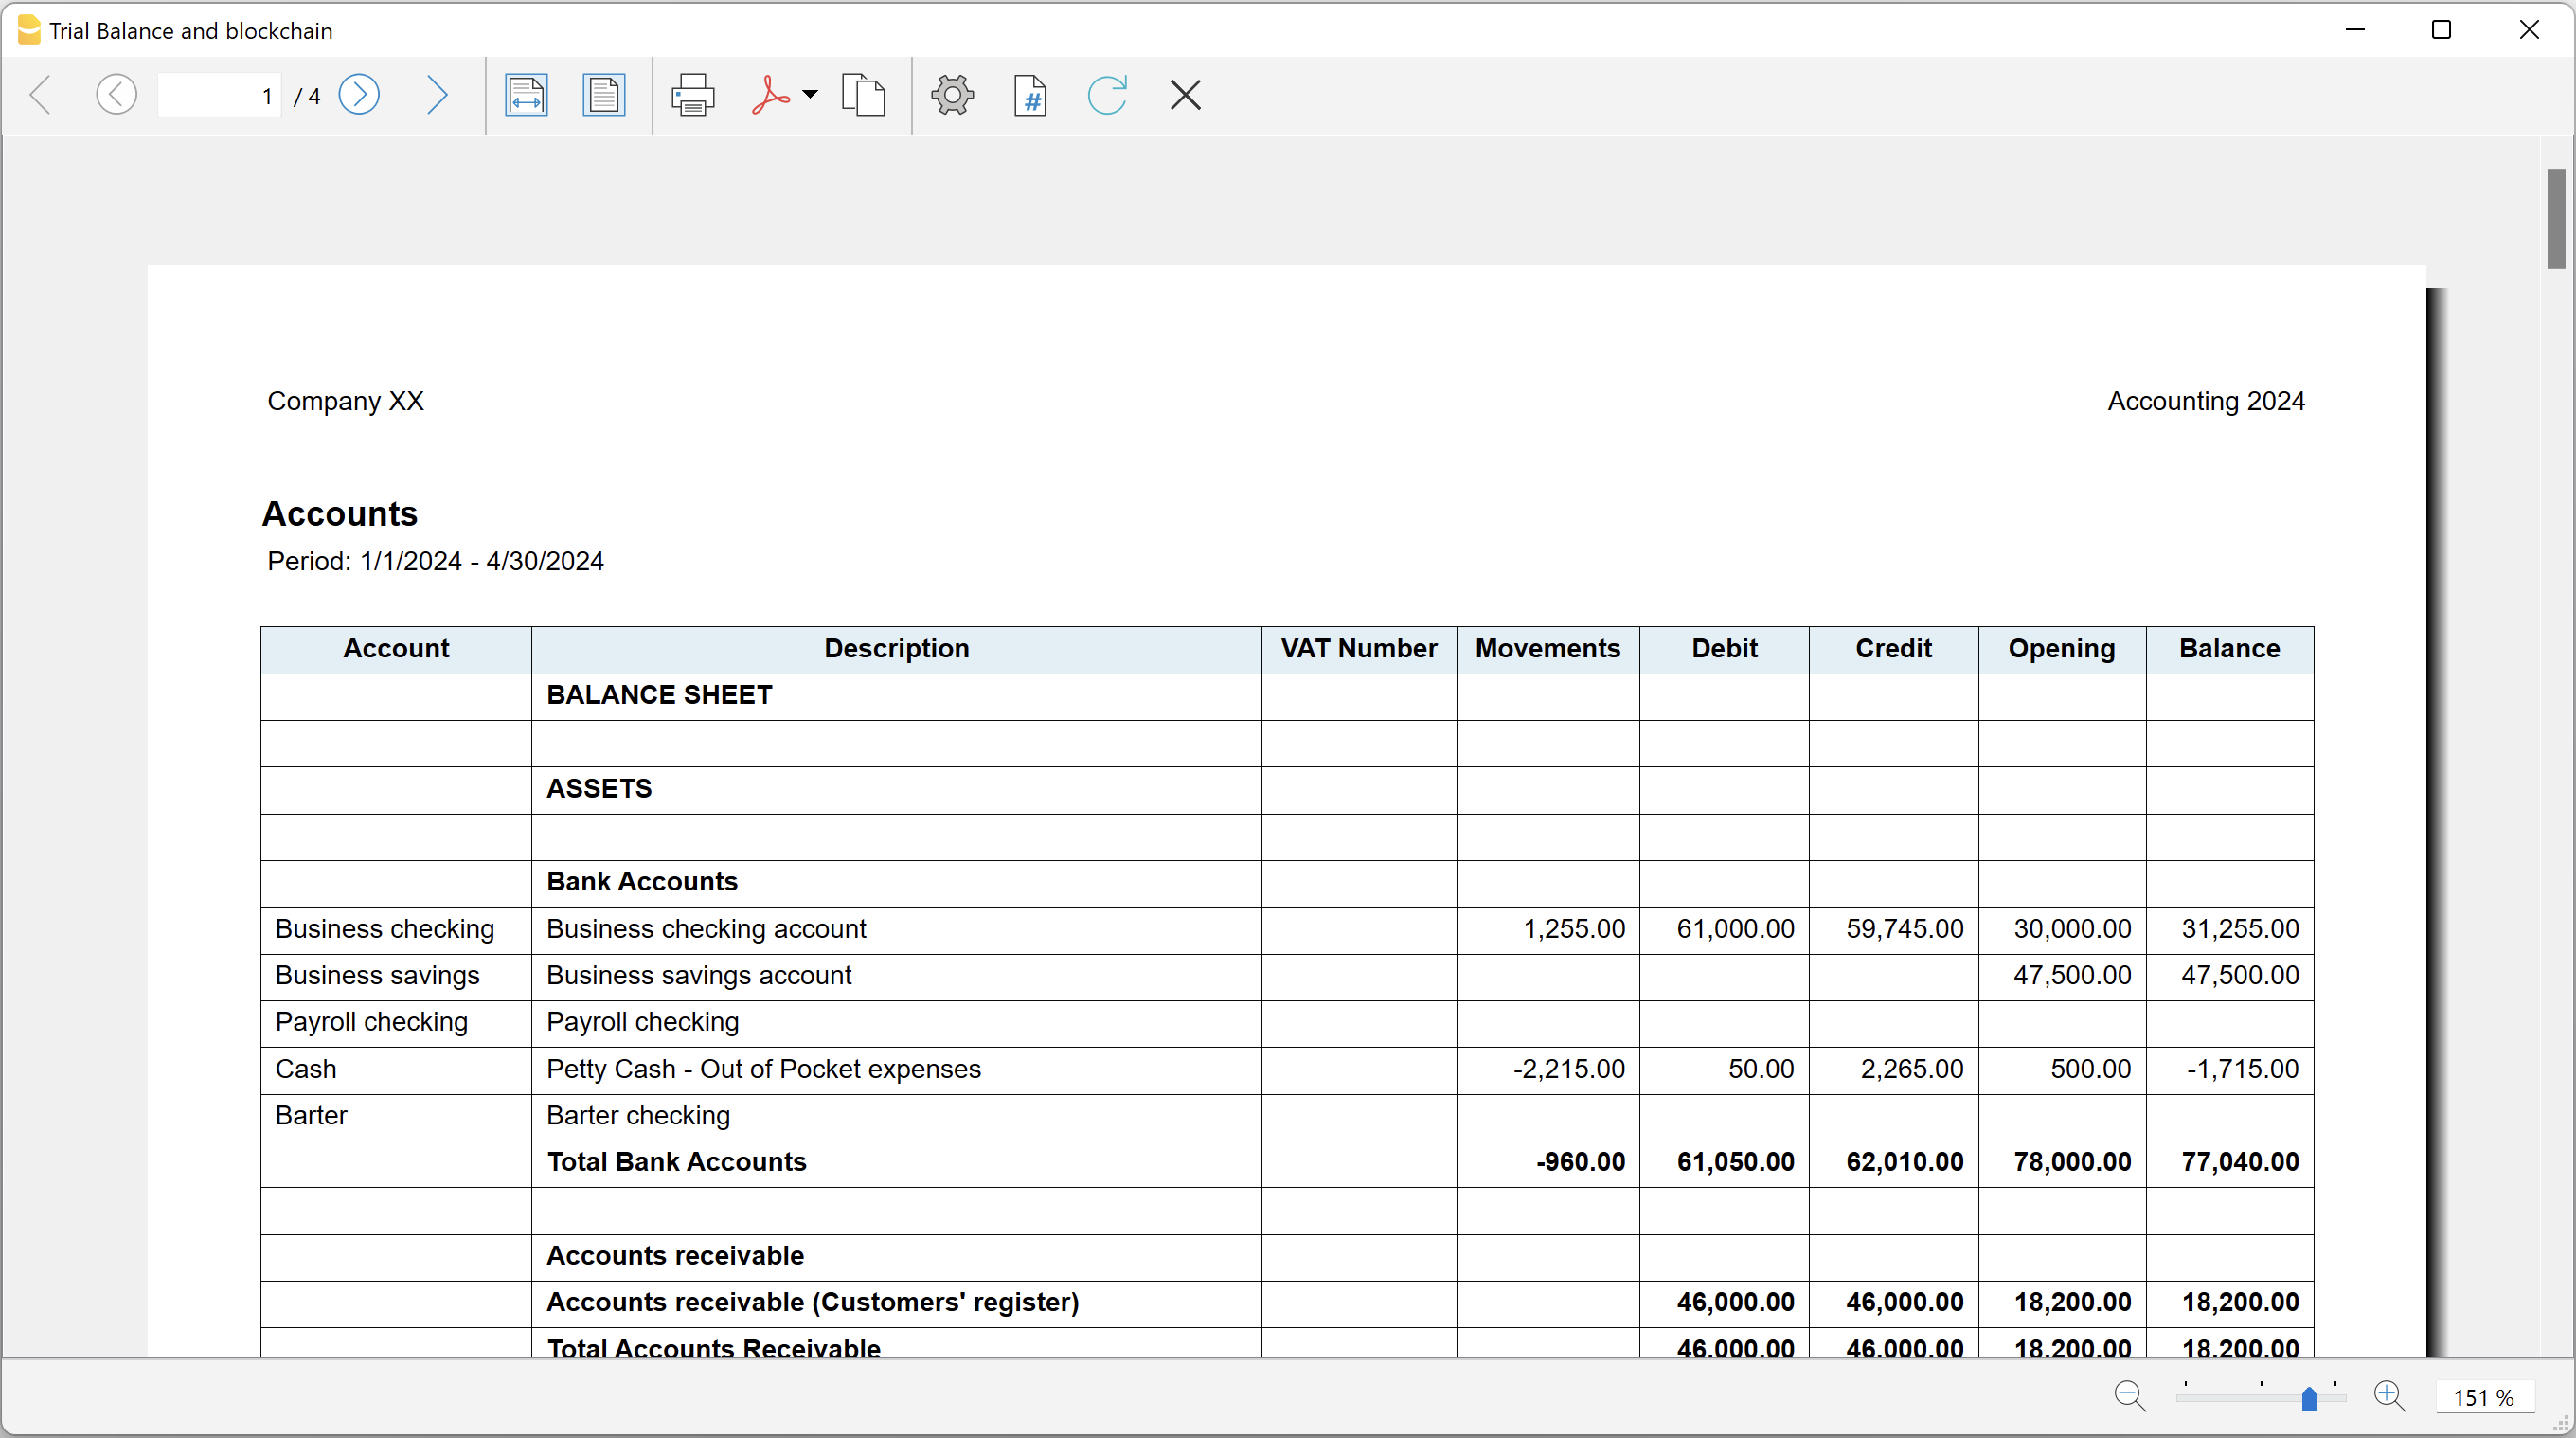
Trial Balance with transaction's lock blockchain information
Trial Balance with transaction's lock blockchain informationThe extension creates a report containing the table Accounts and the blockchain information regarding the transaction lock of the previous period and of the current period.
This printout has been conceived for a customer that has central SAP accounting and use Banana Accounting locally, to keep accounting for at more than 40 schools. Each school keep their own accounting and every 4 months the data is integrated in the main accounting system.
In order to assure that the information is perfectly synchronized:
- The school lock the transactions so that each movement is marked with a blockchain.
- The school print the report using this extension, with the data and the blockchain info of the current and last period.
- Prior to entering the data in the main system, the responsable verify that the blockchain of the last period already entered is the same as the one printed on the current report.
Personal at the schools can easily manage their finance locally and have more details and better control over the spending. Data is only entered in the main system periodically. The organisation have a better accounting system and save a lot of money in training and SAP licenses.
Install the extension
To install the extension:
- Open Banana Accounting Plus.
- Menu Extensions > Manage Extensions
- Select Universal as country.
- Select Online > Productivity.
- From the extensions list select Trial Balance with transaction's lock blockchain information.
- Click Install to install the extension.
- Click Close to close the window.
Create the report
To creare the report:
- Open an accounting file.
- From the menu File > File and accounting properties, in the Header left and Header right fields enter the texts to be printed on the left and right in the page header.
- From the Extensions menu select Trial Balance with transaction's lock blockchain information.
- In Settings dialogue set header texts, title and font as you want, then click OK.
- In Period dialogue select a period and confirm with OK to create the report.
The texts of the settings dialog and column headers in the printout are fixed and are in the same language as the Banana file (defined from the menu File > File and accounting properties > Other > Current language). The languages that can be used are Italian, French, German and English.
Settings dialogue
Run the extension from the menu Extensions > Trial Balance with transaction's lock blockchain information.
The extension Settings dialogue will open. From here you can choose some parameters to print the report.
- Header left text.
Insert another text to be printed on the left side of the page header. - Header right text.
Insert another text to be printed on the right side of the page header. - Title.
Insert text to be printed as title of the page. - Font family.
Insert the font type. - Font size.
Insert the font size for all the page texts. - Title font size.
Insert the font size for the title.
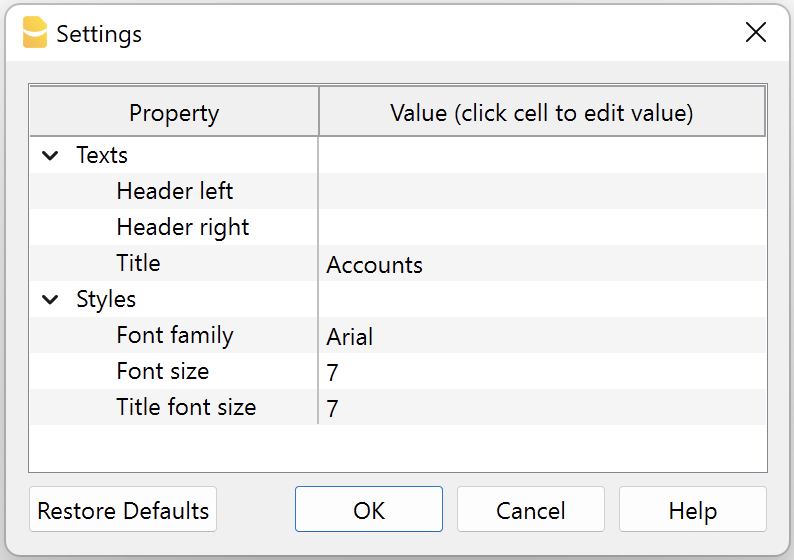
Print example
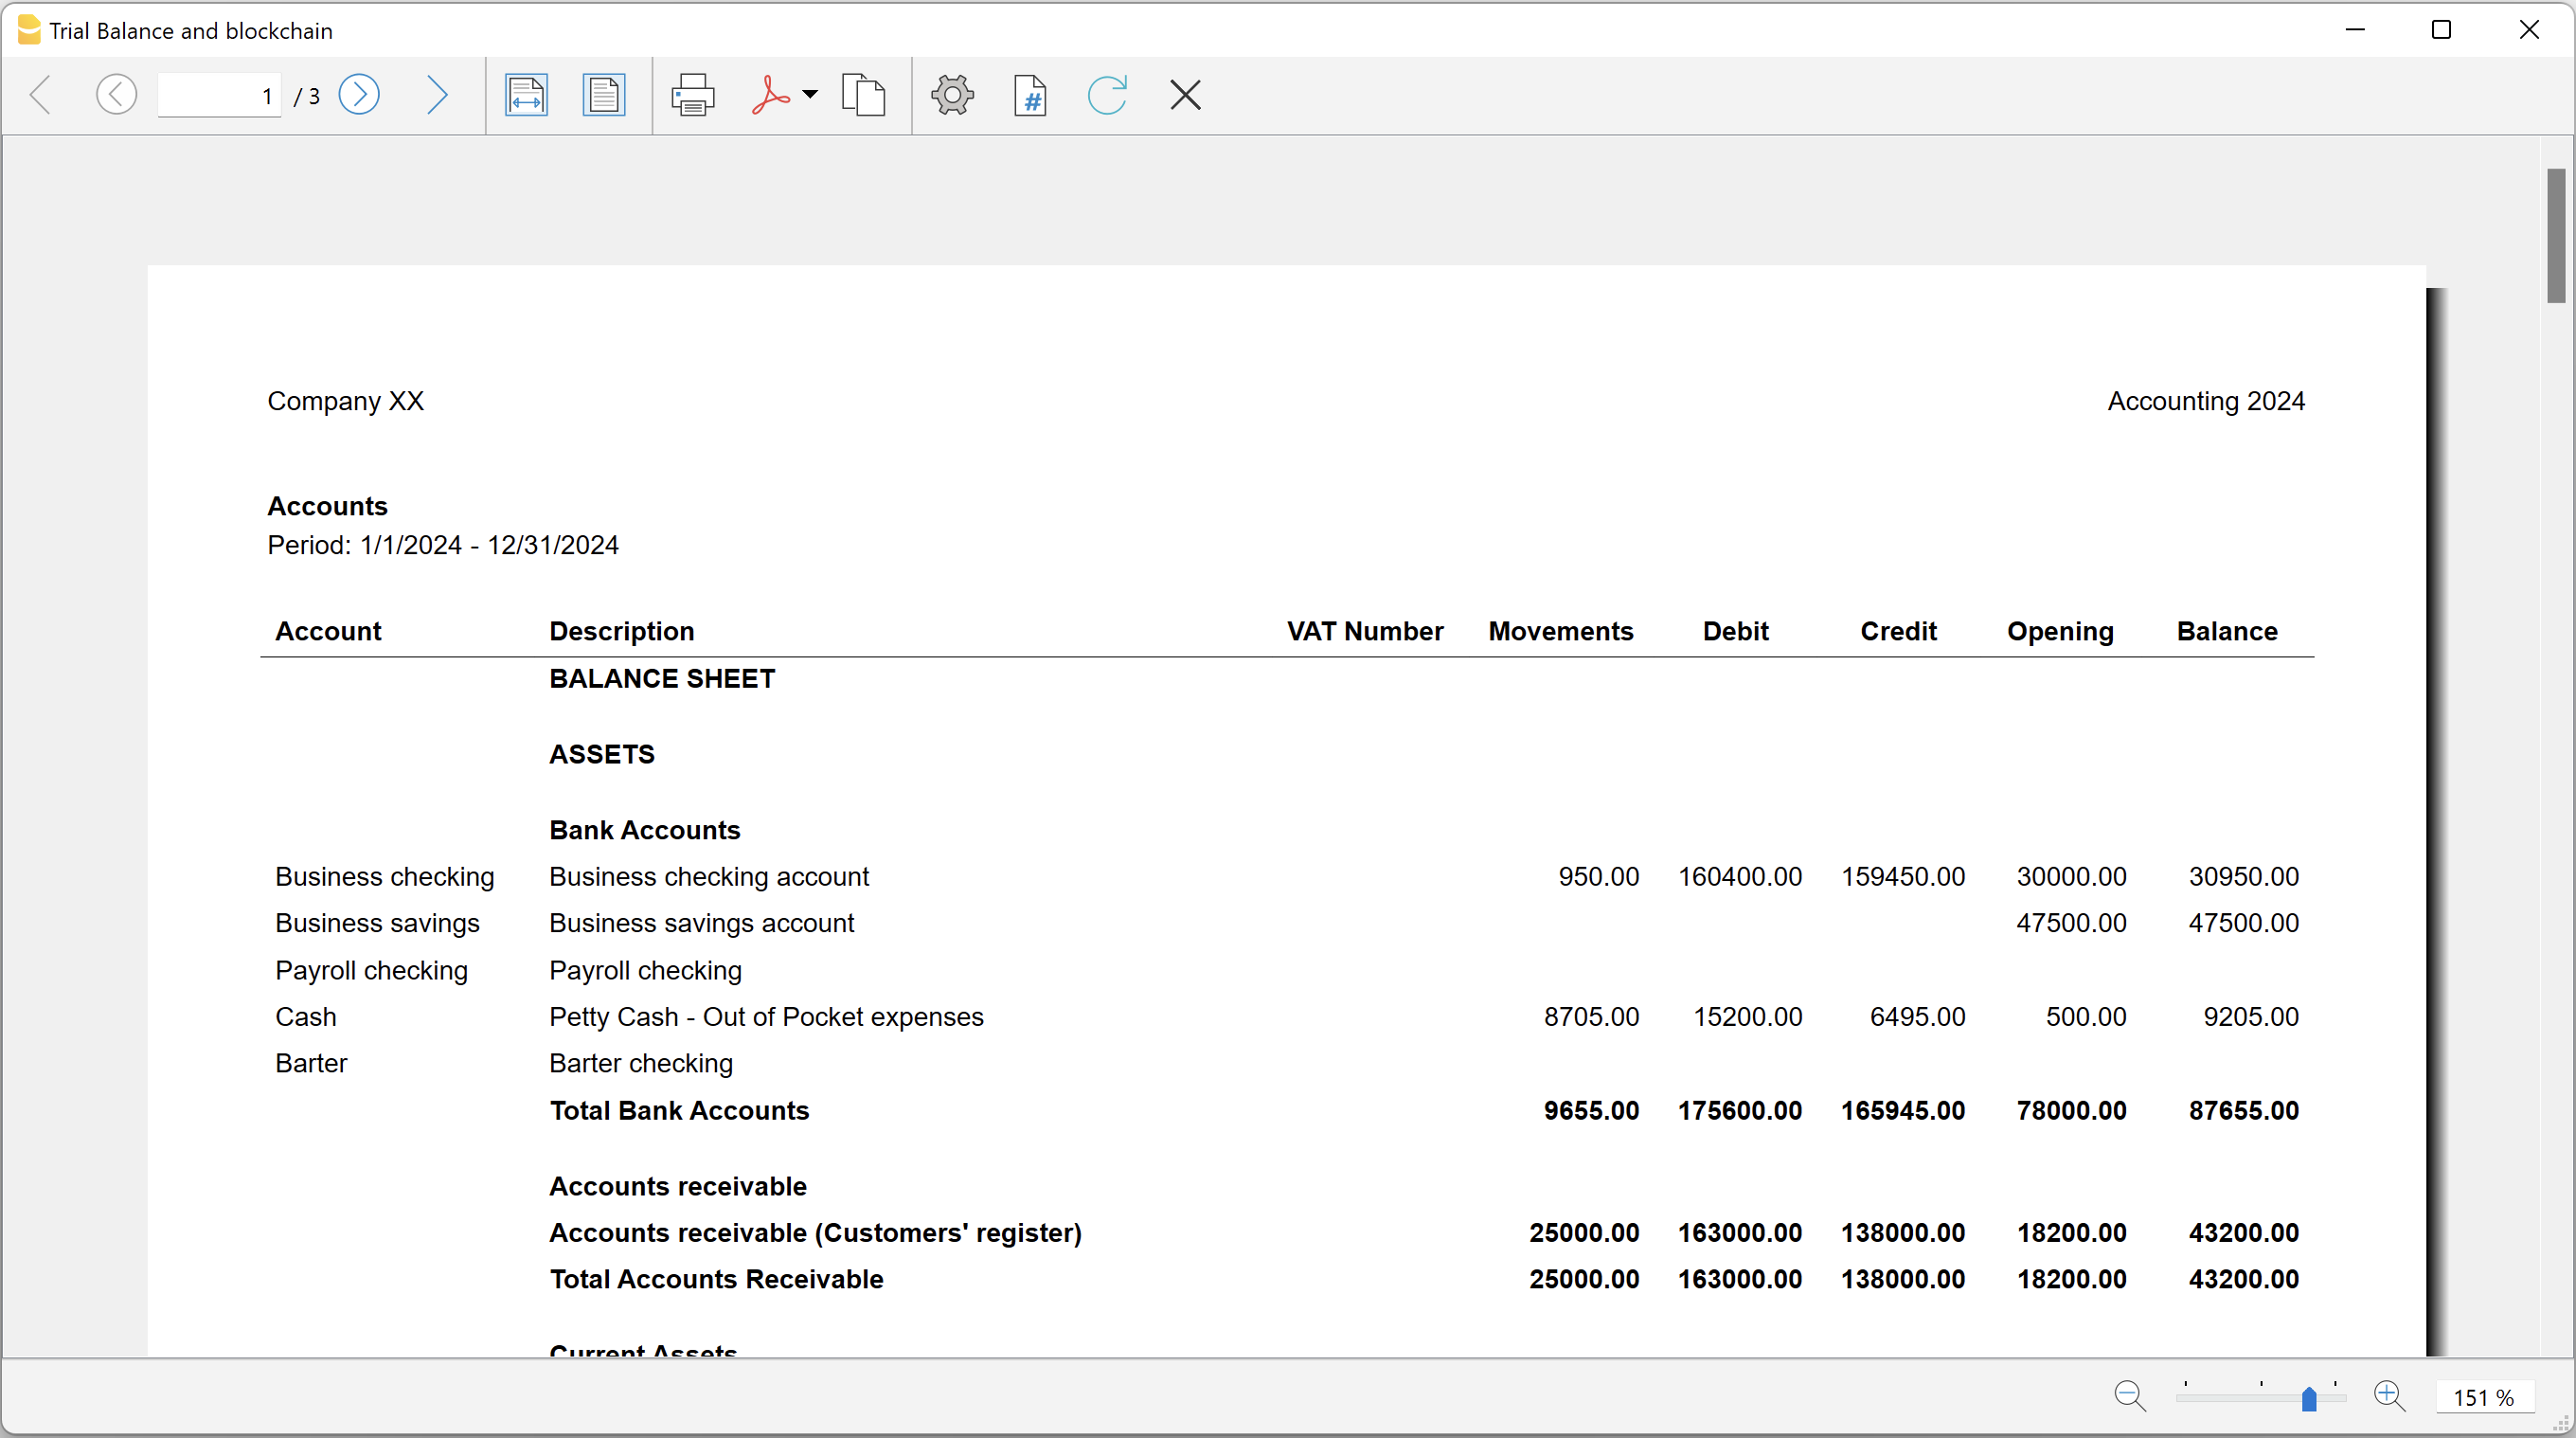
Blockchain row explanation:
- Date until which transactions are locked.
- Date of the last transaction.
- Number of locked transactions.
- Progressive hash of last locked transaction.