Invoicing
New layouts
In the new Banana Accounting Plus version, two new highly customizable layouts have been added:
- The CH10 layout for all users in Switzerland (with or without QR invoice)
- The UNI11 layout for all users in other countries.
We advise you to switch now to Banana Accounting Plus and take advantage of the many new features.
Invoicing integrated in the accounting management
With the invoicing function of Banana Accounting, you will be able to create and print out your invoices very easily, thanks to a series of predefined Invoice layouts that can be customized for each country.
In order to set up your invoices, you must create an accounting file. If an accounting file already exists, you may choose to generate your invoices within it, or you may want to create a new file dedicated entirely to invoice management.
In order to generate your invoices, specific file setups must be present in the accounting file:
 |
|
LogoIt is possible to insert a personalized logo. |
||
|
|
HeadingThe heading of the invoice will be identical to the one entered |
|||
|
|
Client AddressThe client's address will be identical to the one figuring in the Accounts table, where you will have set up the customer accounts with their addresses, learn more on setting up client accounts. |
|||
|
|
Invoice dataThe contents of the invoice must be entered in the Transactions table, learn how to enter invoices. |
|||
|
|
Custom text at endThere is blank space available for you to insert your own comments at the end of your invoice. Use Menu Account2 → Clients → Print Invoices → section Option layout. |
|||
|
|
ISR (Switzerland)Settings to create your ISR policy automatically can only be defined for Switzerland and for layouts that start with CH, please check: Menu Account2→ Clients → Print invoices → Settings. |


Follow these steps to create your invoices:
- Prepare your accounting files for invoicing with Banana Accounting
- Add customer accounts with addresses
- Enter data for your invoices
- Print invoices
Other functions:
- Print invoices in different currencies
- Print invoices in your customer's language
- Define due date of an invoice
- Invoices with the Swiss QR code and reference number (NEW - It is currently released in the Experimental version of Banana Accounting).
- Invoices with the Swiss QR code with empty amount and address (NEW - It is currently released in the Experimental version of Banana Accounting).
Related topics:
- Example file in Income/Expense accounting
- Example file invoices in Double-entry accounting
- Example file invoices using Cost centers
Useful for registering VAT on the cash-in basis or if you want to remove the details of the invoices from the budget accounts.
Setting up the file for managing invoices
New layouts
In the new Banana Accounting Plus version, two new highly customizable layouts have been added:
- The CH10 layout for all users in Switzerland (with or without QR invoice)
- The UNI11 layout for all users in other countries.
We advise you to switch now to Banana Accounting Plus and take advantage of the many new features.
Setting up the file
There are two ways to set up your accounting file for your invoicing
- Create a new accounting file, using an existing template.
- Adapt your existing accounting file.
New Accounting File
Several templates are available, containing a preset ledger of clients. Creating Invoicing is possible in the following accounting types:
- Double-entry accounting.
- Multi-currency accounting.
- Income & Expense accounting.
The listed accounting types may or may not include VAT options.
A new accounting file is created as follows:
- File Menu → New.
- Select the Region and the language.
- Type Invoice in the Filter by field.
- Select a template a template in the right hand section.
- Save your file with a name.
Please follow the instructions contained in the Invoicing documentation.
Adapt your existing Accounting File
If you wish to adapt your existing accounting file for creating your invoices, you will have to add certain functions and settings in order to be able to print them:
Insert the data for your company
- In the File menu -> File and accounting properties... you can setup your company's address and data, which will be used as the header of the invoice.
- To use your personal logo, check instructions here.
Set the list of customers in the Accounts table
-
In the Accounts table, you can setup your customers register
- Add and display customer address columns.
- In the Accounts table, you can select the Address view and enter your customer's data.
- If the Address view is not visible, you can add it using the Tools menu -> Add new functionalities... command -> Add Address columns in the Accounts table.
- Manage your customer settings via the Account2 menu -> Customers -> Settings.
Add the columns you wish to use in the Transactions table
-
Display the columns for Invoicing in the Transactions table:
- Data menu → Columns setup and check the DocType and DocInvoice boxes.
- Add the columns for Quantity and Unit Price (optional).
Tools Menu → Add new functionalities → Add Items Columns in Transactions table. - Add Items table (optional).
This will assist you keep track of your Items and micro-manage your inventory.
Tools Menu → Add new functionalities → Add Items table.
Invoicing managed in a file dedicated to Invoicing only,
If you wish to manage your invoicing separately from your main accounting, you will have to create a new file. You will insert the accounts for the clients you need for the Invoicing only, in your Plan of Accounts. Invoices are entered via the Transactions table.
This approach is suitable for when:
- Accounting on a cash-in basis. Only the the payed amount is entered in the accounting file.
- Wishing to keep the management of your invoices completely separate from your main accounting ledger, for example for an Association that needs to send membership fees to their members.
How to create a separate accounting file for invoices:
- Download the template, open it and adjust it to your requirements.
Alternatively, you may start out with any template and adapt it - as previously indicated - for use with invoicing. - Make sure al setups and and columns are present, as explained above.
Entering the invoice data
Invoice Data is entered in the Transactions table. Use a new row for each new invoice.
- Enter the Date for your transaction.
- The Invoice number.
- The text entered in the Description column (product, services, consulting ...) will appear on the invoice to your client.
- Insert the client number in the Debit column.
- Insert the counterpart in the Credit column (Sales account, Consulting fees etc).
- Enter the Amount.
- If your subject to VAT, enter your VAT code with the respective applicable VAT rate.
Invoices on multiple rows
If there are several elements to your invoice (different items or services, or both) you will have to enter them on separate line (one element per row):
- Use a new row for entering each item you wish to appear when printing your invoice.In
- Use equal dates and invoice number for each row.

Basic columns for Invoices in the Transactions table
Date
The invoices's data is reported in this column. All rows appertaining to the document must report the same date.
Invoice
In order to manage the invoices, it is mandatory that you enter an invoice number in the Invoice column and an account belonging to the customers register.
Extra Columns
Type
In the Type column, you can define detailed rows, such as totalization rows or a specific payment term for an invoice. This column is not visible by default, but must be displayed via the Data menu → command Columns setup and by checking the DocType column.
Quantity
The quantity of goods and services provided is entered in this column. To add the Quantity column use the menu Tools → Add new functionalities→ Add Items Columns in Transactions table.
Unity
Insert unity type (for example 'pz', 'h', 'm', 'kg').
Unit Price
Insert Unit Price for the goods or services. The program will automatically calculate the resulting amount for your input into the Quantity column.
Discounts and rebates
To enter a discount or rebate in an invoice, add a new row and enter:
- Invoice date.
- Invoice number.
- Description of the discount or rebate
- Accounts in the Debit and Credit columns. It is important to invert the accounts compared to the sales transaction.
- In case of VAT, indicate the VAT code with the minus sign, so that the VAT is deducted, or, if present use the VAT code for discount and rebates.

Set customer language
The default layouts include the following languages: Italian, German, English, French, Dutch.
Invoice texts are printed in the customer's language, provided that this is set in the Language column (Accounts table, Address view).
The language is an ISO code generally of 2 lowercase letters (it=italian, de=german, en=english, fr=french, nl=dutch).
In acse no language has been indicated for the customer account, the language of the accounting is used, defined in the File menu→ File and accounting properties (basic data) → Other.

Due dates and payment terms
The due date of an invoice can be set up in different ways:
- Generalized due date - identical due date for all invoices
Select menu Account2 → Customers → Settings → General → Invoices are due, indicate the period (in days) after which the invoice is considered due. As an example, if the date of your document is the 10th of May and you enter a value of 10 days, the due date will be the 20th of May. - Due dates per customer - specific for each customer
In the Accounts table, a DateExpiration column is available (if not on display set up via Data → Columns setup ...). The period (in days) after which the invoice is considered to be due can be set up in this column. - Specific dates per invoice
In the Transactions table a Due dates option allows you to display the Date Exp. column. -
Alternative text for the expiration date
It is possible to define a text of your choice as a payment term for each invoice. This will replace the text of the expiration date. Revert to Advanced input -Type column for detailed information.
Printing invoices in other currencies
You can print invoices in different currencies as well
- You must use a multi-currency accounting file.
- Invoices are printed in the currency of the customer's account.
If you want to send invoices in different currencies to the same customer, you must create accounts in different currencies for the same customer.
Advanced input -Type column
Advanced input -Type columnThe Type column in the Transactions table can be used to define the commands that are relevant to the display for printing data specific to your Invoice.
Check the DocType via menu Data → Columns setup ..., to display the column.
Entering data
Once the column is displayed, you may proceed by entering your data. You will need to:
- Add an empty row after the Date of the Invoice.
- Enter the date of the Invoice in the Date column.
- Enter the required parameter in the Type column (refer to table below)
- Enter the Invoice number in the Invoice column.
- Enter the data relevant to appear on the Invoice in the Description column.
Invoice to the customer
Typing 10: the Type column will list all possible options available to customize the data of your invoice.
| Invoice data | Column Type | Description column |
|---|---|---|
|
Client address If an address different to the one defined in the Accounts table (Address view) is required, it may be specified using the appropriate options. Indicate elements of the address in each row (name, surname, address...). |
10:adr 10:adr:fna |
Enter name |
|
Greetings After the invoice details, you may add a line of text for your final greetings. |
10:gre | Enter your greetings |
|
Final notes One or several rows of notes can be inserted after the details of the invoice and before the greetings. |
10:not | Enter your notes |
|
Parameters (advanced) When wanting to print personalized data on the invoice, you can use the appropriate command. This option is aimed at users with JavaScript programming knowledge, and allows you to change the invoice layout, so as to use the parameters indicated via this command. For further information please revert to Printing custom data. |
10:par | Enter your customized parameters |
|
Payment term Should you want to indicate an alternative text as a payment term, enter the desired text. This will be displayed on the invoice. |
10:ter | Enter the alternative text for the payment term |
|
Title If you do not wish to use the default invoice title, you can choose a different title. |
10:tit | Enter your text to appear as the invoice title |
|
Items subtotals It is possible to enter intermediate totals for your invoice in the table with the details of the invoice. |
10:tot 10:tot:0 |
Enter level 0 subtotal |
Intermediate Totals
In order to insert intermediate totals, you will need to add additional rows in the Transactions table:
- Enter 10 in the Type column: select :tot from the drop down menu, 10:tot will display. Select and enter :1
- Enter the appropriate description in the Description column (ex. Total goods)
- Enter the Invoice number (in the absence of number, the total will not be printed).
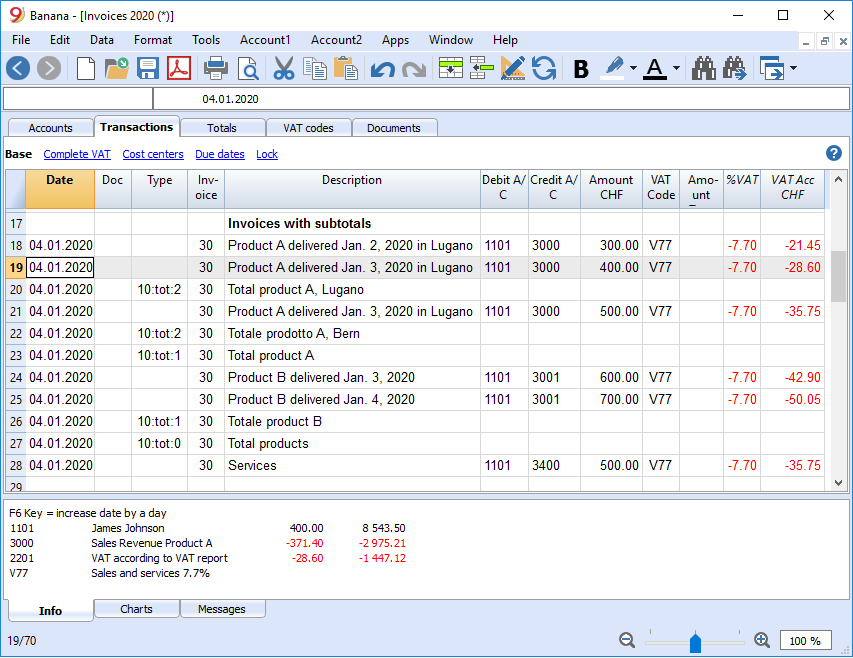
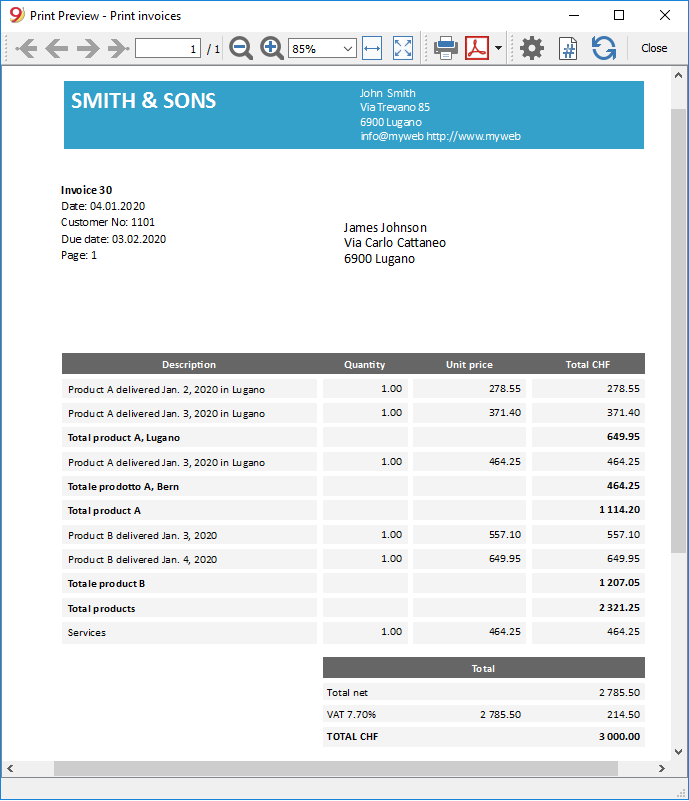
Example of Invoice with intermediate totals.
Alternative text for payment terms
It is possible to define your own wording as a payment term for each invoice and this will replace the existing text for the expiry date.
- Enter an additional line with the same invoice number in the Transactions table.
- You will need to enter 10: in the Type column and select :ter from the drop-down menu, select> 10:ter
- In the Description column, enter your text (ex 30 days net, 60 days etc ..).
When the invoice is printed, the value assigned as a payment term will be displayed.
Print invoices
The Print invoices dialog is accessed from the Account2 menu → Customers→ Print invoices...
Once you have chosen the printing options, press the OK button to preview the invoice.
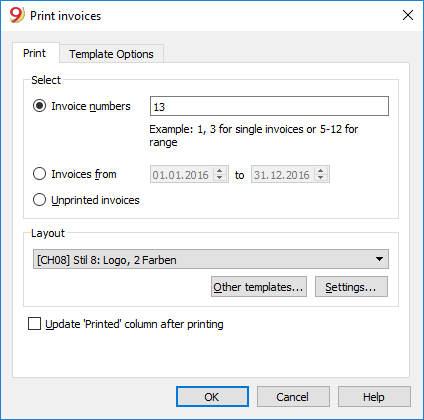
Print tab
Invoice numbers
In order to print single invoices, indicate
- The number of the invoice for a single print;
- The numbers between commas "1,3,6" for multiple prints.
- The numbers separated by hyphen "1-3" to print a range.
If the invoice itself contains a '-', for example if you have an invoice number '2016-1', this must be enclosed in brackets {}, to distinguish the numbering of a range of documents {2016-1}-{2016-3}.
Invoices from
This option allows you to print all invoices included in the selected period. You need to enter an initial and final date.
Unprinted invoices
Invoices where the 'Printed' column of the Transactions table is empty are printed. All unprinted invoices are therefore printed.
Layout
The styles allow you to change the invoice layout. Templates with logos, with quantity column or with ISR slip are available.
Other templates
This button takes you to the Manage Apps dialog window, where you update your templates to the most recent version or to add your own.
Settings
You can setup specific parameters for the selected style, refer to explanations in the Templates page for further information.
The main options are:
Update the 'Printed' column after printing
You can make this column visible by using the Data menu -> Columns setup command.
The program will update the content of this column after the print preview, adding the text '1'. This will allow the Select unprinted invoices command to only print the invoices with no content in this column.
Templates Options tab
In this tab it is possible to add specific texts for every language, such final greetings or your bank details to facilitate the payment.
Depending on the customer's language, the program will display the saved texts for the indicated language at the end of the invoice.
Select the Account2 menu → Customers → Print invoices → Templates options, enter the desired text and then press OK. You will see the print preview.
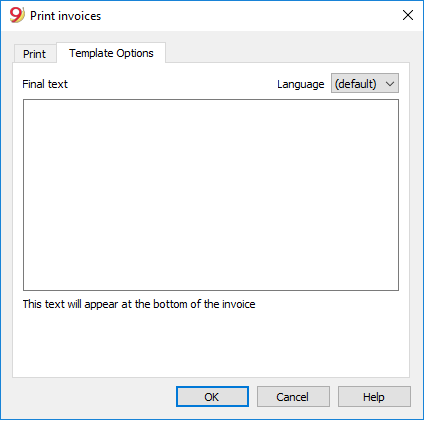
Templates and settings
New layouts
In the new Banana Accounting Plus version, two new highly customizable layouts have been added:
- The CH10 layout for all users in Switzerland (with or without QR invoice)
- The UNI11 layout for all users in other countries.
We advise you to switch now to Banana Accounting Plus and take advantage of the many new features.
Predefined Templates
Several templates for invoicing, sending reminders and reports are available in the program. Printing characteristics are different for each template.
There are some layouts that display amounts with VAT included and others that display amounts net of VAT and add VAT separately to the total.
You can install or remove the templates through menu Account2 -> Customers -> Print Invoices -> Other templates or menu Apps -> Manage Apps.
Change template parameters
For each template some parameters can be set up and changed, such as including (or not) of a header, ISR payment slip (Switzerland only), modifying text- or background colors. Here is how to proceed:
- Menu Account2 -> Customers -> Print invoices
- In the Print section -> Layout, choose the preferred template from the list
- Click on the Parameters button to define your preferences.
Select a different template
- Menu Account2 -> Customers -> Print invoices
- In the Print section -> Layout, choose the preferred template from the list
Update predefined templates
The default templates are being updated automatically, or you can force the update through the menu Apps -> Manage Apps... -> Update Apps.
Create your own customized invoice
To create an invoice App you need programming knowledge, javascript language.
Banana allows you to modify the layout of your invoice; if none of the predefined templates matches your needs, you may create your own by customizing an existing one or by creating one from scratch.
More information can be found here: Create your invoice Layout
Settings of the invoices
By clicking on the Settings button (menu Account2 → Customers → Print invoices), you access the dialog that allows you to change the parameters of the invoice (header, logo, ISR, colors,...).

- Include page header - Check box for Yes or leave empty for No, enter 1 for Yes or 0 for No in versions previous to 9.0.4.
- Print logo - Check box for Yes or leave empty for No, enter 1 for Yes or 0 for No in versions previous to 9.0.4.
- Print ISR - Check box for Yes or leave empty for No, enter 1 for Yes or 0 for No in versions previous to 9.0.4.
Layouts starting with [CHxx] allow for printing in ISR font (Switzerland only). - Bank name - indicate bank name
- Bank address - indicate bank address
- ISR account - ex. 01-9999-9 (enter with dashes).
- ISR subscriber number (ID), ex. 113456 (insert without dashes)
- Character horizontal scaling (optional) - font size - it is normally not necessary to change from the default values
- ISR X-Position and ISR Y-Position (optional) - horizontal and vertical number positions - it is normally not necessary to change from the default values
- Print ISR on new page - Check box for Yes or leave empty for No, enter 1 for Yes or 0 for No in versions previous to 9.0.4.
- Font type - enter font type you wish to use, ex. Arial, Times New Roman, ...
- Background color - Background color may be customized in the header table of the invoice. Predefined value: #005392 (blue).
- Text color - Text color may be customized in the header table of the invoice. Predefined value: #ffffff (white).
Final text
You can enter lines of text in the lower part of the invoice. This can be useful, for example, for entering bank data.
Select Account2 ->Customers -> Print invoices -> Template options. Enter the desired text in the Final text field and confirm with OK to obtain a print preview of the invoice.
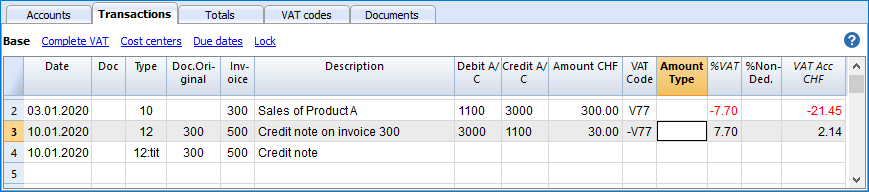
Credit notes
Credit notes have their own TypeDoc, different from invoices.
- Enter your transaction, as if it was an invoice.
- Indicate the credit note number in the Invoice column.
The accounts will follow the logic of recording a credit note. As a result, the amount of the document will be negative. - Enter '12:' in the Type column.
- Enter the wording Credit Note instead of Invoice into the Description column.
In some print layouts the wording Invoice will always be printed, to change, proceed as follows:- enter a new row with identical invoice number and 12:tit in the Type column.
- insert Credit Note in the Description column.
Printing the credit note
The same command is used as the one for printing invoices: Account2 → Clients → Print invoices.
Print payment reminders
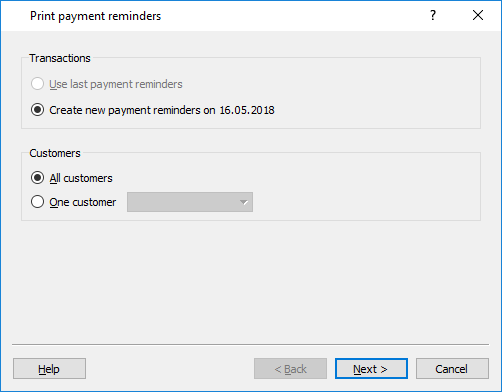
- The program automatically creates the payment reminders from the overdue invoices
- In addition to the printouts, the program directly creates the transactions in the Transactions table, which are used to recreate the issued reminders history.
- These transactions show the document date and the document Type: 16-1 first reminder, 16-2 second reminder and 16-3 third reminder.
Use last payment reminders
If in the Transactions table there are reminder transactions with the indicated date, the program will suggest to print these reminders.
Create new payment reminders
For all expired invoices new reminder transactions are created, that can be then printed.
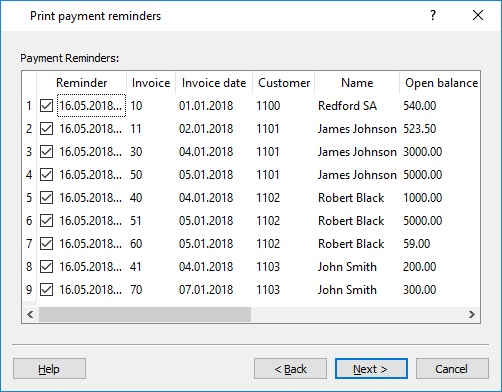
Payment reminders
The program will show the expired invoices, which you can deactivate if you do not wish to send the reminder.
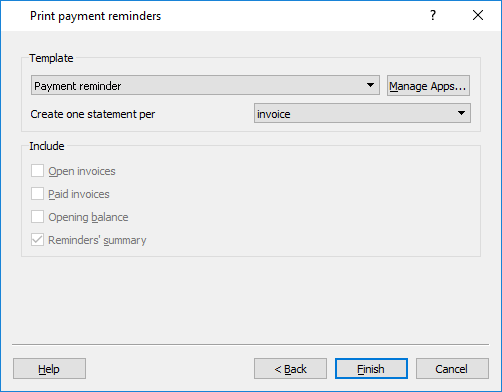
Template
The styles allow you to change the print layout.
Manage apps
Use this button in order to update the templates with the most recent ones or to add you own templates.
Use this button in order to setup the selected style parameters.
Print statements
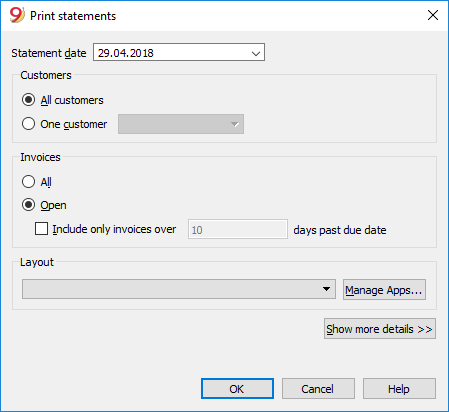
Statement date
This is the date printed on the statement. It is not possible to set up a date prior to the date of the last existing transaction.
Layout
The styles allow you to change the print layout.
Manage apps
Use this button in order to update the templates with the most recent ones or to add your own templates.
Use this button in order to setup the selected style parameters.
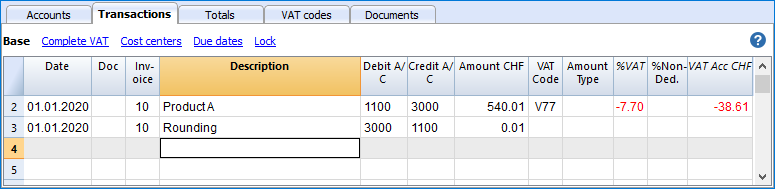
Roundings in the invoices
When you print out an invoice in CHF, the total will rounded to the next 5 cents, if necessary. If the total on the printed invoice does not match the transaction amount, the user will be notified of the difference.
If the rounding up of the total amount is not required, select command Account2->Customers->Settings->Advanced in order to set the desired rounding, such as 0.01, which will match the total of the invoice to the transaction amount.
Create the rounding transaction that will be included in the invoice printout, see example: