Free Time Sheet application
The Timesheet is a free and unlimited application because it is included in the Banana Accounting Plus Free Plan. It works like Excel but is optimized for calculation of hours. It is therefore much more reliable and you can easily manage all kind of working hours. You have a comprehensive view of the hours and can always correct.
Follow specific settings:
 | HeadingThe Time sheet header data is taken from those entered in the menu | |||
Schedule Working time scheduleYou can plan your working hours by entering the hours carried over of the previous year, working days, holidays and working hours due in via the following menu | ||||
Dates, holidays and festive daysYou can define the period and customize holidays and non-working days. Use the Journal table of the Time Sheet, Festive column | ||||
Time sheet dataEnter the Time sheet data, recording your working hours, absences and planning your vacation day by day. Go to the Journal table of the Time Sheet to enter your data . | ||||
CheckStay in control of the totals and balances of hours worked, payment due, leaves and holidays. |
You can set the hours you have to work every day and thus have the balance of hours constantly updated. You can also indicate the vacation days you are entitled to, enter the holidays you will take, and will always know how many days are still have available.
The Time Sheet allows you to have a complete report to present to your employer, which allows you to comply with the legal obligation to keep track of hours worked.
Useful links
Characteristics of the Time Sheet
The Time sheet is the new Free Banana Accounting Plus application that allows you to easily manage your working hours and instantly know the situation of hours worked, overtime, holidays, absences.
To start, just download and install Banana Accounting Plus and, when creating a new file, choose the Time sheet template.
Multiple automations to allow for quick and easy management of hours .
- Software available free of charge, to work on any operating system, including mobile.
- Easy to use and implement solutions, no login and password required.
- Each employee keeps the file on their computer or mobile device.
- Fully adaptable to the requirements of the employee and the company.
- Great time savings and calculation errors are avoided.
- File templates available with the calendar of the current year.
- Powerful and automated calculation system.
- Uniformity of calculations. All calculations are based on hours and minutes and this makes it possible to adapt to every case and requirement.
- Balances and totals updated instantly by day, month and year.
- Data entered in predefined columns, for results that are always ordered and clear.
- Forecast for working hours.
- Management of project hours.
- Hours worked and indication of less or more hours worked and progressive balance.
- Indication of the holidays taken and remaining, with carry over to the following year.
- Possibility of coding other useful information for the company (projects, expenses, notes).
- Complies with the regulations of the European Court of Justice and Swiss regulations.

How to keep the hours
The Time Sheet supports different data collection methods:
- Systematic collection.
Enter the work start and stop times and the program will calculate the hours worked. Display the Start1-Stop1, Start2-Stop2, ... , Start5-Stop5 columns where you can enter the times of beginning and end. - Simplified collection.
Indicate the hours worked in a day,
Display Work1 and Work2columns to enter the hours worked of the day. - Mixed collection.
You can enter both the time of beginning and end, or the time worked.
Display the Start and Stop columns and the Work columns.
Accurate and uniform calculations for every use
The time sheet always uses the hour and minute format (for example: 8:15). Holidays and absences are also indicated daily with hours and minutes. This allows for easy and accurate management of situations with irregular working hours, or that are subject to change.
The totals are also always shown in hours and minutes. This uniformity allows an exact overview of one's work situation, fully compliant with legal regulations, and avoids discussions between employee and employer regarding the calculations.
Below is an overview of how data entry and calculations take place.
- Expected working time (hours due)
For each single day of the week, the exact number of hours and minutes of work expected can be indicated. The program indicates the expected total of hours per week. The working hours can also be changed only temporarily (for example change of hours during only one week). - Hours worked
The daily working hours can be entered with taking up work or leaving time(s), or even as a total of hours and minutes or a combination of both. The program then calculates the total number of daily hours worked. - Extra hours for nightshift or holidays
They can be specified both as hours and minutes and as a percentage; the program then calculates the total. - Holidays
They are indicated in hours and minutes for the entire year. It's simple, just multiply the total hours per week by the number of vacation weeks. The program calculates the remaining holiday balance which will be accurate to the minute, even if the working hours are variable. - Absences due to illness, military service or any other kind
They are also referred to as hours and minutes. The program then calculates the total number of absences per day. - Total hours
This is the sum in hours and minutes of hours worked, supplements and absences. The program calculates the daily difference between the hours due (expected) and the total. There is also a progressive counter of the differences so that you have an instant view of the hours balance. - Columns related to time counters
The program will calculate the monthly and yearly total, displayed in hours and minutes format, so that you have complete control and consistency of calculation. - Hours in decimal format
When entering hours, you can also indicate a decimal number (8.50) and the program converts it to hours and minutes (8:30). - The Time sheet also displays some totals in decimal hour format, so as to simplify the insertion into other programs.
- The monthly report presents the totals of the daily and monthly hours.
- Print extensions allow you to total and view working time in any other format.
File and data saving
- All the data is saved in a single file, where you can easily retrieve everything without wasting time.
- Give the file the name you want.
- You can manage an unlimited number of files.
- Save your data to any media, computer, network, cloud or it can be emailed. You can access it wherever you are.
- Make your Time sheet more secure by using password protection.
Based on columns such as Excel
The Time Sheet has a Journal table with columns already set up, where you can write down your working hours (start and end time), holidays, overtime or any sick leaves, day by day.
- The columns of the Journal table are predefined and can be displayed as desired.
- Predefined columns for many needs:
- Working hours forecast.
- Actual hours worked.
- Difference between hours worked and expected hours. Therefore, the overtime hours or hours to be recovered are reported.
- Annotations and Refunds.
- Hours for projects.
- Possibility to add multiple rows for the same working day.
- In the Links column you can add a Link to a document (example medical certificate).
- The Search command allows you to quickly search for data.
Error reporting and control
- Command for recalculating the Time sheet.
- Reporting of any wrong settings, differences or errors.
- Each report contains a link to a help page that explains the causes and the solution.
- Possibility to correct.
Monthly Printouts and Reports
- Printable ledger as seen on the screen, or by selection.
- Monthly Report.
Exporting, Importing and Archiving data
- Copy and paste directly to and from Excel.
- Export tables to pdf and various other formats.
- Archiving of printouts and accounting data in pdf or other formats.
- Saving the accounting file on any backup device.
- Importing time sheet data into other programs.
Comprehensive documentation
- Each dialogue and error has its own documentation page accessible in a click.
- Constantly updated documentation.
- FAQ.
- Documentation also available in Pdf format.
Features currently not available
These features, although requested by some users, are not available at the moment:
- Possibility to include the logo on the printout of the monthly report, as well as an indication for the signature, and to be able to select the columns to be printed.
- No link with billing. Working hours must be reported manually in the billing
How to start a Time Sheet
To use the Time sheet, Banana Accounting+ has to be be downloaded and installed. In the free version, the Time sheet is in unrestricted mode.
For a quick and easy start of the Time sheet, we recommend opening one of our templates.
Banana Accounting includes three types of template with preset columns:
- Systematic records - the start and end times of work are indicated, as generally required by law.
- Simplified registrations - enter the daily hours worked (with due hours setting).
- Hourly wages - the daily hours worked are indicated (without setting hours due).
Setting up your Time Sheet file
Proceed as follows to set up your file:
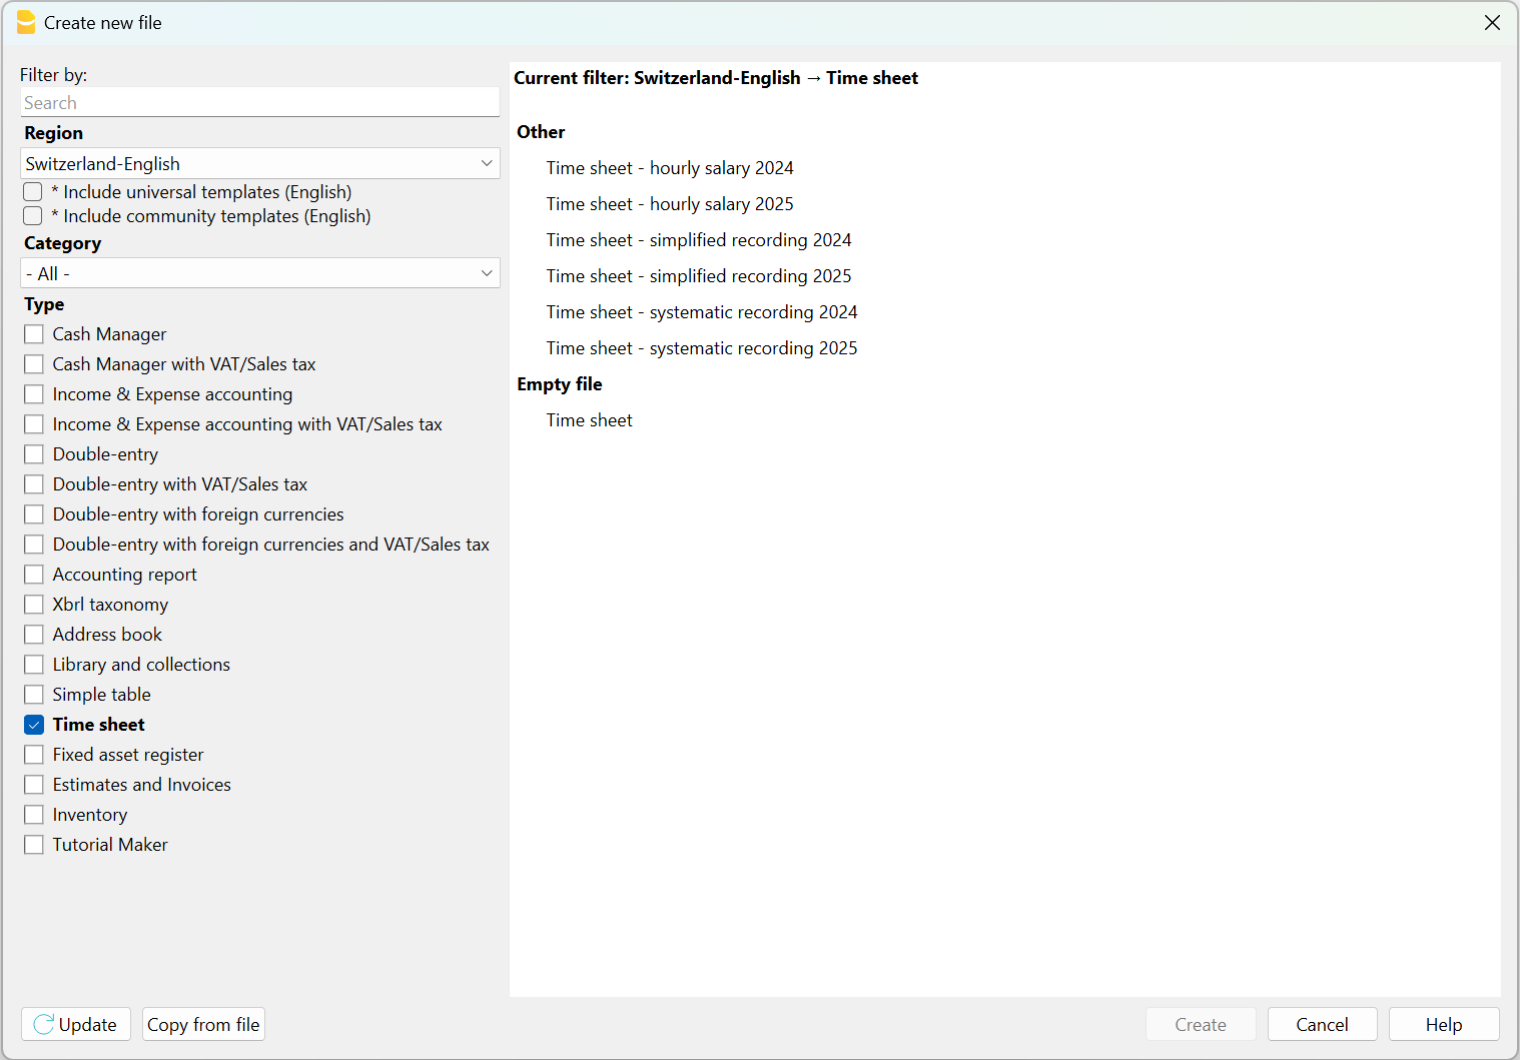
- File menu → New
- Select the Region/Language
- Select the Category -> All or Other
- In the Search area, type Time Sheet, or activate under Type -> Time Sheet. The program displays the available templates.
- In the section on the right, select the desired template.
- By double clicking on the name of the selected template or on the Create button, the program will directly open the file.
- Save the file under a new name.

Setting up your data
- Set up your own data from the File menu -> File and accounting properties (Basic data) -> Time Sheet .
- Enter your first and last name, start and end date, work percentage of work and other required data if available.

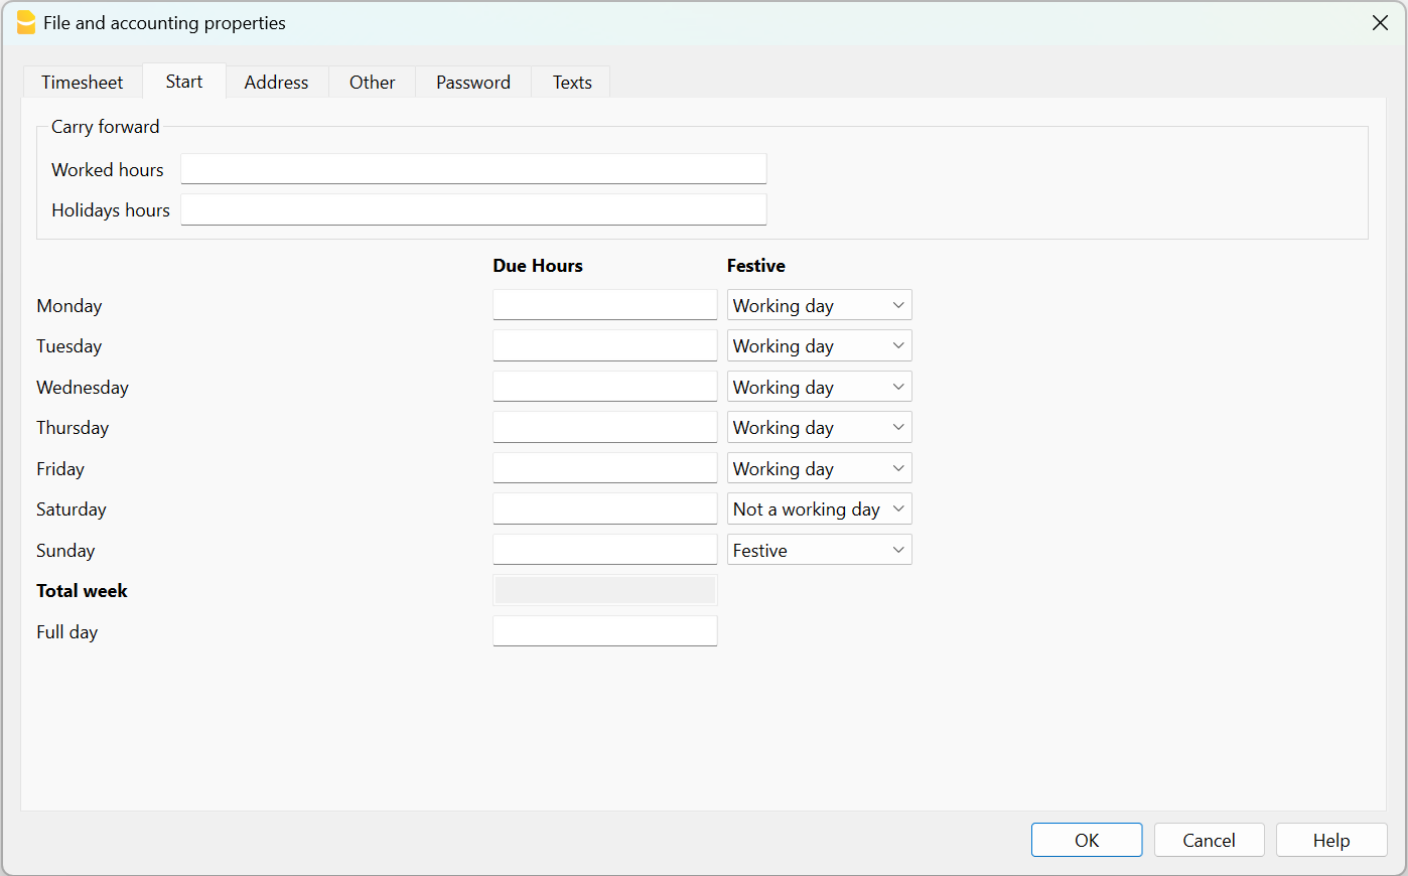
Set working hours as per contract
- Set the weekly working time via the File → File and accounting properties → Start .
- The cells of the Report are intended for unpaid hours of work and for hours of unused holidays carried over from the previous year.
- Enter working hours for each day and define working days, festive days and holidays. These settings are displayed in the Journal table.

Recording work time
In the Journal table you enter the daily data, the time of start and end of work, the hours of absence due to illness, holidays and leave. The data can be modified and entered as required.
- Write down the hours of vacation you are entitled to in the current year.
- Include, edit, add, personalize any holiday if needed.
- Enter your daily hours of work, sickness, vacation, etc.

- The first row of the Report shows the hours of holidays not taken from the previous year, present in the Start dialog.
- In the Start row of the first day of the month, you enter the hours of annual holidays to which you are entitled, as per contract.
- Non-working days are distinguished in blue, while holidays are in red.
- The program calculates on the basis of the data entered, the daily and monthly totals of the Due, the difference between the hours worked and those due and the progressive.
- In the window below, the balances of the weekly hours due and worked and the balance of the holiday hours are reported automatically.
Printing your end of month report
Using the Reports → Monthly Report... command, the program calculates and displays a summary report of the selected period with the main columns to be used.

For more detailed information and specific examples of the Time sheet application, please refer to the following pages:
- Time Sheet
- Characteristics
- Setting up the file
- Journal table
- Enter working hours
- Printouts
- Managing project hours
File properties - Time Sheet
Via the File menu → File and accounting properties ... → Time Sheet tab the following data must be set up:
Enter into the Timesheet tab:
- Name and Surname.
- Start and End date
You can enter any period of your choice. - Work percentage
- Any other available data.

Journal table of the Time Sheet
In the Journal table you enter the daily data of the Time sheet, which can be modified and entered according to your own requirements.
Thanks to the rows and columns with totals, it allows for an instant overview of the situation.
The Journal table includes several columns to suit all needs. Depending on your needs, the columns of your choice can be displayed.

Typology of rows, colors, and formats
When creating a new file, the rows of the Journal are generated automatically by the program. When using an existing template, they will already be predefined.
Daily rows
Daily rows are used for entering your data.
- Normal rows - refer to rows for working hours.
- Rows in red - refer to official holidays
- Rows in blue - refer to non working days.
- Rows high-lighted in yellow - refer to the current date.
Multiple rows for a day
By duplicating the day row, you can enter additional information about the same day, such as timetables by project, annotations, or other.
To differentiate between the following rows, the Day description is slightly indented.
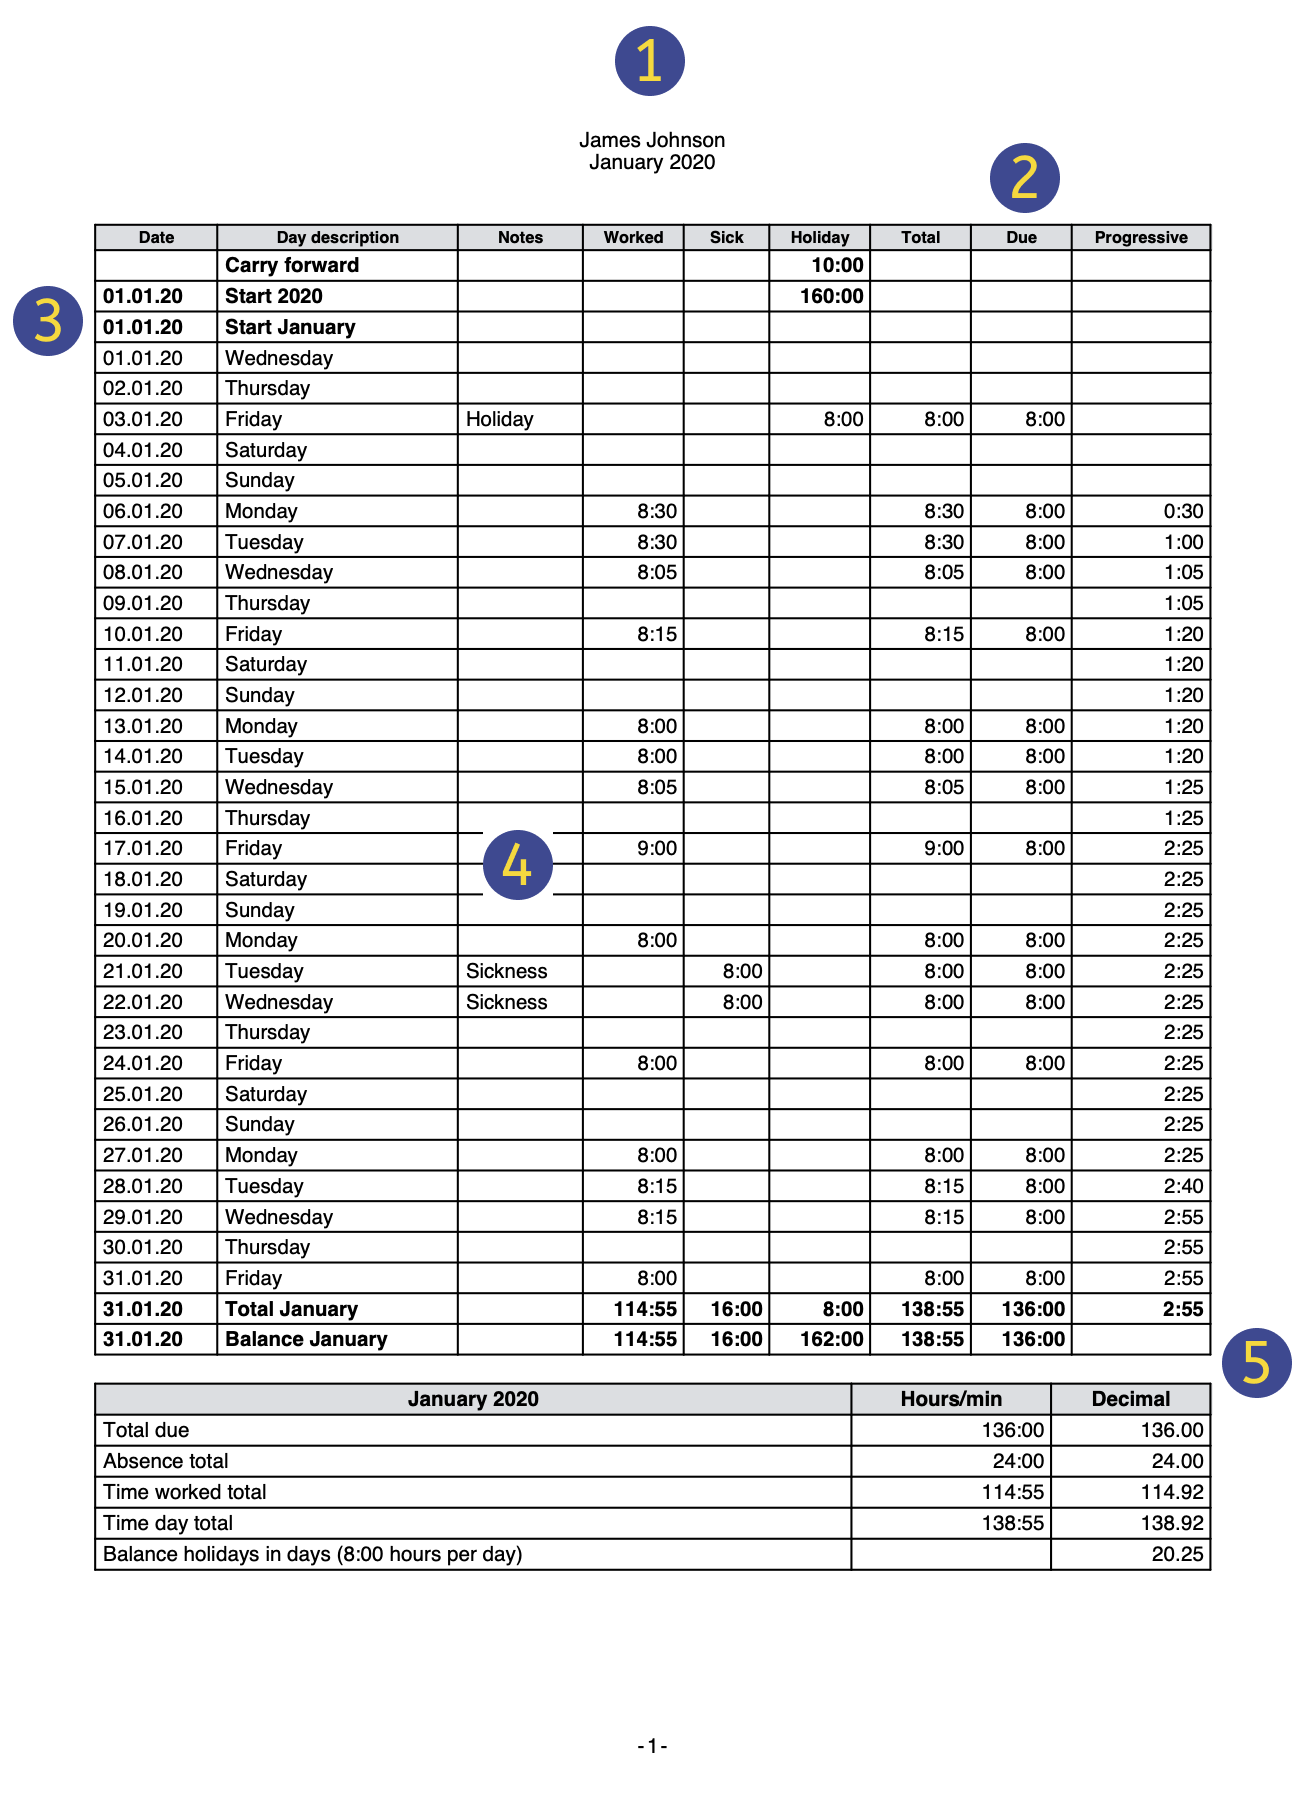
Carried forward, Start, Total and Balance rows
The Carried forward, Start, Total and Progressive row are indicated in bold character.
- The Carried forward row will automatically display holidays and hours belonging to the previous year, that were entered via File property > Start.
- The Start rows refer to the start of the year and month. Enter the initial values for holidays and hours.
- The Total rows refer to the end of the year and month. The total of columns are automatically reported and totaled here.
- The Balance rows are automatically calculated by the program and will the progressive value of the columns that contain data.
Journal table view
The Journal table is created with a series of columns that will cover the major part of your requirements.
Predefined columns are displayed, depending on the view you select:
- Base - displays the main principal columns.
- Minimal - displays the columns to enter your data.
- Complete - displays all available columns of the Journal.
The columns of the Journal table
The columns in the Journal table can be customized according to your requirements.
Via Data > Columns setup you can display further columns or hide those you don't need, change existing headers, add your own columns and change the format.
In the columns, the program always works with hours and minutes, eg. 8:30 means 8 hours and 30 minutes:
- Internally, the values are saved as seconds and then displayed in the hours and minutes format.
- When entering schedules, the times are rounded to the minute.
Section
The column is protected. It is used by the programme to make a distinction between rows used for data entry and system-specific rows.
Rows used for data entry and editing (working hours, absences, holidays, etc.) have an empty cell in the Section column.
System-specific rows, used by the programme to make calculations, have a special identification code in the Section column cell.
This code must not be changed, otherwise the sums may be wrong.
Examples of codes used: AllStart, YearStart_2020, MonthStart_202001, MonthTotal_202001, MonthBalance_202001, SpaceAfterMonth_202001.
The value is an identification code consisting of several elements:
Period
- All - Refers to year rows.
- Year - Refers to year rows.
- Month - Refers to the month rows.
- Week - Refers to the week rows.
- Day - Refers to the day rows.
Type
- CarryForward - Carry-forward rows of hours and holiday balances from the previous year. Carryovers are automatically inserted by the programme in the file's Properties, for both positive and negative values.
- Start - Start Rows. To enter start values (planned holidays, holiday adjustments).
- Total - Rows where totals are indicated. They are summed in the total rows (daily time columns, Start and CarryForward adjustments).
- Balance - For the holiday balance. This is the difference between the sum of the holidays, found in the CarryForward and Start rows, and the sum of the daily holidays.
- SpaceAfterMonth -To indicate that there should be an empty line (year, month or day to which the identifier refers).
Date
Protected column. Is used for entering the date of the day.
Festive
Column for setting the day. If the cell remains empty, the value set in the File Properties is taken over, or the value defined with the W code (see below).
The possible values are:
- Blank - business day.
- 0 - to set the current day as a holiday (row displayed in red).
If it is a day that is generally considered as a "public holiday", but on which you are required to work, you must enter "working". - 1 - to set the current day as non-working (row displayed in blue).
- 2 - to set the current day as a working day. Overrides the default value.
- [0] - festive day set automatically, as per the File Properties. No value is indicated in the Due column.
- [1] - non-working day set automatically, as per the File Properties. No value is indicated in the Due column.
- W0 - to set the current day as festive. On the same day, in the following weeks it will be automatically set with the (0) value.
- W1 - to set the current day as non-working day. On the same day, in the following weeks it will be automatically set with the (1) value .
- W2 - to set the current day as a working day. On the same day, in the following weeks it will be automatically set with the (2) value.
- WR - to reset the current day with the value indicated in the File Properties.
- WA - to reset the current day with the value indicated in the File Properties. On the same day, in the following weeks it will be set automatically with the value indicated in the file properties.
Day description
Column used by the program for automatic insertion of the name of the day, based on the date.
If you want a text other than that reported by the program, insert a text preceded by the # character (eg #Christmas, #National holiday).
Description
Column for entering an additional description.
Code1
Column to indicate any customer, project or other number.
Work1 and Work2
The columns Work1 and Work2 are used in particular to register working hours in the Time Sheet - Systematic 2023 template. Furthermore, in the Banana Accounting Plus version they can be used to enter special working hours (e.g. nights, holidays).
Supplement columns are also used in parallel with these columns (see explanations below).
Start1, Stop1, Start2, Stop2 ...
These columns allow entry and exit times to be entered. There can be several entries and exits on the same day.
The programme calculates the time of attendance and adds up in the columns Total and Difference.
Sick leave
Column for entering the hours of absence due to illness.
Holiday
Column for entering holiday hours.
Service
Mandatory absences, such as military service, community service or other, can be entered.
Adjustment
Column for entering an adjustment value.
Other
Other types of absence, not indicated in the Service or Sick or Holiday column, may be entered.
Absence
Protected column. It is used by the programme to automatically calculate the sum of absences.
%Surcharge
You can enter the percentage of supplementary work that is paid differently.
If you do both hours without supplement and hours with supplement on the same day, you must enter the times on two lines:
- Add day row
- The first line indicates the work (start and end) normally.
- On the second line you indicate the supplementary hours and the appropriate percentage.
If you want the daily total directly in the table, you must add a daily total row.
Surcharge calculated
The column is protected. It is used by the programme to calculate theovertime, indicated in the Supplement or Supplement % column.
Surcharge total
The column is protected. It is used by the programme to calculate the total additional time, indicated in the Surcharge or Surcharge % column.
This value is added to the Total Hours column.
Total
The column is protected. It is used by the program for automatic entry of the sum of working hours, overtime, absences and adjustments.
Due Code
The column is used, in case of need, to change the value of the Due (hours of work due).
If it is left blank, the Due value is automatically resumed day by day based on the settings in the File → File Properties → Start menu.
If you wish to change the Due value from the Journal table:
- Reset due.
Codes to be entered in the Due Code column to reset the daily due from the row in which you are. The new value must then be entered in the Due column.- DS (Set Today) - Set the due hours of the current day, without changing the other days.
- WS (Set Week Day) - Sets the hours due for the day and for the same day of the following weeks.
- PS (Set Predefined) - Sets the due hours for the day and for all subsequent days without a different setting
- Daily Due Reset Codes
- WR (Reset Week Day) - Reset the default value for the day of the week.
- WA (Reset All Week Days) - Resets all the default values for the days of the week.
- PR (Reset Predefined) - Reset general default. Removes the default value set previously.
- PA (Reset Predefined and Week Days) - Reset the general default and those of the week. It is like starting everything anew.
- Progressive reset code
- RP (Restart progressive) - Restarts the value of the Progressive column from zero. You insert this code in the beginning of month row, when all hourly salaries, when all the hours of the previous month have been paid.
Due
The column is protected. The program automatically calculates the difference between the hours worked and those due. At the end of the month and year, the totals of the Due are also reported.
- If there are no values in the Due Code column, the program resumes, the values present in File Properties - Start in the Due Code column.
- If codes are entered in the Due Code column (see previous paragraph), the program calculates the due based on these codes.
- All rows that have 0 (holiday) or 1 (non-working) in the Festive column, the cell will remain empty in the Due column.
Difference
The column is protected. The program automatically calculates the difference between the hours worked (Total) and those due (Due). At the end of the month and at the end of the year, the totals of the difference are also reported.
Progressive
The column is protected. The program automatically calculates the difference between the hours worked (Total) and those due (Due). At the end of the month and at the end of the year, the totals of the difference are also reported.
Worked
The column is protected. It is used by the program for the automatic calculation of the sum of the hours worked.
Detail
The column is protected. It is used by the program to automatically display work details (eg projects). Also see details in Managing projects.
Surcharge
You can enter the additional working time paid differently, in hours and minutes. It can also be used to manage reclaims or penalties for delays or other.
Split1 and Split1
Columns that can be used to track hours invested in projects.
Hours in decimal format
You can also enter the hours in digital format (1.5 = 1:30).
- If you enter a value preceded by the sign ">" or "<" (greater or lesser), the program considers it as a decimal value and converts it to hours and minutes:
- "<1.50" is converted to 1:30
- "<1.75" is converted to 1:45 an hour and three quarters.
- In the hour counter, enter the number of hours with the decimal separator. For example, if you enter 1.75, the program displays the value in hours and minutes (1:45).
Display in digital format
- The info window also indicates the value of the hours in decimals.
- In the monthly printout certain values are also referred to as decimals (this is because payroll programs often work with decimals).
Speed up insertion
- Go to the current day.
- The row of the current day is the one marked in yellow.
- Actions → Go to today menu.
- Enter the time of entry and exit.
- With the "." computer time is entered.
- If for example, you enter +5 or -5 (or any other number), the program displays the current time with 5 minus plus minutes to the computer time.
- Copy from the previous week.
Using the Actions → Copy menu, the times of the previous week are resumed. - Take over the value of the previous row.
Use the Actions → Copy menu from above (or button F4 or Cmd 4). - Vacation or Absence Auto-Completion.
Go to cell modification (with a space) and the program suggests the hours due, minus the hours already performed.
Hour column blocks
The hours columns of the Journal table are organized into blocks, as explained below.
Hours worked columns
These are the columns used to indicate the daily working hours. The working time carried out in the day can be entered in two ways:
- As hours worked - data is entered in the Work1 and Work2 columns.
In the Banana Accounting Plus version, all columns of the hour counter type starting with TimeWork are considered hours worked. - As time of entry and exit - data is entered in the columns Start1, Stop, Start2, Stop2, etc.
The program will calculate the time elapsed.
Total hours worked
In the Total hours worked column, the hours indicated in the hours worked columns and those indicated as Start and Stop times are summed.
In the Banana Accounting Plus version there is also the total Detail column. If the Row Type contains the value "D", the working hours are summed in the Detail column and not in the Total column.
Extra hours
These columns are only available in the Banana Accounting Plus version.
They are used to insert surcharge hour. For example, in the case of holiday or night work which involves a surcharge.
The Extra Total is the sum of the extra hours, indicated as hours, and those calculated as a percentage.
Absences
Absences are entered in the Sickness, Holidays, Service or Other columns, as appropriate.
These hours are totaled in the Absence column (TimeAbsenceTotal) and then in the Total column. When calculating the difference between the hours due, absences are considered as paid.
In the Banana Accounting Plus version all the time counter columns starting with TimeAbsense are added to the total absence. The user can add absence columns for other cases.
If you need to keep track of the absences that do not have to be added to the Total hours, you have to add columns of the Hour counter type.
Adjustments
This column is used for accounting adjustments, as in the case of extra hours having been made and paid; then to scale them from the total, enter the value with the negative sign in the Adjustments column.
The Total hours
Is the sum of the total hours, considered as hours to be counted and as part of the amount due. It includes the following columns:
- Total hours worked.
- Total supplements.
- Totale absences.
- Adjustments.
Hours due
The Spreadsheet allows you to indicate the hours due. In the case of a Fixed rate salary contract, the hours of the working days are indicated per contract.
In the case of hourly wages, without a fixed number of hours included in the contract, the hours owed part is generally not used.
The employee's daily working time is indicated in the Due column. The value is indicated on the basis of various parameters (see columns of the Journal table):
- The working hours settings, indicated in File properties → Start.
- The Festive column.
The program completes the value due only for the days indicated as Business. - The Due Type column
By indicating a code, the content of the Due daily column can be set differently.
Difference and Progressive hours
In the Difference column, the program indicates the difference in hours between the Total and the Due.
In the Progressive column, the program indicates the cumulative difference.
If no Due has been indicated, the Progressive corresponds to the sum of the hours worked. This value can be reset by inserting the RP (Progressive Restart) code in the Due Type column.
Split
They are information columns that are used to indicate hours allocated to projects.
Journal Table - Additional Columns
In Banana Accounting Plus columns have been added for the calculation of the supplement (festive, night) and for the management of multiple lines for the same day.
Detail
The column is protected. It is used by the program to automatically display work details (eg projects). See Project management.
Surcharge
You can enter the additional work time paid differently, in hours and minutes. It can also be used to manage recoveries or penalties for delays or other.
%Surcharge
You can enter the percentage of additional work that is paid differently.
If both hours without supplement and hours with supplement are worked on the same day, the times must be entered in two lines:
- Add day row
- The first row will indicate the work (start and end) normally.
- The second row will indicate the extra hours and indicate the appropriate percentage.
If you want the daily total directly in the table, you will have to add a row for daily total.
Surcharge calculated
The column is protected. It is used by the program to calculate the overtime, indicated in the Supplement or Supplement% column.
Total Surcharge
The column is protected. It is used by the program to calculate the total overtime, shown in the Supplement or Supplement% column.
This value is summed in the total hours column.
New user columns
You can add columns which are then totaled into groups. The Xml name of the column must be of type time counter and must start as follows:
- TimeWork. Added to the total work.
- TimeSurchargeManual. Added to the total work.
- TimeAbsence. Added to the total absences.
- TimeSplit. Summed in the TimeSplitTotal if existing.
You can define the columns to indicate the hours of a project, also added up in the TimeWork, or, the hours of absences for training or other, considered absences and counted in the total absences.
Working Times and Hours
The program always works with hours and minutes, 8:30 means 8 hours and 30 minutes.
- Values are saved internally as seconds and then displayed in the hour and minute format.
- When entering timetables, time is rounded to the minute.
Hours in decimal format
The hours can also be entered in digital format (1.5 = 1:30).
- If you enter a value preceded by the sign ">" or "<" (greater or lesser), the program considers it as a decimal value and converts it to hours and minutes:
- "<1.50" is converted to 1:30
- "<1.75" is converted to 1:45 one and three quarters.
- In the hour counter, enter the number of hours with the decimal separator. For example if you enter 1.75, the program displays the value in hours and minutes (1:45).
Display in digital format
- The info window also indicates the value of hours in decimals.
- In the monthly printout certain values are also indicated as decimals (this is because payroll programs often work with decimals).
Speed up insertion
- Position yourself on the current day.
- The row of the current day is the one in yellow.
- Utilities menu → Go to day.
- Enter the time of start and stop.
- With the "." computer time is entered.
- If you enter +5 or -5 (or any other number) the program displays the current time with 5 minutes more or less than the computer time.
- Copy from the previous week.
Using the commands menu Actions → Copy, the times of the previous week are resumed. - Returns the value of the previous line
Use the commands menu Data → Copy from above (or the F4 or Cmd 4 button). - Vacation or Absence Auto-Completion.
Go to cell modification (with a space) and the program suggests the hours due, minus the hours already performed.
Hour column blocks
The hours columns of the Journal table are organized in blocks, as explained below.
Hours worked columns
- Data is entered as hours worked in the Start1 and Start2 columns.
In the Banana Accounting Plus version, all columns of the hour counter type starting with TimeWork are considered hours worked. - As time of entry and exit - data is entered in the columns Start1, Stop1, Start2, Stop2, etc.
The program calculates the time elapsed
In the Experimental version there is also the total Detail column. If the Row Type contains the value "D" the working hours are added together in the Detail column and not in the Total column.
Total hours worked
The hours indicated in the hours worked columns and those indicated as start and stop times are totaled in the Total hours worked column.
In the Banana Accounting Plus version, there is also the total Detail column. If the Row Type contains the value "D", the working hours are summed in the Detail column and not in the Total column.
Extra hours
These columns are only present in the Banana Accounting Plus version.
These columns are used to insert hour supplements. In the case, for example, of work on holidays or at night which involves an increase.
The Extra Total is the sum of the extra hours, indicated as hours, and those calculated as a percentage.
Absences
There are the Sickness, Holidays, Service or Other columns, where absences are entered.
These hours are added up in the Absence column (TimeAbsenceTotal) and then in the Total column. When calculating the difference between the hours due, absences are considered as paid.
In the Banana Accounting Plus version all the time counter columns starting with TimeAbsence are added to the absence total. The user can add absence columns for other cases.
If you want to take note of absences that do not have to be added to the hours Total, you have to add columns of Hour counter type.
Adjustments
This column serves for accounting adjustments, as in the case where extra hours have been made and these are paid; then to scale them from the total, enter the value with the negative sign in the Adjustments column.
Hours Total
It is the sum of the total hours, considered as hours to be counted and as part of the amount due. It includes the following columns
- Total hours worked
- Total hours supplements
- Total absences
- Adjustments
Hours due
The Spreadsheet allows you to indicate the hours due. In the case of a contract with a Fixed salary, the hours of the working days are indicated per contract.
In the case of hourly wages, without a fixed number of hours included in the contract, the hours owed part is generally not used.
The employee's daily working time is indicated in the Due column.The value is indicated based on various parameters (see Journal table):
- The working hours settings are indicated in File properties→ Start.
- The Festive column.
The program completes the value due only for the days indicated as Business. - The Due Type column
By indicating a code, the content of the Due daily column can be set differently.
Difference and Progressive hours
In the Difference column, the program indicates the difference in hours between the Total and the Due.
In the Progressive column, the program indicates the cumulative difference.
If no Due has been indicated, the Progressive will be the sum of the hours worked. This value can be reset by entering the RP (Progressive Restart) code in the Due Type column.
Subdivision
These information columns are used to indicate hours allocated to projects.
Managing holidays with the Time Sheet
Holidays are designated in hours and are entered in the Holiday column of the Journal.
Holidays carried forward
When creating a new year via File and accounting properties ... → Start, any holidays to be carried forward from the previous year must be indicated.
The value is indicated automatically in the Carry forward row of the Holiday column.
Paid holidays or paid leaves, as defined by contract
If some holidays are already included in your schedules :
- Indicate the number of hours of paid holiday in the Start year (for example, Start 2020) initial row.
- Enter the number of paid holiday hours, as per your contract, in the Holiday column. (ex. for 20 days of 8 hours, enter 160, or 80 hours in case you would work part-time at 50%).
- Paid leave days, considered as holidays:
Enter the amount of hours you are entitled to (days x daily hours) in the Start Month row .
Setting up holidays and paid leaves
The start rows are used to indicate the number of holidays granted in hours and minutes. You may indicate the holidays either in the Start year or in the Start month row.
If a person is entitled to 4 weeks of holidays and works 40 hours a week: 40 * 4 = 160. This value will be indicated in the Start year row.
If the hours of allocated holidays changes during the year, enter the number of hours as plus or minus (negative sign) in the available Start month row, Holiday column.
The Holiday column is also used to indicate paid leaves.
Completed and paid holidays
Completed or paid hours of holidays are indicated In the Holiday column of the daily rows.
Remaining holidays
The hours of remaining holidays is indicated in the Total row and calculated automatically.
When holidays are paid:
- In the start row of the following month enter the vacation hours paid with a negative sign.
- For example, indicate "Payment Holidays" in the Notes column.
Changes during the year
If working hours are changed during the year or there are any interruptions that change the holiday hours, these must be calculated and changed manually.
Plus or minus differences can be entered in the line at the beginning of the month where the change occurs.
Enter your work schedule
Working hours and other data are entered in the Journal table.
In the Carry forward row, the programme reports the holiday hours from the previous year, entered in the File and Accounting Properties > Start dialogue.

In the Journal table, data can be edited and entered as required.
- Write down the holiday hours to which you are entitled in the current year.
- Include, edit, add, customise any holidays if required.
- Enter your daily working hours, sickness, holidays, etc.
Print your monthly report
If you go to the Reports menu > Monthly Report..., you can immediately generate, print and save a complete monthly report.

Useful links
- Journal table
- Salary types (Fixed salary or Hourly salary)
Report and Timesheet Actions Menu
Working with the Banana Accounting Time sheet can be optimized, via different functions in the Reports and Actions menus.
Reports Menu
The Monthly Report command is activated via the Reports menu, to create the monthly report of working time and other data entered in the Journal (holidays, absences, other) month by month.
Actions Menu
The following commands can be activated in the Actions menu:
Go to today
Positions the cursor on today's row.
Recheck all... (F9)
The program recalculates, double-checks and displays any errors or differences.
Use this command whenever you are in doubt that there is a problem.
Sort Journal
Sort the rows by date.
Check-in or Check-out
Inserts the current time in the selected cell. Alternatively, you may type "." (point without quotes) in the selected start or end cell.
Fill Day (from last week)
Resumes work and absence time of the current day with the values of the day of the previous week.
Fill Week (from last week)
Resumes work and absence time of the current week with the values of the respective days of the previous week.
Add row day
Adds a row successive to the selected one and with the same date. Use this to enter additional daily values.
Add row total day
Adds a row, where daily values will be totaled.
Create rows for period ...
Add rows (daily, start, total, balances and carryovers) based on the selected period. All rows of the Journal will be sorted by date.
Create New Year
The command creates a new Timesheet file for the following year, transferring the initial values of the vacation balance and hours from the previous year into the new file.
Warning! When creating a new year, public holidays are not flagged. It is necessary to manually modify the days that are marked as holidays.
To avoid manually handling holidays, we recommend downloading the template file with the holidays already set according to the country. In this case, you will need to manually enter the vacation and hour balances in the File Properties > Start section (File menu). See How to start.
Import Time sheet
Takes over values from an external time sheet. You indicate the file from which to recover the values and specify which values to recover.
The program searches the imported file for rows with the same date and section, and resumes these values.
If there are multiple rows for the same date in the imported file, these values after the first line are not imported.
The dialog box allows you to choose one of the following options:
Import festive only
It only imports the values from the Festive column.
Import all values
It imports the Festive, Notes, Worked, Absences, Adjustment, Due and Subdivision values.
Inserimento valori
Ore nel formato decimale
Il programma lavora sempre con ore e minuti 8:30 significa 8 ore e 30 minuti.
Si possono però anche inserire le ore nel formato decimale (1.5 = 1:30).
- Se si inserisce un valore preceduto dal segno ">" o "<" (maggiore o minore), il programma lo considera come un valore decimale lo converte in ore e minuti:
- "<1.50" viene convertito in 1:30
- "<1.75" viene convertito in 1:45 un ora e tre quarti.
- Nei contatore ore inserire il numero delle ore con il separatore decimale. Per esempio se si inserisce 1.75, il programma visualizza il valore in ore e minuti (1:45).
Visualizzazione nel formato digitale
- Nell'info Windows viene indicato anche il valore delle ore in decimali.
- Nella stampa mensile certi valori sono anche indicati come decimali (questo perché i programmi dei salari lavorano spesso con i decimali).
Velocizzazione inserimento
- Posizionarsi sul giorno corrente
- La riga del giorno corrente corrente è quella in in giallo.
- Menu Utilità -> Vai a giorno.
- Inserisci l'ora di entrata e uscita.
- Con il "." viene inserita l'ora del computer.
- Se inserisci +5 o -5 (o qualsiasi altro numero) il programma visualizza l'ora attuale con 5 minuti in più o in meno rispetto all'ora del computer.
- Ricopia dalla settimana precedente
Usare i comandi menu Utilità1-> Ricopia si riprendono orari della settimana precedente. - Riprende il valore della riga precedente
Comando Riprendi da sopra (o il bottone F4 o Cmd 4) - Autocompletamento Vacanze o Assenza
Andare in modifica della cella (con uno spazio) e il programma suggerisce le ore dovute, meno le ore già eseguite.
Gestione progetti
Il Foglio ore si presta bene anche per prendere nota delle ore lavorate su progetti.
Nella Versione Experimental sono state aggiunte ulteriori possibilità proprio per facilitare la gestione dei progetti.
Il Foglio di calcolo offre diverse possibilità, si deve scegliere quella che fa al proprio caso, eventualmente combinando gli approcci. .
Attribuire i tempi con le colonne suddivisioni
Con questo approccio, la tenuta delle ore avviene normalmente con le normali colonne (Lavoro o ora entrata e uscita). Nelle colonne Suddivisioni indichi le ore da attribuire a un determinato progetto.
- Ci sono due colonne predefinite per la suddivisione e puoi ovviamente aggiungere altre colonne (Tipo contatore) per altri progetti.
- Nelle righe di totale si ha poi la somma per ogni progetto.
- Nella riga Riporto puoi inserire manualmente il riporto per ogni progetto.
Nella versione Experimental se aggiungi una colonna con il nome TimeSplitTotal, di tipo contatore tempo, il programma somma tutte le colonne il cui nome campo XML inizia con TimeSplit.
Se vuoi il totale giornaliero di tutti le suddivisioni, quando aggiungi una nuova colonna dagli il nome XML che inizia con TimeSplit (per esempio TimeSplitP1, TimeSplitProjectX).
Inserire le ore nelle colonne Lavoro (TimeWork)
Puoi usare le colonne Lavoro1 e Lavoro2 per inserire le ore lavorate al progetto. Le ore del progetto andranno a sommarsi alle ore di lavoro giornaliero.
Nelle righe di totale avrai la somma di ogni progetto.
Nella versione Experimental se aggiungi delle colonne di tipo contatore tempo, che iniziano con TimeWork, verranno anche queste sommate nella colonna Lavoro totale. Hai la possibilità quindi di aggiungere quante colonne progetto ti servono.
Più righe giornaliere per lo stesso giorno
Nel Foglio ore puoi avere diverse righe dello stesso giorno.
- Puoi creare una riga per ogni progetto. Se sullo stesso giorno lavori su più progetti dovrai aggiungere una nuova riga, con la stessa data del giorno.
- A partire dalla seconda riga dello stesso giorno, la descrizione risulterà leggermente rientrata.
- Per aggiungere una nuova riga puoi usare la funzione duplica riga.
- Nella versione Experimental c'é il comando per aggiungere una riga giornaliera e anche la riga di totale giorno.
Righe di Dettaglio
Nella versione Experimental è stata aggiunta una colonna RigaTipo. Se in questa colonna inserisci il valore "D" (Dettaglio), le ore di lavoro inserite in questa riga, sono sommate nella colonna Dettaglio totale, invece che nella colonna Totale.
Nella riga giornaliera normale inserisci le ore di lavoro effettive, anche con ora inizio e fine.
Nelle righe supplementari di Dettaglio, inserisci le ore per i singoli progetti. Puoi indicarli come ora inizio o fine o anche inserendo le ore nella colonna Lavoro (TimeWork).
Se usi le colonne TimeWork è meglio non usare delle colonne diverse per inserire le ore effettuate e quelle dei progetti, in questo modo nel totale giornaliero o mensile avrai le somme separate.
Stampe
Per il momento non vi sono ancora stampe che raggruppano i valori per progetto inseriti su righe diverse. Si prevede che verranno create in futuro.
Se sai programmare in Javascript puoi creare delle stampe come desideri e anche metterli a disposizione di altri.
Aggiunta Tabella Progetti, Categorie
Nella Versione Experimental puoi aggiungere delle Tabelle Progetti e Categorie, dove indicare l'elenco progetti.
Nella tabella Giornale ti troverai una colonna dove, per ogni riga, inserire il codice del progetto o della categoria.
Puoi anche aggiungere altre tabelle e collegarli con la tabella Giornale, per codificare altri valori.
New year's Time sheet
To create the Time sheet file for the new year, there are two options:
- Download the Time sheet Template with Predefined Holidays for the New Year.
- Use the Create New Year Command from the Actions Menu.
New Year Time sheet from Default Template
This is the recommended procedure. The template already includes predefined holidays according to the country.
In this case, you need to:
- Start Banana Accounting
- Go to File > New
- Choose Time sheet as the file type
- Select one of the proposed templates as the Time sheet
There are the following predefined templates:
Time Sheet - Systematic Recording
This model is ideal for those who need to record work hours by specifying the start and end times for all working days defined in the Basic settings (Menu File > File Properties (Basic Data) > Start section).
In the Journal table of this model, there are the following main columns:
- Start, Stop, Due, Difference and Progressive
By entering the start time and end time in their respective columns, the program automatically calculates and inserts the hours worked, the difference between the hours worked and the hours due, and the balance of hours in the Progressive column. If the balance is negative, the hours worked are less than the hours due; conversely, if the balance is positive.
Time Sheet - Simplified Recording
This model is ideal for those who record the total hours worked daily without specifying the start and end times.
In the Journal table of this model, there are the following main columns:
- Work 1, Work 2, Due, Difference, and Progressive.
Unlike the systematic recording model, the start and end times are not entered; instead, the total hours worked are recorded. The program automatically fills in the Due column (for the hours of work required by the contract), the Difference column (between the hours worked and the hours due), and the Progressive column (for the balance of hours).
Time sheet - Hourly Wage
This model is to be used in cases where work is paid by the hour without a fixed salary. Therefore, in the Basic settings (Menu File > File Properties (Basic Data) > Start section), the Start dialog remains empty without indicating the hours due.
The columns are identical to those in the Time sheet - Systematic Recording and Time sheet - Simplified Recording templates. The difference lies in the Progressive column because, starting from February, the Due Code column contains the code RP (Restart Progressive) to ensure that the Progressive column resets and does not display the balance of hours, as payments are made monthly.
Once the template is saved with a name, it is necessary to manually carry over the balances for overtime and vacations from the previous year.
- Menu File > File Properties (Basic Data) to enter the employee's data.
New Year Timesheet Using the Create New Year Command
This procedure involves creating the new year's timesheet starting from the previous year's file:
- Open the previous year's Time sheet file.
- Menu Actions > Create New Year.
- Save As the new Time sheet.
In this case, the balances for overtime and vacations from the previous year are automatically carried over to File Properties (Basic Data) > Start section (Menu File). The initial data is also carried over to the initial rows of the Journal table, where you need to enter all the hours for the vacation days to which you are entitled in the Start row.
Attention: Public holidays are carried over as they were in the previous year. Therefore, it is necessary to verify all holidays and correct them manually.
Printouts
Print Journal table
When using the File → Print ... command, you can:
- Print all the rows of the Journal table.
- Print the selected rows of the Journal table.
Monthly report
Using the Reports → Monthly report ... the program will calculate and display a summary report of the selected period including the main columns used
- If you want to change the column headers in the printout, you have to change them in the Journal table. They will be resumed automatically.
- The program prints the default columns.
For the moment it is not possible to print other columns when printing the monthly report.
Fixed Rate Salary
With the free Banana Accounting Plus Time Sheet, you can easily start entering work times, your holidays and absences and instantly know the totals and balances of all the data.
According to what is stipulated in the contract:
- Set the due working time (agreed) and include holidays.
- Actual working hours and absences are entered.
- The program calculates the daily and progressive balance.
All values, time due, hours worked, absences and holidays are entered and displayed as hours: minutes (eg 10:30).
This unified approach allows you to enter data quickly and instantly and be in control of the situation.
The values entered are checked by the program. If you enter an incorrect value, it will show instantly.
Setting up the due time
The Time Sheet, in File Properties - Start, allows you to quickly set up the weekly working time.
If the scheduled time is different or changes during the year, you can adapt it, see Set the working period and times.
Planned Holidays are set directly in the Holidays column instead of the Journal table.

Entry of working times and absences
Enter the daily values in the appropriate columns of the Journal table, relating to the following data:
- Hours of work carried out are entered as follows:
- Entry and exit times (systematic collection)
The program calculates the hours and minutes of work. - Work hours, Work 1 or 2 columns
Total hours worked are entered. - If you enter both entry and exit values and hours worked, the program adds them.
- Entry and exit times (systematic collection)
- Hours of absence (Sickness, Vacation, Service, Other).
These are the hours that will be deducted from the due hours. - Adjustments.
When accounting adjustments are required, enter a positive or negative value in the Adjustments column.
When extra hours are paid, for example, the hours are entered in negative, so that the progressive is reduced.
When you start work during the year
When the work period begins during the year, proceed as follows to reset the hours due from the first of January to the work start date:
- On 1st January, in the corresponding line and in the column Due code, enter WA. The programme resets the total hours for all days before the start of the working period.

- On the start date line, and for all working days of the first week, enter WS in the column Due code and the number of working hours in the column Due. The programme will automatically complete the hours due for all weeks until the end of the year.

How to change work days during the year
If working days change during the year, the new working day settings must not be changed in the File properties, otherwise the change is applied retroactively from the first of January, but directly in the Journal table using the appropriate codes. Several changes during the year are possible.
If a working day becomes a non-working day:
- On the line of the day you wish to change (from a working day to a non-working day), enter the code W1 in the column Holiday. For the programme to resume the change as a non-working day for all weeks of the year, the code WS must be entered in the column Due code.
If a non-working day becomes a working day:
- On the line of the day you wish to change (from a non-working day to a working day), enter the code W2 in the column Holiday. For the programme to resume the change as a working day for all weeks of the year, the code WS must be entered in the column Due code.
For further customisations see the explanation of the Journal Table columns.
How to change the work rate during the year
If the number of working hours due increases or decreases during the year, the new settings must be entered in the Journal table, in the columns Due code and Due.
On the day in which the changes are to be implemented (e.g. from 5 working hours to 8):
- In the Due code column, enter the code WS.
- In the Due column, enter the current due hours (8)
The programme resumes the change of the new due hours for all weeks of the year.

For other customisations, please refer to the explanation of the Due code column .
If the available holiday hours change during the year, the differences must be calculated and changed manually. See Changes during the year.
Multiple rows for the same days
You can manage multiple rows for the same working day, where you can enter different daily values. To make understand that it is the same row of the day, the description is indented in the following rows of the same day .
There are several possibilities to create an additional row for the same day:
- Via the Edit → Duplicate rows... menu
- Via the Edit → Add rows... menu, inserting the date of the day (you have to remove the protection from the date column).
- Via the Actions → Add row Day (only in the Banana Accounting Plus version).
The difference with respect to the amount due and the totals
In the Journal Table, the program displays the following data after each entry:
- The difference between the hours due and the hours worked on the day.
- The progressive balance.
- The total by month, year and grand total of the different hour columns and numeric columns.
The total for the holidays results as the difference between the holidays set at the beginning of the year and those used, see Holidays page. - The carry-over to the end of the month and year of the various numerical columns:
- The carry-over is the total of the position, and also takes into account the values of the previous periods.
- At the end of the month you will also known how many hours have been done since the beginning of the year.
- The final total is equal to the carry-over.
Monthly printout
The monthly printout presents all values in summary form.
Adjustments and payment of accumulated hours
The Adjustments column allows you to modify the total hours due / worked.
- If hours are accumulated and these are paid:
- In the row of the day they are paid
- Enter the hours paid in negative in the Adjustment column.
- Indicate "Payment of accumulated hours" in the notes
- The progressive balance decreases.
- In the row of the day they are paid
- When accumulated holidays are paid:
- In the row of the day when the holidays are paid.
- Enter the hours paid in negative in the Holidays column.
- Indicate "Accumulated holiday payment" in the notes
- The progressive balance decreases.
- In the row of the day when the holidays are paid.
Paid by the hour wage
It is quick and easy to enter data in the free Time sheet of Banana Accounting Plus as it immediately provides you with daily, monthly and yearly total hours.
All values (due time, worked hours , absences and holidays..) are entered and displayed as hours:minutes (10:30).
allows data to be entered quickly and the programme's automated control allows for correct reports.
The application allows you to enter the days and hours agreed as per contract and the hours of work performed highlighting any differences between what was agreed and what was carried out. The monthly Report which needs to be handed over to your employer is now complete and complies with legal requirements.
Please consult the How to start page.
Setting of weekly working hours
The Time sheet adapts to any kind of working time, whether fixed, flexible, part-time, or with combined settings.
In File Properties → Start indicate the working days and weekly working hours.
With the paid-by-the-hour wage, the hours actually worked are counted.
- If a certain number of daily working hours have been agreed, it is possible to indicate them as due hours, as for the fixed salary. In this way, the program calculates and displays the differences between what is agreed and carried out.
- If the expected working time is different or changes during the year, you can adapt it, as indicated in the next paragraph Set period and working time.
- The planned holidays are instead set directly in the Journal table columns
Input of working time and absences
In Paid by the hour wages, the hours worked are entered in the Journal table in one of the following ways:
- Enter the start and end time in the corresponding columns (systematic collection).
The programme calculates the hours and minutes of work in the Total column. - Enter the total of hours worked in column Work 1 or 2.
If the Start, End and also the Work 1 or 2 columns have been used, the programme sums all of the total hours in the Totals column .
Where hours due have been indicated in the File properties, the Progressive column shows the differences between hours worked and due.
Hours of absence due to illness, holiday, duty or other reasons, entered in the respective columns, are added together in the hours due.
Adjustments
When accounting adjustments are required, the adjusted hours must be entered in the Adjust. column, with a positive or negative value.
For example, when overtime hours are paid, negative hours are entered in the Adjust. column, so that in the Progressive column, the hours are reduced.
Start working during the year
When the working period begins during the year, proceed as follows to reset the hours due, from the first of January to the date of starting:
- On January 1st, enter "WA" in the column Due code.The programme resets the total hours for all days before the start of the working period.
- On the start date line, and for all working days of the first week, enter WS in the Due code column and the number of working hours in the Due column . The program will automatically complete the hours owed for all weeks until the end of the year.
Change of working days during the year
If working days change during the year, the new settings must not be changed in the File properties, otherwise the change is applied retroactively from the first of January, but directly in the Journal table, using the appropriate codes. Several changes are possible during the year.
If a working day becomes a non-working day:
- On the line of the day you wish to change (from a working day to a non-working day), enter the code W1 in the Holiday column. For the programme to resume the change as a non-working day for all weeks of the year, insert WS in the Due code column .
If a non-working day becomes a working day:
- On the line of the day you wish to change (from a non-working day to a working day), enter the code W2 in the Holiday column. For the programme to be able to resume the change as a working day for all weeks of the year, the WS code must be entered in the Code Due column.
For other customisations, see the explanation of the Journal Table columns.
Changing the percentage of work during the year
If the number of working hours due increases or decreases during the year, the new settings must be entered in the Journal table, columns Due code and Due.
On the date when the changes are to be implemented (e.g. from 5 working hours to 8):
- In the Due Code column, enter the code WS.
- In the Due column, enter the current hours due (8).
The programme amends the new hours due for all weeks of the year.
For other customisations, please refer to the explanation of the Due Code column .
If holiday hours change during the year, the differences must be calculated and changed manually. See Changes during the year.
Difference between due and total hours
In the Journal table, the program displays after each input:
- The daily and progressive due difference.
- These are the additional or less hours than contracted.
- The total by month, year and overall total of the different hours and numbers columns.
- The total for holidays is the difference between the holidays set and those taken, see Holidays page.
- The carry forward of both the end of the month and the year of the different numerical columns.
- The carry forward is the total of the position inclusive of the values of previous periods.
At the end of the month the hours which have been done since the beginning, will display.
The final total amount is equal to the carry forward amount.
Progressive balance reset
If you insert the abbreviation "RP" in the Due Code column, the progressive balance restarts from 0.
Holidays
For the setting of holidays, see the Holidays page.
Absences and sickness
Insert the hours of absence in the Sick, Holidays, Service or other columns.
Add km and expenses
To take note of the km traveled or expenses that must be reimbursed, add a special column in the Journal table, from Menu Data → Columns setup.
If the column addition is Type Amount, the program will automatically sum up in the total rows.
Adjustments and payment of accumulated hours and holidays
The Adjustments column allows you to change the total of the due/worked hours.
- If you accumulate hours and these are paid to you, on the row of the day on which you are paid, proceed as follows:
- In the Adjustments column, enter the hours paid in negative.
- In the Notes column enter "Payment Accumulated Hours".
- If you are paid for accumulated holidays. On the row of the day when the holidays are paid:
- Enter in the holiday column the hours paid in negative.
- In the Notes column enter "Accumulated holiday payment"
In both cases, the progressive balance will decrease.
Multiple rows for the same days
You can have multiple rows where to enter daily values. To make it clear that it is the same row of the day, in the following lines on the same day the description is indented.
There are several possibilities to create an additional row for the same day:
- From the Edit menu → Duplicate rows...
- From the Edit menu → Add rows...enter the date of the day (you have to remove the protection from column date).
- From the Actions menu → Add daily row (only in Banana Accounting Plus version).
Monthly Print
The monthly print resumes all the values.
Managing project hours in the Time Sheet
With Banana Accounting Plus you can easily start keeping track of the hours dedicated to projects, obtaining instant reports that you can view at any time.
Users who have files created with older versions must convert their file.
To manage working hours for projects, add the required columns in the Journal table.
There are two ways to manage project hours:
- Work with the Projects table.
- Work with the Work1, Work2 columns, etc.
Manage projects in the Projects table
You will need to add the Projects table if using this method:
Tools menu → Add new functionalities → Add table → Projects.
The following columns are available in the Projects table:
- Id - enter an id unique for each project
- Description - enter the name/description the project.
- Notes - enter any additionally required notes.
Adding the Projects table will automatically add the Projects Id and Projects Description columns in the Journal table.
Display the following columns in the Journal table via the Data → Columns display ... menu:
- RowType (Type) column - enter D if you wish to separate the detail of the project hours from the total of hours worked.
- TimeDetailTotal (Detail) - is a protected column. If D has been entered in the Type column, the program calculates and displays the total project hours projects separately.
- If the Type column is empty, the program calculates and displays the total of project hours in the Total column.
Enter project hours
The hours dedicated to projects can be managed within their own worksheet.
To separate the hours of work done, from the project hours of, it is necessary to:
- Position yourself on the line of the day to which you want to add the project (or projects).
- Via Utilities1 → Add row Day add a new row.
- Enter D in the Type column if you want to separate the detail of the project hours from the total hours worked. Leave blank, if you want the total project hours to be added to the hours worked (Total column).
- Enter the Id of the project, as set up in the Id table. The project description is automatically displayed.
- Enter the start and end time of the project.
The program calculates and updates the Total, Due, Difference and Progressive columns
Manage projects in the Work1, Work2 (etc) columns
As an alternative to the Projects table to manage project hours, it is possible to use the Work1, Work2 (etc.) columns.
Each column refers to the hours of a different project. The program includes two predefined columns, but you can add other columns under condition that TimeWork3, TimeWork4... is inserted in the Xml name of the New column window (menu: Data → Columns setup ... → Add).
Via Data → Columns setup, display the following columns in the Journal:
- RowType (Type) column - enter D if you wish to separate the detail of the project hours from the total of hours worked.
- TimeDetailTotal (Detail) column - is a protected column. If D has been entered in the Type column, the program calculates and displays the total project hours projects separately.
- If the Type column is empty, the program calculates and displays the total of project hours in the Total column.
Enter project hours
The hours dedicated to projects can be managed within their own worksheet.
To separate the hours of work done from the project hours, it is necessary to:
- Position yourself on the line of the day to which you want to add the project (or projects).
- Add a new row via Actions → Add row Day menu.
- Enter D in the Type column if you want to separate the detail of the project hours from the total hours worked. Leave blank,k if you want the total project hours to be added to the hours worked (Total column).
- Enter the Id of the project, as set up in the Id table. The project description is automatically displayed.
- Enter the start and end time of the project.
The program calculates and updates the Total, Due, Difference and Progressive columns.
Adding Additional Columns
If you need to keep track of instruments used, amounts, kilometers traveled or anything else in the project, you can add additional columns via the menu Data → Columns setup.
These can also be linked with an added table.
Report with project and resource data
You can filter your projects and resources and create a report with data for each of them.
Information on the time sheet for employers
The Time Sheet allows companies, which do not have an automated work time tracking, to easily start with a modern data collection system and have immediate counts and reports, without wasting time.
In order to protect their employees, companies are required by law to set up a system for recording the daily working time, complete with absences and holidays.
- In Europe this principle was reiterated in a ruling by the European Court of Justice. It is up to the member states to regulate this matter.
- In Switzerland there are ordinances in this regard which require the systematic recording of working time, with some exceptions for the simplified recording (only the number of hours worked).
How to implement the Time Sheet for your employees
- Each employee will have to download and install Banana Accounting on their computer, tablet or mobile phone.
- The employee creates his own time sheet for the entire year.
There are several methods:- Use a template emailed to him by his employer.
- Start the program and via the File → New menu create your own Time Sheet, for the entire year, choosing the most appropriate Time Sheet template.
- Each employee enters their working hours and saves the file on their computer.
- At the end of the month, the employee generates his own Monthly report and sends it to the employer. Alternatively, you can directly send the entire file of your time sheet.
Self-declaration of hours worked
The Banana Accounting Timesheet allows each employee to input their hours individually and to always be in control of their situation.
The month-end report will summarize all the necessary information. You can also create specific reports for specific needs, if required.
Centralized data entry
The Timesheet is also suitable if the employer collects the data of the hours delivered by the employees.
Hours can be attributed to projects or whatever else is needed.
Preparing templates for your company's employees
Each company has different requirements.
To facilitate keeping hours for your employees, it is useful to prepare Time sheet files that serve as templates, with the following presets:
- Annual holidays.
- The columns required for the type of data collection (systematic, simplified, mixed).
- The columns for the type of salary.
- The columns for absences.
- Additional columns for reimbursable expenses, projects and notes on the progress of the work can also be added.
Specific reports
Extensions allow you to create specific reports, tailored to the needs of a company.
Version for employers
We are thinking about developing an application for employers that will allow for the collection and consolidation of the data contained in the files managed by employees, for statistical or other purposes.
Should there be a wider interest in such a tool, please report it to us via the contact form, by also indicating which functionalities would be of interest to you.