Invoice Dialog Add and Edit Invoices
The Invoice and Estimate dialog allows invoice data to be entered and edited.
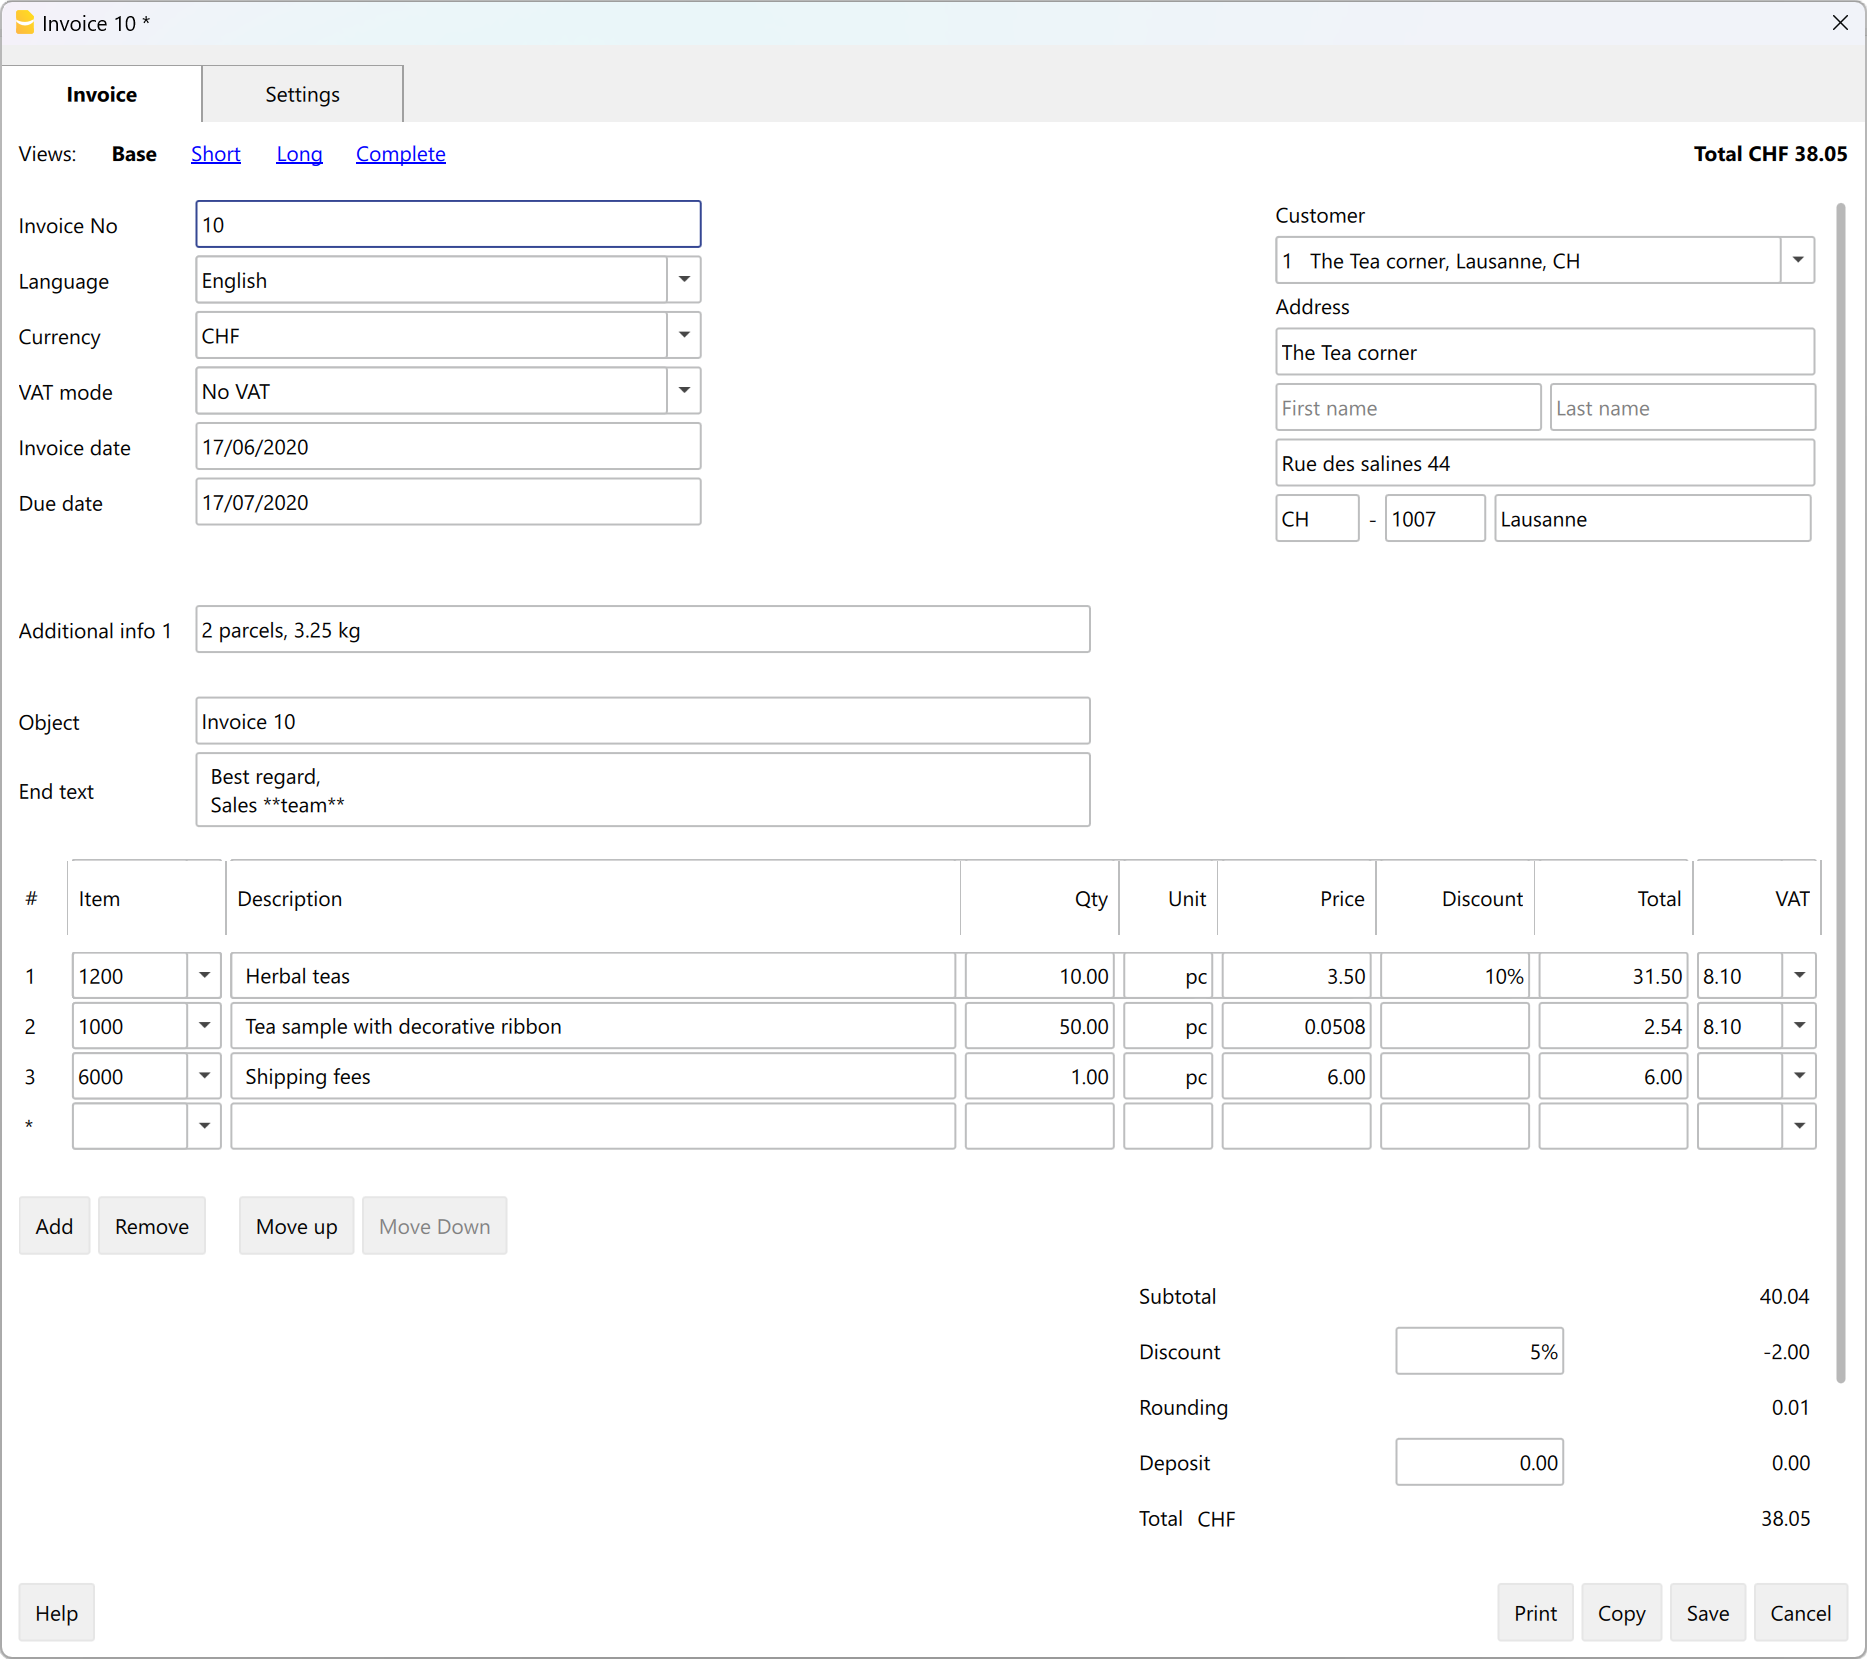
Open the Dialog
The dialog can be opened via:
- For the Invoice
- The Invoice menu > New invoice.
- The Invoice menu > Edit invoice.
- The Invoice table > Double-click on the invoice line of relevance, in the Address column.
- The Invoice table > Double-click on the invoice line of relevance, in the Total Amount column.
- From the ID column, click on the small icon Edit invoice on the right-hand-side of the cell.
- For the Estimate
- The Invoice menu > New estimate.
- The Invoice menu > Edit estimate.
- The Estimate table > Double-click on the estimate line of relevance, in the Address column.
- The Estimate table > Double-click on the estimate line of relevance, in the Total Amount column.
- From the ID column, click on the small icon Edit estimate on the right-hand-side of the cell.
Dialog Sections
The dialogue is divided into two sections:
- Invoice
- In the Invoice section you enter the invoice data.
- Settings
- In the Invoice settings section, parameters for new documents and interface settings of the invoice dialogue are defined.
Dialogue extension
The dialogue for entering invoice data is implemented via the Estimates and Invoice Dialogue Extension.
- The extension is installed automatically when an Estimates and Invoice file is opened.
- The extension is updated automatically when a new version of the extension is released.
- The dialogue can therefore change even if the Banana Accounting programme has not been updated.
Invoice Edit Dialog
Here is how the invoice dialog window appears. Below, we explain its individual elements.
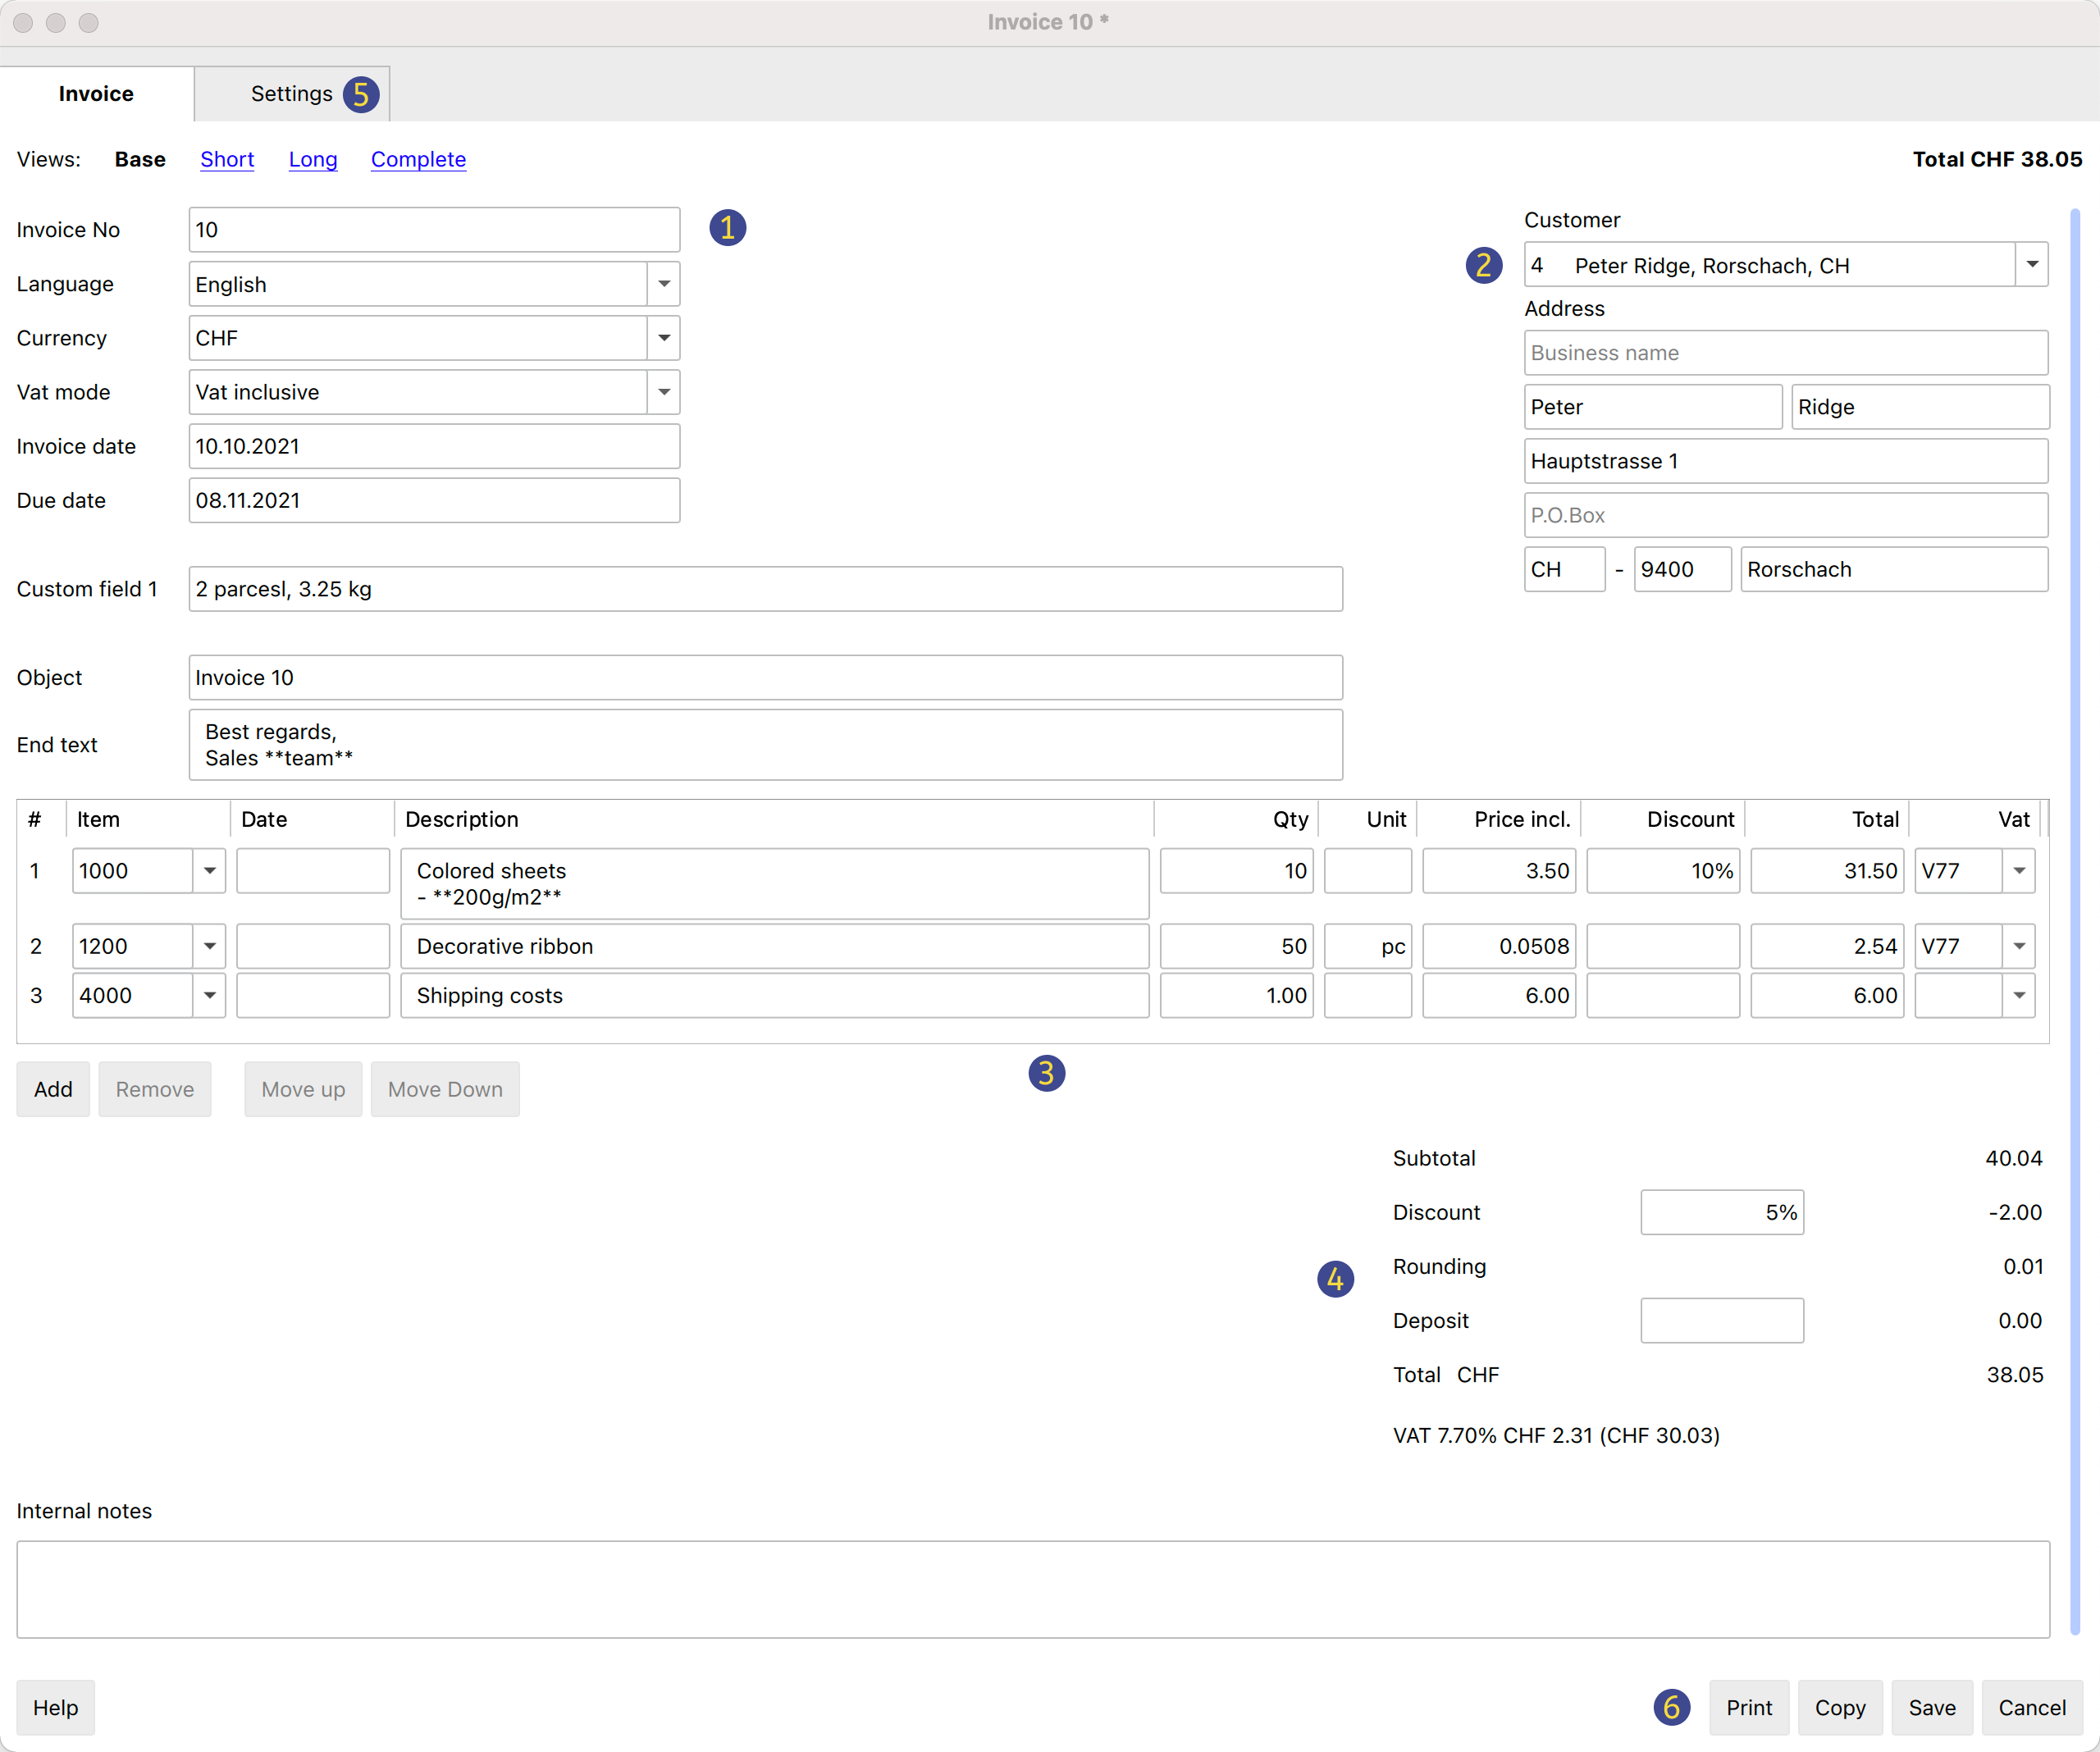
Views
These are shown at the top.
They define which data entry fields are visible and which are hidden.
By switching between the different views, you can switch between more general and more detailed views.
The following views are available:
- Base
- Shows the most frequently used fields.
- Can be adjusted to one's needs.
- Short
- Focuses on the Item table.
- Can be adjusted to one's needs.
- Long
- Complete view with all fields.
- Can be adjusted to one's needs.
- Complete
- Complete view with all fields.
- Cannot be adjusted.
Via the Settings section, for the Base, Short and Long views, it is possible to define which fields to make visible and which ones to hide.
Structure
(1) Information and Free Texts
This section allows you to enter information regarding the invoice and define free texts to be included in the printout.
- Invoice number
- The invoice number is entered.
- The number is taken and inserted automatically by the programme in the Id column of the Invoices table.
- It can be included in the invoice printout.
- Language
- The language in which the invoice is to be printed is entered.
- If defined, the customer language set in the Contacts table is taken over and inserted.
- Currency
- The currency in which to print the invoice is entered.
- You can indicate the abbreviation (CHF, EUR, USD, etc.) that will be printed on the invoice.
- The programme does not make exchanges and conversions to other currencies.
- VAT mode
- Select the VAT mode.
- If the VAT mode is changed, the programme modifies the amounts already entered, so that the same invoice can be printed with gross and net amounts.
- Without VAT
No VAT is applied. - VAT excluded
Amounts are net. - VAT included
Amounts are considered gross.
- Without VAT
- The total VAT amount may vary by a few cents compared to the calculation performed directly on the VAT taxable total. The reason for this is that the VAT total is calculated by adding up the (rounded) VAT amount of each individual item. This difference is not to be considered an error, but a feature of the calculation of invoice amounts.
- Invoice date
- The invoice date is entered.
- The date is taken and inserted automatically by the programme in the Date column of the Invoices table.
- It can be included in the invoice printout.
- Due date
- The payment due date is entered automatically by the programme for all invoices.
- It can be entered manually for each invoice.
- It can be included in the invoice printout.
- Order number
- It's optional.
- The order date is entered.
- It can be included in the invoice printout.
- Order date
- It's optional.
- The order date is entered.
- It can be included in the invoice printout.
- Invoice custom fields
- It requires the Advanced Plan.
- They are optional.
- Additional information fields can be defined and added to the invoice (maximum 8 fields) where customized texts can be entered.
- The value/content is entered. In the Settings section, you define the names/texts of the fields.
- They can be included in the invoice printout using the CH10 and UNI11 layouts. In the print settings of the layouts, under Print → Information . Custom fields must be activated.
- Invoice title
- It's optional.
- The text of the invoice subject is entered.
- The text is taken over and inserted automatically by the program in the Description column of the Invoices table.
- The text is included in the invoice printout as title/object. It takes priority over any title entered in the settings of the invoice layout.
- Begin text
- It's optional.
- You enter the initial text to be included in the invoice printout, immediately after the title/object.
- The text may be entered on several lines.
- You can put the text in bold, including the part of the text between double asterisks **.
Example: **text1 text2** text3 = text1 text2 text3.
- End text
- It's optional.
- You enter the final notes to be included in the invoice printout, immediately below the details table.
- The text is taken over and inserted automatically by the programme in the Notes column of the Invoices table.
- The text may be entered on several lines.
- You can put the text in bold, including the part of the text between double asterisks **.
Example: **text1 text2** text3 = text1 text2 text3.
(2) Customer address
This section allows you to enter the invoice address. You have two possibilities:
- Retrieve the data from the Contacts table.
- Select a customer from the list.
- You can also search directly for an address by entering the first name, surname, company, email or tax number.
- When you select a contact, the various address fields are automatically completed by the programme.
- Enter the data manually.
- Complete each element of the address field by field.
The address fields are as follows:
- Business name
- Enter business name.
- Prefix
- Enter customer's prefix.
- First Name
- Enter the first name.
- Last name
- Enter the last name.
- Address street
- Enter the street.
- Address extra
- If necessary, enter extra address.
- Post Box
- Enter Post Box
- Country code
- Enter country code.
- ZIP
- Enter ZIP.
- Locality
- Enter locality.
- Email
- Enter email.
- Phone
- Enter phone number
(3) Items / item columns
This is a table that allows you to enter the lines for the items that make up the invoice.
In the Settings section, you can choose for each view:
- Which columns to display.
- The maximum table height.
If you define a value, the table used for entering items will have a maximum size (calculated based on the height of a text line). If there are many items, you will be able to scroll through them while always keeping the buttons at the bottom visible.
While the cursor is on the table, the mouse wheel scrolls the table content. To scroll the form instead, use the vertical scroll bar.
This table includes the following columns:
- Row
- The sequential row number.
- Type
- Requires the Advanced Plan.
- Allows you to assign a special role to the invoice row, such as headings, notes, and subtotals.
See the detailed explanation of advanced entry in the Type column.
- Item
- Optional.
- By using the Items table, you can select an item from the list. The fields in the following columns (Description, Quantity, Unit, Unit Price) are automatically completed by the program.
- You can also search for an item by typing part of its descriptive text.
- Item date
- Requires the Advanced Plan.
- Optional.
- Enter a date for each item, useful for example to indicate the execution date of the billed work.
- Description
- Enter the description of the item or the object being invoiced.
- The description text can span multiple lines.
- You can make text bold by enclosing the relevant part between double asterisks **.
Example: **text1 text2** text3 = text1 text2 text3.
- Quantity
- Mandatory.
- Enter the quantity.
- To create, for example, a credit note or a discount, enter the quantity with a negative sign (the total amount of the row will be negative). See also Create a credit note.
- Unit
- Optional.
- Enter the text related to the unit (pcs, hours, etc.).
- Unit Price
- Mandatory.
- Enter the price of a single unit.
- Item Discount
- Requires the Advanced Plan.
- Optional.
- Specify a discount for each item.
The discount is calculated on the price of a single unit (Unit Price column), and can be entered:- As an amount. Enter the discount amount directly.
Example: Quantity 2; Unit Price 10.00; Discount 1.00; Total = 18.00
If the Discount is equal to or greater than the Unit Price, the Total is set to 0 - As a percentage. Enter a percentage (e.g. 10%).
Example: Quantity 2; Unit Price 10.00; Discount 10%; Total = 18.00
If the Discount is equal to or greater than 100%, the Total is set to 0
- As an amount. Enter the discount amount directly.
- Total
- The total is calculated and entered automatically by the program.
- VAT
- Optional.
- Enter the VAT code to use as defined in the VAT Codes table.
(4) Discounts and totals
This section allows any discounts to be entered and shows the invoice totals.
The programme automatically calculates the following
- Subtotal
- The sum of all amounts in the Total details column is shown.
- Discount
- It's optional
- You enter the discount to be applied to the invoice total by entering a description and the percentage or amount.
- If a percentage is entered, the programme automatically calculates and displays the discount based on the percentage value entered.
- Rounding
- Rounding is indicated.
- Deposit
- It's optional
- The deposit already paid by the customer is entered, indicating the description and amount.
- Total
- The final total of the invoice is shown.
- The total is also shown in the top right-hand corner of the dialogue to speed up invoice verification.
- VAT
- The totals of the VAT amounts are shown.
(5) Settings
The settings of the Invoice Dialogue.
For more information, please refer to the Invoice settings dialogue page.
(6) Commands
- Print
- Command to print an invoice.
- Copy
- Command to copy an invoice.
- Save
- Command to save changes.
- Close
- Command to end the dialogue.
- Cancel
- Command to delete changes and close the dialogue without saving.
- Help
- Command linking to online documentation where information on invoice dialogue can be found.
Customisation
The invoice dialog is programmed through a BananaPlus extension, and is updated independently of the application. The version provided is generic and covers most of the needs.
For contexts where invoices are complex, or many invoices are created, you can adapt the dialog to make creating invoices easier, more functional, and faster.
Advanced input Type column for Estimates and Invoices
Requires the Advanced Plan of Banana Accounting Plus.
The Type column in the Invoice Edit Dialog allows you to assign a specific role (e.g. header, notes, subtotals) to the invoice row.
To use the column, you first need to make it visible in the desired view, from the Settings tab (section Items columns > enable the Type column).

The available options in the Type column are as follows:
- Header
Allows you to insert a header text to be displayed in the invoice details (in blue in the image). - Note
Allows you to insert annotation text to be displayed in the invoice details (in green in the image). - Totals
Allows you to insert up to three levels of subtotals (in yellow in the image).

Header
Inserts a header row for the content of the following rows, where the items or services are listed.
- In the Type column, select Header from the list.
- In the Description column, enter text that will be displayed in bold as the header for the content of the following rows. The text can span multiple lines.
- The other columns must remain empty.
Example of data entry:
| Type | Item | Description | Quantity | Unit price | Total |
| Header | Consulting services | ||||
| A | Service A | 1 | 150 | 150 | |
| B | Service B | 2 | 100 | 200 | |
| Header | Development services | ||||
| C | Service C | 3 | 120 | 360 | |
| D | Service D | 1 | 90 | 90 |
Note
Inserts a note row to be displayed in the invoice details, before or after the list of items or services.
- In the Type column, select Note.
- In the Description column, enter text that will be displayed on the invoice. The text can span multiple lines.
- The other columns must remain empty.
Example of data entry:
| Type | Item | Description | Quantity | Unit price | Total |
| A | Consulting service | 2 | 100 | 200 | |
| Note | Remote assistance provided | ||||
| B | Technical support | 1 | 150 | 150 | |
| Note | Support provided in April |
Total 2
Inserts a subtotal row that sums up the preceding items.
- In the Type column, select Total 2.
- In the Description column, enter text that will be displayed on the invoice. The text can also span multiple lines.
- The other columns must remain empty.
The Total 2 row:
- Automatically calculates the subtotal of the items entered in the preceding rows.
- You can insert multiple Total 2 rows: each one sums all the items that precede it.
Example of data entry:
| Type | Item | Description | Quantity | Unit price | Total |
| A | Service A | 2 | 50 | 100 | |
| B | Service B | 1 | 30 | 30 | |
| Total 2 | Subtotal 2 | 130 |
Total 1
Inserts a subtotal row that sums up Total 2 rows and the previous items or services not included in a Total 2.
- In the Type column, select Total 1.
- In the Description column, enter text that will be displayed on the invoice. The text can also span multiple lines.
- The other columns must remain empty.
The Total 1 row:
- Automatically calculates the subtotal of the items entered in the preceding rows.
- If the preceding rows contain Total 2 rows, their values are included in the subtotal calculation.
- You can insert multiple Total 1 rows: each one sums all the items and Total 2 subtotals that precede it.
Example of data entry:
| Type | Item | Description | Quantity | Unit price | Total |
| A | Service A | 2 | 50 | 100 | |
| Total 2 | Subtotal 2 | 100 | |||
| B | Service B | 1 | 30 | 30 | |
| C | Service C | 1 | 70 | 70 | |
| Total 2 | Subtotal 2 | 100 | |||
| Total 1 | Subtotal 1 | 200 |
Total
Inserts a subtotal row that sums up Total 1, Total 2 and the previous items or services not included in Total 1 or Total 2.
- In the Type column, select Total.
- In the Description column, enter text that will be displayed on the invoice. The text can also span multiple lines.
- The other columns must remain empty.
The Total row:
- Automatically calculates the subtotal of the items entered in the preceding rows.
- If the preceding rows contain Total 1 or Total 2 rows, their values are included in the subtotal calculation.
- You can insert multiple Total rows: each one sums all the items or services and Total 1 and Total 2 subtotals that precede it.
Example of data entry:
| Type | Item | Description | Quantity | Unit price | Total |
| Header | Consulting services | ||||
| A | Service A | 1 | 150 | 150 | |
| B | Service B | 2 | 100 | 200 | |
| Total 2 | Total consulting services | 350 | |||
| Header | Development services | ||||
| C | Service C | 3 | 120 | 360 | |
| D | Service D | 1 | 90 | 90 | |
| Total 2 | Total development services | 450 | |||
| Total 1 | Total work | 800 | |||
| Header | Extra expenses | ||||
| E | Travel expenses | 1 | 100 | 100 | |
| Total | Subtotal | 900 |
Invoice settings dialogue
By clicking Settings (in the lower left corner) you enter the settings dialog of the invoice.
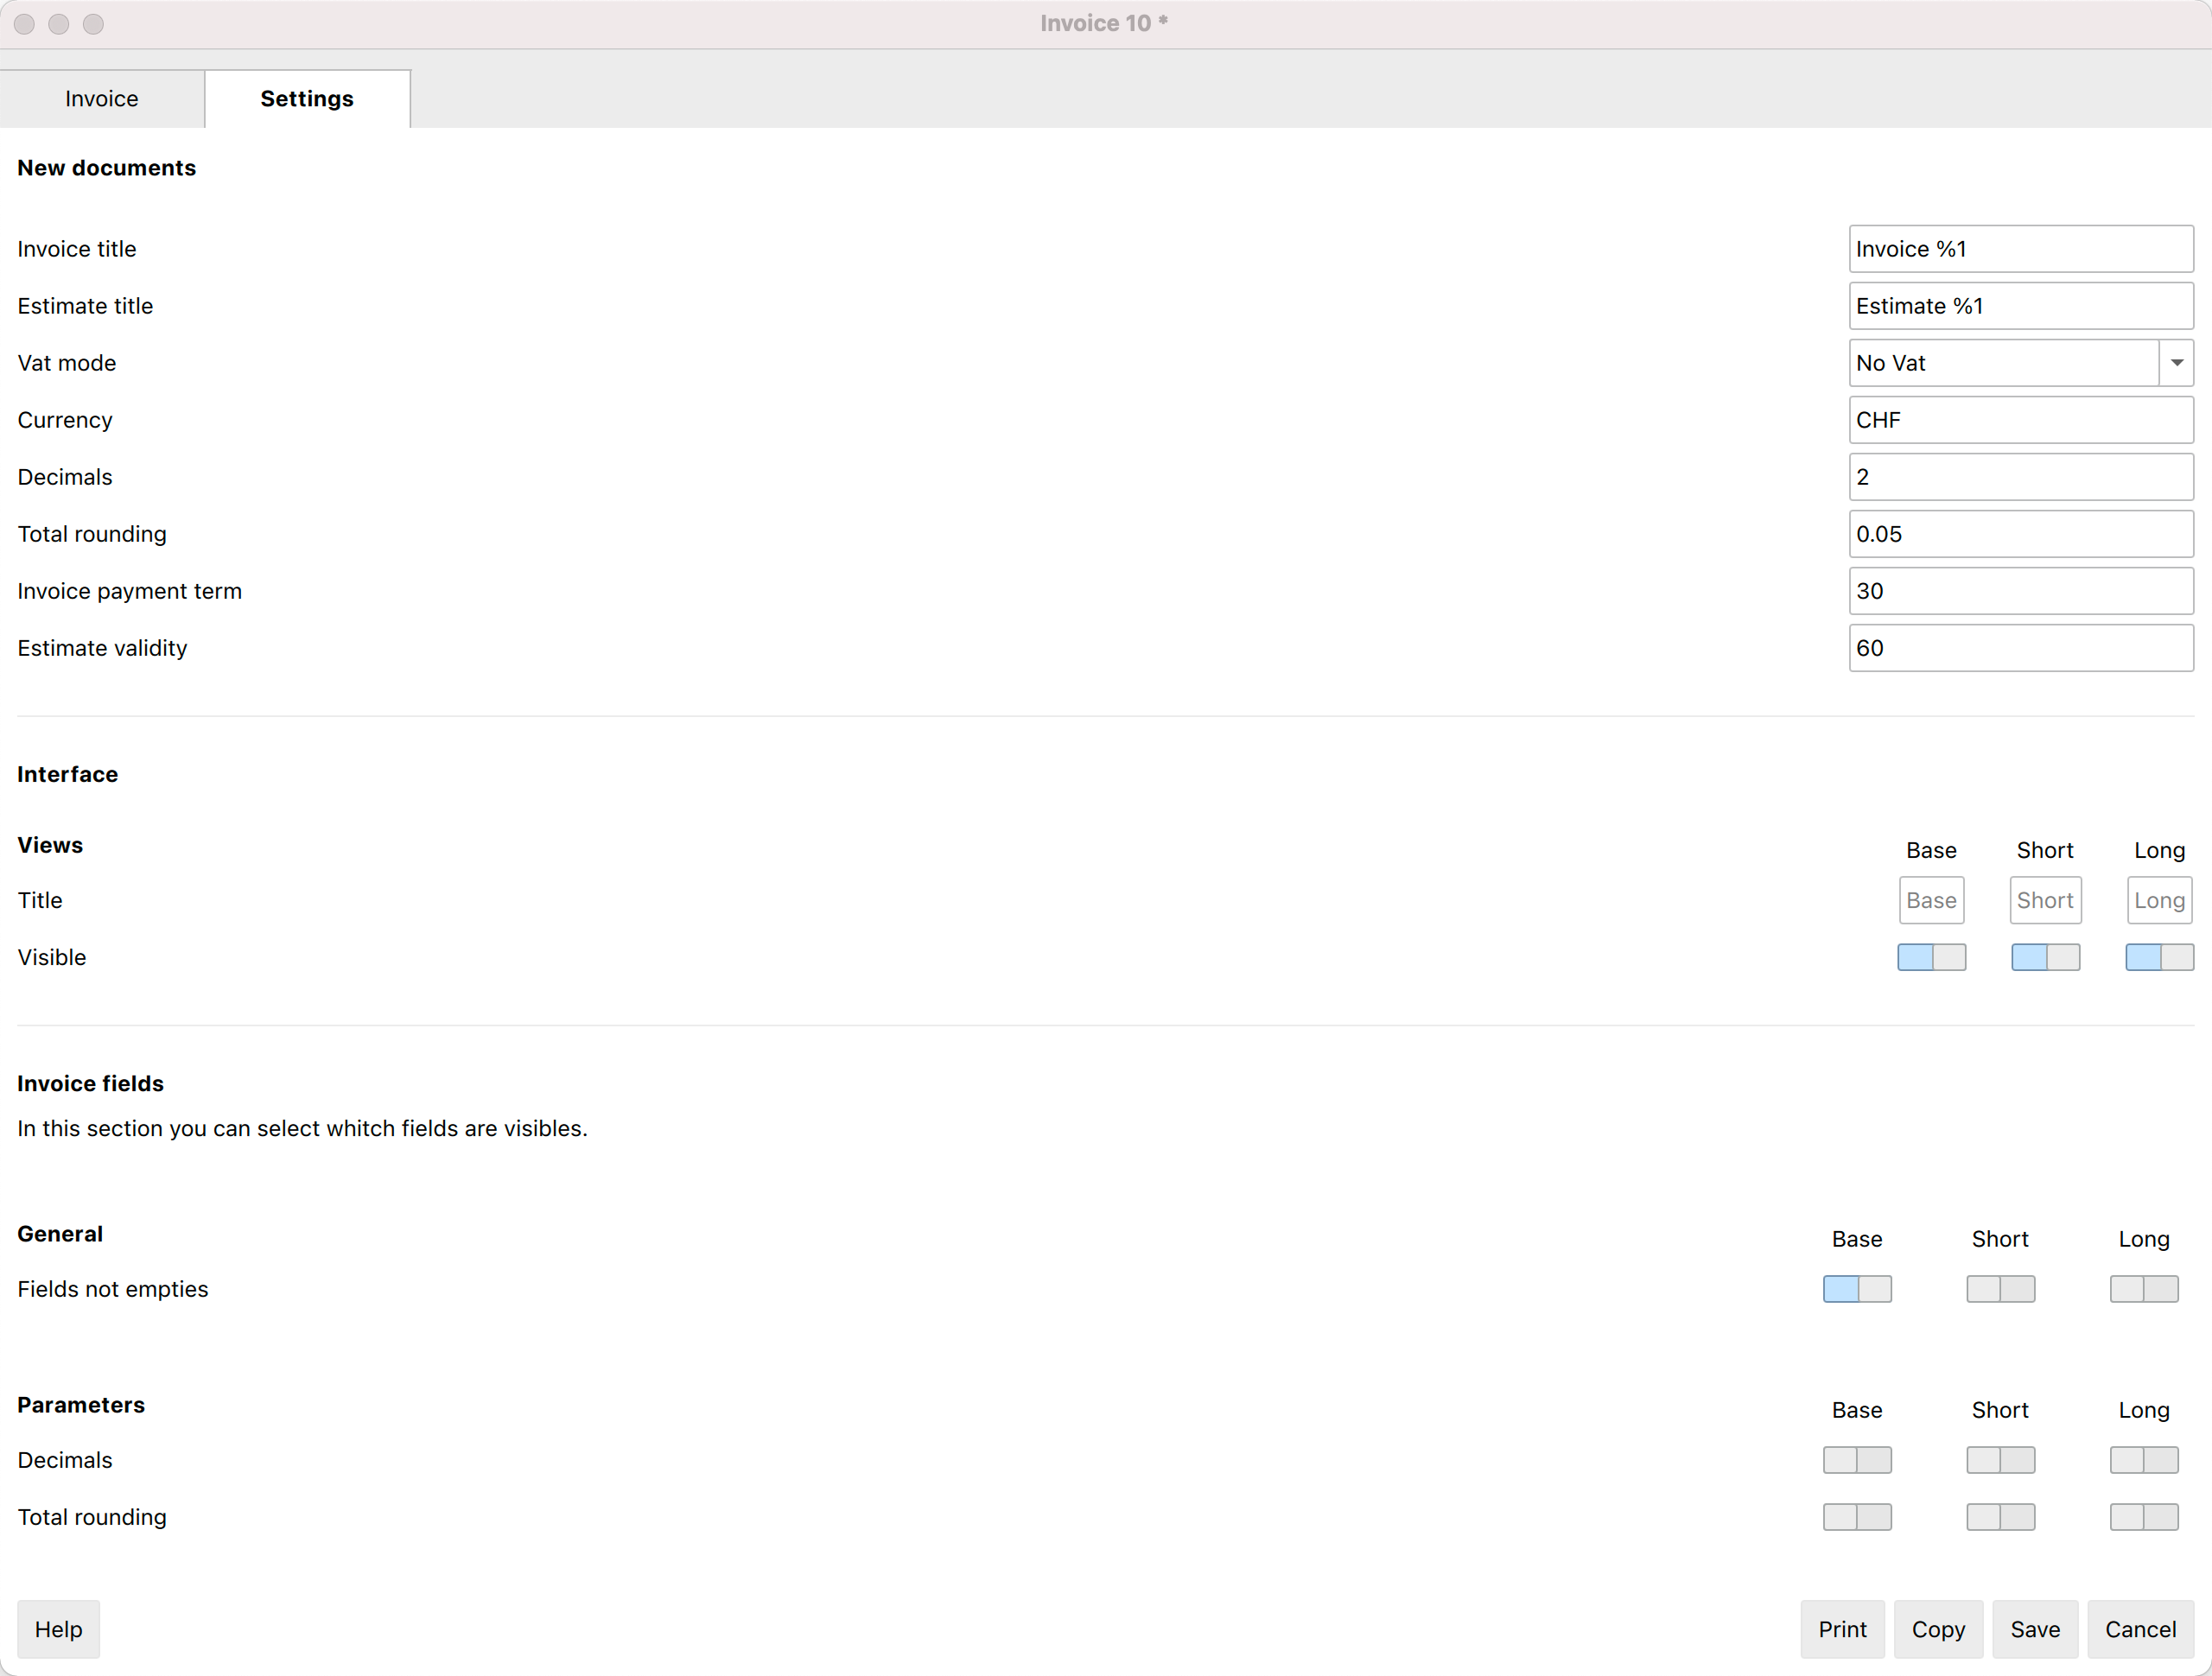
The settings you set are specific for the invoice.
- The currency code
You can indicate the code (CHF, EUR, USD, etc.) that will be printed on the invoice.
The program does not make exchanges and conversions in other currencies. - The number of decimals to be used for the amounts.
All amounts will have the number of decimals set. - Rounding up totals.
Put a "0.05", "0.10" amount that becomes the minimum rounding unit.
The decimal separator must always be the dot ".". - Payment term in days
It is used to preset the due date, which can then be changed manually. - Validity of the Estimate in days
This is used to preset the expiry date of the offer, which can then be changed manually. - The VAT mode
If the VAT mode is changed, the program modifies the amounts already entered, so that the same invoice can be printed with both gross and net amounts. If the VAT is set to gross and net amounts have been entered, once the setting has been changed, the amounts must also be changed so that they are net amounts.- No VAT. No VAT is applied.
- VAT Inclusive. The amounts are considered gross.
- VAT Exclusive. The amounts are considered net.
Use settings for new invoices
You can choose to use these settings for new invoices that will be created.
The settings of other existing invoices are not changed.
Translations of invoice's texts
In the Settings dialog, clicking on a text field, such as the title for new invoices or the description of one of the user fields, leads to the Translations dialog.
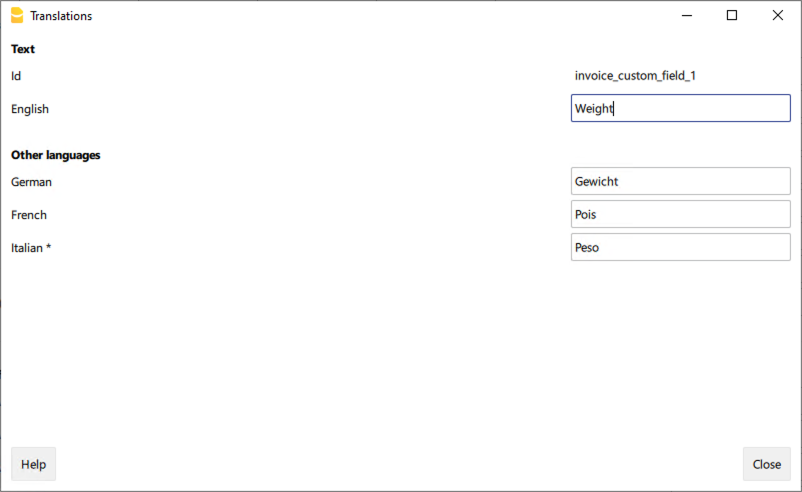
In the Translations dialog:
- You can enter the texts to be used in the various languages.
- Only the languages currently in use are listed.
- If a language is not listed, simply add a contact or invoice in the desired language.
- The first language listed corresponds to the programme language.
- The language marked with an asterisk * is the document language, defined in the menu File → File accounting properties→ Other tab → Current language.
Estimates and Invoices Dialogue Beta Release
The beta version of the Estimates and Invoices extension provides early access to new features and bug fixes before the official release.
How to install it
Watch the video tutorial which shows you how to try out the brand new Beta version of the Estimates and Invoices extension.
- Download and install the last Banana Accounting+
- Open the Extensions menu > Manage Extension dialog
- Select the Estimates and Invoices extension
- Select the Beta release as preferred channel.
You can change the release channel at any time without data loss.
Change history
View the change history.
Feedback
We would appreciate every feedback about this new release.
You can send us your feedback through the contact form, please also include a short description about the context where your are using this extension.