Integration von Microsoft Excel in Banana Buchhaltung
Excel Reports Add-in (Beta)
With this add-in there will no longer need to make "copy and paste" of the values each time you update your accounting file.
You create worksheets with formulas, charts, formatting and more in Excel, and the add-in will retrieve for you the data from the accounting file.
Just click on the update button and your Excel worksheet will be automatically filled with the new values from Banana Accounting, and the results of formulas and charts will be updated accordingly.
See Documentation Banana Accounting Excel Add-in.
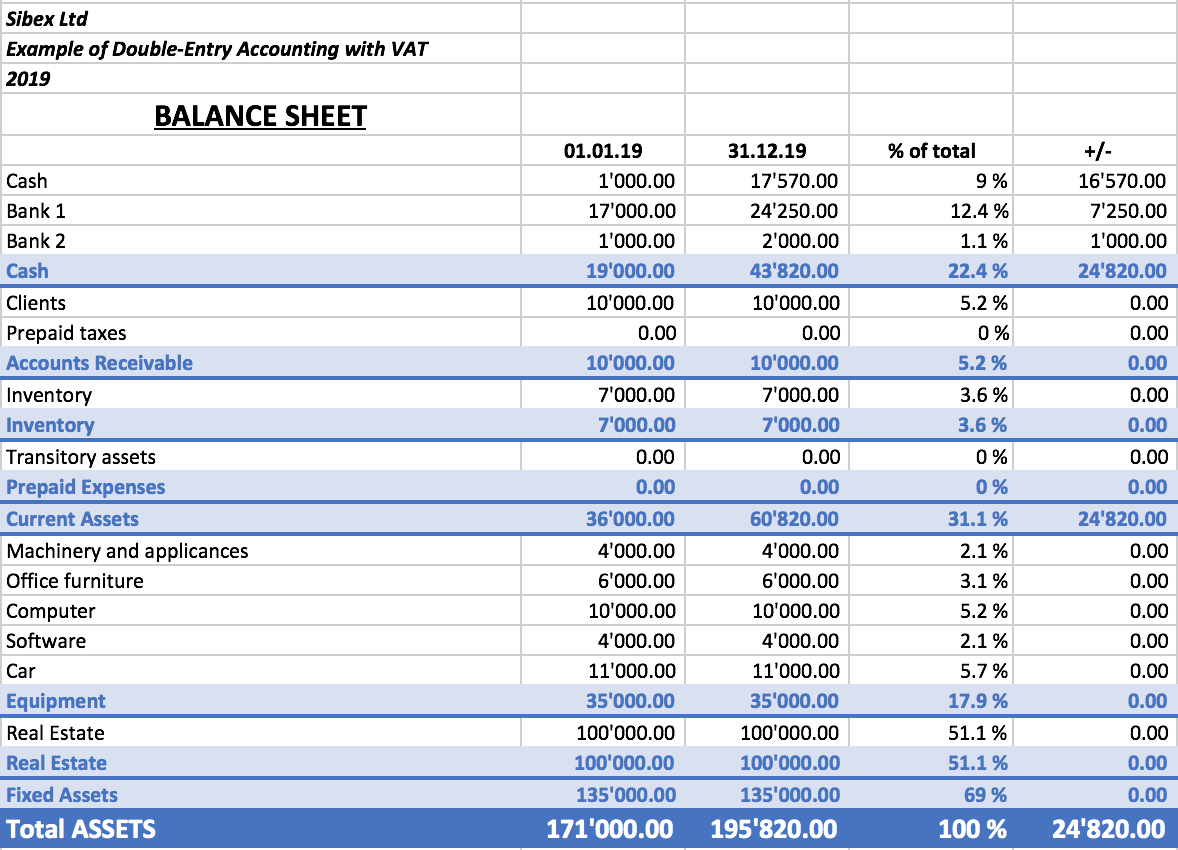
Example of a Balance sheet report created with the Excel Reports add-in
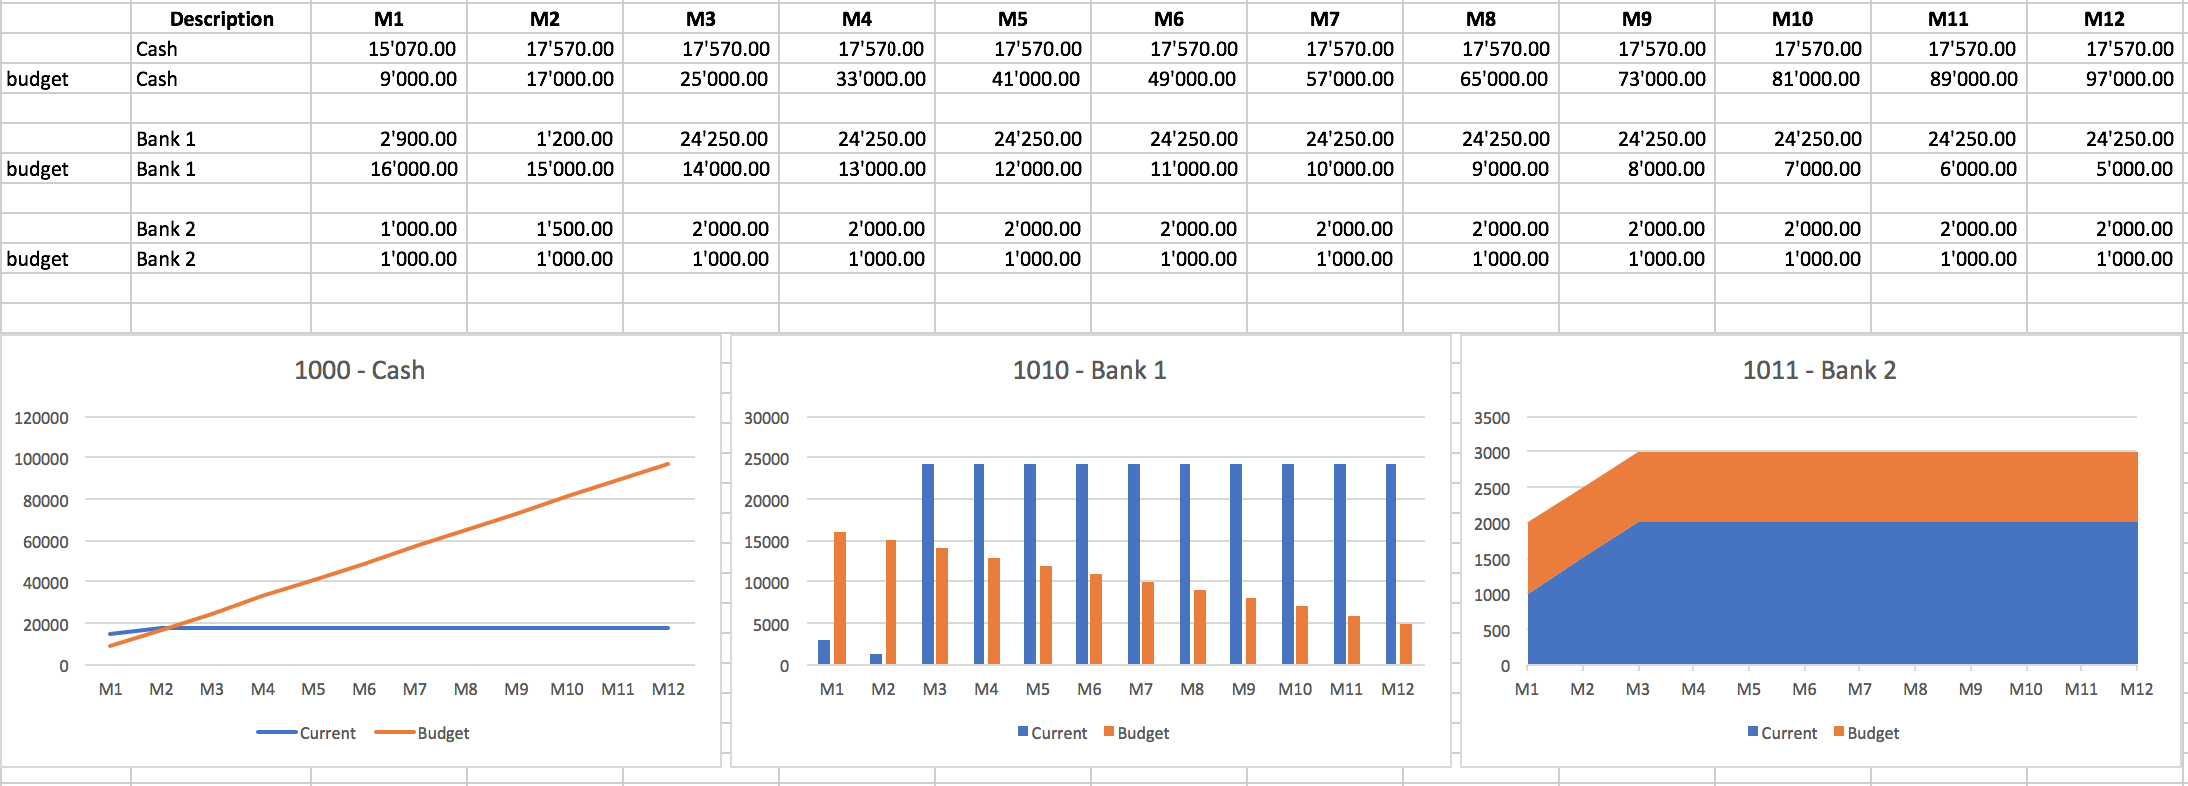
Example of a report with charts created with the Excel Reports add-in
Characteristics
- This add-in is hosted on our server.
Once you have installed the manifest on your computer, your will automatically use the last version. - The add-in are secure.
Unlike Excel-macros the Add-in are secure and cannot compromise your computer. - The add-in is currently in Beta Test.
- Please check everything and report any problem.
- You can use for free, but It is also possible that it will be made available with a cost.
Installation Banana Accounting Excel Add-In
The steps below walk you through all the setup to run the Banana Office Add-ins for Microsoft Office 2016 or more recent.
Minimum requirements:
- Banana Accounting Plus or Banana Accounting 9.
- Microsoft Office 2016 or more recent (Word, Excel, PowerPoint, Outlook).
Get Banana Accounting
- Download Banana Accounting for Windows or Mac.
- Install it on your pc.
Activate Banana Accounting web server
- Start Banana Accounting.
- On Menu bar click Tools → Program options and select the Interface tab
- Check the Start Web Server and Start Web Server with ssl options.
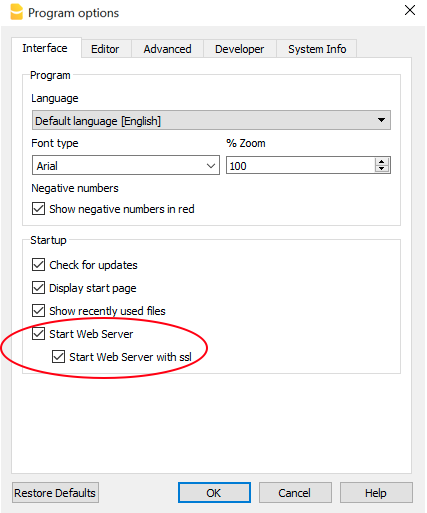
- Click OK.
Load the Add-in
- Open Excel.
- Click on Insert tab.
- Click on the Get Add-ins icon to open the Office Add-ins store.

- In the Office store page search for "Banana" add-in.
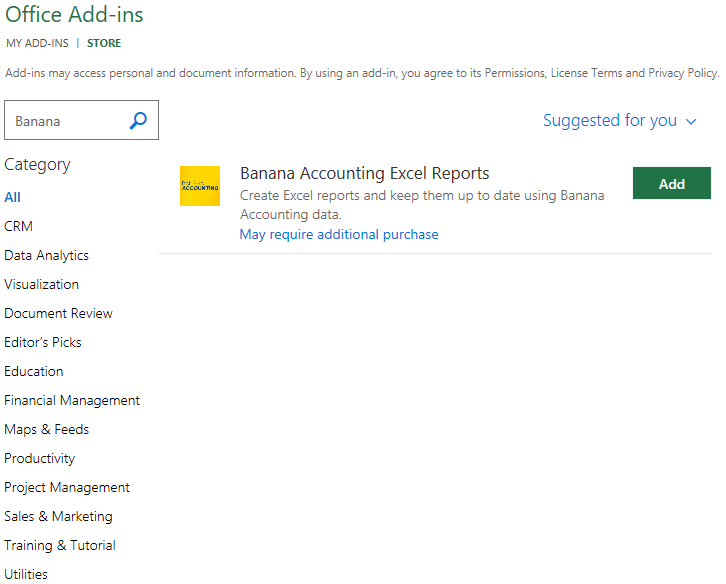
- Click on the Add button to add the Banana Accounting Excel Reports add-in.
- As soon as the add-in is added in Excel, on the Home tab of the main ribbon is loaded the Banana Accounting add-in command.
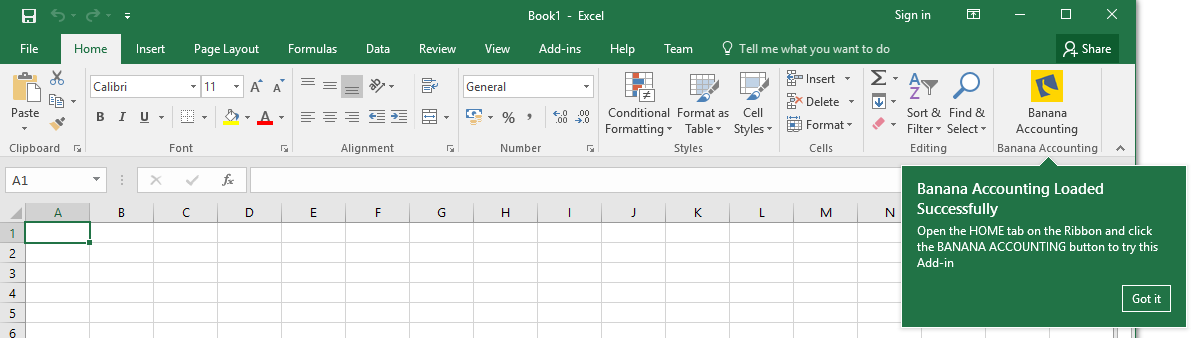
- Click on the Banana Accounting icon to use the add-in.
Once the add-in has been added from the Office store it is saved into My Add-ins section.
To load an add-in previously added from the office store:
- Click on Insert tab.
- Click on the My Add-ins icon.

- Select the Banana Accounting add-in.
- Click on the Add button.
Windows users
For Windows users, please also follow the Troubleshooting for Windows guide to complete the installation of the add-in.
macOS users
For macOS users, please also follow the Troubleshooting for macOS guide to complete the installation of the add-in.
Troubleshooting Excel add-in for Windows
The guide below walk you through the Windows troubleshooting step by step.
- Download and install the latest version of Banana Accounting Plus for Windows.
- Update Windows and Excel.
- Open Excel and check you are logged in with your Microsoft account (File → Account → User Information).
- Start Banana Accounting web server:
- Open Banana Accounting Plus.
- Click on menu Tools > Program Options.
- Select the tab Interface.
- Check the options Start Web Server.

- Edit the BananaPlus web server configuration file:
- Click on menu Tools > Program Options.
- Select the tab Advanced.
- Click on System info button

- Select the entry Web Server > Settings file path
- Click on Open path... button

- Open the file httpconfig.ini
- Right click > Open with > Notepad.
- In the file look for the following properties and edit as indicated:
- accessControlAllowOrigin
Modify the value of property accessControlAllowOrigin to "*" (accessControlAllowOrigin=* ) - accessToken
Modify the value of property accessToken with a password of your choice (e.g. "accessToken=MyPasswordX" )
It is used to have more security when using the Banana Web Server. For more information visit Web Server Security. - authenticationMode (starting from Banana Accounting version 10.2.12)
Modify the value of property authenticationMode to "fixed-token" (authenticationMode=fixed-token).
This is required when using a personal accessToken
- accessControlAllowOrigin
- Save the file and restart BananaPlus
- Add a local loopback exemption to Microsoft Edge Web Viewer (see Microsoft documentation , Add-ins and Edge for more information):
- In the search box enter cmd.

- On the right side select Run as administrator.

- Confirm with Yes.

- Copy and paste the following command:
CheckNetIsolation LoopbackExempt -a -n="microsoft.win32webviewhost_cw5n1h2txyewy"
- Press enter to run the command.
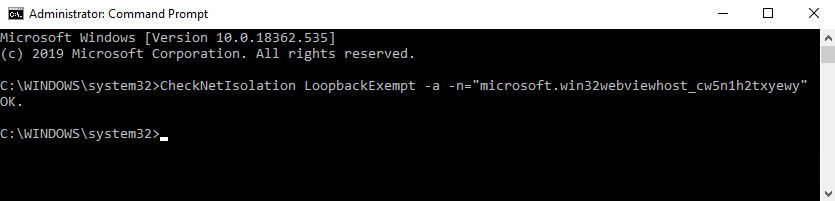
- Close the command prompt.
- In the search box enter cmd.
- Change the server URL on the Add-in settings:
- Start Excel Add-in.
- Click the Options tab.
- As Server informaion select Other, and complete as following:
- Server URL
Enter http://localhost:8081 - Connection token
If you have configured the accessToken password during the Setup of the Banana Web Server (Windows), you have to enter the password here.
- Click OK to confirm and save the changes.
- On the Setup tab of the add-in refresh the files list.
Note: in case you don't want to use the Excel add-in anymore, you can remove the local loopback exemption at any time with the command:
CheckNetIsolation LoopbackExempt -d -n="microsoft.win32webviewhost_cw5n1h2txyewy"
Messages
- Error Loading Add-in
You may get this error while trying to install the add-in from the Store. This is due to an authentication issue. To get this solved you need to:- Logout of Microsoft Excel.
- Restart Excel and sign in again.
- Restart Excel.
- Load the add-in.
- Cannot connect to local web server. Incorrect URL server or Banana Accounting/web server are not running.
The connection between Banana Accounting and Excel add-in did not occur. Please follow step by step the Troubleshooting for Windows guide on this page. - No file is open in Banana Accounting.
Banana Accounting is working but no file is open. Open at least one file in Banana Accounting. - File not selected.
No file is selected from the files list. Refresh the files list and select one of them.
Troubleshooting Excel add-in for macOS
The guide below walk you through the macOS troubleshooting step by step.
- Download and install the latest version of Banana Accounting Plus for Mac.
- Start Banana Accounting Plus web servers:
- Open Banana Accounting Plus.
- Click on menu Tools > Program Options.
- Select the tab Interface.
- Check the options Start Web Server and Start Web Server with ssl.
- Edit the BananaPlus web server configuration file:
- Click on menu Tools > Program Options.
- Select the tab Advanced.
- Click on System info button

- Select the entry Web Server > Settings file path
- Click on Open path... button

- Open the file httpconfig.ini
- Right click > Open with > Notepad.
- In the file look for the following properties and edit as indicated:
- accessControlAllowOrigin
Modify the value of property accessControlAllowOrigin to "*" (accessControlAllowOrigin=* ) - accessToken
Modify the value of property accessToken with a password of your choice (e.g. "accessToken=MyPasswordX" )
It is used to have more security when using the Banana Web Server. For more information visit Web Server Security. - authenticationMode (starting from Banana Accounting version 10.2.12)
Modify the value of property authenticationMode to "fixed-token" (authenticationMode=fixed-token).
This is required when using a personal accessToken
- accessControlAllowOrigin
- Save the file and restart BananaPlus
- Open Safari and insert the url https://127.0.0.1:8089
- When the dialog appears, insert your system password and click on Always allow button.
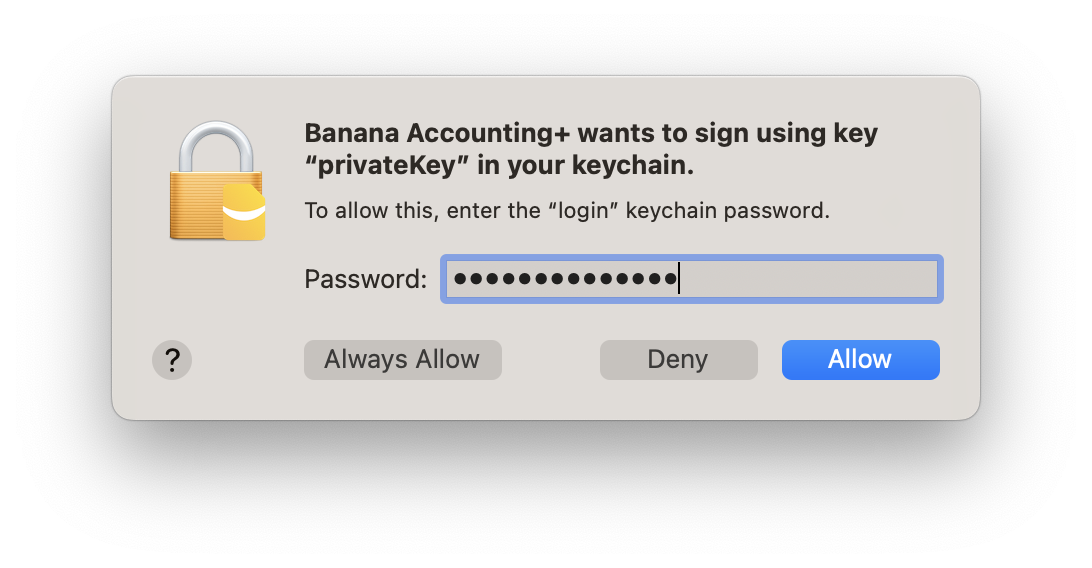
- Open macOS Keychain Access application (Applications > Utilities) and search for the banana.localhost certificate.

- Double click on the banana.localhost certificate, expand the Trust section and for "Secure Socket Layer (SSL)" select "Always Trust".
Close the dialog and enter your system password to confirm the changes.
- Close and reopen the macOS Keychain Access application, the banana.localhost certificare appears now with a blue plus icon.

- Start Excel 2016 and load the Add-in.
- Click on the Refresh file list button.
Messages
- Cannot connect to local web server. Incorrect URL server or Banana Accounting/web server are not running.
The connection between Banana Accounting and Excel add-in did not occur. Please follow step by step the Troubleshooting for macOS guide on this page. - No file is open in Banana Accounting.
Banana Accounting is working but no file is open. Open at least one file in Banana Accounting. - File not selected.
No file is selected from the files list. Refresh the files list and select one of them.
Documentation Excel Add-in
Introduction
With this add-in you can create Excel sheet that are filled with Banana Accounting data. Once you have added transactions to the accounting file you just need to click on the Update Button of the add-in and your spreadsheet content will be updated with the new data.
Your existing formatting and formula will be preserved.
- Create an Excel sheet with headers information
This information allows the add-in to retrieve data from Banana Accounting.
There are information relative to the file, column and account or group to be retrieved.
The add-in help you add the necessary information to retrieve the data. - Click on the Update button
The add-in will retrieve the values from Banana Accounting software.
It mantains the format or formula you enter.
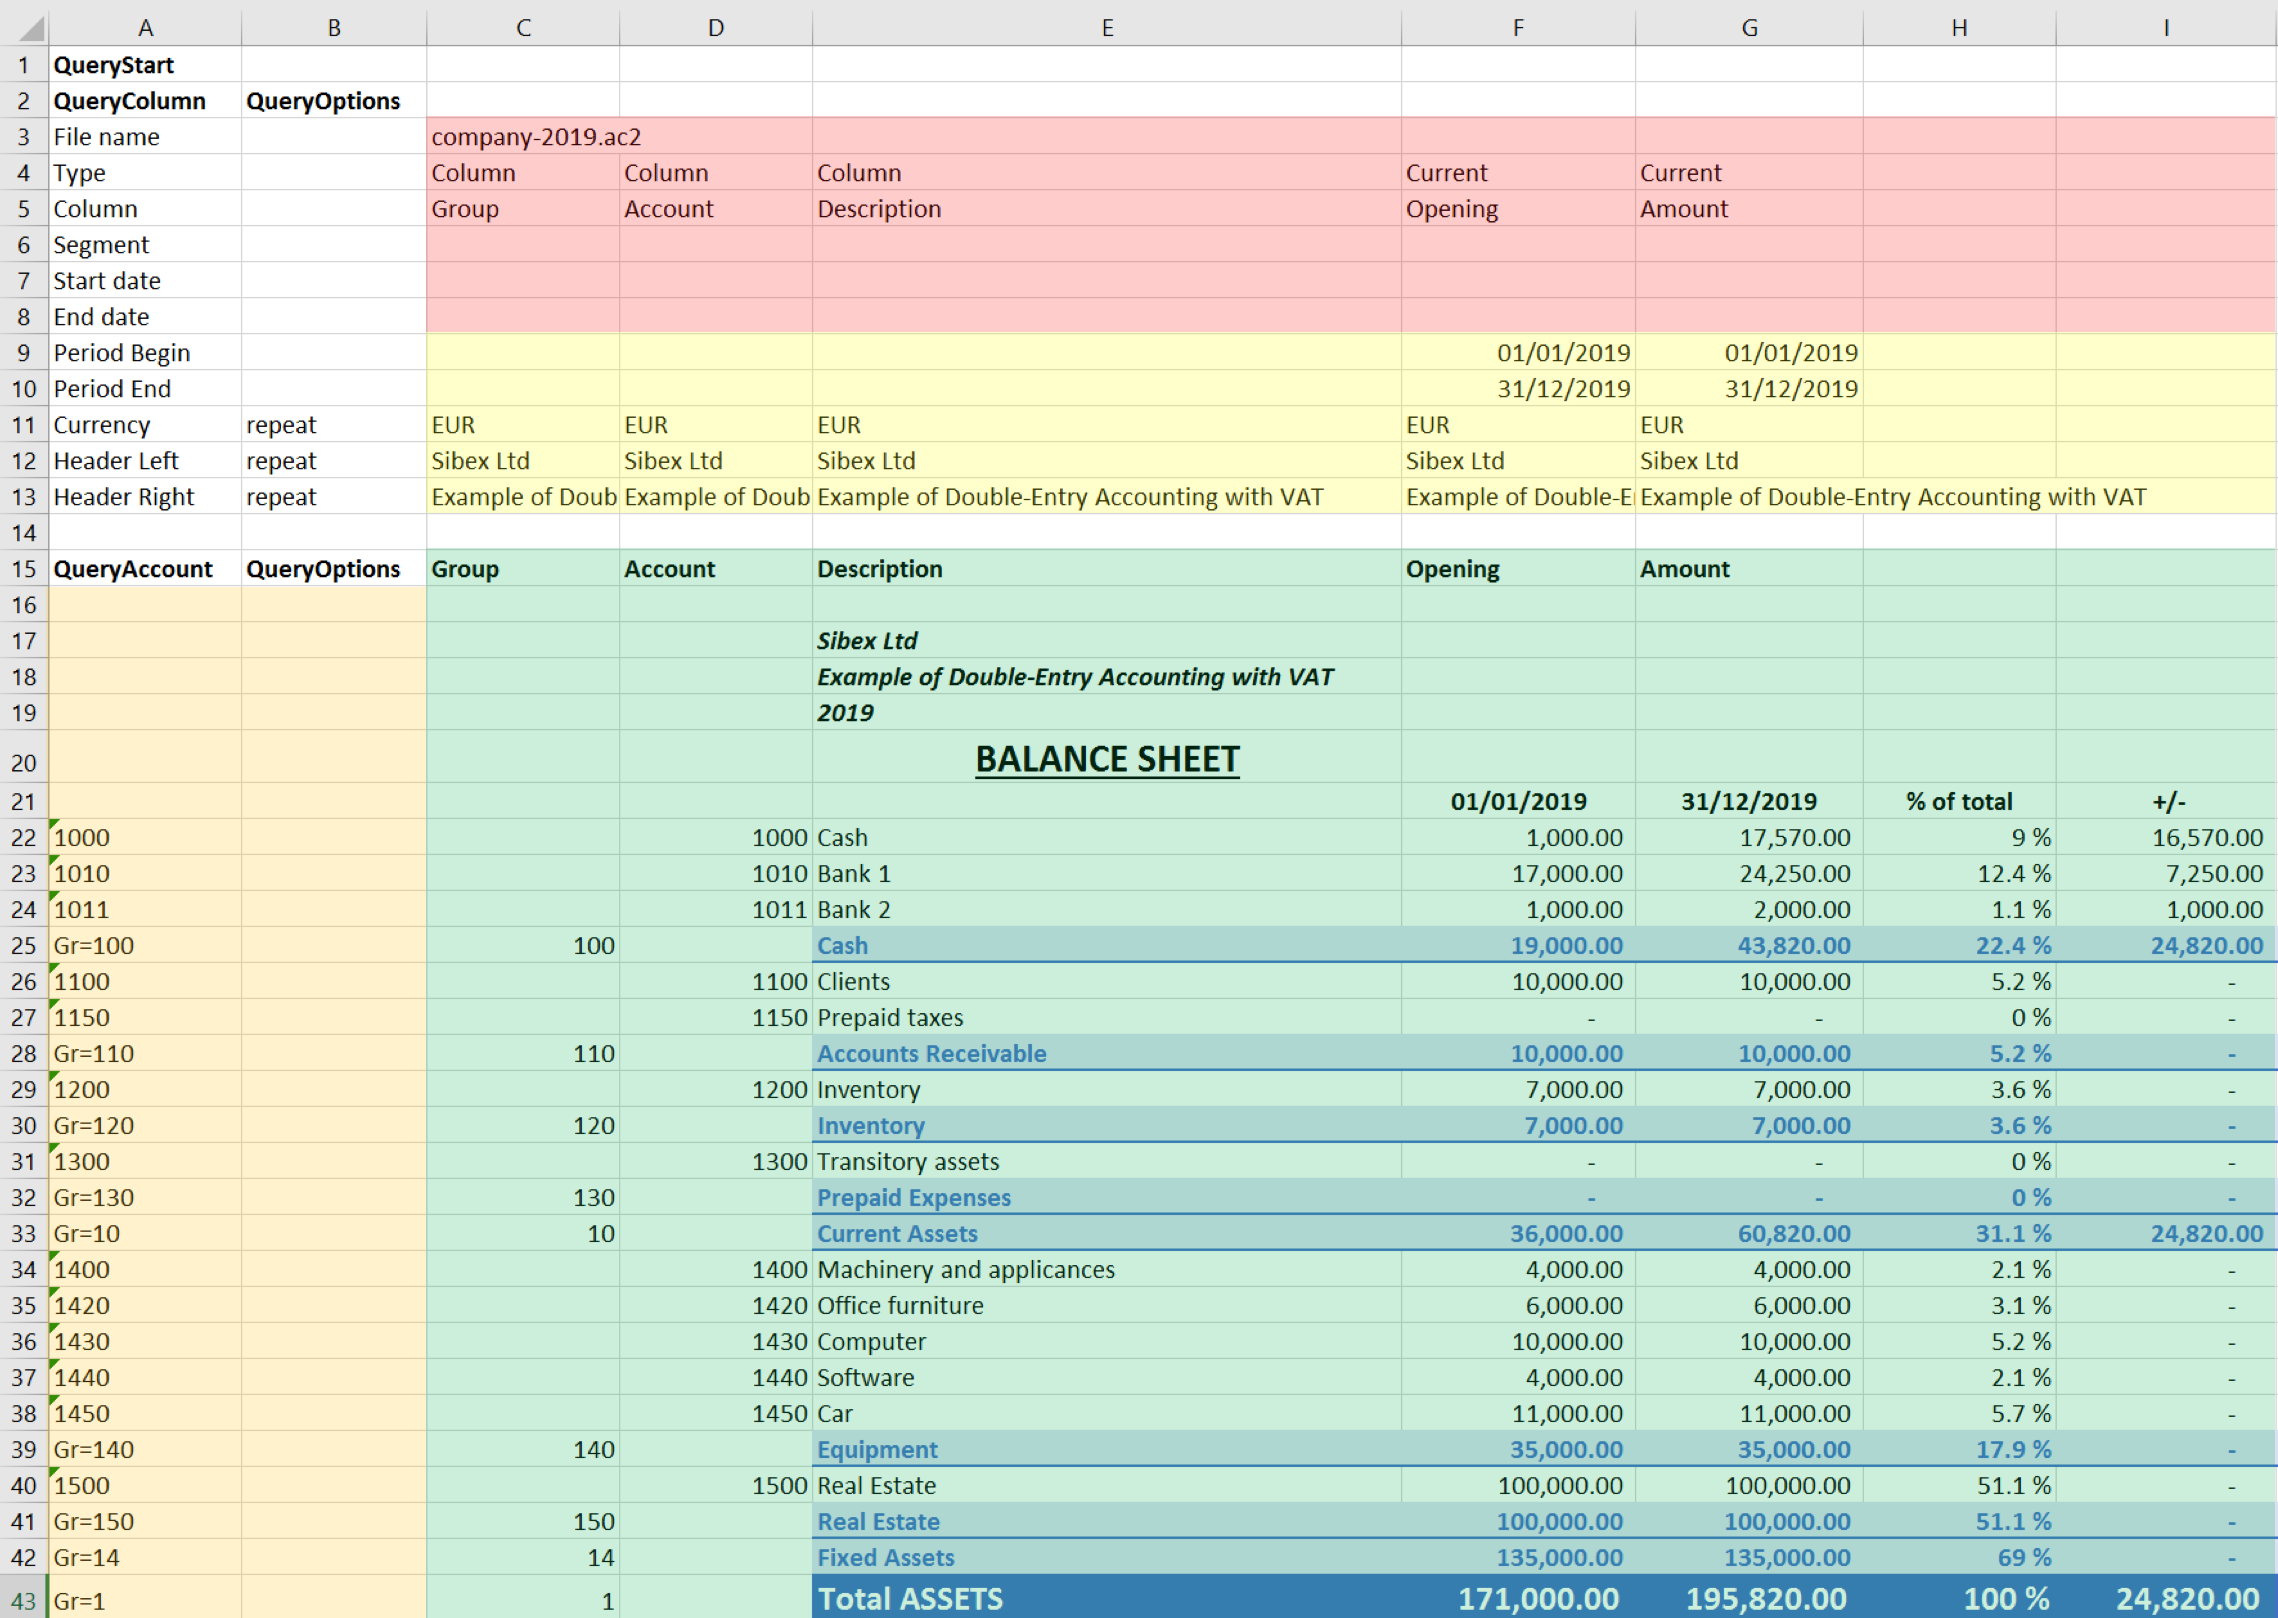
Example of a Balance sheet report created with the Banana Accounting Excel add-in
In the example above we can see:
- The data part
Here is where the data is synchronized, based on the QueryAccount and QueryColumns.- Accounting data (Green)
Filled with the information coming from Banana Accounting - Header data (Yellow)
- Accounting data (Green)
- QueryColumns (Red)
The file name, columns names and type to retrieve.
If the column is empty no data in this column will be retrieved. You can use the columns to enter formula. - QueryAccounts (Orange)
The accounts or groups to retrieve.
If the row is empty no data in this row will be retrieved. You can use the row for entering formula o text that is not overwritten.
By clicking on the update button the Data part is updated with the new data of the accounting file, and all the previously settings like fonts, colors, formulas will remain.
Download and installation
See documentation on how to Download and install the Add-in
Example files:
- File Excel already with columns setup.
- Banana Accounting file used for the example excel file.
Add-in Command
As soon as the add-in is added in Excel, on the Home tab of the main ribbon is loaded the Banana Accounting add-in command.
Banana Accounting Add-in command
When the Banana Accounting button is clicked, it loads the start screen of the add-in. The start screen provides additional information describing the functionalities of the add-in.
Click on the Let's Begin! button to start using the add-in.
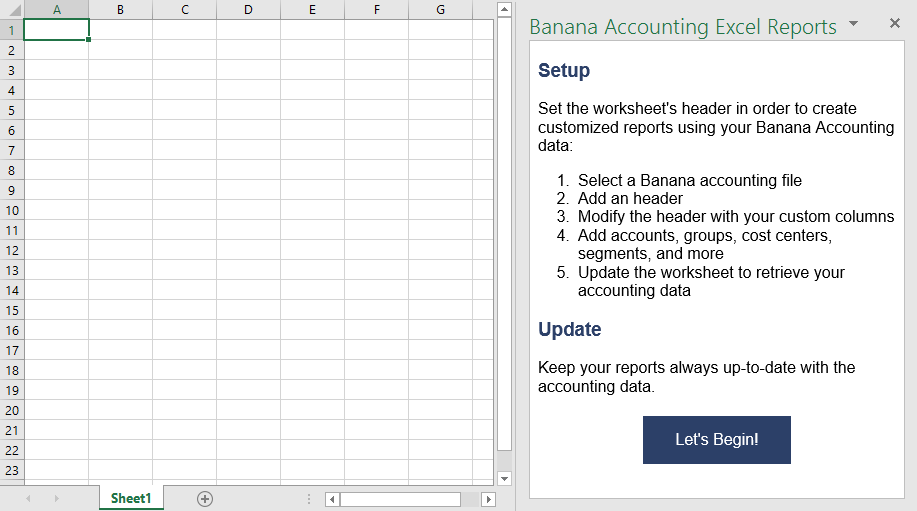
Banana Accounting Add-in start screen
Add-in general overview
The add-in is a task pane add-in type. This means that the add-in is loaded in a pane on the right side of the Excel worksheet.
It is composed by three tabs, each of them has one specific task:
- The Setup tab contains all the tools needed to add information to your sheet so that the add-in can fill the data part with the accounting data. Typically it is used every time you want to create something new, like for example the very first time you use this add-in.
- The Update tab is used to update the content of the Excel worksheet with the accounting data. It is used after the header section and some accounts/groups has been added.
- The Messages tab shows some messages about the add-in and the operations it does. For example when you update the sheet a message is displayed telling you that the update is completed.
- The Options tab is used to set some settings like the language and the server's Url.
Update of the worksheet
The Update tab is composed only of one button: Update current worksheet.
When clicked, this will start the updating process of the current Excel worksheet. Combining Header, QueryAccount and QueryOptions information, the add-in retrieves all the data directly from the Banana Accounting file and writes them in the Excel worksheet.
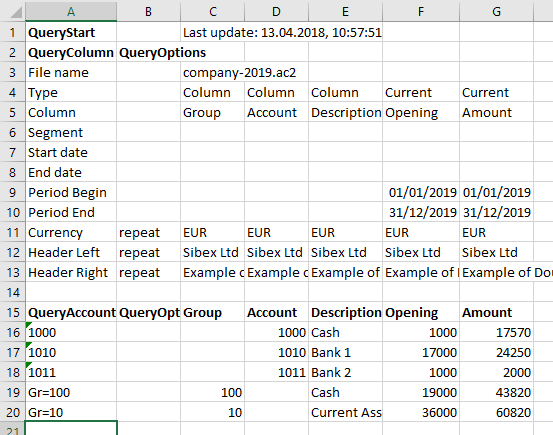
Retrieve data from Banana Accounting and update the worksheet
Setup of the worksheet
These features will add the necessary information to the current worksheet to retrieve data from Banana Accounting.
In the Setup tab there are four sections:
- Accounting file selection
- Set Header
- Set QueryColumns
- Set QueryAccounts
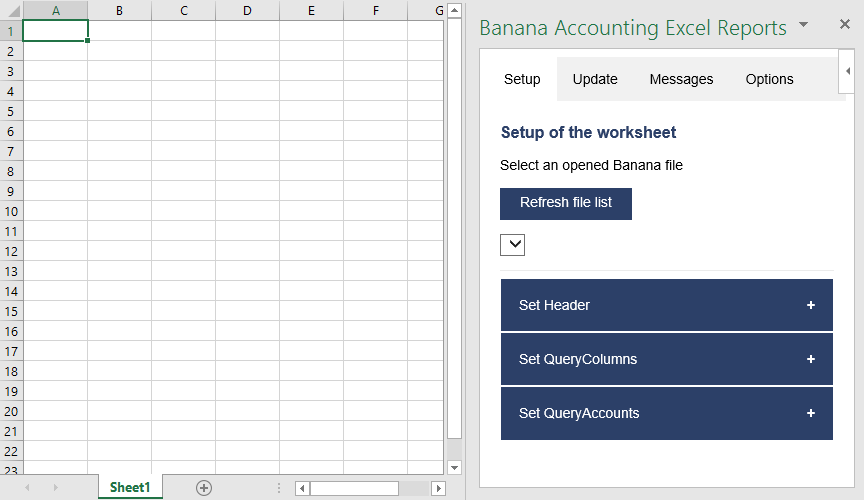
Setup of the worksheet tab
Select an opened Banana file
The first section of the setup page lists all the currently opened Banana Accounting files.
When the Refresh file list button is clicked, the add-in checks for all the opened Banana Accounting files and lists them.
Click the button, select a file, then go to the next setup section.
If you cannot see any file on the list and an error message is displayed, please follow the Troubleshooting for Windows or the Troubleshooting for macOS documentations.
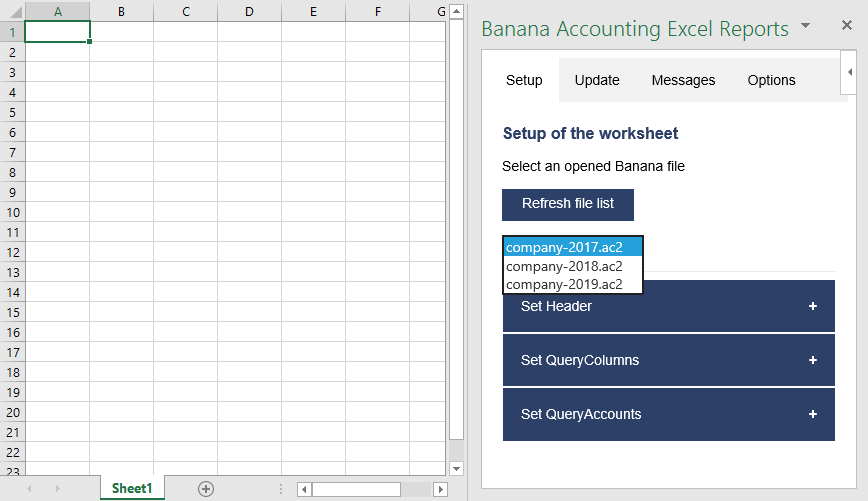
Example of file selection
Set Header
The second section of the setup page inserts, on the top of the current worksheet, the header that allows the user to insert information that will be used by the add-in to retrieve data from the accounting file.
Add an header
The first step is to select from the list a type of header. There are two options:
- Predefined header with columns to insert an header with default values for columns and options
- Empty header to insert a blank header. In this case you must manually add columns and options values.
When the button Add Header is clicked, the selected type of header is inserted in the worksheet. It is then possible to modify it by changing the values of QueryColumns and QueryOptions.
Add header options
The second step is to define some options for the Currency, Header Left and Header Right values using the QueryOptions column. The options are:
- Repeat to repeat the values in each column
- Do not repeat to avoid repeated values. Only when the file name changes the values are entered again.
When the button Add options is clicked, the selected options will be inserted in the related cells.
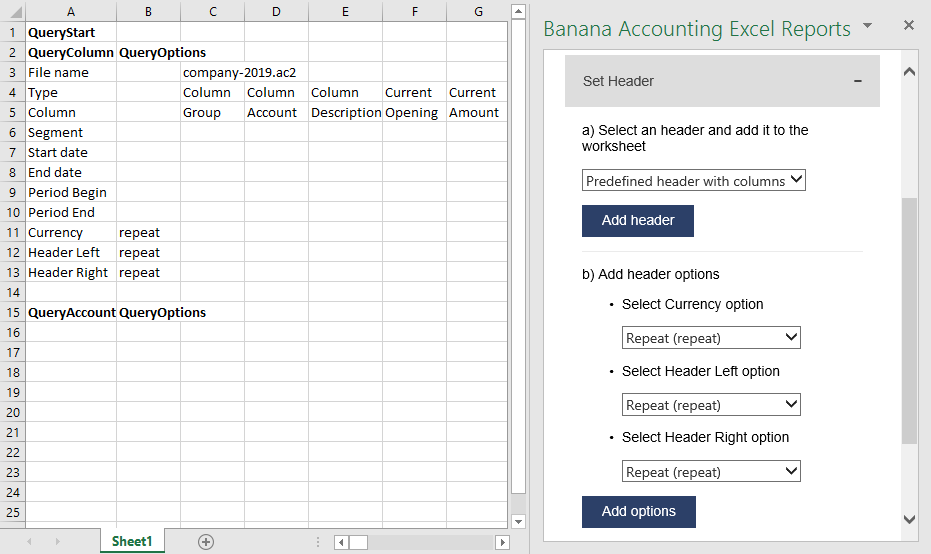
Example of predefined header
Set QueryColumns
This section guides step by step the user to modify the header by adding QueryColumns to the worksheet.
The QueryColumns information allows the user to define exactly which data the add-in has to retrieve from the accounting file and in which column of the worksheet insert them.
Each QueryColumn consists of six information:
- The Column of the worksheet is used to define in which column of the worksheet all the QueryColumns values will be inserted.
- The File name is used to define the accounting file to use when retrieving data.
- The Type value is used to define the type of data of the accounting file.
- The Column value is used to define the accounting file data for the given type.
- The Segments (OPTIONAL) is used to have a more detailed classification of the costs. It is optional, if not specified none segments are added.
- The Periods (OPTIONAL) is used to define a period of the accounting. It is optional, if not specified all accounting period is automatically used.
When the button Add values to column is clicked, all the information are automatically added to the selected column of the worksheet.
You must repeat this process for each column you want to add to the worksheet.
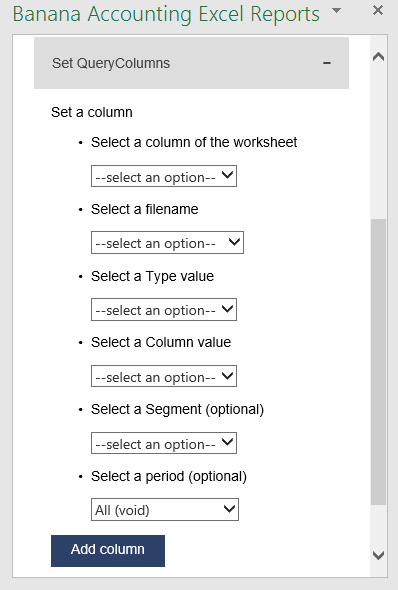
Set QueryColumns section
Select a column of the worksheet
Use this to define in which column of the worksheet all the values of the QueryColumns are inserted. Possible values are:
- Current selected to use the colum of the cell selected on the worksheet (ex. if the cell D8 is selected, D column will be used).
- From C to Z.
The list shows only columns from C to Z, but it is also possible to use columns until AZ by adding them manually.
Select a filename
Use this to define the file name for a QueryColumn. When a file name is specified it is used until a new file name is inserted.
The possible values are:
- Current to use the selected file from the list on the top.
- Current (void) to use the previously inserted file but let the cell empty. It works only if in previous columns there is a specified file name.
- 1 previous year (p1) to use the previous year file of the last file inserted (example: if current year is "2019.ac2", p1 refers to "2018.ac2").
- 2 previous years (p2) to use two previous years file of the last file inserted(example: if current is "2019.ac2", p2 refers to "2017.ac2").
- 3 previous years (p3) to use three previous years file of the last file inserted(example: if current is "2019.ac2", p3 refers to "2016.ac2").
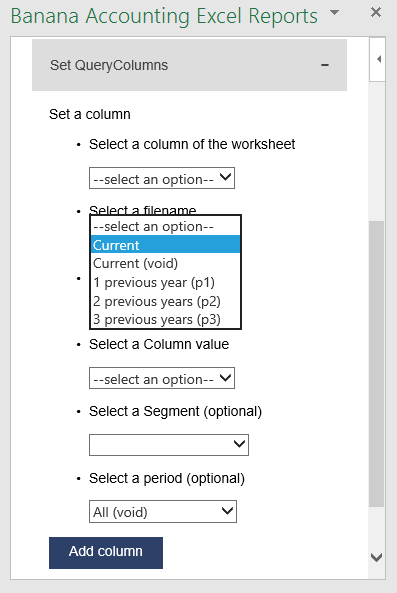
Filename selection
Notes:
- Remember to always open in Banana Accounting all the files specified in the header.
- The p1, p2 and p3 abbreviations always refer to the last file specified in the header.
- Use p1, p2 and p3 only if in the accounting file is used the File and accounting properties → Options → File from previous year.
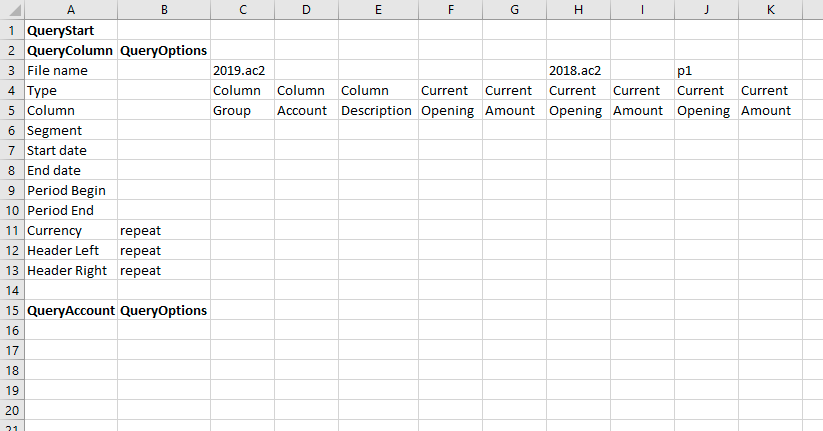
Example of more file insertion
On the image above we can see there are three different files defined, each of them using different columns.
- The columns from C to G refer to the 2019.ac2 file.
- The columns from H to I refer to the 2018.ac2 file.
- The coumns from J to K refer to the previous year file of the 2018.ac2 file. This file must be specified in the File and accounting properties → Options → File from previous year of the 2018.ac2 file.
Select a Type and a Column value
Use Type and Column rows to define the data you want to retrieve from the accounting file.
- Type specify the type of data of the accounting file.
- Column specify the data of the accounting file for the given Type.
Enter the values using the add-in or writing them directly into the worksheet cells.
List of possible Type-Columns combinations (not Case-Sensitive) you must enter into the related Type and Column rows of the header:
- column
- Group, Account, Description, Disable, FiscalNumber, BClass, Gr, Gr1, Gr2, Opening, Debit, Credit, Balance, Budget, BudgetDifference, Prior, PriorDifference, BudgetPrior, PeriodBegin, PeriodDebit, PeriodCredit, PeriodTotal, PeriodEnd, NamePrefix, FirstName, FamilyName, OrganisationName, Street, AddressExtra, POBox, PostalCode, Locality, Region, Country, CountryCode, Language, PhoneMain, PhoneMobile, Fax, EmailWork, Website, DateOfBirth, PaymentTermInDays, CreditLimit, MemberFee, BankName, BankIban, BankAccount, BankClearing, Code1
- current
- amount, amountcurrency, balance, balancecurrency, bclass, credit, creditcurrency, debit, debitcurrency, enddate, opening, openingcurrency, periodstring, rowcount, startdate, total, totalcurrency
- budget
- amount, amountcurrency, balance, balancecurrency, bclass, credit, creditcurrency, debit, debitcurrency, enddate, opening, openingcurrency, periodstring, rowcount, startdate, total, totalcurrency
- columnvat
- Group, VatCode, Description, Gr, Gr1, IsDue, AmountType, VatRate, VatRateOnGross, VatPercentNonDeductible, VatAccount
- currentvat
- taxable, amount, notdeductible, posted, rowcount
- taxable, amount, notdeductible, posted, rowcount
Below some examples of queries that can be entered in the header:
- Example 1: return from the Accounts table the value of the column description for the account specified in the QueryAccount column.
Type: column
Column: description
- Example2: return the amount of debit transactions for all the accounting period for the account specified in the QueryAccount column.
Type: current
Column: debit
- Example 3: return the opening + debit-credit from the 01.01 to 10.01.2022 for the account and segment specified in the QueryAccount column.
Type: current
Column: balance
Segment: :S1
Start date: 01.01.2022
End date: 10.01.2022
- Example 4: return the difference between debit-credit for the 6th month for the account specified in the QueryAccount colum.
Type: current
Column: total
Start date: M6
- Example 5: return the difference between debit-credit for the second quarter for the account specified in the QueryAccount column.
Type: current
Column: total
Start date: Q2
- Example 6: return from the Vat Codes table the value of the column description for the vat code specified in the QueryAccount column.
Type: columnvat
Column: description
- Example 7: return the amount of the taxable column for the vat code specified in the QueryAccount column.
Type: currentvat
Column: taxable
Select a Segment (optional)
If the selected file has segments they will appear in the list.
Use this to define a segment to have a more detailed classification of the costs.
Select a period (optional)
Use this to define the accounting period that will be used to retrieve data from the accounting file.
Possible values are:
- All (void) to use all the accounting period.
- Custom date to specify a custom period (example: Start date "04.02.2022", End date "12.03.2022").
- Month 1 (M1) ... Month 12 (M12) to specify a single month (example: M1 for 1st month, M2 for 2nd month, etc.).
- Quarter 1 (Q1) ... Quarter 4 (Q4) to specify a single quarter (example: Q1 for the 1st quarter, period from 01.01 to 31.03).
- Semester 1 (S1) ... Semester 2 (S2) to specify a single semester (example: S2 for the 2nd semester, period from 01.07 to 31.12).
- Year 1 (Y1) ... Year 10 (Y10) to specify a single year (example: Y1 for the 1st year).
Set QueryAccounts
This section provides to insert:
- QueryAccounts to specify all the desired accounts, groups, cost centers, segments or vat codes that will be used with the data specified in the header to retrieve the accounting data.
- QueryOptions (OPTIONAL) to specify an option for a specific QueryAccount. Just select a cell next to the account and insert the option. It is optional, if not specified none options are added.
Add accounts
When an option is selected, the add-in loads the appropriate check box list with all the elements taken from the selected accounting file. It is possible to choose between six options:
- Accounts to load a list of all the accounts/categories codes taken from the table Accounts/Category of the accounting file.
- Groups to load a list of all the groups codes taken from the table Accounts/Category of the accounting file.
- Cost centers to load a list of all the cost centers codes taken from the table Accounts/Category of the accounting file.
- Segments to load a list of all the segments codes taken from the table Accounts/Category of the accounting file.
- All to load a list of all the accounts/categories, groups, cost centers and segments codes taken from the table Accounts/Category of the accounting file.
- Vat codes to load a list of all the VAT codes taken from the table VAT codes of the accounting file.
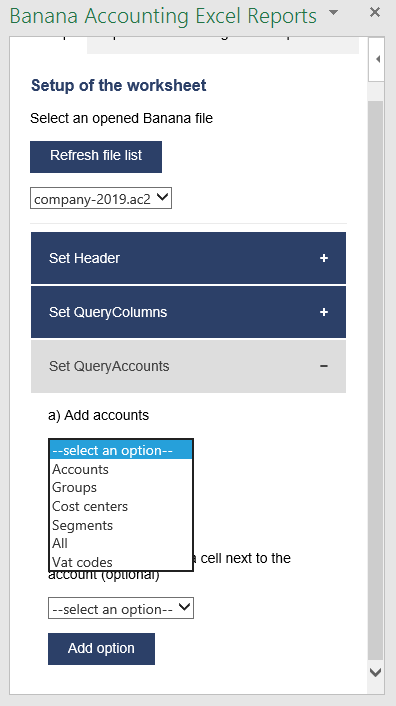
Type of account selection
For example, choosing the All option, the add-in loads a list containing all the accounts, groups, cost centers and segments respecting the order in which they appear in the accounting file.
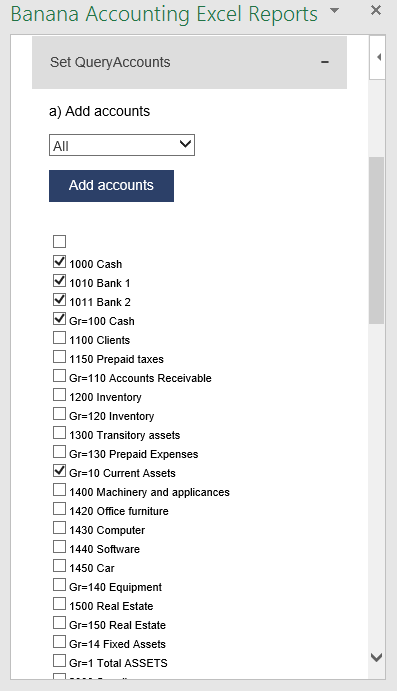
Example of accounts and groups selection
Select the desired elements and click the Add accounts button to add them to the worksheet under the QueryAccount (column A) starting from the selected cell. By default the add-in starts the insertion immediately after the QueryAccount title (row 16).
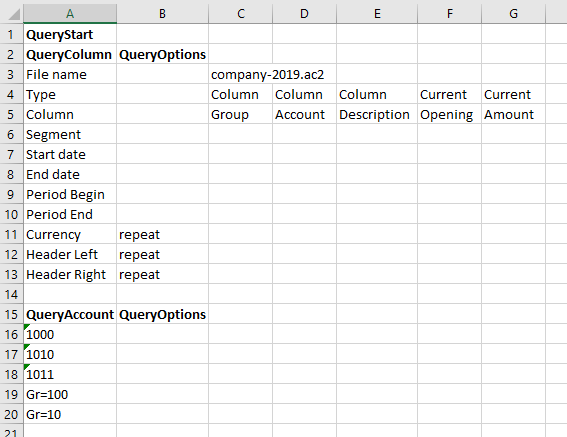
Add the selected accounts and groups to the Excel worksheet
Add option
The QueryOptions column is designed to add some options to the query. It is optional, if not specified no options are used.
The possible values are:
- invert to invert the sign of the current and budget balances.
- budget to get the budget balances of the selected QueryAccount.
- budgetinvert to get the budget balances of the selected QueryAccount and also to invert the sign.
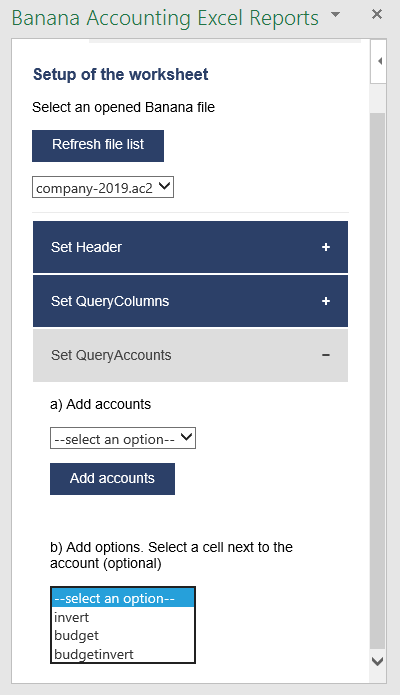
QueryAccounts options selection
Header settings
- Do not add or delete rows in the header.
- Do not add or delete columns before the column B.
- From column C forward, it is possible to add or remove columns. Columns A (QueryColumn) and B (QueryOptions) must always exist.
- Added columns can also be empty.
- If columns from AA to AZ are used, plese re-enter the file name at least on the AA column, even if it is the same used in the previous column.
To better understand how exactly the header works and how to properly modify it, below there are some explanation about the most important things.
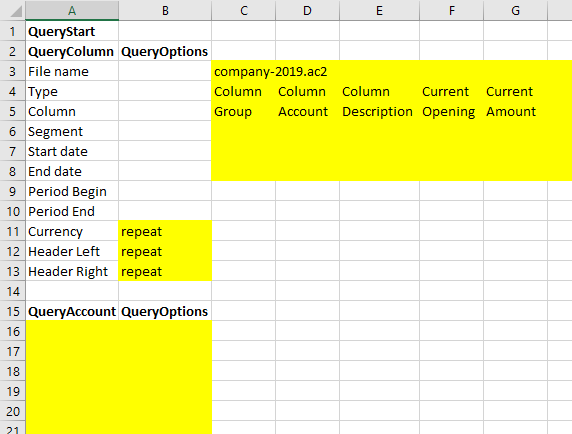
Editable header parts
On the image above we highlighted in yellow all the header's parts that can be modified by adding information when creating a report.
Everything else will be automatically filled by the add-in when the Update current worksheet button is clicked.
Period Begin
A conversion of the start date to be easily read.
This is automatically filled for each column by the add-in when the worksheet is updated.
Period End
A conversion of the end date to be easily read.
This is automatically filled for each column by the add-in when the worksheet is updated.
Currency
The accounting basic currency.
This is automatically filled for each column by the add-in when the worksheet is updated.
Header Left
One of the information property of the accounting.
This is automatically filled for each column by the add-in when the worksheet is updated.
Header Right
One of the information property of the accounting.
This is automatically filled for each column by the add-in when the worksheet is updated.
QueryAccount
As already said, in this column are listed all the chosen accounts, each on a different row.
Instead of insert an account, is also possible to add a custom regroup using a particular accounting column.
The custom regroup QueryAccount syntax is $column=value, where:
- $ indicates that a custom regroup is used.
- column is the Xml name of the column. It can be a user created column (for example "Abc") or a column that already exists in the accounting (for example the "Gr").
- value indicates the regroup.
If we insert something like "$Abc=1" in the QueryAccount cell, this means that the add-in takes and sums together all the accounts/groups balances that have the 1 value in the "Abc" column of the accounting.
Messages
The Messages tab shows some information about the add-in and the operations that it does.
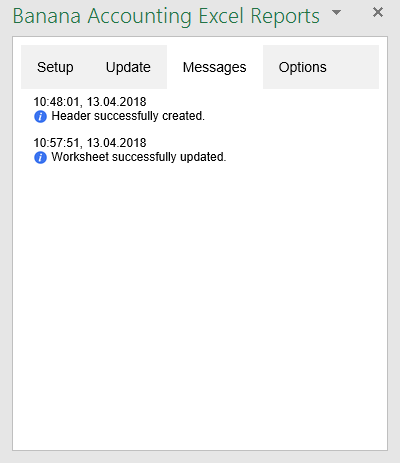
Example of messages
Settings
The Settings tab allows to change some settings of the add-in:
- the Server information.
- Define the URL of Banana Accounting Web Server.
- On Windows, select http://localhost:8081.
- On macOS, select https://127.0.0.1:8089.
- Define the URL of Banana Accounting Web Server.
- the Connection token.
- Enter the security password used when connecting to the Banana Web Server. It is necessary to set it first via Banana Web Server configuration (file httpconfig.ini > accessToken).
- the Language to define the language of the Banana Excel Add-in. Available languages are english, french, german and italian.
- the Development is used only by developers for testing purposes, and users cannot access it.
Click on the Ok button and accept to reload the add-in in order to use the new settings. The settings are saved for future use of the add-in.
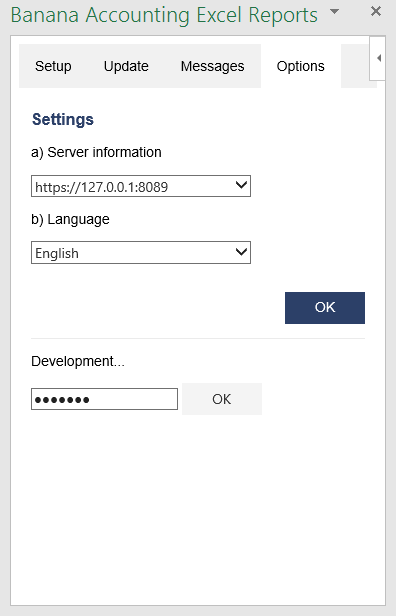
Settings tab
Release History
- 2017-06-12 First release
- 2017-07-07
- Added Add-in Commands functionality.
- Added a start screen that provides additional information describing the functionalities of the add-in.
- Added the settings tab to allow the user to change the Port of the URL.
- 2017-09-29
- Changed the name of the add-in to "Banana Accounting Excel Reports".
- Changed some texts.
- New add-in design.
- Added new functionalities that allow the user to set and insert all the required information more easily.
- Added localization language for english, french, german and italian.
- 2017-11-24
- Added new functionality that allows to set the parameters for the connection.
- 2018-04-04
- Settings options are now saved.
- Changed the appearance of the error messages.
- Changed some texts.
- Other minor changes.
Excel Banana Accounting Functions Add-in (in Englisch)
The free Banana Accounting Functions add-in allows you to retrieve and view accounting data in Excel through the use of simple formulas.
The main benefits are as follows:
- Dynamically retrieve data from Banana Accounting.
- When the accounting file is changed you can instantly update the Excel sheet with the new values.
- You no longer have to rewrite data in Excel via import or copy-paste.
- Formulas are easy to use and allow you to create powerful spreadsheets in Excel to analyze and present accounting data.
To read and retrieve data from Banana Accounting, the add-in uses Banana Integrated Web Server with the API Version V2.
Prerequisites
To use the Banana Accounting Functions add-in you need to:
- Download and install Banana Accounting Plus (version 10.1.7 or higher).
- Have the Advanced plan of Banana Accounting Plus.
- Use Microsoft Excel for Windows or Mac (desktop version Microsoft 365, 2019 or newer).
How to get started
To read and retrieve data from Banana Accounting, the add-in uses Banana Integrated Web Server with the API Version V2. So you have to configure the webserver in both Banana Accounting and indicate in the addin the connection parameters.
- Download and install Banana Accounting Plus (version 10.1.7 or higher).
- Configure the Banana Web Server.
- Start Banana Accounting Plus and activate the Web Server.
- Download the two sample accounting files and open them with Banana Accounting Plus.
- Download the already prepared Excel file and open it.
- Install the add-in.
- Check the add-in settings.
- In yellow cells of the Start sheet enter the file names of the downloaded sample accounting files. In the other sheets you can see the data taken from the accounting.
- When you update your accounting in Banana, re-enter the file name in yellow cells to recalculate all your formulas.
Install the Excel add-in
- Open Excel.
- Make sure you're signed in to Office with your Microsoft user account.
- Open Excel and, in the top right corner, click Sign in.
- Type the email address and password you use with Office Microsoft user account.
- Select Home > Add-ins > More Add-ins (or click File > Get Add-ins).
- Click on Store.
- In the store, search for "Banana".
- Select the add-in Banana Accounting Functions and click Add.
- The add-in is added the Home section in Excel.
You can now find the add-in in Home > Add-ins > More Add-ins > My Add-ins section. From there, if you want you can also remove it by clicking on the three dots in the upper right corner of the add-in and then on Remove.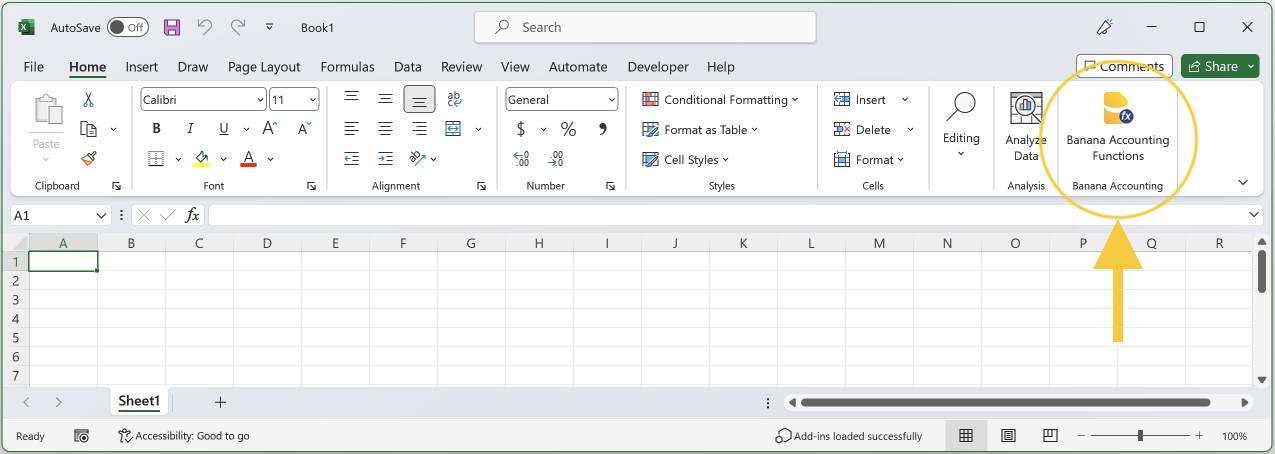
- Click on the add-in icon.
- The add-in panel opens on the right side of Excel.

Add-in settings
When you click on the Banana Accounting Functions add-in icon in Excel, a side panel opens. Here you can set some parameters to allow the add-in to connect to the Banana Web Server (make sure you configure the Web Server first).
The settings are the following:
- Server information
Set the URL of the Banana Web Server:- On Windows, select http://localhost:8081.
- On macOS, select https://127.0.0.1:8089.
- Access Token
Enter the security password used when connecting to the Banana Web Server. It is necessary to set it first via Banana Web Server configuration (file httpconfig.ini > accessToken).
After you entered the web server URL and the password, click on "Test connection" to apply the changes and test the connection with the Banana Web Server.
In case of problems, see Error messages > Add-in errors for more information.
You can also change the language by selecting the one you prefer from English, Italian, French and German.
Once finished with the settings, you can also close the add-in panel. You do not need to keep it open to use the Banana Accounting Functions in Excel.
The Start sheet
The sample Excel file has a sheet named Start. It is used to enter the accounting files you want to retrieve data from.
How to use the Start sheet:
- In the yellow cells enter the names of the accounting files you want to retrieve data from.
You can enter the current year file and the previous years files.
To recalculate, re-enter the file name or double click on file name and press ENTER. - As soon as you enter the file names, a function checks the connection to the files.
The files must be open in Banana.
If the connection is okay, the file names are displayed in cells called File0, File1, and File2. If not, see the section Error messages > Excel errors for more information. - The cells File0, File1 and File2 are used as a reference for your accounting file names in all your formulas.
This means that in formulas you can use File0, File1 and File2 as file names (File0 for current year, File1 for previous year, File2 for current year-2).
Add the Start sheet to a new Excel file
In case you do not want to use the sample file, you can also add the Start sheet to any Excel file:
- Create a new empty Excel file.
- Click on the add-in icon to open the side panel.
- Click Add Start sheet.
- The Start sheet is added to the Excel file you are currently working on.
Note: if the Excel file already has a sheet named "Start", this will be replaced.

How to create your own Excel file
- Download the already prepared Excel file and save it under another name, or create a new empty Excel file and use the "Add Start sheet" command of the add-in to create the Start sheet.
- Open your accounting files in Banana.
- In the yellow cells of the Excel file ("Start" sheet), replace the sample file names with the names of your accounting files.
- Change the spreadsheets as needed.
- Recalculate Excel data: double-click on the yellow cells where you entered the file names and immediately press ENTER. This will recalculate all your formulas.
File Name
Almost all Banana Accounting Functions require the accounting file name as first parameter. It can be:
- A string with the full name of the file in quotation marks (e.g., "company-2024.ac2").
- A reference to a cell that contains the file name.
It is best to use the reference to a cell that contains the file name. This way you can use the same Excel file for different years as well. You will only have to enter the new file name in one cell, without change the name in each formula you entered.
The best way is the one used in the example file (Start sheet):
- The current year file name is taken as a reference from the cell called File0.
- The previous year file name is taken as a reference from the cell called File1.
- The file name of two previous years is taken as a reference from the cell called File2.
These cells called File0, File1, and File2 contain the function BA.FileName which checks the connection with a file:
- If the file is open in Banana and the add-in can connect with the web server, the function returns the name of the file. All the other functions will return values taken from accounting.
- If the file is not open in Banana or the add-in cannot connect with the web server, the function returns empty. All the other functions will not return any value (see the section Error messages > Excel errors for more information).
Period
Many functions use period as an optional parameter. It can be:
- An empty string or not present at all.
The accounting period used will be the one defined in File > File and accounting properties > Accounting. - A period with a start date and an end date in the form "yyyy-mm-dd/yyyy-mm-dd" (e.g.“2024-01-01/2024-01-31”).
To create a period from two dates in Excel, we use the function BA.CreatePeriod. - Abbreviation.
Using an abbreviation you can use the same Excel with accounting files of different periods.- M + number of the month (e.g. "M1", "M2", ...).
- Q + quarter number (e.g. "Q1", "Q2", ...).
- Y + year number (e.g. "Y1", "Y2", ...).
Banana Accounting Functions
Banana Accounting Functions are formulas for use in Excel. The composition of the formulas is the following:
- Starts with "BA."
- Then the name of the function.
- Then the parameters of the function.
Parameters can be entered as a reference to another cell or written manually between double quotes (e.g. "1000", "2024-01-01/2024-01-31", ...).
The parameters in square brackets are optional.
When you start typing "=BA." in a cell, you see all the available Banana functions.
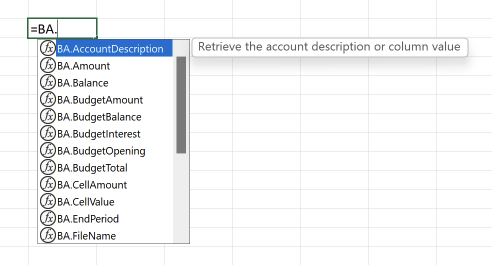
Select the function you want to use, enter the parameters required by the function, and finally press ENTER.

In the cell you will see the value returned by the function.

BA.FunctionsVersion()
Returns the date of the current published version of the add-in.
BA.FileName(fileName)
Returns the file name or an empty string if the specified file is incorrect or not found.
Parameters:
- fileName: name of the accounting file.
Examples:
- =BA.FileName(C3)
- =BA.FileName("company-2024.ac2")
You should use the cells that contain the result of this function as a parameter for the filename of all other functions that return accounting data.
If it returns an empty string, only a single call to the web server is made.
BA.CreatePeriod(startDate, endDate)
Returns the period string according to the format used by Banana (yyyy-mm-dd/yyyyy-mm-dd).
Parameters:
- startDate: start date of the accounting period.
- endDate: end date of the accounting period.
The two dates must be a reference to cells that contain the dates.
Alternatively, you can use the Excel DATEVALUE function to convert a date that is stored as text to a serial number that Excel recognizes as a date.
Examples:
- =BA.CreatePeriod(D4, D5)
Returns "2023-01-01/2023-12-31" - =BA.CreatePeriod(DATEVALUE("01.01.2023"), DATEVALUE("31.12.2023"))
Returns "2023-01-01/2023-12-31"
BA.StartPeriod(fileName, [period])
Returns the date of the start period.
Parameters:
- fileName: name of the accounting file.
- period (optional): the period from which to take the start date.
Examples:
- =BA.StartPeriod(File0)
Start date of the accounting period. - =BA.StartPeriod(File0, "M1")
Start date of the first month. - =BA.StartPeriod(File0, "Q2")
Start date of the second quarter.
BA.EndPeriod(fileName, [period])
Returns the date of the end period.
Parameters:
- fileName: name of the accounting file.
- period (optional): the period from which to take the end date.
Examples:
- =BA.EndPeriod(File0)
End date of the accounting period. - =BA.EndPeriod(File0, "M1")
End date of the first month. - =BA.EndPeriod(File0, "Q2")
End date of the second quarter.
BA.Info(fileName, sectionXml, idXml)
Returns information regarding the file and file properties.
To see this information in Banana: menu Tools > File Info, Complete view.
Parameters:
- fileName: name of the accounting file.
- sectionXml: can be a value specified in the "Section Xml" column of the "Info file" table.
- idXml: can be a value specified in the "ID Xml" column of the "Info file" table.
Examples:
- =BA.Info(File0, "Base", "HeaderLeft")
- =BA.Info(File0, "Base", "HeaderRight")
- =BA.Info(File0, "AccountingDataBase", "Company")
- =BA.Info(File0, "AccountingDataBase", "OpeningDate")
- =BA.Info(File0, "AccountingDataBase", "BasicCurrency")
BA.AccountDescription(fileName, account, [column])
Returns the description of the specified account or group in the Accounts table.
Parameters:
- fileName: name of the accounting file.
- account: account or group in the Accounts table.
- column (optional): you can return another column (name XML) instead of the Description column.
Examples:
- =BA.AccountDescription(File0, "1000")
Description of account 1000 - =BA.AccountDescription(File0, "Gr=10")
Description of group 10 - =BA.AccountDescription(File0, "1000", "Gr1")
Content of column Gr1 of account 1000 - =BA.AccountDescription(File0, "1000", "Notes")
Content of column Notes of account 1000
BA.Amount(fileName, account, [period])
Returns the normalized amount based on the BClass.
Only work for double entry accounting only. For Income and expenses accounting use BA.Balance or BA.Total.
- for accounts of BClass 1 or 2 it return the balance (value at a specific instant).
- for accounts of BClass 3 or 4 it return the total (value for the duration).
- For accounts of BClass 2 and 4 the amount is inverted.
You can use this functions also with groups provided you assign a BClass also to a group.
Parameters:
- fileName: name of the accounting file.
- account: account, group, cost center or segment in the Accounts table.
- period (optional): the period.
Examples:
- =BA.Amount(File0, "1000")
- =BA.Amount(File0, "1000", "2024-01-01/2024-12-31")
- =BA.Amount(File0, "1000", "M1")
BA.Balance(fileName, account, [period])
Returns the Balance at the end of the period of the indicated account, cost center, groups, segments
The BA.Balance result is the sum of the BA.Opening + BA.Total.
It is used for retrieving accounting data for the Balance Sheet accounts (Assets, Liabilities).
- Single account number ("1000").
- Several accounts summed toghether.
Enter the accounts numbers separated by the character "|" ("1000|1001"). - You can specify normal accounts, cost centers or segments.
- You can also use wild cards and also use "Gr=" followed by the accounting group.
- For more information see the Javascript function description for currentBalance
- Example
Parameters:
- fileName: name of the accounting file.
- account: account, group, cost center or segment in the Accounts table.
- period (optional): the period.
Examples:
- =BA.Balance(File0, "1000")
Balance of account 1000 - =BA.Balance(File0, "1000", "2020-01-01/2020-12-31")
Balance of account 1000 using the period - =BA.Balance(File0, "1000|1010")
Balance of account 1000 and 1010 are summed together - =BA.Balance(File0, "10*|20*")
All account that start with 10 or with 20 are summed toghether - =BA.Balance(File0, "Gr=10")
Balance of group 10 - =BA.Balance(File0, "Gr=10|20")
Balance of group 10 and 20 are summed together - =BA.Balance(File0, ".P1")
Balance of the cost center .P1 - =BA.Balance(File0, ";C01|;C02")
Balance of cost center ;C01 and ;C02 are summed together - =BA.Balance(File0, ":S1|S2")
Segment :S1 and :S2 - =BA.Balance(File0, "1000:S1:T1")
Balance of account 1000 with segment :S1 or ::T1 - =BA.Balance(File0, "1000:{}")
Balance of account 1000 with segment not assigned - =BA.Balance(File0, "1000:S1|S2:T1|T2")
Balance of account 1000 with segment :S1 or ::S2 and ::T1 and ::T
BA.Opening(fileName, account, [period])
Returns the Balance at the beginning of the period for specified account.
Parameters:
- fileName: name of the accounting file.
- account: account, group, cost center or segment in the Accounts table.
- period (optional): the period.
Examples:
- =BA.Opening(File0, "1000")
Opening balance of account 1000 - =BA.Opening(File0, "1000", "M1")
Opening balance of account 1000 at the beginning of the period M1 - =BA.Opening(File0, "1000", "Q2")
Opening balance of account 1000 at the beginning of the period Q2
BA.Total(fileName, account, [period])
Returns the movements for the period indicated ("Debit - Credit" difference).
Should be used to retrieve the data for the Profit and Loss accounts (Cost and Revenues).
Parameters:
- fileName: name of the accounting file.
- account: account, group, cost center or segment in the Accounts table.
- period (optional): the period.
Examples:
- =BA.Total(File0, "4100")
Movements balance of account 4100 - =BA.Total(File0, "Gr=3", "M1")
Movements balance of group 3 for the period M1 - =BA.Total(File0, "Gr=4", "Q2")
Movements balance of group 4 for the period Q2
BA.Interest(fileName, account, interestRate, [period])
Calculate the interest for the indicated account and the period.
Parameters:
- fileName: name of the accounting file.
- account: account can be any account as specified in BA.Balance.
- interestRate: the interest in percentage:
- > 0 calculate the interest on the debit amounts
- < 0 calculate the interest on the credit amount
- period (optional): the period.
Examples:
- =BA.Interest(File0, "1000", "5")
Interest 5% of account 1000 - =BA.Interest(File0, "1000","5", "M1")
Interest 5% of account 1000 for period M1 - =BA.Interest(File0, "2000", "-5")
Interest -5% of account 2000 - =BA.Interest(File0, "2000", "-5", "M1")
Interest -5% of account 2000 for period M1
BA.VatBalance(fileName, vatCode, vatValue, [period])
Returns a value regarding the specified VatCode (or multiple VatCodes).
Parameters:
- fileName: name of the accounting file.
- vatCode: the VAT code.
- vatValue: can be "taxable", "amount", "notdeductible", "posted".
- period (optional): the period.
Examples:
- =BA.VatBalance(File0, "V10", "taxable")
- =BA.VatBalance(File0, "V10|V20", "posted")
- =BA.VatBalance(File1, "V10", "taxable")
BA.VatDescription(fileName, vatCode, [column])
Returns the description of the specified VAT code in the VatCodes table.
Parameters:
- fileName: name of the accounting file.
- vatCode: the VAT code.
- column (optional): you can return another column (name XML) instead of the Description column.
Examples:
- =BA.VatDescription(File0, "V10")
Description of VAT code V10 - =BA.VatDescription(File0, "V10", "VatRate")
VAT rate of VAT code V10
BA.BudgetAmount(fileName, account, [period])
Same as BA.Amount but uses budget data instead of accounting data.
BA.BudgetBalance(fileName, account, [period])
Same as BA.Balance but uses budget data instead of accounting data.
BA.BudgetOpening(fileName, account, [period])
Same as BA.Opening but uses budget data instead of accounting data.
BA.BudgetTotal(fileName, account, [period])
Same as BA.Total but uses budget data instead of accounting data.
BA.BudgetInterest(fileName, account, interestRate, [period])
Same as BA.Interest but uses budget data instead of accounting data.
BA.CellValue(fileName, table, rowColumn, column)
Returns the content of a table cell as a text.
Parameters:
- fileName: name of the accounting file.
- table: the XML name of the table (Accounts, Categories, Transactions, Budget, Totals, VatCodes,...).
- rowColumn: the row of the table.
- column: the XML name of the column (Group, Account, Description, Notes,...).
Esempi:
- =BA.CellValue(File0, "Accounts", 2, "Description")
Text cell of table Accounts, row 2, column Description - =BA.CellValue(File0, "Accounts", "Account=1000", "Description")
Text cell of table Accounts, row where the account is 1000, column Description - =BA.CellValue(File0, "Accounts", "Group=10", "Description")
Text cell of table Accounts, row where the group is 10, column Description
BA.CellAmount(fileName, table, rowColumn, column)
Retrieve the content of a table cell as an amount.
Parameters:
- fileName: name of the accounting file.
- table: the XML name of the table (Accounts, Categories, Transactions, Budget, Totals, VatCodes,...).
- rowColumn: the row of the table.
- column: the XML name of the column (Group, Account, Description, Notes,...).
Examples:
- =BA.CellAmount(File0, "Accounts", 2, "Opening")
Amount cell of table Accounts, row 2, column Opening - =BA.CellAmount(File0, "Accounts", "Account=1000", "Balance")
Amount cell of table Accounts, row where the account is 1000, column Balance - =BA.CellAmount(File0, "Accounts", "Account="&$A4, "Balance")
Amount cell of table Accounts, row where the account is the value $A4 (Excel cell reference), column Balance - =BA.CellAmount(File0, "Accounts", "Group=10", "Balance")
Amount cell of table Accounts, row where the group is 10, column Balance
Error Messages
Excel error
When entering accounting file names in yellow cells, the following message may be displayed next to the yellow cell:
- Banana not open, file not open or WebServer not active.
It means that the Banana Web Server cannot find the file you entered.- Make sure you enter the accounting file name correctly.
- Make sure Banana Accounting+ is open.
- Make sure to open the accounting file you entered.
- Make sure the Banana Web Server is active.
Add-in errors
In some cases red messages may appear at the bottom of the add-in. The messages are the following:
- Download and install Banana Accounting+ (version 10.1.7 or later).
It means that you cannot use the add-in with versions of Banana Accounting earlier than the one indicated.- Download and install the latest version of Banana Accounting Plus.
- Banana Web Server Connection Failed. Banana version not supported, Banana not open, Web Server not active or wrong add-in server settings.
It means that the connection with the Banana Web Server is not working. The causes may be different as indicated.- Make sure you are using version 10.1.7 (or later) of Banana Accounting Plus. Download the latest version of Banana Accounting Plus.
- Make sure that Banana Accounting Plus has been started.
- Make sure that the Banana Web Server is active and correctly configured. See the Web Server configuration:
- Make sure the file names entered in the yellow cells in Excel are correct.
- Make sure the file you entered in Excel are open in Banana.
- Make sure you have set the server information correctly in the add-in settings:
- Unauthorized connection. Missing or wrong Access Token.
It means the password for the access token is missing or is wrong, so the connection with the Banana Web Server cannot be established.- During the Banana Web Server configuration, define a password for the "accessToken" in the "httpconfig.ini" file. See the Web Server configuration:
- In the add-in Settings > Access Token, you have to enter the same password.
Release History
- 2023-07-21 First release.
- 2023-09-20
- Added a command to test the connection with the Banana Web Server.
- Selecting a language now reloads the add-in panel immediately.
- Added a command to create the Start sheet.
Office Scripts in Excel
With Banana Accounting Plus you can use Office Scripts in Excel (the successor of VBA Scripts) to retrieve and display the data of your accounting in Excel.
To read and retrieve data from Banana Accounting with Office Scripts, we use the integrated Banana Web Server.
Prerequisites
To use Office Scripts you need to:
- Download and install Banana Accounting Plus.
- Have the Advanced plan of Banana Accounting Plus.
- Have Excel for Windows (version 2210 or higher) or Excel for Mac.
- Use OneDrive for Business.
Office Scripts files
Office Scripts are written using the TypeScript language. They are stored as .osts files in your Microsoft OneDrive, separately from the Excel file.
For more information visit Office Scripts file storage and ownership.
Configure Banana Accounting Web Server
To read and retrieve data from Banana Accounting with Office Scripts we use the Banana integrated Web Server.
IMPORTANT: To properly configure the Banana Web Server, follow the guide for your operating system:
How to start
- Open Banana Accounting Plus and Configure Banana the Web Server
- Open an accounting file.
- Open an empty Excel file or download the example file from here.
- Select the Automate tab and click on New Script.

- The Code Editor opens on right side of the Excel window.
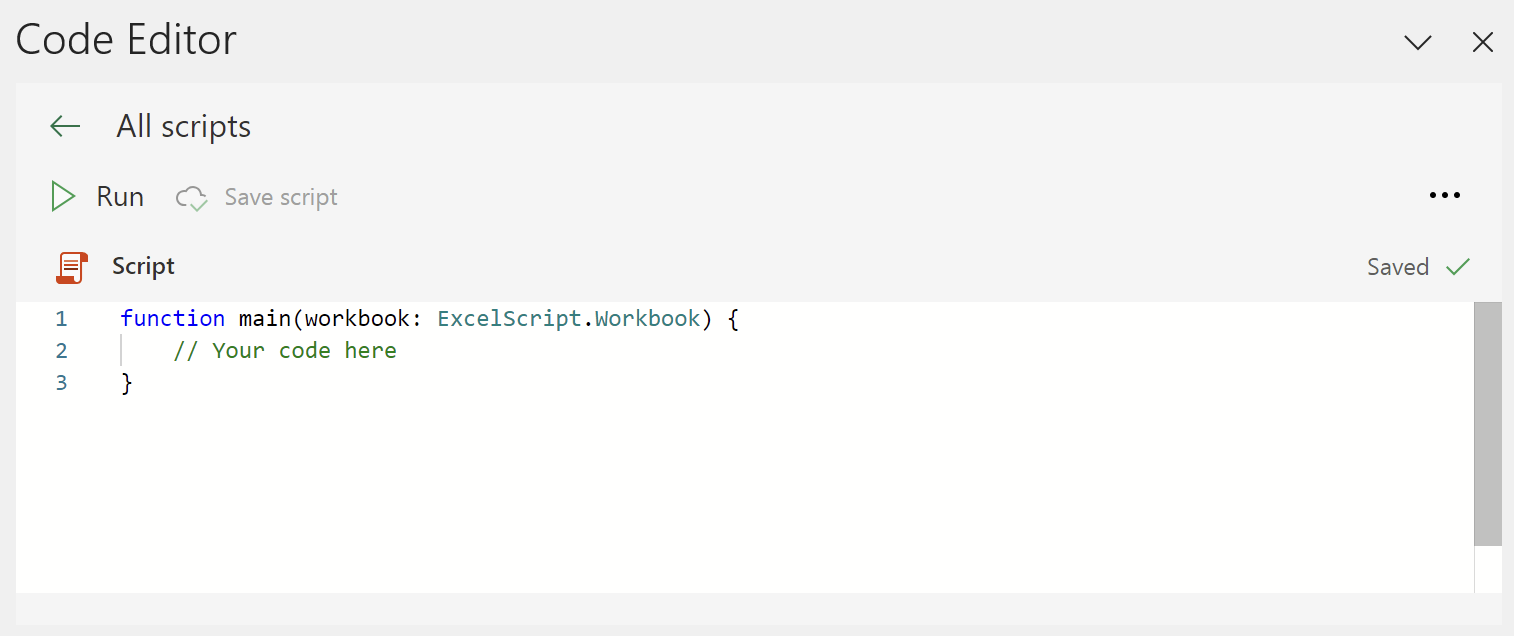
- Enter an example code in the Code Editor. If you want to try all the examples, you have to create a new script for each example.
- In the Code Editor delete all the code.
- Copy the code from one of the examples below.
- Paste the copied code in the Code Editor.
- Rename the script as you want.
- Click on Save script .
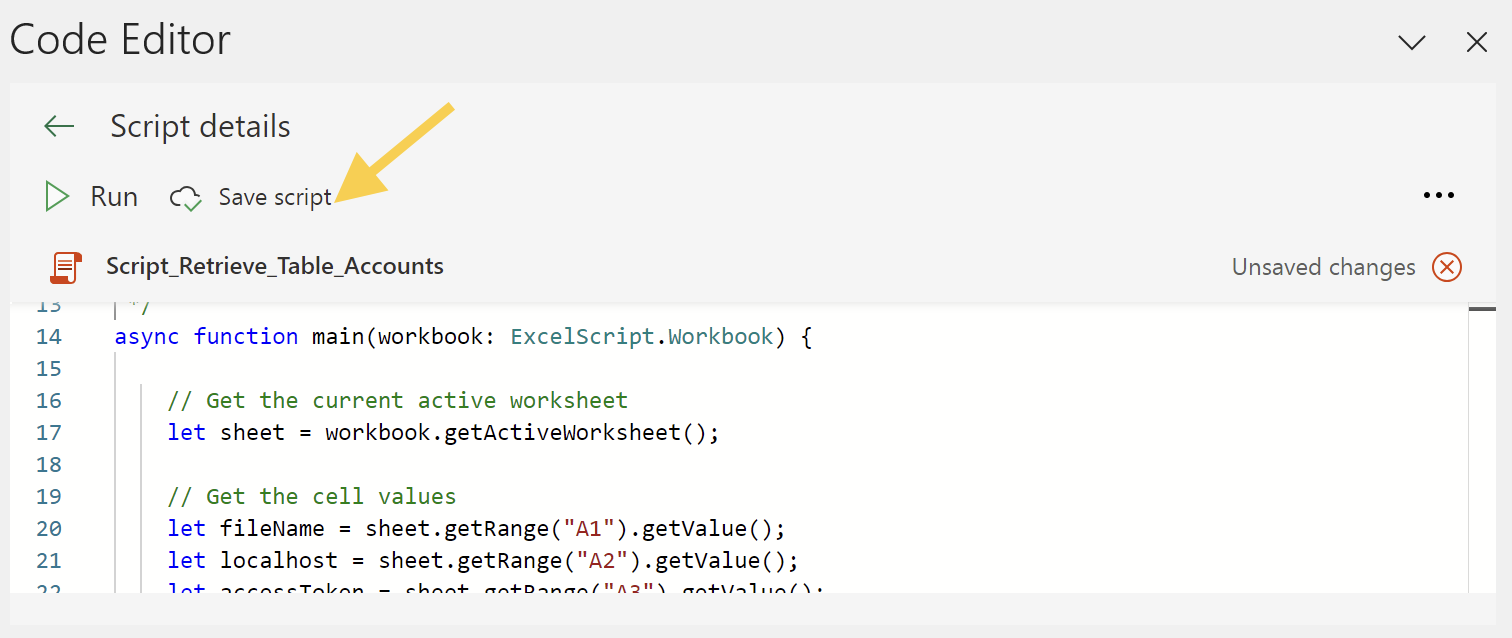
- Click on Run to run the script.
Note: before running the scripts, set the file name and the server settings.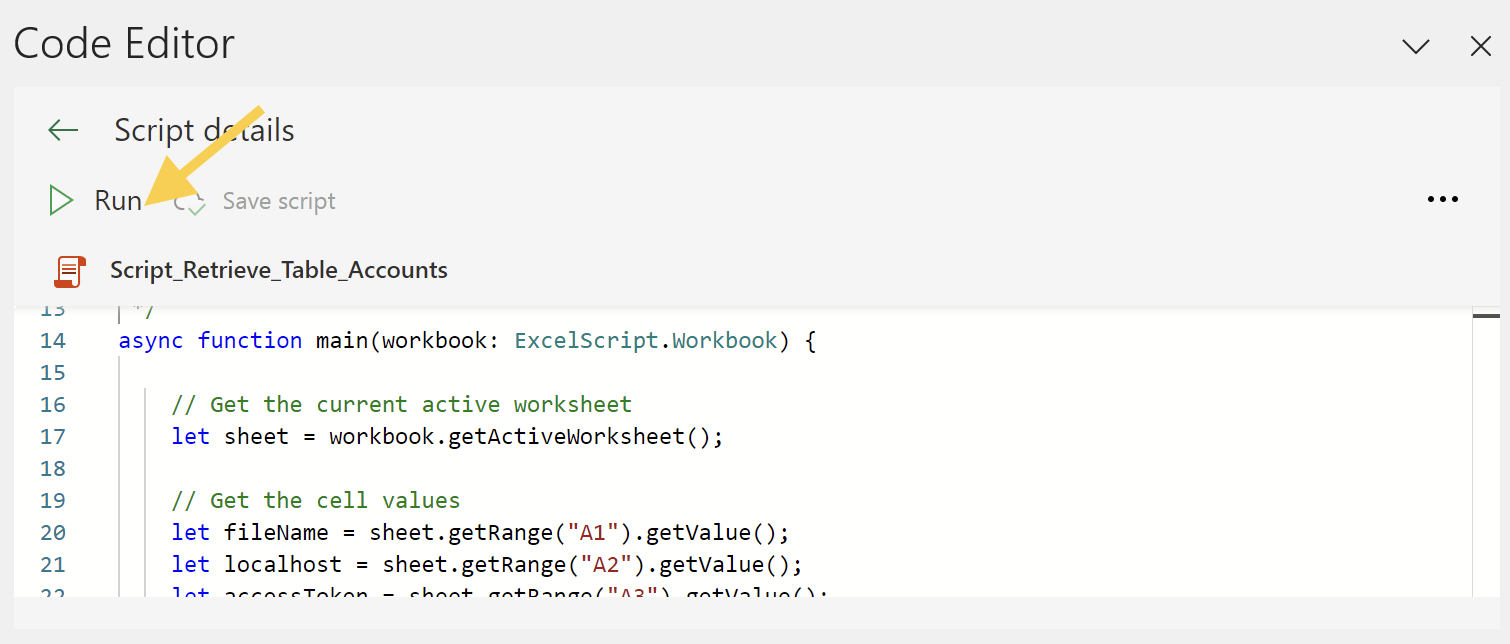
File Name and Server settings
Define the accounting file name and the server settings (yellow cells). In the Excel file:
- In cell B1, enter the accounting file name (e.g. "company-2024.ac2").
- In cell B2, enter the webserver URL:
- If you are on Windows, enter "http://localhost:8081".
- If you are on macOS, enter "https://127.0.0.1:8089".
- In cell B3, enter the same Access Token key you defined in the httpconfig.ini file during the Configuration Banana Accounting Web Server.
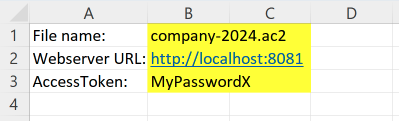
In these examples, we use the B1, B2 and B3 cells to also show how to get a value from a specific cell and use it inside of the Office Script code.
let fileName = sheet.getRange("B1").getValue();
let localhost = sheet.getRange("B2").getValue();
let accessToken = sheet.getRange("B3").getValue();
But if you want, you can also enter the file name, the Web Server URL and the Access Token key directly in your Office Script code, without using the B1, B2, and B3 cells.
let fileName = "company-2024.ac2";
let localhost = "http://localhost:8081";
let accessToken = "MyPasswordX";
Example 1: Retrieve data from the table Accounts
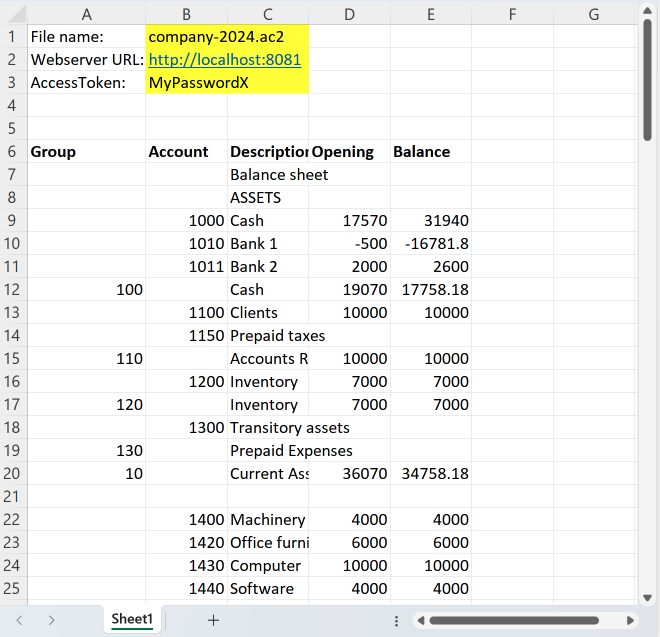
This example shows how to retrieve and display the data from the table Accounts.
If the worksheet you are working already contains data, these will be overwritten. Make sure you are in an empty sheet.
To use this script:
- Copy the following script code.
- Paste the script in the Code Editor.
- Save and Run the script.
Note: before running the scripts, set the file name and the server settings.
When you run the script:
- The data of the table Accounts are displayed on the current worksheet.
- If the worksheet you are working already contains data, these will be overwritten.
Script code:
/**
 * This example retrieves all the Accounts table.
 *
 * In order to connect to the Banana Web Server, define some information:
 * - Cell B1 the accounting file name
 * - Cell B2 the localhost web server url
 * - Cell B3 the accessToken security password
 *
 * You can get these information from cells of the worksheet or you can define them in the script.
 * In this example we get the information from the cells B1, B2, B3.
 */
async function main(workbook: ExcelScript.Workbook) {
  // Get the current active worksheet
  let sheet = workbook.getActiveWorksheet();
  // Get the cell values
  let fileName = sheet.getRange("B1").getValue();
  let localhost = sheet.getRange("B2").getValue();
  let accessToken = sheet.getRange("B3").getValue();
  // Retrieve JSON data of table Accounts from Banana Web Server.
  let fetchResult = await fetch(localhost + '/v1/doc/' + fileName + '/table/Accounts?view=Base&format=json&acstkn=' + accessToken);
  // Convert the returned data to the expected JSON structure.
  let json: JSONData = await fetchResult.json();
  // Display the content in a readable format.
  console.log(JSON.stringify(json));
  // Write columns headers texts on the row 6
  let row = 6;
  let col = sheet.getRange('A' + row);
  col.setValue([['Group']]);
  col.getFormat().getFont().setBold(true);
  col = sheet.getRange('B' + row);
  col.setValue([['Account']]);
  col.getFormat().getFont().setBold(true);
  col = sheet.getRange('C' + row);
  col.setValue([['Description']]);
  col.getFormat().getFont().setBold(true);
  col = sheet.getRange('D' + row);
  col.setValue([['Opening']]);
  col.getFormat().getFont().setBold(true);
  col = sheet.getRange('E' + row);
  col.setValue([['Balance']]);
  col.getFormat().getFont().setBold(true);
  // Write table Accounts data from the row 7
  row = 7;
  for (let i in json) {
    let col = sheet.getRange('A' + row);
    col.setValue(json[i].Group);
    col = sheet.getRange('B' + row);
    col.setValue(json[i].Account);
    col = sheet.getRange('C' + row);
    col.setValue(json[i].Description);
    col = sheet.getRange('D' + row);
    col.setValue(json[i].Opening);
    col = sheet.getRange('E' + row);
    col.setValue(json[i].Balance);
    // increase row
    row++;
  }
}
// Json structure of table Accounts
interface JSONData {
  Section: string;
  Group: string;
  Account: string;
  Description: string;
  BClass: number;
  Gr: string;
  Opening: number;
  Balance: number;
}
/* Complete list of columns
SysCod,Links,Section,Group,Account,Description,Notes,Disable,VatCode,GrVat,VatNumber,FiscalNumber,BClass,Gr,Gr1,Gr2,Opening,Debit,Credit,Balance,Budget,BudgetDifference,Prior,PriorDifference,BudgetPrior,PeriodBegin,PeriodDebit,PeriodCredit,PeriodTotal,PeriodEnd,NamePrefix,FirstName,FamilyName,OrganisationName,Street,AddressExtra,POBox,PostalCode,Locality,Region,Country,CountryCode,LanguageCode,PhoneMain,PhoneMobile,Fax,EmailWork,Website,DateOfBirth,PaymentTermInDays,CreditLimit,MemberFee,BankName,BankIban,BankAccount,BankClearing,Code1
*/
After running the script, the result is the following:
Example 2: Retrieve Transactions from the Journal
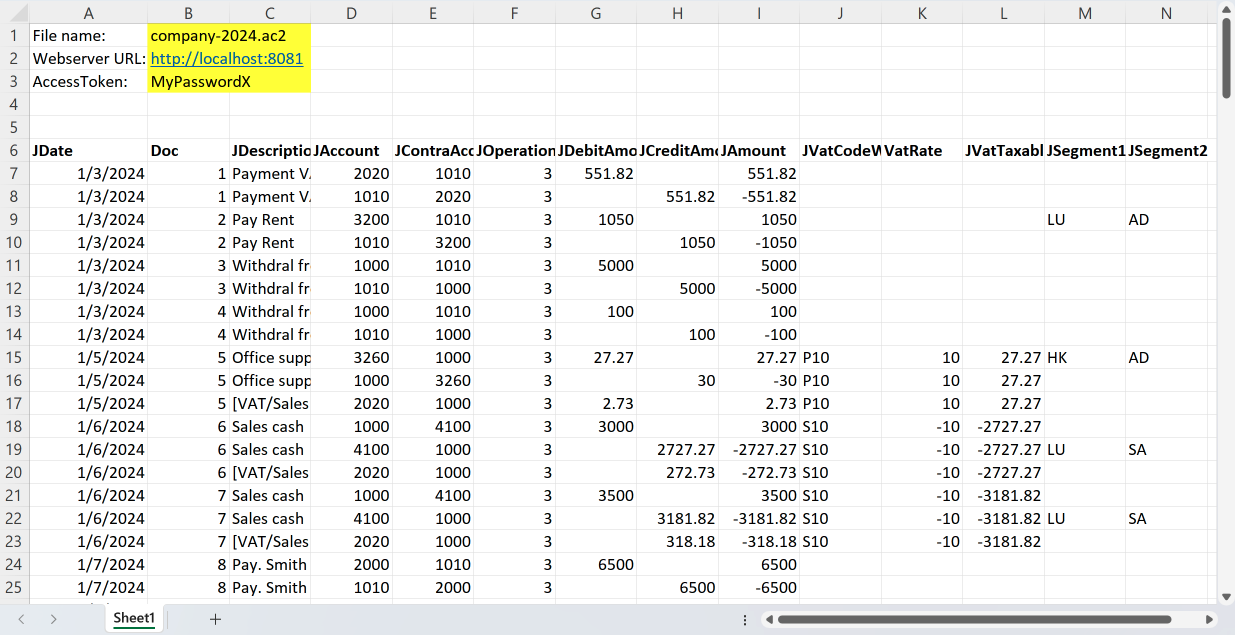
This example shows how to use the Banana Journal to get all the data, and from that retrieve only the Transactions rows.
The Banana Accounting Journal contains the Transactions Data with one row for each account. It can be useful for creating pivot tables.
If the worksheet you are working already contains data, these will be overwritten. Make sure you are in an empty sheet.
To use this script:
- Copy the following script code.
- Paste the script in the Code Editor.
- Save and Run the script.
Note: before running the scripts, set the file name and the server settings.
When you run the script:
- The transactions rows of the Journal are displayed.
- If the worksheet you are working already contains data, these will be overwritten.
Script code:
/**
 * This example retrieves all the Transactions rows from the Journal
 *
 * In order to connect to the Banana Web Server, define some information:
 * - Cell B1 the accounting file name
 * - Cell B2 the localhost web server url
 * - Cell B3 the accessToken security password
 *
 * You can get these information from cells of the worksheet or you can define them in the script.
 * In this example we get the information from the cells B1, B2, B3.
 */
async function main(workbook: ExcelScript.Workbook) {
  // Get the current active worksheet
  let sheet = workbook.getActiveWorksheet();
  // Get the cell values
  let fileName = sheet.getRange("B1").getValue();
  let localhost = sheet.getRange("B2").getValue();
  let accessToken = sheet.getRange("B3").getValue();
  // Retrieve JSON data of the journal from Banana Web Server
  let fetchResult = await fetch(localhost + '/v1/doc/' + fileName + '/journal?format=json&acstkn=' + accessToken);
  // Convert the returned data to the expected JSON structure.
  let json: JSONData = await fetchResult.json();
  // Display the content in a readable format.
  console.log(JSON.stringify(json));
  // Write columns headers texts on the row 6
  let row = 6;
  let col = sheet.getRange('A' + row);
  col.setValue([['JDate']]);
  col.getFormat().getFont().setBold(true);
  //col.getFormat().getFont().setColor("black");
  //col.getFormat().getFill().setColor("yellow");
  col = sheet.getRange('B' + row);
  col.setValue([['Doc']]);
  col.getFormat().getFont().setBold(true);
  col = sheet.getRange('C' + row);
  col.setValue([['JDescription']]);
  col.getFormat().getFont().setBold(true);
  col = sheet.getRange('D' + row);
  col.setValue([['JAccount']]);
  col.getFormat().getFont().setBold(true);
  col = sheet.getRange('E' + row);
  col.setValue([['JContraAccount']]);
  col.getFormat().getFont().setBold(true);
  col = sheet.getRange('F' + row);
  col.setValue([['JOperationType']]);
  col.getFormat().getFont().setBold(true);
  col = sheet.getRange('G' + row);
  col.setValue([['JDebitAmount']]);
  col.getFormat().getFont().setBold(true);
  col = sheet.getRange('H' + row);
  col.setValue([['JCreditAmount']]);
  col.getFormat().getFont().setBold(true);
  col = sheet.getRange('I' + row);
  col.setValue([['JAmount']]);
  col.getFormat().getFont().setBold(true);
  col = sheet.getRange('J' + row);
  col.setValue([['JVatCodeWithoutSign']]);
  col.getFormat().getFont().setBold(true);
  col = sheet.getRange('K' + row);
  col.setValue([['VatRate']]);
  col.getFormat().getFont().setBold(true);
  col = sheet.getRange('L' + row);
  col.setValue([['JVatTaxable']]);
  col.getFormat().getFont().setBold(true);
  col = sheet.getRange('M' + row);
  col.setValue([['JSegment1']]);
  col.getFormat().getFont().setBold(true);
  col = sheet.getRange('N' + row);
  col.setValue([['JSegment2']]);
  col.getFormat().getFont().setBold(true);
  // Write the transactions rows data from the row 7
  row = 7;
  for (let i in json) {
    if (json[i].JOperationType === "3") {  // JOperationType=3 are rows from table Transactions
      let col = sheet.getRange('A' + row);
      col.setValue(json[i].JDate);
      col = sheet.getRange('B' + row);
      col.setValue(json[i].Doc);
      col = sheet.getRange('C' + row);
      col.setValue(json[i].JDescription);
      col = sheet.getRange('D' + row);
      col.setValue(json[i].JAccount);
      col = sheet.getRange('E' + row);
      col.setValue(json[i].JContraAccount);
      col = sheet.getRange('F' + row);
      col.setValue(json[i].JOperationType);
      col = sheet.getRange('G' + row);
      col.setValue(json[i].JDebitAmount);
      col = sheet.getRange('H' + row);
      col.setValue(json[i].JCreditAmount);
      col = sheet.getRange('I' + row);
      col.setValue(json[i].JAmount);
      col = sheet.getRange('J' + row);
      col.setValue(json[i].JVatCodeWithoutSign);
      col = sheet.getRange('K' + row);
      col.setValue(json[i].VatRate);
      col = sheet.getRange('L' + row);
      col.setValue(json[i].JVatTaxable);
      col = sheet.getRange('M' + row);
      col.setValue(json[i].JSegment1);
      col = sheet.getRange('N' + row);
      col.setValue(json[i].JSegment2);
      // increase row
      row++;
    }
  }
}
// JSON structure of the Journal
interface JSONData {
  JDate: string;
  Doc: string;
  JDescription: string;
  JAccount: string;
  JContraAccount: string;
  JOperationType: number;
  JDebitAmount: number;
  JCreditAmount: number;
  JAmount: number;
  JVatCodeWithoutSign: string;
  VatRate: number;
  JVatTaxable: number;
  JSegment1: string;
  JSegment2: string;
}
/* Complete list of journal
    SysCod, Section, Date, DateDocument, DateValue, Doc, DocProtocol, DocType, DocOriginal, DocInvoice, InvoicePrinted, DocLink, ExternalReference, Description, Notes, AccountDebit, AccountDebitDes, AccountCredit, AccountCreditDes, Amount, Balance, VatCode, VatAmountType, VatExtraInfo, VatRate, VatRateEffective, VatTaxable, VatAmount, VatAccount, VatAccountDes, VatPercentNonDeductible, VatNonDeductible, VatPosted, VatNumber, Cc1, Cc1Des, Cc2, Cc2Des, Cc3, Cc3Des, Segment, DateExpiration, DateExpected, DatePayment, LockNumber, LockAmount, LockProgressive, LockLine, JDate, JDescription, JTableOrigin, JRowOrigin, JRepeatNumber, JGroup, JGr, JAccount, JAccountComplete, JAccountDescription, JAccountClass, JAccountSection, JAccountType, JOriginType, JOriginFile, JOperationType, JAccountGr, JAccountGrPath, JAccountGrDescription, JAccountCurrency, JAmountAccountCurrency, JAmount, JTransactionCurrency, JAmountTransactionCurrency, JTransactionCurrencyConversionRate, JAmountSection, JVatIsVatOperation, JVatCodeWithoutSign, JVatCodeDescription, JVatCodeWithMinus, JVatNegative, JVatTaxable, JContraAccount, JCContraAccountDes, JContraAccountType, JContraAccountGroup, JCC1, JCC2, JCC3, JSegment1, JSegment2, JSegment3, JSegment4, JSegment5, JSegment6, JSegment7, JSegment8, JSegment9, JSegment10, JDebitAmountAccountCurrency, JCreditAmountAccountCurrency, JBalanceAccountCurrency, JDebitAmount, JCreditAmount, JBalance, JInvoiceDocType, JInvoiceAccountId, JInvoiceCurrency, JInvoiceStatus, JInvoiceDueDate, JInvoiceDaysPastDue, JInvoiceLastReminder, JInvoiceLastReminderDate, JInvoiceIssueDate, JInvoiceExpectedDate, JInvoicePaymentDate, JInvoiceDuePeriod, JInvoiceRowCustomerSupplier, ProbableIndexGroup, VatTwinAccount, DateEnd, Repeat, Variant, ForNewYear, ItemsId, Quantity, ReferenceUnit, UnitPrice, FormulaBegin, Formula, AmountTotal
*/
After running the script, the result is the following:
Example 3: Create a new accounting file using data from Excel Sheets
For following this example you can download a Excel file that content some data of transactions and accounts.
Download Excel file with transaction and accounts
In this example we want to:
- Create a new Banana Accounting file using the web server Create a new file functionality.
- Take some transactions data from Excel.
For this example, transactions in Excel are entered as shown in the following image: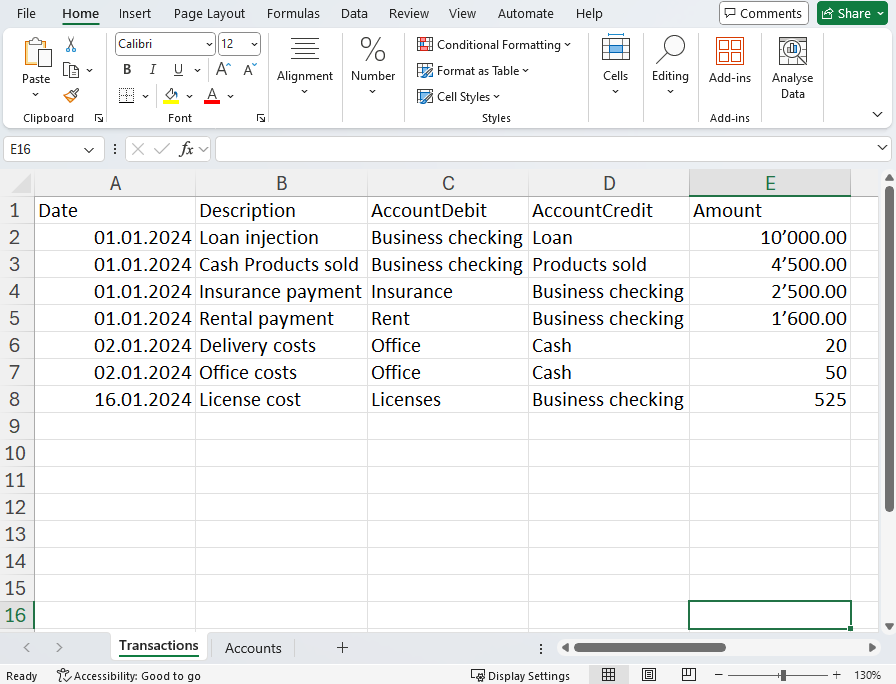
- Take some accounts and descriptions data from Excel.
Accounts can be numbers or texts.
The BClass columns set the type of account (1=assets, 2=liabilities, 3=expenses, 4=revenues).
For this example, accounts in Excel are entered as shown in the following image.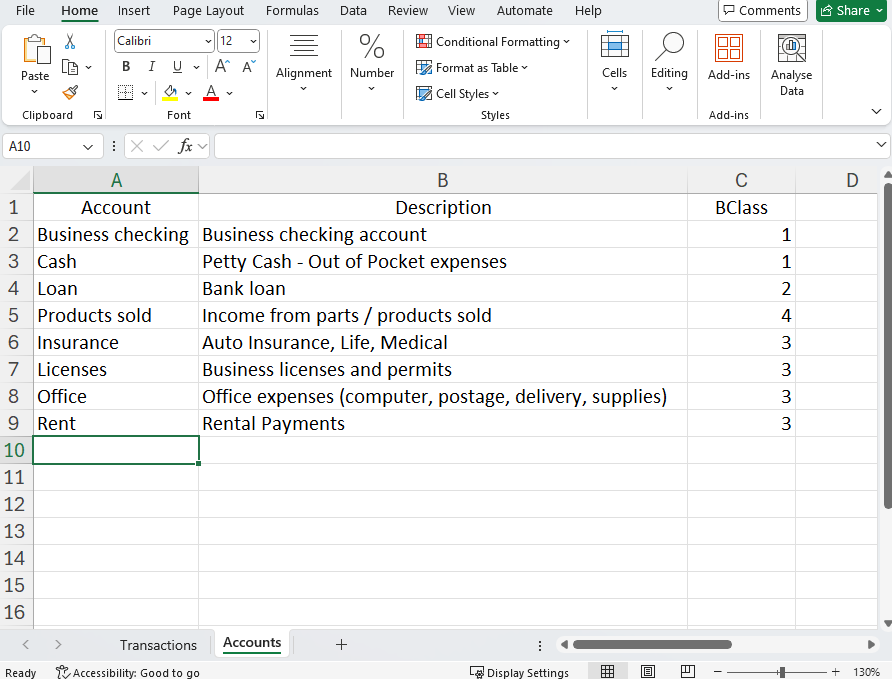
- Create a specific JSON used by the Document change API to add the the data in the accounting file.
We use the add Rows operation to append the transactions to the Transactions table and accounts to the Accounts table.
To use this script:
- Open Banana Accounting Plus and Configure Banana the Web Server.
- Copy the following script code.
- Paste the script in the Code Editor.
- Save and Run the script.
When you run the script:
- The script creates a new Banana Accounting file.
- The Excel transactions rows are added to the Transactions table in the accounting file.
- The Excel accounts rows are added to the Accounts table in the accounting file.
Script code:
async function main(workbook: ExcelScript.Workbook) {
    // Get the specific sheet
    const sheetTransactions = workbook.getWorksheet("Transactions");
    const sheetAccount = workbook.getWorksheet("Accounts");
    // Get the range of cells used in the sheet
    const usedRangeTransactions = sheetTransactions.getUsedRange();
    const usedRangeAccounts = sheetAccount.getUsedRange();
    // Get the last used row of the sheet
    const lastRowTransactions = usedRangeTransactions.getLastRow().getRowIndex();
    const lastRowAccounts = usedRangeAccounts.getLastRow().getRowIndex();
    // TRANSACTIONS
    const dateRange = sheetTransactions.getRange(`A2:A${lastRowTransactions + 1}`).getValues(); // From line 2 (skip header)
    const descriptionRange = sheetTransactions.getRange(`B2:B${lastRowTransactions + 1}`).getValues();
    const accountDebitRange = sheetTransactions.getRange(`C2:C${lastRowTransactions + 1}`).getValues();
    const accountCreditRange = sheetTransactions.getRange(`D2:D${lastRowTransactions + 1}`).getValues();
    const amountRange = sheetTransactions.getRange(`E2:E${lastRowTransactions + 1}`).getValues();
    // ACCOUNTS
    const accountRange = sheetAccount.getRange(`A2:A${lastRowAccounts + 1}`).getValues();
    const descRange = sheetAccount.getRange(`B2:B${lastRowAccounts + 1}`).getValues();
    const bclassRange = sheetAccount.getRange(`C2:C${lastRowAccounts + 1}`).getValues();
    // Initialize JSON structure.
    // The JSON is used by the documentChange to add rows in Transactions table
    // https://www.banana.ch/doc/en/node/9841#example_adding_a_row
    var jsonData = {
        "format": "documentChange",
        "error": "",
        "data": [
            {
                "document": {
                    "dataUnits": [
                        {
                            "data": {
                                "rowLists": [
                                    {
                                        "rows": []
                                    }
                                ]
                            },
                            "nameXml": "Transactions"
                        },
                        {
                            "data": {
                                "rowLists": [
                                    {
                                        "rows": []
                                    }
                                ]
                            },
                            "nameXml": "Accounts"
                        }
                    ]
                }
            }
        ]
    };
    // TRANSACTIONS: Iteration on each row of the columns.
    for (let i = 0; i < dateRange.length; i++) {
        let dateValue = dateRange[i][0]; // Value of column A (Date)
        let descriptionValue = descriptionRange[i][0]; // Value of column B (Description)
        let accountDebitValue = accountDebitRange[i][0]; // Value of column C (AccountDebit)
        let accountCreditValue = accountCreditRange[i][0]; // Value of column D (AccountCredit)
        let amountValue = amountRange[i][0]; // Value of column E (Amount)
        // adds "fields" object to "rows"
        jsonData.data[0].document.dataUnits[0].data.rowLists[0].rows.push({
            "fields": {
                "Date": formatDateToYyyyMmDd(Number(dateValue)),
                "Description": descriptionValue,
                "AccountDebit": accountDebitValue,
                "AccountCredit": accountCreditValue,
                "Amount": amountValue.toString()
            },
            "operation": {
                "name": "add"
            }
        });
    }
    // ACCOUNTS: Iteration on each row of the columns.
    for (let i = 0; i < accountRange.length; i++) {
        let accountValue = accountRange[i][0]; // Value of column A (Account)
        let descValue = descRange[i][0]; // Value of column B (Description)
        let bclassValue = bclassRange[i][0]; // Value of column C (BClass)
        // adds "fields" object to "rows"
        jsonData.data[0].document.dataUnits[1].data.rowLists[0].rows.push({
            "fields": {
                "Section": "",
                "Group": "",
                "Account": accountValue.toString(),
                "Description": descValue.toString(),
                "BClass": bclassValue.toString(),
                "Gr": ""
            },
            "operation": {
                "name": "add"
            }
        });
    }
    let jsonString = JSON.stringify(jsonData);
    //console.log(jsonString);
    createAc2(JSON.parse(jsonString));
}
async function createAc2(jsonData: JSON) {
    // Web server url
    let _LOCALHOST = "http://localhost:8081"; //for macOS use "https://127.0.0.1:8089";
    // Web server password
    let _PASSWORD = "MyPasswordX";
    // Request to Banana web server
    let url = _LOCALHOST + "/v2/doc?show&acstkn=" + _PASSWORD;
    // Accounting type parameters
    let fileTypeGroup = 100; // Double entry accounting
    let fileTypeNumber = 100; // without VAT
    let fileDecimals = 2;
    try {
        // Body of the request
        const httpBody = {
            fileType: {
                accountingType: {
                    docGroup: fileTypeGroup,
                    docApp: fileTypeNumber,
                    decimals: fileDecimals
                }
            },
            data: jsonData,
        }
        const response = await fetch(url, {
            method: 'POST',
            headers: {
                'Content-Type': 'application/json'
            },
            body: JSON.stringify(httpBody)
        });
        //const responseData: string = await response.text();
        //console.log(responseData);
    } catch (error) {
        console.log(error);
    }
}
// Convert Date type of Excel in yyyy-mm-dd string format
function formatDateToYyyyMmDd(date: number): string {
    let dateString = new Date(Math.round((date - 25569) * 86400 * 1000)).toISOString().split("T")[0];
    return dateString;
}
Accounting type parameters "_DOC_GROUP" and "_DOC_APP" define the type of accounting to create. For more information please visit the @doctype Attributes page.
Useful resources
Create a Banana Accounting File Using Excel Office Script
This page explains:
- How to create a Banana Accounting file with double registration without VAT starting from Excel data using the Excel Office Script module.
- How to use the http POST protocol with Banana APIs to transfer the current and budget transactions, the chart of accounts into Banana Accounting Plus from the Excel file.
- How to create financial statement and income statement reports in Banana with this data.
Prerequisites
For use these functions you need to have:
- Download and install Banana Accounting Plus.
- Have the Advanced plan of Banana Accounting Plus.
- Have Excel for Windows (version 2210 or higher) or Excel for Mac.
- Use OneDrive for Business.
- Configure the webserver in Banana Accounting Plus based on your operating system.
Note
- The entered budget and transaction data must be considered over the period defined in the FileInfo in order to be calculated and evaluated
Steps to Integrate Excel Office Script
After checking the prerequisites for this use case, you can follow the next steps:
- Download the example Excel with data.
- Create a new Office Script file in Excel, copy and paste the example code into the code editor in Office Script.
- Open Banana Accounting Plus.
- Make sure that the Webserver is working.
- Save and Run the code in Office Script.
- See the results in the Banana Accounting Plus.
The Office Script will do the following:
- Create a Banana Accounting Json Document Change Object
- For each Excel Sheet:
- Read the content of the Excel Sheet.
- Add the data to the Json Document Change Object.
- Send the Json Document Change Object to the Banana Web Server using the http POST method.
The Banana Accounting software will create a new file and display within the software.
The structure of the Excel file
The file is divided into several sheets, each corresponding to the data structure and Table in the Banana Accounting file.
- FileInfo: Banana Accounting File Properties.
- Accounts: Accounts Table.
- Transactions: Transactions Table.
- Budget: Budget Table.
All the data you enter into Excel sheets are used to create a basic Json structure (documentchange) that must pass into Banana Accounting Plus.
FileInfo
In this sheet, you will enter basic business data. This information is essential to ensure that all entries are consistent and properly contextualized. Here you will be able to specify:
- Company: The company name, that is the name and legal form.
- Opening and closure date: The date the accounts were opened and closed, that are related to period that you want evalueted your accounting.
- Basis currency: The currency to be used.
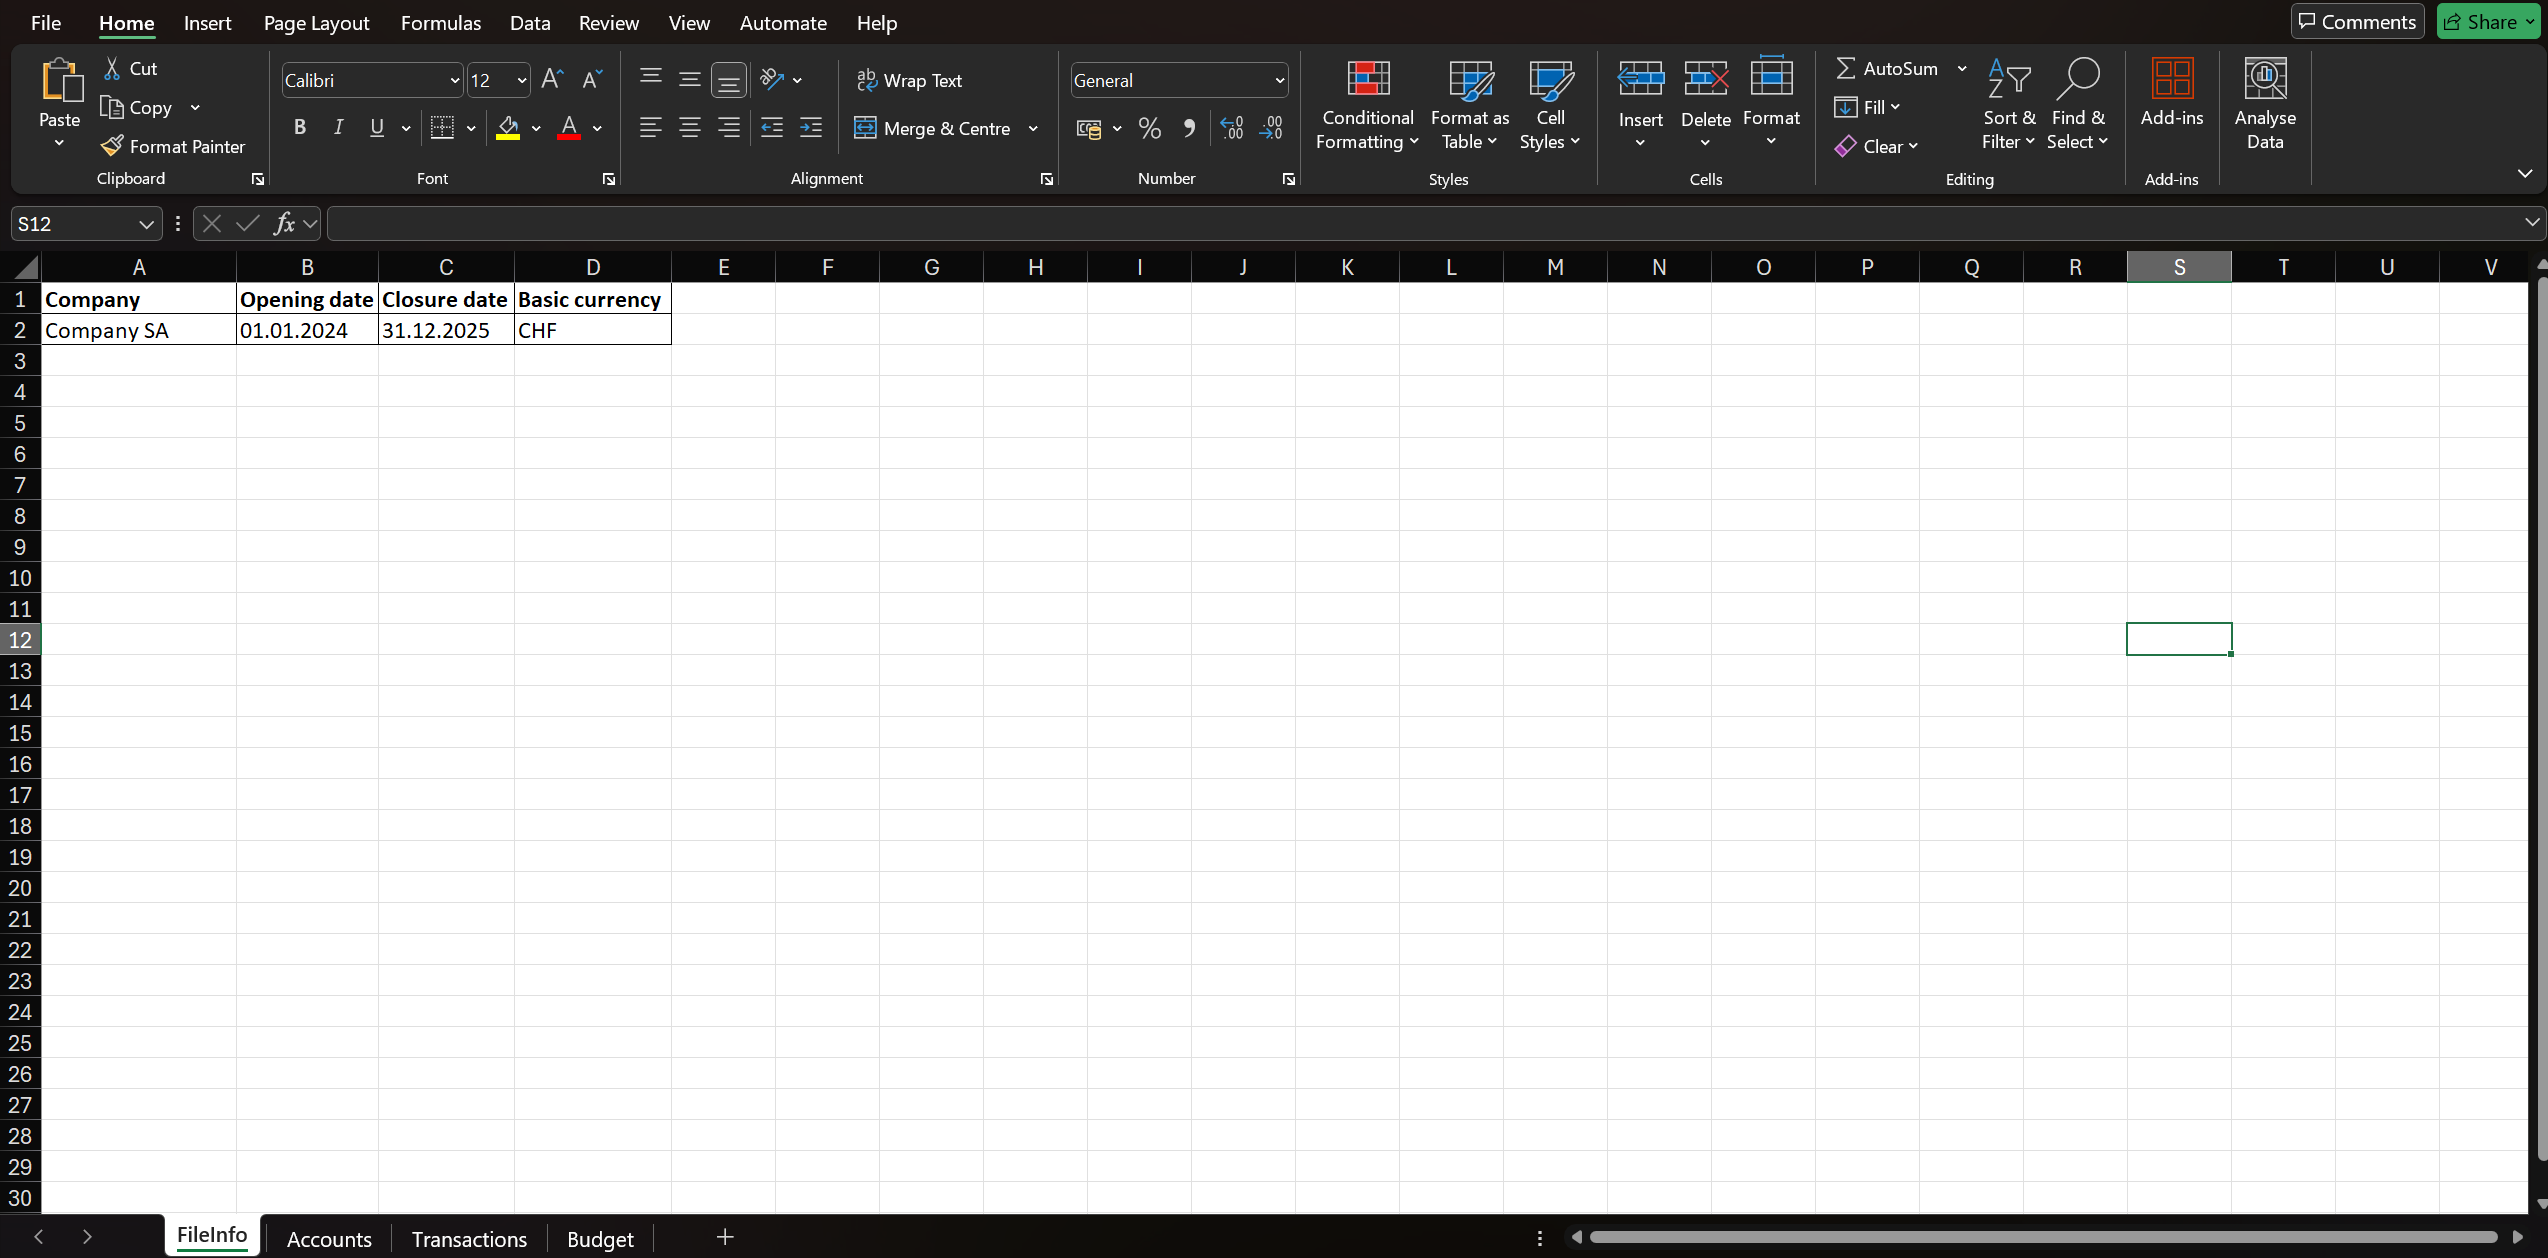
Accounts
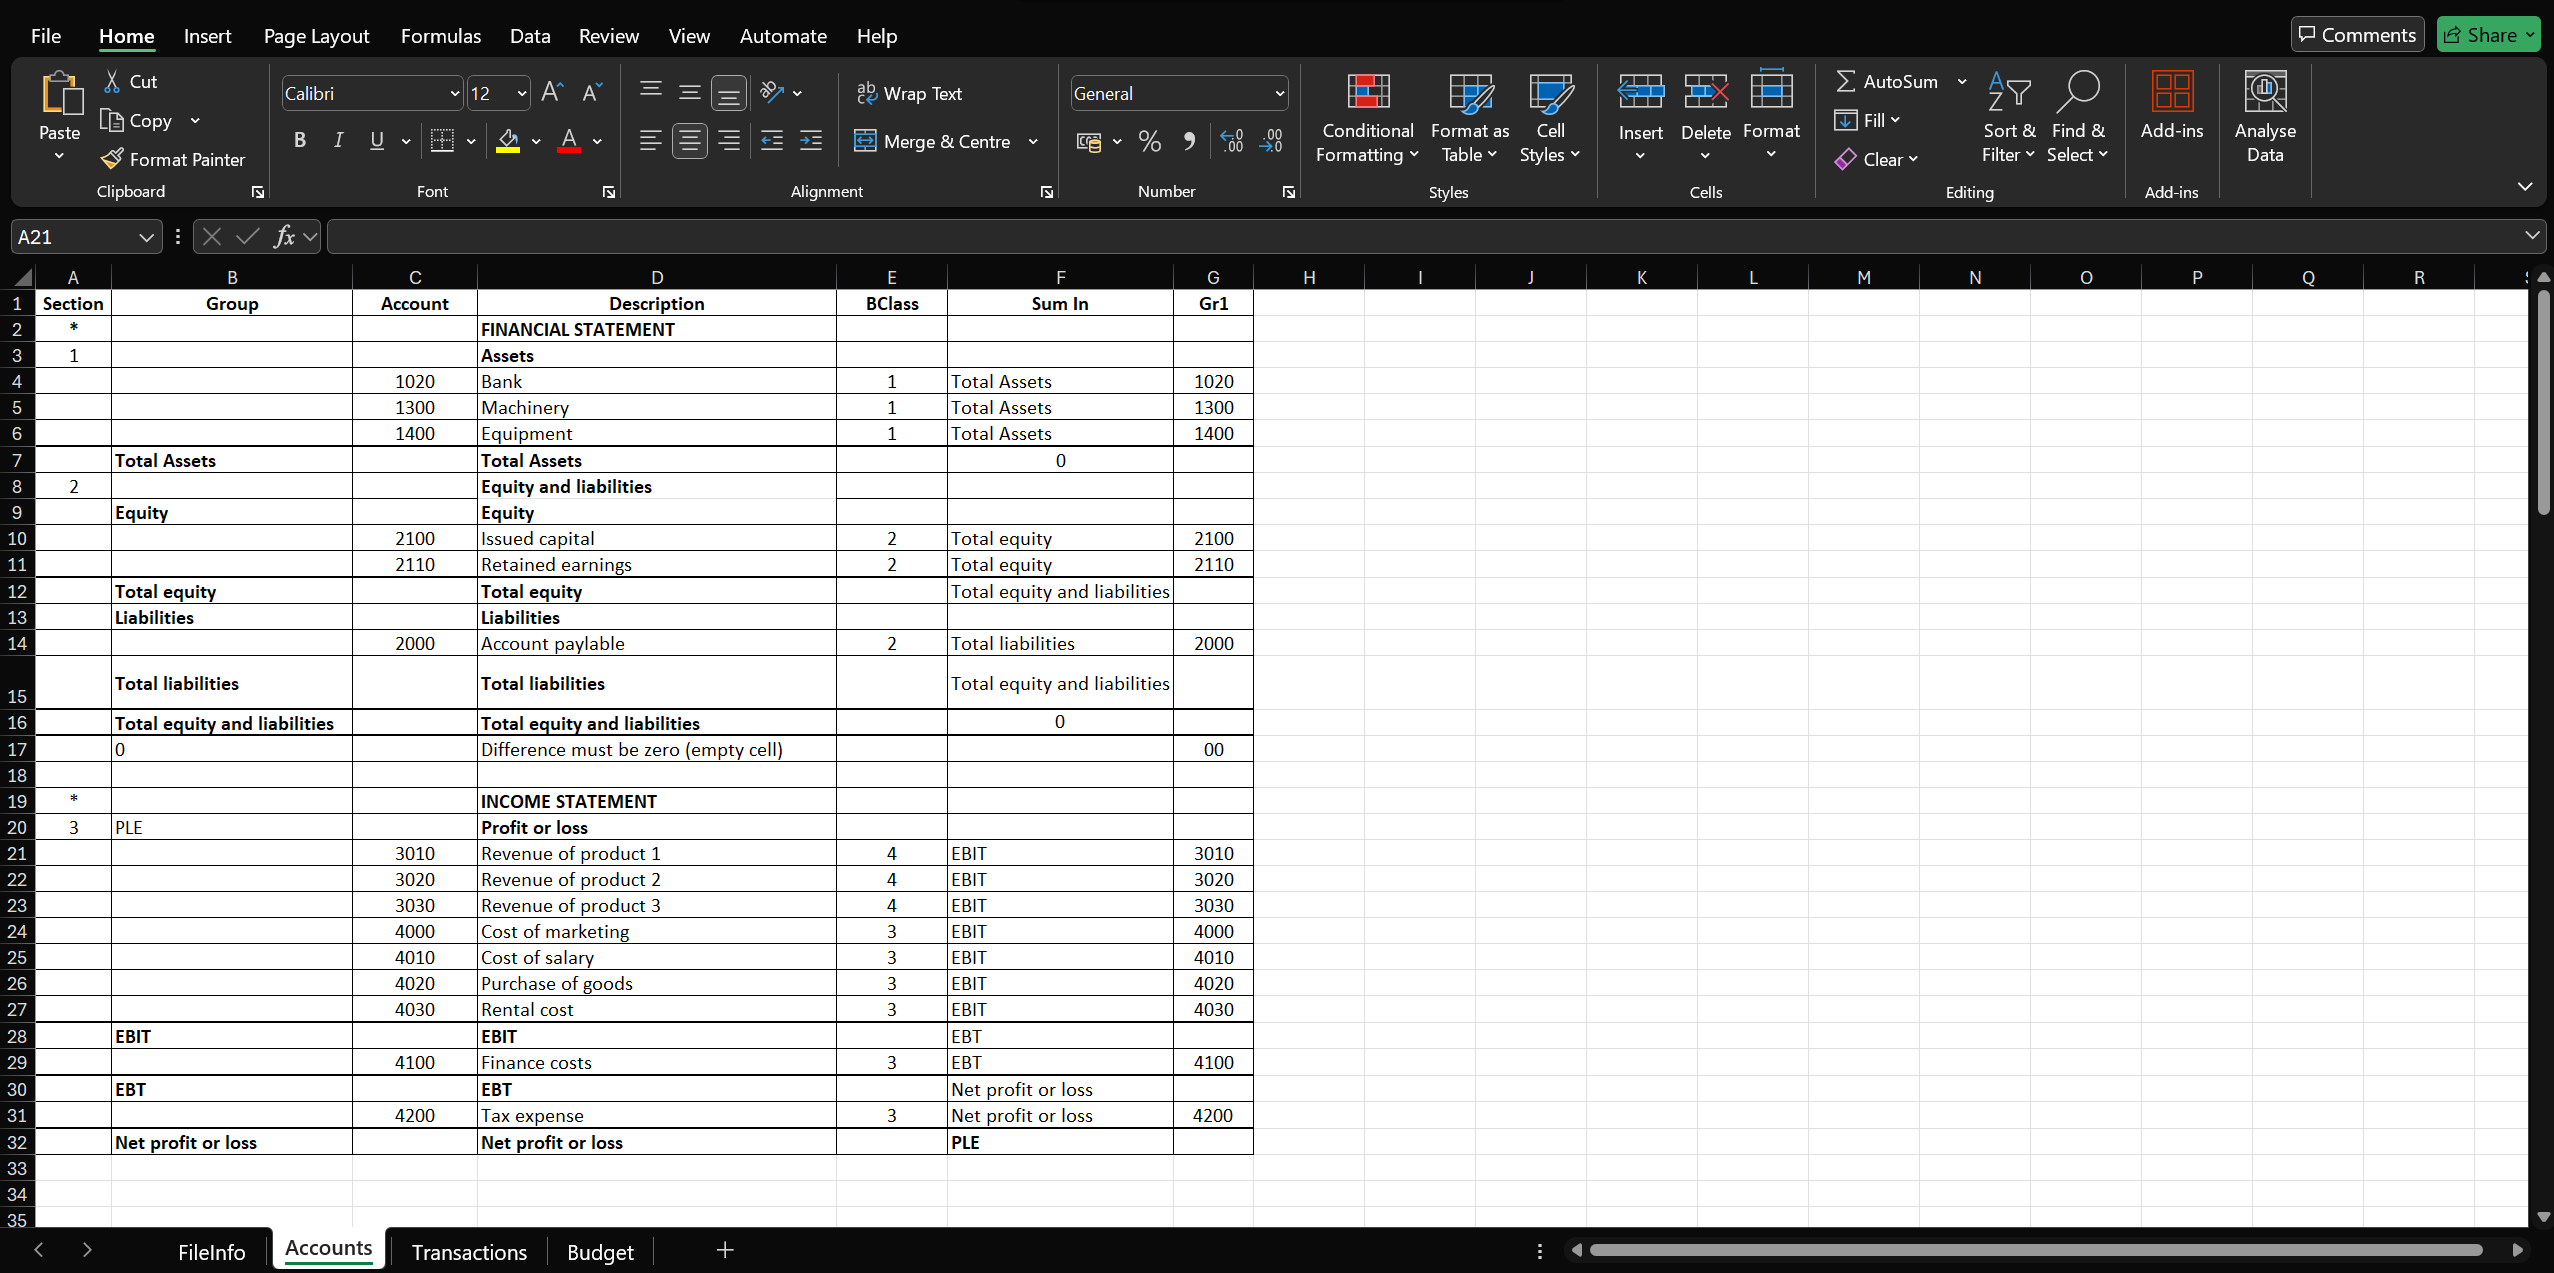
This sheet is dedicated to creating the chart of accounts. Here you will be able to define:
- The account names and codes.
- The type of account.
- The groupings required for summing account groups.
- For example, you will be able to sum all accounts receivable to get the total assets, thus facilitating the preparation of the fiancial statement and income statement.
The columns of the sheet Accounts in Excel file refer the same table in Banana Accounting Plus.
The accounting sheet contains the main data for constructing the chart of accounts based on the document change structure and later creating the Financial statement and Income Statement reports, with the same columns that find in Banana Accounting Plus:
Transactions
In this sheet, you will record:
- All accounting transactions for the current year.
The entries will include key data such as:
- Date: The date of the transaction.
- Description: Transaction description.
- AccountDebit: Debit account.
- AccountCredit: Credit account.
- Amount: Amount of your transaction.
This will enable you to keep track of financial transactions in a detailed and organized manner.
The sheets of Transactions and Budget have the same columns, but refer to different table.
To understand and learn more about the use of these columns you can look at this link Transactions.
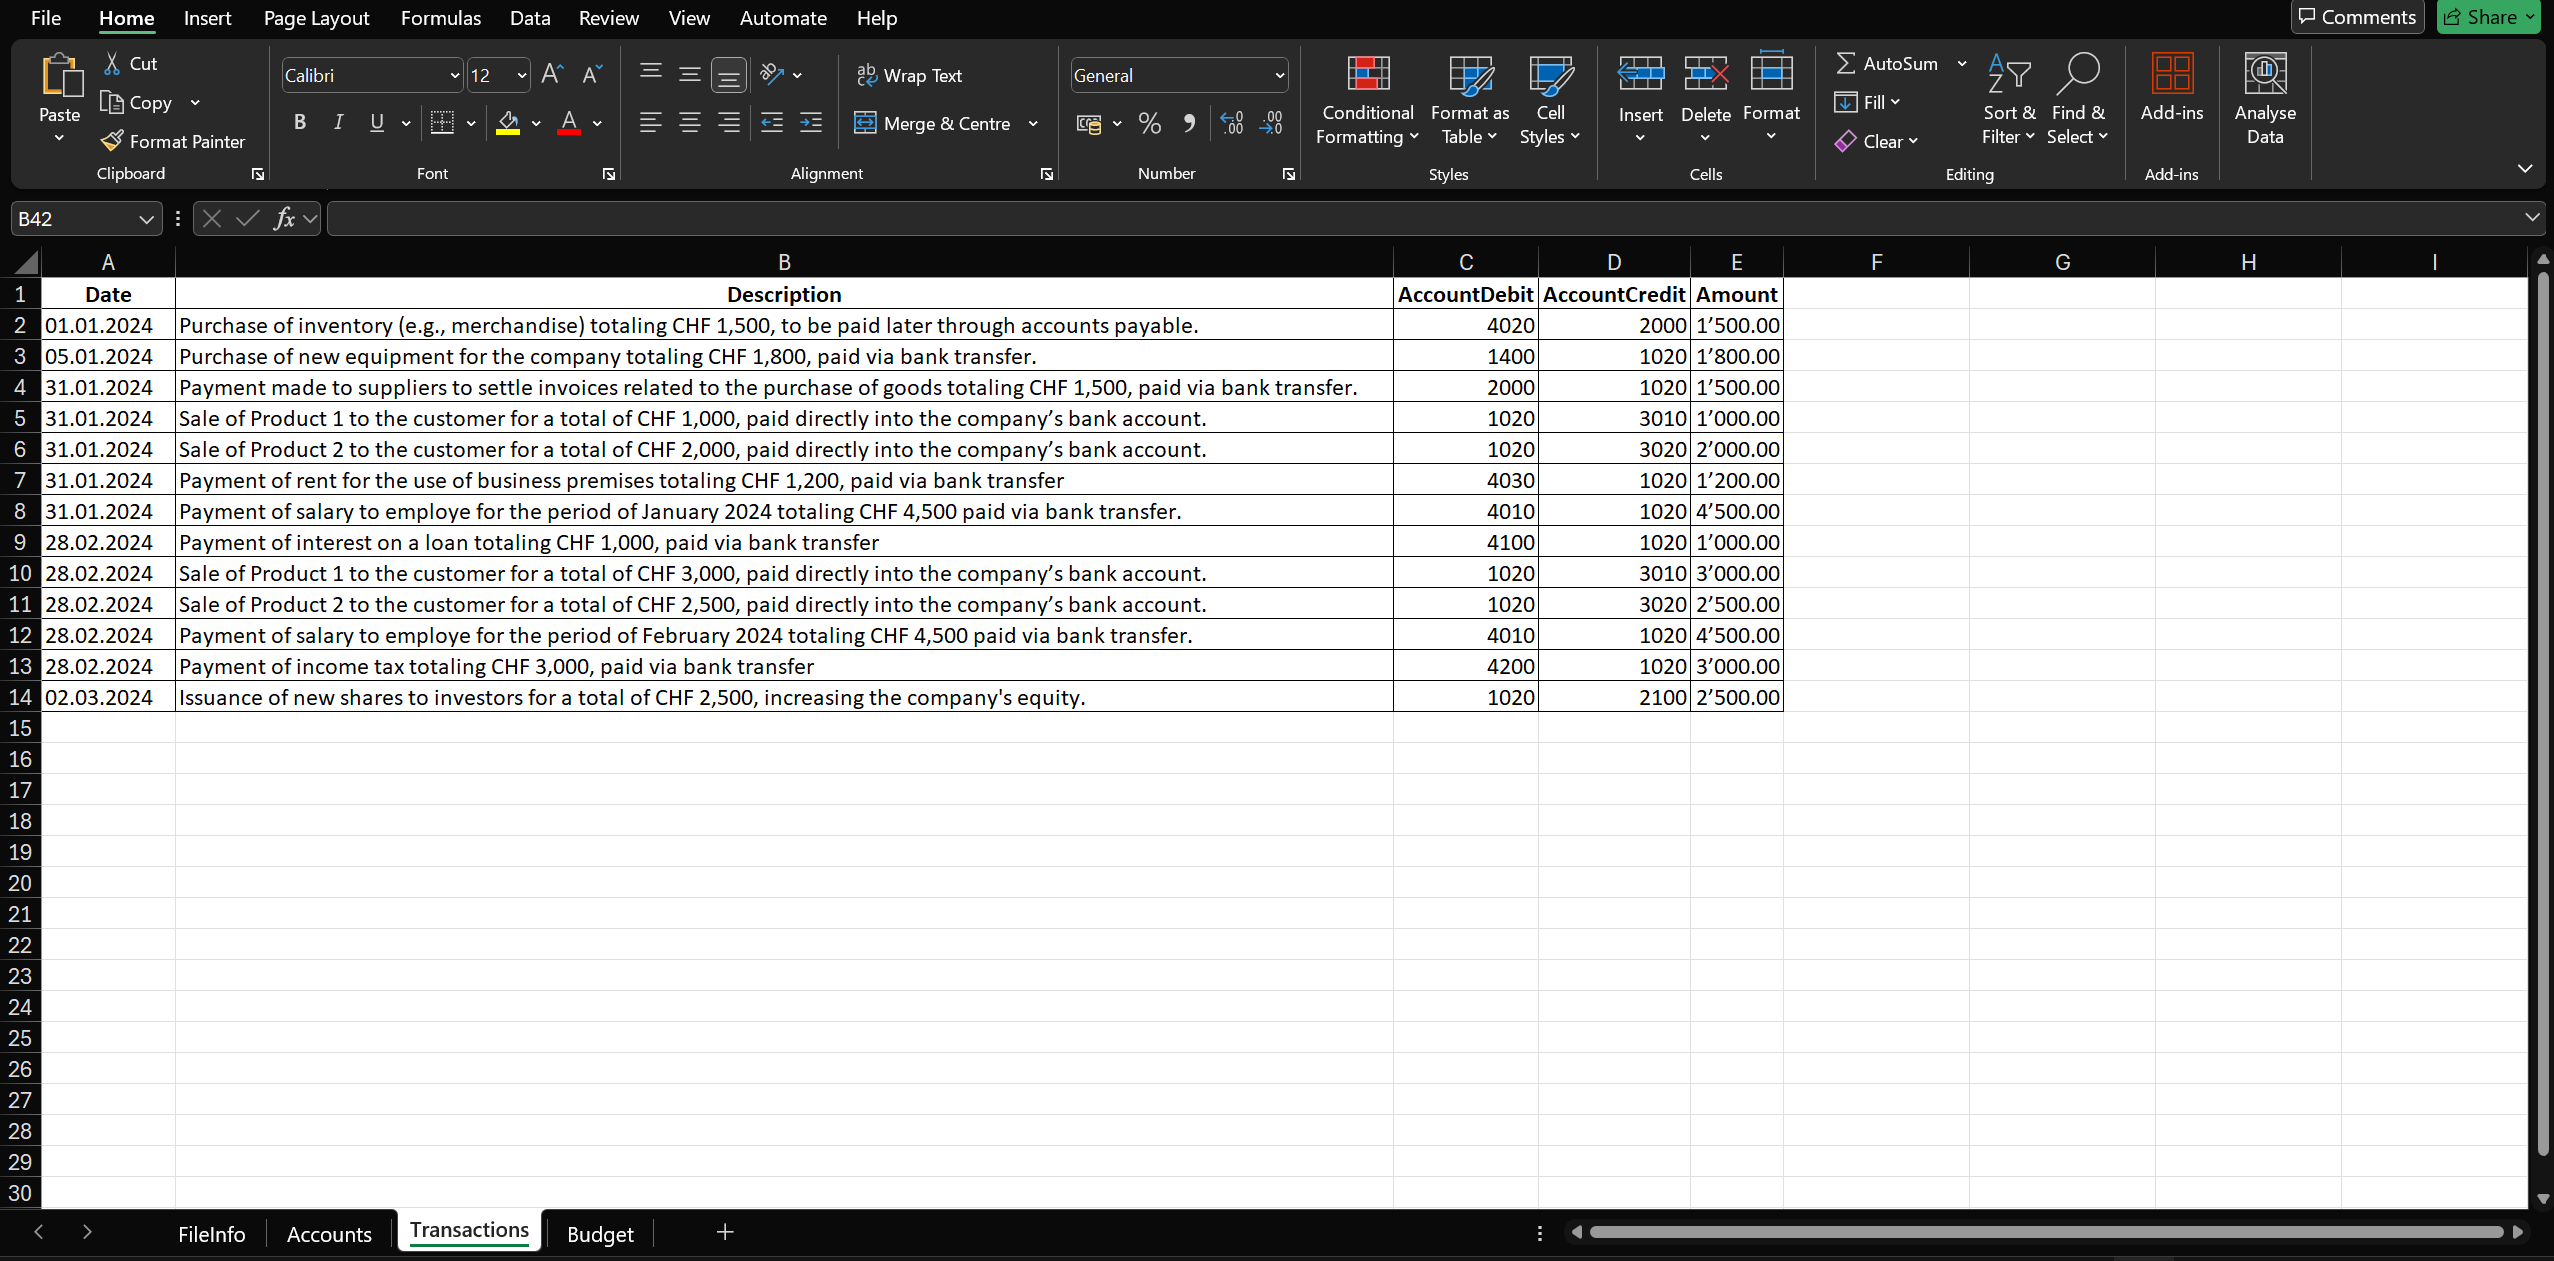
Budget
The entries will include key data such as:
- Date: The date of the budget transaction.
- Description: Budget transaction description.
- AccountDebit: Debit account.
- AccountCredit: Credit account.
- Amount: Amount of your budget transaction.
Finally, the Budget sheet is dedicated to planning future expenses.
Here you will be able:
- To enter the projected expenses you intend to incur, taking into account the closing date indicated on the FileInfo sheet.
- Monitor and manage the company budget proactively.
These data even though they have the same columns as transactions will be recorded in the Budget table for future forecasting.
For further study: Budget Table
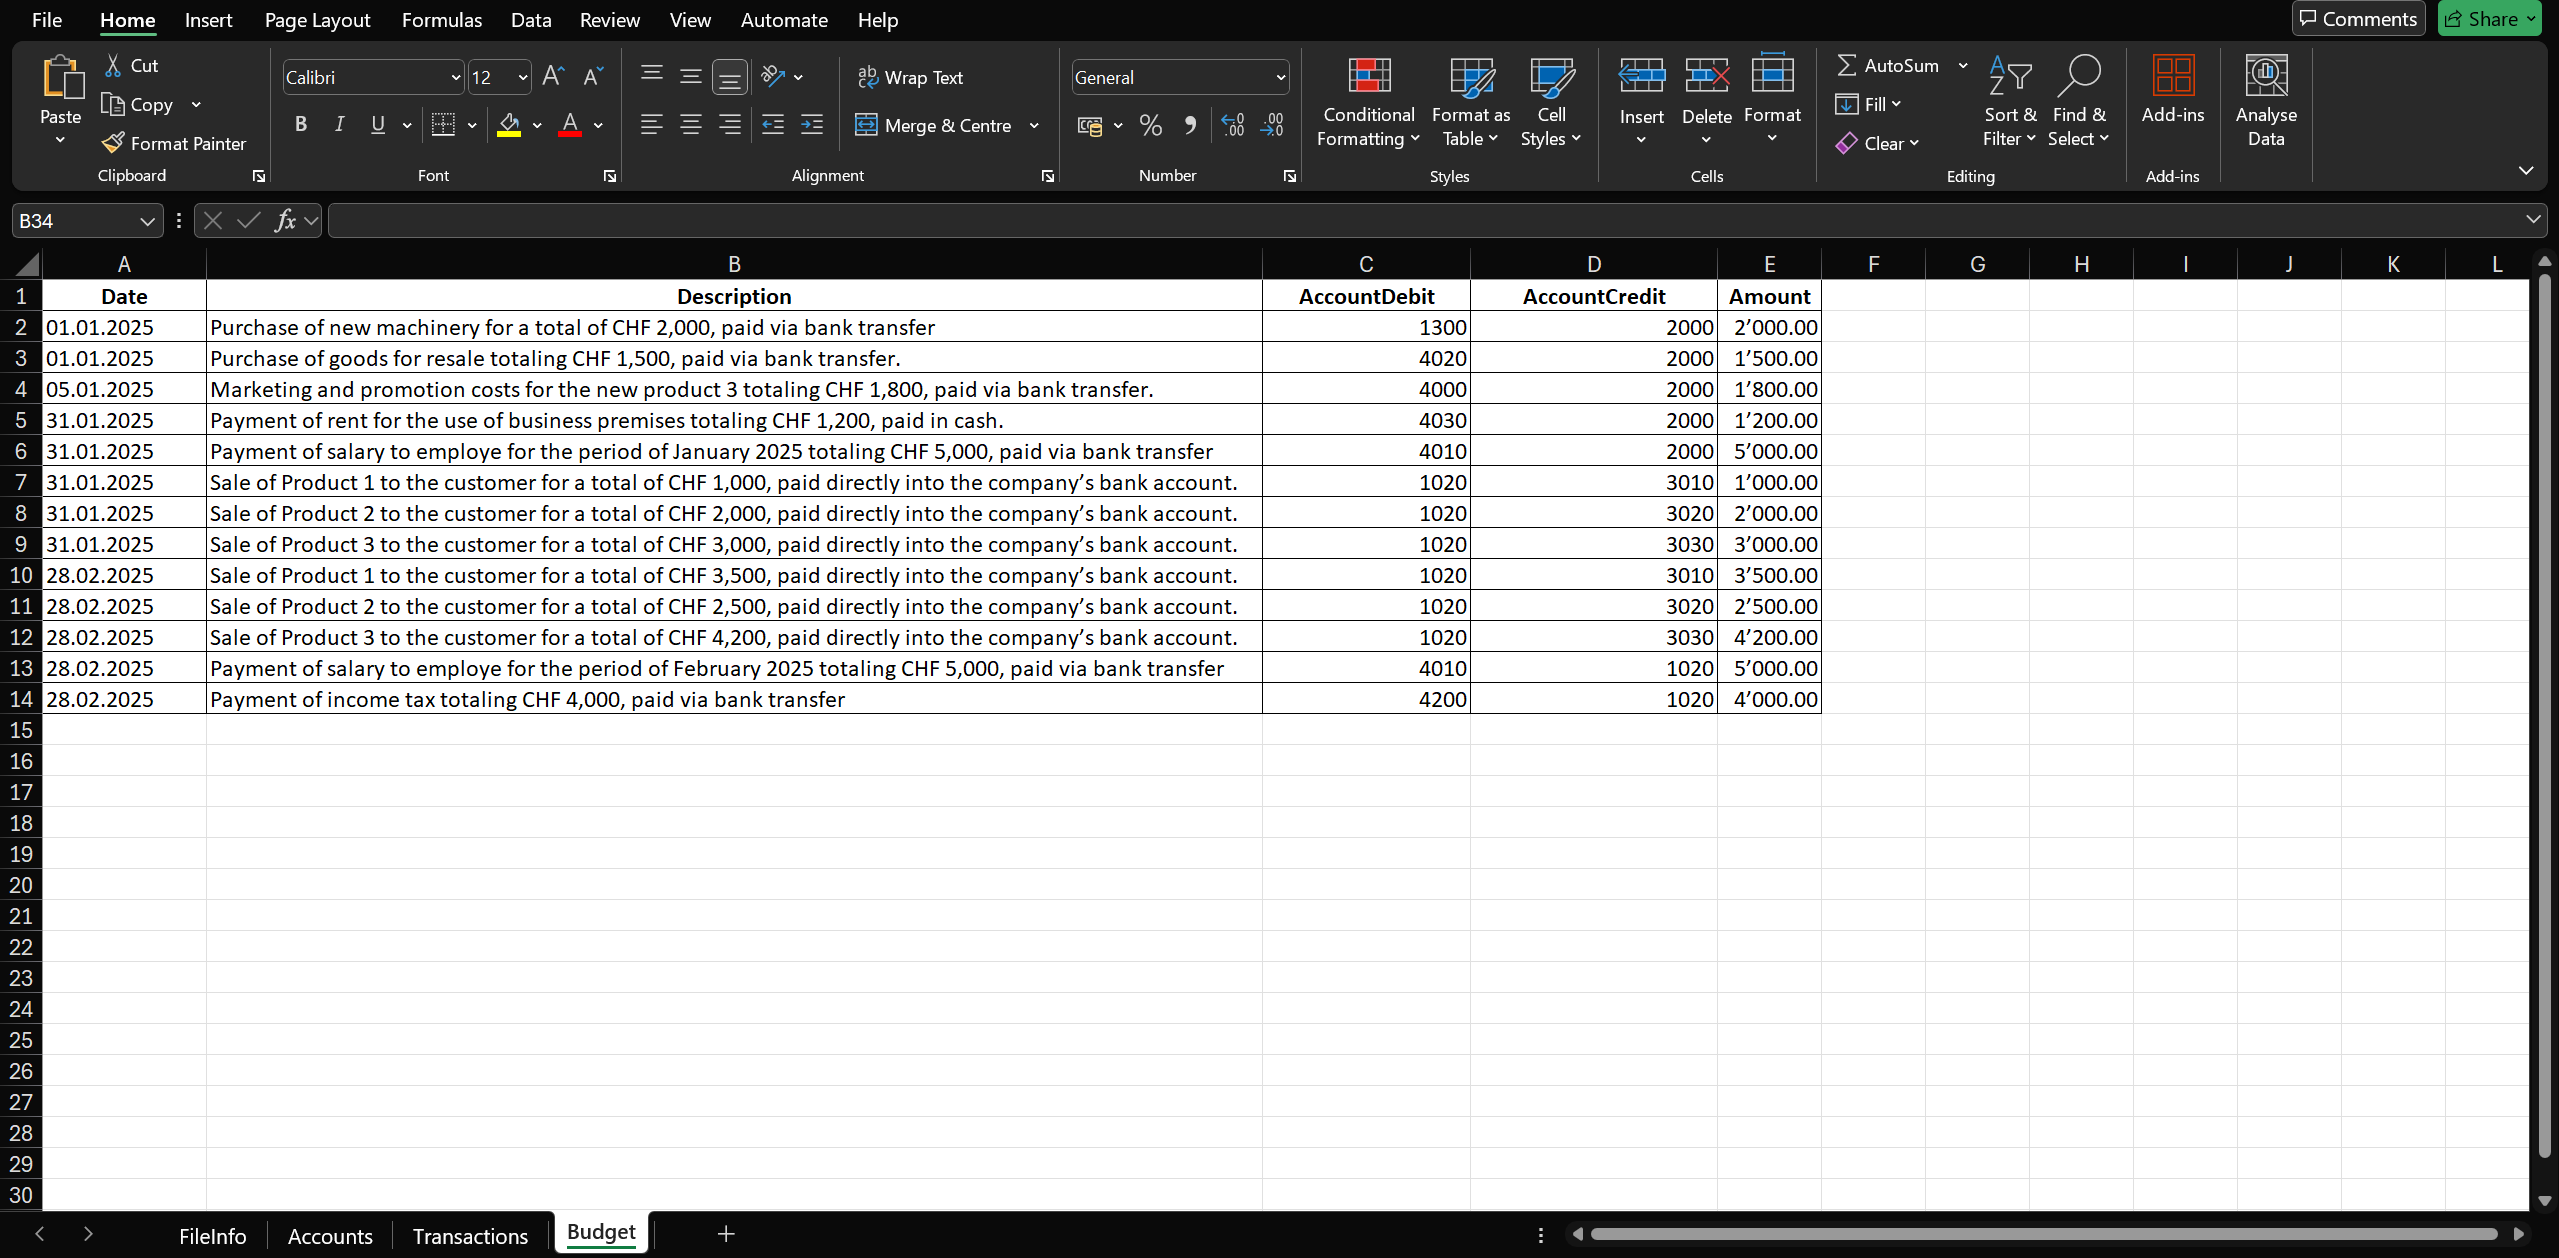
Script code in Office Script
The code is structured as:
- The function main.
- An Office Script for Excel must include a main function with the ExcelScript.Workbook as its first parameter.
- When you execute a function, the Office Script calls the main function by providing the workbook as first parameter.
- ExcelScript.Workbook should always be first parameter.
- The function is defined async because the script needs to interact with APIs (forsend data).
Using async allows you to handle these calls without blocking the execution of the rest of the script.
- Initialization in the jsonData variable based JSON who are structured as DocumentChange that have an array of dataUnits objects defined by the following properties:
- FileInfo.
- Transactions.
- Budget.
- Accounts.
- For each sheet:
- There is the initialization of the parameters of the range that are used to read the cells.
- There are the reading the rows containing the data needed to build the DocumentChange and inserting them into the rows object array of variable jsonData.
- To send the data contained in the jsonData variable to Banana Accounting Plus using the function createAc2(jsonData: JSON).
- The body of request:
- jsonData
represents the data of Documentchange that need to create a file accounting in Banana Accounting. - fileType
that define the which type of accounting you want to create in Banana Accounting.- docGroup: if you set the number 100 you create a file with double-entry accounting.
- docApp: if you set the number 100 you create a file without VAT.
- decimals: is the number of decimal digits (default value is 2).
- jsonData
- HTTP method:
- POST.
- Header:
- 'Content-Type': 'application/json'.
- Is defined to Async:
- The script needs to interact with APIs.
- Errors:
- To verify the success of the Banana API call, I print an error message if a problem occurs.
- Endpoint:
- http://<_PASSWORD>/v2/doc?show&acstkn=<_LOCALHOST >
- The _PASSWORD variable must be replaced with your own token password used to configure the Banana Accounting Plus webserver as described in Integrated Web Server
- The _LOCALHOST variable must be replaced with your compatible with your operating system if it is Windows or if is Mac, have a different localhost.
- The body of request:
- Formatting the date with the function formatDateToYyyyMmDd(date: number | string | number | boolean): string
- date: Office Script when reading a cell, there are different types of data and it is not possible to impose which input format arrives for reading, so to avoid possible errors it has been integrated as possible data: boolean, number and string.
- The date is first verified as a number, because at the time of reading the cell the data is in number and subsequently if it is a number it is converted to a string with a calculation because the format being read is a number and the destination format in Banana accepts the string format.
Note
- You can add rows to create more records or change data of row without modifying the code.
- If you move, delete, or add new columns, you must update the column references in the code accordingly.
- Adding Rows:
You can add a row in the Transactions sheet (or any other sheet) following the existing column order without any code changes.
Adding Columns:
If you add a column in the Transactions sheet to include a new field, you must adapt the code to reflect this change in the document structure.
The structure of Json data that rapresent the Document Change Object
The Office Scipt will generate a DocumentChange Json object with the following properties:
- FileInfo: refers to the FileInfo table of Banana Accounting.
- Accounts: refers to the Accounts table of Banana Accounting.
- Transactions: refers to the Transactions table of Banana Accounting.
- Budget: refers to the Budget table of Banana Accounting.
These properties of the DocumentChange object are technically called nameXml and refer to the data structured, that in this is the tables of Banana Accounting.
These properties are directly connected to the structure of the Banana Accounting and are used to pass data to the corresponding table.
For further details and references, please see the Structure of DocumentChange and DocumentChange JSON.
Code
async function main(workbook: ExcelScript.Workbook) {
    // Initialize JSON structure.
    // The JSON is used by the documentChange to add rows in Transactions, Budget and Accounts table.
    // The data of property FileInfo in JSON is related of the properties in the Accounting File
    // https://www.banana.ch/doc/en/node/9841#example_adding_a_row
    var jsonData = {
        "format": "documentChange",
        "error": "",
        "data": [
            {
                "document": {
                    "dataUnits": [
                        {
                            "nameXml": "FileInfo",
                            "data": {
                                "rowLists": [
                                    {
                                        "nameXml": "Base",
                                        "rows": []
                                    }
                                ]
                            }
                        },
                        {
                            "data": {
                                "rowLists": [
                                    {
                                        "rows": []
                                    }
                                ]
                            },
                            "nameXml": "Transactions"
                        },
                        {
                            "data": {
                                "rowLists": [
                                    {
                                        "rows": []
                                    }
                                ]
                            },
                            "nameXml": "Budget"
                        },
                        {
                            "data": {
                                "rowLists": [
                                    {
                                        "rows": []
                                    }
                                ]
                            },
                            "nameXml": "Accounts"
                        }
                    ]
                }
            }
        ]
    };
    //FILE INFO
    // Get the specific sheet
    const sheetFileInfo = workbook.getWorksheet("FileInfo");
    // Get the range of cells used in the sheet
    const usedRangeFileInfo = sheetFileInfo.getUsedRange();
    const columnRangeFileInfo = sheetFileInfo.getUsedRange().getRow(0).getColumnCount();
    // Get the last used row of the sheet
    const lastRowFileInfo = usedRangeFileInfo.getLastRow().getRowIndex();
    // Get data range of File Info
    const companyRange = sheetFileInfo.getRange(`A2:A${lastRowFileInfo + 1}`).getValues();
    const openingDateRange = sheetFileInfo.getRange(`B2:B${lastRowFileInfo + 1}`).getValues();
    const closingRange = sheetFileInfo.getRange(`C2:C${lastRowFileInfo + 1}`).getValues();
    const basicCurrencyRange = sheetFileInfo.getRange(`D2:D${lastRowFileInfo + 1}`).getValues();
    // iteration on each row of the columns.
    let companyValue = companyRange[0][0];
    let openingDateValue = openingDateRange[0][0];
    let closureDateValue = closingRange[0][0];
    let basisCurrencyValue = basicCurrencyRange[0][0];
    jsonData.data[0].document.dataUnits[0].data.rowLists[0].rows.push({
        "fields": {
            "SectionXml": "AccountingDataBase",
            "IdXml": "Company",
            "ValueXml": companyValue.toString()
        },
        "operation": {
            "name": "modify"
        }
    });
    jsonData.data[0].document.dataUnits[0].data.rowLists[0].rows.push({
        "fields": {
            "SectionXml": "AccountingDataBase",
            "IdXml": "OpeningDate",
            "ValueXml": formatDateToYyyyMmDd(openingDateValue)
        },
        "operation": {
            "name": "modify"
        }
    });
    jsonData.data[0].document.dataUnits[0].data.rowLists[0].rows.push({
        "fields": {
            "SectionXml": "AccountingDataBase",
            "IdXml": "ClosureDate",
            "ValueXml": formatDateToYyyyMmDd(closureDateValue)
        },
        "operation": {
            "name": "modify"
        }
    });
    jsonData.data[0].document.dataUnits[0].data.rowLists[0].rows.push({
        "fields": {
            "SectionXml": "AccountingDataBase",
            "IdXml": "BasicCurrency",
            "ValueXml": basisCurrencyValue.toLocaleString()
        },
        "operation": {
            "name": "modify"
        }
    });
    // TRANSACTIONS
    // Get the specific sheet
    const sheetTransactions = workbook.getWorksheet("Transactions");
    // Get the range of cells used in the sheet
    const usedRangeTransactions = sheetTransactions.getUsedRange();
    // Get the last used row of the sheet
    const lastRowTransactions = usedRangeTransactions.getLastRow().getRowIndex();
    // Get data range of Transactions
    const dateRange = sheetTransactions.getRange(`A2:A${lastRowTransactions + 1}`).getValues();
    const descriptionRange = sheetTransactions.getRange(`B2:B${lastRowTransactions + 1}`).getValues();
    const accountDebitRange = sheetTransactions.getRange(`C2:C${lastRowTransactions + 1}`).getValues();
    const accountCreditRange = sheetTransactions.getRange(`D2:D${lastRowTransactions + 1}`).getValues();
    const amountRange = sheetTransactions.getRange(`E2:E${lastRowTransactions + 1}`).getValues();
    //Iteration on each row of the columns.
    for (let i = 0; i < dateRange.length; i++) {
        let dateValue = dateRange[i][0]; // Value of column A (Date)
        let descriptionValue = descriptionRange[i][0]; // Value of column B (Description)
        let accountDebitValue = accountDebitRange[i][0]; // Value of column C (AccountDebit)
        let accountCreditValue = accountCreditRange[i][0]; // Value of column D (AccountCredit)
        let amountValue = amountRange[i][0]; // Value of column E (Amount)
        // adds "fields" object to "rows"
        jsonData.data[0].document.dataUnits[1].data.rowLists[0].rows.push({
            "fields": {
                "Date": formatDateToYyyyMmDd(dateValue),
                "Description": descriptionValue.toString(),
                "AccountDebit": accountDebitValue.toString(),
                "AccountCredit": accountCreditValue.toString(),
                "Amount": amountValue.toString()
            },
            "operation": {
                "name": "add"
            }
        });
    }
    //BUDGET
    // Get the specific sheet
    const sheetBudget = workbook.getWorksheet("Budget");
    // Get the range of cells used in the sheet
    const usedRangeBudget = sheetBudget.getUsedRange();
    // Get the last used row of the sheet
    const lastRowBudget = usedRangeBudget.getLastRow().getRowIndex();
    // Get data range of BUDGET
    const dateRangeBudget = sheetBudget.getRange(`A2:A${lastRowBudget + 1}`).getValues();
    const descriptionRangeBudget = sheetBudget.getRange(`B2:B${lastRowBudget + 1}`).getValues();
    const accountDebitRangeBudget = sheetBudget.getRange(`C2:C${lastRowBudget + 1}`).getValues();
    const accountCreditRangeBudget = sheetBudget.getRange(`D2:D${lastRowBudget + 1}`).getValues();
    const amountRangeBudget = sheetBudget.getRange(`E2:E${lastRowBudget + 1}`).getValues();
    // iteration on each row of the columns.
    for (let i = 0; i < dateRangeBudget.length; i++) {
        let dateValueBudget = dateRangeBudget[i][0]; // Value of column A (Date)
        let descriptionValueBudget = descriptionRangeBudget[i][0]; // Value of column B (Description)
        let accountDebitValueBudget = accountDebitRangeBudget[i][0]; // Value of column C (AccountDebit)
        let accountCreditValueBudget = accountCreditRangeBudget[i][0]; // Value of column D (AccountCredit)
        let amountValueBuget = amountRangeBudget[i][0]; // Value of column E (Amount)
        jsonData.data[0].document.dataUnits[2].data.rowLists[0].rows.push({
            "fields": {
                "Date": formatDateToYyyyMmDd(dateValueBudget),
                "Description": descriptionValueBudget.toString(),
                "AccountDebit": accountDebitValueBudget.toString(),
                "AccountCredit": accountCreditValueBudget.toString(),
                "Amount": amountValueBuget.toString()
            },
            "operation": {
                "name": "add"
            }
        });
    }
    // ACCOUNTS
    // Get the specific sheet
    const sheetAccount = workbook.getWorksheet("Accounts");
    // Get the range of cells used in the sheet
    const usedRangeAccounts = sheetAccount.getUsedRange();
    // Get the last used row of the sheet
    const lastRowAccounts = usedRangeAccounts.getLastRow().getRowIndex();
    // Get data range of ACCOUNTS
    const sectionRange = sheetAccount.getRange(`A2:A${lastRowAccounts + 1}`).getValues();
    const groupRange = sheetAccount.getRange(`B2:B${lastRowAccounts + 1}`).getValues();
    const accountRange = sheetAccount.getRange(`C2:C${lastRowAccounts + 1}`).getValues();
    const descRange = sheetAccount.getRange(`D2:D${lastRowAccounts + 1}`).getValues();
    const bclassRange = sheetAccount.getRange(`E2:E${lastRowAccounts + 1}`).getValues();
    const sumInRange = sheetAccount.getRange(`F2:F${lastRowAccounts + 1}`).getValues();
    const grRange = sheetAccount.getRange(`G2:G${lastRowAccounts + 1}`).getValues();
    // Iteration on each row of the columns.
    for (let i = 0; i < accountRange.length; i++) {
        let sectionValue = sectionRange[i][0]; // Value of column A (section)
        let groupValue = groupRange[i][0]; // Value of column B (Group)
        let accountValue = accountRange[i][0]; // Value of column C (Account)
        let descValue = descRange[i][0]; // Value of column D (Description)
        let bclassValue = bclassRange[i][0]; // Value of column E (BClass)
        let sumInValue = sumInRange[i][0]; // Value of column F (Sum In)
        let gr1Value = grRange[i][0]; // Value of column G (Gr1)
        // adds "fields" object to "rows"
        jsonData.data[0].document.dataUnits[3].data.rowLists[0].rows.push({
            "fields": {
                "Section": sectionValue.toString(),
                "Group": groupValue.toString(),
                "Account": accountValue.toString(),
                "Description": descValue.toString(),
                "BClass": bclassValue.toString(),
                "Gr": sumInValue.toString(),
                "Gr1": gr1Value.toString()
            },
            "operation": {
                "name": "add"
            }
        });
    }

    let jsonString = JSON.stringify(jsonData);
    createAc2(JSON.parse(jsonString));

}
async function createAc2(jsonData: JSON) {
    // Web server url
    let _LOCALHOST = "http://localhost:8081"; //for macOS use "https://127.0.0.1:8089";
    // Replace with your Webserver password
    let _PASSWORD = "My_Password";
    // Request to Banana web server
    let url = _LOCALHOST + "/v2/doc?show&acstkn=" + _PASSWORD;
    // Accounting type parameters
    let fileTypeGroup = 100; // Double entry accounting
    let fileTypeNumber = 100; // without VAT
    let fileDecimals = 2;
    try {
        // Body of the request
        const httpBody = {
            fileType: {
                accountingType: {
                    docGroup: fileTypeGroup,
                    docApp: fileTypeNumber,
                    decimals: fileDecimals
                }
            },
            data: jsonData,
        }
        const response = await fetch(url, {
            method: 'POST',
            headers: {
                'Content-Type': 'application/json'
            },
            body: JSON.stringify(httpBody)
        });
    } catch (error) {
        console.log(error);
    }
}
// Convert Date type of Excel in yyyy-mm-dd string format
function formatDateToYyyyMmDd(date: number | string | number | boolean): string {
    if(typeof date == 'number'){
        let dateString = new Date(Math.round((date - 25569) * 86400 * 1000)).toISOString().split("T")[0];
        return dateString;
    }

}
Results in Banana Accounting Plus
If you don't see the Budget data, use the command with the Shift + F9 keys (Windows and Mac) or Cmd + 9 (Mac) for recalcute the data in Banana Accounting.
Output of accounts base
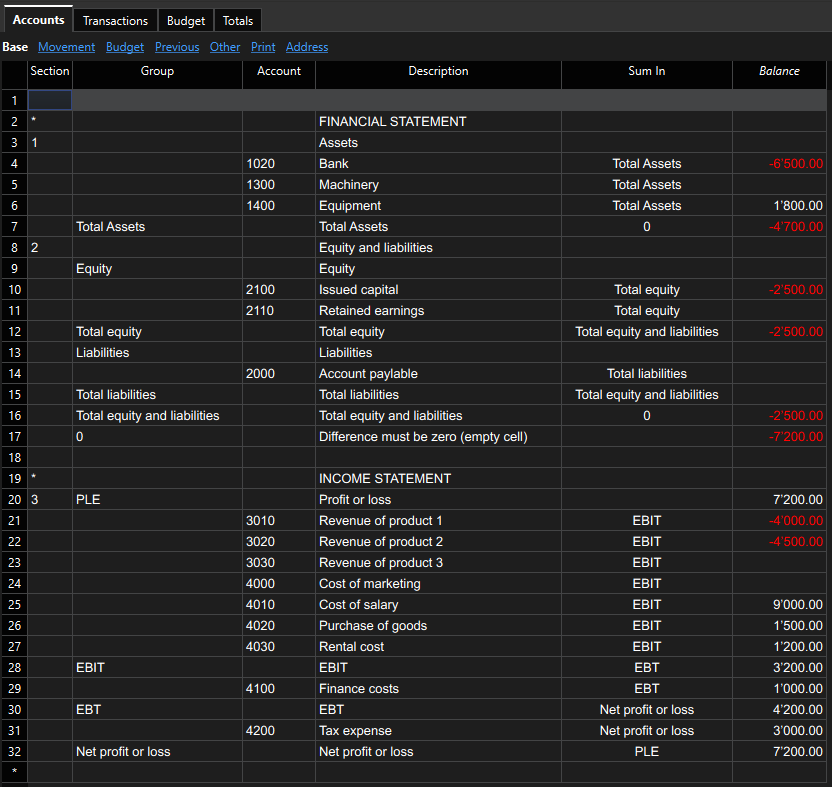
Output of accounts of budgeting
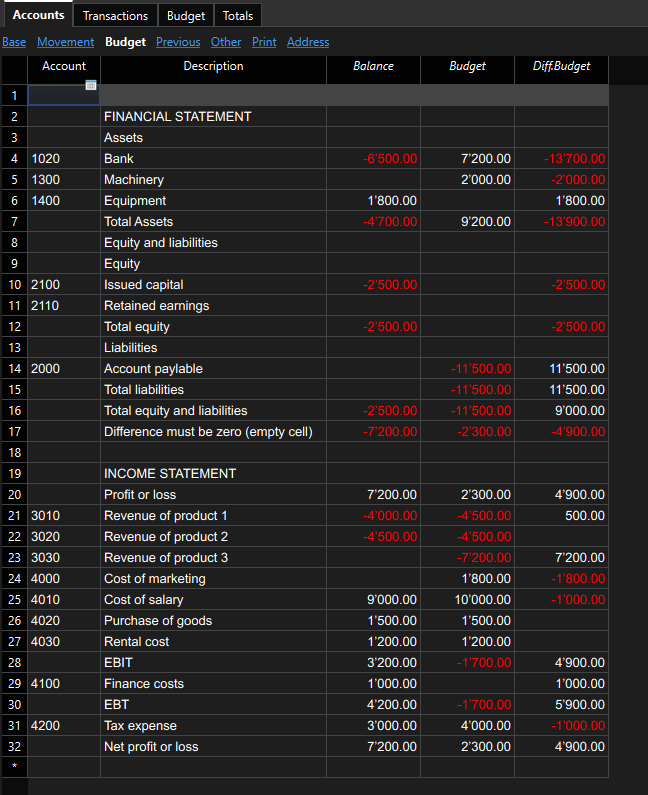
Output of transactions of budgeting
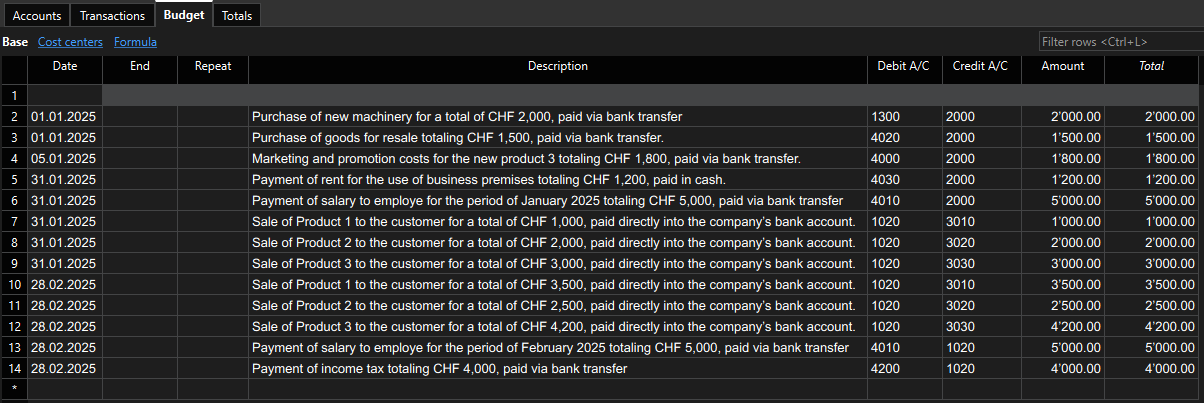
Output of transactions
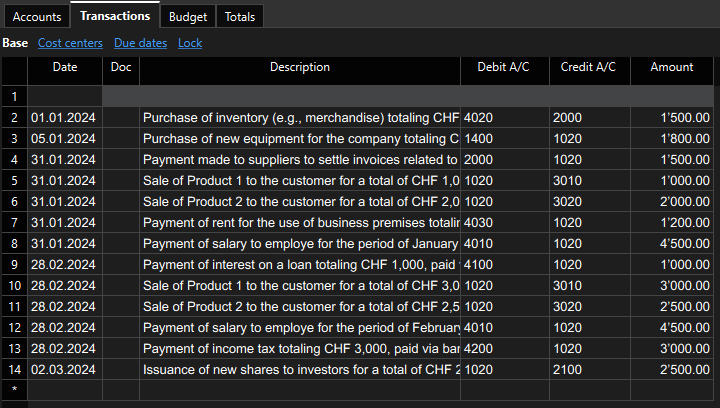
Create a report Financial statement and Income statement
- When you pass all the data in Banana Accounting Plus, you can print the report in base of your configuration in the table Accounts.
- You can use a Enhanced Balance Sheet with groups report for printing, which integrates transaction and budget data as described in this image.
Procedure to create a report with Enhanced Balance Sheet with Groups
- Open the file that you have created.
- menu Reports → Enhanced balance sheet with groups → select Columns → in the section Balance sheet and Profit and loss statement → select Current and Budget → click Ok.
- You can see a tutorial of how to create and customize the Balance Sheet and Profit & Loss Statement.
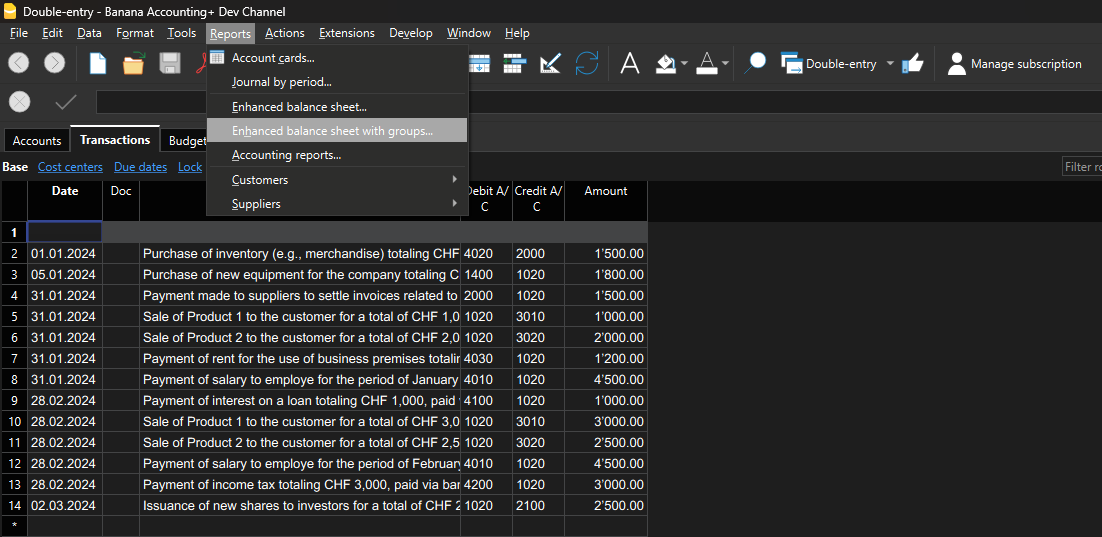
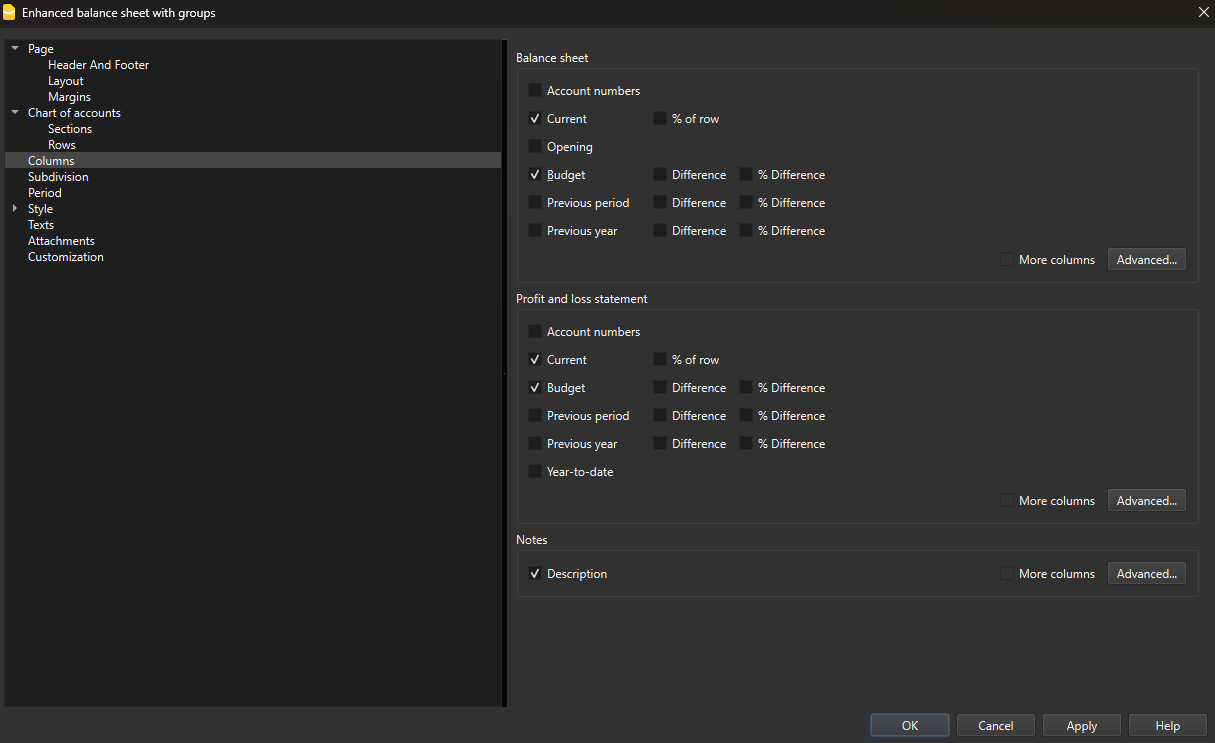
Report of Financial statement
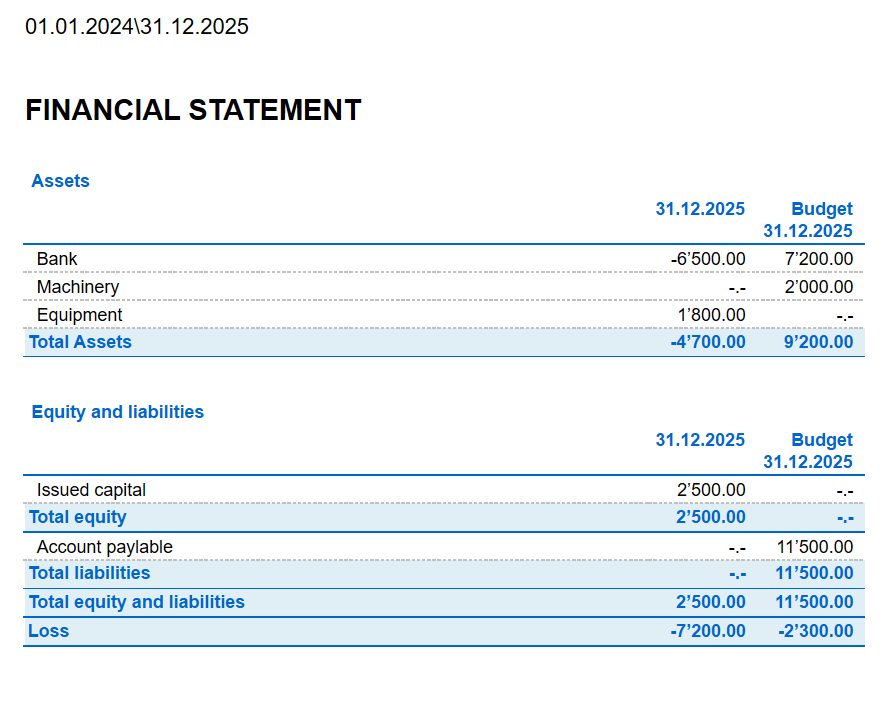
Report of Income statement
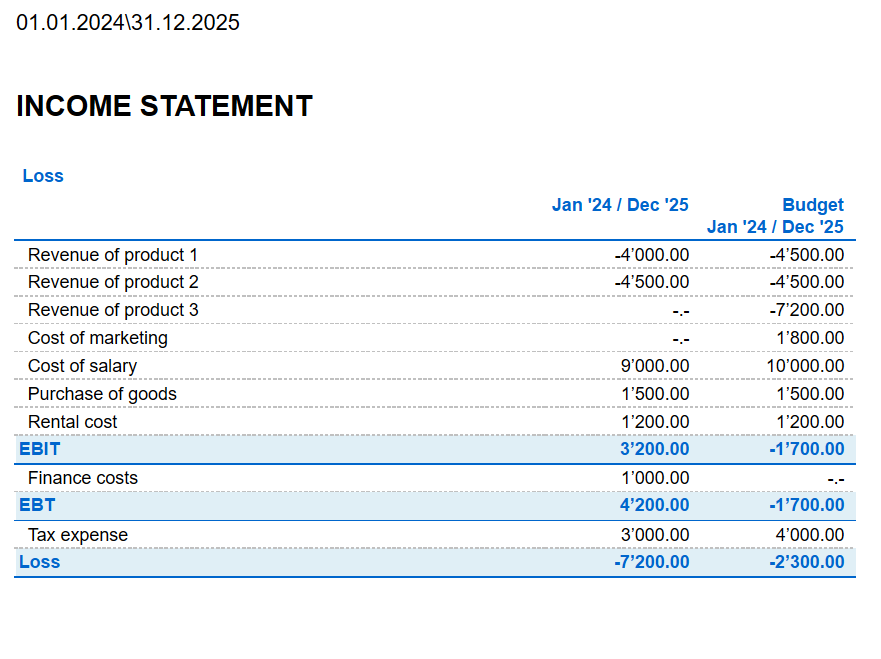
Excelfunktionen VBA (veraltet)
Benutzerdefinierte Excelfunktionen erlauben, auf einfachste Weise in Echtzeit Werte aus Banana Buchhaltung zu übernehmen.
Sie aktualisieren Ihre Buchhaltung und auch die Daten Ihrer Exceldatei werden sofort aktualisiert. Auf dem Mac funktioniert das leider nicht.
Die aktuellsten technischen Informationen finden Sie auf der Seite in englischer Sprache.
Beispiel Kosten geteilt pro Kunde
Mit der Funktion ExcelSync werden Formeln verwendet, welche die aktualisierten Salden direkt aus Banana Buchhaltung übernehmen.
Die Excel-Tabelle wird gemäss den letzten, in die Buchhaltung eingegebenen Daten, aktualisiert.
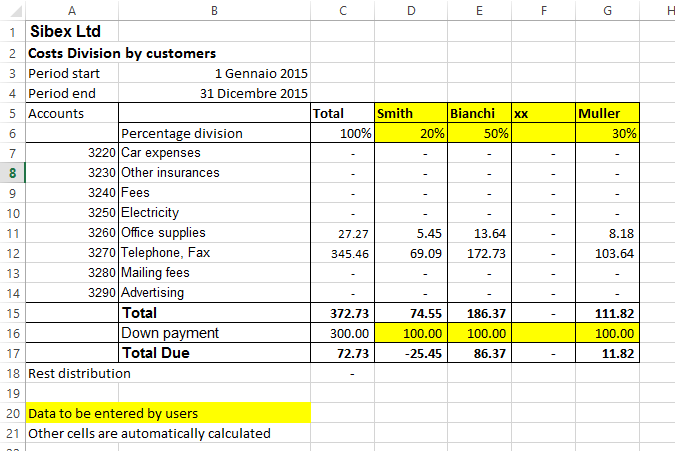
Benutzerdefinierte Excelfunktionen
Benutzerdefinierte Funktionen (UDF - user-defined functions) sind kleine Visual-Basic-Programme (oder Makros) die Excel erweitern und ermöglichen, in den Zellen Formeln einzufügen.
- Für die Verwendung von UDF brauchen Sie eine Excel-Datei mit der Erweiterung *.xlsm.
- Die UDF von Banana werden gemäss der Apache-Lizenz bereitgestellt (Open-Source-Software - siehe: /www.apache.org/licenses/LICENSE-2.0)
- Entwicklung und aktuellste Version der Funktion sind unter github.com/BananaAccounting/General/ verfügbar.
- Die UDF benutzen den Banana-Webserver.
Dank den benutzerdefinierten Funktionen (UDF) werden Sie in Excel Formeln schreiben und bestimmte Daten direkt aus Banana Buchhaltung übernehmen können.
- Es ist nicht mehr nötig, Daten in Excel zu übertragen (oder zu importieren, zu kopieren und einzufügen).
- Wird die Buchhaltung geändert, wird das Excel-Spreadsheet mit den neuen Werten gefüllt.
- Benutzerfreundliche Formeln, mit denen Sie Werte pro Periode berechnen und leistungsstarke Tabellen zur Auswertung, Präsentation von Daten oder Erstellung von Diagrammen erstellen können.
Beispiel ansehen
- Excel-Spreadsheet mit Beispielsdateien herunterladen.
- Inhalt entpacken.
- Banana Buchhaltung starten.
- Das erste Mal Webserver aktivieren.
(über Menü Werkzeuge → Basiseinstellungen → Option Webserver starten aktivieren. - Banana-Dateien company_2014.ac2 und company_2015.ac2 öffnen.
- Datei BananaSync.xlsm öffnen und das Makro aktivieren.
Falls das Makro automatisch von Excel deaktiviert wird, müssen Sie Ihre Makro-Sicherheitseinstellungen ändern.
Befolgen Sie gegebenenfalls die Anweisungen Registerkarte Entwicklertools im Menüband anzeigen - Berechnen Sie das Excel-Blatt mit dem Makro "Recalculate" (Strg+R) neu.
So erstellen Sie Ihr eigenes Arbeitsblatt
- Speichern Sie die Datei BananaSync.xlsm mit einem anderen Namen.
- Öffnen Sie Ihre Banana Buchhaltungsdateien
- In der Exceldatei ersetzen Sie den Namen (Zellen in Gelb) mit dem Namen Ihrer Buchhaltungsdatei.
- Ändern Sie das Arbeitsblatt nach Ihren Bedürfnissen.
- Mit der Schaltfläche Recalculate oder der Tastenkombination Ctrl+R berechnen Sie die Daten neu.
Funktionen anwenden
Parameter Dateiname
Wird Banana oder der Banana-Webserver nicht ausgeführt, braucht Excel etwas Zeit, um auf den HTTP-Request zu antworten.
Um dieses Problem zu umgehen:
- Die meisten Funktionen benutzen den Parameter Dateinamen.
Bei leerem Dateinamen erfolgt keine http-Request. - Anstatt den Dateinamen zu übernehmen, verwenden Sie einen Verweis auf die Zelle, die die Formel =BFileName("myfile.ac2") enthält.
- Wenn Banana nicht geöffnet ist, wird der BFileName in einem Leerstring resultieren, und es wird keine weitere Query gestartet.
Parameter Periode
Viele Funktionen benutzen den fakultativen Parameter Periode. Das kann sein:
- Ein Leerstring. Anfangs- und Enddatum der Buchführung werden benutzt.
- Ein Anfangs- und Enddatum in Form von yyyy-mm-dd/yyyy-mm-dd (z.B. “2015-01-01/2015-01-31”)
Um einen Zeitraum zwischen zwei Exceldaten zu erstellen, verwenden Sie die Funktion BCreatePeriod. - Eine Abkürzung (M1, M2, Q1, Q2, Y1), die Monat, Quartal oder Jahr der Buchführung angibt.
Sie können die Funktion BCreatePeriod verwenden, um eine Periodenkette auf Basis des Datums von zwei Zellen zu erstellen.
Beschreibung der Funktionen
- BAccountDescription(account[, column])
Übernimmt die Beschreibung des genannten Kontos oder der Gruppe.
Mit dem Parameter Column können Sie angeben, dass eine andere Spalte anstelle der Spalte Beschreibung übernommen werden soll.
Beispiele:
=BAccountDescription('1000')
=BAccountDescription('1000', 'Gr1')
=BAccountDescription('Summ.in=10')
=BAccountDescription('1000', 'FiscalNumber') - BAmount(fileName, account, [,period ])
Den auf Basis der BKlasse genormten Betrag abrufen.. - BBalance(fileName account [, period])
Für das angegebene Konto den Saldo per Ende der Periode aufrufen.
Das Ergebnis BBalance ist die Summe von BOpening + BTotal.
Zum Übernehmen der buchhalterischen Daten in den Konten der Bilanz (Aktiva, Passiva).Das Konto kann eine Kontonummer oder eine String mit mehreren Konten sein, getrennt durch das Zeichen "|".
Es können normale Konten, Kostenstellen oder Segmente angeben werden.- Es können auch Wildcards (Platzhalter) und 'Summ.in=' gefolgt von der Buchhaltungsgruppe verwendet werden.
Weitere Informationen finden Sie in der Beschreibung der JavaScript-Funktion für currentBalance (Englisch). - Beispiele:
“1000” “1000|1001” “10*|20*” “Summ.in=10” “Summ.in=10|Summ.in=20” “Summ.in=1*”
".P1" ";C01|,C02",":S1|:S2"
"1000:S1"
- BBalanceGet(fileName, account, cmd, valueName [,period ])
Mit dieser Funktion kann einfach auf alle übrigen von REST API zur Verfügung gestellten Daten wie 'Saldo' und 'Budget'' zugegriffen werden.
Beispiele:
=BAmount( FName, “1000”, “balance”, “currencyamount”)
=BAmount( FName, “1000”, “balance”, “count”)
=BAmount( FName, “1000”, “balance”, “debit”)
=BAmount( FName, “1000”, “budget”, “debit”) - BBudgetAmount(fileName account [, period])
Wie BAmount, verwendet jedoch Saldodaten anstelle von Buchhaltungsdaten - BBudgetBalance(fileName account [, period])
Wie BBalance, verwendet aber Budgetdaten anstelle von Buchhaltungsdaten. - BBudgetInterest(filename, account, interestRate [, period])
Wie BInterest, verwendet jedoch Budgetdaten anstelle von Buchhaltungsdaten - BBudgetOpening(fileName account [, period])
Gleich wie BOpening, verwendet jedoch Budgetdaten anstelle der Buchhaltungsdaten. - BBudgetTotal(fileName account [, period])
Gleich wie BTotal, verwendet jedoch Budgetdaten anstelle der Buchhaltungsdaten. - BCellValue(fileName, table, rowColumn, column)
Übernimmt den Inhalt einer Zelle der Tabelle.
Beispiele:
=BCellValue(FName, “Accounts”, 2, “Description”)
=BCellValue(FName, “Accounts”, “Account=1000”, “Description”)
=BCellValue(FName, “Accounts”, “Group=10”, “Description”) - BCreatePeriod( startDate, endDate)
Nimmt die Daten von zwei Zellen und erstellt eine Periodenstring
=BCreatePeriod(D4, D5) - BDate(isoDate)
Konvertiert Iso-Daten in Excel-Daten. - BFileName(fileName [, disable connection])
Übernimmt den FileName oder ein Leerstring, wenn keine Verbindung zum Webserver besteht oder wenn die Datei nicht korrekt ist.
Wenn der Wert von disableConnection nicht ausgewählt wird, gibt diese Funktion einen Leerstring.
Verwenden Sie die Zellen, die das Ergebnis dieser Funktion enthalten, als Parameter für den Dateinamen, wenn Sie die anderen Funktionen verwenden. Ist Banana nicht offen, wird nur ein Anruf gemacht und Excel wartet nicht für eine lange Zeit. - BFunctionsVersion()
Übernimmt die Version der Funktion im Datumsformat. - BInfo(fileName, sectionXml, idXml)
Informationen betreffend Dateieigenschaften abrufen.
Beispiele:
=BInfo( FName, “Base”, “HeaderLeft”)
=BInfo( FName, “Base”, “DateLastSaved”)
=BInfo( FName, “AccountingDataBase”, “OpeningDate”)
=BInfo( FName, “AccountingDataBase”, “BasicCurrency”) - BInterest(filename, account, interestRate [, period])
Den Zins für dieses Konto für die definierte Zeitspanne berechnen.- das Konto kann ein beliebiges Konto sein, wie in BBalance angegeben
- die Berechnung von interestRate als Prozentsatz
- > 0 Zinsen auf Sollbeträgen berechnen
- < 0 Zinsen auf Habenbeträgen berechnen
- BOpening(filename, account [period])
Saldo für Saldo zu Beginn der Periode für angegebenes Konto abrufen. - BQuery(fileName, query)
Das Ergebnis einer frei definierten Abfrage zurücksenden.
Beispiele:
=BQuery(FName;"startperiod?M1”)
=BQuery(FName;"startperiod?M1”) - BTotal(filename, account [,period])
Übernimmt die Bewegung der Periode.
Sollte verwendet werden, um die Daten für die Erfolgsrechnungskonten (Aufwand und Ertrag) abzurufen. - BVatBalance(filename, vatCode, vatValue [, period])
Übernimmt einen Wert in Bezug auf einen definierten MWST-Code (=Mehrwertsteuerbetrag) (oder mehrere MWST-Codes).
'vatValue' kann 'taxable', 'amount', 'notdeductible' oder 'posted' sein.
Beispiele:
=BVatBalance( FName, “V10”, “taxable”)
=BVatBalance( FName, “V10|V20”, “posted”)
Neu berechnen
Die automatische Neuberechnung aktualisiert die Daten der Buchhaltungsdatei nicht.
Für aktualisierte Daten wählen Sie das Makro RecalculateAll(), welches die Application.CalculateFullRebuild-Methode aufruft.
Die Musterdateien enthalten eine Schaltfläche Recalculate, welche das Makro RecalculateAll aufruft.
Hostname von Banana und Anschluss
Web-Server-Daten werden von 'localhost:8081' abgerufen.
Es kann ein anderer Host angegeben werden, indem ein anderer Wert in die Zelle mit Namen 'BananaHostName' eingegeben wird.
Funktionen ändern oder eigene hinzufügen
Funktionen sind im Visual-Basis-Modul 'Banana' definiert.
Wir können dieses Modul aktualisieren und neue Funktionen hinzufügen.
Eigene Funktionen sind vorzugsweise in Ihrem Modul hinzuzufügen.
Für den Zugriff zu den Funktionen Makro des Visual-Basic aktivieren Sie die Makros.
Um die Funktionen anzuzeigen und zu bearbeiten, muss man die Registerkarte Entwicklertools im Menüband anzeigen.
Historie der Versionen
- 2014-07-24 erste Veröffentlichung
- 2015-02-28 Aktualisierung neue Version mit neuen Funktionen
- 2015-05-12 Aufruf zum Webserver erfordert v1
- 2015-05-12 Entwickung auf GitHub verschoben
- 2015-05-25 Geänderte BAmount-Funktion für die Verwendung von BClass
- 2015-10-04 B Date-Funktion hinzugefügt