Printouts
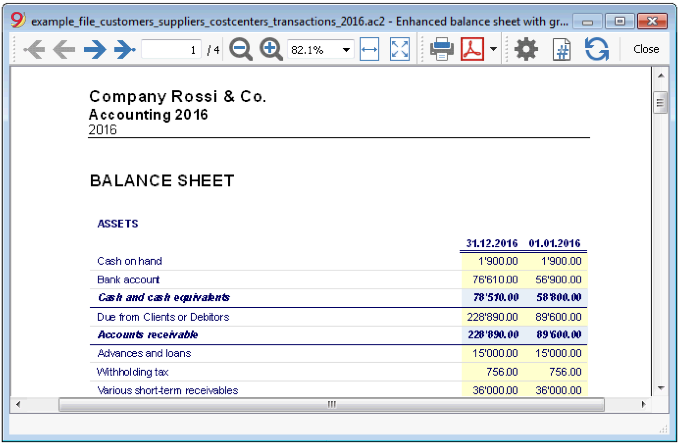
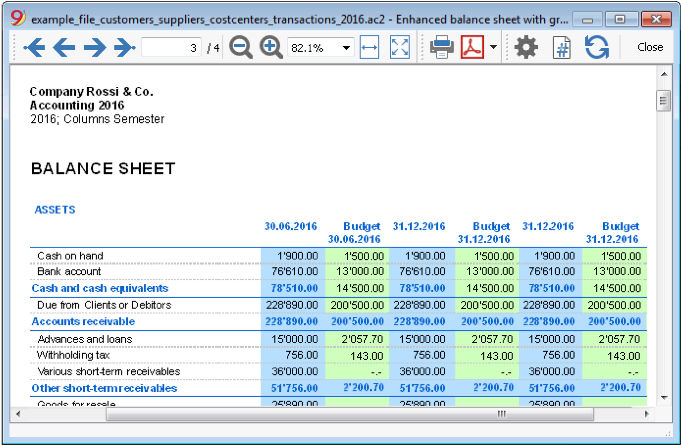
Enhanced Balance sheet with groups - colored columns
This example has been realized with the following features:
- Enhanced Balance sheet with groups
- Columns setup to indicate which columns are to be displayed (in the example the columns of the Current and the Preceding year are being displayed)
- Colors (Column properties) to indicate the color of a column.
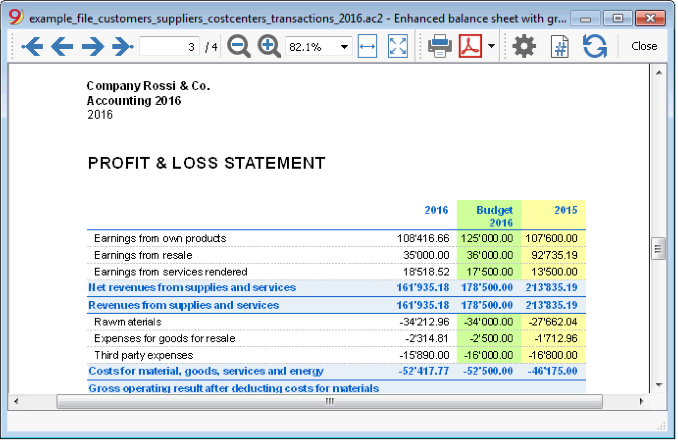
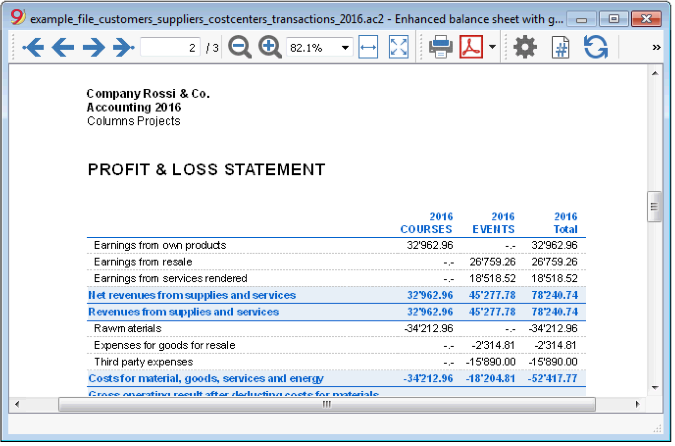
Profit & Loss Statement with budget
This example has been realized with the following features:
- Enhanced Balance sheet with groups
- Columns setup to indicate which columns are to be displayed (in the example the columns of the Current year, the Budget and the Preceding year are being displayed)
- Colors (Column properties) to indicate the color of a column.
Enhanced Balance sheet
This example has been realized with the following features:
- Enhanced Balance sheet- Base tab
- Style setup (for this printout the Berlin style has been chosen)
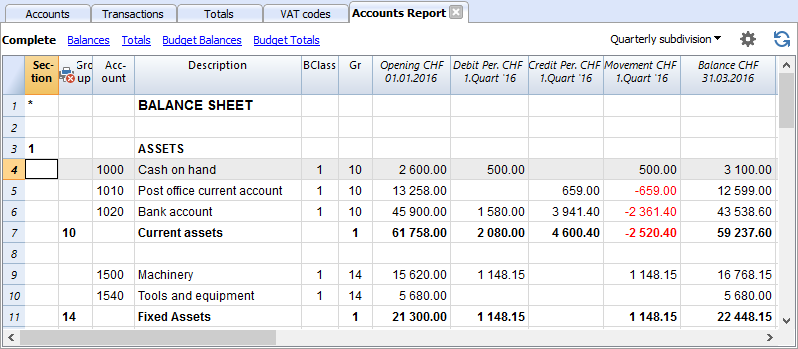
Subdivision by quarter
This example has been realized with the following features:
- Enhanced Balance sheet with groups
- Subdivision -> Subdivision by period in order to set up the subdivsion by period
- Columns setup to indicate which columns are to be displayed
- Colors (Column properties) to assign different colors to the columns.
Subdivision by segment
This example has been realized with the following features:
- Enhanced Balance sheet with groups
- Subdivision -> Subdivision by segment in order to choose the segment level to be displayed.
- Print style
When printing the segments, it is not possible to set up the colors of the columns.
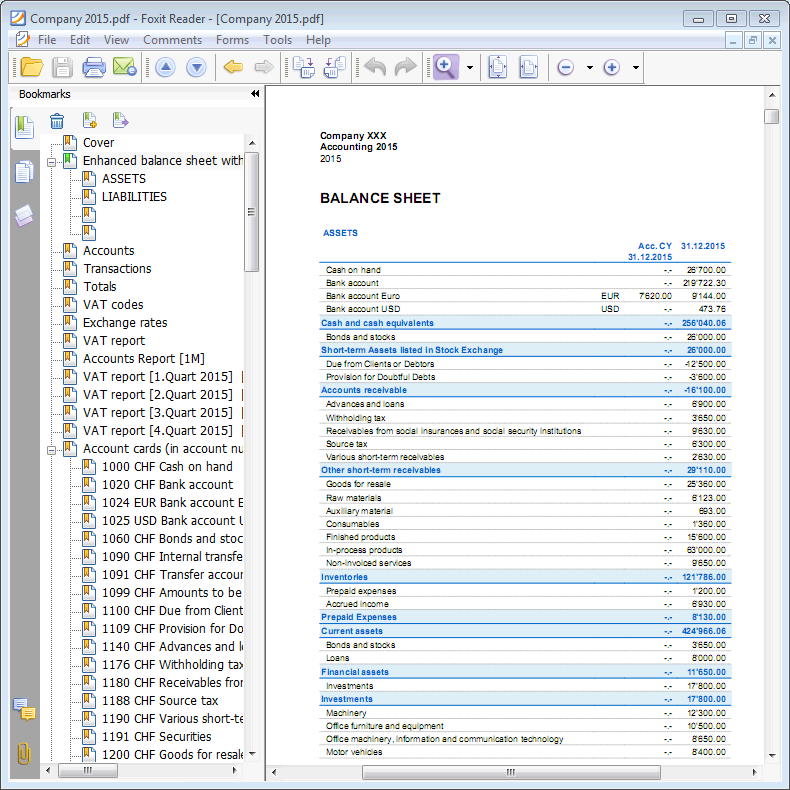
Pdf dossier with all the accounting data
The file is being created with a summary that gives access to the different printouts in an easy way.
The following data can be saved in Pdf
- Balance sheet and Profit & Loss statement
- Accounts table, Transactions, VAT Codes, Totals
- VAT reports
- Account cards
If you save this file on a non-rewritable CD (to keep together with your accounting documents), this satisfies the legal requirements for archiving the accounting data.
This example has been realized with the following features:
File menu, Create Pdf dossier command

Printing an extra column
In order to print, in the Balance sheet, an extra column, the following features have been used:
- Columns setup, Data menu, in order to display or add a new column in the Accounts table
- Enhanced Balance sheet with groups
- Columns - advanced, to make the column visible.
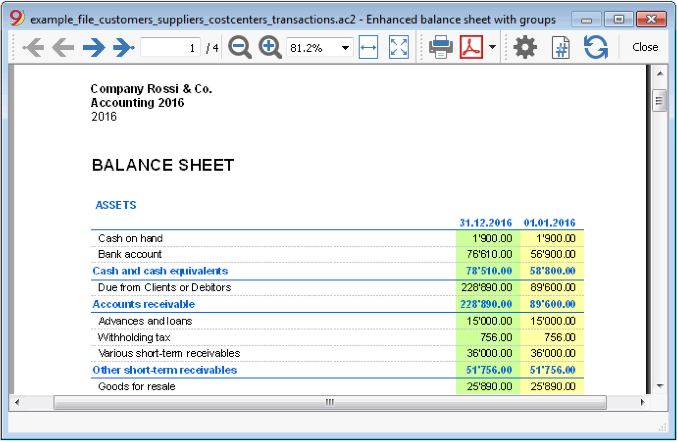
Enhanced Balance Sheet
- The Balance Sheet represents all the Assets, Liabilities, Expenses and Income in a specific moment. The difference between Assets and Liabilities gives the personal capital.
- The grouping of the accounts is done according to the contents of the BClass column.
- The Enhanced Balance Sheet, shown in the preview, can be saved in different formats (PDF, HTML, MS Excel) and can be copied in the clipboard.
- In order to calculate, display and print it at the end of year or the end of a period, activate the Enhanced balance sheet command from the Account1 menu.
- Transactions without date are being considered as opening transactions and will not appear in the printouts of the Profit & Loss Statement.
Including a logo in the Enhanced Balance Sheet
From the Banana version 9.0.3 it is possible to include a logo and to define its settings (width, height, position) from the File meu > Logo setup command. It is also possible to create and save Compositions with different logo settings.
This feature is a simpler alternative to the logo setting with the Documents Table.
From the following window several printing options can be activated, appears.
See also Print Examples.
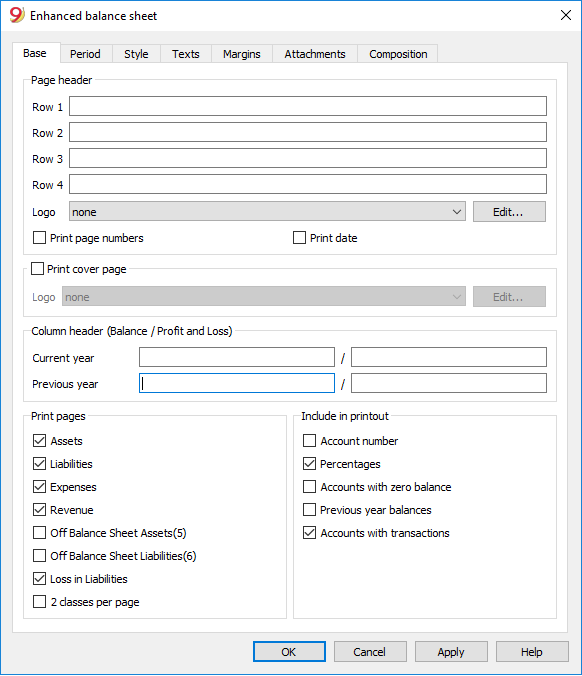
Page header
Rows 1 thru 4
In this field, enter texts to use as headers when printing.
Print cover page / Print date / Print page numbers
The activated options will be shown in the print-out.
Column header (Balance / Profit and Loss)
The first two vertical fields refer to the Balance Sheet, the two second ones refer to the Profit and Loss Statement.
Current year
Insert the final date of the current accounting.
Previous year
In this field, enter the final date of the previous year's accounting.
Print pages / Include in printout
By selecting the appropriate cells, it is possible to choose the options that should be activated in the printouts.
Other tabs
The explanations for the other tabs are available at the following pages:
Results
Enhanced Balance Sheet with groups
The Balance sheet with groups differs from the Balance sheet for the following characteristics:
- Includes also subgroups in the printout, as in the chart of accounts (and not only groups).
- Offers the possibility to exclude groups or accounts (for instance, to display only the total of the group and not the accounts of which the total is composed).
- In the Chart of accounts - Sections it is possible to select which accounts to include or leave out in the printouts
- It is possible to choose, for a given period, what kind of subdivision you want (for example in the first semester, you can choose wether to obtain the data by month or by quarter)
- It is possible to have a subdivision by segment
- ... and much more!
In order to calculate, display and print the Enhanced Balance sheet by groups, click on the Enhanced balance sheet with groups command from the Account1 menu; a window appears, with different sections that allow the user to define the print setup.
See also Print Examples.
FAQ
- If I exclude the groups with a zero balance, the title rows that refer to the excluded groups are still being displayed; how can I erase them?
Go to Sections and activate Hide current row on the title rows that you wish to exclude. - I would like to exclude the display of the period in the titles of the printouts ("1st Semester 2013"); how can i do it?
Go to the Headers section and deactivate the Print period option. - On the cover page, when there are long titles, I would like to be able to choose how to subdivide the texts on two rows and whether I wish to apply bold print. Is it possible?
It is impossible to change the fonts on the cover page. - Some amounts are not included in the indicated period. Why?
Transactions without a date are being counted as openings and do not appear in the printouts of the Profit & Loss statement. Be sure to enter the date into all the transactions. - The Total groups that contain all the accounts of the classes 3 and 4 are being renamed with the text Profit or Loss, depending on the result of the accounting period. Can I change that?
Go to the Sections and overwrite the original text in the Alternate text zone of the active row. - In case the Show previous year option is being activated, and in the previous year file there are groups that are no longer present in the current year, the program will give error messages. Can I do something about it?
In order to print the Balance sheet with data of the previous and the current year, the groups of the previous year have to also be present in the current year.
Headers
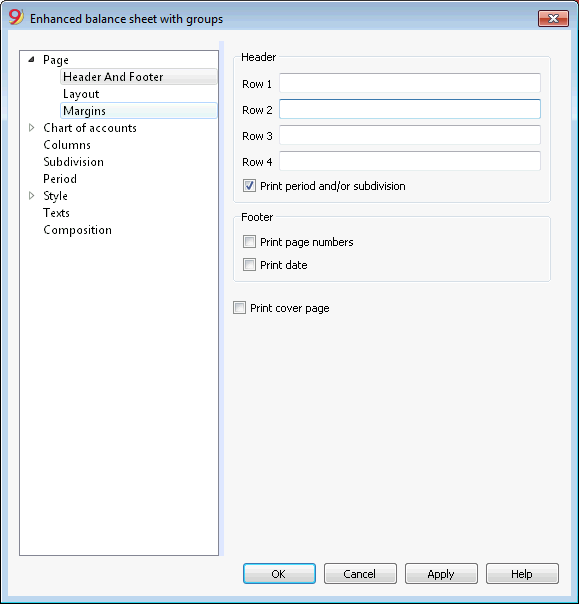
Header 1, Header 2, Header 3, Header 4
Enter as headers the text you wish appearing in the printouts. They will be on the cover page and on each page headings.
Print period and/or subdivision
This option is active only when a specific period has been defined. When you deactivate this option, the period will not be indicated in the titles of the printouts.
Footer
Print page numbers
By activating this function, page numbers will be printed.
Print date
By activating this function the date will be printed.
Print cover page
By activating this function the cover page will be printed.
Layout
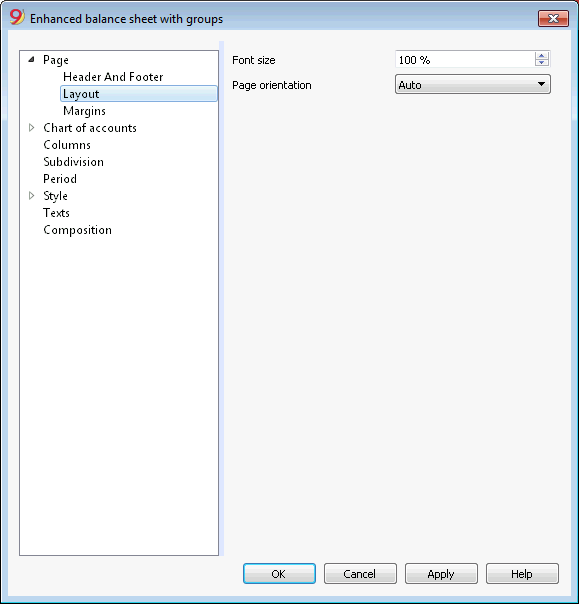
Zoom
The printout layout will change according to the entered value.
Page orientation
You can select the page orientation: automatic, landscape and portrait.
Logo
From the Banana version 9.0.3 it is possible to include a logo and to define its settings (width, height, position) from the File meu > Logo setup command. It is also possible to create and save Compositions with different logo settings.
This feature is a simpler alternative to the logo setting with the Documents Table.
When you print the Balance sheet with groups - Account1 menu -> Balance sheet with groups command, Header and footer tab -> Header, as Logo you can select your own image (with the Edit button), instead of the none option.
![]()
Margins
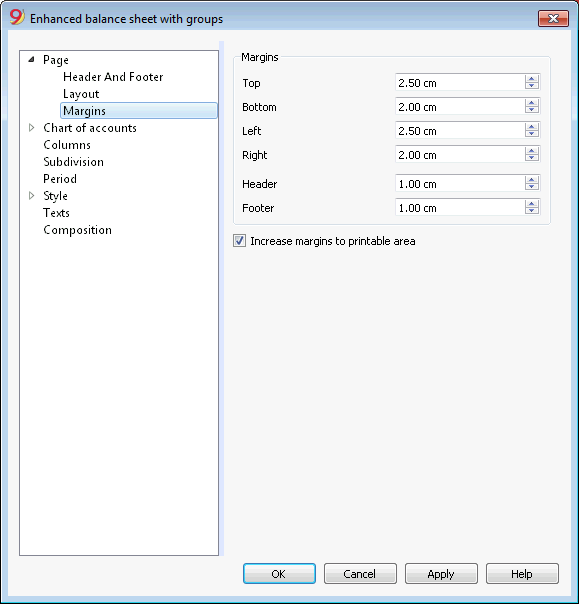
Top, Bottom, Left, Right
It's the distance between the page border and the content.
Header
It's the distance between the page header and the content.
Footer
It's the distance between the page footer and the content.
Increase margins to printable area
If the content exceeds the page margins it will be automatically adjusted to fit the printable area.
Sections
This section can vary depending on the settings of the Section column of the accounting plan - See the related document: Sections in the accounting plan
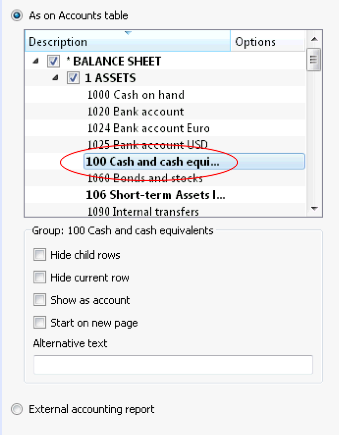
As on Accounts table
The display and the printout settings of the Enhanced Balance Sheet with groups, are the same as in the Accounts table.
Depending on the selection, there are different sections with different options:
- sections 1, 2, 3, 4, 01, 02, 03, 04... refer to the main items of the Balance Sheet
- account sections refer to the selected account
- group sections refer to the selected group
Section*
If you select a section with an asterisk, you will have the following options:
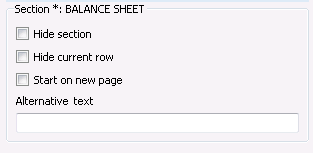
Hide section
Click on the section that you wish to hide.
Hide current row
Click on the row that you wish to hide.
Start on new page
Click on the header that you want to have on a new page and activate the option.
Alternative text
Enter an alternative text if you want to have a different one for the selected section or row.
If you select a number or a group section (1, 2, 3, 4.....), there are extra options:
Group for % calculation (%)
This option is visible when selecting a section (Assets, Liabilities, ...). It is possible to indicate which group the % calculation should be based on.
Hide child rows
If you select a group and you activate this function, child rows of this group won't be printed in the Enhanced Balance Sheet.
Show as account
If you select a group and you activate this function, the group will be displayed as an account in the Balance sheet.
External accounting report
Print the Enhanced Balance Sheet by groups, based on the structure of the Accounting report file.
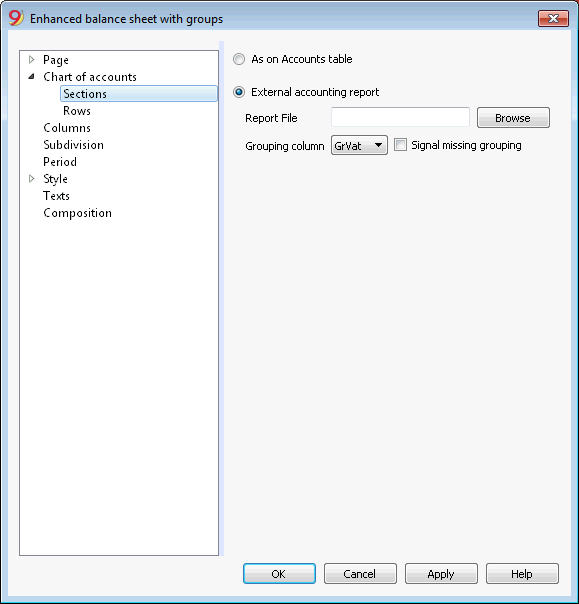
Report File
You can select the file of the External Accounting report with the Browse button.
Grouping column
Column in which the accounts refer to the groups defined in the External Accounting report. Available columns: Gr1, Gr2, Gr, BClasse and GrVat.
Signal missing grouping
Checks whether all accounts belong to a group in the External Accounting report.
Rows
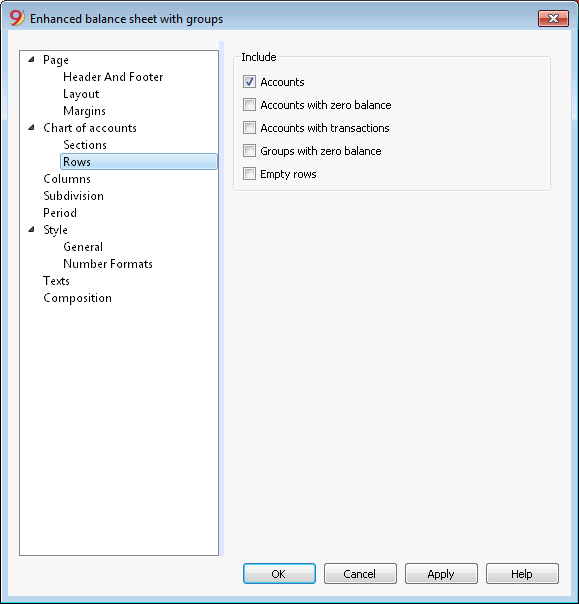
Accounts, accounts with zero balance, accounts with transactions, groups with zero balance, empty rows.
By activating the different options, you can include them in the printouts.
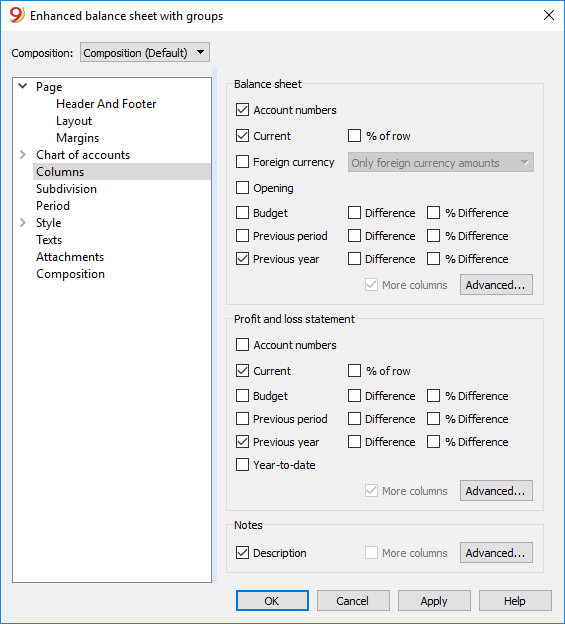
Columns
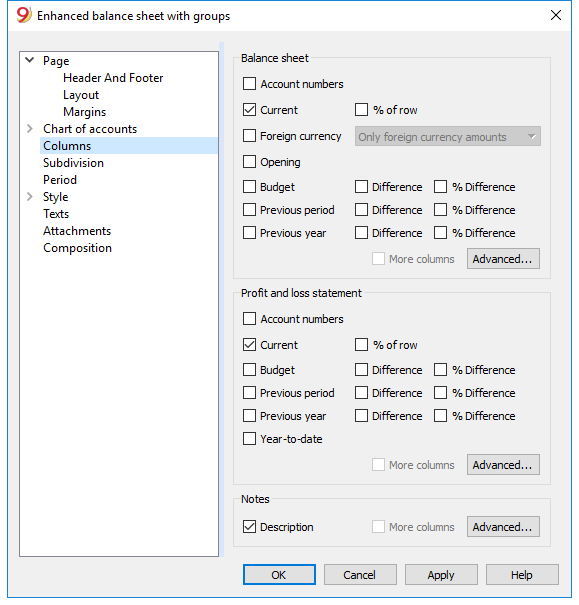
Balance Sheet, Profit & Loss Statement and Notes
You can choose the options you wish to include in the Balance Sheet, in the Profit and Loss Statement and in the Notes:
- Account number
- Current: the balance or movement in basic currency referred to the selected period or period subdivision
- Foreign currency: the balance in the account currency referred to the selected period or period subdivision
- % of row: includes the column with the percentage referring to the total (for example, % total Assets)
- Opening: opening balance at the beginning of the period
- Budget: budget amount referred to the selected period or period subdivision
- Previous period: the amount of the period previous to the selected period or period subdivision
- Previous year: the amount of the same period in the previous year
- Difference: the difference between the amounts of the current period and the other column (Budget, Previous period, Previous year)
- % Difference: is the difference, expressed in percentage, between the current period and the other column (Budget, Previous period, Previous year)
- Year-to-date: the balance or movement from the beginning of the accounting until the date of the last transaction.
Headers editing, color or display change of the columns
Each section has the Advanced button from where it is possible to change the column's settings and options.
Columns (Advanced)
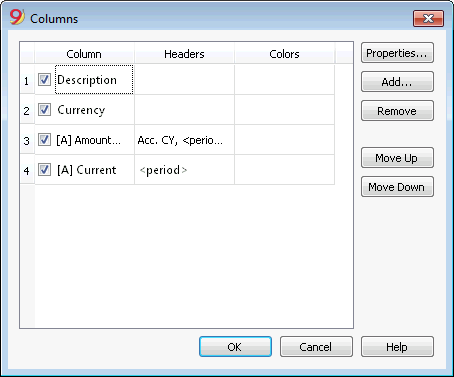
By pressing the Advanced button, it is possible to change the column's header:
- in order to make the column visible in the printout, check che corresponding checkbox
- in order to change the sequence of the columns, drag up or down the name of the column you wish to move, or use the Move Up and Move Down buttons
- In order to add new columns to be shown in the report (choosing them from a list) use the Add button
- In order to remove some columns from the list, use the Remove button
- In order to edit the display properties of a column (colors, headers, etc.) use the Properties button
Columns - add
In the Balance sheet, Profit and Loss Statement and in the Notes, it is possible to add new columns (from the ones included in the list), or to delete the undesired ones. Starting from the Account1 menu -> Enhanced Balance sheet with groups -> Columns -> Advanced button -> Add button.
If one or more options are being activated, the program includes:
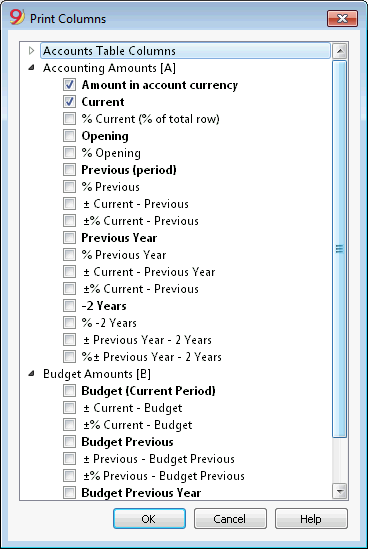
Accounts Table Columns
If you click on the header a list of all the columns of the Accounts Table will be shown:
You can then inlcude in the printout any column existing in the Accounts Table
Accounting amounts
These are the columns with the amounts calculated by the program, the opening balances and the entered transactions, for the indicated period or for the subdivision period
Amount in the Account currency
The account balances in foreign currencies will also be displayed.
Current
The balances of the current year will be displayed.
Opening
The Opening balances will be displayed.
Previous (period)
The balances of the previous period are being displayed (month, quarter, semester, etc).
Previous Year
The balances of the previous year are being displayed.
YTD (Year To Date)
This column is only available in the Profit & Loss Statement. The balances from the beginning of the year until the last transaction date are being displayed.
Budget amounts
See also Budget information. These are the columns with the amounts calculated by the program based on the budget amounts entered in the Accounts Table or in the Budget Table. If you created the Budget table and if some rows have been entered, the program will use the data of this table for its calculation, even if there are values in the Budget column of the Accounts Table.
Budget (Current period)
The amounts related to the foreseen budget of the current period are being displayed.
Budget Previous
The amounts related to the foreseen budget of the previous period are being displayed.
Budget Previous Year
The amounts related to the foreseen budget of the previous year are being displayed.
Notes on calculation period
The program cannot calculate amounts for periods overlapping between several accounting years or years with initial and final accounting dates that do not match.
Headers and options (Columns properties)
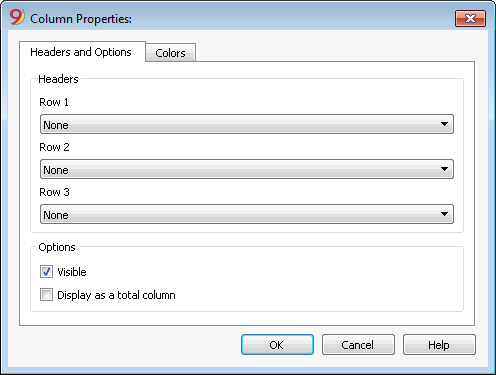
Headers
Row 1/ Row 2 / Row 3
It is possible to change the columns headers by selecting the Text option (from the drop down menu) and by entering the new header. If you select the Column option, the column name of the selected column will be shown.
Options
Visible
If this cell is activated, the column header will be shown.
Display as a total column
If activated, this option only shows the amounts in the Totals column.
Colors (Columns properties)

You can access this window by pressing on the Properties button, Colors tab (from the Enhanced balance sheet by groups command - Columns, from the Account1 menu)
Change
With this button you can change the text or the background color
Default color
With this button you can restore the default color for the text or the background.
Subdivision
From the Account1 menu choose the Enhanced Balance Sheet with groups command and select the Subdivision tab.
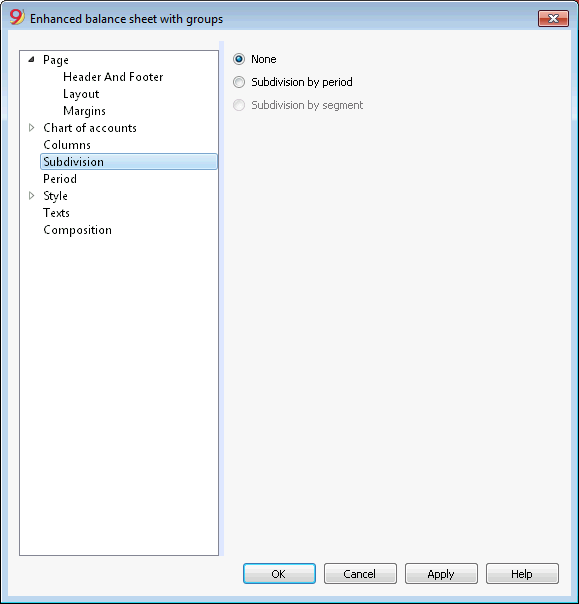
None
The whole period is shown.
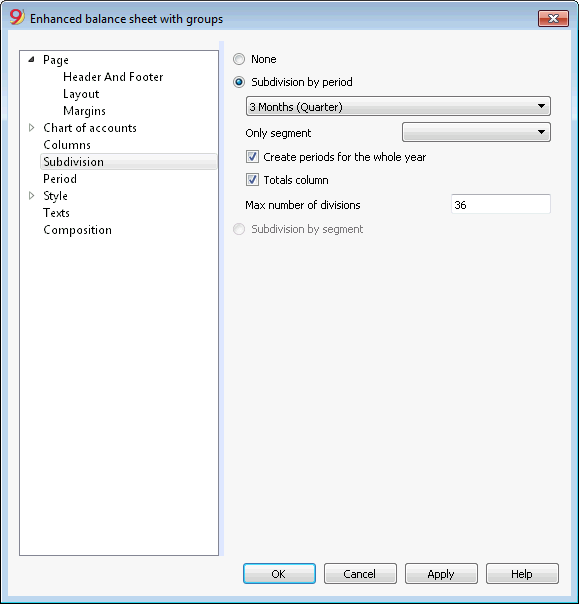
Subdivision by period
This function makes it possible to display the dates of the selected period per day, month, bi-monthly, per quarter, per 4 months, per semester or per year. The selected period will be shown in the column headers.
Only segment
Only the data related to the selected segment are being shown.
Create periods for the whole year
When the accounting period is not the same as the solar year, but when the user still wants to see all months, this function needs to be activated.
Totals column
This function creates a Totals column for the selected periods in the Profit / Loss Statement and in the Totals view of the Accounting reports command (Account1 menu).
Max number of divisions
The default maximum number of periods is 36. In particular cases, if the user would want to obtain special and very detailed statistics over a long time span, this value can be changed manually. A very high maximum number of periods can slow down the program.
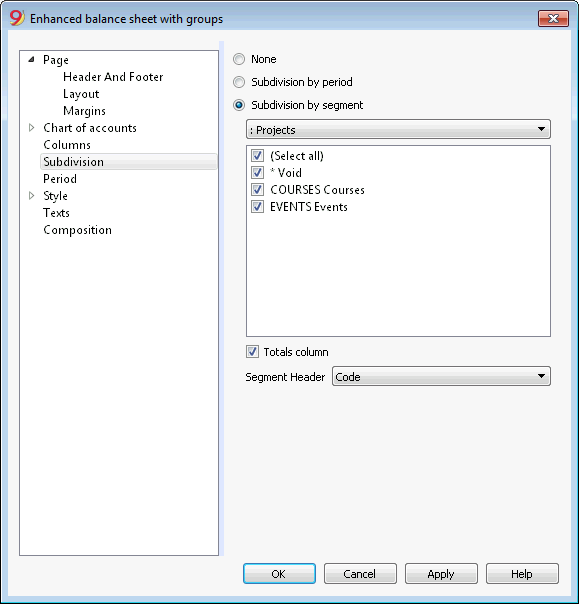
Subdivision by segment
The data related to the selected segment are being shown. This option is only available if segments have been set.
- Select all - all options will are selected
- Void - only the amount not assigned to any segment is shown
- Segments subdivision - Each subdivision will have the header given in the accounting plan. The data of the selected subdivision are shown.
Totals column
When this option is being activated, the totals for the selected segment will be obtained.
Segment header
You can choose the text to be displayed as column header for the segments.
Period
Explanations on the Period tab are available at the following link:
https://www.banana.ch/doc/en/node/2602
Style Tab
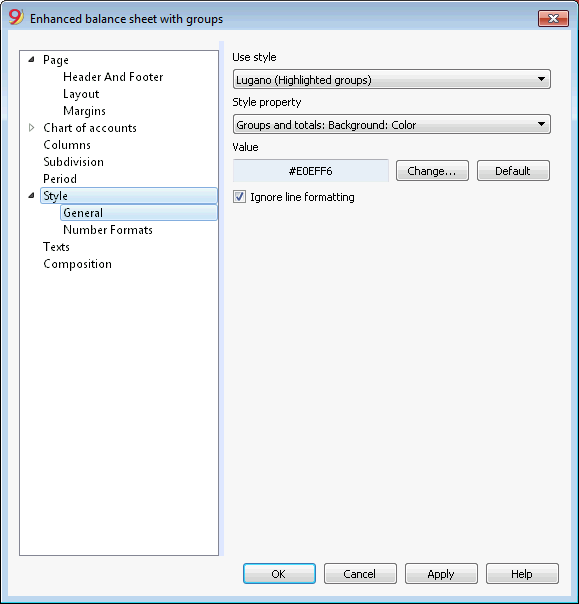
Use style
There are different models of the Enhanced balance sheet provided. By selecting one, the user can obtain the Enhanced balance sheet of his choice.
Style property
For each style, the color of the fonts and the backgrounds can be defined.
Value / Change... / Default
These functions allow the user to change style or to restore the default style.
Ignore line formatting
If this function is activated, the formatting will not be maintained.
Number formats
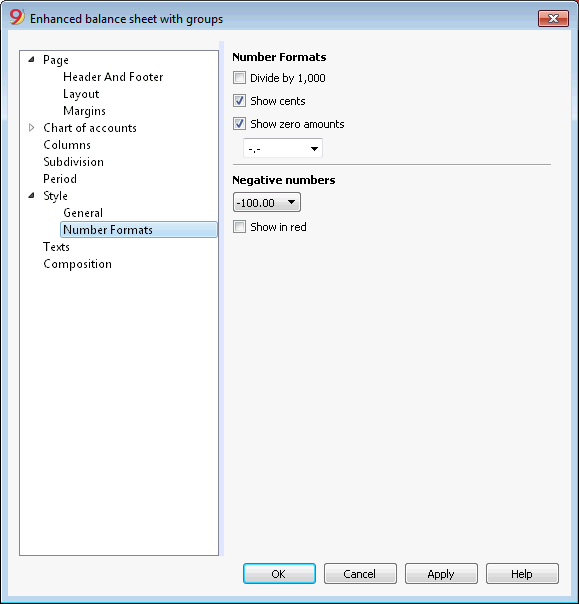
Divide by 1'000
If there are big amounts, by activating this option, three zeros will be taken off.
Show cents
By activating this option the cents will be shown.
Show zero amounts
By activating this option it is possible to choose between having the zero amounts shown with the 0,00 number or with the -,- symbol.
Negative numbers
Negative amounts can be shown with a minus sign before the amount, after the amount or the amount can be shown between parenthesis. You can also activate the option to have the negative numbers shown in red.
Texts
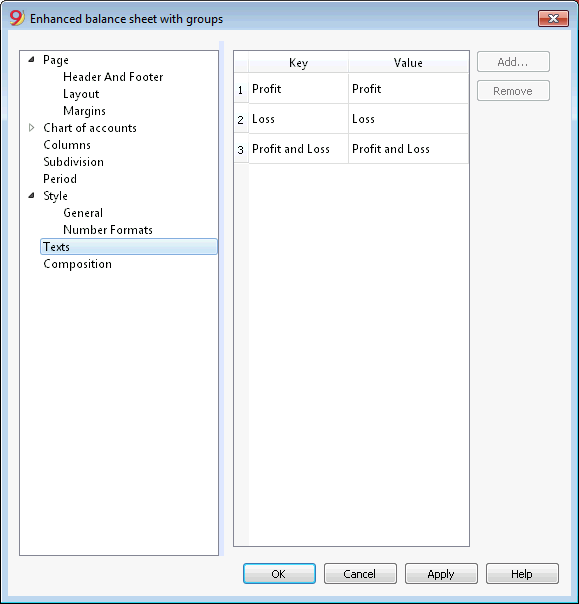
This tab is used to alter the texts of the program columns headers for print-outs.
In order to change the Value column you just have to double-click on the cell you want to edit.
Attachments
This sections allows you to add text that will be printent with the Balance sheet and Profit & Loss statement.
- texts are printed after the Balance sheet and Profit & Loss statement.
- each document begins on a new page
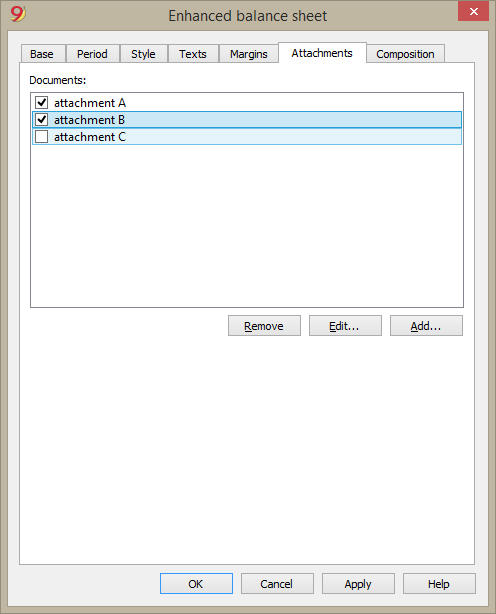
Documents
All documents listed in the Documents table (Html or text format) are listed here.
- You can change the report sequence, just by dragging the item with your mouse
- All documents with a check mark will be printed.
Edit...
A text editor will open allowing you to enter new text or edit the existing one.
Add
This button will open a text editor where you can add new text.
If you haven't created the Documents table yet, the programm will automatically add it.
Remove
This button will remove the selected element and its content.
Notes
- This feature is not available in previous versions.
If the file is open with a previous version of the Banana Accounting software, you will get a message that the file is not totally compatible. - If you edit this section and you press OK, in order to undo the operation you need to give the Undo command more that once.
Composition
Explanations on the Composition section are available at the following link:
https://www.banana.ch/doc9/en/node/2768
Journal
With Banana Accounting the Journal corresponds to the Transactions table. It is possible to print the whole journal or just a part of it, selecting the rows that you wish to print.
In order to personalize the journal printout you can change the columns order and headings: you can find all the information on how to proceed in the Columns setup page; you can also choose several options in the printout; please visit the Page setup page.
There are different ways to print:
- place yourself in the Transactions table and click on the Print icon
- place yourself in the Transactions table and launch the Print command form the File menu
- from the Account1 menu click on the Print journal by period command; in this case you should then indicate if you wish to print the whole table or just a specific period
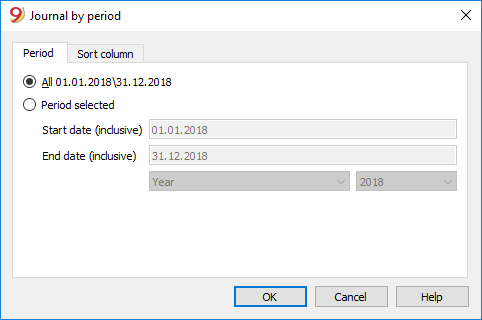
The information on the Period tab are explained in detail in the Period page of the General settings.
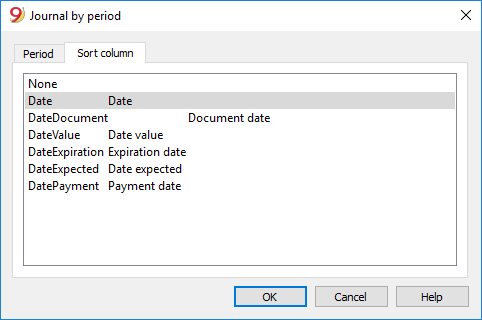
In the Sort column tab in is possible to choose the criteria the journal should be sorted and printed.
Accounting report
- This command allows the user to visualize the amounts of accounts with a specific grouping, for a specific period or with a specific subdivision.
- In order to calculate, obtaine and print reports, choose the Accounting reports command form the Account1 menu.
- Transactions without date are being considered as opening transactions and will not appear in the printouts of the Profit & Loss Statement.
Include a logo in the accounting report printout
From Banana Accounting 9 it is possible to include a logo in the accounting report printout as well. After obtaining your accounting report , go to File menu -> Print preview command. From the print preview click on the the Setup icon, and in the dialog window that will open, in the Logo option, seleg your logo insted of the none option.
You can also check the how to setup a logo page.
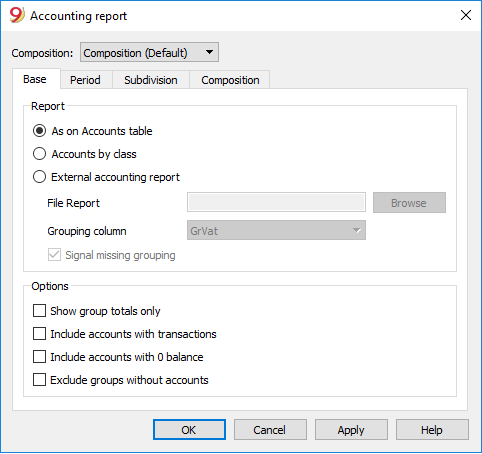
Base tab
Report
You can select the desired grouping scheme:
- As on Accounts table - the Report will show a list of all accounts just as in the Accounts table with the Opening balance and Balance columns
- Accounts by class - the Report will show the list of the accounts but without subgroups
- External accounting report - the Report will show the data according to a grouping system preset in a separate file (File menu, New command, Double-entry accounting group, Accounting Report).
Options
You can select the accounts to be included or excluded:
- Show group totals only - only the group totals will be shown
- Include accounts with transactions - only accounts with transactions will be printed
- Include accounts with 0 balance - accounts with zero balance will be printed as well
- Exclude groups without accounts - groups that contain only accounts with zero balance will not be printed.
Other tabs
The explanations for the other tabs are available at the following pages:
Report result
A new table is created where the results are shown.
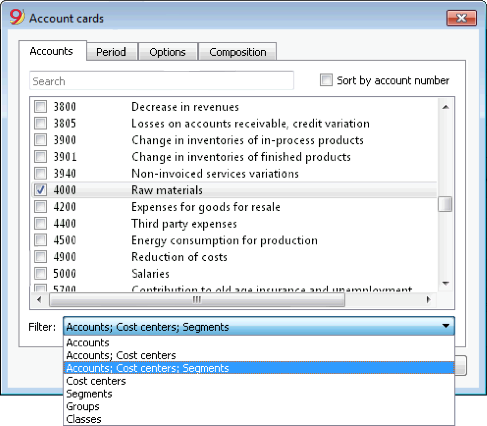
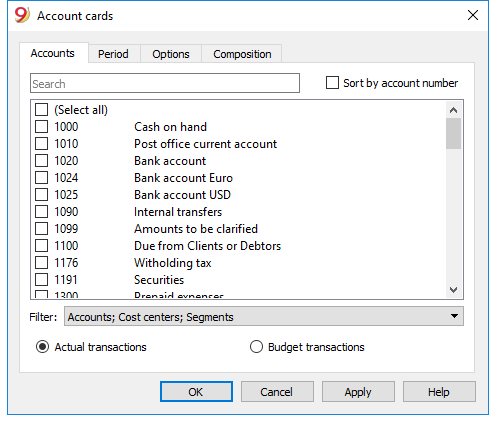
Account cards / Ledger
The account card corresponds to the Ledger and allows you to have a complete list of accounting movements concerning the same account, the same categories (income & expense accounting and cash manager), a cost centre, segments and groups.
Opening the Account card
There are two methods to open an account card or a category card:
- Select the Account/category Card (Cash book and Income & Expense accounting) command or the Account card (Double-entry accounting) command of the Account1 menu in order to open and print several or all account cards.
- On the account number cell there is a small blue symbol; click on it just once in order to obtain the account card.
The groups of the Chart of accounts have the same symbol available as well, in order to display the account card.
Updating the accounting card
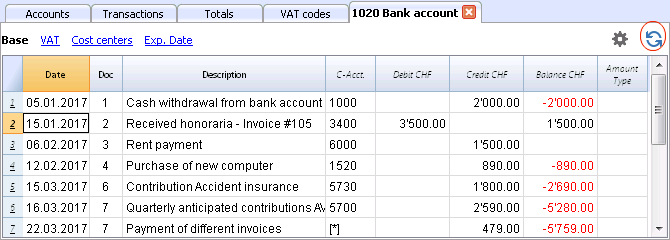
The account card table is temporary and it is calculated when the command is given to do so. If, in the Transactions table, transactions are altered or added, they are not automatically updated on the account card - the user needs to select the Account Cards command again or click, in the Transactions table, once more on the account number's blue symbol, or in case the account card is still open, click on the small Refresh button on the right side (see image hereunder).
Note:
It is not possible to modify the data in the Account card. Double-click on the row number to go back to the original corresponding row of the Transactions or Budget table.
The AccountSelected column
In the AccountSelected column, which can be made visible, starting from any Account card, through the Data menu -> Columns setup, the account on which the transaction took place is being displayed.
When you get an account card of one or more accounts, groups and segments, you will see the exact account that has been used.
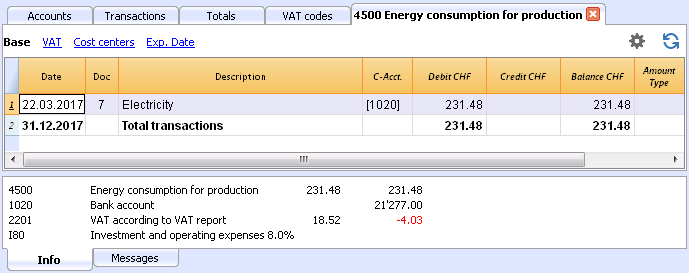
The contra account in the account cards
In the Account cards, the Contra Account column (C-Acct.), which indicates the account that completes the transaction, is being shown.
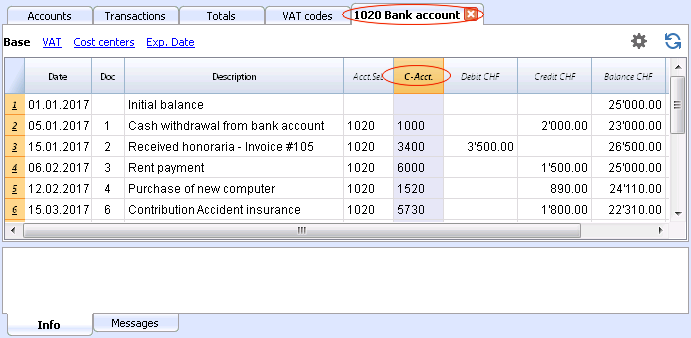
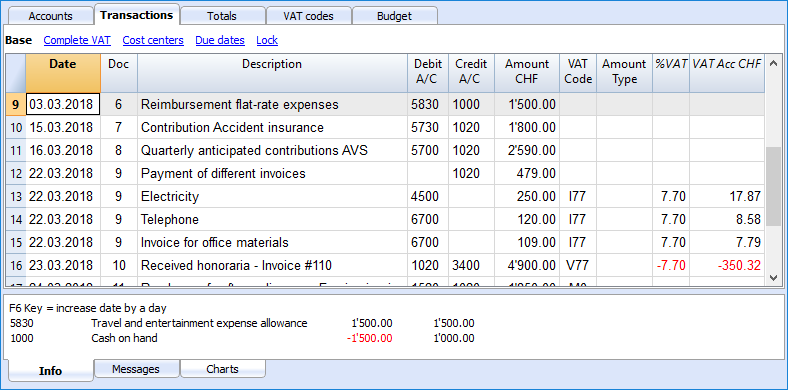
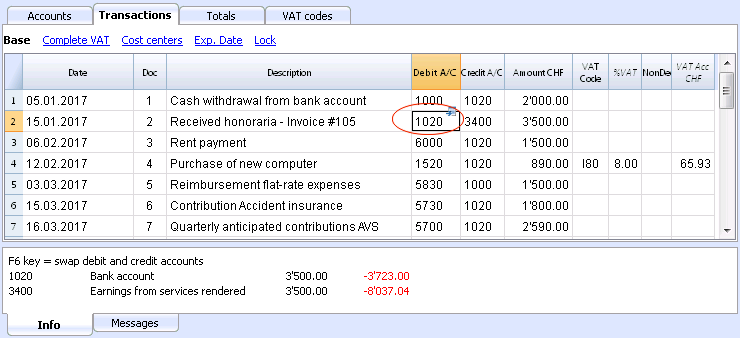
When there are transactions on multiple accounts (transactions on multiple rows) as in the example hereunder, and there is one account entered in debit and several accounts in credit, or the other way around, the software deducts the possible contra account using the following logic:
- In the first transaction row, the 1020 account is considered the common contra account of the transactions that follow.

- On the Account card 1020, the composed transaction (Payment various invoices) shows the contra account indicated by the [*] symbol. It is impossible to have the indication of the contra accounts directly in the account card, because the account has several contra accounts (4500, 6700, 6700). For this reason the program indicates the [*] symbol in the C-Acct (Conta-Account) column, which means that we are dealing with a transaction on multiple accounts.
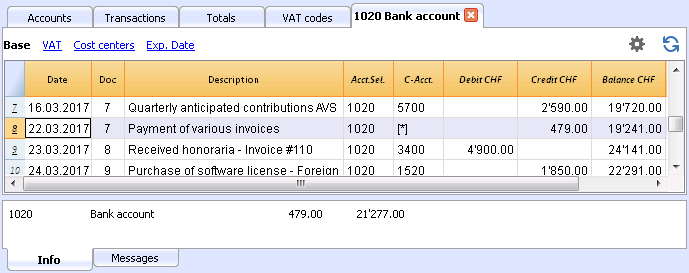
- On the Account cards of the next transaction rows (4500, 6700, 6700), the common contra account is indicated between square brackets ("[1020]"), and indicates a deducted contra account.
Cards of groups and classes
In the Account card of a group or a class, all the transactions of the accounts that belong to the selected group or class are being grouped together.
The accounts of the group or the class can be displayed by making the AccountSelected column visible.
Print the Ledger (all account cards)
To print the Account cards:
- Account1 menu, Account cards command
- By means of the Filter, all the account cards that need to be printed completely or partially (for example, only accounts, cost centers, segments) can be automatically selected
- In the various sections Period, Options, Composition, activate the desired options (for ex. period, 1 account per page, ...)
- Press OK to confirm, after having selected the desired options.
For the explanations of the different tabs, please visit the next few pages: Accounts/Categories tab, Period and Options.
The program will show the selected account cards.
In order to print, choose the Print command from the File menu.
When you have activated the Budget table in your file, you may choose which transactions you want to see (actual transactions or budget transactions).
Include a logo in the account cards
From Banana Accounting 9 it is possible to include a logo in the account cards printout as well. After obtaining your account cards details (with the Account1 -> Account cards command), go to File menu -> Print preview command. From the print preview click on the the Setup icon, and in the dialog window that will open, in the Logo option, seleg your logo insted of the none option.
You can also check the how to setup a logo page.
Save the settings
In case you regularly print the account cards of specific accounts, for example, all those that concern the Sales accounts, it is useful to create a specific composition.
- Go to the Composition tab
- Create a new composition, using the New button
- Indicate the name of the composition, for example "Sales accounts", in the Description field of the window
- Select the accounts that you want to be printed.
Every time you wish to print these accounts, you can select the composition that you created.
Page setup
In Page setup, you can specify the margins & other settings of the page.
Accounts/Categories tab
You can access this windows by choosing the Account1 menu -> Account cards command (see the Account cards page)
Search
Enter the account or the description in order to filter the accounts list.
You can also enter the account to be displayed with segments.
Accounts and segments can be combined (see developer explanations):.
- 10000:01 will show all transactions of the 1000 account with the 01 segment.
- 1000|1001will show the transactions for account 1000 and 1001.
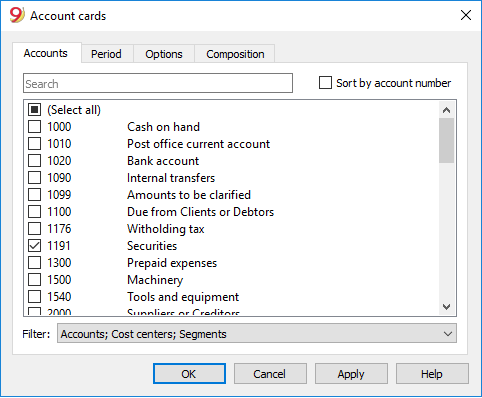
Accounts
The list of all available accounts appears.
If you wish to print one or more account cards activate only the desired accounts.
- (Select All)
By activating this option, all the accounts that are part of the Chart of accounts are automatically selected. - Filter
This function allows you to filter all account cards or just a selection, specifically:- Accounts, cost centre and segments - if no selection is made they are filtered by default
- Accounts/categories (existing cost centres and segments are excluded)
- Accounts, Cost centres (only segments are excluded)
- Cost centres (accounts and/or categories and segments are excluded)
- Segments (accounts and/or categories and cost centres are excluded)
- Groups - existing groups will be shown - you need to select the ones to be printed
- Classes - all classes will be shown - you need to select the ones to be printed.
Actual or Budget
When you have activated the Budget table in your file, you may select:
- Actual transactions
The entries in the Transaction tab will be processed. - Budget transactions
The entries in the Budget tab will be processed.
In the absence of the Budget tab, the amounts in the budget column of the account card, will be converted to monthly amounts on the basis of the opening and closing dates of the accounting file (if this one year, will be devided by 12 monthly instalments).
Differences in accounting entries (account card 00)
If differences in accounting entries occur (refer to the DEBIT - CREDIT difference error page), open the Group 00 account card (or the one in your Chart of Accounts that contains all the accounts of BClass 1,2,3,4).
You will have a list of all transactions with the successive balances, which after each entering should equal zero. The row which balance is not at zero contains the error.
Period Accounting Card
The explanations of the Period tab are the same as those for the Enhanced Balance Sheet with Groups.
Options tab

Lines before end of page
This function was created in order to avoid printing an account partially on one page and partially on the following. If the account card to be printed doesn't have at least a number of lines correspondent to the number input in this field, printing the whole card will be moved to the next page.
One account per page
By activating this function, each card will be printed on a separate page (even those with few transactions).
Repeat column's headers
By activating this function, the column headers will be repeated for each account, within the page.
Include accounts with no transactions
By activating this function, cards without transactions will be printed as well.
View
You can select the columns view to be included in the account cards display and printout:
- Base
- VAT
- Cost centers
- Expiration dates
If no criteria is specified the program will keep the order present in the transactions table.
Sort column
In the account card, transactions can be sorted according to different data criteria:
- Document date
- Value date
- Expiration date
- Payment date
End of Year PDF printouts
From the print preview of a document, you can save in PDF format and print.
You can save in a PDF format the following documents:
- Balance sheet and Profit and Loss Statement
- Accounts, Transactions, VAT, Totals tables
- VAT Reports
- Account cards
This PDF file will have an index that will allow to access easily the different printouts.
If you save this file on a non rewritable CD (to be kept along with the accounting documents), you will meet the law requirements for accounting data archiving.
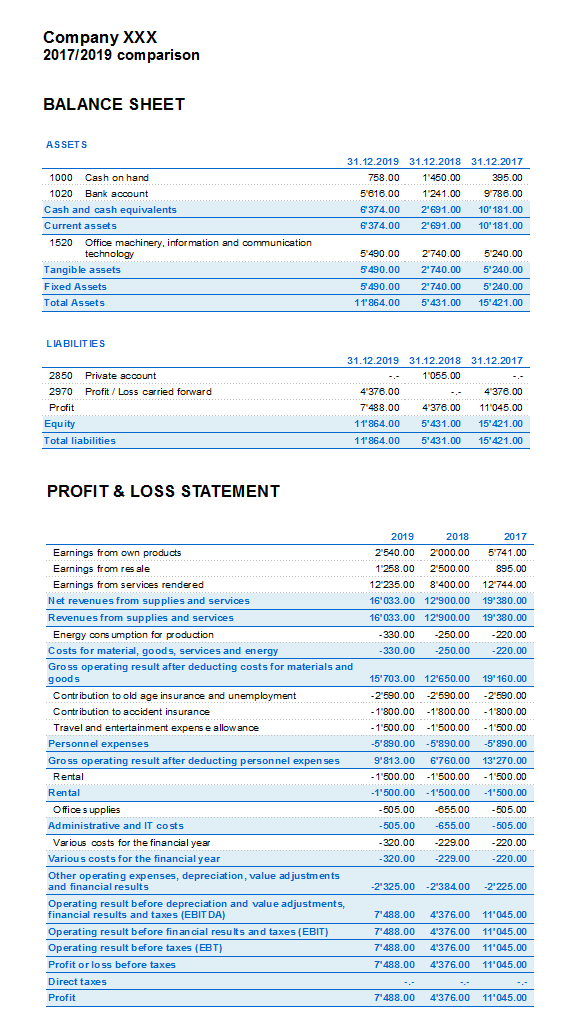
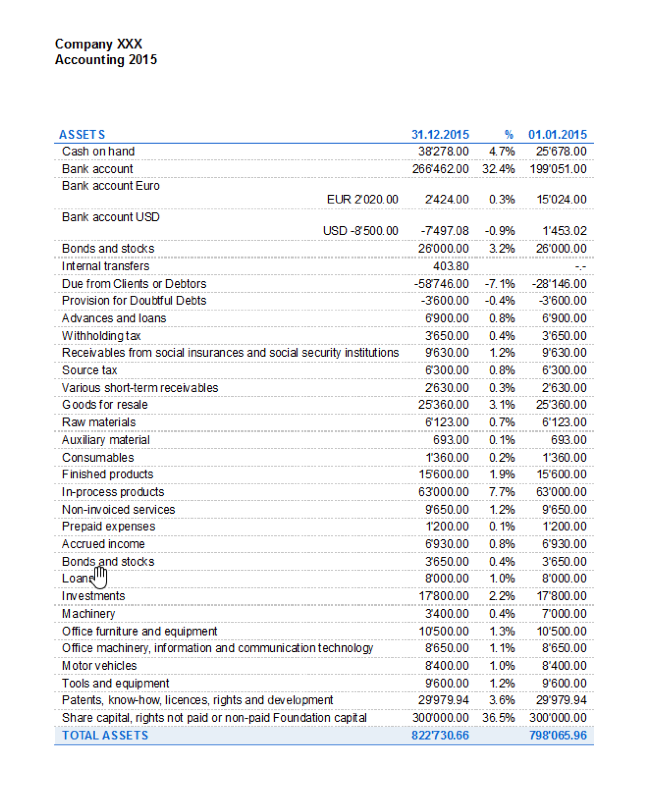
Reports over several years
A statement over several years allows a simple and immediate comparison of the evolution of your business. Banana Accounting can display the balances up to two previous years in the same report, so for example the balances of the years 2019, 2018 and 2017 on a single page.
In order to use this feature though, you need to make sure that in the basic accounting data the "previous year's file" option is activated and that the correct file is entered (File menu -> File properties (Basic data) -> Options tabn -> Previous year file), otherwise Banana Accounting cannot recover the balances of the previous accounting periods, and they won't appear in the report.
In the following example we will show you how to obtain a report over the years 2017, 2018 and 2019. Here is how to proceed:
- from the Account1 menu choose the Enhanced balance sheet with groups...
- from the Columns section, check the Current and Previous year boxes
- then click on the Advanced button (this operation must be done both for the Balance sheet and for the Profit & Loss statement) and,
from the dialog window that opens, click on the Add button to add a column - scroll down the list of possibilities until you reach -2 Years - we are indeed in the year 2019 and in order to have a 2017 report we have to go 2 years back
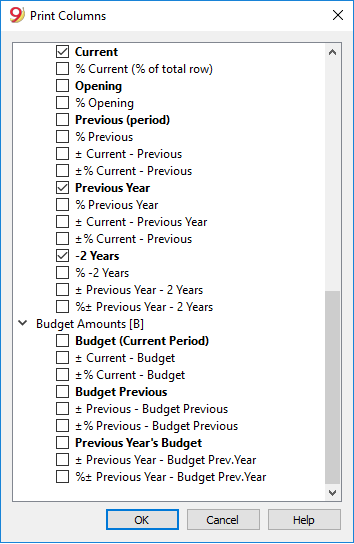
- confirm with OK and enjoy your report