How to start with Banana Accounting Plus
With Banana Accounting Plus you can get started in just a few minutes, work easily and safely, and grow with advanced features when your business needs them.
Whether you're managing a small business, an association, or personal accounting, no complex setup or technical knowledge is required: Banana guides you step by step, with ready-to-use and customizable templates that adapt to your way of working and your needs.
With Banana, accounting takes shape in three simple steps:
And the accounting is done....
Watch the 3-step accounting video: 1'00"

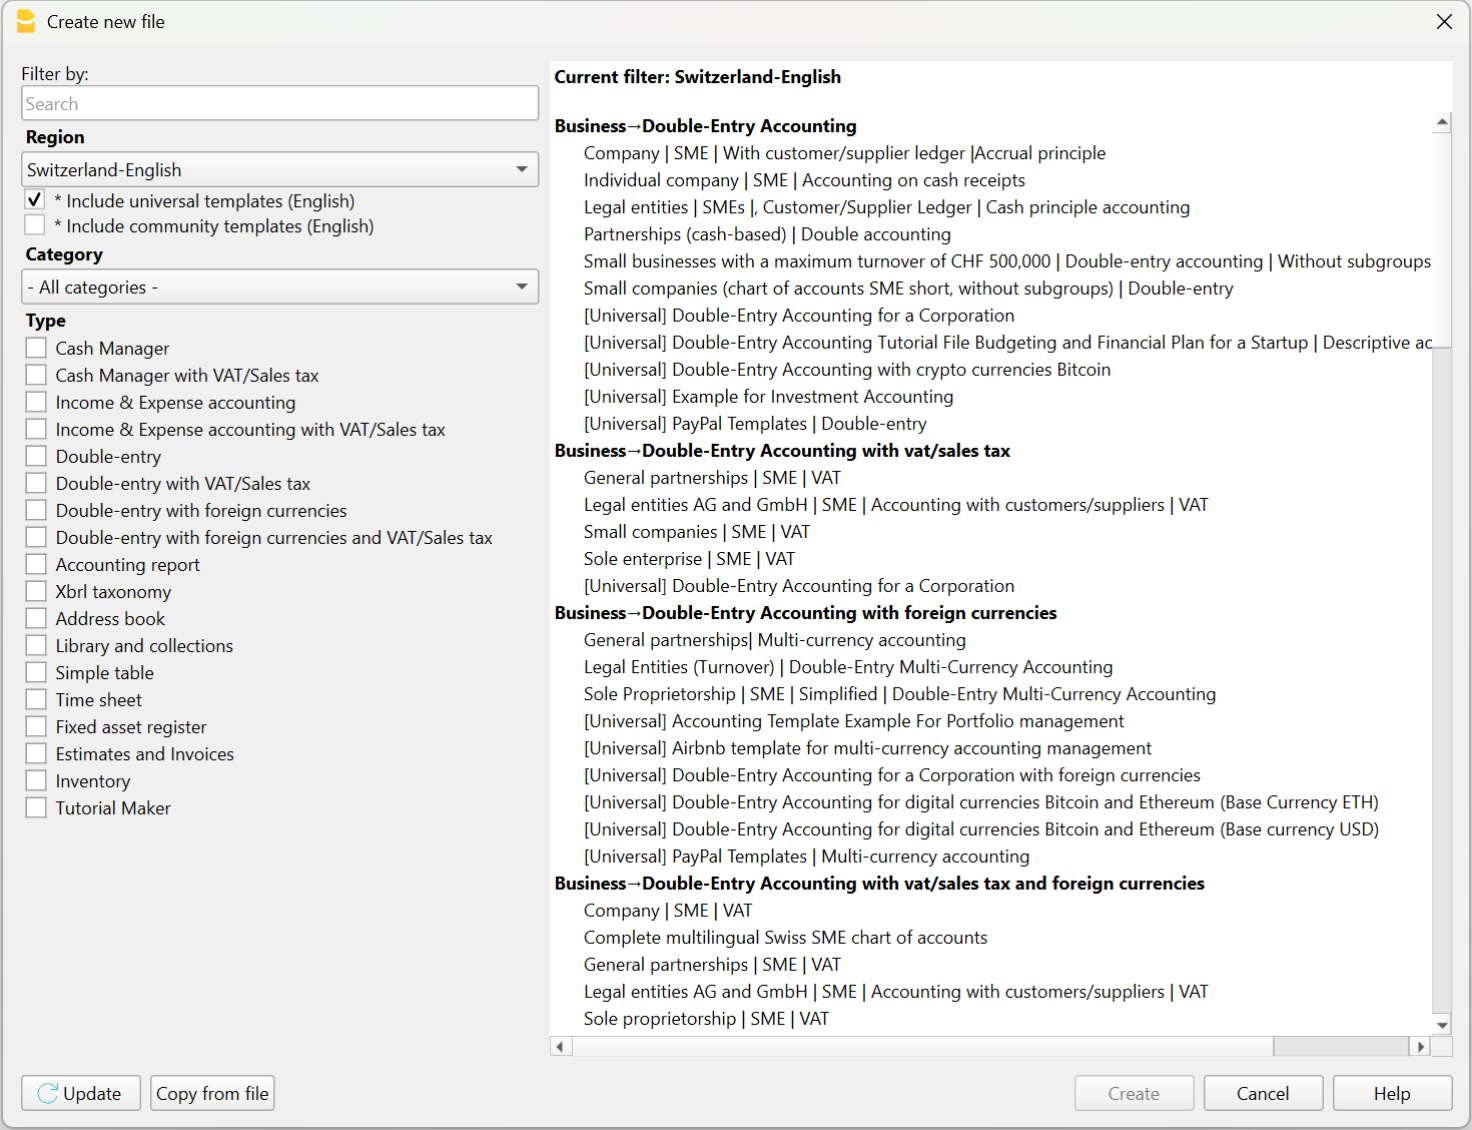
1. Choose the template that suits you best
Each Banana Accounting Plus template is already configured for a specific type of accounting, such as Income/Expense, Double-entry, Multi-currency.
The template you choose is therefore a complete, ready-to-use solution, with all functions, extensions, and calculations already set up for your accounting.
You can choose and open the template:
- from the program, via the menu File > New
- from our Template Store, downloading it to your computer or opening it via the WebApp (directly in the browser – still in testing phase).
Starting from a template saves you time, avoids errors, and immediately gives you a solid base to begin with.
Each template can be expanded with new features (VAT management, budgeting, cost centers) at any time, without having to rewrite your accounting data in a new file.
2. Customize your accounts
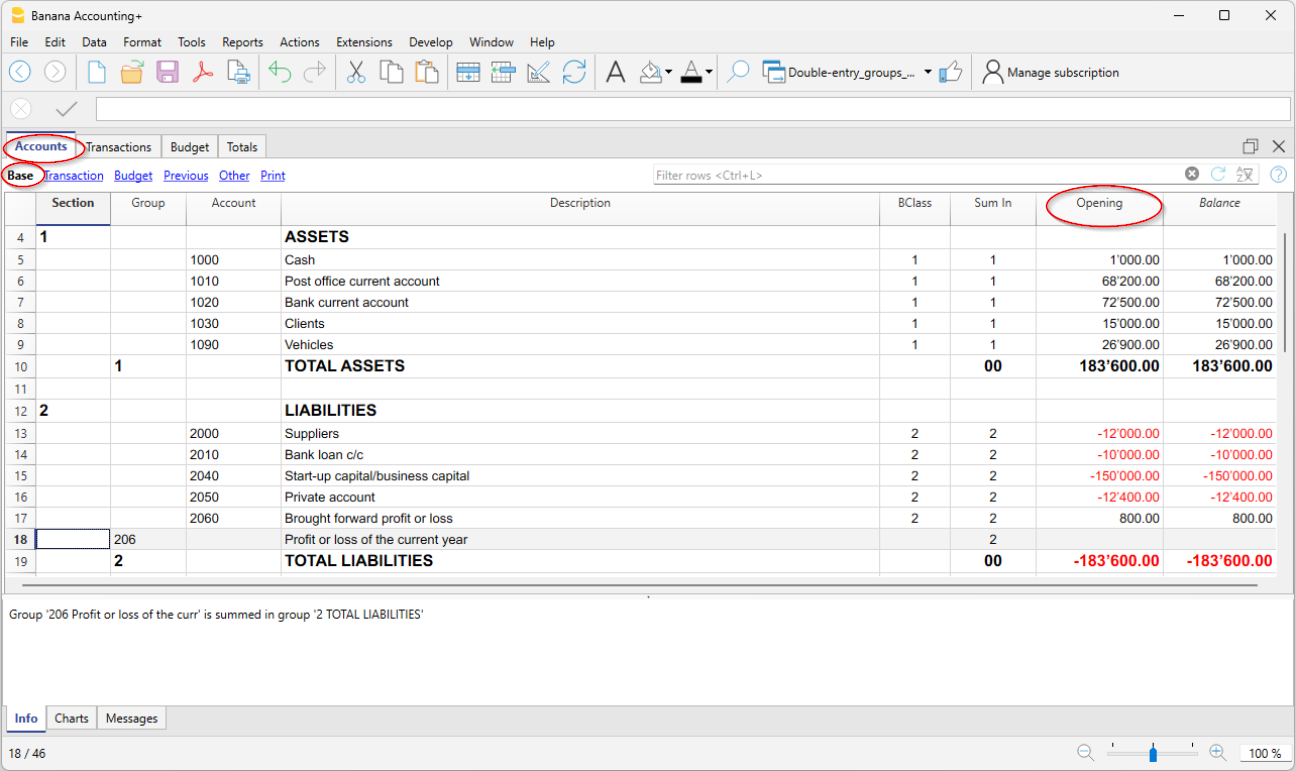
Each Banana Accounting template already includes a predefined Accounts table, with the most common accounts for that type of accounting, but you can freely customize it. All accounts, including those you add or edit, will appear in the balance sheets, reports, and official printouts. Here are the basic customizations:
- From the File > File Properties menu (basic data), enter your company's name and information.
- In the chart of accounts (the Accounts table):
- In the Description column of bank accounts, enter the names of your banks.
- Enter the accounts of your customers and suppliers with all the details (name, address, VAT number…)
- In the Opening column, enter the opening balances of your accounts.
- Save it to your PC or cloud. The template is now your own accounting file.
Banana Accounting Plus is flexible and modular: you can add new features at any time without creating a new file or losing any data already entered. This allows you to gradually evolve your accounting as your business grows. You can add immediately or later when needed:
3. Import or enter transactions
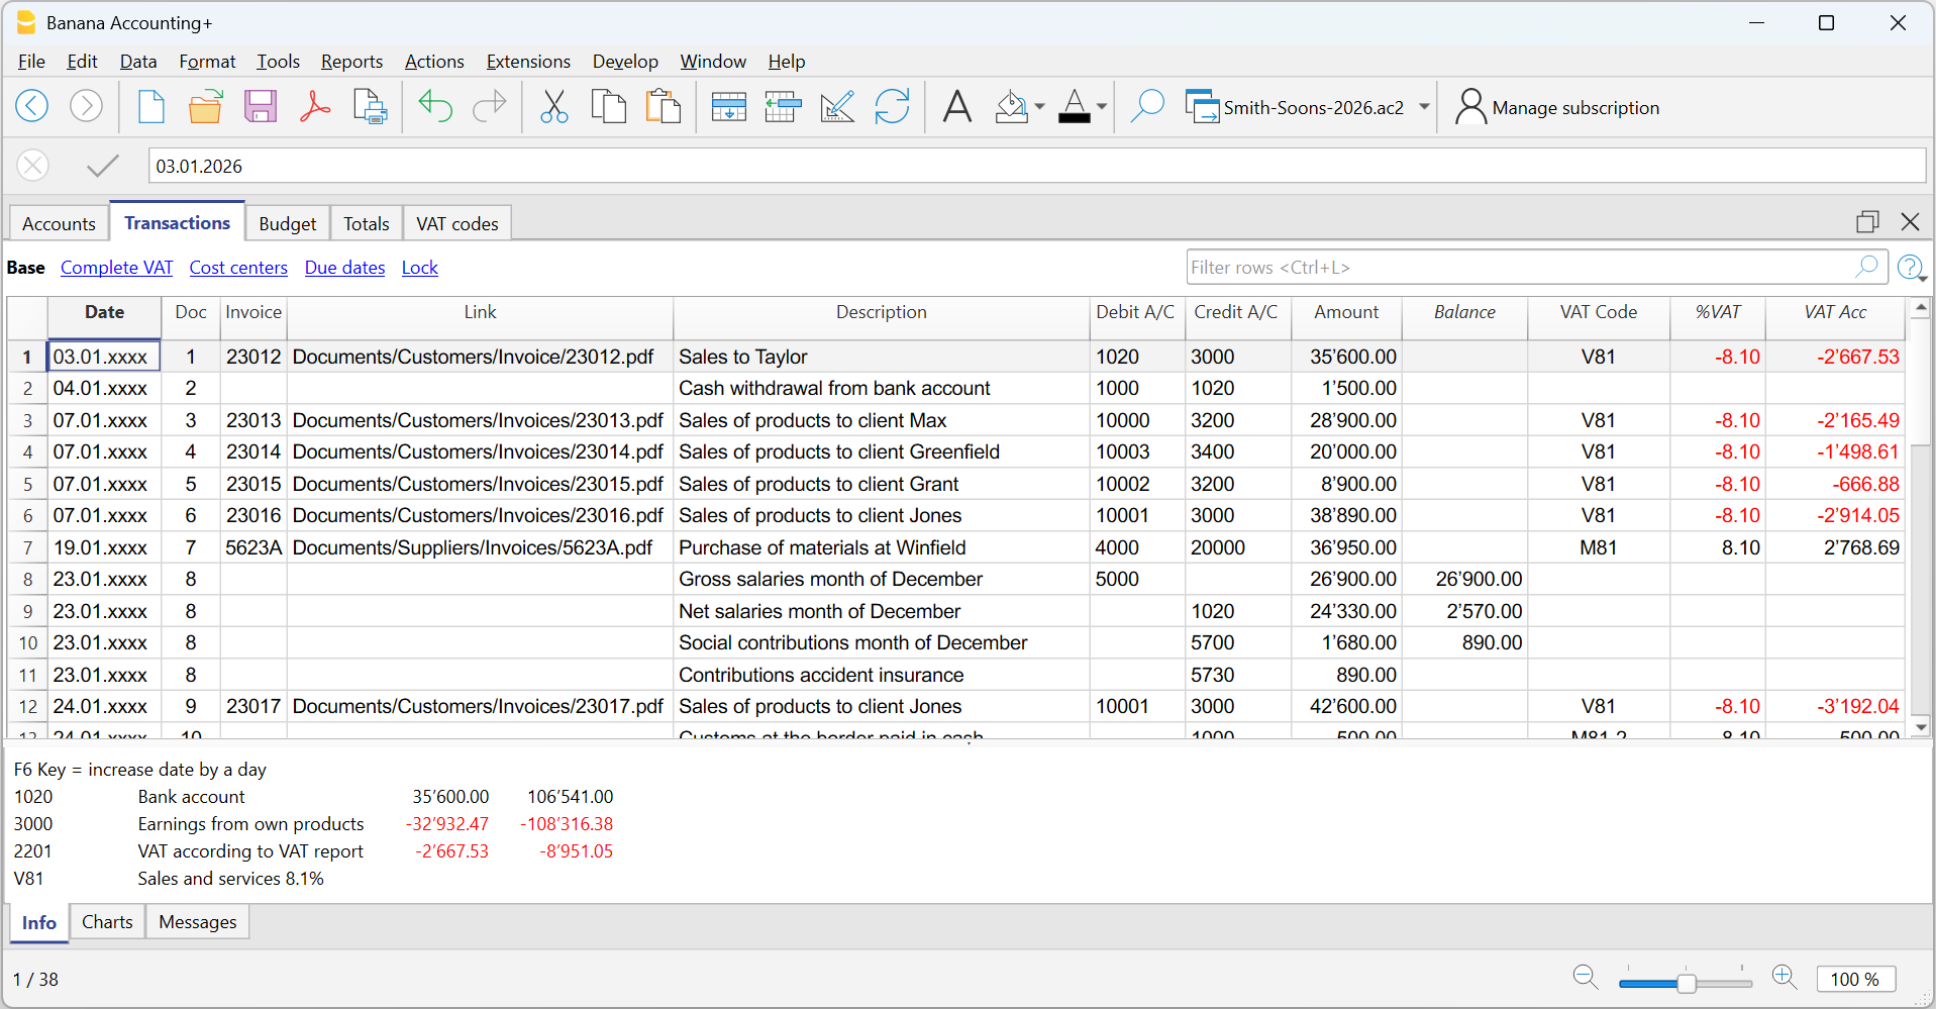
The Transactions table is the heart of the program, where all daily entries are recorded. Based on the data entered in the Transactions table, the program automatically updates account balances, and you can instantly generate all the reports you need.
To quickly enter transactions, we recommend using some time-saving features:
- Import transactions from your bank, postal account, or credit card.
- To import transactions, you need the data in .csv format (Advanced plan) or ISO 20022 standard format (camt.053, xml, … – Professional plan).
- After the import, you only need to complete the counterpart in the transaction rows.
- Use Rules (Advanced plan), to have transactions automatically recorded with no manual entry of counterpart, VAT code, or other details.

And the accounting is done...
More details about models used in different applications are available on the following pages:
- Transactions in double-entry accounting
- Transactions in multi-currency accounting
- Transactions in income & expense accounting
- Transactions in the Cash Manager
Banana Accounting Plus offers many other features to work even faster, optimising your time and saving energy.
Professional Balance Sheets and Reports
With Banana Accounting Plus you can generate up-to-date reports and printouts at any time, to monitor your accounting or present data externally. You have access to a wide range of printouts, from invoices to financial statements. Most commonly used:
- Balance Sheet → shows assets and liabilities, with subgroups and organised totals.
- Profit and Loss Statement → shows costs, revenues, and net income or loss.
- Budget → compares expected values with actual ones.
- Balance sheet and profit and loss with previous year columns and corresponding variances.
- VAT Reports – with the Advanced plan, you can quickly prepare and submit the VAT report (for Switzerland).
All printouts update automatically based on your entries and the features you have activated (VAT, multi-currency, budget).
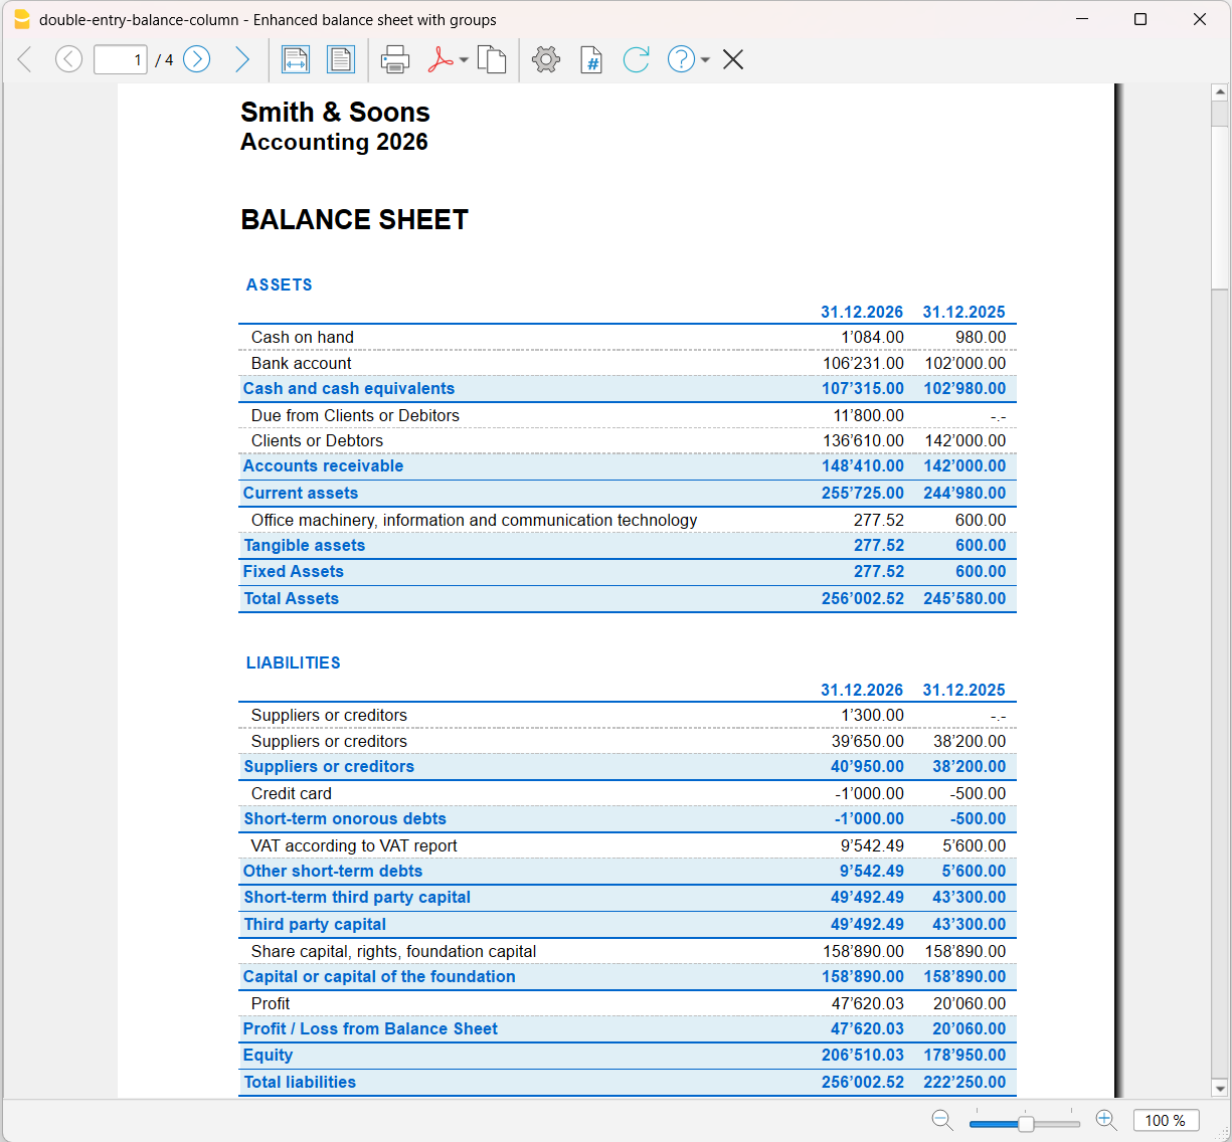
Some examples of printouts from various applications
Balance sheet from double-entry accounting, showing current year and previous year actual values.
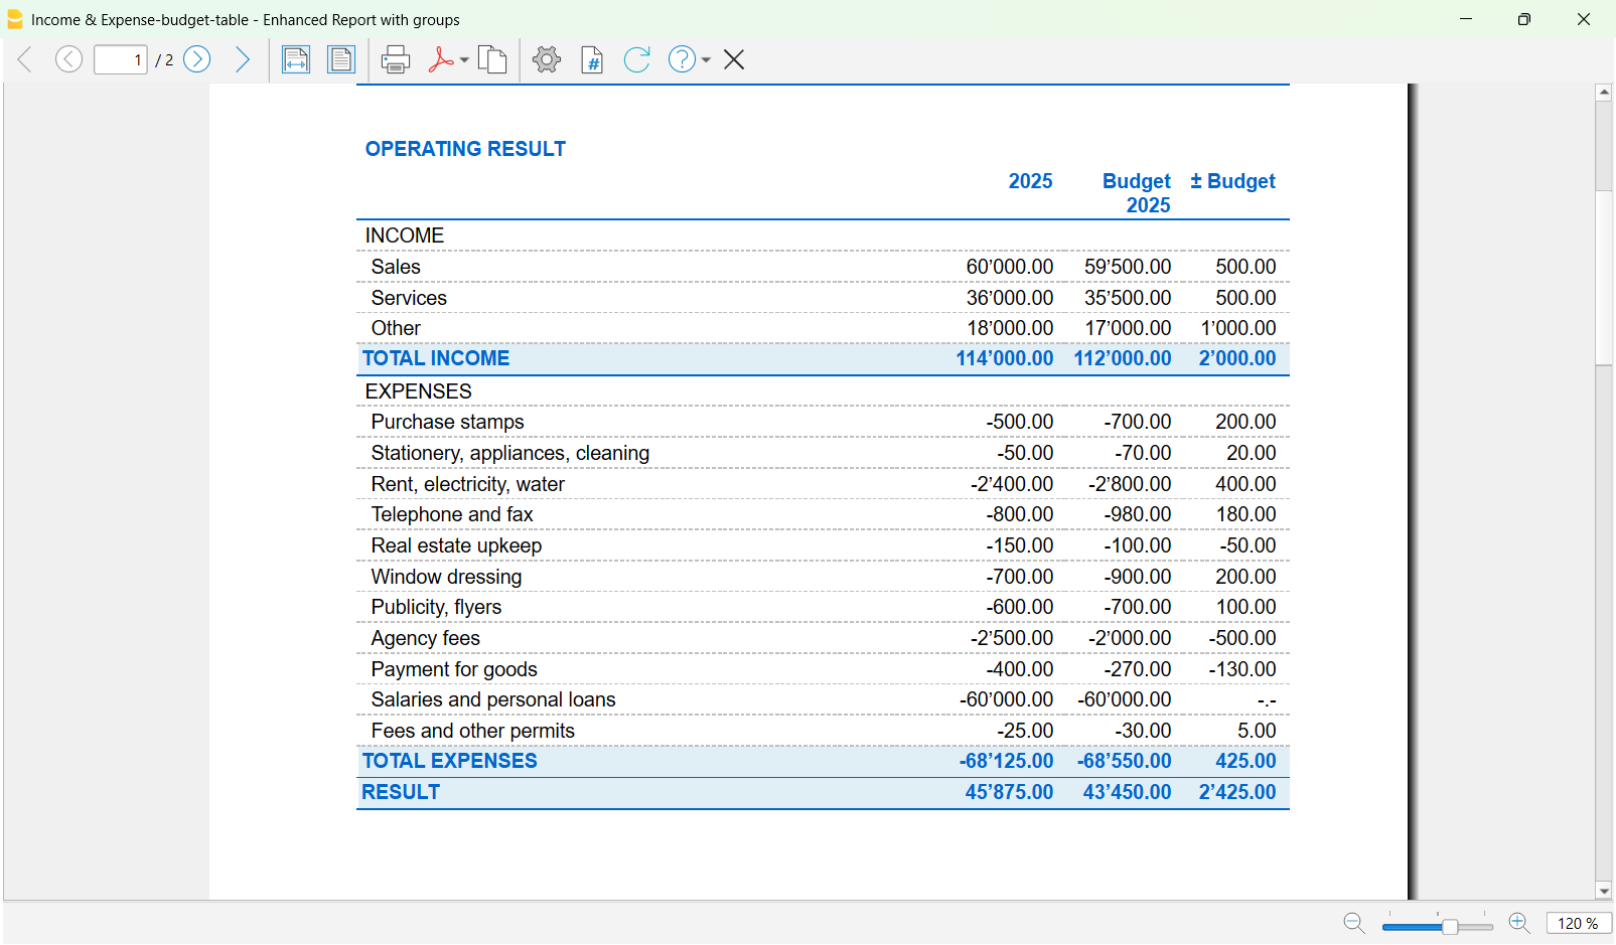
Report from income & expense accounting, with columns for current year actual, current year budget, and variances between actual and budget.
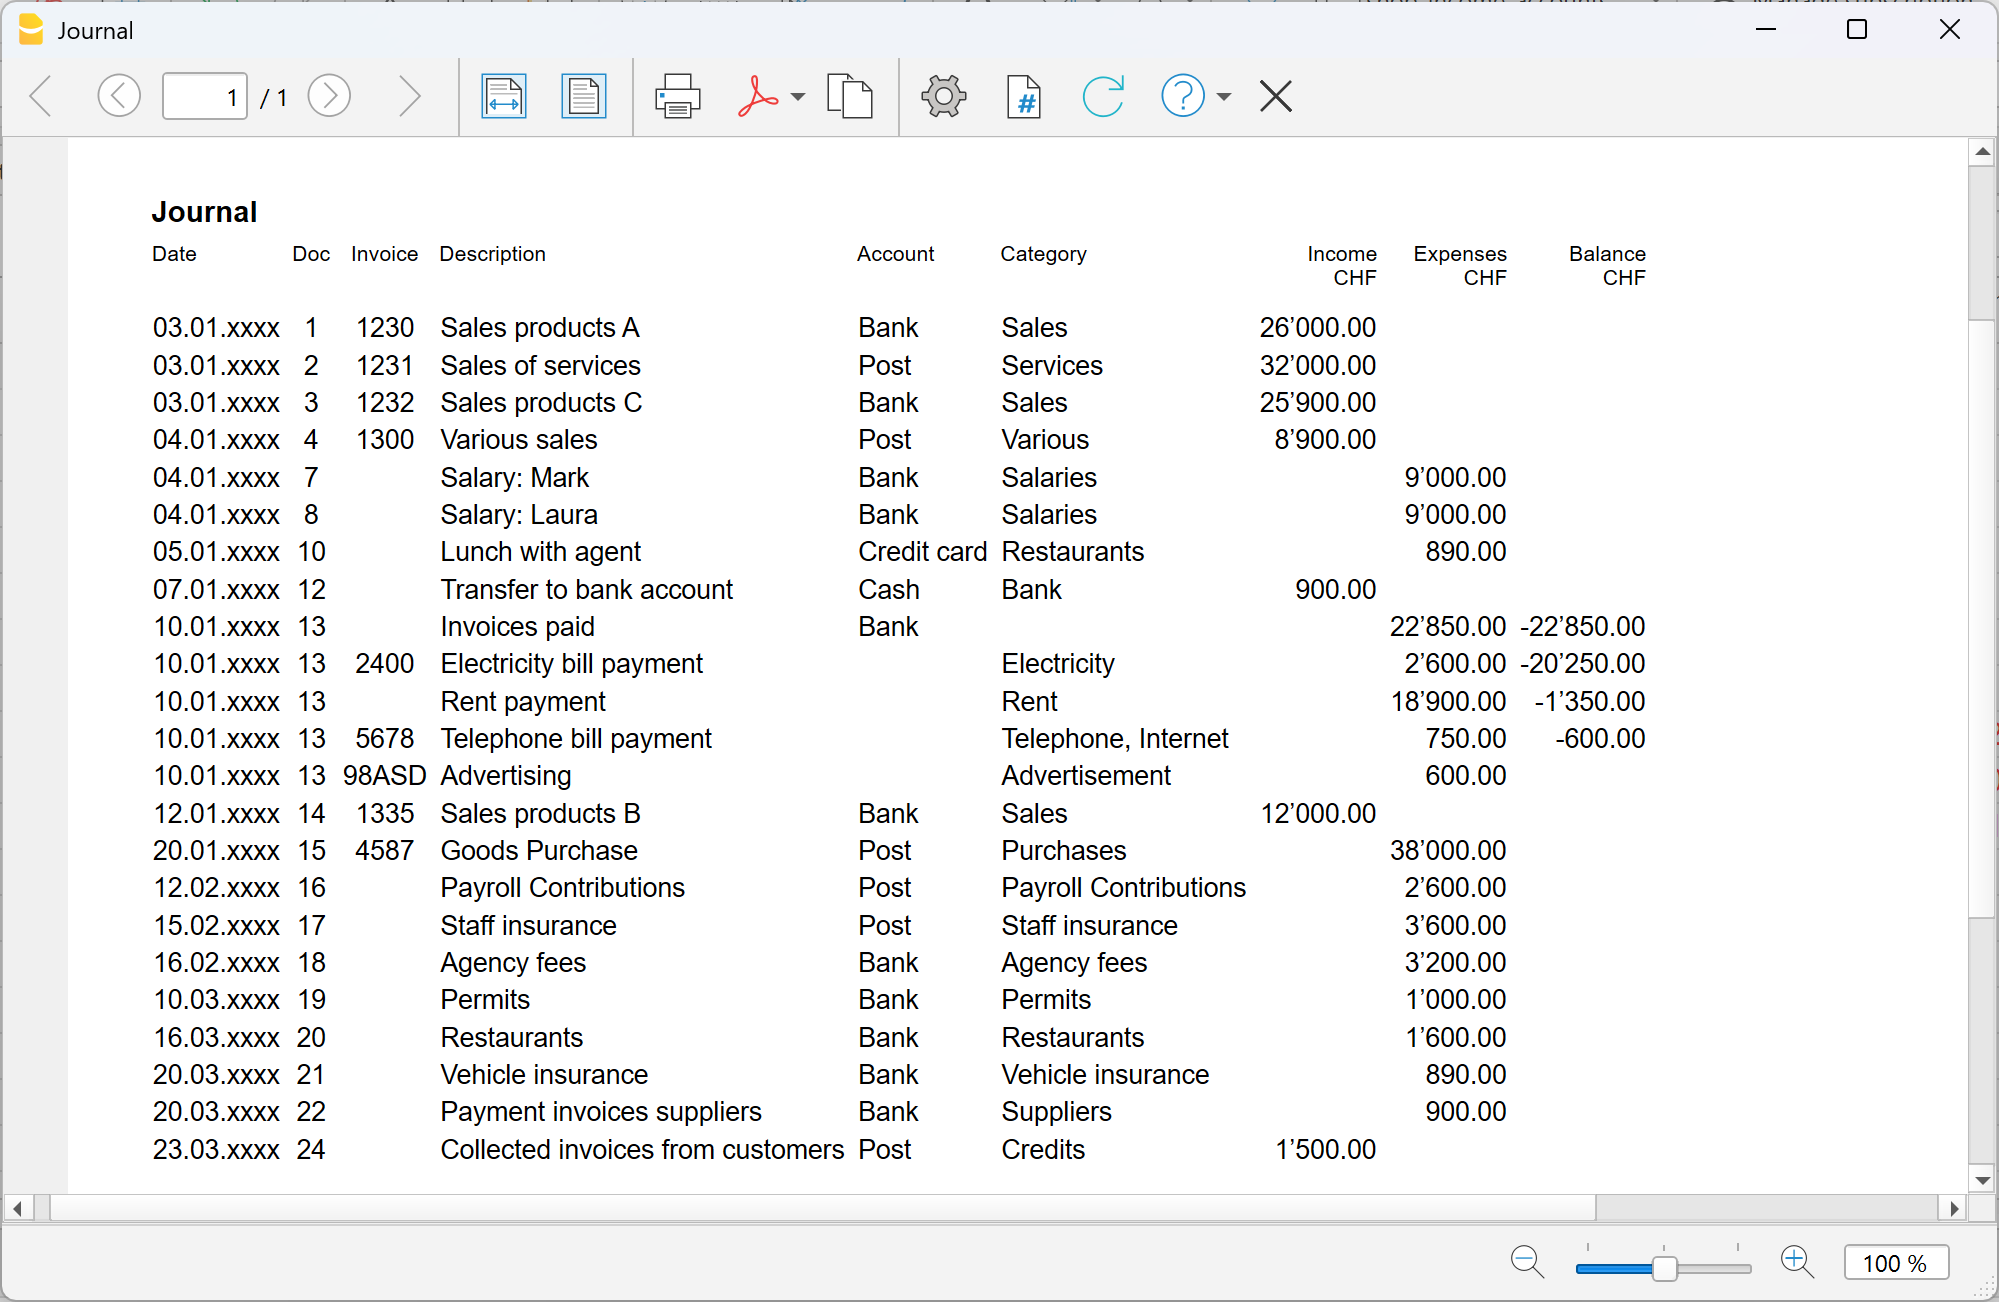
Journal from income & expense accounting.
Discover all the features of Banana Accounting Plus...
How to choose the right accounting template
Banana Accounting Plus offers several templates that make it easier to get started with your accounting. Choosing the right template helps you save time and immediately get a clear overview of your finances.
Each accounting year is contained in a file that includes the chart of accounts, the Transactions table and other tables that vary depending on the type of accounting you need. Based on our experience, we have identified a few simple initial questions that help you quickly find the template that best suits your needs.
What type of activity do you want to manage?
Banana offers predefined templates that can always be customized according to the type of activity: personal accounting, association or nonprofit organization, small business or microbusiness.
- Personal accounting
Household accounts, household budget, children’s pocket money (it is never too early to start), health insurance expenses, etc.
View the available templates for individuals
- Association or nonprofit organization
For small associations, or when the accounting is managed by a volunteer without specific experience, Income & Expense accounting may be sufficient.
Some associations, however, prefer to use double-entry accounting.
If the association also has bank accounts in foreign currencies, multicurrency accounting is required.- View the templates for associations
- Other resources for associations - project management, donation certificates, membership fee management.
- Business
If you need to manage a business activity, it is useful to look more closely at these topics:- What type of business do you have? View the templates for corporations and limited liability companies, for sole proprietorships, or for partnerships.
- Are you subject to VAT? View the double-entry accounting templates with VAT.
If you have a business in Switzerland, are you subject to VAT using the effective method or the net tax rate method? See the differences between the two systems. - Do you manage your accounting on an accrual or cash basis? See the difference between the two methods.
- Do you work internationally? Do you have bank accounts in different currencies? Choose a multicurrency double-entry accounting template.
Important note: if you have a business in Switzerland and are subject to VAT, you need the Advanced plan of Banana Accounting Plus to obtain the VAT Report.
- Trustees and accounting professionals
Banana Accounting offers solutions for every type of client. With a single subscription, you can manage different mandates and quickly prepare the most suitable chart of accounts for each client. This applies both when your clients manage their accounting directly and when you manage it entirely as a professional.
With Banana, you can also go further by offering specific services such as accounting for forensic accounting (or accounting reconstructions) and financial planning.
More useful details for trustees and accountants: Features for Accountants, Trustees and Accounting Professionals | Banana Accounting Software.
- Other activities: Solutions are also available for managing real estate accounting, accounting for public-law corporations, for support administrators or guardianships, and securities management accounting
Are you already familiar with accounting?
Regardless of the activity you need to manage, an important factor in choosing the right template is understanding your level of knowledge of accounting principles:
- If you are a beginner - we recommend an Income & Expense accounting template. There are also templates with descriptive accounts and categories (that is, words instead of account numbers), which make everything even more intuitive. You learn while you work, and you can always convert your Income & Expense file into a double-entry accounting file.
- If you already have experience - choose a double-entry accounting template. You can also review the theory on our website. There are double-entry templates with very compact charts of accounts for simpler cases.
- If you are an expert - we definitely recommend double-entry accounting and the Advanced plan, which offers time-saving features and automation for the most common tasks, such as entering rules for automatically completing imported transactions, or using the Filter, which lets you search, find and edit text, amounts, etc. in transactions in just a few seconds. The Advanced plan is designed for users with many monthly transactions who need speed.
How many transactions do you enter?
This information is important when choosing both the type of accounting and the subscription plan. A small number of monthly transactions can be entered manually or by using Recurring transactions, included in the Professional plan. If you have many transactions, the Advanced plan, is more convenient because it includes specific import extensions for different banks and credit cards (the Professional plan includes only the standard ISO 20022 format).
You can always start with one plan and upgrade to a higher plan later, even during the year, paying only the pro-rata difference.
Do you need to issue invoices?
If you want to issue and manage invoices, you can do so in two ways: directly in the accounting file or separately from the accounting with the Estimates and Invoices application. Consider the pros and cons of both solutions. You can find more details on the following pages:
Not sure? Start anyway
If you have doubts, start with the simplest template. It is not a final choice: you can always adapt it or switch to another template later without losing the work you have already done. The important thing is to get started.
Next steps
By choosing the template, you have already done most of the work. Now you only need to enter the basic data of your business in the file, adapt your accounts if necessary, and you are ready to enter transactions.
Customize your accounts
All Banana templates are fully customizable. For example, you can add or modify accounts, change categories and descriptions, add or modify VAT codes, and adapt the structure to your business. Changes can be made at any time during the year. Learn more..
Import transactions
Once you have chosen the template and made the first small adjustments, you are ready to enter transactions.
See how to import them directly from your bank.