Basic accounting features
The grouping system in Banana Accounting+
Banana Accounting's grouping system is used to totalise the amounts of accounts and groups quickly and easily. The programme gives you maximum flexibility to create as many levels of totalling as you want.
▶ Video: Grouping and totalling system
Where it is used
- In the Accounts and Categories tables to define the structure of the Balance sheet and the Profit & Loss Statement.
- In the VAT Codes table to group VAT codes
- In the Items table in the Stock Application.
- In the Items table in the Fixed asset register Application.
How it works
Grouping is always based on two columns:
- The Group column, where group identifiers are indicated, which may be textual or numeric.
- The column Sum In, where for each account or group row the Totalisation Group is indicated.
Each group row is a total row, where:
- Group balances are the sum of the rows that contain the group name in the Sum In column.
- The programme calculates the totals of all columns containing amounts (type Amount), both the predefined ones (Opening, Balance, etc.) and those added manually.
Grouping allows the creation of many levels of totalisation.
The logic of the programme
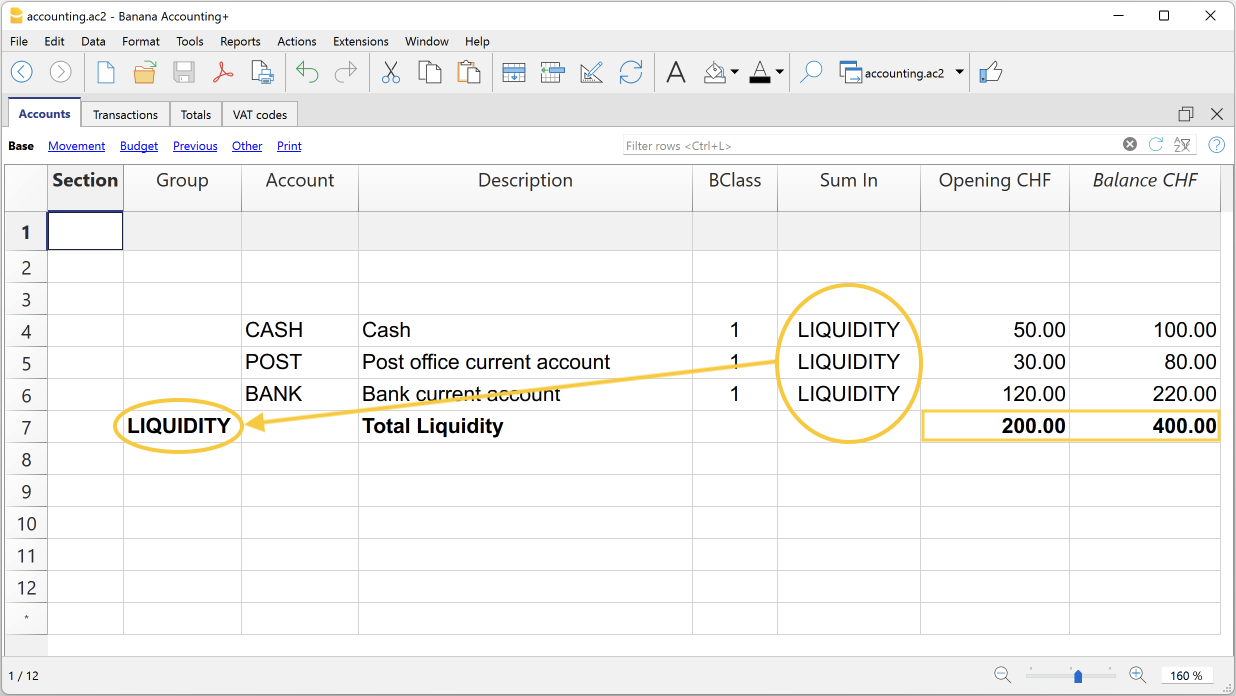
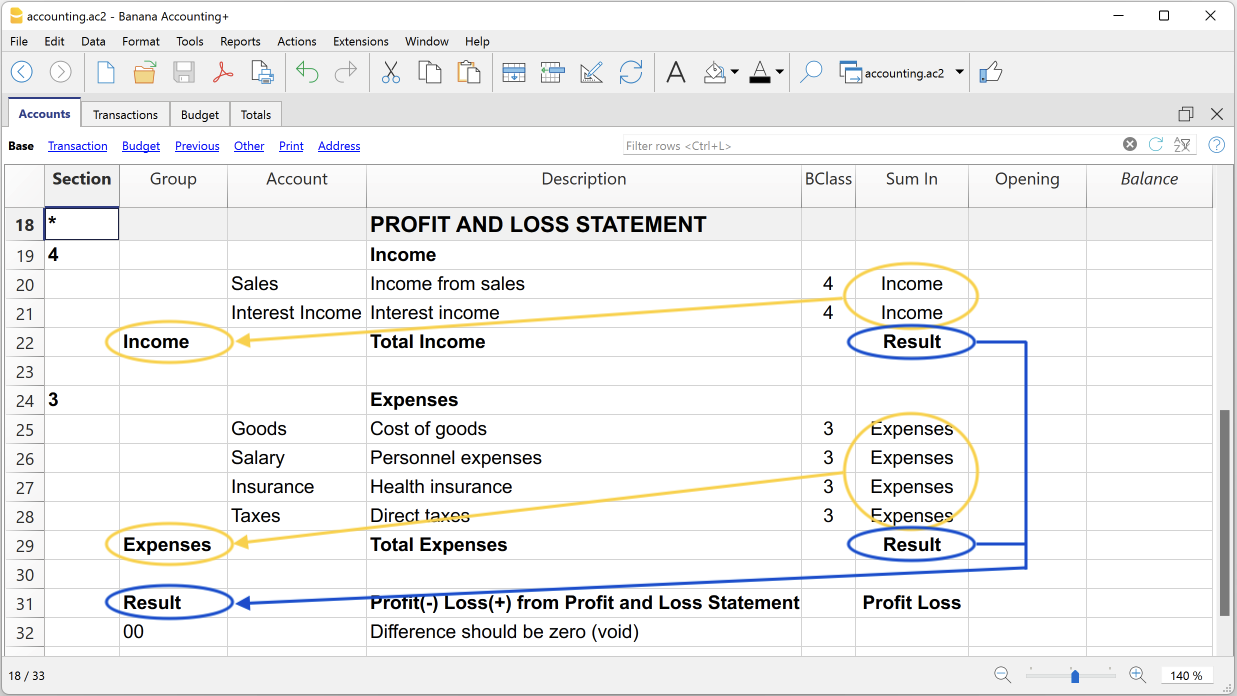
To understand the logic, let us present an example of a small part of the chart of accounts. For the accounts Cash, Post and Bank we create the Liquidity group:
- In the line below the liquidity accounts, in the Group column, enter the name of the Liquidity group.
- In the Description column, you enter the description of the group.
- In order for the programme to be able to update the balances in the liquidity group, it must be indicated which accounts are to be totalled.
In the Sum In column of the Cash, Post and Bank account, the name of the cash group is entered. The balances of the group are updated immediately.
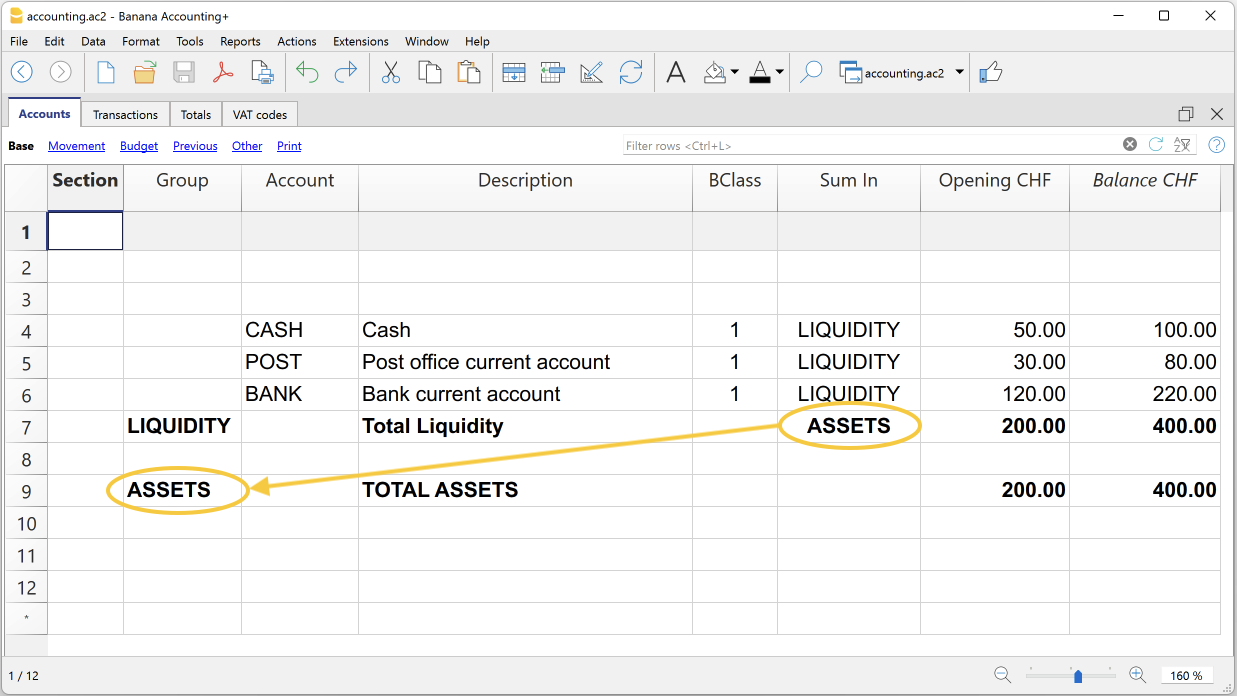
Using the same logic, we can also group groups. In fact, groups can also be totalled into other groups at a higher level.
Suppose we add a group into which to group and then total the Liquidity group.
- In the line below the Liquidity group, in the Group column, the name of the Assets group is entered.
- In the Description column, you enter the description of the group.
- In order for the programme to be able to update the balances in the Assets group, it must be indicated which groups are to be totalled.
In the Sum In column of the Liquidity group, the name of the Assets group is entered. The group's balances are updated immediately.
Following this logic, it is possible to create a structure with groups and subgroups for the entire chart of accounts, in order to create charts of accounts suitable for any specific country and requirement.
The exact same logic can also be applied for grouping VAT codes in the VAT Codes table, and also for grouping items in the Items table of the Warehouse and Fixed asset register.
Extensive use of the totalisation system
The totalisation system is very flexible:
- Accounts and groups can be added together in a group.
- Title texts can be assigned the group to which they belong.
- Any kind of numbering (numerical and/or letter) can be used.
- Up to 100 totalisation levels can be created.
- Group totalisation is independent of the sequence of rows:
- The total row can be defined before and after the account or group rows.
- The total row can also be defined in a completely detached position from the account and group rows, as in the case of the Accounts Payable / Suppliers ledger.
- The same account cannot be totalled in two Groups at the same time.
- The system is also used to total the Cost Centres and Segments.
The totalisation of amount columns
The calculation procedure totals the columns of type amount.
- The amount columns defined by the system are totalled.
- The amount columns added by the user are totalled.
The calculation sequence
The programme calculates totals as follows:
- Clears the column amounts of the Group rows.
- Adds up the amounts of the Accounts rows in the Group rows (first level of calculation).
- Adds up the balance of the Group rows in the higher level Groups.
Repeats the operation until all levels are calculated.
When a Group is totalled in a lower level Group, an infinite error loop is created.
Error checking and reporting
When creating groupings, the programme checks and reports any errors so that they can be corrected immediately.
When a non-existent group has been indicated in the Sum In column, the programme reports the error 'Group not found'. In this case it is sufficient to:
- Create the group in the Group column.
- Recalculate accounting with the command Check and recalculate accounting
- Recalculate all totals with the command Recalculate totals.
Rename groups
With the Rename command, existing group names can be renamed automatically, without having to manually change the matches in the Group and Sum In columns.
Printouts
When printing the Balance Sheet, Profit and Loss Statement or other reports that contain groupings, the printout shows the order of the groupings as they have been set in the various tables.
Switch to new chart of accounts
Below is an explanation of how to proceed to:
- switch to a chart of accounts with a different numbering;
- retrieve and convert the existing accounting data, including transactions, into the new chart of accounts.
Conversion for the new year
If you want to start a new year with a new chart of accounts, there are two possible approaches.
1. Convert the previous year and then create the new year
In this case you will have two files:
- the file of the year being closed, which contains:
- the Accounts column with the old account numbers;
- the Accounts_1 column with the new account numbers;
- the file for the new year, based on the new chart of accounts.
This approach is recommended because it allows the charts of accounts of the two years to be aligned.
Furthermore, it allows you to continue making changes in the closing year and to later retrieve the opening balances in the file for the new year.
2. Create the new year and convert the new year file
The file for the year being closed remains unchanged.
For the new year, you initially get an intermediate file, with the old chart of accounts but with carried forward balances.
The conversion of the new year's file can be performed immediately or even after some transactions have already been entered.
With this method, since the previous year's file keeps the old account numbers, it will no longer be possible to retrieve later changes made in the previous year into the new year.
- Create a new accounting file
- Create a new file via the File > New menu.
- Choose a predefined chart of accounts template.
- Adapt the chart of accounts to your needs.
- Add the matching accounts in the Accounts table
- Open the Data > Columns setup menu.
- Click the Add button.
- Insert the column with the description Account_1.
For each account in the new chart, in the Account_1 column enter the corresponding number from the old chart of accounts.
- If an account remains unchanged, the Account_1 column can also be left empty.
- If multiple accounts must be grouped into a single account, indicate the numbers separated by semicolons, for example:
1000;1001
In this case, the first account must be repeated, otherwise only the last one will be considered. - If instead one account must be split into several accounts, the split must be performed manually.

Start the import
- Activate the command from the Actions > Import into accounting > Import file menu.
- With the Browse button, select the accounting file with the old chart of accounts.

- Click OK to proceed to the next window.
- Set the import options:
- enable the Convert account numbers option
- indicate that the matchings are present in the destination file.
- Start the import.

Repeat the import
If errors are reported and the operation needs to be repeated, it is essential to undo the previous import so that the destination file is empty.
Otherwise, the opening balances and transactions would be duplicated.
Splitting an account into multiple accounts
When switching to a more detailed chart of accounts, it may be necessary to split one account into several.
After the import, proceed manually as follows:
- in the chart of accounts, split the opening, budget and previous balances into several accounts;
- review each transaction of the account to be split and assign the more specific account;
- if necessary, create additional transactions to split an amount into several parts;
- proceed in the same way for the transactions in the Budget table.
Result and possible errors
If the program reports errors (missing accounts or other issues), it is often necessary to:
- undo the import;
- complete or correct the matchings;
- repeat the import operation.
Since the program works with different charts of accounts, it is not possible to automatically perform in-depth checks on the correctness of the groupings.
It is therefore recommended to manually check the result, ensuring that the totals of the balance sheet and income statement are correct.
How to reclassify the balance sheet and income statement
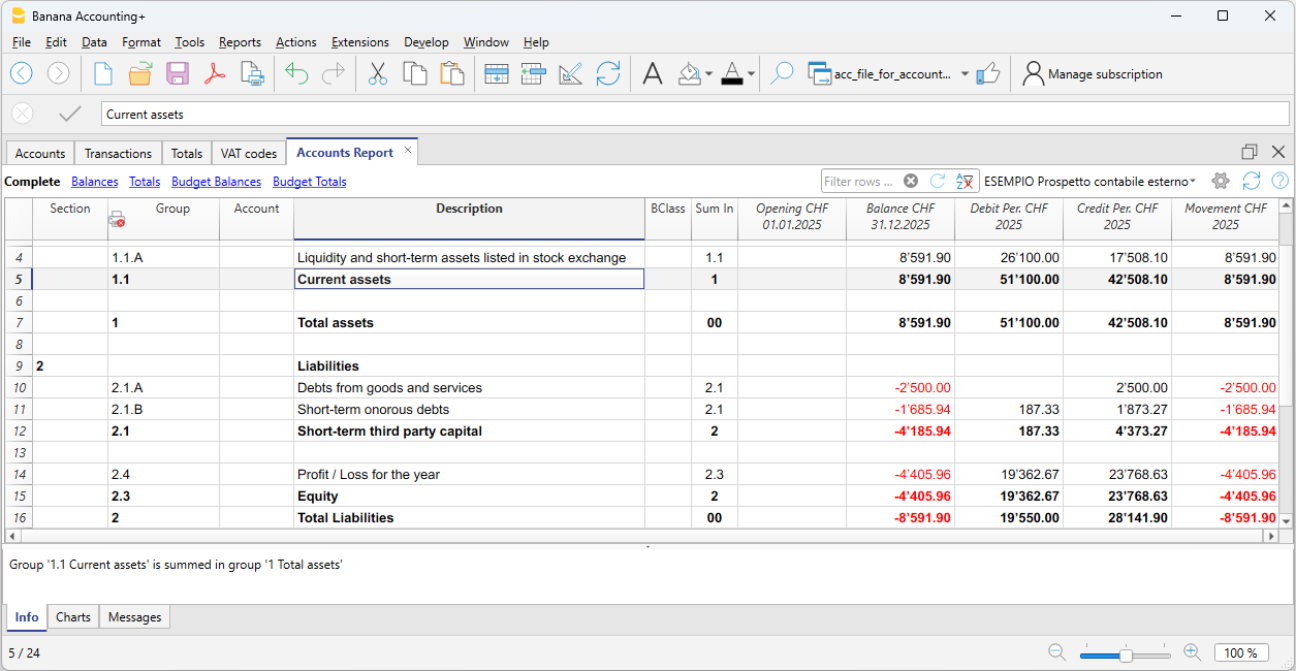
In Banana Accounting Plus, the reclassification of the balance sheet and income statement is done through the External Accounting Report, a file separate from the accounting, designed to set up a customized presentation of the data. This allows accounts to be grouped differently from the standard chart of accounts structure.
The grouping scheme defined in the External Accounting Report is linked to the accounting file to extract, total, and present the accounts according to the new desired classification. This feature is available exclusively with the Advanced plan of Banana Accounting Plus.
Create an Accounting Report File
To create an Accounting Report file:
- Menu File > New > Accounting Report
- You can choose from an existing template or start from a new one
- Once created, save the file with a name.
Below is an example of a predefined Accounting Report used to create a reclassification of the Balance Sheet according to Art. 959 of the Swiss Code of Obligations.
Everyone can choose to have their own, starting from an empty file.
- When creating your own Accounting Report, groups and totals can be freely defined.
- It is also possible to customize the Accounting Report used in this example by downloading it from our program, as indicated in the previous sections, and customize the accounts or groups for your own reclassification.

The Columns of the Accounting Report
The Accounting Report table includes the same columns found in the Accounts table, where the Accounts or Groups for Totals are set up based on a custom scheme.
In the example, groups and totals were created for the reclassification of the Balance Sheet according to Art. 959 of the Swiss Code of Obligations.

Section
This column is used to indicate the value to be used in the presentation.
For the different options, see the Documentation on sections.
Group
Indicates the group in which to totalize the accounts retrieved from the accounting and the total group.
Account (visible only in the Complete view)
The account from the accounting file to be included in the accounting report.
- If accounts are entered, only those specified accounts will be included when the Report is executed.
- If no accounts are entered, the accounts from the accounting will be included, linked via the group.
Description
Description of the grouping or account.
Sum In
In the Sum In column, the Group (total row) in which the row should be totalized is indicated.
Tot
If set to "Yes", only the total row is displayed, not the individual account rows that make it up.
See Show only group totals in the Accounting Report.
Keep
Normally, the report includes total rows that contain accounts with balances.
If set to Yes, this column ensures the row is always shown. It can be applied to both groups (totals) and accounts.
With Mov.
Applies to groups with a zero balance.
The row is displayed if there have been movements during the period.
Methods for Reclassifying the Balance Sheet and Income Statement
To reclassify the balance sheet and income statement, you must first prepare the Accounting Report file.
There are two methods to set up the Accounting Report file for the reclassification of the balance sheet and income statement:
1. Reclassify Based on the Group Column
This method allows the reclassification of the balance sheet and income statement using the Group column of the Accounting Report file.
In the Accounting Report, you create your own system of groups and subgroups
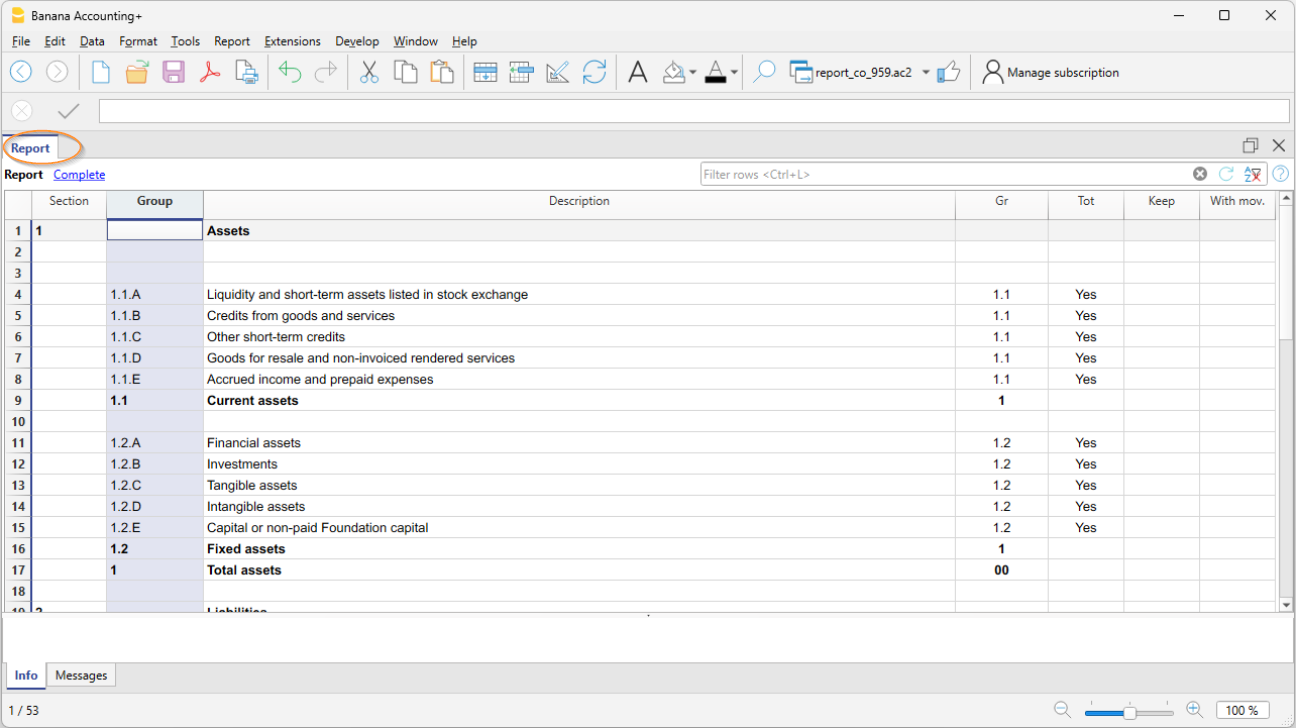
In the Section column, a number is inserted to define the title of the various sections in the printout.
- In the Group column, enter the groups that will total a series of accounts from the accounting file.
In the example, Group 1.1.A of the accounting report totals the liquidity accounts (cash, bank, post, etc.). - In the Gr column, insert the group that will totalize the individual groups listed in the previous rows.
In the example, in the Gr column, 1.1, which corresponds to Group 1.1, will totalize the Current Assets.
In the accounting file, to link with the Accounting Report, you must set the GR1 column
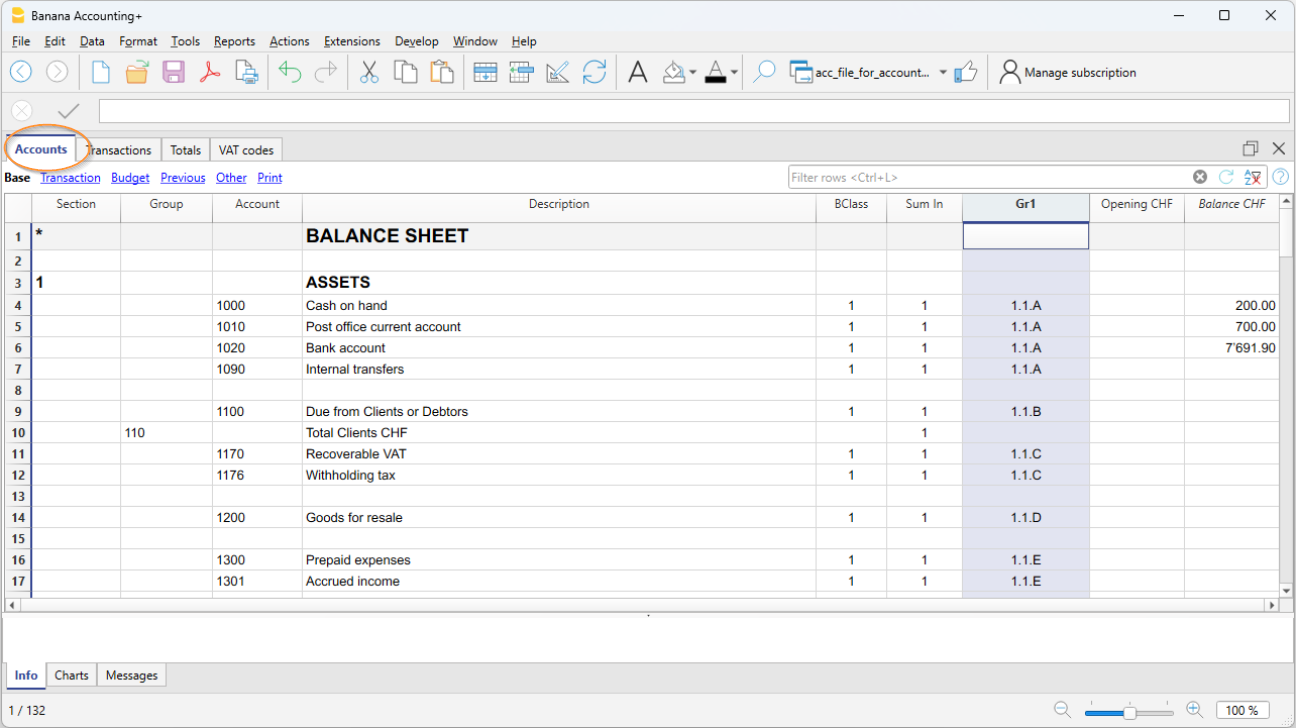
- In the Accounts table, column Gr1 or Gr2, insert the group set in the Accounting Report, in which the account should be totalized.
In the example, in the GR1 column all liquidity accounts have the group 1.1.A, which in the accounting report totalizes the Liquidity accounts.
If the Gr1 column is not visible, use the command Data > Columns setup. - Accounts without any linkage will not be included in the Report.
2. Reclassify Based on Accounts
This method is useful when you want to include only certain accounts from the accounting in the Accounting Report file
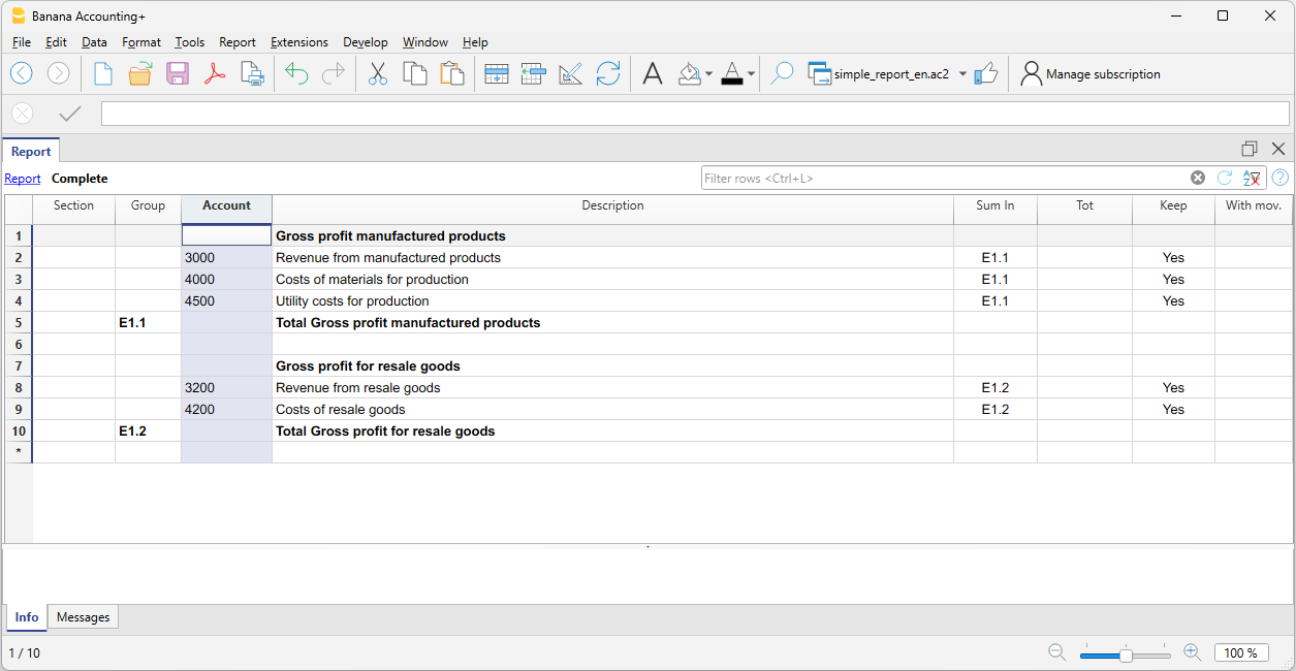
- In the Section column, a number is inserted to define the title of the various sections in the printout
- In the Group column, the groups that total each account imported from the accounting are defined
In the example, Group E1.1 of the accounting report totals accounts 3000, 4000, 4500 from the Accounting Report - In the Account column, enter the same account numbers from the accounting that you want to include in the Accounting Report
Only the specified accounts will be included in the report. - In the Description column, enter the description of the accounts
In the Sum In column, enter the totalization group (e.g. E.1, E1.2...).
Print the Accounting Report
The Accounting Report that reclassifies the balance sheet and income statement is displayed and printed from the accounting file :
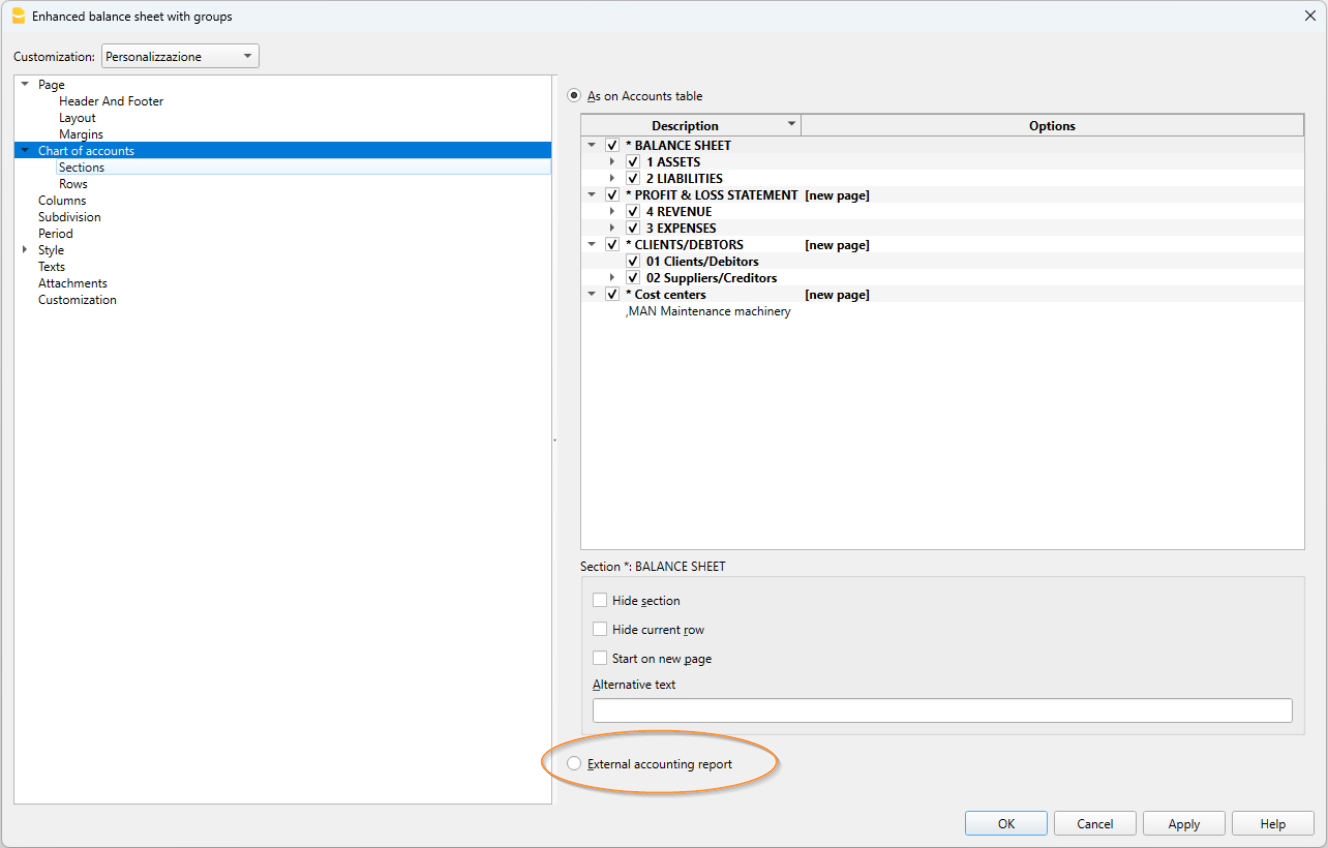
- Menu Reports > Enhanced balance sheet with groups
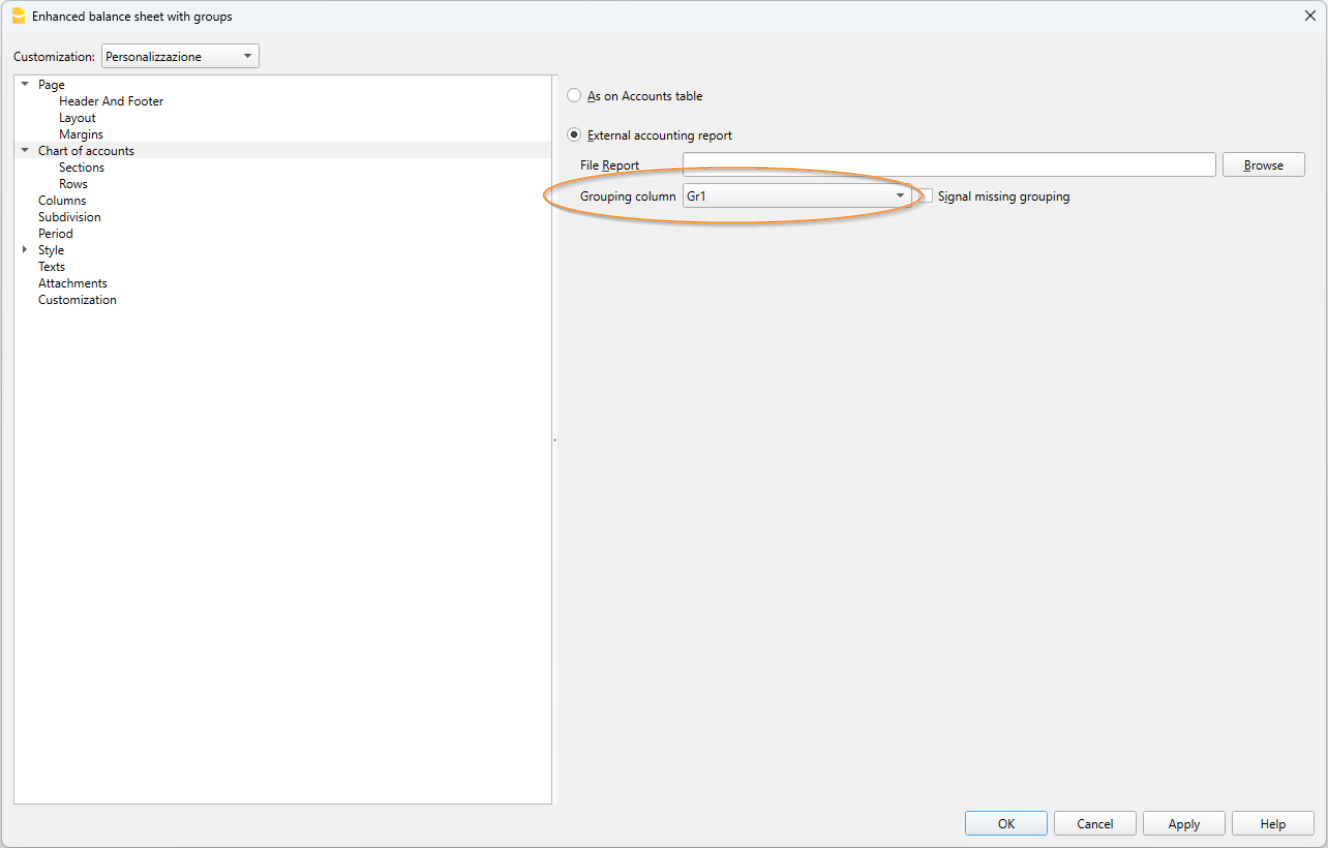
- Section Chart of Accounts > External Accounting Report
- In the dialog window, in the grouping column, select the column through which you want to apply the grouping (GR1, BClasse, VAT, etc...).
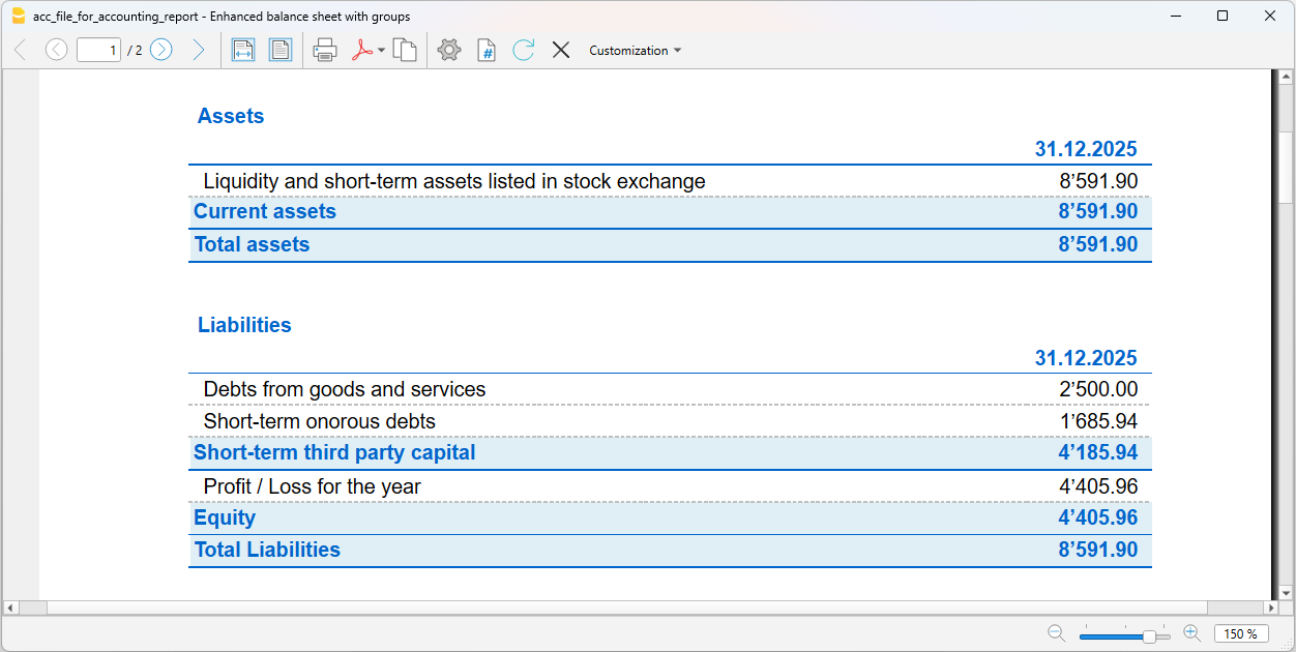
You obtain a printout like the Enhanced Balance Sheet with Groups, but with your own reclassification.
Or:
- Menu Report > Accounting Report
- In the Basic section, select the External Accounting Report option.
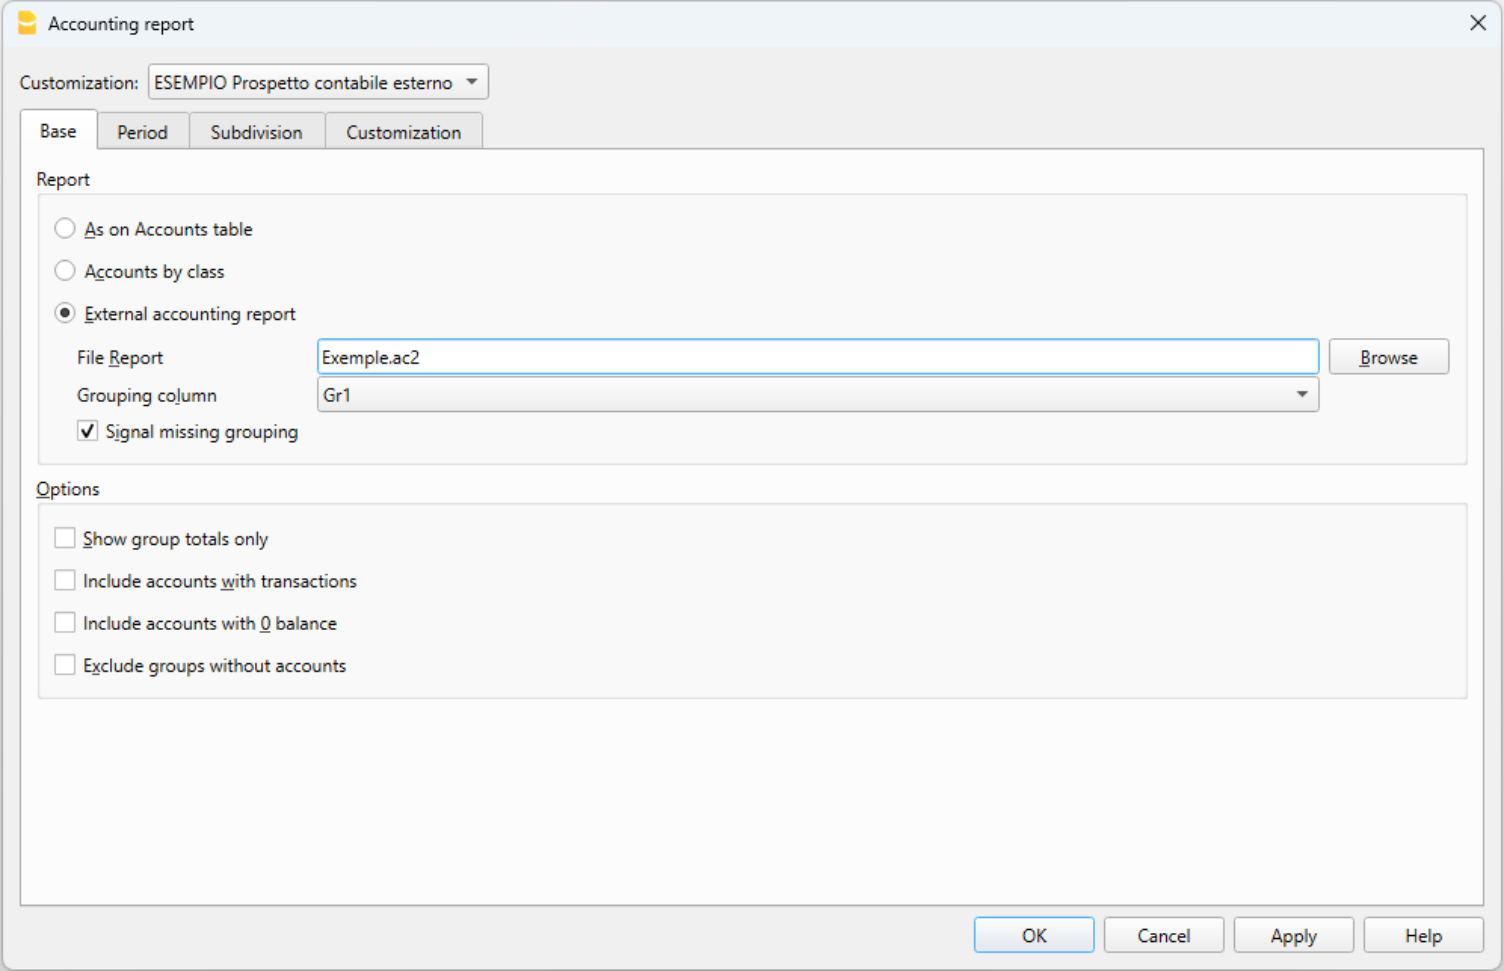
A table view is displayed, similar to the Accounts table, but with your own reclassification