Report Extensions
Account Statement Letter
Account Statement LetterInstall the extension
To install the extension:
- Open Banana Accounting Plus.
- Menu Extensions > Manage Extensions.
- In the search field enter Account Statement Letter.
- From the extensions list select Account Statement Letter.
- Select the extension and click Install.
- Click Close to close the window.
Create the report
To creare the report:
- Open an accounting file.
- From the menu File > File and accounting properties > Address, enter the sender address.
- In the Accounts table (Address view) enter the receiver address for the account.
- From the Extensions menu select the Account Statement Letter.
- Enter the account number.
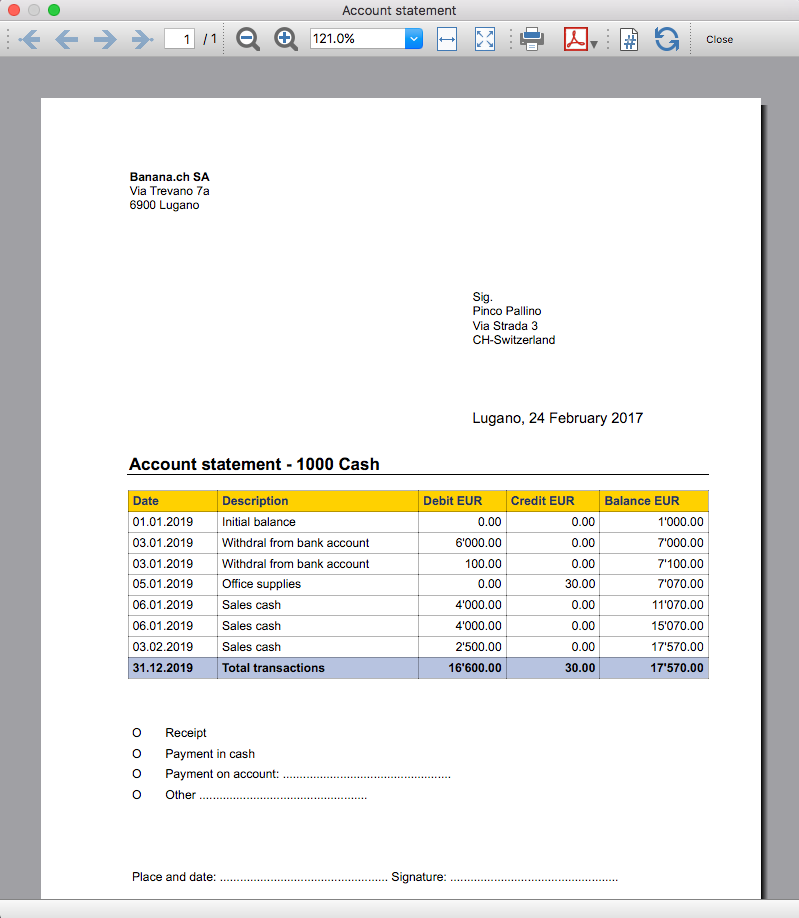
Example of account statement report:
Account balance by day within a period
Account balance by day within a periodInstall the extension
To install the extension:
- Open Banana Accounting Plus.
- Menu Extensions > Manage Extensions.
- In the search field enter Account balance by day within a period.
- From the extensions list select Account balance by day within a period.
- Select the extension and click Install.
- Click Close to close the window.
Create the report
To creare the report:
- Open an accounting file.
- From the Extensions menu select the Account balance by day within a period.
- Enter the account number.
- Select the period.
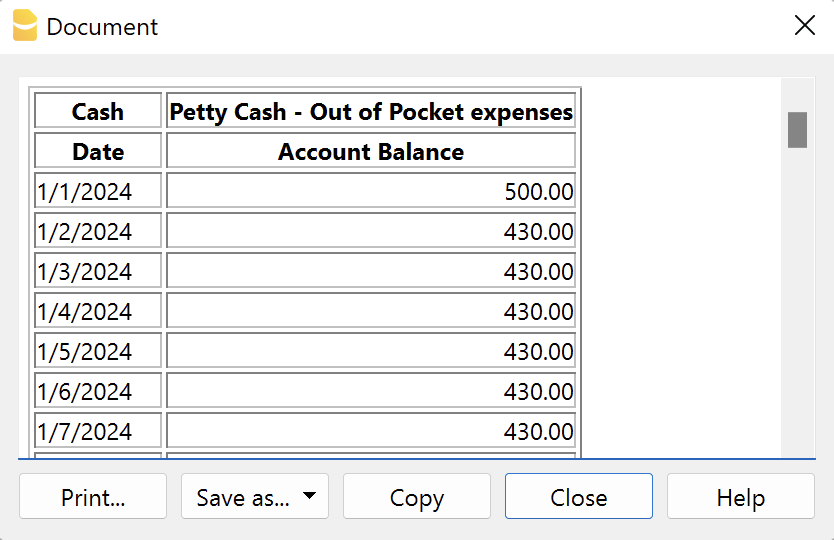
A window with results is displayed. You can copy, save and print the results.
Account balance for all days in a month
Account balance for all days in a monthInstall the extension
To install the extension:
- Open Banana Accounting Plus.
- Menu Extensions > Manage Extensions.
- In the search field enter Account balance for all days in a month.
- From the extensions list select Account balance for all days in a month.
- Select the extension and click Install.
- Click Close to close the window.
Create the report
To creare the report:
- Open an accounting file.
- From the Extensions menu select Account balance for all days in a month.
- Enter the month number.
- Enter the account number.
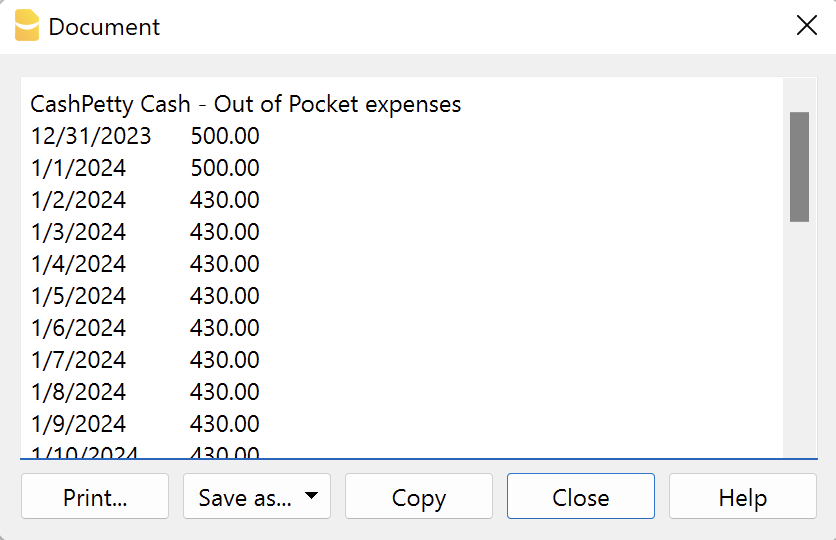
A window with results is displayed. You can copy, save and print the results.
Audit Reports [BETA]
Audit Reports [BETA]The main purpose of this extension is to provide reports that can be easily copied into excel, summarising and showing the main accounting data that are normally taken as a basis by auditors when preparing their analysis.
Useful reports for Banana users who need to send their auditor accounting data, but also for auditors who use Banana themselves, as these reports are based on the functionalities already offered by Banana and therefore facilitate and speed up the collection of accounting data.
Reports
The following reports can be generated:
- General Ledger: Shows the transactions for each account, like in the account card.
- Journal: Shows the details of each transaction.
- VAT Journal: Shows the details of each VAT transaction.
- Trial Balance: Shows the balance of all accounting items in two columns (debit and credit).
- Customers And Suppliers: Shows list of customers and suppliers and information about them.
Through a dialogue it is possible to decide the time of year to be taken into account in the reports.
Adding extra columns
Through the command "Columns Settings" additional columns can be inserted in each report, except for the trial balance, which remains as it is. To add a column to the report, simply enter its xml name in the dialogue. To add several columns, separate them with a semicolon ";" as shown in the example.

The columns you can add are the same present in the Transactions table, except for the Customers and Suppliers report, for which you find the data in the Accounts table.
If you accidentally add a column that is not contained in the tables mentioned, no error is currently raised, the column will be added but no value will be present.
Copy to Excel
Reports are easily copied to Excel, when the report preview is generated, just click on the "copy" icon and paste the copied table into an Excel sheet.

Once the whole table has been copied, you can arrange the file as you want and customise your report with Excel tools.

Messages
- Total debit and total credit are different: The total Debit and total Credit do not match, check if the same error is present in your Accounting file, if it is only present in the report send us a feedback
Lettera con testo libero (Banana+)
Lettera con testo libero (Banana+)L'estensione presentata qui di seguito permette di creare una lettera con testo libero per i soci registrati in Banana Contabilità Plus (tabella Conti).
È fondamentale avere l'impostazione dei soci con i centri di costo, utilizzando il centro di costo CC3.
Prerequisiti
Per utilizzare questa estensione è necessario:
- Scaricare e installare Banana Contabilità+ (versione 10.1.7 o successive).
- Avere il piano Advanced di Banana Contabilità Plus.
Installazione e utilizzo dell'estensione
- Installa l'estensione Lettera (Banana+). Visita la documentazione Gestione Estensioni.
- Una volta installata, l'estensione sarà visibile nel menu Estensioni dove potrà essere eseguita.
Creare una lettera
- Inserisci i dati dell'Associazione nella scheda Indirizzo del file contabile.
- Dal menu Estensioni seleziona l'estensione Lettera (Banana+) .
- Completa i campi del dialogo Impostazioni e clicca su OK.
Dialogo Impostazioni
Esegui l'estensione dal menu Estensioni > Lettera (Banana Plus).
Si aprirà il dialogo delle Impostazioni dell'estensione, dove puoi definire le informazioni necessarie per creare la stampa della lettera.
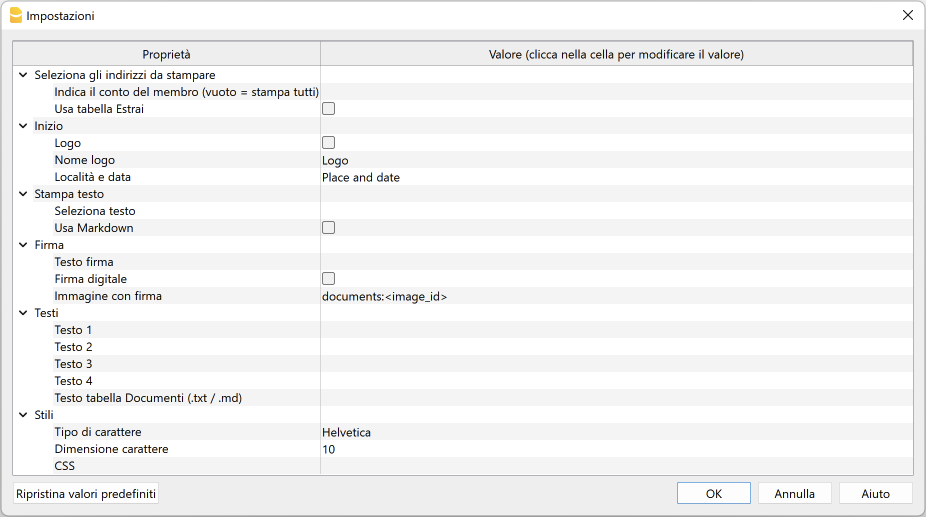
Per l'inserimento dei dati fai un clic nel campo della colonna Valore.
Le impostazioni sono suddivise nei seguenti gruppi:
- Seleziona gli indirizzi da stampare
- Definisci i conti dei soci per i quali creare la lettera.
- Inizio
- Definisci il logo per l'intestazione, la località e la data.
- Stampa testo
- Definisci quale testo utilizzare.
- Firma
- Definisci il testo e l'immagine per la firma.
- Testi
- Definisci fino a quattro testi diversi o riprendi un testo dalla tabella Documenti.
- Stili
- Definisci il tipo di carattere e la dimensione per i testi della lettera.
I dati inseriti vengono utilizzati per generare il report, che sarà poi possibile salvare e stampare.
Seleziona gli indirizzi da stampare
Qui puoi decidere per quali soci, definiti con i centri di costo CC3, creare la lettera.
- Indica il conto del membro (vuoto = stampa tutti)
- Inserisci un conto singolo (ad es. "10001").
- Inserisci più conti suddivisi da una "," (ad es. "10001,10002,10005").
- Se non inserisci nulla verrà stampata una lettera per tutti i membri registrati.
- Usa tabella Estrai
- Utilizza i conti estratti nella tabella Estrai.
- È necessario prima utilizzare il comando dal menu Dati > Estrai righe e ordina righe per estrarre le righe con i conti che vuoi utilizzare.
Inizio
Qui definisci il logo per l'intestazione, la località e la data.
- Logo
- Includi un logo nell'intestazione. Il logo è definito tramite il comando dal menu File > Imposta logo.
- Nome logo
- Inserisci il nome del logo da utilizzare.
- Località e data
- Inserisci la località e la data.
Stampa testo
Qui puoi decidere quale testo utilizzare tra quelli che hai inserito.
- Seleziona testo
- Seleziona dalla lista il testo che si desidera utilizzare.
- Per l'inserimento dei testi vedere più in basso.
- Usa Markdown
- Il testo selezionato viene interpretato come un testo di tipo Markdown (richiede il piano Advanced di Banana Contabilità Plus).
Firma
Qui definisci il testo e l'immagine per la firma della lettera.
- Testo firma
- Inserisci nome e cognome di chi rilascia la lettera.
- Firma digitale
- Utilizza un'immagine come firma.
- Immagine con firma
- Inserisci l'immagine da utilizzare. Hai due modalità per farlo:
- documents:<nome_id>: per utilizzare un'immagine salvata nella tabella Documenti, dove <nome_id> rappresenta il nome inserito nella colonna ID della tabella (es. "documents:firma").
- file:document/<immagine>: per utilizzare un'immagine salvata esternamente a Banana, ma nella stessa cartella del file .ac2. Indica anche l'estensione dell'immagine .png oppure .jpg (es. "file:document/firma.png").
- Inserisci l'immagine da utilizzare. Hai due modalità per farlo:
Testi
Qui definisci i testi della lettera. Puoi inserire fino a quattro testi diversi o riprendere un testo dalla tabella Documenti.
- Testo 1, Testo 2, Testo 3, Testo 4
- Inserisci il testo che desideri visualizzare nella stampa. Il testo può essere disposto anche su più righe.
- I testi possono essere di tipo testo e di tipo Markdown.
- Puoi inserire fino a quattro testi diversi, e scegliere poi quale utilizzare.
- Testo tabella Documenti (.txt / .md)
- Per utilizzare i testi inseriti nella tabella Documenti.
- Inserisci l'Id del documento (es. "Lettera.txt", "Lettera", "Lettera.md", ecc).
- I testi possono essere di tipo testo e di tipo Markdown.
- Per i testi di tipo Markdown, l'Id nella tabella Documenti deve terminare con ".md" e quì deve essere riportato il nome completo, compreso il ".md" finale (es."Lettera.md").
Stili
Qui definisci il tipo di carattere e la dimensione per i testi della lettera.
- Tipo di carattere
- Definisci il tipo di carattere.
- Il tipo predefinito è "Helvetica".
- Dimensione carattere:
- Definisci la dimensione del carattere.
- La dimensione predefinita è "10".
- CSS
- Opzionale.
- Puoi modificare l'aspetto della stampa (formattazione del testo, posizionamento dell'indirizzo, ecc.) inserendo il codice CSS per personalizzare lo stile (richiede il piano Advanced di Banana Contabilità Plus).
- Vedi la documentazione per creare stili CSS (documentazione in in inglese).
Tabella Estrai (comando Estrai righe)
La funzionalità Estrai e ordina righe può essere utilizzata per selezionare i conti dei soci per cui creare la lettera. È utile per quando ad esempio si vuole stampare una lettera solo per alcuni soci, senza dover inserire l'elenco dei conti direttamente nelle impostazioni dell'estensione.
Raggruppando ad esempio i soci in diversi gruppi (tabella Conti), con il comando dal menu Dati > Estrai righe e ordina righe si possono poi estrarre le righe dei soci appartenenti solo a determinati gruppi (nell'esempio i soci appartenenti ai gruppi S1 e S3).
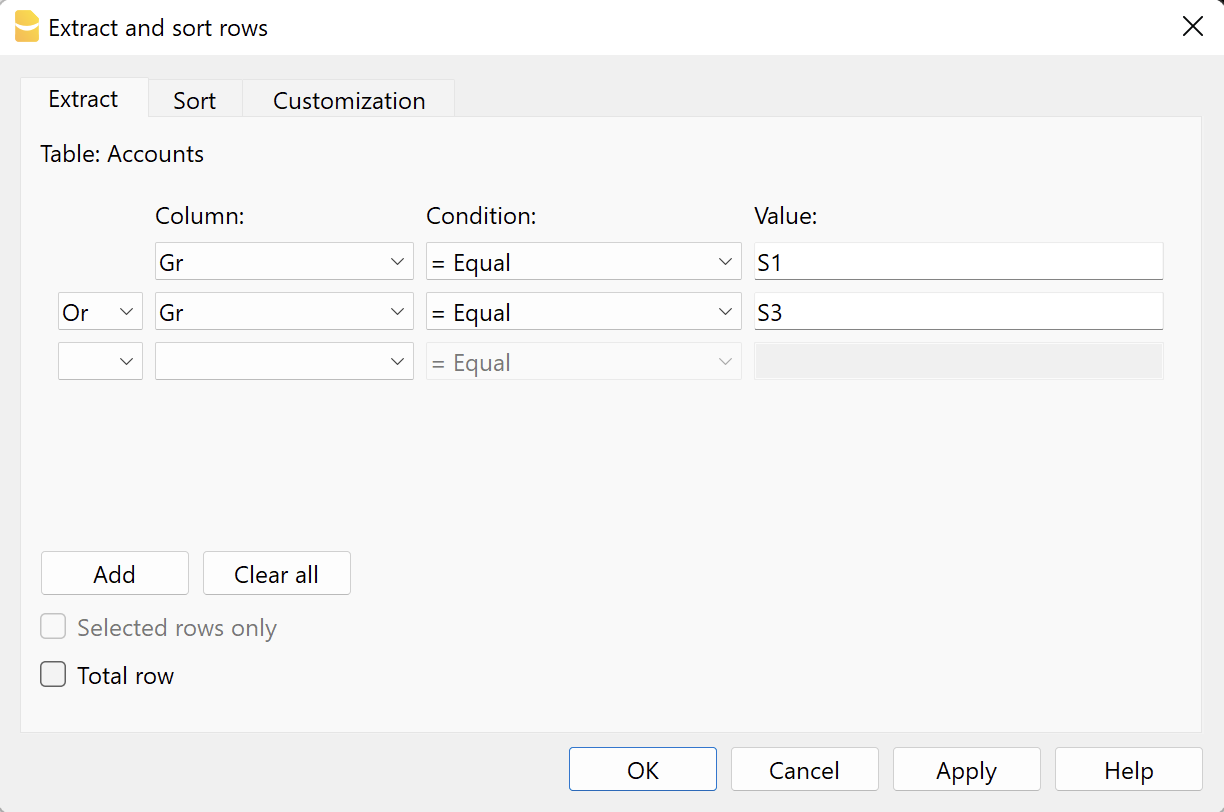
Per utilizzare le righe estratte:
- Estrai le righe con il comando dal menu Dati > Estrai righe e ordina righe.
- Esegui l'estensione e nel dialogo Impostazioni, sezione Seleziona gli indirizzi da stampare, e vista la casella Usa tabella Estrai.
- Se non sono state estratte le righe prima di avviare la stampa, verrà mostrato un messaggio di avviso e verranno utilizzati tutti i conti dei soci registrati.
Testo della lettera (testo normale)
Per inserire e utilizzare un normale testo ci sono due possibilità:
- Inserire il testo nel dialogo Impostazioni.
- Inserisci il testo nei campi Testo 1, Testo 2, Testo 3 o Testo 4.
Puoi aggiungere fino a quattro testi. - In Stampa testo > Seleziona testo, selezionare il testo da utilizzare.
- In Stampa testo, NON selezionare l'opzione Usa Markdown.
- Inserisci il testo nei campi Testo 1, Testo 2, Testo 3 o Testo 4.
- Inserire il testo nella tabella Documenti.
- Aggiungi un documento selezionando il tipo Testo normale (text/plain).
Non ci sono limiti, puoi aggiungere tutti i testi che vuoi. - Nel dialogo Impostazioni:
- In Stampa testo > Seleziona testo, seleziona l'opzione Testo tabella Documenti (.txt / .md).
- In Testi > Testo tabella Documenti (.txt / .md), inserisci l'Id del testo inserito nella tabella Documenti (es. "text.txt").
- Aggiungi un documento selezionando il tipo Testo normale (text/plain).
Per tutti i testi:
- Con un'annotazione specifica puoi applicare lo stile grassetto ai testi. Per farlo, includi i testi desiderati tra doppi asterischi ** .
Esempi:- **testo** = testo
- **testoA testoB** testoC = testoA testoB testoC
- Se nelle righe di testo vengono inseriti i seguenti valori (in inglese), essi saranno sostituiti dai valori corrispondenti:
- <Account> : conto del socio
- <NamePrefix> : prefisso socio
- <FirstName> : nome del socio
- <FamilyName> : cognome del socio
- <OrganisationName> : organizzazione del socio
- <Address> : indirizzo del socio
- <AddressExtra> : indirizzo extra
- <Region> : regione/stato o provincia
- <Country> : nazione
- <Currency> : moneta
- <Amount> : importo totale delle donazioni
Testo della lettera (testo Markdown)
Il Markdown è un linguaggio che permette di creare del testo formattato usando un normale editore di testo e una sintassi semplice da scrivere e leggere.
Per utilizzare il Markdown è necessario il Piano Advanced di Banana Contabilità Plus.
Per inserire e utilizzare un testo di tipo Markdown ci sono due modalità.
- Inserire il testo nel dialogo impostazioni.
- Inserisci il testo nei campi Testo 1, Testo 2, Testo 3 o Testo 4.
Puoi aggiungere fino a quattro testi. - In Stampa testo > Seleziona testo, selezionare il testo da utilizzare.
- In Stampa testo, vistare l'opzione Usa Markdown.
- Inserisci il testo nei campi Testo 1, Testo 2, Testo 3 o Testo 4.
- Inserire il testo nella tabella Documenti.
- Utilizza l'Editor Markdown per aggiungere un documento, selezionando il tipo Testo formattato markdown (text/markdown).
Non ci sono limiti, puoi aggiungere tutti i testi che vuoi. - Il nome del file nella colonna Id deve terminare con ".md" (es. "text.md").
- Nel dialogo Impostazioni:
- In Stampa testo > Seleziona testo, seleziona l'opzione Testo tabella Documenti (.txt / .md).
- In Testi > Testo tabella Documenti (.txt / .md), inserisci l'Id del testo markdown inserito nella tabella Documenti (es. "text.md").
- Utilizza l'Editor Markdown per aggiungere un documento, selezionando il tipo Testo formattato markdown (text/markdown).
Per tutti i testi:
- Se nelle righe di testo vengono inseriti i seguenti valori (in inglese), essi saranno sostituiti dai valori corrispondenti:
- {{Account}} : conto del socio
- {{NamePrefix}} : prefisso socio
- {{FirstName}} : nome del socio
- {{FamilyName}} : cognome del socio
- {{OrganisationName}} : organizzazione del socio
- {{Address}} : indirizzo del socio
- {{AddressExtra}} : indirizzo extra
- {{Region}} : regione/stato o provincia
- {{Country}} : nazione
- {{Currency}} : moneta
- {{Amount}} : importo totale delle donazioni
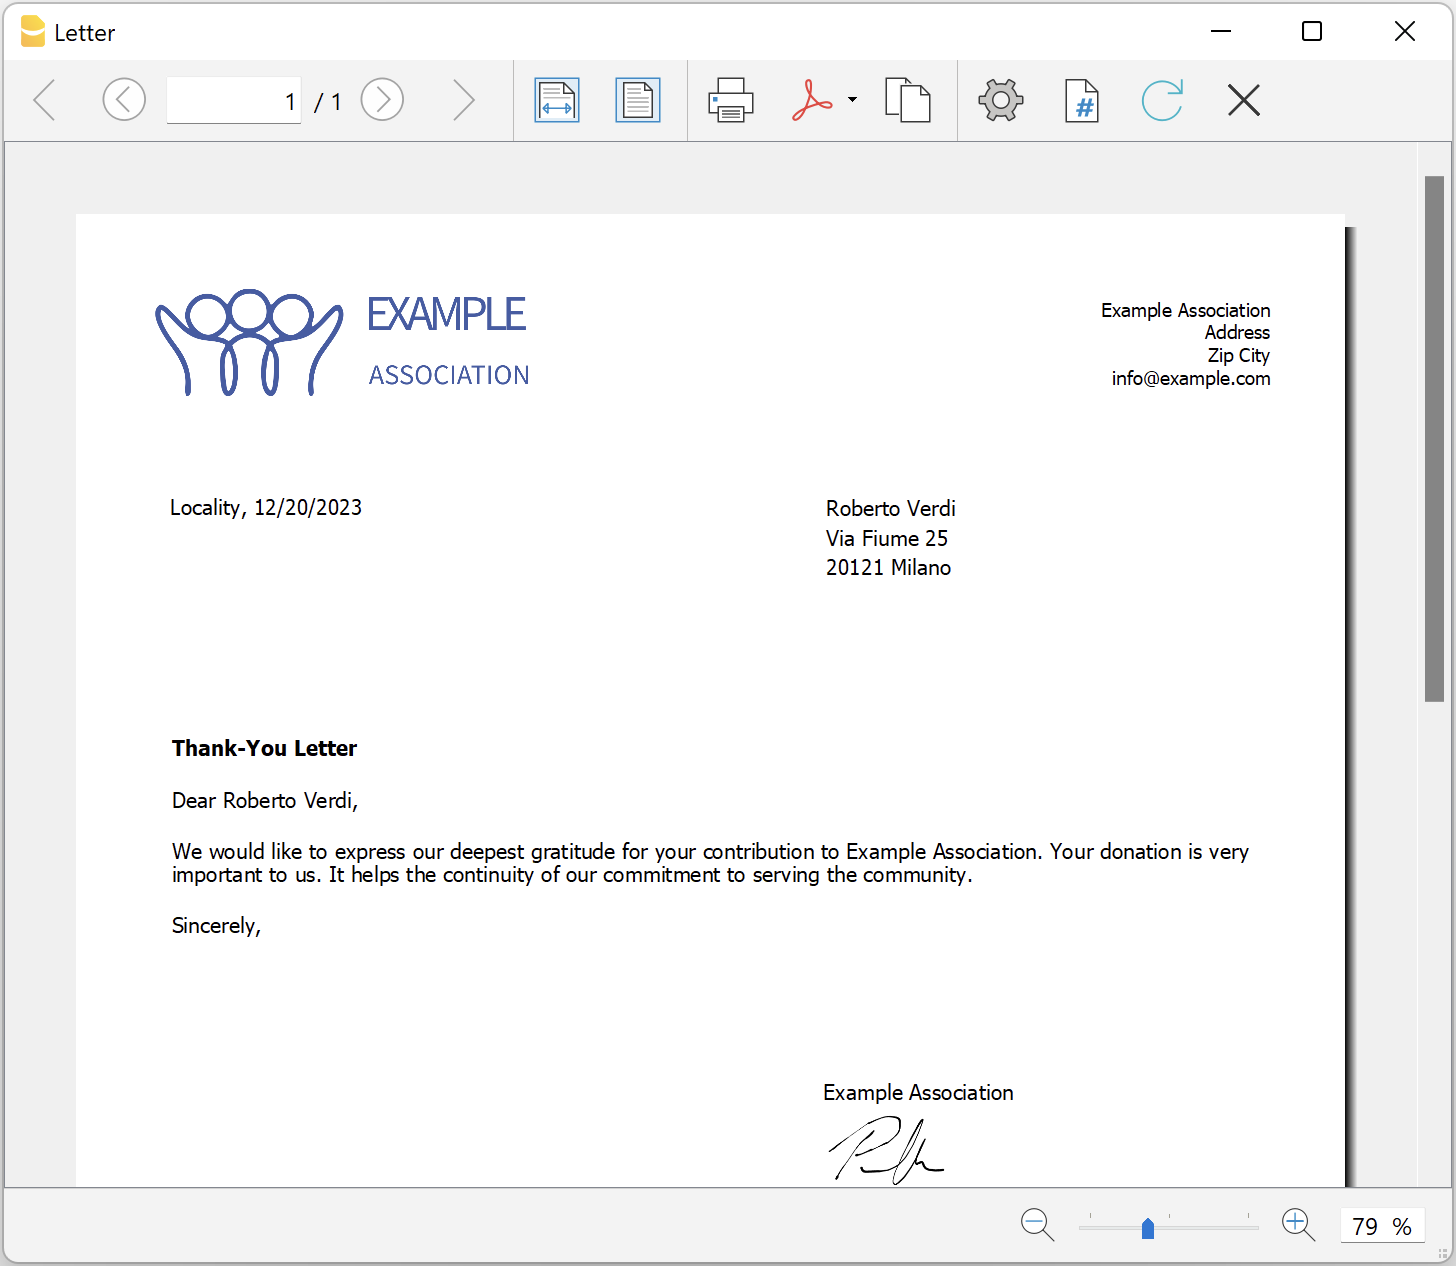
Esempio di stampa
Printing receipts from cash book transactions
Printing receipts from cash book transactionsThis extension prints payment receipts based on transactions from cash book accounting file.
Example of a payment receipt:
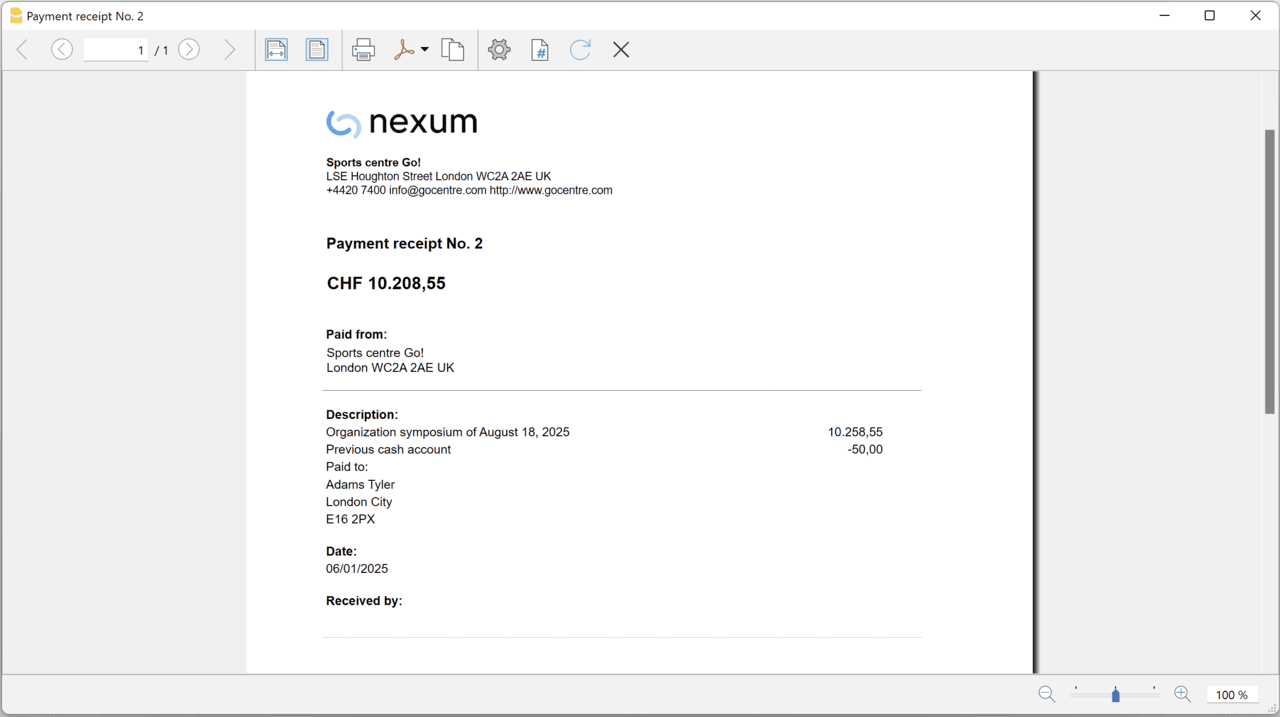
The program prints the receipt using the following logic:
- It takes all the lines with the same Doc Number, of the lines where the cursor is positioned.
- It prints the document number in the "Payment receipt No: "
- It prints the amount by summing all the amounts.
- It prints the Descriptions in different lines.
with the text of the Description column of all the transactions that have the same doc number.
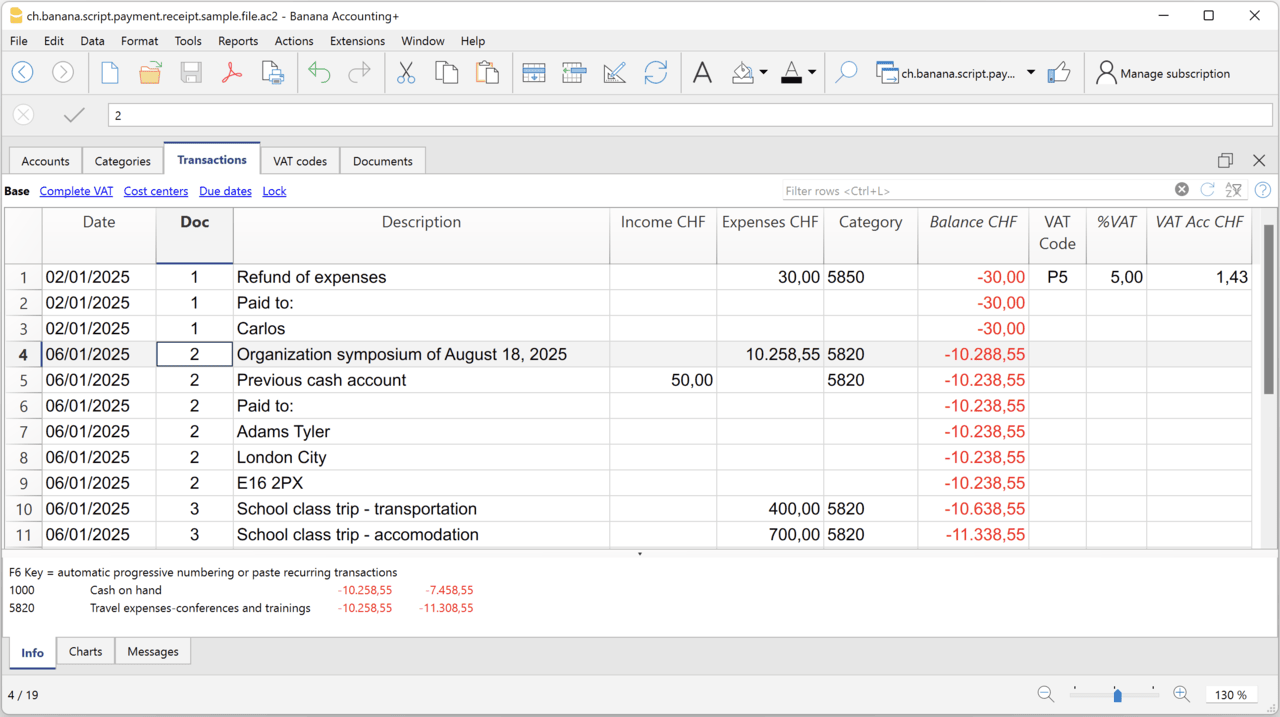
Example file
To created the receipts:
- Open a Cash Book file:
- Or download the example ch.banana.script.payment.receipt.sample.file.ac2 and open it.
- Positions on the line of the transaction group you wish to print.
- From the Extensions menu select the Printing receipts from cash book transactions.
Settings and properties
Prior to printing the receipt you can set the
Extension properties
You can set the following parameters from the menu Extensions > Manage Extensions, select the Printing receipts from cash book transactions extension and click on Settings.
- Include page header (1=yes, 0=no)
The logo and the address information can be included as header of the page. - Automatic date (1=yes, 0=no)
The date of the transaction is used. - Font type
The font type of the texts (Arial, Helvetica, Times New Roman, ...)
Address
Set your address from the menu File > File and accounting properties > Address.
Header logo
A logo for the header can be added as attachment in the Documents table.
- Add the Documents table to the Banana Accounting file.
If it is not already present you need to add the Documents table in the Banana document with the menu command Tools > Add new features > Add document table. - Add a row in the Documents table.
- In the ID column, enter "logo".
- In the Attachments column, double click on the cell and select Image, then choose the logo image you want to use.
Entering transactions
Cash book transactions are entered as usual in the Transactions table.
- Transactions are considered to belong to the same group when they have the same doc number.
- Paid to
- You can enter the text you want to display on the printout (e.g. "Paid to:").
- You can also enter text in bold by enclosing it in double asterisks ** (e.g. **Paid to:**)
- You can enter the text "#paidto" (without quotes) to let the program insert a blank line followed by the text in bold and in the language of the accounting file (it, fr, de, en, nl).
Report Balance and Profit & Loss with transactions details
Report Balance and Profit & Loss with transactions detailsThis extension creates a Balance Sheet and Profit & Loss report with transactions details for each account.
Install the extension
To install the extension:
- Open Banana Accounting Plus.
- Menu Extensions > Manage Extensions.
- In the search field enter Report Balance and Profit & Loss with transactions details.
- From the extensions list select Report Balance and Profit & Loss with transactions details.
- Select the extension and click Install.
- Click Close to close the window.
Create the report
To creare the report:
- Open an accounting file.
- From the Extensions menu select the Report Balance and Profit & Loss with transactions details.
- Select the financial report you want to print:
- Assets / Liabilities
- Income / Expenses
- All
Example of assets details: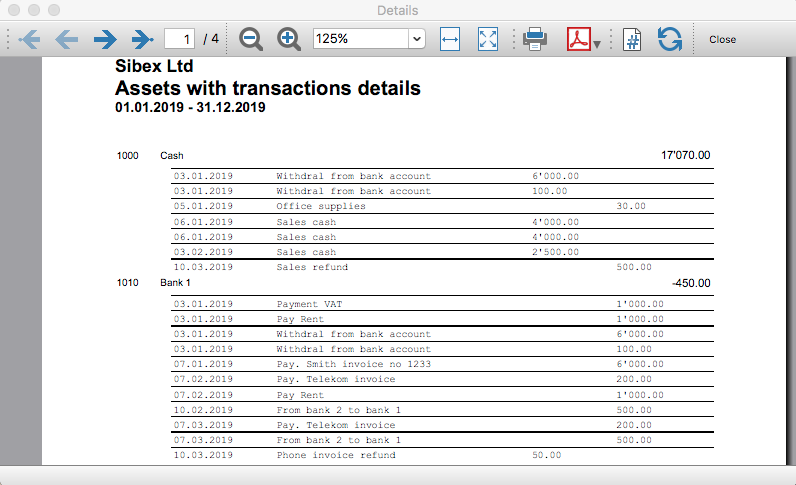
Example of liabilities details: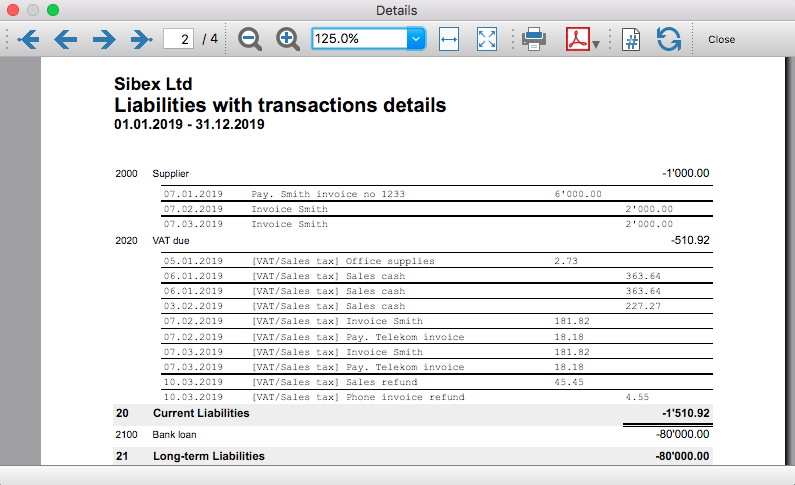
Example of income details: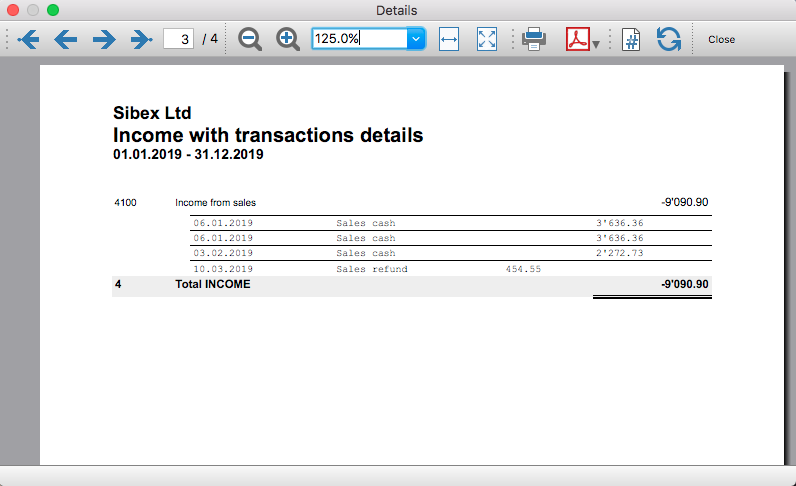
Example of expenses details: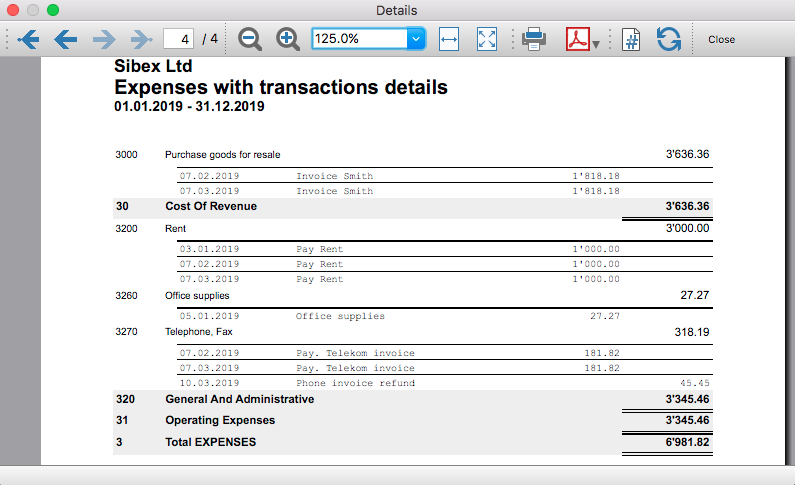
Transaction Voucher (Banana+)
Transaction Voucher (Banana+)Accounting settings
From menu File > File and accounting properties > Accounting Tab, enter the project number/name in the Header Left field.
How it works
- For each transaction of the Transactions table enter the voucher number in the Doc column.
- From the Transactions table of the accounting file select a row with the desired voucher number you want to create the report.
The voucher number is taken from the selected row where the cursor is positioned, but you can also change it manually into settings dialog. - Launch the extension from the menu Extensions > Transaction Voucher (Banana+).
- In the settings dialog window enter the required information.
- Logo
Check to include the logo in the header.
The logo is defined with the command File > Logo setup where you can also set the size, choose how to align it (left, centre, right). - Logo-Name
Enter the name of the logo customisation defined in the menu File > Logo setup, respecting upper and lower case. - Title
- Voucher number
- Paid to
- Paid in
- Cheque No.
- Payment Received by
- Paid by
- Prepared by
- Verified by
- Recommended by
- Approved by
- Logo
- All the values entered are saved and proposed the next time.
- The extension will print the information entered in the dialog plus the data of the transaction with the specified Voucher / Doc number.
Transaction Voucher (Helvetas model)
Transaction Voucher (Helvetas model)How it works
- From the Transactions table of the accounting file select a row with the desired Doc number.
- Launch the extension from the menu Extensions > Transaction Voucher (Helvetas model).
- A dialog window requesting some information will appear.
The voucher number is taken from the row selected where the cursor is positioned, but you can change it manually.
Complete all the remaining fields by entering your data and click Ok.
The values entered are saved and proposed the next time. - The extension will print the information entered in the dialog plus the data of the transactions with the specified Voucher / Doc number.
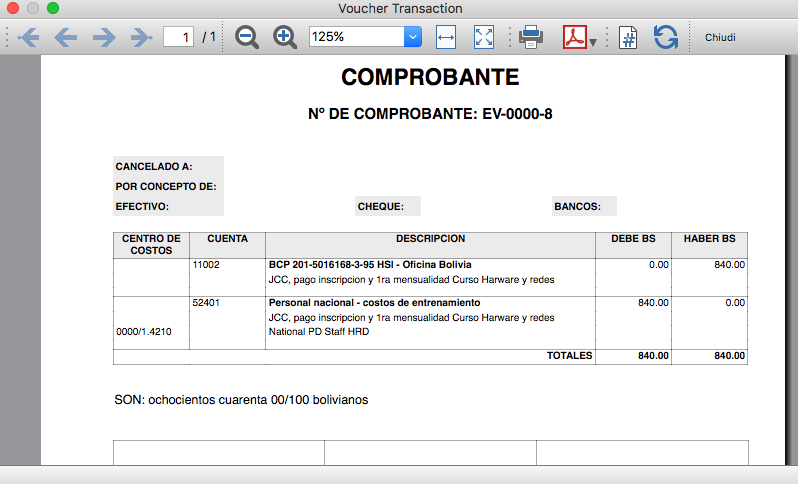
Example of Voucher report:
Transaction Voucher (Swiss Red Cross model)
Transaction Voucher (Swiss Red Cross model)Accounting settings
Two settings are required:
- the Header Left
- click menu File > File and accounting properties > Header Left.
The Header Left field must contain the project number and the project name divided by the "-" character (example: "1234 - Abc")
- click menu File > File and accounting properties > Header Left.
- add a small image/logo
- Add the Documents table to the Banana Accounting file.
If it is not already present you need to add the Documents table in the Banana document with the menu command Tools > Add new features > Add document table. - In the Id column, of the documents table insert transaction_voucher_image.
- In the Attachments column, double click on the cell, select Image and add the desired image.
- Add the Documents table to the Banana Accounting file.
How it works
- From the Transactions table of the accounting file select a row with the desired Doc number.
For example: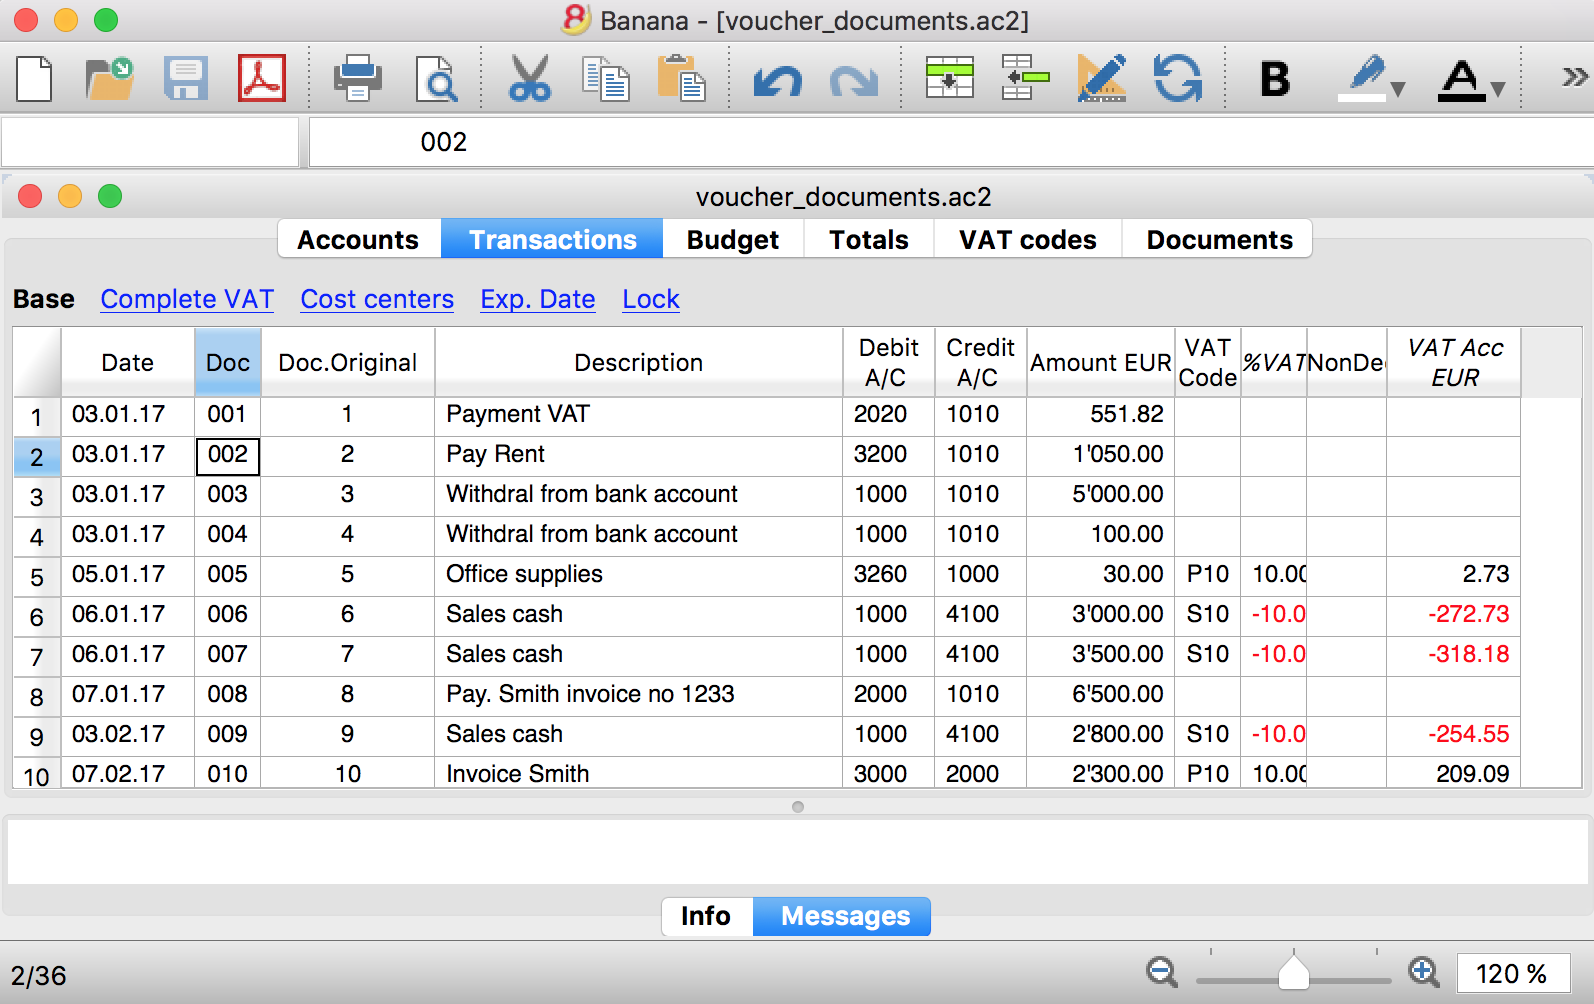
- Launch the extensions from the menu Extension > Transaction Voucher. A dialog window requesting some information will appear.
- The voucher number is taken from the row selected where the cursor is positioned, but you can change it manually.
- Complete all the remaining fields by entering your data and click Ok.
The values entered are proposed the next time.
Dialog example: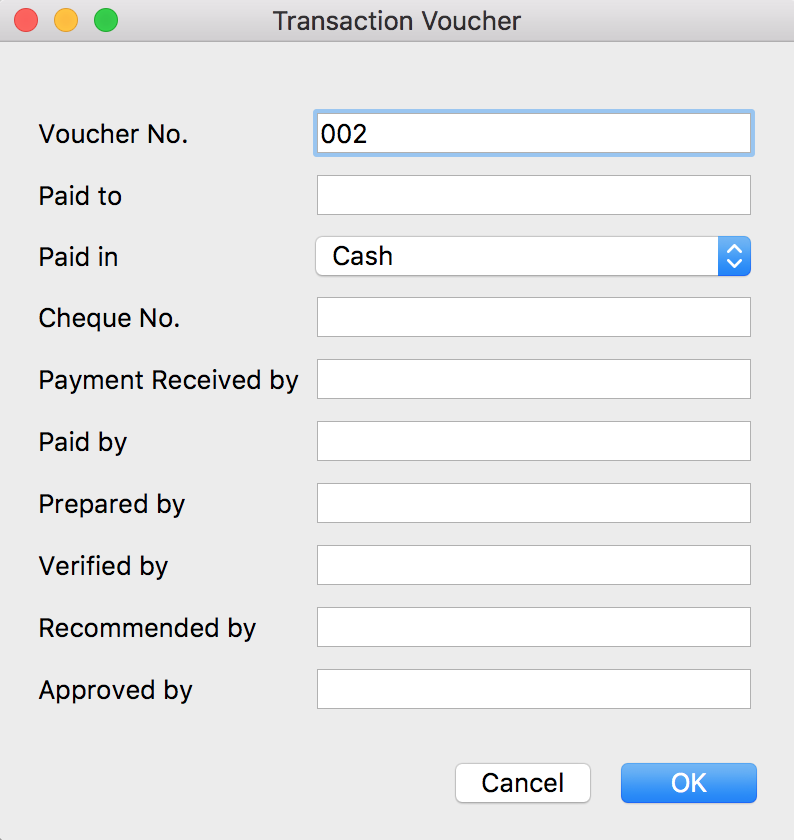
- The extension will print the information enterd in the dialog plus the data of the transactions with the specified Voucher / Doc number.
For example: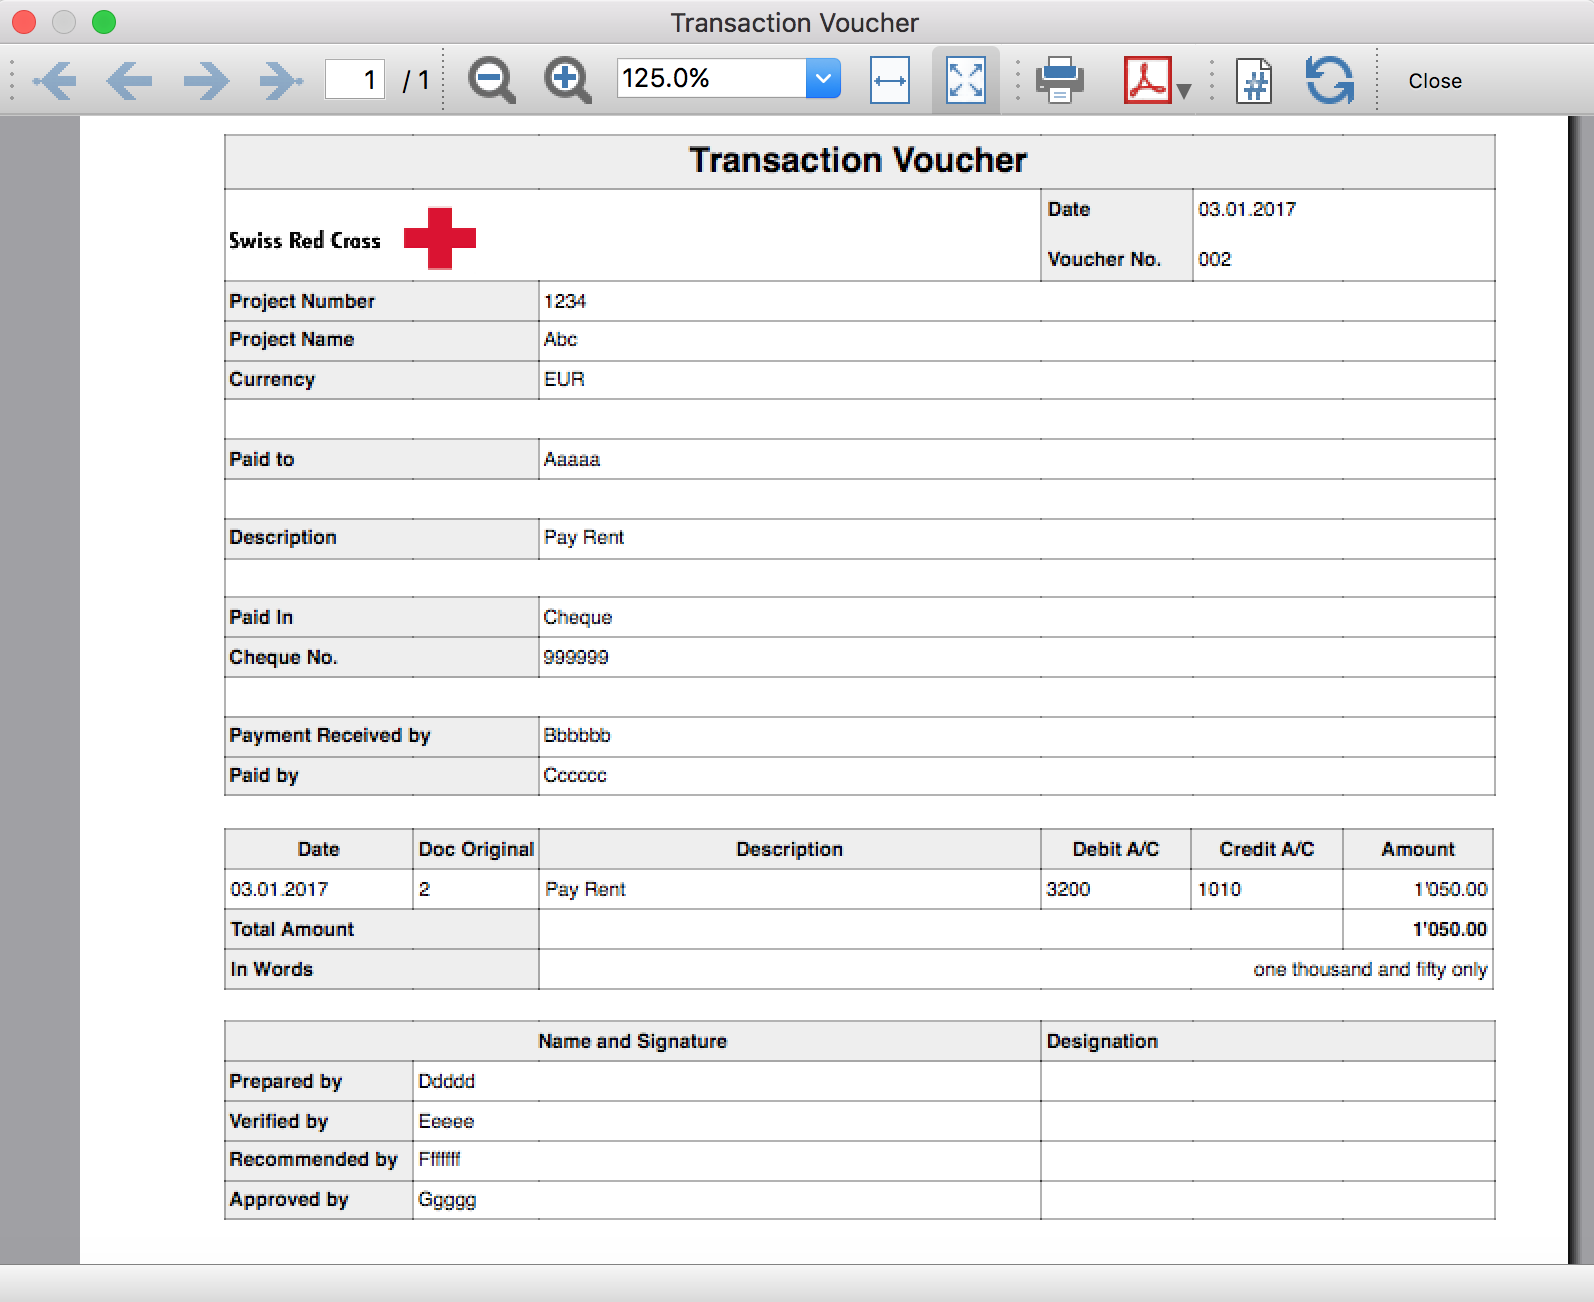
Trial Balance
Trial BalanceInstall the extension
To install the extension:
- Open Banana Accounting Plus.
- Menu Extensions > Manage Extensions.
- In the search field enter Trial Balance.
- From the extensions list select Trial Balance.
- Select the extension and click Install.
- Click Close to close the window.
Create the report
To creare the report:
- Open an accounting file.
- From the Extensions menu select the Trial Balance.
- Select the period.
For the given period, display a Trial Balance report containing:
- Balance sheet
- Profit & Loss
The details displayed are the following:
- Account
- Account description
- Debit amounts
- Credit amounts
Example of Trial Balance report: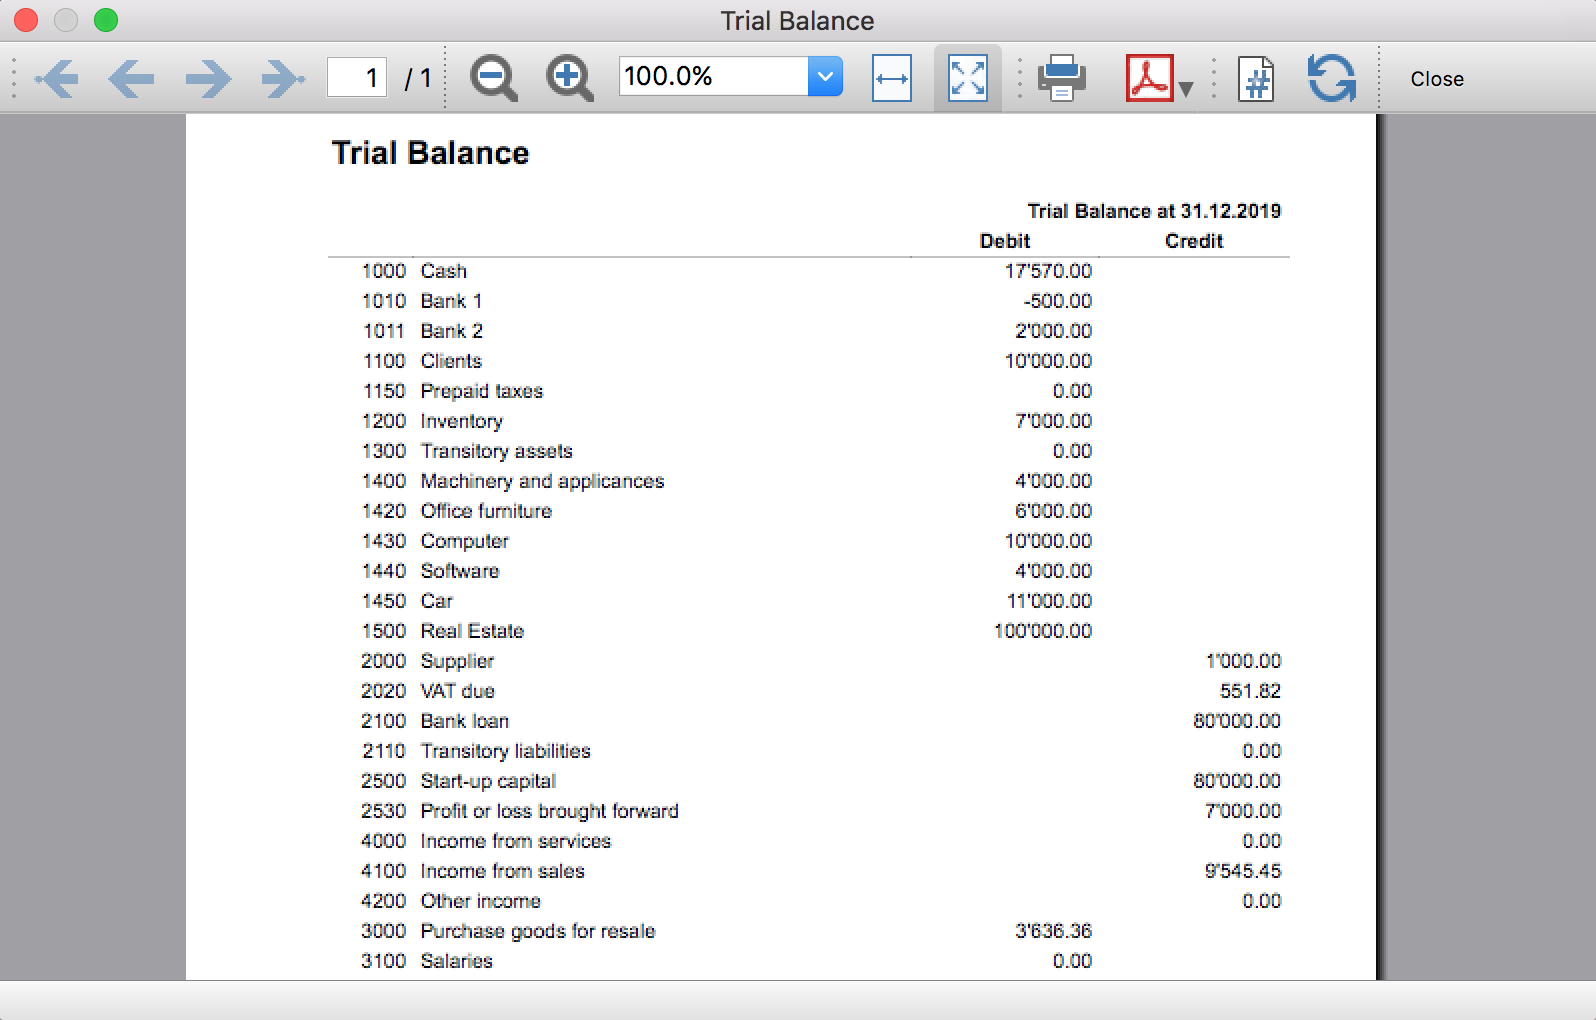
Trial Balance and Blockchain (Quarter periods)
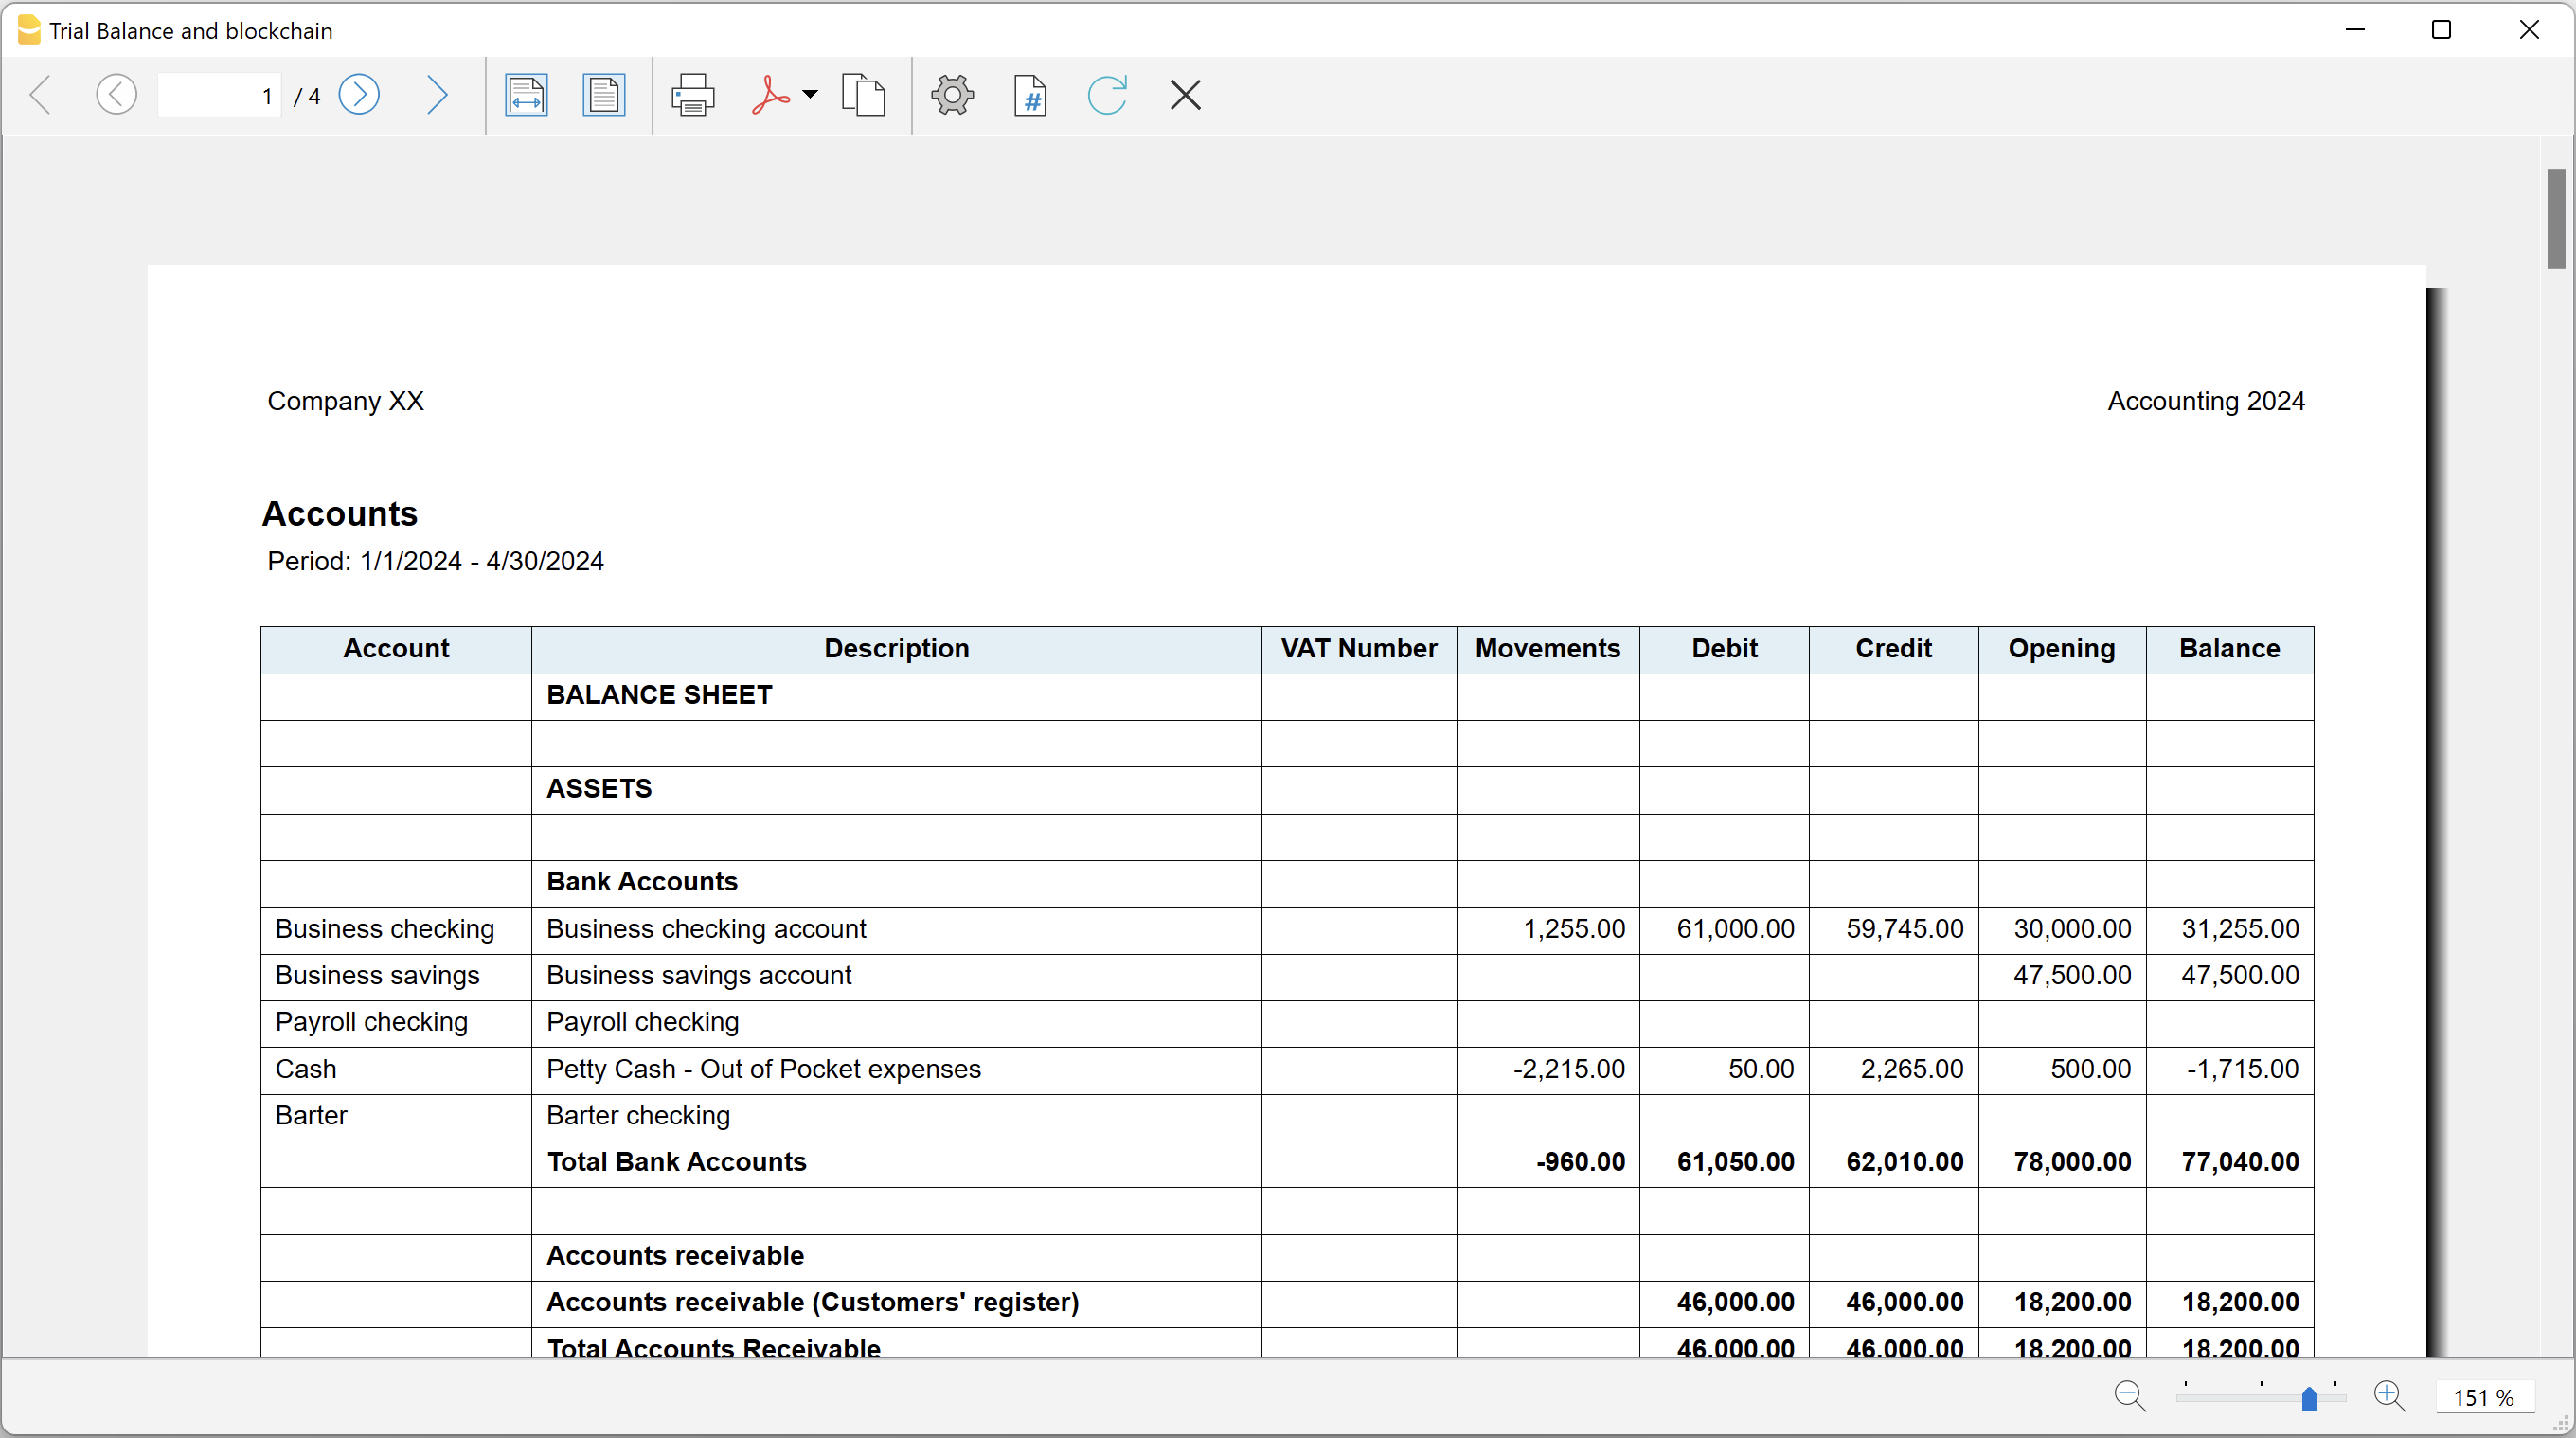
Trial Balance and Blockchain (Quarter periods)This extension creates a report containing the table Accounts and at the end the blockchain for the selected quarter period.
Prerequisites
To use this extension you must download and install Banana Accounting Plus.
Install the extension
To install the extension:
- Open Banana Accounting Plus.
- Menu Extensions > Manage Extensions
- Select Universal as country.
- Select Online > Productivity.
- From the extensions list select Trial Balance and Blockchain (Quarter periods).
- Click Install to install the extension.
- Click Close to close the window.
Create the report
To creare the report:
- Open an accounting file.
- From the menu File > File and accounting properties, in the Header left and Header right fields enter the texts to be printed on the left and right in the page header.
- From the Extensions menu select Trial Balance and Blockchain (Quarter periods).
- In Settings dialogue select the period, set the header texts, the title and font, then click OK to create the report.
The texts of the settings dialog and column headers in the printout are fixed and are in the same language as the Banana file (defined from the menu File > File and accounting properties > Other > Current language). The languages that can be used are Italian, French, German and English.
Settings dialogue
Run the extension from the menu Extensions > Trial Balance and Blockchain (Quarter periods).
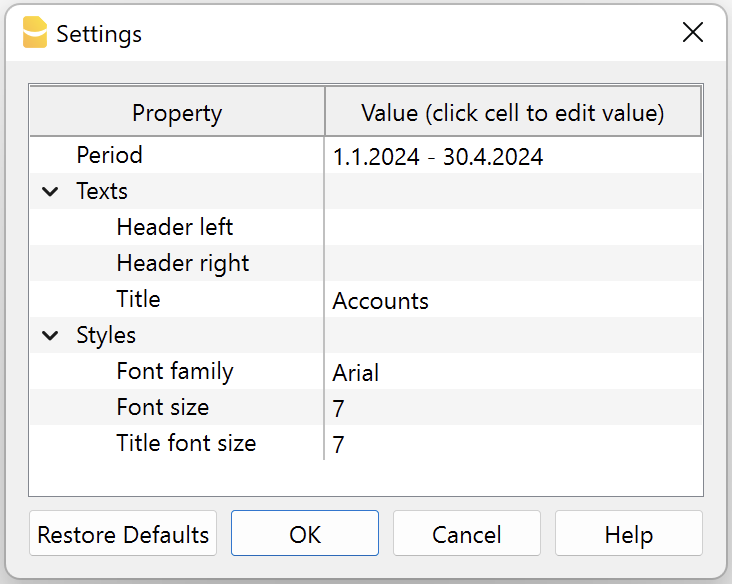
The extension Settings dialogue will open. From here you can choose some parameters to print the report.
- Period.
Select a period from the list. The periods are divided into three quarters. - Header left text.
Insert another text to be printed on the left side of the page header. - Header right text.
Insert another text to be printed on the right side of the page header. - Title.
Insert text to be printed as title of the page. - Font family.
Insert the font type. - Font size.
Insert the font size for all the page texts. - Title font size.
Insert the font size for the title.
Print example
Trial Balance with transaction's lock blockchain information
Trial Balance with transaction's lock blockchain informationThe extension creates a report containing the table Accounts and the blockchain information regarding the transaction lock of the previous period and of the current period.
This printout has been conceived for a customer that has central SAP accounting and use Banana Accounting locally, to keep accounting for at more than 40 schools. Each school keep their own accounting and every 4 months the data is integrated in the main accounting system.
In order to assure that the information is perfectly synchronized:
- The school lock the transactions so that each movement is marked with a blockchain.
- The school print the report using this extension, with the data and the blockchain info of the current and last period.
- Prior to entering the data in the main system, the responsable verify that the blockchain of the last period already entered is the same as the one printed on the current report.
Personal at the schools can easily manage their finance locally and have more details and better control over the spending. Data is only entered in the main system periodically. The organisation have a better accounting system and save a lot of money in training and SAP licenses.
Install the extension
To install the extension:
- Open Banana Accounting Plus.
- Menu Extensions > Manage Extensions
- Select Universal as country.
- Select Online > Productivity.
- From the extensions list select Trial Balance with transaction's lock blockchain information.
- Click Install to install the extension.
- Click Close to close the window.
Create the report
To creare the report:
- Open an accounting file.
- From the menu File > File and accounting properties, in the Header left and Header right fields enter the texts to be printed on the left and right in the page header.
- From the Extensions menu select Trial Balance with transaction's lock blockchain information.
- In Settings dialogue set header texts, title and font as you want, then click OK.
- In Period dialogue select a period and confirm with OK to create the report.
The texts of the settings dialog and column headers in the printout are fixed and are in the same language as the Banana file (defined from the menu File > File and accounting properties > Other > Current language). The languages that can be used are Italian, French, German and English.
Settings dialogue
Run the extension from the menu Extensions > Trial Balance with transaction's lock blockchain information.
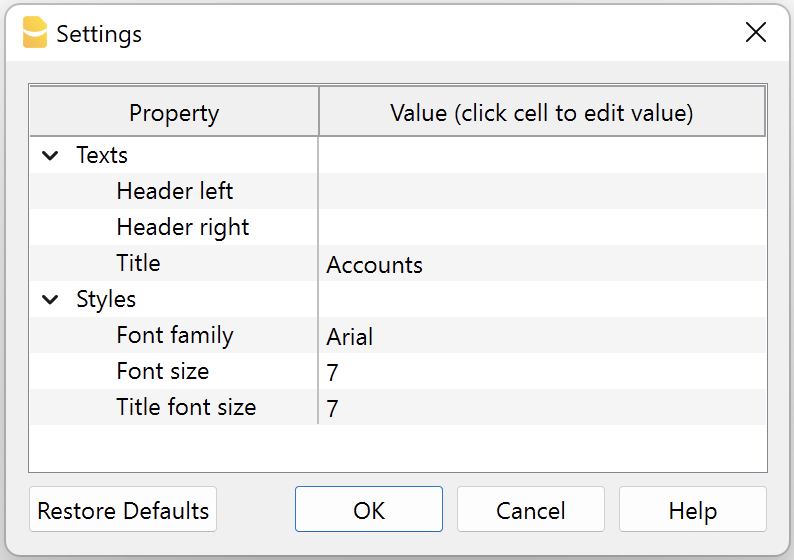
The extension Settings dialogue will open. From here you can choose some parameters to print the report.
- Header left text.
Insert another text to be printed on the left side of the page header. - Header right text.
Insert another text to be printed on the right side of the page header. - Title.
Insert text to be printed as title of the page. - Font family.
Insert the font type. - Font size.
Insert the font size for all the page texts. - Title font size.
Insert the font size for the title.
Print example
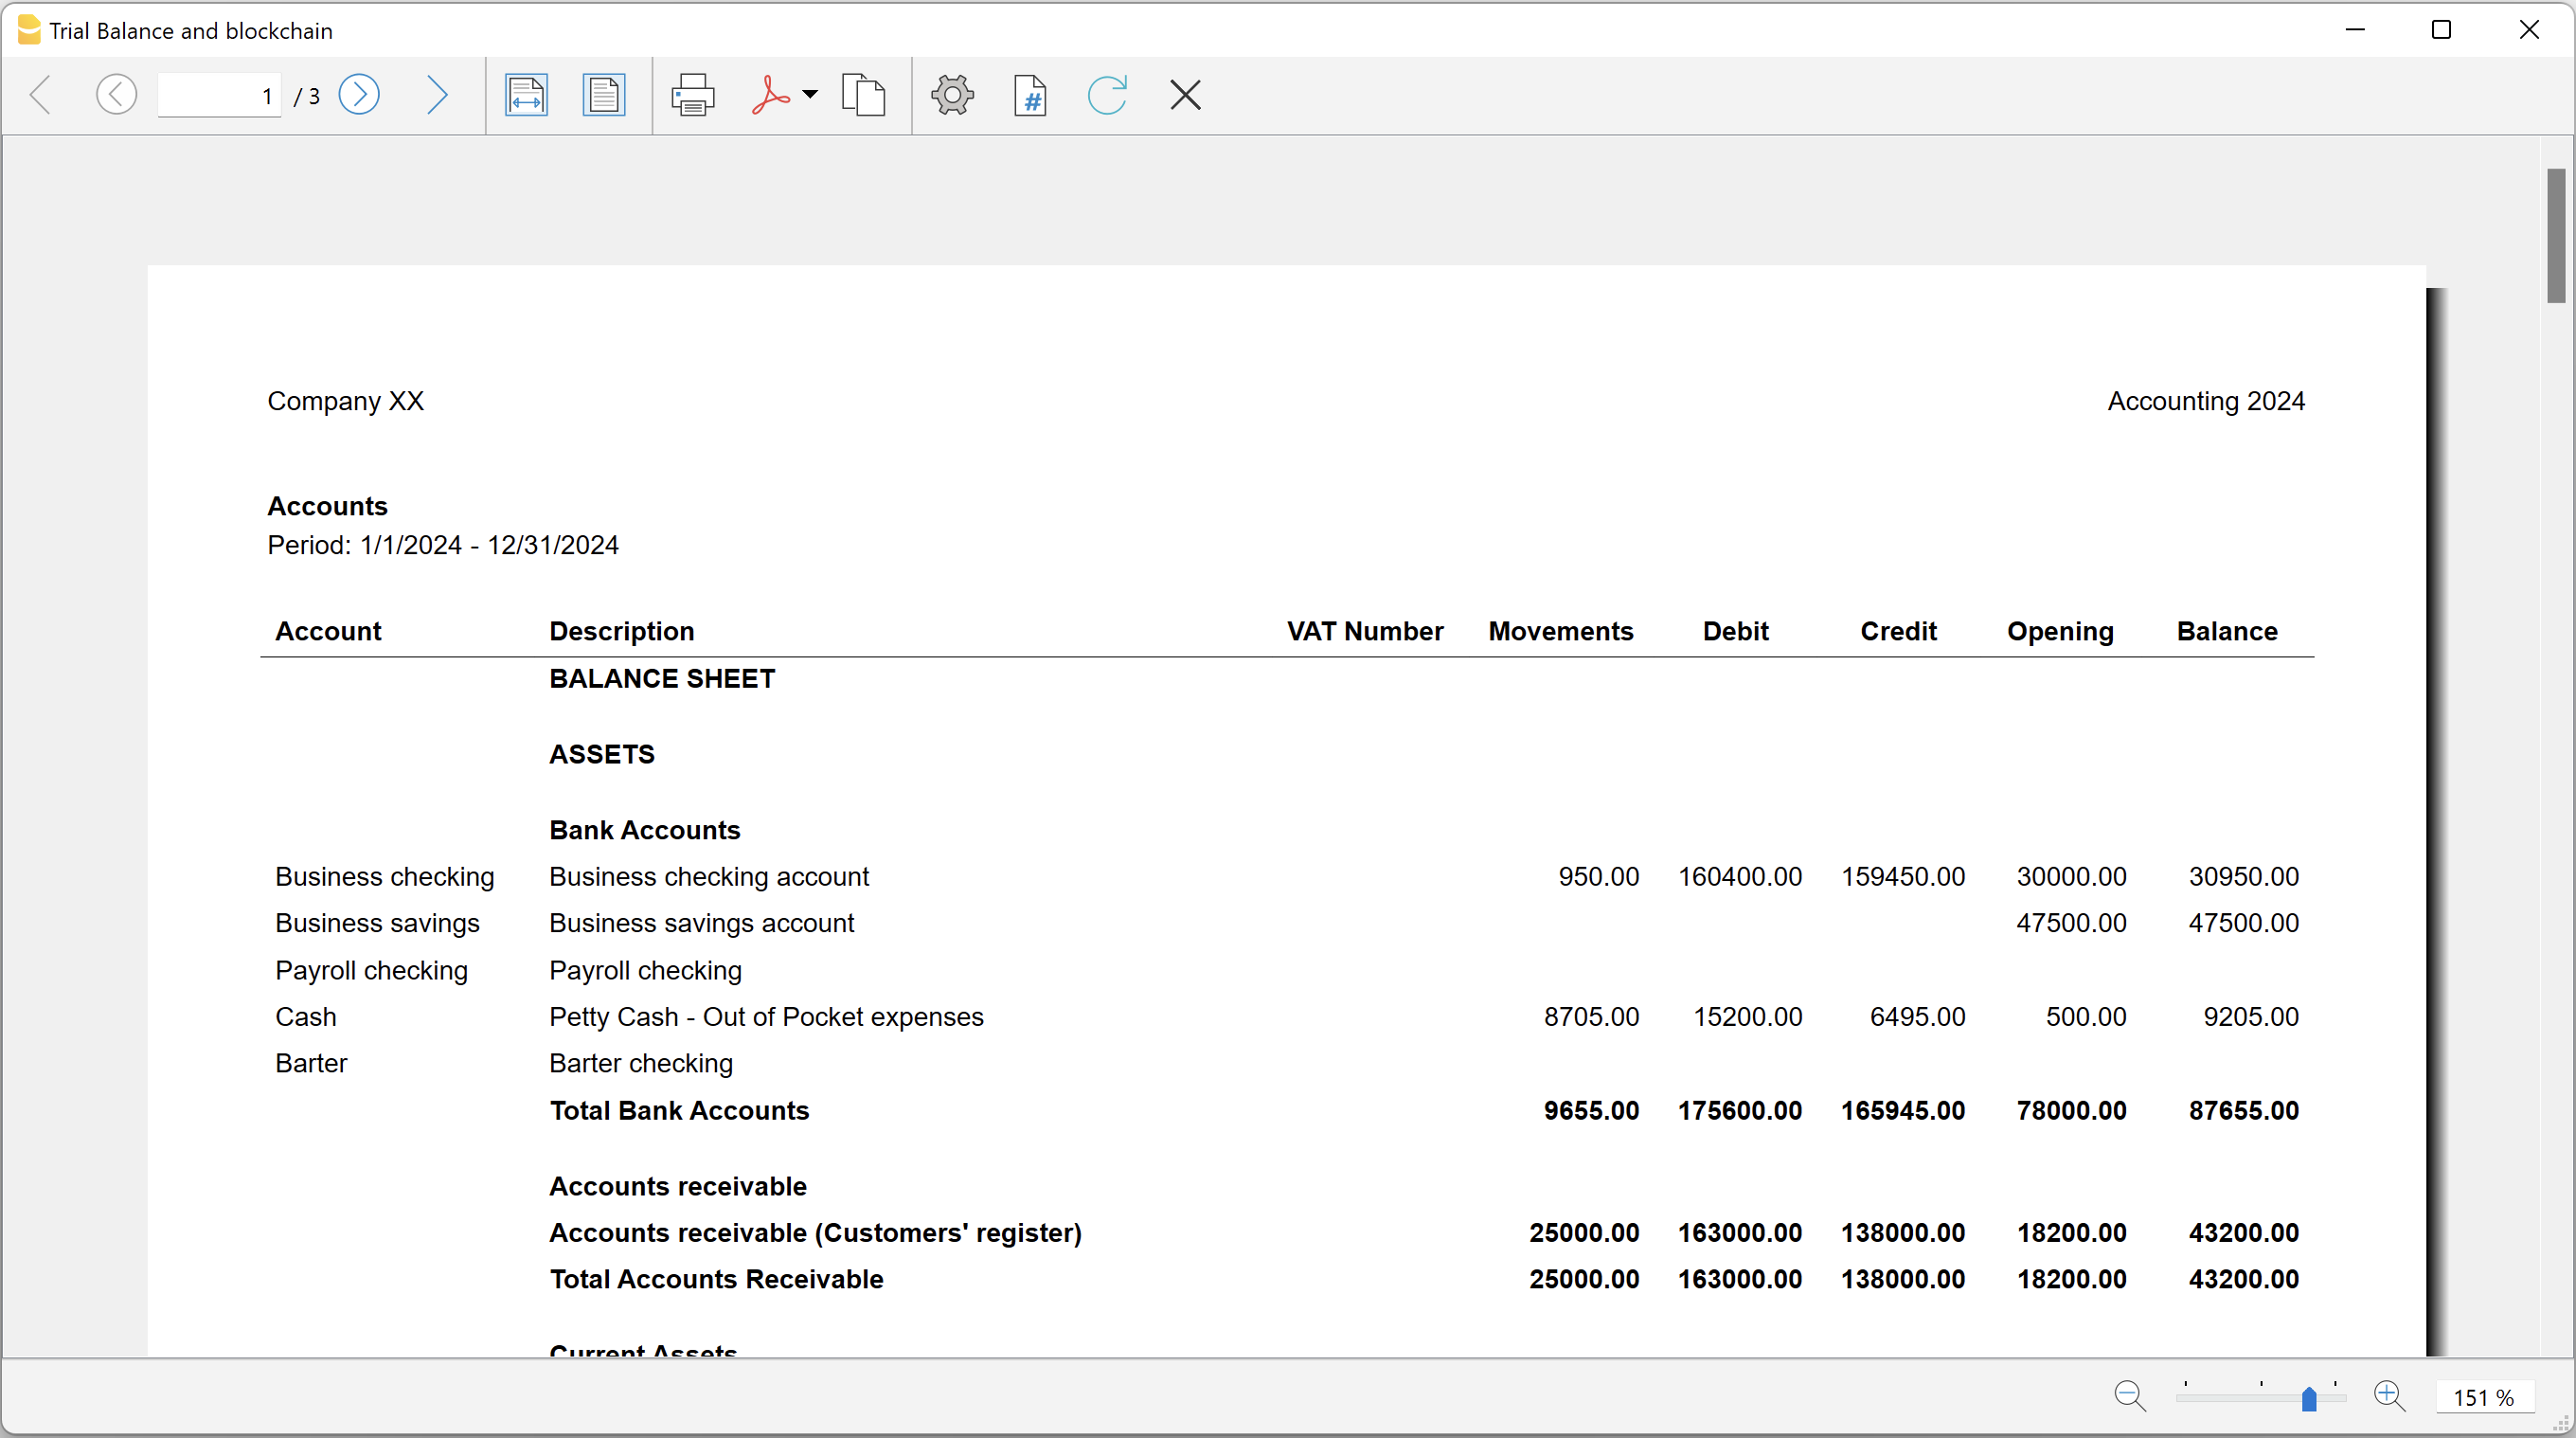
Blockchain row explanation:
- Date until which transactions are locked.
- Date of the last transaction.
- Number of locked transactions.
- Progressive hash of last locked transaction.