Extensions for Banana Accounting
Introduction
By creating an Extension you can add new functionalities of Banana Accounting Software:
- Create own calculations or reports.
- Interest calculation.
- Statistics on transactions data.
- Report based on special query.
- Import data from proprietary file format.
- Import data from a bank file format and automatically assign accounts.
- Import data from an invoice software.
- Consolidate accounting data entered with other software.
- Export data in a custom format.
- Create an Export file for the Tax authorities.
- Export the balances of some accounts in a format ready to be published on internet or inserted in other documents.
- Check the accounting data.
- Test transactions for a particular condition; You can show the rows that didn't meet the condition in a table, or display a message with detailed information to the user;
- Modify the accounting data.
- This functionality called Document Patch is only available on the Experimental version and is still in development.
- Append, insert, delete or modify transactions.
- Modify single row's fields, like for example the row's description or the transaction's exchange rate.
- Import external data and insert new accounts as well as new transactions in one single run.
Install and run Banana Accounting Extensions
See documentation on the Menu Apps and command Manage Apps.
Quick "How To" guides
- Build your first Extension
- Experiment with the API
- Install an Extension
- Create your invoice Layout
- Working with Report Tables
- Journal reporting
- Working with import Extentions
- Working with TestFramework
- Working with DocumentPatch
Examples file
- On github.com/BananaAccounting you will find the GitHub repository for Extensions.
- On the Embedded Extension JavaScript Tutorial you will find two files that contains different basic examples.
Introduction to Extension for Banana Accounting
Extension (previously BananaApps) are JavaScript programs that extend the Banana Accounting functionalities. Other names are add-ins, add-on, scripts, apps.
Extensions file format
Extensions can be packed in different format:
- Embedded in the accounting file: the Extension is saved in the Documents table of the accounting file.
- Included in a JavaScript plain text file: the Extension is saved within a file that is stored on the local disk. Banana reads the file and executes it.
- Included in a packaged file: a packaged file can contain different JavaScript files and also other files, like images.
Extension file structure
Extension files have two parts:
- Extension Attributes
Apps Attributes are special formatted JavaScript comment lines, at the beginning of the file. The apps attributes have a left part (name of the attribute) and right part, with the value. Attributes give information about the script, like its purpose, description and so on. For more information, see Apps Attributes documentation. - JavaScript code
The code must be included within functions. Functions are divided in startup functions, settings functions and normal functions.- Startup functions
Are called by Banana software when the script is executed.
The name of the function called depend on the type of the App.- exec() for following types:
- app.command
- export.file
- export.rows
- export.transactions
- import.transactions
- import.rows
- import.accounts
- import.categories
- import.exchangerates
- import.vatcodes
- report.general
- printDocument() for the following types:
- report.customer.invoice
- report.customer.statement
- report.customer.reminder
- exec() for following types:
- settingsDialog() function
It is called by the Banana Software when the user click on the Setting button, relative to the specific app.
The setting data is saved within the Accounting file. - Other JavaScript functions
You can write any functions that is necessary.
- Startup functions
Extensions types, startup functions and how to run them
The Extension type is defined within the attribute @task.
There are many types, and some of them are started in different ways.
app.command
Is a general application. It can contain any command.
- Types: app.command, export.file, export.rows, export.transactions, report.general
- Startup function: exec()
- How to run it:
- File based Apps are started from the menu App.
- Embedded Apps are run with the button within the Document table
import
The purpose is to translate the content of a file to a Banana Compatible format.
It is used in Import to Accounting.
- import.transactions
- Type: import.transactions
- Startup function: excec(fileContent) with the content of the file as parameter. The function should return a comma separated file.
- How to run it:
- Select from the menu Account1 the command Import to accounting...
- As Import type select Transactions
- Select an import app from the list
- Click Browse to select the file with the data to import in Banana
- import.rows
- import.accounts
- import.categories
- import.exchangerates
- import.vatcodes
report
The purpose of this app is to create a report.
The report is run by the specific function in Banana, for example the print invoice function.
The result is displayed on the preview windows.
The function should return a Banana.Report document.
- report.customer.invoice
- Type: report.customer.invoice
- Startup function printDocument(jsonInvoice, repDocObj, repStyleObj)
- How to run it:
- Select from the menu Account2 > Customers the command Print invoices...
- report.customer.statement
- Type: report.customer.statement
- Startup function printDocument(jsonInvoice, repDocObj, repStyleObj)
- How to run it:
- Select from the menu Account2 > Customers the command Print statements...
- report.customer.reminder
- Type: report.customer.reminder
- Startup function printDocument(jsonInvoice, repDocObj, repStyleObj)
- How to run it:
- Select from the menu Account2 > Customers the command Print reminders...
Installing file based Extensions
Before using an Extension you need to install it through the ManageApps menu.
If you develop a new app, you have to Install the BananaApp from a local file.
How-to for Extension
Build your first Extension
Introduction
This walkthrough provides step-by-step guidance for creating a simple BananaApp that uses JavaScript API to interact with Banana Accounting software.
The “Hello World!” program is a classic tradition in computer programming. It is a short and complete first program for beginners, and it is perfect as first BananaApp example.
There are three basic steps in order to experiment with BananaApps:
- Create the JavaScript file
- Install the BananaApp
- Run the BananaApp
Create the JavaScript file
-
Use a text editor. Download a text editor from your choice (Notepad++, Sublime Text, etc.) that will let you code in a simple way.
It is important to be sure you can save with the UTF-8 encoding. -
Copy the following JavaScript code and paste it on your text editor.
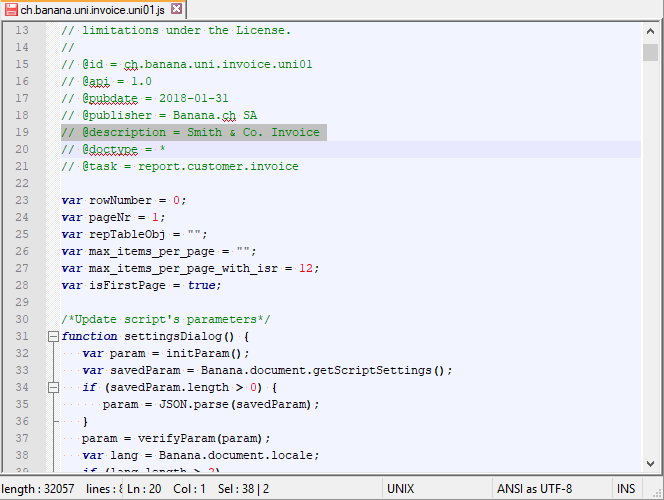
// @id = ch.banana.app.helloworldexample // @api = 1.0 // @pubdate = 2018-10-24 // @publisher = Banana.ch SA // @description = BananaApp example: Hello world // @task = app.command // @doctype = *.* // @docproperties = // @outputformat = none // @inputdataform = none // @timeout = -1 function exec() { //Create the report var report = Banana.Report.newReport("Report title"); //Add a paragraph with the "hello world" text report.addParagraph("Hello World!"); //Print the report var stylesheet = Banana.Report.newStyleSheet(); Banana.Report.preview(report, stylesheet); } - Change the attributes of the BananaApp (for more information, see Apps attributes):
- @id = <your_script_id>
This is the identification of the script.
In order to avoid duplicates, it is important to assign a unique id at avery script. - @description = <your_script_description>
This is the name of the BananaApp. The text will be displayed in the dialogs.
- @id = <your_script_id>
- Save the file as helloworld.js.
You have now created your first BananaApp!
Install the Extension
What next? The next step is to install your Extension into the Banana Accounting software.
Before to use the Extension , and see the "Hello World!" text displayed as report in Banana, the App needs to be installed.
So, let's see how to install the "Hello World!" Extension.
- Open an accounting file in Banana Accounting
- In Banana select from the menu Apps the command Manage Apps...
- Click on Add from file...

- Select the helloworld.js file.
- Click on Open to install the App.
- The Extension is displayed in the dialog.
By Selecting Installed from the left, all the installed Extensions (both local and online apps) will be displayed.

- Click on Close to close the Manage Banana Apps dialog
You have now installed the Extension!
Important:
- Once installed, the JavaScript file needs to always remain in the same directory.
- If the JavaScript file is modified, the program will always use the last version.
Run the Extension
Finally, now it is possible to run the "Hello World!" Extension and see the results.
To run the app:
- In Banana select from the menu Apps the Example Hello World app.

- The app is executed and returns the following reports

Congratulations, you have now created, installed and executed your own BananaApp!
Uninstall the Extension
In case you don't need an installed Extension anymore, it is also possible to remove it from Banana Accounting software using the uninstall command.
- In Banana select from the menu Apps the command Manage Apps...
- Select the Installed section on the left in order to display all the currently installed Extensions.
- Select the Extensions you want to remove and click Uninstall.
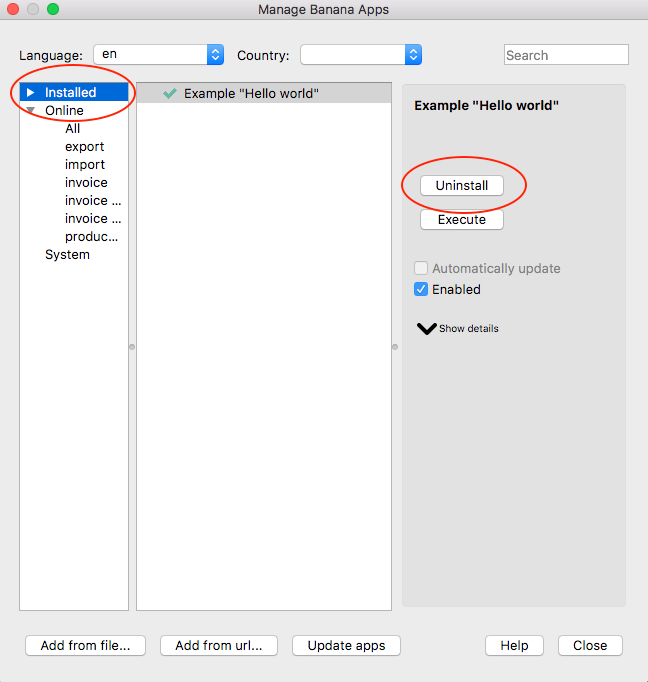
- Confirm with Ok to remove the App from Banana Accounting software.

The Extension is now removed from Banana Accounting software, but the JavaScript file (i.e. helloworld.js) is not removed from you computer.
More about Extensions
- JavaScript API
- Extensions documentation
- Working with Report Tables
- Experiment with embedded Extensions
Experiment with the API
Banana does allow to have Extensions that are embedded within a Banana File.
We have prepared tutorial files that include samples code for most API.
- You can see how the API works and experiment with it.
- Just download and open a tutorial file in Banana.
See explanation Embedded Extensions JavaScript Tutorial on Github.
Install an Extension
In Banana Accounting anyone can create Extensions to add new functionalities.
Install an Extension from a local file
- In Banana select from the menu Apps the command Manage Apps...
- Click on Add from file...
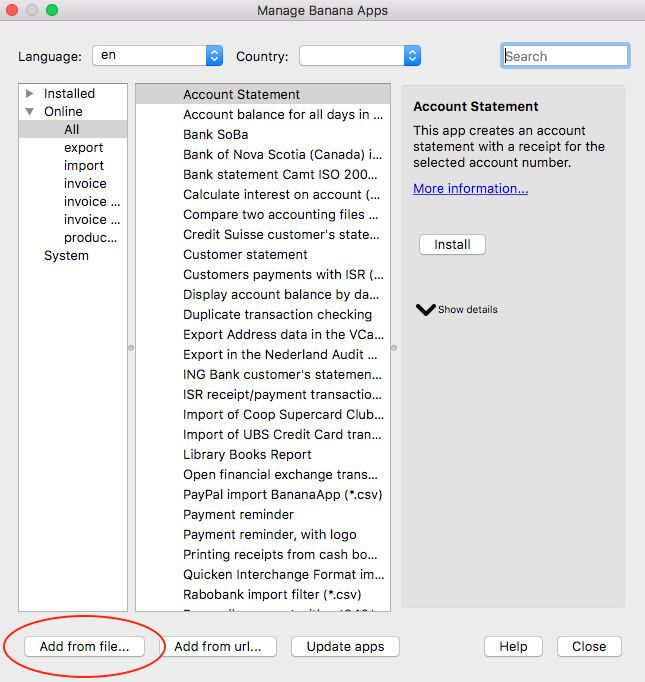
Manage Banana Apps dialog
- Choose your JavaScript (.js) file
- Click on Open to install the App
- Click on Close to close the Manage Banana Apps dialog
At this point, the BananaApp is installed and ready to be used.
Important information:
- Once installed, the file .js needs to always remain in the same directory.
- If the App is modified, the program will always use the last version.
Run the Extension
In Banana select from the menu Apps the App you have installed.
Uninstall the Extension
- In Banana select from the menu Apps the command Manage Apps...
- Select an App from the Installed section and click on Uninstall
Manage Banana Apps dialog
- Click on Close to close the Manage Banana Apps dialog
Create personal Invoice Layout
In Banana you can create your own Invoice Layout.
A Layout is an Extension that is specific for printing an Invoice.
The following steps describe how to create an invoice template starting from an existing one and adapting it to your needs.
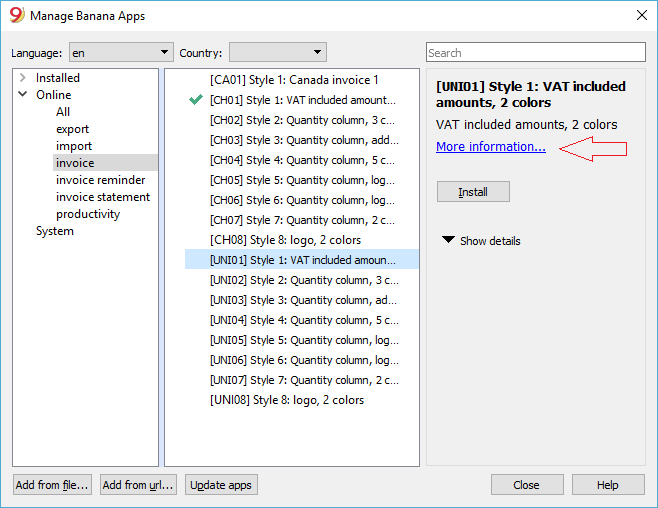
1. Choose your print style to start from.
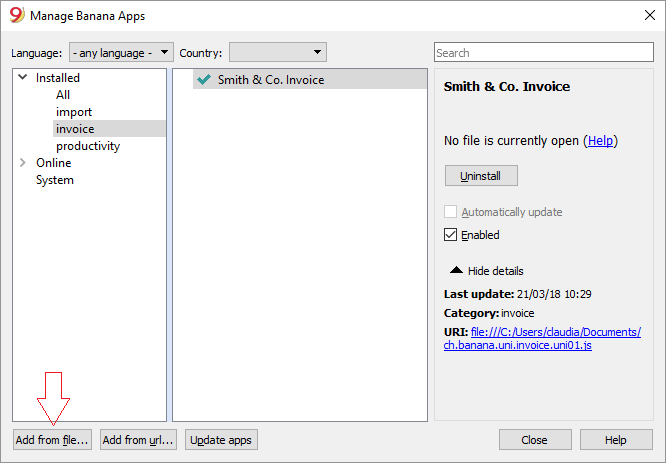
- In Banana select from the menu Apps the command Manage Apps...
- Select Online, Invoice.
- Choose one of the existing template you want (i.e. [UNI01])
- Click on More information...
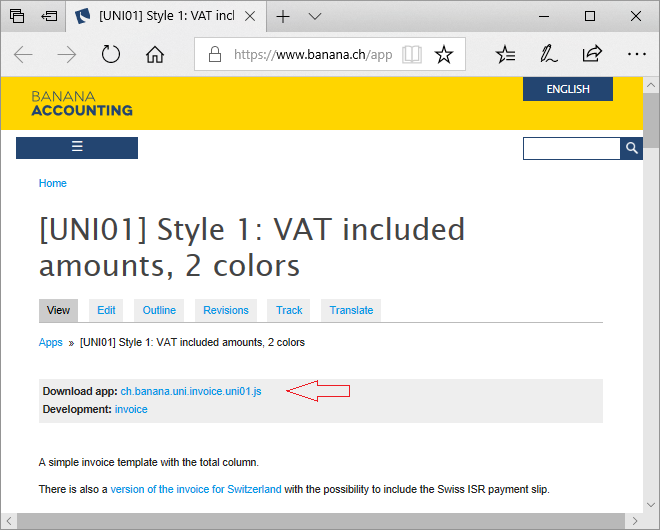
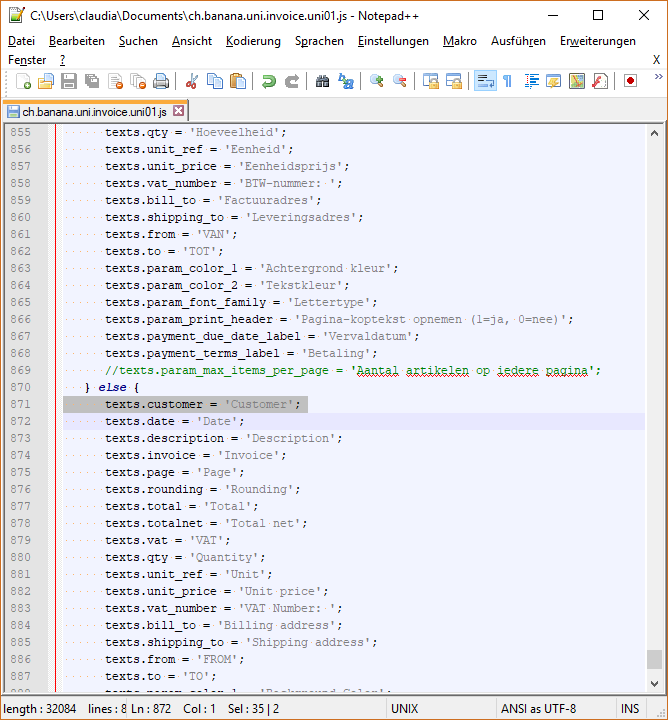
2. Click on the link ch.banana.uni.invoice.uni01.js and save the file to your documents folder (menu File -> Save Page As...).
3. Modify the template
- Open the local file with a text editor program
- Right click on the file
- Open with .... and select the text editor program
- Changing the @description and the @id.
- Save the file.
4. Add your template to the Banana Apps.
- In menu Apps from Banana select Manage Apps....
- Click on the button Add from file... and choose the file you just downloaded and modified.
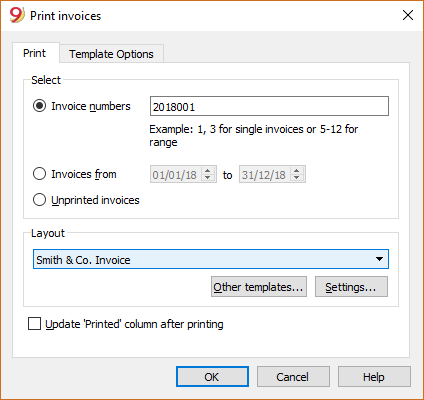
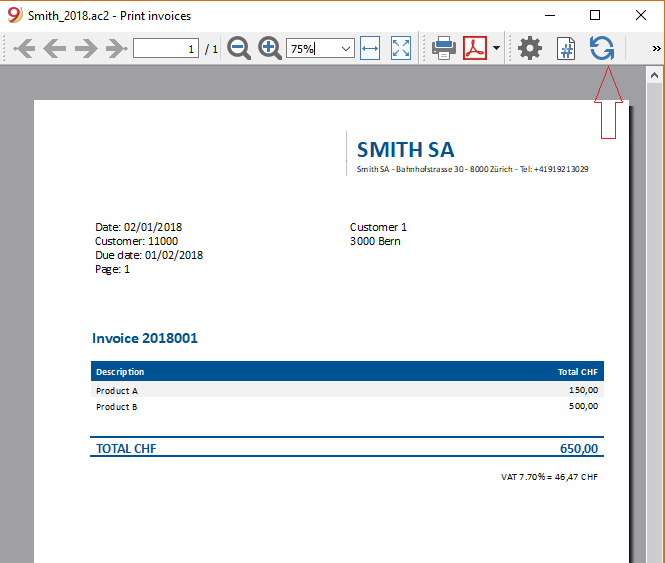
5 View an invoice with the custom template.
- In menu Account2 from Banana select Customers, Print Invoices... and select the layout Smith & Co. Invoice
- Click Ok
Here the previews

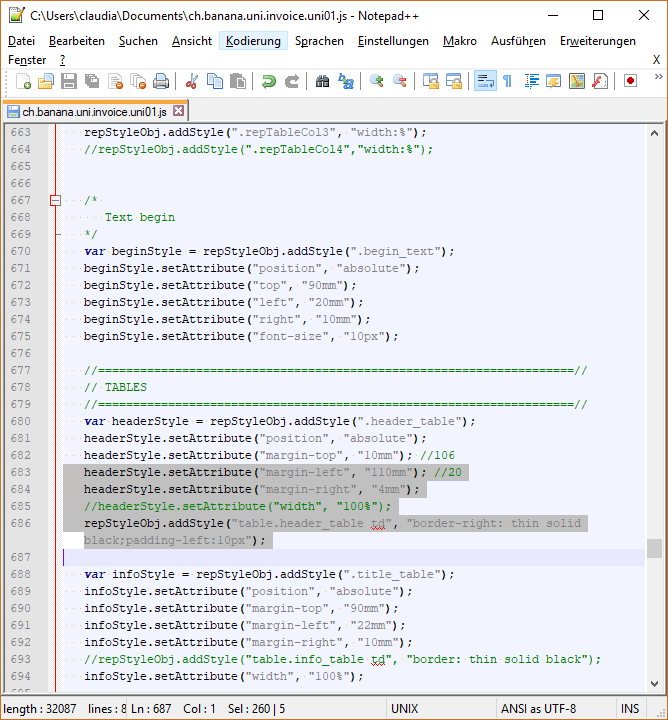
5. Makes more changes
- For example change the header position, we put it on the right.
- Modify the lines as described here.
- Save the changes
- Change the text "Customer No" to "Customer"
6. See your changes
Simply click on the refresh button
Working with Document Change
Introduction
In this page we will be going through all the possible operations that can be done using the Banana API Document Change in order to modify in any way our accounting document. Every time we are going to write Javascript code which will produce a JSON File containing all the changes we want to make on the Banana accounting file.
JSON File
A JSON (Javascript Object Notation) File is a particular type of file that let us store and transmit data objects, more in particular we are going to use them to describe which elements of the accounting file we want to change and in what the changes consists.
To have a more complete view on how JSON files are used in Banana and on their structure for various operations, you can always visit the following page: Banana Document Change.
Add Operation
In this section we are going to see how to add some transactions in Banana using the command add, the following function can be added to our code by simply changing the name "transactionRowOperation()" when it's invoked in our Main Program with "transactionRowAdd()".
Steps to add rows:
- Define row object
- choose which operation we are going to perform, in this case "add"
- Define the fields we are going to add in our row, in this case "Date" and "Description".
- Create an Array which will contain all the rows we want to add, and then push to the Array those rows.
- Define the table in which we are going to make changes in Banana.
- Initialise JSON document object.
- add changes to the object.
function transactionRowAdd(){
    //row operation
    var row = {};
    row.operation = {};
    row.operation.name = "add";

    //row fields
    row.fields = {};
    row.fields["Date"] = getCurrentDate();
    row.fields["Description"] = "This is the row you just added";

    //rows
    var rows = [];
    rows.push(row);

    //table
    var dataUnitTransactions = {};
    dataUnitTransactions.nameXml = "Transactions";
    dataUnitTransactions.data = {};
    dataUnitTransactions.data.rowLists = [];
    dataUnitTransactions.data.rowLists.push({"rows":rows});

    //document
    var jsonDoc = initDocument();
    jsonDoc.data.document.dataUnits.push(dataUnitTransactions);

    return jsonDoc;
}
It is worth mentioning that after have defined the row.operation.name = "add" if we also define row.operation.sequence = "n" we are going to perform an Insert Operation, adding the new row after the nth row in the Transactions table.
Delete Operation
In this section we are going to see how to delete some transactions in Banana using the command delete, the following function can be added to our code by simply changing the name "transactionRowOperation()" when it's invoked in our Main Program with "transactionRowDelete()".
Steps to delete rows:
- Define row object
- Choose which operation we are going to perform, in this case "delete"
- Define in row.operation.sequence = "n" where n is the row that we want to delete from the table.
- Create an Array which will contain all the rows we want to delete, and then push to the Array those rows.
- Define the table in which we are going to make changes in Banana.
- Initialise JSON document object.
- add changes to the object.
function transactionRowDelete(){
    //row operation
    var row = {};
    row.operation = {};
    row.operation.name = "delete";
    row.operation.sequence = "5";

    //rows
    var rows = [];
    rows.push(row);

    //table
    var dataUnitTransactions = {};
    dataUnitTransactions.nameXml = "Transactions";
    dataUnitTransactions.data = {};
    dataUnitTransactions.data.rowLists = [];
    dataUnitTransactions.data.rowLists.push({"rows":rows});

    //document
    var jsonDoc = initDocument();
    jsonDoc.data.document.dataUnits.push(dataUnitTransactions);

    return jsonDoc;
}
Modify Operation
In this section we are going to see how to modify some transactions in Banana using the command modify, the following function can be added to our code by simply changing the name "transactionRowOperation()" when it's invoked in our Main Program with "transactionRowModify()".
Steps to modify rows:
- Define row object
- Choose which operation we are going to perform, in this case "modify"
- Define in row.operation.sequence = "n" where n is the row that we want to modify from the table.
- Define the fields we are going to modify in our row, in this case "Description".
- Create an Array which will contain all the rows we want to modify, and then push to the Array those rows.
- Define the table in which we are going to make changes in Banana.
- Initialise JSON document object.
- add changes to the object.
function transactionRowModify(){ //row operation var row = {}; row.operation = {}; row.operation.name = "modify"; row.operation.sequence = "5"; //row fields row.fields = {}; row.fields["Description"] = "This description is edited using DocumentChange"; //rows var rows = []; rows.push(row); //table var dataUnitTransactions = {}; dataUnitTransactions.nameXml = "Transactions"; dataUnitTransactions.data = {}; dataUnitTransactions.data.rowLists = []; dataUnitTransactions.data.rowLists.push({"rows":rows}); //document var jsonDoc = initDocument(); jsonDoc.data.document.dataUnits.push(dataUnitTransactions); return jsonDoc; }
Replace Operation
In this section we are going to see how to replace some transactions in Banana using the command replace, the following function can be added to our code by simply changing the name "transactionRowOperation()" when it's invoked in our Main Program with "transactionRowReplace()".
Steps to replace rows:
- Define row object
- Choose which operation we are going to perform, in this case "replace"
- Define in row.operation.sequence = "n" where n is the row that we want to replace from the table.
- Define the fields we are going to modify in our row, in this case "Description".
- Create an Array which will contain all the rows we want to modify, and then push to the Array those rows.
- Define the table in which we are going to make changes in Banana.
- Initialise JSON document object.
- add changes to the object.
function transactionRowReplace(){
    //row operation
    var row = {};
    row.operation = {};
    row.operation.name = "replace";
    row.operation.sequence = "5";

    //row fields
    row.fields = {};
    row.fields["Description"] = "We have replaced the old transaction with this one";

    //rows
    var rows = [];
    rows.push(row);

    //table
    var dataUnitTransactions = {};
    dataUnitTransactions.nameXml = "Transactions";
    dataUnitTransactions.data = {};
    dataUnitTransactions.data.rowLists = [];
    dataUnitTransactions.data.rowLists.push({"rows":rows});

    //document
    var jsonDoc = initDocument();
    jsonDoc.data.document.dataUnits.push(dataUnitTransactions);

    return jsonDoc;
}
We can see how the structure for Replace and Modify operation is more or less the same, the difference is the fact that when we perform a Modify only the field we choose are modified and all the other parts of the row remain the same as before, instead while we perform a Replace, all the field are changed with the one we defined in the functions, and if we have not defined any value for some fields, those will be empty.
Move Operation
In this section we are going to see how to replace some transactions in Banana using the command replace, the following function can be added to our code by simply changing the name "transactionRowOperation()" when it's invoked in our Main Program with "transactionRowMove()".
Steps to move rows:
- Define row object
- Choose which operation we are going to perform, in this case "move"
- Define row.operation.sequence = "n" where n is the row that we want to move from the table.
- Define row.operation.moveTo = "n" where n is the row where we want to move in.
- Create an Array which will contain all the rows we want to modify, and then push to the Array those rows.
- Define the table in which we are going to make changes in Banana.
- Initialise JSON document object.
- add changes to the object.
function transactionRowMove(){
    //row operation
    var row = {};
    row.operation = {};
    row.operation.name = "move";
    row.operation.sequence = "5";
    row.operation.moveTo = "8";

    //row fields
    row.fields = {};

    //rows
    var rows = [];
    rows.push(row);

    //table
    var dataUnitTransactions = {};
    dataUnitTransactions.nameXml = "Transactions";
    dataUnitTransactions.data = {};
    dataUnitTransactions.data.rowLists = [];
    dataUnitTransactions.data.rowLists.push({"rows":rows});

    //document
    var jsonDoc = initDocument();
    jsonDoc.data.document.dataUnits.push(dataUnitTransactions);

    return jsonDoc;
}
Initialise Document
From the above functions that we are always returning a JSON document, in order to initialise it we have to define the following parameters for the object:
function initDocument() { var jsonDoc = {};jsonDoc.format = "documentpatch";jsonDoc.data.document = {}; jsonDoc.data.document.fileVersion = "1.0.0"; jsonDoc.data.document.dataUnits = []; jsonDoc.creator = {}; jsonDoc.creator.executionDate = getCurrentDate(); jsonDoc.creator.executionTime = getCurrentTime(); jsonDoc.creator.name = Banana.script.getParamValue('id'); jsonDoc.creator.version = "1.0"; return jsonDoc; }
Helper Functions
As we can see from the code above from the section Initialise Document, there are few undefined functions called getCurrentDate() and getCurrentTime(), we can proceed defining them in the program as:
function getCurrentDate() {
    var d = new Date();
    var datestring = d.getFullYear() + ("0" + (d.getMonth() + 1)).slice(-2) + ("0" + d.getDate()).slice(-2);
    return Banana.Converter.toInternalDateFormat(datestring, "yyyymmdd");
}

function getCurrentTime() {
    var d = new Date();
    var timestring = ("0" + d.getHours()).slice(-2) + ":" + ("0" + d.getMinutes()).slice(-2);
    return Banana.Converter.toInternalTimeFormat(timestring, "hh:mm");
}
Working with Report Tables
Introduction
All the following code samples are used in the embedded_javascript_tutorial1.ac2 file as embedded BananaApps. This file contains a list of complete and working examples that can be run.
Another complete and working example of BananaApp that use a table can be found here.
Table object
Tables are used in BananaApps to present tabular data as reports.
A Table object is defined using the addTable([classes]) function, and contains a number of table cells which are organized into table rows.
The process for creating a table is the following:
- Create the report object that willl contain the table
- Add a table object to the report
- Add a row object to the table using the addRow([classes]) method.
- Add cells objects to the row using the addCell([span]) or addCell(text [,classes, span]) methods.
- Repeat steps 3 and 4
Table Code Sample: Simple Table
var report = Banana.Report.newReport("Report title"); // create the report
var myTable = report.addTable("myTable");             // create and add a table to the report

var tableRow = myTable.addRow();                      // add a row to the table
tableRow.addCell("Cash");                             // add a first cell to the row
tableRow.addCell("500.00");                           // add a second cell to the row

var tableRow = myTable.addRow();                      // add a row to the table
tableRow.addCell("Bank");                             // add a first cell to the row
tableRow.addCell("1200.50");                          // add a second cell to the row
Output:

Column headers
Table cells may should act as column headers, in such cases it should be used the getHeader() function.
If the table goes over several pages, this would allow you to repeat at the beginning of each page the headers of the columns.
var report = Banana.Report.newReport("Report title");
var table = report.addTable("myTable");

// add the table header
var tableHeader = table.getHeader();
var tableRow = tableHeader.addRow();
tableRow.addCell("Description");
tableRow.addCell("Amount");

// add the first row of the table
tableRow = table.addRow();
tableRow.addCell('Cash');
tableRow.addCell('1200');
Output:

Caption
A caption, which is a descriptive text associated with the element, can be added to a table using the getCaption() function.
var table = report.addTable("MyTable");
var caption = table.getCaption();
caption.addText("Table caption text", "captionStyle");
Output:

Merge cells
Table cells can be merged using the span attribute of the addCell([span]) or addCell(text [,classes, span]) functions.
tableRow.addCell();                        // span empty cell over 1 column (default value)
tableRow.addCell("", 3);                   // span empty cell over 3 columns
tableRow.addCell("Cash", 2);               // span the cell over 2 columns
tableRow.addCell("Cash", "classStyle", 2); // span the cell over 2 columns
Columns and Cells attributes
Styles attributes can be defined to set, for example, the columns width and cells borders using the addColumn([classes]) and setStyleAttributes(attributes) functions.
- The width attribute (applied to a table) specifies the width of a table. If the width attribute is not set, a table takes up the space of the report page.
- The width attribute (applied to a column) specifies the width of a column. If the width attribute is not set, a column takes up the space it needs to display the data.
- The border attribute (applied to a cell) specifies the border of a cell. If the border attribute is not set, a cell will be displayed without borders.
var report = Banana.Report.newReport("Report Title");
var table = report.addTable("MyTable");
table.setStyleAttributes("width:100%;"); // specifies the width of the table

var column1 = table.addColumn("col1");
column1.setStyleAttributes("width:10%"); // specifies the width of the column1
var column2 = table.addColumn("col2");
column2.setStyleAttributes("width:55%"); // specifies the width of the column2
var column3 = table.addColumn("col3");
column3.setStyleAttributes("width:30%"); // specifies the width of the column3
var column4 = table.addColumn("col4");
column4.setStyleAttributes("width:5%");  // specifies the width of the column4

var tableRow = table.addRow();
tableRow.addCell("A", "", 1).setStyleAttributes("border:thin solid black"); // specifies the cell border
tableRow.addCell("B", "", 1).setStyleAttributes("border:thin solid black"); // specifies the cell border
tableRow.addCell("C", "", 1).setStyleAttributes("border:thin solid black"); // specifies the cell border
tableRow.addCell("D", "", 1).setStyleAttributes("border:thin solid black"); // specifies the cell border
Output:

Cell with multiple paragraphs
Table cells can contain multiple paragraphs of text or data. Use the addParagraph([text, classes]) function to add many paragraphs to a cell.
var report = Banana.Report.newReport("Report Title");
var table = report.addTable("MyTable");
table.setStyleAttributes("width:100%;");
tableRow = table.addRow();

// Add first cell with paragraphs
var cell1 = tableRow.addCell("", "", 1);
cell1.setStyleAttributes("border:thin solid black");
cell1.addParagraph("First paragraph...", "");
cell1.addParagraph("Second paragraph...", "");
cell1.addParagraph(" "); //empty paragraph
cell1.addParagraph("Fourth paragraph...", "");

// Add second cell without paragraphs
var cell2 = tableRow.addCell("Cell2...", "", 1).setStyleAttributes("border:thin solid black");
Output:

Table Code Sample: Complex Table
var report = Banana.Report.newReport("Report Title");
var table = report.addTable("MyTable");
table.setStyleAttributes("width:100%;");

var column1 = table.addColumn("col1");
column1.setStyleAttributes("width:25%");
var column2 = table.addColumn("col2");
column2.setStyleAttributes("width:25%");
var column3 = table.addColumn("col3");
column3.setStyleAttributes("width:25%");
var column4 = table.addColumn("col4");
column4.setStyleAttributes("width:25%");

// 1st row
tableRow = table.addRow();
tableRow.addCell("Row 1, Cell 1: span cell over 4 columns", "", 4).setStyleAttributes("border:thin solid black");

// 2nd row
tableRow = table.addRow();
tableRow.addCell("Row 2, Cell 1: span cell over 2 columns", "", 2).setStyleAttributes("border:thin solid black");
tableRow.addCell("Row 2, Cell 3: span cell over 2 columns", "", 2).setStyleAttributes("border:thin solid black");

// 3rd row
tableRow = table.addRow();
tableRow.addCell("Row 3, Cell 1", "", 1).setStyleAttributes("border:thin solid black");
tableRow.addCell("Row 3, Cell 2: span cell over 2 columns", "", 2).setStyleAttributes("border:thin solid black");
tableRow.addCell("Row 3, Cell 4", "", 1).setStyleAttributes("border:thin solid black");

// 4th row
tableRow = table.addRow();
tableRow.addCell("Row 4, Cell 1", "", 1).setStyleAttributes("border:thin solid black");
tableRow.addCell("Row 4, Cell 2", "", 1).setStyleAttributes("border:thin solid black");
tableRow.addCell("Row 4, Cell 3", "", 1).setStyleAttributes("border:thin solid black");
tableRow.addCell("Row 4, Cell 4", "", 1).setStyleAttributes("border:thin solid black");

// 5th row
tableRow = table.addRow();
tableRow.addCell("Row 5, Cell 1: span cell over 3 columns", "", 3).setStyleAttributes("border:thin solid black");
tableRow.addCell("Row 5, Cell 4", "", 1).setStyleAttributes("border:thin solid black");
Output:

Table within a Table
Tables can also be added within other tables, in particular to cells of "externals" tables. This might be useful when you need to create tables with more complex structures.
In these cases it is only necessary to add a tables to the cell object of the external tables instead of the report. These tables are treated as a separate table, with their own rows, cells and attributes.
var report = Banana.Report.newReport("Report Title");

/*  EXTERNAL TABLE */
var table = report.addTable("outTable");
// ... add style attributes, rows, cells, etc. for the first external table

/* INTERNAL TABLE */
row_out = table.addRow(); // add a new row and a cell
cell_out = row_out.addCell("", "", 1);

var insideTable = cell_out.addTable("inTable"); // add a second table within a cell of the first table

var row_in = insideTable.addRow();
var cell_in = row_in.addCell("1", "", 1);
cell_in = row_in.addCell("2", "", 1);

row_in = insideTable.addRow();
cell_in = row_in.addCell("3", "", 1);
cell_in = row_in.addCell("4", "", 1);

// add a second cell to the first table
cell_out = row_out.addCell("row 2, cell 2", "", 1);
Output example:

Working with XML
Introduction
This page contains some code examples of how to read, write and more in general how to work with XML files in Banana.
All the code reported above as example can be found in the following file: embedded_javascript_tutorial1.ac2
XML object
XML files are used to save a large amount of data in an organized way.
Using the Banana APIs is possible to retrieve data from XML files and also create new XML files.
Read XML
In order to read an XML string we have to follow the following steps:
- Create the XML parse object
- Take the root of the XML
- Find the data we want to retrieve from the file using firstChildElement([text]).
- Iterate all over the file as long as we always have something from step 3.
Read XML Code Sample: Simple XML
var xml =   '<Library updated="2018-09-03">' +                            //  To simplify,
              '<Book>' +                                                  //  the variable
                '<Title>Paths of colours</Title>' +                       //  xml contains
                '<Author>Rosa Indaco</Author>' +                          //  the xml string
              '</Book>' +
              '<Book>' +
                '<Title>Accounting exercises</Title>' +
                '<Author>Su Zhang</Author>' +
              '</Book>' +
            '</Library>';

var bookList = "";                                                        //  Create string for the output
var xmlFile = Banana.Xml.parse(xml);                                      //  Create XML Parse object
var xmlRoot = xmlFile.firstChildElement('Library');                       //  Find the first tag "Library" in the XML
var updateDate = xmlRoot.attribute('updated');                            //  Take attribute assigned to the tag
bookList += "Books in the library on " + updateDate + "\n\n";             //  Append to the output string

var bookNode = xmlRoot.firstChildElement('Book');                         //  Take the first Book
while (bookNode) {                                                        //  As long as there are books, repeat
    var title = bookNode.firstChildElement('Title').text;                 //  Find the first tag "Title" in the XML
    var authorNode = bookNode.firstChildElement('Author');                //  Find the first tag "Author" in the XML
    var author = authorNode ? authorNode.text : 'unknow';                 //  Check whether there is a tag "Author"
    bookList += title + " - " + author + "\n";                            //  Append to the output string
    bookNode = bookNode.nextSiblingElement('Book');                       //  Go to the next book
}

Banana.Ui.showText("List of books present in the xml file", bookList);    //  Output the results
Output:

Write XML
In order to write and create an XML file we have to follow the following steps:
- Create the XML document object.
- Create a root tag for the document using newDocument([text]).
- Add new tag using addElement([text]).
- Add text for the tag with addTextNode([text]).
Write XML Code Sample: Simple XML
    var xmlDocument = Banana.Xml.newDocument("Library");                    //  Create XML file
    xmlDocument.addComment("This is the generated xml file");               //  Add comment to the file
    var rootNode = xmlDocument.addElement("Library");                       //  Set root tag "Library"
    rootNode.setAttribute("updated", "2018-09-03");                         //  Set attribute to the tag "Library"

    var bookNode = rootNode.addElement("Book");                             //  Create tag "Book" child of "Library"
    bookNode.addElement("Title").addTextNode("Paths of colours");           //  Create tag "Title" child of "Book"
    bookNode.addElement("Author").addTextNode("Rosa Indaco");               //  Create tag "Author" child of "Book"

    var bookNode = rootNode.addElement("Book");                             //  Create tag "Book" child of "Library"
    bookNode.addElement("Title").addTextNode("Accounting exercises");       //  Create tag "Title" child of "Book"
    bookNode.addElement("Author").addTextNode("Su Zhang");                  //  Create tag "Author" child of "Book"

    var xmlString = Banana.Xml.save(xmlDocument);                           //  Create output

    Banana.Ui.showText("Xml file", xmlString);                              //  Generate output
Output:
Validate
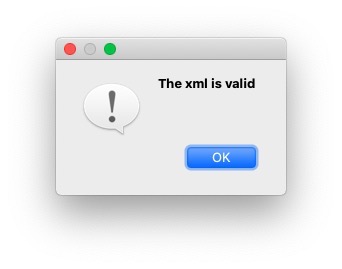
Is possible to validate if a file is in fact an XML which contains tag with the validate() function.
    var xmlFile = Banana.Xml.parse(xml);                                    //  Create the XML file

    var valid = Banana.Xml.validate(xmlFile, 'documents:xsd');              //  Validate the XML
    if (valid) {
        Banana.Ui.showInformation('Validation result', 'The xml is valid');
    } else  {
        Banana.Ui.showInformation('Validation result', 'The xml is not valid: ' + Banana.Xml.errorString);
    }
Output:
General examples with XML
In this section we are going to provide some examples of how to use API functions for XML files, here below there is the XML file used for the first example:
<solarSystem updated="2020-03-27">
<Planet>
<name>Sun</name>
<sizeOrder>1</sizeOrder>
</Planet>
<Planet>
<name>Earth</name>
<sizeOrder>6</sizeOrder>
<satellite>Moon</satellite>
</Planet>
<Planet>
<name>Jupiter</name>
<sizeOrder>2</sizeOrder>
<satellite>Callisto</satellite>
</Planet>
<Planet>
<name>Saturn</name>
<sizeOrder>3</sizeOrder>
<satellite>Cronus</satellite>
</Planet>
<Planet>
<name>Mars</name>
<sizeOrder>8</sizeOrder>
<satellite>Phobos</satellite>
</Planet>
<Planet>
<name>Neptune</name>
<sizeOrder>5</sizeOrder>
<satellite>Triton</satellite>
</Planet>
<Planet>
<name>Mercury</name>
<sizeOrder>9</sizeOrder>
</Planet>
<Planet>
<name>Venus</name>
<sizeOrder>7</sizeOrder>
</Planet>
<Planet>
<name>Uranus</name>
<sizeOrder>4</sizeOrder>
<satellite>Ariel</satellite>
</Planet>
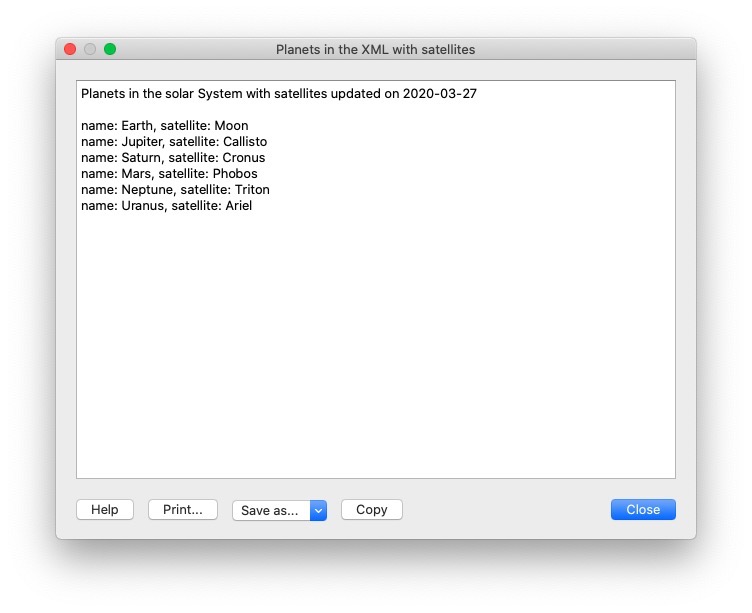
</solarSystem>Check if a tag has a specific Child tag
the following is a code example of how to return and print only planets with a satellite, the other will be excluded, therefore will be used the function hasChildElements([text]).
var outputString = "";
    var xmlFile = Banana.Xml.parse(xml);
    var xmlRoot = xmlFile.firstChildElement('solarSystem');
    var updateDate = xmlRoot.attribute('updated');
    outputString += "Planets in the solar System with satellites updated on " + updateDate + "\n\n";

    var planet = xmlRoot.firstChildElement('Planet');                                   //  Take the first tag "Planet"
    while (planet) {                                                                    //  As long as we have planets
        if (planet.hasChildElements('satellite')) {                                     //  Check if the planet has tag "satellite"
            var planetName = planet.firstChildElement('name').text;                     //  Save the planetName
            var planetSatellite = planet.firstChildElement('satellite').text;           //  Save the satelliteName
            outputString += "name: "+planetName+", satellite: "+planetSatellite+"\n";
        }
        planet = planet.nextSiblingElement('Planet');                                   //  Move to the next planet
    }
    Banana.Ui.showText("Planets in the XML with satellites", outputString);             //  Show the output
Output:
Export Transactions in XML format
Here there is an example of how to take various fields from the table Transactions in one of our .ac2 files and then print them in an xml files.
Naturally it is possible to change various parameter as for example the table we want to take the data. But also the number and type of fields we want to print in our file, in order to do so we have to follow the following steps:
- Decide which table we want to retrieve informations.
- Remember to handle the error for which the file doesn't have the desired table.
- Loop through the entire table taking only the desired fields.
- Decide the indentation for the file by appending to the strings special characters like '\t' (tab) or '\n' (new line).
// @id = ch.banana.apps.export
// @api = 1.0
// @pubdate = 2016-04-08
// @doctype = *.*
// @description = Export into an xml file (.xml)
// @task = export.file
// @exportfiletype = xml
// @timeout = -1

function exec() {
    var xmlDocument = Banana.Xml.newDocument("Transactions");
    xmlDocument.addComment("This is the generated xml file");
    var rootNode = xmlDocument.addElement("transactions");
    var tableTransactions = Banana.document.table('Transactions');
    if (!tableTransactions) {
        return;
    }
    for (i=0;i<tabletransactions.rowcount;i++) {
        if (tableTransactions.row(i).value('Amount')) {
            var transactionNode = rootNode.addElement("transaction");
            transactionNode.addElement("date").addTextNode(tableTransactions.row(i).value('Date'));
            transactionNode.addElement("description").addTextNode(tableTransactions.row(i).value('Description'));
            transactionNode.addElement("amount").addTextNode(tableTransactions.row(i).value('Amount'));
        }
    }
    var xmlString = Banana.Xml.save(xmlDocument);
    Banana.Ui.showText("Xml file", xmlString);
    return xmlString;
The code above and his explanation are available also here.
Import transactions from XML
The following is an example of how to add new transactions to a .ac2 file in Banana, below is possible to see the XML file used as example:
<transactions>
    <transaction>
        <date>2020-01-01</date>
        <description>Red car sale</description>
        <income>10000.50</income>
        <expenses></expenses>
    </transaction>
    <transaction>
        <date>2020-03-15</date>
        <description>ATM withdrawal</description>
        <income></income>
        <expenses>600.00</expenses>
    </transaction>
    <transaction>
        <date>2020-02-14</date>
        <description>Bought silver ring</description>
        <income></income>
        <expenses>2000.00</expenses>
    </transaction>
    <transaction>
        <date>2020-04-01</date>
        <description>Yellow rubber duck sale</description>
        <income>4200.00</income>
        <expenses></expenses>
    </transaction>
</transactions>
We can eventually modify the XML file above by adding new fields for our transactions and obviously add new transactions to the file, but in order to transfer data from the file into Banana we have to follow these instructions:
- We are going to transfer the data from XML to CSV and then from CSV to TSV which are Tab separated files.
- Create the CSV string we are going to append data from our file.
- As we did before in the Read XML example we have to iterate through the XML file we take in input and then append the values of the tags into our CSV string, this time we have to remember to format the string by adding special character like '\n' (new line), ',' (comma), ''' (apostrophe) or '"' (quotation mark).
- once this process is complete and we have our CSV String ready we have to convert it into an Array using csvToArray(string, [, separator, textdelim]) function and once again convert the resulting array into a TSV using arrayToTSV(table, [, defaultChar]) and return the TSV.
// @api = 1.0
// @pubdate = 2020-04-02
// @id = ch.banana.uni.app.tutorialretrieverowstablevalues
// @description = Import transactions
// @task = import.transactions
// @outputformat = transactions.simple
// @doctype = *
// @inputdatasource = openfiledialog
// @inputencoding = latin1
// @inputfilefilter = Text files (*.xml);;All files (*.*)
// @publisher = Banana.ch SA
// @timeout = -1

function exec(inputFile) {
    var CSV_String = "Date" + '","' + "Description" + '","' + "Income" + '","' + "Expenses" + '\n';
    var xmlFile = Banana.Xml.parse(inputFile);
    var xmlRoot = xmlFile.firstChildElement('transactions');
    var transactionNode = xmlRoot.firstChildElement('transaction');
    while (transactionNode) {
        var date = transactionNode.firstChildElement('date').text;
        var description = transactionNode.firstChildElement('description').text;
        var income = transactionNode.firstChildElement('income').text;
        var expenses = transactionNode.firstChildElement('expenses').text;
        CSV_String += ('"' + date + '","' + description + '","' + income + '","' + expenses + '"' + '\n');
        transactionNode = transactionNode.nextSiblingElement('transaction');
    }
    var csvFile = Banana.Converter.csvToArray(CSV_String, ',', '"');
    var tsvFile = Banana.Converter.arrayToTsv(csvFile);
    return tsvFile;
}
Create a Cash Flow Report
Introduction
This walkthrough provides step-by-step guidance for creating an Extension for printing a cash flow report.
As example we use the Cash Flow Report that is part of the Rapports comptables (OHADA - RDC) Extension, developed following the specifications for the OHADA-RDC in Africa (for more information, visit the GitHub documentation).
There are three basic steps in order to experiment with this Extension:
- Prepare for programming
- Create a JavaScript programming
- Install the Extension
- Run the Extension
Preparation work
Before you start programming, you need to define how the output should look like and how its calculations will be done.
With the following information the software developer will be able to program the software:
- Prepare an accounting file with:
- The accounting plan you will use as the base for the report.
The Cash flow report is related to a specific accounting plan, its accounting groups and its numbers. - The data that is necessary to test if the report is correct.
- Opening balances for all the accounts and groups that partecipate in the calculation.
Possibly use simple to understand amounts (10, 20, 100, 1000). - Transactions for all relevant accounts.
- Opening balances for all the accounts and groups that partecipate in the calculation.
- The accounting plan you will use as the base for the report.
- Decide how the report should look like.
If you aren't already in process of an example printout, use Excel and prepare an example of the desired printout.
On the left side ad a column with the name for each row.
See OHADA example. - Explain for each row how the calculation for the related row of the report should be done.
See OHADA example.- Specify the accounts or groups that will be summed
- Specify amounts that should be entered manually.
In case the information cannot be retrieved from the accounting data (lack of account), the programmer can easily create a dialog in order to enter the information manually.
How to specify calculations for programmers
In order to understand how to specify calculations for programmers, you need to know which amounts you can retrieve from the Accounts table of Banana Accounting.
You can retrieve amounts for both, accounts and groups, and specify the type of amount:
- opening: the amount at the beginning of the period (the Opening column of the Accounts table). Can be positive or negative.
- debit: the amount of debit transactions for the period (the Debit column of the Accounts table). Only positive values.
- credit: the amount of credit transactions for the period (the Credit column of the Accounts table). Only positive values.
- total: the difference between debit-credit for the period. Can be positive or negative.
- balance: the balance for the period (opening + total). Can be positive or negative.
The combination of account/group and amounts type can be used to specify the calculations for programmers:
- In case of accounts, indicate "account_number , amount_type" (i.e. "1000 , opening").
- In case of groups, indicate "Gr=group_number , amount_type" (i.e. "Gr=10 , total").
See the table below for more examples:
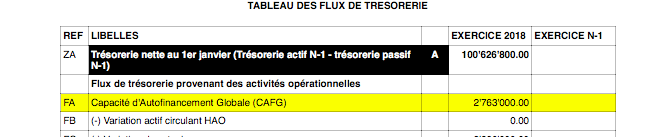
| Row name | Formula | Description |
|---|---|---|
| ZA | getAmount(Gr=BT, opening) | Takes the opening amount of the group BT |
| FA | + (-1) getAmount(Gr=134, total) + getAmount(6541, total) + getAmount(6542, total) - (-1)getAmount(7541, total) - (-1)getAmount(7542, total) + (-1)getAmount(Gr=136, total) + (-1)getAmount(Gr=TO, total) - getAmount(Gr=RP, total) - getAmount(Gr=RQ, total) - getAmount(Gr=RS, total) |
add (inverted) total amount of group 134 add total amount of account 6541 add total amount of account 6542 subtract (inverted) total amount of account 7541 subtract (inverted) total amount of account 7542 add (inverted) total amount of group 136 add (inverted) total amount of group TO subtract total amount of group RP subtract total amount of group RQ subtract total amount of group RS |
| FB | getAmount(488, total) | Takes the movement of the period (total) for the account 488 |
| FJ | + getAmount(826, credit) + getAmount(Gr=AS-1, credit) - getAmount(4856, debit) |
add credit amount of account 826 add credit amount of group AS-1 subtract debit amount of account 4856 |
Example of the "FA" row in the report with the sum of all the amounts:
Here is the Javascript code for the calculation of each line. For a better control there has been created a function for each row, that retrieves and sums the values for a specific period and then returns the amount to be printed.
function calculate_ZA(banDoc, startDate, endDate) {
   /*
      Gr=BT,opening - (- Gr=DT,opening)
   */
   var grBT = getAmount(banDoc,'Gr=BT','opening',startDate,endDate);
   var grDT = getAmount(banDoc,'Gr=DT','opening',startDate,endDate);
   return Banana.SDecimal.subtract(grBT, Banana.SDecimal.invert(grDT));
}

function calculate_FA(banDoc, startDate, endDate) {
   /*
      + (-Gr=134, total)
      + account 6541, total
      + account 6542, total
      - (-account 7541, total)
      - (-account 7542, total)
      + (-Gr=136, total)
      + (-Gr=TO, total)
      - Gr=RP, total
      - Gr=RQ, total
      - Gr=RS, total
   */
   var gr134 = getAmount(banDoc,'Gr=134','total',startDate,endDate);
   var acc6541 = getAmount(banDoc,'6541','total',startDate,endDate);
   var acc6542 = getAmount(banDoc,'6542','total',startDate,endDate);
   var acc7541 = getAmount(banDoc,'7541','total',startDate,endDate);
   var acc7542 = getAmount(banDoc,'7542','total',startDate,endDate);
   var gr136 = getAmount(banDoc,'Gr=136','total',startDate,endDate);
   var grTO = getAmount(banDoc,'Gr=TO','total',startDate,endDate);
   var grRP = getAmount(banDoc,'Gr=RP','total',startDate,endDate);
   var grRQ = getAmount(banDoc,'Gr=RQ','total',startDate,endDate);
   var grRS = getAmount(banDoc,'Gr=RS','total',startDate,endDate);
   var res = 0;
   res = Banana.SDecimal.add(res, Banana.SDecimal.invert(gr134));
   res = Banana.SDecimal.add(res,acc6541);
   res = Banana.SDecimal.add(res,acc6542);
   res = Banana.SDecimal.subtract(res, Banana.SDecimal.invert(acc7541));
   res = Banana.SDecimal.subtract(res, Banana.SDecimal.invert(acc7542));
   res = Banana.SDecimal.add(res, Banana.SDecimal.invert(gr136));
   res = Banana.SDecimal.add(res, Banana.SDecimal.invert(grTO));
   res = Banana.SDecimal.subtract(res,grRP);
   res = Banana.SDecimal.subtract(res,grRQ);
   res = Banana.SDecimal.subtract(res,grRS);
   return res;
}

function calculate_FB(banDoc, startDate, endDate) {
   /*
      account 488, total
   */
   return getAmount(banDoc,'488','total',startDate,endDate);
}

function calculate_FJ(banDoc, startDate, endDate) {
   /*
      + account 826, credit
      + Gr=AS-1, credit
      - 4856, debit
   */
   var acc826 = getAmount(banDoc,'826','credit',startDate,endDate);
   var grAS1 = getAmount(banDoc,'Gr=AS-1','credit',startDate,endDate);
   var acc4856 = getAmount(banDoc,'4856','debit',startDate,endDate);
   var res = 0;
   res = Banana.SDecimal.add(res,acc826);
   res = Banana.SDecimal.add(res,grAS1);
   res = Banana.SDecimal.subtract(res,acc4856);
   return res;
}
Create the JavaScript programming
The script retrieves all the required data from Banana Accounting files, makes some addition and subtraction operations, and presents the data in a table.
By looking a the source code for Cash Flow Report (OHADA - RDC) you will understand how the report is setup.
If you want to experiment with the script, copy and paste it on your text editor and save the file as .js (i.e. cashflow.js). Otherwise you can just install and run the app following the GitHub documentation.
Retrieve data from Banana
In order to build a cash flow it is required to get different data from the accounting. These data are values related to specific accounts or groups and to some columns of the table accounts.
But how to do that? How to retrieve a specific account value for a specific column of the accounts table and period?
Function currentBalance()
To retrieve the various amounts of the report, we use the currentBalance(account, startDate, endDate) function.
The function sums the amounts of opening, debit, credit, total and balance calculated based on the opening and all transactions for the given accounts/group and period.
To build the cash flow report we use this function for accounts and groups:
// example for account 1000
var currentBal = Banana.document.currentBalance('1000','2019-01-01','2019-12-31');

// example for group 10
var currentBal = Banana.document.currentBalance('Gr=10','2019-01-01','2019-12-31');
The parameters of the function are:
- account or group number (the group number is preceded by "Gr=")
- start date of the period we are intrested
- end date of the period we are intrested
The returned value of the currentBalance() function is an object, which has name:values pairs called properties. These properties are the values we need.
The object structure is like the following one:
{
   "amount":"17570.00",
   "amountCurrency":"",
   "bClass":"1",
   "balance":"17570.00",
   "balanceCurrency":"",
   "credit":"30.00",
   "creditCurrency":"",
   "debit":"16600.00",
   "debitCurrency":"",
   "opening":"1000.00",
   "openingCurrency":"1000.00",
   "rowCount":"6",
   "total":"16570.00",
   "totalCurrency":""
}
As you can see this object has many properties, but the cash flow report we want to build uses only four of them:
- opening the amount at the beginning of the period (the Opening column of the Accounts table). Can be positive or negative.
- debit the amount of debit transactions for the period (the Debit column of the Accounts table). Only positive values.
- credit the amount of credit transactions for the period (the Credit column of the Accounts table). Only positive values.
- total the difference between debit-credit for the period. Can be positive or negative.
- balance the balance for the period. (opening + total). Can be positive or negative.
For more information, see the documentation here.
Accessing Object Properties
Ok, now we have the object with all the properties. But how to get a single property value?
There are three methods for accessing the property of an object:
// method 1: objectName.property
var value = currentBal.debit; // returns 16600.00

// method 2: objectName["property"]
var value = currentBal["credit"]; // returns 30.00

// method 3: objectName[expression]
var x = "total";
var value = currentBal[x]; // returns 16570.00
It doesn't matter which method is used, the result does not change.
Calculate totals
The cash flow report requires to do addition and subtraction operations using some specific values retrieved from the accounting file.
To build all the various totals we encounter in the report we use the add(value1, value2) and the subtract(value1, value2) functions.
// example sum the amounts of accounts 6541 and 6542
var acc6541 = Banana.document.currentBalance('6541','2019-01-01','2019-12-31').total;
var acc6542 = Banana.document.currentBalance('6542','2019-01-01','2019-12-31').total;
var sum = Banana.SDecimal.add(acc6541, acc6542);
Previous year Banana document
To generate the report, the Extension retrieves data from the current year accounting file and from the previous year accounting file.
The current year accounting file is the one that is opened in Banana, the one that starts the execution of the Extension.
The previous year accounting file is not opened in Banana, it is just selected from the menu File -> File and accounting properties... -> Options tab -> File from previous year.
In order to retrieve data from the previous year we use the previousYear([nrYears]) function.
The function returns the previous year as a Banana.Document object. If the previous year is not defined or it is not found it returns null.
/* CURRENT year file: the opened document in Banana */
var current = Banana.document;

/* PREVIOUS year file: open a dialog window to select the previous year .ac2 file */
var previous = Banana.document.previousYear();
The object Banana.document represent the current document opened in the application.
The previous variable represent the defined previous year document.
Function getAmount()
We have added to the script a parameterized function that calls the currentBalance() and retrieves the value for the given parameters.
With this function it is possible to define which value to extract and from which Banana document file.
function getAmount(banDoc,account,property,startDate,endDate) {
   var currentBal = banDoc.currentBalance(account,startDate,endDate);
   var value = currentBal[property];
   return value;
}
The parameters are:
- banDoc: the Banana document from which retrieve the data (see Open Banana document);
- account: the account or group;
- property: the property of the returned currentBalance() object (i.e. opening, debit, credit, total);
- startDate: the opening date of the accounting period;
- endDate: the closing date of the accounting period;
// retrieve from the current year Banana document the 6541 account's total value
var current6541 = getAmount(current,'6541','total','2019-01-01','2019-12-31');

// retrieve from the previous year Banana document the 6541 account's total value
var previous6541 = getAmount(previous,'6541','total','2018-01-01','2018-12-31');
The use of the function is the same, but the returned values are different: one returns the value of the current year and the other the value of the previous year.
The Dates
Dates that we use in the script are taken from the accounting file using the info(section, id) function.
These dates are retrieved from the Opening and Closing dates of the accounting file (File properties > Accounting Tab).
// Accounting period for the current year file
var currentStartDate = current.info("AccountingDataBase","OpeningDate");
var currentEndDate = current.info("AccountingDataBase","ClosureDate");

// Accounting period for the previous year file
var previousStartDate = previous.info("AccountingDataBase","OpeningDate");
var previousEndDate = previous.info("AccountingDataBase","ClosureDate");
Function toLocaleNumberFormat()
The function toLocaleNumberFormat is used to convert all the amount numbers to the local format.
Banana.Converter.toLocaleNumberFormat('16570.00'); // returns 16'570.00
Install and run the Extension
Visit the Install your Extension documentation to install and run the app.
Report example:

Extension for Journal reporting
In the following we will explain what need to be considered when creating a new BananaApps for a journal reporting.
- Retrieving the transactions data.
- Creating specific reports using the functionalities offered by the Banana API.
Documentation
Example files
- The examples files are available on github/General/CaseStudies/JournalReport.
- Solutions making use of the journal api:
- China, Voucher report
- Netherlands, Auditfile
Transactions table
The following table is an example of transactions:
![]()
We see above different types of transactions. The transactions can be on a single line or over multiple lines, with or without VAT.
The idea here is to print a journal’s table that contains all the accounts and the transactions. The final result it’s the following one:
Javascript API equivalent
To retrieve a Table object with all the amount registered on the accounts, we use the Journal’s API:
var journal = Banana.document.journal(Banana.document.originType, Banana.document.accountType);
where
originType specifies the row to be filtered for. Can be one of:
- ORIGINTYPE_NONE no filter is applyied and all rows are returned (current and budget)
- ORIGINTYPE_CURRENT only the normal transactions are returned
- ORIGINTYPE_BUDGET only the budget transactions are returned
accountType specifies the row to be filtered for. Can be one of:
- ACCOUNTTYPE_NONE no filter is applied and all rows are returned.
- ACCOUNTTYPE_NORMAL only rows for normal accounts are returned
- ACCOUNTTYPE_CC1 only rows for Cost Center 1 are returned
- ACCOUNTTYPE_CC2 only rows for Cost Center 2 are returned
- ACCOUNTTYPE_CC3 only rows for Cost Center 1 are returned
- ACCOUNTTYPE_CC Cost Center rows are returned same as using (ACCOUNTTYPE_CC1 | ACCOUNTTYPE_CC2 | ACCOUNTTYPE_CC3)
The returned table has all the columns of the transaction's table plus many other (please, visit the Journal's API for more information).
Code example
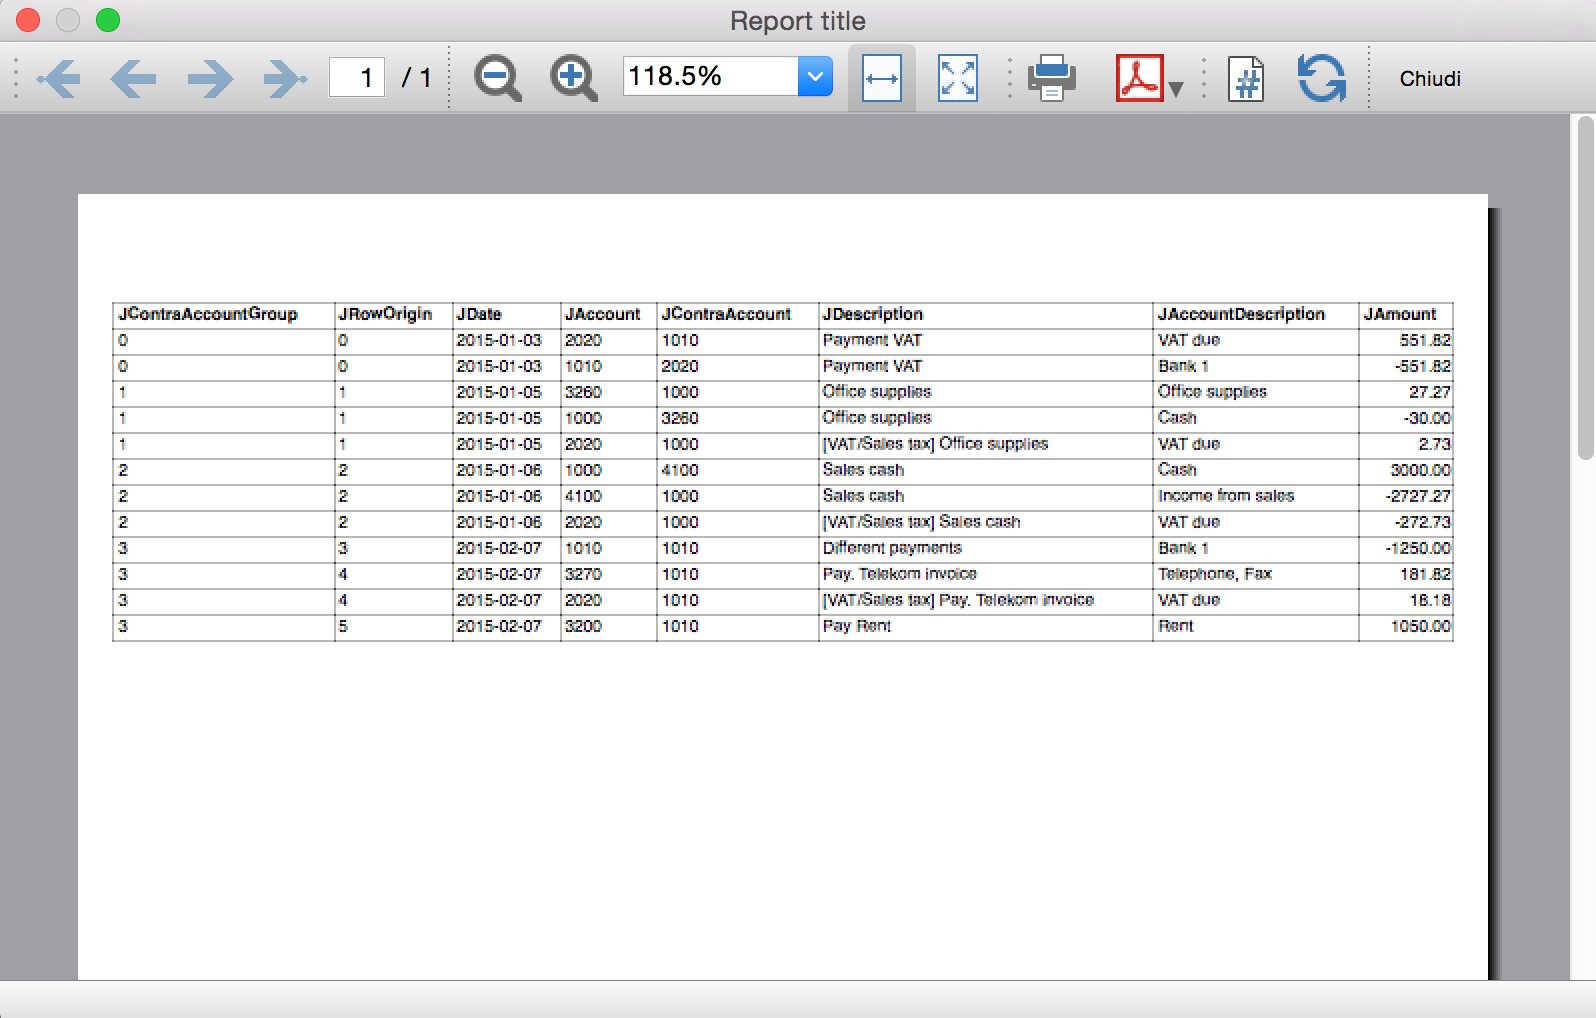
A common use to create and use a journal table to retrieve transactions data would be:
// Create the journal table
var journal = Banana.document.journal(Banana.document.ORIGINTYPE_CURRENT, Banana.document.ACCOUNTTYPE_NORMAL);

// Read the table row by row and save some values
for (var i = 0; i < journal.rowCount; i++) {
       var tRow = journal.row(i);

       // From the journal table we take only the transactions rows
       if (tRow.value('JOperationType') == Banana.document.OPERATIONTYPE_TRANSACTION) {

              // Save some column values
              var jContraAccountGroup = tRow.value('JContraAccountGroup');
              var jRowOrigin = tRow.value('JRowOrigin');
              var jDate = tRow.value('JDate');
              var jAccount = tRow.value('JAccount');
              var jContraAccount = tRow.value('JContraAccount');
              var jDescription = tRow.value('JDescription');
              var jAccountDescription = tRow.value('JAccountDescription');
              var jAmount = tRow.value('JAmount');
              //...
       }
}
Results of the Journal’s table for each transaction
The journal’s table above is useful to better understand exactly how the journal works.
In general:
- For each account used in the transaction table (AccountDebit, AccountCredit, CC1, CC2, CC3) the program generates a journal row with the JAccount column set with the specific account.
- For a double entry account transaction that use AccountDebit, AccountCredit, AccountVat, CC1, CC2, CC3 the Journal will contain six rows. If the transaction has only AccountDebit and AccountCredit, then two rows will be generated.
All transactions in specific:
- Doc 001 – Single line transaction without VAT
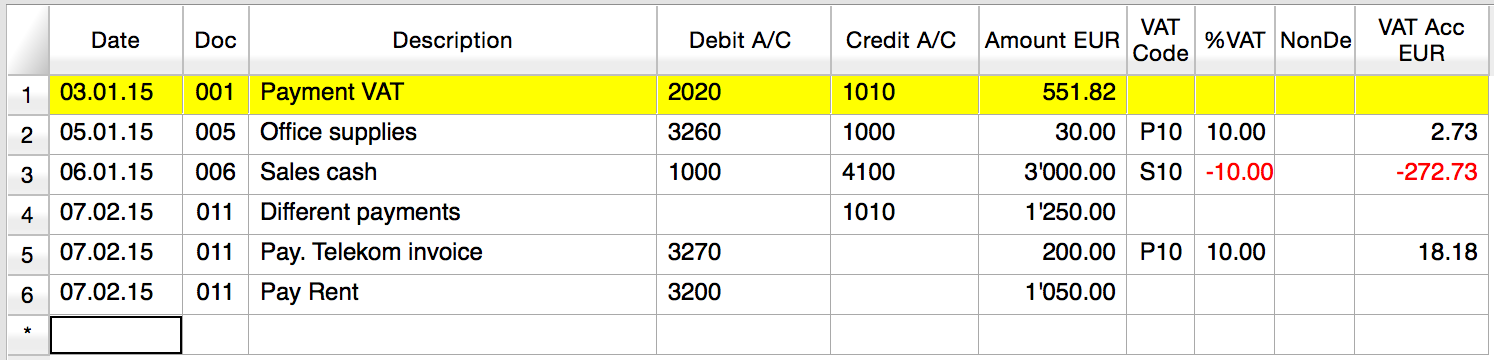
Journal:

One line for the 2020 JAccount
One line for the 1010 JAccount
- Doc 005 – Single line transaction with VAT
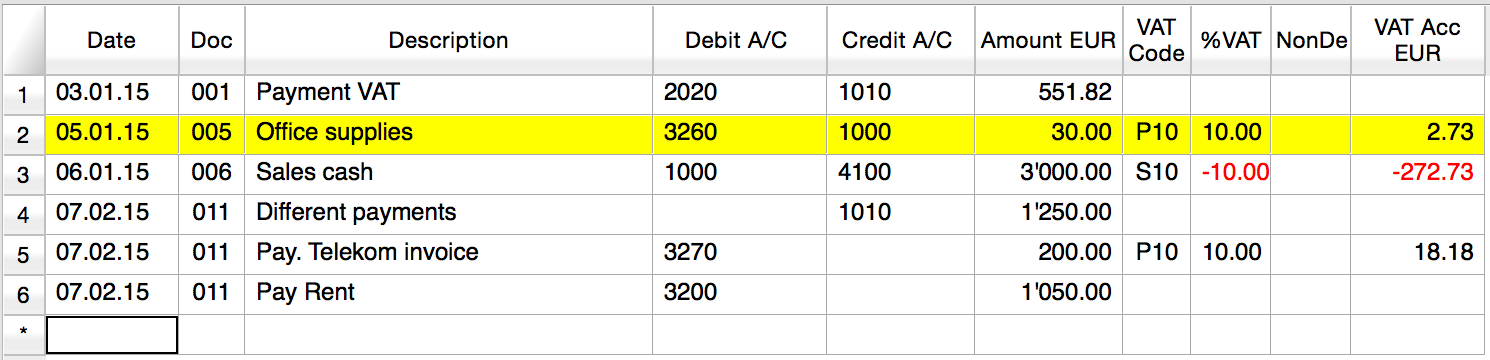
Journal:

One line for the 3260 JAccount
One line for the 1000 JAccount
One line for the 2020 JAccount
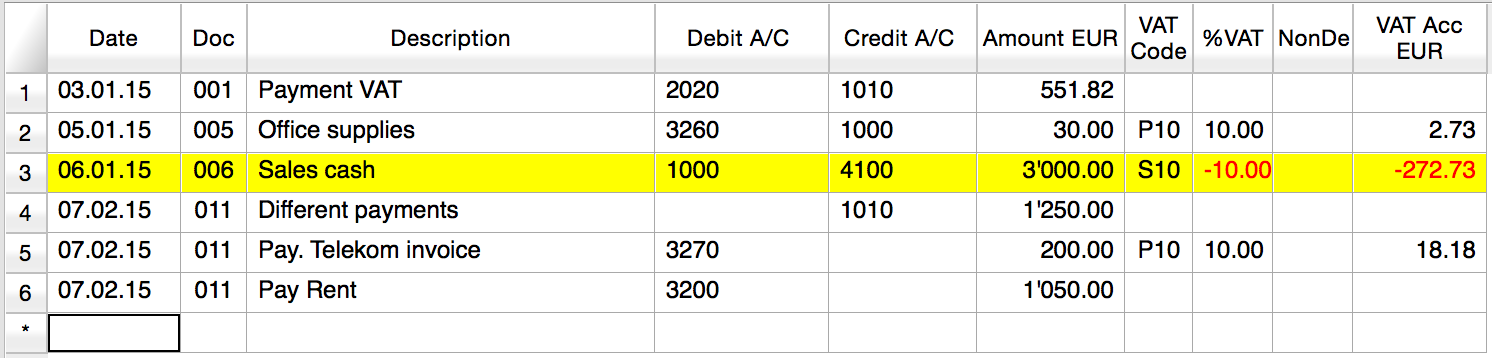
- Doc 006 – Single line transaction with negative VAT
Journal:

One line for the 1000 JAccount
One line for the 4100 JAccount
One line for the 2020 JAccount. The VAT amount is in negative for the fact that the VAT amount is registered in credit, and therefore the amount must be pay to the tax authority
- Doc 011 – Multiple lines transaction with VAT
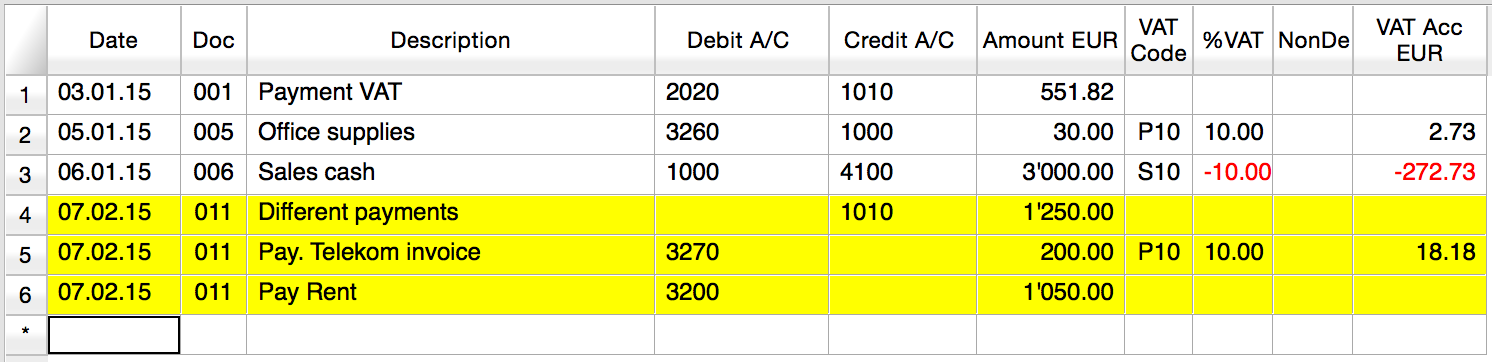
Journal:

One line for the 1010 JAccount
One line for the 3270 JAccount
One line for the 2020 JAccount
One line for the 3200 JAccount
Extensions for importing data in Banana Accounting
Introduction
This walkthrough provides step-by-step guidance for creating a simple BananaApp to import income & expenses transactions in CSV format, that reads the data to import from a CSV file, trasform and then return them in a format comptatible with Banana Accounting.
The steps in order to experiment with import BananaApps are the following:
- Create a CSV file example
- Create the import BananaApp
- Install the BananaApp
- Run the import BananaApp
Create the CSV file
First we need a data source in order to import them in Banana Accounting, and for this example we want to use a CSV file.
Copy the following CSV example, paste it on your text editor and save it as csv_example.csv:
"Date","Description","Income","Expenses"
"2019-01-01","Income transaction text","100.00",""
"2019-02-02","Expense transaction text","","200.00"
- First line is the fields header. Fields names are case sensitive and must correspond to the NameXml (English) of the columns in Banana Accounting.
- Fields names and data values are between double quotes.
- Fields and values are separated with a comma
- Each line is a new record
- The format for the Date fields is yyyy-mm-dd
Create the import BananaApp
Copy the following JavaScript code, paste it on your text editor and save it as import_transaction_example.js:
// @id = ch.banana.app.importtransactionexample
// @api = 1.0
// @pubdate = 2018-10-30
// @publisher = Banana.ch SA
// @description = Example Import Transactions (*.csv)
// @doctype = *
// @docproperties =
// @task = import.transactions
// @outputformat = transactions.simple
// @inputdatasource = openfiledialog
// @inputencoding = latin1
// @inputfilefilter = Text files (*.txt *.csv);;All files (*.*)

/* CSV file example:
"Date","Description","Income","Expenses"
"2019-01-01","Income transaction text","100.00",""
"2019-02-02","Expense transaction text","","200.00"
*/

// Parse the data and return the data to be imported as a tab separated file.
function exec(inText) {

   // Convert a csv file to an array of array.
   // Parameters are: text to convert, values separator, delimiter for text values
   var csvFile = Banana.Converter.csvToArray(inText, ',', '"');

   // Converts a table (array of array) to a tsv file (tabulator separated values)
   var tsvFile = Banana.Converter.arrayToTsv(csvFile);

   // Return the converted tsv file
   return tsvFile;

}
When it is used transaction.simple as @outputformat attribute in the script, it's important that CSV file includes "Income" and "Expenses" fields.
Install the BananaApp
For the installation of the BananaApp, see Install your BananaApp.
Run the import BananaApp
To run an import BananaApp follow the steps below:
- Open an accounting file in Banana Accounting.
- In Banana select from the menu Account1 the command Import to accounting...

- From the import type selection select Transactions.
- From the list select the Example Import Transactions (*.csv) BananaApp.
- Click on Browse and look for the csv_example.csv file, then click to Open.

- Click Ok to begin the import process.
- On the dialog window select a Destination account and click on Ok to terminate and import the data.

The data from the CSV file are imported into the Transactions table of your accounting file like the following examples.
- For a Double-Entry accounting:

You can now replace all the [CA] values with the appropriate contra-account, so that the Credit transactions will be balanced with the Debit transactions.
- For an Income & Expenses accounting:

For each transaction you can now enter an income or expense category, as defined in the Categories table.
More about Import BananaApps
Working with the TestFramework
Introduction
This walkthrough provides step-by-step guidance for creating a simple test case example that uses Extensions Test Framework to run unit tests of Extensions.
The steps in order to experiment with Extensions Test Framework are the following:
- Download and use the Banana Experimental version
- Create a Extension to be tested
- Create a test case
- Run the test
- Verify the test results
Create an Extension to be tested
A test case is related to a working Extension.
For this example we use a modified version of "Hello World!" Extension example (see Build your first Extension).
- Copy the code below, paste it on your text editor and save the file as helloworld2.js
// @id = ch.banana.app.helloworldexample
// @api = 1.0
// @pubdate = 2018-10-23
// @publisher = Banana.ch SA
// @description = Example Hello world 2
// @task = app.command
// @doctype = *.*
// @docproperties =
// @outputformat = none
// @inputdataform = none
// @timeout = -1
function exec() {
   //Call the function to create the report
   var report = createReport();

   //Print the report
   var stylesheet = Banana.Report.newStyleSheet();
   Banana.Report.preview(report, stylesheet);
}

function createReport() {
    //Create the report
    var report = Banana.Report.newReport("Report title");

    //Add a paragraph with the "hello world" text
    report.addParagraph("Hello World!");

    //Return the report
    return report;
}
Create a test case
Follow the instructions below to create a working test case:
- Create a folder test in the same folder where the Extension helloworld2.js is located.
- Copy the following JavaScript code and paste it into a text editor.
// @id = ch.banana.app.helloworld2example.test // @api = 1.0 // @pubdate = 2018-10-30 // @publisher = Banana.ch SA // @description = [Test] Example Hello world 2 // @task = app.command // @doctype = *.* // @docproperties = // @outputformat = none // @inputdataform = none // @timeout = -1 // @includejs = ../helloworld2.js // Register this test case to be executed Test.registerTestCase(new TestFrameworkExample()); // Define the test class, the name of the class is not important function TestFrameworkExample() { } // This method will be called at the beginning of the test case TestFrameworkExample.prototype.initTestCase = function() { this.progressBar = Banana.application.progressBar; } // This method will be called at the end of the test case TestFrameworkExample.prototype.cleanupTestCase = function() { } // This method will be called before every test method is executed TestFrameworkExample.prototype.init = function() { } // This method will be called after every test method is executed TestFrameworkExample.prototype.cleanup = function() { } // Every method with the prefix 'test' are executed automatically as test method // You can defiend as many test methods as you need TestFrameworkExample.prototype.testVerifyMethods = function() { Test.logger.addText("The object Test defines methods to verify conditions."); // This method verify that the condition is true Test.assert(true); Test.assert(true, "message"); // You can specify a message to be logged in case of failure // This method verify that the two parameters are equals Test.assertIsEqual("Same text", "Same text"); } TestFrameworkExample.prototype.testBananaApps = function() { Test.logger.addText("This test will tests the BananaApp helloworld.js"); var document = Banana.application.openDocument("file:script/../test/testcases/accounting_file.ac2"); Test.assert(document, "File ac2 not found"); // Add the report content text to the result txt file var report = createReport(); Test.logger.addReport("ReportName", report); } - Modify the script: find the row "var document = Banana.application.openDocument("file:script/../test/testcases/accounting_file.ac2")" and replace "accounting_file.ac2" with the name of your Banana accounting file.
- Save the file into test folder as helloworld2.test.js (the file name must always be <same_name_bananaapp>.test.js).
- Create a folder test/testcases and copy there your file .ac2.
- Now you should have something like this:

- helloworld2.js: the BananaApp
- test: the test folder
- helloworld2.test.js: the test script for the Extension
- testcases: the folder for test ac2 files
- xxx.ac2: your Banana accounting file
Run the test case
Finally, now it is possible to run the test case and see the results.
To run the test:
- In Banana select from the menu Apps the command Manage Apps...

- Select from the Installed element the “Example Hello World 2” Extension
- Click on the button Run tests

Test case results
The test compare the current results with the expected results and checks if there are differences.
If differences are found a dialog message warn you. All the details can be found inside the .test.diff.txt file.
The first time you run a test probably you will see the following "Test failed" dialog message:

In your test folder you can see two new auto generated folders:
- test/testresults:
contains the helloworld2.test folder with a helloworld2.test.txt file with the results of the test.
When the test is run, the folder and the file are automatically generated. - test/testexpected:
contains the helloworld2.test folder that should contain a helloworld2.test.txt file with the expected results.
When the test is run, the folder is automatically generated, but the file NOT. The first time you run the test the folder is empty. This is why the test fails.
You now should have something like that:

Inside the test/testresults/helloworld2.test folder there is the helloworld2.test.txt file with all the results of the test, like the following one:

The file helloworld2.test.diff.txt is a resume of the results, with all the differences the test has found.
The image below shows an example of test summary with differences:
- with the sign "+" are indicated the rows added to the .txt file of the test/testresults folder (compared with the testexpected folder)
- with the sign "-" are indicated the rows removed from the .txt file of the test/testresults folder (compared with the testexpected folder)

As mentioned above, the folder test/testexpected is empty. This is why we can see a lot of added rows to the .txt file of the test/testresults folder.
If you have differences and and you know these differences are correct (like in this case):
- copy the test results .txt file from the folder test/testresults to the folder test/testexpected.
You should have a structure like this:

Note that the helloworld2.test.txt file is now located in both folders, in the test/testresults/helloworld2.test folder and in the test/testexpected/helloworld2.test folder.
If you run again the test, this time the result is different. You now should see a positive message from the dialog:

This means that the results .txt file generated from the test, is perfectly identical of the expected .txt file. So, the test is successfully passed.
You can also check the helloworld2.test.diff.txt file of the test/testresults/helloworld2.test folder to see the differences results, and there should not be differences found.

From that point, every time you do changes to the Extension you can test it and see if the changes you made works as you expected.
Remember: if you have differences and you know these differences are correct, you have to replace the expected .txt file.
More about Extensions Test
- Extension Test Framework
- TestFramework GitHub documentation
- JavaScript code example (ch.banana.script.testframework.test.js)
App Design
Extension File
Javascript compliant script
Extensions are essentially javascript compliant script files (ECMA-262). People knowing javascript can easily write an Extension.
Am Extension file contains the following two sections:
- Extension's attributes
The apps's attributes give information about the script, like it purpose, description and so on.
They are inserted at the beginning of the file through tags in comment's lines. - The exec([inData, options]) function
The function exec() is the function that is called every time an Extension is executed.
It has some optional arguments:
- inData: the requested input data as a string or a Banana.Document object;
This parameters is only used for import scripts, for all other tasks this parameter is just null;
- options: options as an object that can contains those parameters;
- useLastSettings: if true the script executes with the last used setttings and doesn't show a setting's dialog;
The script return a string formatted according the tag @outputformat.
Errors are notified through exceptions (clause throw), or just by returning a string beginning with "@Error:"
- [Optional] The settingsDialog() function
If the script has a dialog for settings some parameters it is advised to put the code for the dialog in this function. In this way the application can call this function just for showing or editing the parameters without executing the whole script.
This method should return null if the user click on cancel button, or a value different of null if the user click on ok button.
For a list of supported javascript functions, objects and properties see: Qt ECMAScript Reference.
Extensions interact with Banana Accounting through some global objects made available by Banana Accounting, like for example 'Banana.document'. Those objects are described under the Banana Script API.
Extension "Hello World" example
Here an example that open a print preview windows, and show a document with the text "Hello world!!!". Other examples are found in the Extensions tutorial.
// @id = ch.banana.report.helloworld
// @version = 1.0
// @doctype = nodocument
// @publisher = Banana.ch SA
// @description = Hello world
// @task = app.command
// @timeout = -1
function exec() {
   //Create the report
   var report = Banana.Report.newReport('Report title');
   //Add a paragraph with some text
   report.addParagraph('Hello World!!!');
   //Preview the report
   var stylesheet = Banana.Report.newStyleSheet();
   Banana.Report.preview(report, stylesheet);
}
Extension with a setting's dialog example
Here an example that use a dialog to input a text. Other examples are found in the Extensions tutorial.
// @id = ch.banana.report.settingsdialog
// @version = 1.0
// @doctype = *
// @publisher = Banana.ch SA
// @description = Example for settings dialog
// @task = app.command
// @timeout = -1
function exec(inData, options) {
   // Show dialog if options.useLastSettings is not set or is false
   if (!options || !options.useLastSettings) {
      if (!settingsDialog())
         return; // return if user pressed cancel
   }

   // Get the settings
   var text = Banana.document.getScriptSettings();

   //Create the report
   var report = Banana.Report.newReport('Report title');
   report.addParagraph('You entered: "' + text + '"');
   report.addParagraph(new Date().toString());

   //Stylesheet
   var stylesheet = Banana.Report.newStyleSheet();

   //Preview the report
   Banana.Report.preview(report, stylesheet);
}

function settingsDialog() {
   // Ask the user to enter a text that will be printed in the report
   var text = Banana.document.getScriptSettings();
   text = Banana.Ui.getText("Enter a text", "The text will be printed in the report", text);
   if (typeof(text) === 'string') {
      Banana.document.setScriptSettings(text);
      return true;
   }
   return false; // cancel pressed
}
Extensions have a strong Security model
Extensions are secure for the fact that are confined within Banana.
Extensions are NOT ALLOWED to directly write or read file, web resource, change computer setting or execute programs.
Extensions , contrary to Excel Macro, can be run with the confidence, they will not change any data and modify any file or computer settings.
To access or write to file you need to use the Banana Api that display a dialog box to the user.
- To write file you need to use the export functionality, that display a dialog where the user indicate the file name where to save.
- To import file you need to use the import functionality that display a dialog where the user specify the file name.
Best way to distribute the Extensions
- Single App file (javascript file)
- Easier to edit (external text editors), move and update.
- Can be included in the menu Apps.
- Can be used by different accounting file.
- Embedded apps
- Not available in the menu Apps.
- Only relative to the file where it is included.
- More difficult to edit and update.
- Packaged App file
- Cannot be easily changed.
- Can be included in the menu Apps.
- Can be used by different accounting file.
- Protected from user modification.
Extensions as a single javascript file
A single javascript (.js) file that includes all the code of the app.
This is how it works:
- Extensions are saved in UTF-8 file without BOOM.
- The Extension needs to be installed through the Manage Apps command.
- Once the Extension is installed, it appears in the menu Apps.
- The Extension can be run from the menu Apps.
Embedded Extension in documents
Banana allows to have Extensions that are embedded within a Banana File. Embedded apps run only for the specific file, but don't need to be installed.
To create embedded Extensions you can add script files in the table Documents.
On the Embedded Extensions JavaScript Tutorial you will find the documentation and different basic examples embedded in a document that you can run and edit.
Extensions as packaged file
It is possible to package one or more apps composed by one or more files (.js, .qml and other files) in one single .sbaa Extensions file (see documentation below).
It's very practical for distributing Apps composed by two or more files, or packages with two or more Extensions.
This is how it works:
- The .sbaa Extension needs to be installed through the Manage Apps command.
- Once the Extensions is installed, it appears in the menu Apps.
- The Extension can be run from the menu Apps.
Extensions file extention '.sbaa'
A .sbaa file can be either a text file containing javascript code (.js files) or a packaged qt resource file (.sbaa). The application determine automatically the type of the file.
When Banana loads a packaged .sbaa file, it looks for all .js files contained in the package that have an attribute section. Those files are readen and a corresponding entry is inserted in the menu Apps.
Javascript files in packages can include other javascript files in the same package using the directive @includejs or the method Banana.include(fileName). It is not possibile to include files outside the package.
// Include a script via @includejs attribute
// @includejs = somescript.js"

// Include a script via Banana.include() method
Banana.include(somescript.js);
Here is how to create a packaged .sbaa file:
- Create a manifest.json file with the information regarding the package
- Create a .qrc file with the list of the files to be included.
- It is also possibile to create package files with the 'rcc' tool from the QT (see below)
- Open Banana Accounting
- Drag the .qrc file in Banana Accounting.
- It will ask you if you want to compile the file and will generate a .sbaa file.
Qrc resource file (.qrc)
For more information see the Qt Resource system.
Example: ch.banana.script.report.jaml.qrc
<!DOCTYPE RCC><RCC version="1.0">
<qresource>
     <file>ch.banana.script.report.jaml.js</file>
     <file>lib/jaml-all.js</file>
     <file>manifest.json</file>
</qresource>
</RCC>
Qrc file file can also be compiled with the QT
rcc -binary ch.banana.script.report.jaml.qrc -o ch.banana.script.report.jaml.rcc
Manifest file
If you create a .sbaa file, also include a manifest file. The manifest.json file is a JSON-formatted file, which you can include in the .sbaa file through the .qrc file.
Using manifest.json, you specify basic metadata about your package such as the title, description and version.
The file name must end with the extension 'manifest.json'
Example: ch.banana.script.report.vat-ch.qrc
<!DOCTYPE RCC><RCC version="1.0">
<qresource>
     <file alias="manifest.json">ch.banana.script.report.vat-ch.manifest.json</file>
     <file>ch.banana.script.report.vat-ch.js</file>
</qresource>
</RCC>
Example: ch.banana.script.report.vat-ch.manifest.json
{
    "category": "productivity",
    "country":"switzerland",
    "countryCode":"ch",
    "description": "Postfinance Schweiz (Bewegungen importieren): ISO20022 und CSV Format",
    "description.en": "Swiss Postfinance (Import transactions): ISO20022 and CSV File Format",
    "language":"de",
    "publisher": "Banana.ch",
    "title": "Postfinance Schweiz (Bewegungen importieren)",
    "title.en": "Swiss Postfinance (Import transactions)",
    "version": "1.0"
}
- Available categories: export, import, invoice, invoice reminder, invoice statement, productivity.
If you don't specify the category ("category": ""), the program will take the category from the first app included in the package. If you don't specify country or language, the app will be shown for any country or language. - All tags are optional
Extension's Attributes
At the beginning at the script there should be a part that define the Extension's Attribute.
// @api = 1.0
// @id = ch.banana.apps.example.docfilepath
// @description = Hello world
// @task = app.command
// @doctype = nodocument
// @publisher = Banana.ch SA
// @pubdate = 2015-05-12
// @inputdatasource = none
// @timeout = -1
The attribute is a commented text line
- Sart with //
- Followed by the attribute that start with @
- Fossowed by the " = " and the value
Tags defines the purpose (import, export, extract, ...), the name displayed in the dialogs, the kind of data it expect to receive, the kind of data it returns, and other information of the script. Tags are inserted at the beginning of the script in comment's lines though the following syntax: "// @tag-name = tag-value".
Attribute list
| Attribute name | Required |
Value 1) |
Description |
| @api | Required |
The required API version. Available API versions: |
Define the required API to be executed in the form of MAIN_VERSION.SUB_VERSION The implemented API in the application have to be equal or newer. |
| @contributors | List of contributors separated by ';' | This attribute contains the list of people that contribute to the developping of the BananaApp. | |
| @description[.lang] | Required | The name or description of the script |
This text will be displayed in the dialogs. This tag is localisable. |
| @docproperties | any text | Define a property the script is writen for. With this attribute you can manually select for what document the script is visbile in the menu Add-ons and can be run. The property can be added to the document though the dialog Add-Ons. The property can be any text (ex.: "datev", "realestate", ...). Mulitple properties can be defined wiht a ';' as separator (ex.: "datev;skr03"). |
|
| @doctype | Required | nodocument * XXX.* XXX.YYY !XXX.YYY ... |
Define the type of document the script is writen for. nodocument = doesn't require an open document, the add-on is always visible The sign ! is used to invert the definition. The above codes can be combined togheter like the following examples: 100.130 = for double entries with VAT and with foreign currencies100.120;100.130 = for double entry with foreign currencies 100.*;110.*;130.* = for all accounting files !130.* = for any filesexcept cash books |
| @exportfilename | A string defining the name of the file where to export the data. | If the string contains the text <Date>, it will be replaced by the current date in the format of yyyyMMdd-hhmm. | |
| @exportfiletype |
A string defining the type of data exported txt... |
This parameter is used for export scripts, it defines the type of exported data and it is used for the extension in the save file dialog. | |
| @id | Required | An identification of the script | It is used when setting and reading the preferences. In order to avoid duplicate banana.ch use the following scheme. country.developper.app.domain.name for example: ch.banana.app.patriziato.consuntivopersubtotali |
| @includejs | Relative path to a javascript .js file to load before the execution of the script. | Include the javascript file. Every function and object defined in the file are then available to the current script. | |
| @inputdatasource | One of the following values: none openfiledialog fixedfilepath 2) |
With this attribute you can specify if you don't need to input data, if you want the user to select a file to import (openfiledialog), or if you want to get a file which path is defined in @inputfilepath. If you set fixedfilepath the program will ask the user the permission to open this file, the user's answer will be saved for the next execution. | |
| @inputencoding |
The encoding of the input data. One of the following values: |
The encoding used to read the input file (for import apps). If the attribute is empty or not defined, the application try to decode the input data with utf-8, if it fails, the application decode the input data with latin1. For a complete list see QTextCodec |
|
| @inputfilefilter[.lang] |
The file filter for the open file dialog Ex.: Text files (*.txt *.csv);;All files (*.*) |
This value describes the file filters you want to show in the input file dialog. If you need multiple filters, separate them with ';;' for instance. This tag is localizable. |
|
| @inputfilepath | The file to read for the input data | If the script has the value fixedfilepath as @inputdatasource, you can define here the path of the file to load. | |
| @inputformat | One of the following values: text ac2 |
If "text" the filter receive the selected file in inData as a text. If "ac2" the filter receive the selected file in inData as a Banana.Document object. | |
| @outputencoding |
The encoding of the input data. One of the following values: |
The encoding used to write the output file (for export apps). For a complete list see QTextCodec |
|
| @outputformat | One of the follwing values: tablewithheaders transactions.simple |
If the script has an import tasks this value define the format of the returned value. The format transaction.simple contains the transaction as income / expenses. For details of the formats see Import data from a txt file. | |
| @pubdate | Required | The publication date in the format YYYY-MM-DD | This publication date is also used for scripts published by Banana.ch to check if newer version exist. |
| @publisher | The publisher of the script | ||
| @task | Required |
One of following values: |
This value define the purpouse of the script, and determine in which dialog or menu the script is visible.
|
| @testapp | Path and name of the test app. Default is './test/<bananaapp_name>.test.js |
This can be used if there is a test app and the path to the test app is different to the default path. Since Banana 9.0.4 |
|
| @testappversionmin @testappversionmax |
Only for test cases. Minimum and mximum application's version to whitch the test is applicable. | ||
| @timeout | The timeout for the script in milliseconds, default is 2000 (2 seconds). If you set -1 the timeout is disabled and the application allow you to abort it though a progress bar. | If the script takes longer than this value to finish, it will be aborted and a message showed. If you have a script with a very long run time, you can increase the timeout or set it to -1. |
1) Default values are listed in bold.
2) Function not yet available
Example:
// @api = 1.0
// @id = ch.banana.apps.example.docfilepath
// @description = Hello world
// @task = app.command
// @doctype = nodocument
// @publisher = Banana.ch SA
// @pubdate = 2015-05-12
// @inputdatasource = none
// @timeout = -1

/**
 * Hello world example for Banana Accounting.
 */
function exec(inData) {
    Banana.Ui.showInformation("", "Hello World");

    if (Banana.document) {
       var fileName = Banana.document.info("Base","FileName");
       Banana.Ui.showInformation("Current document", fileName);
    }
}
Extension's Parameters
Extensions parameters allow to initialize and set parameters that are relative to an Extension, for example:
- Parameters for the printing.
- Header of a report that are set once only.
The script should provide a function settingDialog() that is called when the user click on the Set Parameters on the Manage Apps dialog.
The function settinDialog() should:
- Read the existing setting with the Banana.document.getScriptSettings();
- Request user to enter the information
- Set the modified values with the function Banana.document.setScriptSettings(paramToString);
The JSon text will be saved within the accounting file.
function settingsDialog() {
   var param = initParam();
   var savedParam = Banana.document.getScriptSettings();
   if (savedParam.length > 0) {
      param = JSON.parse(savedParam);
   }
   param = verifyParam(param);

   param.isr_bank_name = Banana.Ui.getText('Settings', texts.param_isr_bank_name, param.isr_bank_name);
   if (param.isr_bank_name === undefined)
      return;
   var paramToString = JSON.stringify(param);
   Banana.document.setScriptSettings(paramToString);
}
the function Exec() should then read the setting.
It is a good practice to check and verify if the setting are valid.
function printDocument(jsonInvoice, repDocObj, repStyleObj) {
  var param = initParam();
  var savedParam = Banana.document.getScriptSettings();
  if (savedParam.length > 0) {
    param = JSON.parse(savedParam);
    param = verifyParam(param);
  }
  printInvoice(jsonInvoice, repDocObj, repStyleObj, param);
}
Import Extensions
Import Extensions read a custom format and convert in an import format suitable for using with the command "Import to accounting".
- For details of the formats see Import data from a txt file.
- For examples see the Github.com template page.
Import Extensions
Imports Extensions are JavaScript program that read the data to import and transform and return them as text, in a format compatible with Banana.
Import BananaApps have:
- the attribute @task defined as one of the import for example //@task = import.transactions (for more information, see Apps attributes documentation)
- The parameter in the function exec contains the import data (the content of the file specified in the input box)
- You can specify that the data is read from the file specified on the input box or that the user can select the file with "// @inputdatasource = openfiledialog"
- The import text is returned as a String in the function exec with the return statement
// @api = 1.0
// @id = ch.banana.scripts.import.creditsuisse
// @description = Credit Suisse bank (*.csv)
// @task = import.transactions
// @doctype = nodocument
// @publisher = Banana.ch SA
// @pubdate = 2015-06-21
// @outputformat = transactions.simple
// @inputdatasource = openfiledialog
// @inputfilefilter = Text files (*.txt *.csv);;All files (*.*)
// @inputfilefilter.de = Text (*.txt *.csv);;Alle Dateien (*.*)
// @inputfilefilter.fr = Texte (*.txt *.csv);;Tous (*.*)
// @inputfilefilter.it = Testo (*.txt *.csv);;Tutti i files (*.*)

/**
* Parse the data and return the data to be imported as a tab separated file.
*/
function exec(inText) {

  // parse the inText and set to outText
  // in the return text the data is tab separated

  var outText = "";
  outText += "Date\tDescription\tIncome\tExpenses\n";
  outText += "2015-01-01\tIncome text\t100.25\t\n";
  outText += "2015-01-02\tExpense text\t\t73.50\n";

  return outText;
}
Export Extensions
Export apps are used to export data in a custom format.
-
Define attribute @task as export.file
// @task = export.file -
Define the extension of the file to be exported.
// @exportfiletype = xml -
The text to be written to the export file is the return value of the exec function and must be a return.
return "exported text". -
When the script terminate and if the return text is not null and does not start with "@Cancel ", the user will be promped with a dialog to choose a file name where to export.
Example
Export all the accounting with description and balance in a xml file.
// @id = ch.banana.apps.export
// @api = 1.0
// @pubdate = 2016-04-08
// @doctype = *.*
// @description = Export into a text file (.txt)
// @task = export.file
// @exportfiletype = txt
// @timeout = -1

function exec() {
var exportResult = '<accounts>';
    var tableAccounts = Banana.document.table('Accounts');
    if ( !tableAccounts) {
      return;
   }
   for (i=0;i<tableAccounts.rowCount;i++) {
        if (tableAccounts.row(i).value('Account')) {
            exportResult += '<account>';
            exportResult += '<accountnr>' + tableAccounts.row(i).value('Account') + '</accountnr>';
            exportResult += '<description>' + tableAccounts.row(i).value('Description') + '</description>';
            exportResult += '<balance>' + tableAccounts.row(i).value('Balance') + '</balance>';
            exportResult += '</account>';
        }
    }
    exportResult += '</accounts>';
    //return the string
    return exportResult;
}
Report Extensions
Report apps are java-script programs that are used to customize printouts like invoice documents. The main function printDocument() receives the json object from Banana, writes the document and lunches the result in a print preview window.
Copies of some report apps that you can use as starting point are available at the following address: github.com/BananaAccounting
Important notes
- Banana Accounting uses Qt script engine to execute report apps.
- Mandatory functions: printDocument(jsonInvoice, repDocObj, repStyleObj) which is the main function and settingsDialog() which is called from user to set up parameters like colour or additional text.
- Available json objects: invoice json object, statement json object, reminder json object
- The extension of custom report apps should be .js and the script must contains the main attributes, see Apps Attributes.
- The attribute @id of the script should correspond to the file name.
- System report apps are downloaded to the folder /User/.../AppData/Local/Banana.ch/.../Apps
(Mac Users: /Users/.../Library/Application Support/Banana.ch/.../Apps) - Do not overwrite system report apps because updates will overwrite your changes.
- You can save your report app anywhere, Banana Accounting saves the path to your app in the configuration file /AppData/Local/Banana.ch/.../Apps/apps.cfg
Invoice Extensions
Create personalized invoice report apps
We have published our templates on:
- How to create your own invoice
- github.com/BananaAccounting/Universal: in this section you will find different basic examples that works for every country.
- github.com/BananaAccounting/Switzerland: in this section you will find different basic examples made for Switzerland (with the Swiss ISR payment slip).
You can save a copy of one template in your computer and make the changes you wish. In order to use your custom template in Banana you have to:
- select the command Account2 - Customers - Print invoices...
- In the Print invoices dialog select Manage apps...
- In the Manage apps dialog select Add from file... and choose your invoice report file you just created
Extensions attributes
// @id = scriptfilename.js
// @api = 1.0
// @pubdate = yyyy-mm-dd
// @publisher = yourName
// @description = script description
// @task = report.customer.invoice
Report code
The main function is printDocument(jsonInvoice, repDocObj, repStyleObj). The parameter jsonInvoice object contains the data, repDocObj is the document object and repStyleObj is the stylesheet object where you can add styles.
function printDocument(jsonInvoice, repDocObj, repStyleObj) {
  var param = initParam();
  var savedParam = Banana.document.getScriptSettings();
  if (savedParam.length > 0) {
    param = JSON.parse(savedParam);
    param = verifyParam(param);
  }
  printInvoice(jsonInvoice, repDocObj, repStyleObj, param);
}
The function settingsDialog() is called from Banana when you select the button Params... from dialog Manage apps. You can write any code you need for your script.
/*Update script's parameters*/
function settingsDialog() {
   var param = initParam();
   var savedParam = Banana.document.getScriptSettings();
   if (savedParam.length > 0) {
      param = JSON.parse(savedParam);
   }
   param = verifyParam(param);
   ...
   var paramToString = JSON.stringify(param);
   var value = Banana.document.setScriptSettings(paramToString);
}
Printing custom data
You can add your own parameters in order to print specific data. For instance printing a reference order number or removing payments information if the invoice has already been paid.
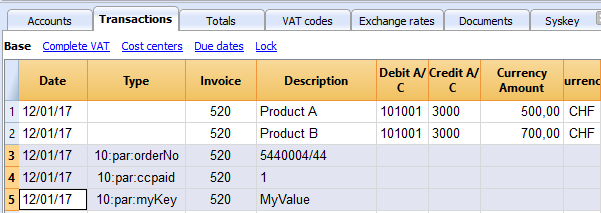
if (invoiceObj.parameters.orderNo) {
    cell1.addParagraph("Reference order: " + invoiceObj.parameters.orderNo);
  }
Printing images
With the command addImage it is possible to add images into the document. For instance
var reportObj = Banana.Report;
var repDocObj = reportObj.newReport();
repDocObj.addImage("documents:logo", "logoStyle");

var logoStyle = repStyleObj.addStyle(".logoStyle");
logoStyle.setAttribute("position", "absolute");
logoStyle.setAttribute("margin-top", "5mm");
logoStyle.setAttribute("margin-left", "20mm");
logoStyle.setAttribute("width", "120px");
If you set the width, the image will be resized to the given width. If the width is not specified the image will be printed with a 72dpi resolution.
Statement Extension
Create personalized statement report extension
We have published our templates on github.com/BananaAccounting. In this section you will find different basic examples.
You can save a copy of one template in your computer and make the changes you wish. In order to use your custom template in Banana you have to:
- select the command Account2 - Customers - Print statements...
- In the Print statements dialog select Manage apps...
- In the Manage apps dialog select Add from file... and choose your statement report file you just created
Extension attributes
// @id = scriptfilename.js
// @api = 1.0
// @pubdate = yyyy-mm-dd
// @publisher = yourName
// @description = script description
// @task = report.customer.statement
Report code
The main function is printDocument(jsonStatement, repDocObj, repStyleObj). The parameter jsonStatement object contains the data, repDocObj is the document object and repStyleObj is the stylesheet object where you can add styles.
function printDocument(jsonStatement, repDocObj, repStyleObj) {
  var param = initParam();
  var savedParam = Banana.document.getScriptSettings();
  if (savedParam.length > 0) {
    param = JSON.parse(savedParam);
    param = verifyParam(param);
  }
  printInvoice(jsonInvoice, repDocObj, repStyleObj, param);
}
The function settingsDialog() is called from Banana when you select the button Params... from dialog Manage apps. You can write any code you need for your script.
/*Update script's parameters*/
function settingsDialog() {
   var param = initParam();
   var savedParam = Banana.document.getScriptSettings();
   if (savedParam.length > 0) {
      param = JSON.parse(savedParam);
   }
   param = verifyParam(param);
   ...
   var paramToString = JSON.stringify(param);
   var value = Banana.document.scriptSaveSettings(paramToString);
}
Json Object
Statement Json Object
Data structure you can access through the report:
{
    "customer_info": {
        "address1": "Viale Stazione 11",
        "business_name": "Rossi SA",
        "city": "Bellinzona",
        "first_name": "Andrea",
        "last_name": "Rossi",
        "number": "1100",
        "origin_row": "26",
        "origin_table": "Accounts",
        "postal_code": "6500"
    },
    "document_info": {
        "date": "20160927",
        "decimals_amounts": 2,
        "description": "",
        "locale": "it",
        "number": "",
        "type": "statement"
    },
    "items": [
        {
            "balance": "540.00",
            "credit": "",
            "currency": "CHF",
            "date": "20160101",
            "debit": "540.00",
            "due_date": "20160131",
            "due_days": "240",
            "item_type": "invoice",
            "last_reminder": "",
            "last_reminder_date": "",
            "number": "10",
            "payment_date": "",
            "status": "",
            "total_amount_vat_exclusive": "",
            "total_amount_vat_inclusive": "",
            "total_vat_amount": "",
            "unit_price": {
            }
        },
        {
            "balance": "540.00",
            "credit": "",
            "currency": "",
            "date": "",
            "debit": "540.00",
            "item_type": "total",
            "number": "",
            "status": "",
            "total_amount_vat_exclusive": "",
            "total_amount_vat_inclusive": "",
            "total_vat_amount": "",
            "unit_price": {
            }
        }
    ],
    "supplier_info": {
        "address1": "Indirizzo 1",
        "address2": "Indirizzo 2",
        "business_name": "Società",
        "city": "Loc",
        "email": "info@myweb",
        "first_name": "Nome",
        "fiscal_number": "numerofiscale",
        "last_name": "Cognome",
        "postal_code": "CAP",
        "web": "http://www.myweb"
    }
}
Reminder Extensions Layout
Create personalized reminder report extensions
We have published our templates on github.com/BananaAccounting. In this section you will find different basic examples.
You can save a copy of one template in your computer and make the changes you wish. In order to use your custom template in Banana you have to:
- select the command Account2 - Customers - Print reminders...
- In the Print payment reminders dialog select Manage apps...
- In the Manage apps dialog select Add from file... and choose your reminder report file you just created
Extensions attributes
// @id = scriptfilename.js
// @api = 1.0
// @pubdate = yyyy-mm-dd
// @publisher = yourName
// @description = script description
// @task = report.customer.reminder
Report code
The main function is printDocument(jsonReminder, repDocObj, repStyleObj). The parameter jsonReminder object contains the data, repDocObj is the document object and repStyleObj is the stylesheet object where you can add styles.
function printDocument(jsonReminder, repDocObj, repStyleObj) {
  var param = initParam();
  var savedParam = Banana.document.getScriptSettings();
  if (savedParam.length > 0) {
    param = JSON.parse(savedParam);
    param = verifyParam(param);
  }
  printReminder(jsonReminder, repDocObj, repStyleObj, param);
}
The function settingsDialog() is called from Banana when you select the button Params... from dialog Manage apps. You can write any code you need for your script.
/*Update script's parameters*/
function settingsDialog() {
   var param = initParam();
   var savedParam = Banana.document.getScriptSettings();
   if (savedParam.length > 0) {
      param = JSON.parse(savedParam);
   }
   param = verifyParam(param);
   ...
   var paramString = JSON.stringify(param);
   var value = Banana.document.setScriptSettings(paramString);
}
Json Object
Reminder Json Object
Data structure you can access through the report:
{
    "customer_info": {
        "address1": "Viale Stazione 11",
        "business_name": "Rossi SA",
        "city": "Bellinzona",
        "first_name": "Andrea",
        "last_name": "Rossi",
        "number": "1100",
        "origin_row": "26",
        "origin_table": "Accounts",
        "postal_code": "6500"
    },
    "document_info": {
        "date": "20160927",
        "decimals_amounts": 2,
        "description": "",
        "locale": "it",
        "number": "",
        "type": "reminder"
    },
    "items": [
        {
            "balance": "540.00",
            "balance_base_currency": "540.00",
            "base_currency": "CHF",
            "credit": "",
            "credit_base_currency": "",
            "currency": "CHF",
            "date": "20160101",
            "debit": "540.00",
            "debit_base_currency": "540.00",
            "item_type": "invoice",
            "number": "10",
            "status": "1. reminder",
            "total_amount_vat_exclusive": "",
            "total_amount_vat_inclusive": "",
            "total_vat_amount": "",
            "unit_price": {
            }
        },
        {
            "balance": "540.00",
            "balance_base_currency": "540.00",
            "base_currency": "",
            "credit": "",
            "credit_base_currency": "",
            "currency": "",
            "date": "",
            "debit": "540.00",
            "debit_base_currency": "540.00",
            "item_type": "total",
            "number": "",
            "status": "",
            "total_amount_vat_exclusive": "",
            "total_amount_vat_inclusive": "",
            "total_vat_amount": "",
            "unit_price": {
            }
        }
    ],
    "supplier_info": {
        "address1": "Indirizzo 1",
        "address2": "Indirizzo 2",
        "business_name": "Società",
        "city": "Loc",
        "email": "info@myweb",
        "first_name": "Nome",
        "fiscal_number": "numerofiscale",
        "last_name": "Cognome",
        "postal_code": "CAP",
        "web": "http://www.myweb"
    }
}
Dialogs in Extensions
For simple interactions with the user you can use the predefined dialogs of the class Banana.Ui. With those dialogs you can ask the user to insert a value, answer a question, or show to the user an information.
For a more complex dialog:
- Install Qt Creator
- Draw the dialog with Qt Creator
- Save the dialog in a .ui file,
- Load the .ui file in the script through the function Banana.Ui.createUi()
All the properties and public slots of the widgets in the dialogs will be accessible from the script.
Example: a script to search in the whole accounting a text.
This example is also found in the tutorial file JavaScript Tutorial 1 under the table documents at code 742.
The dialog:
The script file ch.banana.scripts.find.js:
/**
 * This example search a text in all the tables of the document,
 * and show the matches in the messages pane.
 */
// @id = ch.banana.scripts.find
// @version = 1.3
// @date = 2019-12-06
// @publisher = Banana.ch SA
// @description = Find in whole accounting
// @description.it = Cerca in tutta la contabilità
// @description.de = Suchen in der gesamten Buchhaltung
// @description.fr = Chercher dans toute la comptabilité
// @task = app.command
// @doctype = nodocument
// @inputdatasource = none
// @timeout = -1

/**
 * param values are loaded from Banana.document, edited through dialog and saved to Banana.document
 * This array object is like a map (associative array) i.e. "key":"value", see initParam()
 * Examples of keys: searchText, wholeText, ...
 */
var param = {};

/** Dialog's functions declaration */
var dialog = Banana.Ui.createUi("ch.banana.scripts.find.ui"); // use "documents:742.ui" in template file

/** Dialog Objects declaration */
var findNextButton = dialog.findChild('findNextButton');
var helpButton = dialog.findChild('helpButton');
var closeButton = dialog.findChild('closeButton');
var searchTextLineEdit = dialog.findChild('searchTextLineEdit');
var matchCaseCheckBox = dialog.findChild('matchCaseCheckBox');
var wholeTextCheckBox = dialog.findChild('wholeTextCheckBox');


dialog.checkdata = function () {
    var valid = true;

    if (searchTextLineEdit.text.length <= 0) {
        Banana.Ui.showInformation("Error", "Search text can't be empty");
        valid = false;
    }

    if (valid) {
        dialog.accept();
    }
};

dialog.showHelp = function () {
    Banana.Ui.showHelp("ch.banana.script.find");
};

dialog.closeDialog = function () {
    dialog.close();
};

/** Dialog's events declaration */
findNextButton.clicked.connect(dialog, dialog.checkdata);
helpButton.clicked.connect(dialog, dialog.showHelp);
closeButton.clicked.connect(dialog, dialog.closeDialog);

/** Main function */
function exec(inData) {

    //calls dialog
    // var rtnDialog = true;
    var rtnDialog = dialogExec();

    //search text in the whole accounting
    if (rtnDialog && Banana.document) {
        Banana.document.clearMessages();
        searchInTables();
    }
}

/** Show the dialog and set the parameters */
function dialogExec() {
    // Read saved script settings
    initParam();
    if (Banana.document) {
        var data = Banana.document.getScriptSettings();
        if (data.length > 0) {
            param = JSON.parse(data);
        }
    }

    // Text at cursor position
    var cursor = Banana.document.cursor;
    var columnName = cursor.tableName === 'Documents' && cursor.columnName == 'Attachments' ? 'Description' : cursor.columnName;
    param["searchText"] = Banana.document.value(cursor.tableName,cursor.rowNr,columnName);
    searchTextLineEdit.text = param["searchText"];
    // Set dialog parameters
    if (param["matchCase"] == "true")
        matchCaseCheckBox.checked = true;
    else
        matchCaseCheckBox.checked = false;
    if (param["wholeText"] == "true")
        wholeTextCheckBox.checked = true;
    else
        wholeTextCheckBox.checked = false;

    Banana.application.progressBar.pause();
    var dlgResult = dialog.exec();
    Banana.application.progressBar.resume();

    if (dlgResult !== 1)
        return false;

    // Read dialog parameters
    param["searchText"] = searchTextLineEdit.text;
    if (matchCaseCheckBox.checked)
        param["matchCase"] = "true";
    else
        param["matchCase"] = "false";
    if (wholeTextCheckBox.checked)
        param["wholeText"] = "true";
    else
        param["wholeText"] = "false";

    // Save script settings
    var paramString = JSON.stringify(param);
    var value = Banana.document.setScriptSettings(paramString);

    return true;
}

/** Initialize dialog values with default values */
function initParam() {
    param = {
        "searchText": "",
        "matchCase": "false",
        "wholeText": "false"
    };
}

/** Search a text in the accounting's tables */
function searchInTables() {
    var searchText = param["searchText"];
    if (param["matchCase"] === "false")
        searchText = searchText.toLowerCase();
    var tables = Banana.document.tableNames;
    // Tables
    for (var t=0; t < tables.length; t++) {
        var table = Banana.document.table(tables[t]);
        var columns = table.columnNames;
        // Rows
        for (var r=0; r < table.rowCount; r++) {
            // Columns
            for (var c=0; c < columns.length; c++) {
                var textFound = false;
                var text = table.value(r, columns[c]);
                if (param["matchCase"] === "false")
                    text = text.toLowerCase();
                // Find text
                if (param["wholeText"] === "true") {
                    if (text === searchText)
                        textFound = true;
                } else {
                    if (text.indexOf(searchText) >= 0)
                        textFound = true;
                }
                // Show message
                if (textFound) {
                    table.addMessage("Text \"" + param["searchText"] +
                        "\" found in \"" + table.value(r, columns[c]) + "\"", r, columns[c]);
                }
            }
        }
    }
}
The .ui file: ch.banana.scripts.find.ui
<?xml version="1.0" encoding="UTF-8"?>
<ui version="4.0">
<class>DlgFind</class>
<widget class="QDialog" name="DlgFind">
<property name="geometry">
<rect>
<x>0</x>
<y>0</y>
<width>438</width>
<height>193</height>
</rect>
</property>
<property name="windowTitle">
<string>Find</string>
</property>
<layout class="QVBoxLayout" name="verticalLayout_2">
<item>
<layout class="QGridLayout" name="gridLayout">
<property name="horizontalSpacing">
<number>40</number>
</property>
<item row="0" column="0">
<widget class="QLabel" name="searchTextLabel">
<property name="text">
<string>Search &text</string>
</property>
</widget>
</item>
<item row="0" column="1">
<widget class="QLineEdit" name="searchTextLineEdit"/>
</item>
</layout>
</item>
<item>
<widget class="QGroupBox" name="groupBox">
<property name="title">
<string>Options</string>
</property>
<property name="flat">
<bool>false</bool>
</property>
<property name="checkable">
<bool>false</bool>
</property>
<layout class="QVBoxLayout" name="verticalLayout">
<item>
<widget class="QCheckBox" name="matchCaseCheckBox">
<property name="text">
<string>&Match case</string>
</property>
</widget>
</item>
<item>
<widget class="QCheckBox" name="wholeTextCheckBox">
<property name="text">
<string>&Whole text</string>
</property>
</widget>
</item>
</layout>
</widget>
</item>
<item>
<spacer name="verticalSpacer">
<property name="orientation">
<enum>Qt::Vertical</enum>
</property>
<property name="sizeHint" stdset="0">
<size>
<width>20</width>
<height>15</height>
</size>
</property>
</spacer>
</item>
<item>
<layout class="QHBoxLayout" name="horizontalLayout">
<item>
<spacer name="horizontalSpacer">
<property name="orientation">
<enum>Qt::Horizontal</enum>
</property>
<property name="sizeHint" stdset="0">
<size>
<width>80</width>
<height>20</height>
</size>
</property>
</spacer>
</item>
<item>
<widget class="QPushButton" name="findNextButton">
<property name="text">
<string>&Find</string>
</property>
</widget>
</item>
<item>
<widget class="QPushButton" name="helpButton">
<property name="text">
<string>Help</string>
</property>
</widget>
</item>
<item>
<widget class="QPushButton" name="closeButton">
<property name="text">
<string>Close</string>
</property>
</widget>
</item>
</layout>
</item>
</layout>
</widget>
<tabstops>
<tabstop>matchCaseCheckBox</tabstop>
<tabstop>findNextButton</tabstop>
</tabstops>
<resources/>
<connections/>
</ui>
API
Banana namespace
The whole API (Application Program Interface) made available for Banana is under the namespace "Banana".
There are different objects and methods that belong to the namespace Banana, that can be accessed by the javascript at run time:
Data formats
Date
Date values are in ISO 8601 format "YYYY-MM-DD".
Decimal
Decimal values have a '.' (dot) as decimal separator and don't have a group separator. For example: "12345.67".
Decimal values are rounded according to the accounting settings.
Text
Text values can contain any character supported by UTF-8.
Time
Time values are in ISO 8601 format "HH:MM:SS". The formats "HH:MM" and "HH:MM:SS.ZZZ" are also accepted.
API Versions
List of API Version made available by Banana Accounting.
| Banana Accounting Version | API Version |
| 7.0.6 | 1.0 |
| 8.0.7 or more recent | 1.0 |
| 9.0.0 or more recent | 1.0 |
Banana (Objects)
Banana is the namespace (object) through which all Banana script's methods, class and objects are accessible.
Banana.application
The object Banana.application represents the running application.
Banana.console
The object Banana.console is used to send messages to the debug script.
Banana.Converter
The class Banana.Converter contains methods useful to convert data from and to various formats.
Banana.document
The object Banana.document represents the document currently open in the application. It contains base properties and methods, see Banana.Document (Base), and if the document represents an accounting document that contains additional accounting's properties and methods, see Banana.Document (Accounting). If any document is opened this object is of type Undefined.
Banana.IO
The class Banana.IO is used to read and write files.
Banana.Report
The class Banana.Report enables you to create reports, preview and print them in Banana Accounting.
Banana.script
The object Banana.script is used to get information about the running script.
Banana.SDecimal
The class Banana.SDecimal contains methods useful for decimal math calculation.
Banana.Test
The class Banana.Test contains methods to run test units.
Banana.Ui
The class Banana.Ui contains predefined dialogs to interact with the user, and methods to load dialogs from .ui or .qml files.
Banana.Xml
The class Banana.Xml contains methods to parse and access Xml data.
Banana Methods
Banana.compareVersion(v1, v2)
Compares two version strings. Version strings are in the form of "x.y.w.z". Returns 0 if v1 and v2 are equal, -1 if v2 is later and 1 if v1 is later.
var requiredVersion = "8.0.5";
if (Banana.compareVersion && Banana.compareVersion(Banana.application.version, requiredVersion) >= 0)
   Banana.Ui.showInformation("Message", "More recent or equal than version " + requiredVersion);
else
   Banana.Ui.showInformation("Message", "Older than version " + requiredVersion);
Banana.include(path)
The method Banana.include(path) includes a javascript file evaluating it.
If an error occurs, i.e. the file is not found or is not valid, the method throws an exception.
The path is relative to the current script being executed, if no protocol is specified. Otherwise depending on the protocol it can be relative to the main script's folder, the document's folder or the name of a document attacched to the current file.
- <relative_path_to_current_script>/<file_name>
- file:script/<relative_path_to_main_script>/<file_name>
- file:document/<relative_path_to_file>/<file_name>
- documents:<attachment_name>
Scripts included through the method Banana.include(path) can include other scripts through the method Banana.include(path), but not via the script's attibute @includejs. The method Banana.include(path) garantees that each distinct script is evaluated once, even if it is included more than one time from differents scripts. Path can contain ".." (parent folder), in the case the destination path is outside the main script's folder, the method will throw a security exception.
Banana.include("cashflowlib.js");
Banana.include("folder/cashflowlib.js");
Banana.Application
Banana.Application represents the interface to the program and can be accessed through Banana.application.
Properties
isBeta
Returns true if the application is a beta version.
var isBeta = Banana.application.isBeta;
isExperimental
Returns true if the application is a beta version.
var isExperimental = Banana.application.isExperimental;
serial
Returns the serial of the application in the form of "80006-170428".
var serial = Banana.application.serial;
version
Returns the version of the application in the form of "8.0.4".
var version = Banana.application.version;
locale
Returns the locale of the application in the form of "language_country", where language is a lowercase, two-letter ISO 639 language code, and country is an uppercase, two- or three-letter ISO 3166 country code.
var locale = Banana.application.locale;
progressBar
Returns an object of type ProgressBar used to give the user an indication of the progress of an operation and the ability to cancel it.
var progerssBar = Banana.application.progressBar;
Methods
addMessage(msg [, idMsg])
Adds the message msg to the application. The message is showed in the pane "Messages", and in a dialog if the application option "Show Messages" is turned on.
If idMsg is not empty, the help button calls an url with script's id and message's id (idMsg) as parameters.
Banana.application.addMessage("Hello World");
See also: Table.AddMessage, Row.AddMessage, Document.AddMessage.
clearMessages()
Clears all the messages showed in the pane "Messages".
Banana.application.clearMessages();
showMessages([show])
Enable or disable the notification of new messages through the message dialog.
Banana.application.showMessages(); // Next messages are showed to the user through the message dialog.
Banana.application.showMessages(false); // Next messages will not pop up the message dialog.
openDocument(ac2FilePath [, password] [, title])
Opens the ac2 file located in filePath and returns an Object of type Banana.Document or undefined if the file is not found. The path can be relative, in this case the base directory is the path of the current document.
If the path is empty or contains a "*" or a "?" an open file dialog is showed to the user, and the title is used in the caption of the file open dialog.
With this function you can also open ISO 20022 and MT940 files, in this case a cash book with the transactions of the file is returned.
var file1 = Banana.application.openDocument("*.*");
if (!file1)
   return;

var file2 = Banana.application.openDocument("c:/temp/accounting_2015.ac2");
if (!file2)
   return;
Banana.Application.ProgressBar
Banana.Application.ProgressBar is the interface to the program progress bar and can be accessed through Banana.application.progressBar. The progressBar object is used to give the user an indication of the progress of an operation and the possibility to interrupt the running process. The progress bar is showed in bottom left corner of the application windows.
// Example use of a progress bar
var progressBar = Banana.application.progressBar;
progressBar.start(10);
for (var i = 0; i < 10; i++) {
   ...
   if (!progressBar.step(1)) {
      return; // Operation canceled by the user
   }
}
progressBar.finish();
Properties
showDetails
If true details are showed in the progess bar. If false only the text set by the first progressBar.start() call is showed.
progressBar.showDetails = false; // Example without details: "VAT Report"
progressBar.showDetails = true; // Example with details: "Vat Report; Sales; Row: 120"
Since Banana Accounting 9.0.3.
Methods
finish()
Notifies that the operation has been completed and closes the progress bar.
Returns false if the user canceled the operation, otherwise true.
progressBar.finish();
pause()
Notifies that the operation has been paused, the cursor icon is set to the arrow cursor or poiting hand cursor. This is usually called before showing a dialog.
Banana.application.progressBar.pause();
var result = dialog.exec();
Banana.application.progressBar.resume();
resume()
Notifies that the operation has been resumed, the cursor icon is set back to an hourglass or watch cursor. This is usually called after a dialog has been closed.
Banana.application.progressBar.pause();
var result = dialog.exec();
Banana.application.progressBar.resume();
start(maxSteps)
Starts the progress indicator and defines the number of steps this operation needs before being complete.
You can call this method several times to split the progress in main and sub steps. Every call of the method start() should be paired with a call of the method finish().
Returns false if the user canceled the operation, otherwise true.
// Example use of a progress bar
var progressBar = Banana.application.progressBar;
progressBar.start(10);
for (var i = 0; i < 10; i++) {
   ...
   if (!progressBar.step(1)) {
      return; // Operation canceled by the user
   }
}
progressBar.finish();
start(text, maxSteps)
Starts the progress indicator and defines the text to be showed in the progress bar as well as the number of steps this operation needs before being complete.
You can call this method several times to split the progress in main and sub steps. Every call of the method start() should be paired with a call of the method finish().
Returns false if the user canceled the operation, otherwise true.
// Example use of a progress bar
var progressBar = Banana.application.progressBar;
progressBar.start("Checking rows", 10);
for (var i = 0; i < 10; i++) {
   ...
   if (!progressBar.step("Row: " + i.toString())) {
      return; // Operation canceled by the user
   }
}
progressBar.finish();
Since Banana Accounting 9.0.3.
setText(text)
Sets the text to show in the progress bar.
progressBar.setText("Checking vat rates");
Since Banana Accounting 9.0.3.
step([stepCount])
Advances the progress indicator of stepCount steps. If stepCount is not defined, it advances of one step.
Returns false if the user canceled the operation, otherwise true.
progressBar.step(1);
step(text, [stepCount])
Advances the progress indicator of stepCount steps and sets the text of the progress bar. If stepCount is not defined it advances of one step.
Returns false if the user canceled the operation, otherwise true.
progressBar.step("Row: " i.toString());
Since Banana Accounting 9.0.3.
Example multiple steps inside a block
// Two blocks of progress bar inside a progressBar
var progressBar = Banana.application.progressBar;

progressBar.start("Vat Report", 2);

// Block 1
progressBar.start("Sales", 10)
for (i = 0; i < 10; i++) {
   progressBar.step("Row: " + i.toString());
}
progressBar.finish();

// Block 2
progressBar.start("Purchases", 10)
for (i = 0; i < 10; i++) {
   progressBar.step("Row: " + i.toString());
}
progressBar.finish();

progressBar.finish();
Banana.Console
The Banana.console object is used to output messages to the Debug output panel or to the terminal (command prompt). The methods in this object are mainly used for Debugging purposes.
- To open the debug panel you have to enable the option "Display Debug output panel" under -> Program Options -> Tab Developer options
- The debug panel is located on the bottom of the main widow near the Info and Messages panels
- In the debug panel you can choose the level of messages to shows
- Debug messages can also be displayed in the terminal (command prompt) if the applicaiton is started from a terminal (command prompt)
Methods
console.critical(msg)
Display the msg in the debug panel as critical message.
Banana.console.critical("critical message");
console.debug(msg)
Display the msg in the debug panel as a debug message.
Debug messages are shown if either the 'Debug level' or 'Info level' is selected in the panel.
Banana.console.debug("Debug message");
console.info(msg)
Display the msg in the debug panel as an info message.
Info messages are shown in the panel only if the 'Info level' is selected.
Banana.console.info("Debug message");
console.log(msg)
Display the msg in the debug panel as an info message.
Log messages are shown only if in the panel 'Info level' is selected.
Banana.console.log("Debug message");
Since Banana 9.0.4
console.warn(msg)
Display the msg in the debug panel as a warning.
Banana.console.warn("Warning message");
Deprecated since Banana 9.0.4 use console.warning method instead.
console.warning(msg)
Display the msg in the debug panel as a warning.
Banana.console.warning("Warning message");
Since Banana 9.0.4
Banana.Converter
The class Banana.Converter is a collection of methods useful to convert various formats to and from data tables (array of arrays).
Methods
arrayToObject( headers, arrData, skipVoid)
Converts an array of arrays of string to an array of objects
- headers is an array of strings that will become the properties of the objects.
- arrData is an array containing arrays of strings
- skipVoid if true skip void lines, if not present is set to false
// read a CSV file
var ppData = Banana.Converter.csvToArray(string, ',');
// first line is header
var headers = ppData[0];
// remove first line
ppData.splice(0, 1);
// convert in array of objects
var arraOfObjects = Banana.Converter.arrayToObject(fileData.headers, ppData, true);
csvToArray(string [, separator, textdelim])
Convert a csv file (coma separated values) to an array of arrays.
The parameter string contains the text to convert. The parameter separator specifies the character that separates the values, default is a comma ','. The parameter textDelim specifies the delimiter character for text values, default is a double quote '"'.
Example:
var text = "1, 2, 3\n4, 5, 6\n7, 8, 9";
var table = Banana.Converter.csvToArray(text);
var value = table[0][1];
value == '2'; // true
flvToArray(string, fieldLengths)
Convert a flv file (fixed length values) to an array of arrays.
The parameter string contains the text to convert. The parameter fieldLengths is an array with the lengths of the fields.
Example:
//               6                  20       8
var text = "120608Phone               00002345";
var table = Banana.Converter.flvToArray(text, [6,20,8]);
var value = table[0][2];
value == '00002345'; // true
mt940ToTable(string)
Converts a mt940 file to a table (array of array).
naturalCompare(a, b [, caseSensitive])
Compares two strings so that the string "2" is considered less then "100" as it would be with normal string compare.
This function can be passed to array.sort function.
- a first value to compare
- b second value to compare
- return value is -1 if a < b, 1 if a > b and 0 if a == b
Banana.Converter.naturalCompare(a,b);
objectArrayToCsv(headers, objArray, [separator])
Converts an array of objects (with identical schemas) into a CSV table.
- headers An array of strings with the list of properties to export
- objArray An array of objects. Each object in the array must have the same property list.
- separator The CSV column delimiter. Defaults to a comma (,) if omitted.
- return value a string containing the CSV text.
var csvText = Banana.Converter.objectArrayToCsv(headers, objArray, ";");
stringToCamelCase(string)
Converts a text to camel case, where only the first letter of every word is upper case.
Banana.Converter.stringToCamelCase("this is an example");
// returns "This Is An Example";
stringToLines(string)
Convert a text in an array of lines. The end line character can be '\n', \r' or a combination of both.
Banana.Converter.stringToLines("this is\nan\nexample");
// returns ["this is", "an", "example"]
stringToTitleCase(string)
Converts a text to title case, where only the first letter of the text is upper case.
Banana.Converter.stringToTitleCase("this is an example");
// returns "This is an example";
arrayToTsv(table [, defaultChar])
Converts a table (array of arrays) to a tsv file (tabulator separated values). If a string contains a tab it will be replaced with defaultChar or a space if defaultChar is undefined.
Banana.Converter.arrayToTsv(table);
arrayToCsv(table)
Converts a table (array of arrays) to a csv file (comma separated values). Double quotes in text are replaced by apos. Texts containing commas are inserted in doubles quotes.
Banana.Converter.arrayToCsv(table);
toDate(date[, time])
Converts a date and/or time to a javascript date object.
The parameter date is a string in the formats YYYYMMDD or YYYY-MM-DD.
The time parameter is a string in the fromats HHMM[SSZZZ] or HH:MM[:SS.ZZZ].
Banana.Converter.toDate("2015-12-31");
Banana.Converter.toDate("20151231");
toInternalDateFormat(date [, inputFormat])
Converts a date to the internal format: YYYY-MM-DD.
The parameter date can be a String or a Date object.
The parameter inputFormat specifies the date input format, if it is not specified the local date format is used.
Example:
Banana.Converter.toInternalDateFormat("31-12-13", "dd-mm-yy");
// returns "2013-12-31"
Banana.Converter.toInternalDateFormat(new Date());
// return current date in format "yyyy-mm-dd"
toInternalNumberFormat(value [, decimalSeparator])
Converts a number to the internal format: 123456.78.The internal number format uses the character '.' as decimal separator, and doesn't contain a group separator.
The parameter value can be a string or a number object.
The parameter decimalSeparator specifies the character used to separate the decimals, if it is not specified the local decimal separator is used.
Example:
Banana.Converter.toInternalNumberFormat("1200,25", ",");
// returns "1200.25";
toInternalTimeFormat(string)
Converts a time to the internal format: HH:MM:SS.ZZZ.
Banana.Converter.toInternalTimeFormat("11:24");
// returns "11:24:00";
toInternalTimeFormat(value)
From version 9.1 Experimental
Converts a time to the internal format: HH:MM:SS.ZZZ.
The parameter value can be a String or a Date object.
Banana.Converter.toInternalTimeFormat("11:24")
// returns "11:24:00";
Banana.Converter.toInternalTimeFormat(new Date(2020, 1, 1, 10, 24, 0, 0))
// returns "11:24:00";
Banana.Converter.toInternalTimeFormat(new Date());
toLocaleDateFormat(date [, format])
Converts a date to the local format.
The parameter date can be a string or a date object.
The parameter format specifies the date ouptut format, if it is not specified the local date format is used.
Banana.Converter.toLocaleDateFormat("2014-02-24")
// returns "24.02.2014"
toLocaleNumberFormat(value [, decimals = 2, convZero = true])
Converts a number to the local format.
The parameter value can be a string or a number object.
The parameter decimals sets the number of decimals.
The parameter convZero sets the format returned for zero values. If false the method returns an empty string, if true it returns the zero value as string.
Example:
Banana.Converter.toLocaleNumberFormat("1200.25")
// returns "1'200,25";
toLocalePeriodFormat(startDate , endDate [, format])
Converts a period defined by startDate and endDate to a readable string.
The parameter startDate specifies the start date of the preriod, can be a date object or a string.
The parameter endDate specifies the end date of the preriod, can be a date object or a string.
The parameter format can be empty or one of the following strings: 'short', 'long'. Default is 'long'.
Return the period as a readable string in the current language of the application.
Banana.Converter.toLocalePeriodFormat("2017-01-01", "2017-01-31"); // returns "January '17"
Banana.Converter.toLocalePeriodFormat("2017-01-01", "2017-01-31", "short"); // returns "Jan '17"
Banana.Converter.toLocalePeriodFormat("2017-01-01", "2017-01-31", "long"); // returns "January '17"
toLocaleTimeFormat(string [, format])
Converts a time to the local format.
The parameter format specifies the time ouptut format, if it is not specified the local time format is used.
Banana.Converter.toLocaleTimeFormat("11:24:42");
// returns "11:24";
Banana.Document (Accounting)
Methods for accounting's files
Banana is built with object oriented techologies. Each file is a Banana.document class.
Accounting files are elements of class that derive from the Banana.document.
For each file there are:
- Methods, that apply to all documents, see Banana.Document (Base),
- Method specific to the Accounting class.
The following explanations relate to the accounting functions.
Date functions
endPeriod([period])
Return the end date in the form of 'YYYY-MM-DD'.
The endDate and startDate functions are used to retrieve the date of the accounting, so that you can create scripts that work on files from different years.
var dateEnd = Banana.document.endPeriod();
var dateStartFebruary = Banana.document.endPeriod('2M');
- Period:
- If period is not present the return value is the end date of the accounting.
- The period is added to the starting account date, and the last date of the period is returned.
- Period (for example 2M = 2 months) is a number followed by one of the following charachters
- D for days
- M for months
- Q for quarters
- S for semesters
- Y for years
- Assuming that the Start accounting date is 2015-01-01
- 1M return 2015-01-02
- 2M return 2015-02-28
- 2Q return 2015-06-30
- 2S return 2015-12-31
- 2Y return 2016-12-31
startPeriod ([period])
Return the end date in the form of 'YYYY-MM-DD'.
The endPeriod and startPeriod functions are used to retrieve the date of the accounting, so that you can create scripts that work on files from different years.
var dateStart = Banana.document.endPeriod();
var dateStart3Q = Banana.document.endPeriod('3Q');
- Period:
If period is not present return the start date.- Period (for example 2M = 2 months) is a number followed by one of the following charachters
- D is for Days
- M for Months
- Q for Quorters
- S for Semester
- Y for year
- With 1 the starting date of the accounting is returned.
- Assuming that the Start accounting date is 2015-01-01
- 1M return 2015-01-01
- 2M return 2015-02-01
- 2Q return 2015-04-01
- 2S return 2015-07-01
- 2Y return 2016-01-01
- Period (for example 2M = 2 months) is a number followed by one of the following charachters
previousYear([nrYears])
Returns the previous year as a Banana.Document object. If the previous year is not defined or it is not found, it returns null.
- nrYears is the number of years to go back, default is one.
var previousYearDoc = Banana.document.previousYear();
var previousTwoYearDoc = Banana.document.previousYear(2);
Current accounting functions
The functions that start with "current" retrieve values calculated based on the actual accounting data, comprising:
- Opening amounts (Table accounts)
- Transactions entered in the Transactions table
currentBalance(account [, startDate, endDate, function(rowObj, rowNr, table) ])
Sum the amounts of opening, debit, credit, total and balance calculated based on the opening and all transactions for this account / group.
The calculations are performed by traversing by creating a journal (see journal() function) with all the transactions, and selecting the transactions with the parameters specified.
The computation is usually very fast. But if you have a file with many transactions especially the first query could take some time.
var currentBal = Banana.document.currentBalance('1000','','');
var openingBalance = currentBal.opening;
var endBalance = currentBal.balance;
- Return value
Is an object that has- opening the amount at the begining of the period (all transactions before)
- debit the amount of debit transactions for the period
- credit the amount of credit transactions for the period
- total the difference between debit-credit for the period
- balance opening + debit-credit for the period
- amount it the "normalized" amount based on the bclass of the account or group.
If there are multiple accounts or groups, takes the first BClass of the first.- for BClass 1 or 2 it returns the balance (value at a specific instant).
- for BClass 3 or 4 it returns the total (value for the duration).
- For BClass 2 and 4 the amount is inverted.
- openingCurrency the amount at the begining of the period in the account currency
- debitCurrency the amount of debit transactions for the period in the account currency
- creditCurrency the amount of credit transactions for the period in the account currency
- totalCurrency the difference between debit-credit for the period in the account currency
- balanceCurrency opening + debit-credit for the period in the account currency
- rowCount the number of lines that have been found and used for this computation
- bclass (double entry accounting only) is the bclass of the account or group used to express the amount.
The bclass is the value entered in the columns bclass.
It is taken in consideration the first account or group specified. If for example you query two accounts that first has bclass 2 and the second has bclass 1. The bclass would be 2.
The bclass is assigned by following this steps. :- The bclass of the specified account or group.
- The bclass of the partent group, for the same section.
- The bclass of the section.
- Account
- can be an account id, a cost center, a segment or a group.
- can be a combination of account and segments, separated by the semicolon ":"
In this case it returns all the transactions that have the indicated account and segments- 1000:A1:B1
- can be different accounts and multiple segments separated by the "|"
In this case it includes all transactions that have one of the specified accounts and one of the specified segments- 1000|1001
- 1000|1001:A1:B1
- 1000|1001:A1|A2:B1
- can be a wildCardMatching
Wildcards can be used for accounts, segments, Groups or BClass and in combination- ? Matches any single character.
- * Matches zero or more of any characters
- [...] Set of charachtes
- "100?" match "1001, 1002, 1003, 100A, ...)
- "100*" Matches all accounts starting with 100
- "100*|200*:A?" Matches all accounts starting with 100 or 200 and with segments with A and of two charachters.
- "[1234]000" Matches "1000 2000 3000 4000"
- Can be a group or a BClass.
It includes all the transactions where the account used belongs to a specified Group or BClass.
It is also possible to use wildcards.
The program first creates a list of accounts and then uses the account list.
Do non mix groups relative to normal accounts, with groups relative to cost center or segments. Calculation could provide unexpected results.- BClass (for the double entry accounting only)
- BClass=1
- BClass=1|2
- Gr for groups that are in Accounts table.
- Gr=100
- Gr=10*
- Gr=100|101|102
- GrC for group that are in the Category table of the income and expenses accounting type.
- GrC=300
- GrC=300|301
- BClass (for the double entry accounting only)
- Contra Accounts or other fields selection
Transactions are included only if they have also a value corresponding
After the "&&" you can insert a field name of the table journal.- 1000&&JContraAccount=2000 returns all transactions of the account 1000 that have a contra account 2000.
As per accounts you can specify multiple contra accounts, BClass=, Gr= with also wildcards. - 1000&&JCC1=P1|P2 will use only transactions on account 1000 and that also have the CC1=.P1 or .P2
- 1000&&JContraAccount=2000 returns all transactions of the account 1000 that have a contra account 2000.
- StartDate
- is a string in form 'YYYY-MM-DD' or a date object.
- If startDate is empty the accounting start date is taken.
- End date:
- is a string in form 'YYYY-MM-DD' or a date object.
- If endDate is empty the accounting end date is taken.
- function(rowObj, rowNr, table)
This fuction will be called for each row of the selected account.
The function should return true if you want this row to be included in the calculation.
function exec( string) {
    // We retrive the total sales (account 4000) only for the cost center P1
    var balanceData = Banana.document.currentBalance('4000','', '', onlyCostCenter);
    // sales is a revenue so is negative and we invert the value
    var salesCC1 = -balanceData.total;
    // display the information
    Banana.Ui.showText("Sales of Project P1: " + salesCC1);
}

// this function returns true only if the row has the cost center code  "P1"
function onlyCostCenter( row, rowNr, table){
   if(row.value('JCC1') === 'P1') {
      return true;
   }
   return false;
}
Examples
Banana.document.currentBalance("1000")              // Account 1000
Banana.document.currentBalance("1000|1010")         // Account 1000 or  1010
Banana.document.currentBalance("10*|20*")           // All account that start with 10 or with 20
Banana.document.currentBalance("Gr=10")             // Group 10
Banana.document.currentBalance("Gr=10| Gr=20")      // Group 10 or  29
Banana.document.currentBalance(".P1")               // Cost center .P1
Banana.document.currentBalance(";C01|;C02")         // Cost center ;C01 and C2
Banana.document.currentBalance(":S1|S2")            // Segment :S1  and :S2
Banana.document.currentBalance("1000:S1:T1")        // Account 1000 with segment :S1 or ::T1
Banana.document.currentBalance("1000:{}")           // Account 1000 with segment not assigned
Banana.document.currentBalance("1000:S1|S2:T1|T2")  // Account 1000 with segment :S1 or ::S2 and ::T1 or ::T2
Banana.document.currentBalance("1000&&JCC1=P1")     // Account 1000 and cost center .P1
currentBalances(account, frequency [, startDate, endDate, function(rowObj, rowNr, table) ])
It returns the time series balance for the specified periods. It is used for chart rendering, with one command you can have the monthly data for an account.
Sum the amounts of opening, debit, credit, total and balance for all transactions for this account and returns the values according to the indicated frequency indicated.
The calculations are perfermed by traversing by creating a journal (see journal() function) with all the transactions , and selecting the transactions with the parameters specified.
The computation is usually very fast. But if you have a file with many transactions especially the first query could take some time.
var currentBalances = Banana.document.currentBalances('1000', 'M');
var openingBalance = currentBalances[0].opening;
var endBalance = currentBalances[0].balance;
- Return value
Return an array of objects that have- opening the amount at the begining of the period (all transactions before)
- debit the amount of debit transactions for the period
- credit the amount of credit transactions for the period
- total the difference between debit-credit for the period
- balance opening + debit-credit for the period
- amount it the "normalized" amount based on the bclass of the account or group.
If there are multiple accounts or groups, takes the first BClass of the first.- for BClass 1 or 2 it return the balance (value at a specific instant).
- for BClass 3 or 4 it return the total (value for the duration).
- For BClass 2 and 4 the amount is inverted.
- openingCurrency the amount at the begining of the period in the account currency
- debitCurrency the amount of debit transactions for the period in the account currency
- creditCurrency the amount of credit transactions for the period in the account currency
- totalCurrency the difference between debit-credit for the period in the account currency
- balanceCurrency opening + debit-credit for the period in the account currency
- rowCount the number of lines that have bben found and used for this computation
- bclass (double entry accounting only) is the bclass of the account or group used to express the amount.
The bclass is the value entered in the columns bclass.
It is taken in consideration the first account or group specified. If for example you query two accounts, the first has bclass 2 and the second has bclass 1. The bclass would be 2.
The bclass is assigned by following this steps. :- The bclass of the specified account or group.
- The blcass of the partent group, for the same section.
- The blcass of the section.
- startDate period's start date
- endDate period's end date
- Account
- can be an account id, a cost center or a segment.
- can be a combination of account and segments, separeted by the semicolon ":"
In this case it returns all the transactions that have the indicated account and segments- 1000:A1:B1
- can be different accounts and multiple segments separated by the "|"
In this case it includes all transactions that have one of the specified accounts and one of the specified segments- 1000|1001
- 1000|1001:A1:B1
- 1000|1001:A1|A2:B1
- can be a wildCardMatching
Wildcards can be used for accounts, segments, Groups or BClass and in combination- ? Matches any single character.
- * Matches zero or more of any characters
- [...] Set of charachtes
- "100?" match "1001, 1002, 1003, 100A, ...)
- "100*" Matches all accounts starting with 100
- "100*|200*:A?" Matches all accounts starting with 100 or 200 and with segments with A and of two charachters.
- "[1234]000" Matches "1000 2000 3000 4000"
- Can be a group or a BClass.
It includes all the transactions where the account used to belong to a specified Group or BClass.
It is also possible to use wildcards.
The program first create a list of accounts and then use the account list.
Do non mix mix groups relative to normal accounts, with groups relative to cost center or segments. Calculation could provide unexpected results.- BClass (for the double entry accounting only)
- BClass=1
- BClass=1|2
- Gr for groups that are in Accounts table.
- Gr=100
- Gr=10*
- Gr=100|101|102
- GrC for group that are in the Category table of the income and expenses accounting type.
- GrC=300
- GrC=300|301
- BClass (for the double entry accounting only)
- Contra Accounts or other fields selection
Transactions are included only if they have also a value corresponding
After the "&&" you can insert a field name of the table journal.- 1000&&JContraAccount=2000 return all transctions of the account 1000 that have a contra account 2000.
As per accounts you can specify multiple contra accounts, BClass=, Gr= with also wildcards. - 1000&&JCC1=P1|P2 will use only transactions on account 1000 and that also have the CC1=.P1 or .P2
- 1000&&JContraAccount=2000 return all transctions of the account 1000 that have a contra account 2000.
- Frequency
- Specifiy the frequency to be returned, is one of the following charachters
- D for daily
- W for weekly
- M for montly
- Q for quarterly
- S for semeterly
- Y for yearly
- Specifiy the frequency to be returned, is one of the following charachters
- StartDate
- is a string in form 'YYYY-MM-DD' or a date object.
- If startDate is empty the accounting start date is taken.
- End date:
- is a string in form 'YYYY-MM-DD' or a date object.
- If endDate is empty the accounting end date is taken.
- function(rowObj, rowNr, table)
This fuction will be called for each row of the selected account.
The function should return true if you want this row to be included in the calculation.
function exec( string) {
    // We retrive the montly total sales (account 4000) only for the cost center P1
    var balanceData = Banana.document.currentBalances('4000', 'M', '', '', onlyCostCenter);
    // sales is a revenue so is negative and we invert the value
    var salesCC1 = -balanceData[0].total;
    // display the information
    Banana.Ui.showText("Sales of Project P1: " + salesCC1);
}

// this function return true only if the row has the cost center code  "P1"
function onlyCostCenter( row, rowNr, table){
   if(row.value('JCC1') === 'P1') {
      return true;
   }
   return false;
}
Examples
Banana.document.currentBalances("1000", 'M')
// Montly values for account 1000 and for the accounting start and end period
// See also the examples for the function currentBalance
currentCard(account [, startDate, endDate, function(rowObj, rowNr, table)])
Return for the given account and period a Table object with the transactions for this account.
Row are sorted by JDate
parameters:
- account can be any accounts, cost center or segment as specifiend in currentBalance.
- startDate any date or symbol as specifiend in currentBalance.
- endDate any date or symbol as specifiend in currentBalance.
Return columns the same as for the Journal() function.
var transactions = Banana.document.currentCard('1000','2015-01-01','2015-12-31');
currentInterest( account, interestRate, [startDate, endDate, , function(rowObj, rowNr, table)])
Returns the calculated interest on the specified account.
Interest is calculated on the effective number of days for 365 days in the years.
- account is the account or group (same as in the function currentBalance)
- interestRate. In percentage "5", "3.25". Decimal separator must be a "."
- If positive it calculates the interest on the debit amounts.
- If negative it calculates the interest on the credit amounts.
- startDate, endDate, function see the currentBalance description.
If no parameters are specified it calculate the interest for the whole year.
// calculate the interest debit for the whole period
var interestDebit = Banana.document.currentInterest('1000','5.75');

// calculate the interest credit for the whole period
var interestDebit = Banana.document.currentInterest('1000','-4.75');
Budget Functions
These functions are similar to the "current" functions, but they work on the budget data. They consider:
- The opening amount (table Accounts and Categories)
- Transactions entered in the Budget table.
For detailed information check the documentation on the equivalent "current" functions.
When using the API in the column Formula of the Table Budget a special API is available.
budgetBalance(account [, startDate, endDate, function(rowObj, rowNr, table)])
Sums the amounts of opening, debit, credit, total and balance for all budget transactions for this accounts .
var budget = Banana.document.budgetBalance('1000');
It works the same as the function currentBalance, but for the budgeting data.
budgetBalances(account, frequency [, startDate, endDate, function(rowObj, rowNr, table)])
Time series function. Sums the amounts of opening, debit, credit, total and balance for all budget transactions for this account and returns the values according to the indicated frequency indicated.
var budgets = Banana.document.budgetBalances('1000', 'M');
It works the same as the function currentBalances, but for the budgeting data.
budgetCard(account [, startDate, endDate, function(rowObj, rowNr, table)])
Returns, for the given account and period, a Table object with the budget account card.
var card = Banana.document.budgetCard('1000');
It works the same as the function currentCard, but for the budgeting data.
budgetExchangeDifference( account, [date, exchangeRate])
Returns the unrealized exchange rate Profit or Loss o the account at the specified date.
- account must be a valid account number not in base currency
- date
- a date that is used to calculate the balance
- if empty calculate up to the end of the period
- exchangeRate
- if empty use the historic exchange rate for the specified date or the current if not a valid exchange rate for the date are found.
- if "current" use the current exchange
- if number for example "1.95" use the specified exchange rate.
- Return value
- Positive number (debit) are exchange rate Loss.
- Negative number (credit) are exchange rate Profit.
- empty if no difference or if the account has not been found or not a multicurrency accounting file.
// unrealized exchange rate profit or loss for the account 1000
// last balance and current exchange rate
var exchangeRateDifference = Banana.document.budgetExchangeRateDifference('1000');

// at the end of Semptember and hystoric exchange rate
var exchangeRateDifference = Banana.document.budgetExchangeRateDifference('1000', "2017-09-31");

// at the end of Semptember and current exchange rate
var exchangeRateDifference = Banana.document.budgetExchangeRateDifference('1000', "2017-09-31", "current");

// at the end of Semptember and specified exchange rate
var exchangeRateDifference = Banana.document.budgetExchangeRateDifference('1000', "2017-09-31", "1.65");
budgetInterest( account, interestRate, [startDate, endDate, function(rowObj, rowNr, table)])
Return the calculated interest for the budget transactions.
It works the same as the function currentInterest, but for the budgeting data.
// calculate the interest debit for the whole period
var interestDebit = Banana.document.budgetInterest('1000','5.75');

// calculate the interest credit for the whole period
var interestDebit = Banana.document.budgetInterest('1000','-4.75');
Projections functions
This function is a mix of actual and budget data. It has a parameter projectionStartDate that defines up to when to use actual data and budget data.
The value of a projection is calculated as follows:
- It uses the actual data up to the day before the projectionStartDate.
- From the projectionStartDate it uses the budgeting data.
Assume you have prepared the budget for the year and you have entered accounting data up to the end of March (2015-03-31).
With the projectionBalance function you can have the projected balance up to the end of year, comprised from the actual data up to end of March and the budgeting data starting form 1. April.
In this case the projectionStartDate should be "2015-04-01".
projectionBalance(account, projectionStartDate [, startDate, endDate, function(rowObj, rowNr, table) ])
Same as currentBalance but use the budget data starting from the projectionStartDate.
This function calculates a projection of the end of year result (or specified period) combining the current data and the budget data for the period not yet booked.
If projectionStartDate is empty the result will be the same as currentBalance.
If you have already booked the 1. semester and would like to have a projection up to the end of the year
// We have booked the 1. semester and would like to have
// a projection up to the end of the yer
var cashProjection = Banana.document.projectionBalance('1000','2015-07-01');
var cashEnd = projection.balance;
var salesProjection = Banana.document.projectionBalance('3000','2015-07-01').total;
var salesForYear = -salesProjection.total;
projectionBalances(account, projectionStartDate, frequency [, startDate, endDate, function(rowObj, rowNr, table) ])
Same as currentBalances but use the budget data starting from the projectionStartDate.
projectionCard(account, projectionStartDate [, startDate, endDate, function(rowObj, rowNr, table) ])
Same as currentCard but use the budget data starting from the projectionStartDate.
If projectionStart date is empty result will be the same s currentCard.
var transactions = Banana.document.projectionCard('1000','2015-01-01','','');
Descriptions and Reporting functions
accountDescription(account [,column])
Return the Description of the specified account.
- Account can be an account or a Group (Gr=)
- Column can be an alternative column name to retrieve.
var descriptionAccount = Banana.document.accountDescription('1000');
var descriptionGroup = Banana.document.accountDescription('Gr=10');
var gr = Banana.document.accountDescription('1000','Gr');
accountsReport([startDate, endDate])
Returns the account report for the specified period. Start and end date can be a string in form 'YYYY-MM-DD' or a date object.
var report = Banana.document.accountsReport();
var report = Banana.document.accountsReport('2017-01-01', '2017-03-31');
Journal
This function retrieves an array of transactions, with one line for each account.
This is the accounting information that is used for all accounting related calculations.
- The software first prepares the Journal with one line for each account amount mouvement.
- It uses the Journal data to calculate and report.
One line for each account movement
For each account movement there will be a corresponding line in the journal.
- Opening amounts.
One line is generated for each account with an opening amount. - Double entry transactions or Income and expense accounts.
- Transactions with Debit and Credit accounts.
In the Journal there will be two lines, one for each Credit and Debit account, with the relative amount. - Transactions with Debit and Credit accounts plus VAT.
In the Journal there will be three lines, one for each Credit, Debit and VAT account, with the relative amount. - Transactions with Cost center.
For each cost center used CC1, CC2, CC3 a journal line is created with the Cost center account and relative amount.
- Transactions with Debit and Credit accounts.
Current and Budget data
Each Journal line indicates where is the origin of the data. It can be the Current or Budget.
In case you have both transactions and budget data, for each account you will have Journal lines for Current and Budget.
journal([originType = ORIGINTYPE_NONE, int accountType = ACCOUNTTYPE_NONE])
Returns, for the given parameters, a Table object with all the amount registered on the accounts.
The journal contains a row for each account used.
- originType specify the row to be filtered for
Can be on of- ORIGINTYPE_NONE no filter is applied and all rows are returned (current and budget)
- ORIGINTYPE_CURRENT only the normal transactions are returned
- ORIGINTYPE_BUDGET only the budget transactions are returned
- accountType specify the row to be filtered for
- ACCOUNTTYPE_NONE no filter is applied and all rows are returned
- ACCOUNTTYPE_NORMAL only rows for normal accounts are returned
- ACCOUNTTYPE_CC1 only rows for Cost Center 1 are returned
- ACCOUNTTYPE_CC2 only rows for Cost Center 2 are returned
- ACCOUNTTYPE_CC3 only rows for Cost Center 1 are returned
- ACCOUNTTYPE_CC Cost Center rows are returned same as using (ACCOUNTTYPE_CC1 | ACCOUNTTYPE_CC2 | ACCOUNTTYPE_CC3)
// get all transactions for normal accounts
var journal = Banana.document.journal(Banana.document.ORIGINTYPE_CURRENT, Banana.document.ACCOUNTTYPE_NORMAL );
For each account used in the transaction table (AccountDebit, AccountCredit, CC1, CC2, CC3) the program generates a Journal row with the JAccount column set with the specific account.
For a double entry account transaction that uses AccountDebit, AccountCredit, AccountVat, CC1, CC2, CC3 the Journal will contain 6 rows. If the transaction has only AccountDebit and AccountCredit only 2 rows will be generated.
The column JAmount contains the exact amount registered on the specific account.
The returned table has all the columns of the transaction's table plus the following columns.
The return columns are:
- Origin Information
- JOriginType as defined above
- ORIGINTYPE_CURRENT
- ORIGINTYPE_BUDGET
- JOriginFile the file name where the transaction originates.
- JTableOrigin the source table.
- JRowOrigin the row number in the transaction's table (rows begin from 0).
- JRepeatNumber the progressive number of the repetition of budget transactions.
- JOriginType as defined above
- JOperationType on of
- OPERATIONTYPE_NONE = 0
- OPERATIONTYPE_OPENING = 1
The row is generated from the opening balance - OPERATIONTYPE_CARRYFORWARD = 2
The row is used from the account card and is the balance of the account at this moment. - OPERATIONTYPE_TRANSACTION = 3
The row is generated from the Transactions table if it is ORIGINTYPE_CURRENT
or from the budget table if the row is ORIGINTYPE_BUDGET -
OPERATIONTYPE_INVOICESETTLEMENT = 21
- JDate the date of the transaction.
- JDescription the transaction's description.
- JAccount the account for this line.
There is one row for each account (AccountDebit, AccountCredit, AccountVat, CC1, CC2, CC3). - JAccountDescription the Description for this account.
- JAccountClass the BClass number for this account.
- JAccountGr the Gr for this account.
- JAccountGrDescription the Gr for this account.
- JAccountGrPath the whole Gr path.
- JAccountCurrency the currency of this account.
- JAccountType as defined above (ACCOUNTTYPE_NORMAL, ACCOUNTTYPE_CC1, ...)
- JAmount the amount in basic currency registered on the account (positive is debit, negative is credit).
- JAmountAccountCurrency the amount in the account currency (positive i debit, regative is credit).
- JTransactionCurrency the transaction's currency.
- JAmountTransactionCurrency the amount in transaction's currency.
For account with currency not in transactions currency the exchange rate of the transaction is used. - JTransactionCurrencyConversionRate is the conversion rate to obtain amounts in transaction's currency.
Multiply the transcation's amount in basic currency with the JTransactionCurrencyConversionRate and you will have the amount converted in transaction's currency.
The conversion rate has 12 significant figures so only by very large conversion should there be conversion differences. - JVatIsVatOperation true if this row has a Vat code.
- JVatCodeWithoutSign the Vat code without the evetually preceeding '-'. For example "-V10" becomes "V10".
- JVatCodeDescription the Description for this Vat code.
- JVatCodeWithMinus true if the Vat code is preceeded by "-".
- JVatCodeNegative true if the Vat amount is negative (deductible).
- JVatTaxable the amount VatTaxable with the sign that follows the JVatCodeNegative
- VatTwinAccount the account where the net amount (without VAT) is being registered .
In case of a transaction where the Gross amount is CHF 1100, then the VAT is CHF 100 and the net amount is CHF 1000. The VatTwin account will be the account where the CHF 1000 is being registered.
We use the name Twin for the fact that the VatTwinAccount follows the sign of the VatAccount.
If the Vat amount is registered in debit, the VatTwinAccount will be the AccountDebit.
If the Vat amount is registered in credit, the VatTwinAccount will be the AccountCredit. - JContraAccount the contra account.
The contra account is deducted based on the other accounts and the sequence in the transactions table. - JContraAccountType one of the following value:
- CONTRAACCOUNTTYPE_NONE for no contra account
- CONTRAACCOUNTTYPE_DIRECT when there is on the same line credit and debit accounts.
- CONTRAACCOUNTTYPE_MULTIPLEFIRST the first line of a transaction on more accounts.
The first transactions after a line with debit and credit accounts or with a different date. - CONTRAACCOUNTTYPE_MULTIPLEFOLLOW the second or following line of a MULTIPLEFIRST with the same date.
- CONTRAACCOUNTTYPE_VAT the line for the Vat Account
- JContraAccountGroup the line number corresponding to the row number of the CONTRAACCOUNTTYPE_MULTIPLEFIRST
- JCC1 the CC1 without the preceeding sign
- JCC2 the CC2 without the preceeding sign
- JCC3 the CC3 without the preceeding sign
- JSegment1 .. JSegment10 the segment relative to the account
- JDebitAmount the amount debit in basic currency
- JCreditAmount the amount credit in basic currency
- JDebitAmountAccountCurrency the amount debit in account currency
- JCreditAmountAccountCurrency the amount credit in account currency
- JBalance the balance amount (for account card) in basic currency
- JBalanceAccountCurrency the balance amount (for account card) in account currency
journalCustomersSuppliers([originType = ORIGINTYPE_NONE, int accountType = ACCOUNTTYPE_NONE])
Same as journal with additional settlements rows for closing invoices and additional columns:
- JInvoiceDocType: specifies the type of document (see column DocType)
- JInvoiceAccountId: customer account id from table accounts
- JInvoiceCurrency: the currency of the invoice, same as customer account currency from table accounts
- JInvoiceStatus: paidInvoice (the invoice was offset with the payment that refers to the same document), paidOpening (the invoice was offset with the opening balance of the customer account)
- JInvoiceDueDate: invoice expiration date
- JInvoiceDaysPastDue
- JInvoiceLastReminder
- JInvoiceLastReminderDate
- JInvoiceIssueDate
- JInvoiceExpectedDate
- JInvoicePaymentDate
- JInvoiceDuePeriod
- JInvoiceRowCustomer (1=Customer, 2=Supplier)
Invoices
invoicesCustomers()
Returns a table with the customers' invoices from the transaction table. A customer group must be defined and invoices must be numbered using the column DocInvoice.
See Invoice Json Object.
invoicesSuppliers()
Returns a table with the suppliers' invoices from the transaction table. A supplier group must be defined and invoices must be numbered using the column DocInvoice.
See Invoice Json Object.
Exchange rate functions
exchangeRate( currency, [date])
Returns the exchange rate that converts the amount in currency in basic currency as object with the properties 'date' and 'exchangeRate'. Returns null if no exchange rate is found.
The exchange rate is retrieved from the Currency table, already considering the multiplier.
- If no date is specified the exchange rate without date is used.
- If a date is specified it retrieves the exchange rate with the date minor or equal the specified date.
Vat functions
vatBudgetBalance(vatCode[, startDate, endDate, function(rowObj, rowNr, table) ])
Sum the vat amounts for the specified vat code and period, using the Budget data.
var vatTotal = Banana.document.vatBudgetBalance('V15');
vatBudgetBalances(vatCode, frequency, [, startDate, endDate, function(rowObj, rowNr, table) ])
Sum the vat amounts for the specified vat code and period, using the Budget data and returns the values according to the indicated frequency indicated.
var vatTotal = Banana.document.vatBudgetBalances('V15', 'Q');
vatCurrentCard(vatCode[, startDate, endDate, function(rowObj, rowNr, table) ])
Retrieve the transactions relative to the specified VatCode.
var vatTransactions = Banana.document.vatCurrentCard('V15');
vatCurrentBalance(vatCode[, startDate, endDate, function(rowObj, rowNr, table) ])
Sum the vat amounts for the specified vat code and period.
For more info see :
- explanations of the function currentBalance.
- Example files are available on github/General/CaseStudies.
- Solutions making use of the VAT api.
Example:
var currentVat = Banana.document.vatCurrentBalance('V15','','');
var vatTaxable = currentVat.vatTaxable;
var vatPosted = currentVat.vatPosted;
- Return value:
Is an object that has- vatTaxable the amount of the taxable column
(the sign is the same as the vatAmount) - vatAmount the amount of vat
- vatNotDeductible the amount not deductible
- vatPosted VatAmount - VatNotDeductible
- rowCount the number of lines that have been found and used for this computation
- vatTaxable the amount of the taxable column
- VatCode
One or more VatCode defined in the tabel Vat Codes.
Multiple vat code can be separated by "|" for example "V10|V20", or you can use vildcard "V*".
vatCurrentBalances(vatCode, frequency [, startDate, endDate, function(rowObj, rowNr, table) ])
Sum the vat amounts for the specified vat code and period and returns the values according to the indicated frequency indicated.
For more info see :
- explanations of the function currentBalances.
- Example files are available on github/General/CaseStudies.
- Solutions making use of the VAT api.
Example:
var currentVat = Banana.document.vatCurrentBalances('V15', 'Q');
var vatTaxable = currentVat[0].vatTaxable;
var vatPosted = currentVat[0].vatPosted;
- Return value:
Is an object that has- vatTaxable the amount of the taxable column
(the sign is the same as the vatAmount) - vatAmount the amount of vat
- vatNotDeductible the amount not deductible
- vatPosted VatAmount - VatNotDeductible
- rowCount the number of lines that have bben found and used for this computation
- vatTaxable the amount of the taxable column
- VatCode
One or more VatCode defined in the tabel Vat Codes.
Multiple vat code can be separated by "|" for example "V10|V20", or you can use vildcard "V*". - Frequency
- Specifiy the frequency to be returned, is one of the following charachters
- D for daily
- W for weekly
- M for montly
- Q for quarterly
- S for semeterly
- Y for yearly
- Specifiy the frequency to be returned, is one of the following charachters
vatProjectionBalance(vatCode, projectionStartDate, [, startDate, endDate, function(rowObj, rowNr, table) ])
Same as vatCurrenBalance but use the budget data starting from the projectionStartDate.
var projectionVat = Banana.document.vatProjectionBalance('V15','','');
var vatTaxable = projectionVat.vatTaxable;
var vatPosted = projectionVat.vatPosted;
vatProjectionBalances(vatCode, projectionStartDate, frequency, [, startDate, endDate, function(rowObj, rowNr, table) ])
Same as vatCurrenBalances but use the budget data starting from the projectionStartDate.
var projectionVat = Banana.document.vatProjectionBalances('V15', '2017-03-01', 'Q');
var vatTaxable = projectionVat[0].vatTaxable;
var vatPosted = projectionVat[0].vatPosted;
vatProjectiontCard(vatCode, projectionStartDate, [, startDate, endDate, function(rowObj, rowNr, table) ])
Same as vatCurrentCard but use the budget data starting from the projectionStartDate.
var vatTransactions = Banana.document.vatProjectiontCard('V15','2015-01-01','','');
vatReport([startDate, endDate])
Returns the vat report for the specified period.
Start and end dates are strings in form 'YYYY-MM-DD' or a date object. If startDate is empty the accounting start date is taken. If endDate is empty the accounting end date is taken.
var vatReport = Banana.document.vatReport('','');
Banana.Document (Base)
Banana.Document is the interface to a document in Banana Accounting. The currently opened document can be accessed through the property Banana.document. A document can be also opened with the method Banana.application.openDocument.
Properties
cursor
Return a Cursor object with the current position of the cursor and the range of the selected rows.
var currentCursor = Banana.document.cursor;
locale
Return the locale of the document in the form of "language_country", where language is a lowercase, two-letter ISO 639 language code, and country is an uppercase, two- or three-letter ISO 3166 country code.
var locale = Banana.document.locale;
rounding
Return the rounding context of the current file that can be used with the SDecimal math functions.
var rounding = Banana.document.rounding;
tableNames
Return an array with the xml names of the tables in the document.
var tableNames = Banana.document.tableNames;
Methods
addAttachment(name, content)
Add an attachment to the document.
The param name defines the name of the attachment inclusive extention (.png, .pdf, .xml) that will appear in print preview attachment's list on in the printed pdf.
The param content contains the path to the file to attach or the data to attach. The path can be relative to the script's folder, the document's folder, the name of a document attacched to the file or a data uri scheme (for images imbedded in the document).
- file:script/<relative_path_to_script_folder>/<image_name>
- file:document/<relative_path_to_file_folder>/<image_name>
- documents:<document_name>
- data:[<media type>][;charset=<character set>][;base64],<data>
Example:
//Create the report
var report = Banana.Report.newReport('Report attachments');

//Add a paragraph with some text
report.addParagraph('Report with attachments');

//Attach text files created on the fly
//We use the prefix 'data:...' to tell that the string is not an url but is itself the content of the file
report.addAttachment('text file 1.txt', 'data:text/plain;utf8,This is the content of the text file 1.');
report.addAttachment('text file 2.txt', 'data:text/plain;utf8,This is the content of the text file 2.');
report.addAttachment('text file 3.txt', 'data:text/plain;utf8,This is the content of the text file 3.');

//Attach an image stored in the document table
//We use the prefix 'document:...'
report.addAttachment('logo.jpg', 'documents:logo');

//Add an xml element
//We just add the new created Banana.Xml.newDocument
var xmlDocument = Banana.Xml.newDocument("eCH-0217:VATDeclaration");
var rootNode = xmlDocument.addElement("eCH-0217:VATDeclaration");
rootNode.addElement("title").addTextNode("Vat Declaration 2018");
report.addAttachment('vat_declaration.xml', xmlDocument);

//Print the report
var stylesheet = Banana.Report.newStyleSheet();
Banana.Report.preview(report, stylesheet);
Since Banana Accounting 9.0.4
addMessage(msg[, idMsg])
Add the message msg to the document. The message is showed in the pane "Messages", and in a dialog if the application option "Show Messages" is turned on.
If idMsg is not empty, the help button calls an url with script's id and message's id (idMsg) as parameters.
See also: Application.AddMessage, Table.AddMessage, Row.AddMessage.
Banana.document.addMessage("Message text");
clearMessages()
Clear all the document's messages showed in the pane "Messages".
Banana.document.clearMessages();
getScriptSettings()
Get the settings of the script saved in the document. You use this method to get settings that are private to the running script. It is possible to save the settings of the script through the method "setScriptSettings".
With this method Settings are saved and restored under the script id, If you change the script's id you will lose the saved settings.
Example:
// Initialise parameter
param = {
   "searchText": "",
   "matchCase": "false",
   "wholeText": "false"
};

// Readscript settings
var strData = Banana.document.getScriptSettings();
if (strData.length > 0) {
   var objData = JSON.parse(strData);
   if (objData)
      param = objData;
}
getScriptSettings(id)
Return the settings saved in the document under the id 'id'.
You use this method to get settings that are shared between scripts. As id we recommend to use a substring of the script's id. For example if you have the scripts 'ch.banana.vat.montlyreport' and 'ch.banana.vat.endofyearreport', then you can use as id 'ch.banana.vat'.
Example:
// Initialise parameter
param = {
   "searchText": "",
   "matchCase": "false",
   "wholeText": "false"
};

// Readscript settings
var strData = Banana.document.getScriptSettings('ch.banana.vat');
if (strData.length > 0) {
   var objData = JSON.parse(strData);
   if (objData)
      param = objData;
}
info(section, id)
Return the info value of the document referenced by section and id. Section and Id correspond to the xml name listed in the Info table, see command File info in menu "Tools" and set the view to complete to see the XML columns. If the value referenced by section and id doesn't exist, an object of type undefined is returned.
Example:
// Get some value of the accounting file
var FileName = Banana.document.info("Base","FileName");
var DecimalsAmounts = Banana.document.info("Base","DecimalsAmounts");
var HeaderLeft = Banana.document.info("Base","HeaderLeft");
var HeaderRight = Banana.document.info("Base","HeaderRight");
var BasicCurrency = Banana.document.info("AccountingDataBase","BasicCurrency");

// For openingDate and closureDate use instead startDate and endDate
var openingDate = Banana.document.info("AccountingDataBase","OpeningDate");
var closureDate = Banana.document.info("AccountingDataBase","ClosureDate");

// For file accounting type
var FileType = Banana.document.info("Base","FileType");
var FileGroup = Banana.document.info("Base","FileTypeGroup");
var FileNumber = Banana.document.info("Base","FileTypeNumber");
FileTypeGroup / FileTypeNumber combinations:
- 100 Double entry accounting
- 100 No VAT
- 110 With VAT
- 120 Multi Currency
- 130 Multi Currency with VAT
- 110 Income and Expense accounting
- 100 No VAT
- 110 With VAT
- 130 Cash Book
- 100 No VAT
- 110 With VAT
- 400 Address / Labels
- 110 Labels
- 120 Address
scriptSaveSettings(string)
Save the settings of the script in the document. The next time the script is run, it is possible to read the saved settings with "scriptReadSettings".
With this method Settings are saved and restored under the script id, If you change the script's id you will lose the saved settings.
Example:
// Save script settings
var paramString = JSON.stringify(param);
var value = Banana.document.scriptSaveSettings(paramString);
Deprecated. Use setScriptSettings instead.
scriptReadSettings()
Return the saved settings of the script.
With this method Settings are saved and restored under the script id, If you change the script's id you will lose the saved settings.
Example:
// Initialise parameter
param = {
   "searchText": "",
   "matchCase": "false",
   "wholeText": "false"
};

// Readscript settings
var strData = Banana.document.scriptReadSettings();
if (strData.length > 0) {
   var objData = JSON.parse(strData);
   if (objData)
      param = objData;
}
Deprecated. Use getScriptSettings instead.
setScriptSettings(value)
Save the settings of the script in the document. It is possible to read the saved settings of the script with the method "getScriptSettings".
With this method Settings are saved and restored under the script id, If you change the script's id you will lose the saved settings.
Example:
// Save script settings
var paramString = JSON.stringify(param);
var value = Banana.document.setScriptSettings(paramString);
setScriptSettings(id, value)
Save the settings in the document under the id 'id'. It is possible to read the saved settings with "getScriptSettings(id)".
You use this method to set settings that are shared between scripts. As id we recommend to use a substring of the script's id. For example if you have the scripts 'ch.banana.vat.montlyreport' and 'ch.banana.vat.endofyearreport', then you can use as id 'ch.banana.vat'.
Example:
// Save script settings
var paramString = JSON.stringify(param);
var value = Banana.document.setScriptSettings('ch.banana.vat', paramString);
table(xmlTableName)
Return the table referenced by the name xmlTableName as a Table object, or undefined if it doesn't exist.
Banana.document.table("Accounts");
table(xmlTableName, xmlListName)
Return the table referenced by the name xmlTableName with the rows of the list xmlListName as a Table object, or undefined if the table or the list don't exist. The default list is the 'Data' list.
Banana.document.table("Transactions", "Examples");
Banana.document.table("Transactions").list("Examples");  // alternative way
See also: Table.list, Table.listNames.
value(tableName, rowNr, columnName)
Return the value in table tableName, row rowNr and column columnName as string. If the table, row or column are not found, it returns an object of type undefined.
Banana.document.value("Accounts", 5, "Description")
Banana.Document.Cursor
Banana.Document.Cursor is the interface to the cursor and can be accessed through Banana.document.cursor.
Properties
tableName
Return the xml name of the current table.
var currentTable = Banana.document.cursor.tableName;
rowNr
Return the number of the current row.
var currentRow = Banana.document.cursor.rowNr;
columnName
Return the xml name of the current column.
var currentColumn = Banana.document.cursor.columnName;
selectionTop
Return the index of the top row of the current selection.
var currentSelectionTop = Banana.document.cursor.selectionTop;
selectionBottom
Return the index of the bottom row of the current selection.
var currentSelectionBottom = Banana.document.cursor.selectionBottom;
Banana.Document.Row
Banana.Document.Row is the interface of a row.
Properties
isEmpty
Return true if the row is completly empty.
var isEmpty = tRow.isEmpty;
rowNr
Return the index of the row.
var rowNr = tRow.rowNr;
uniqueId
Return the unique id (an interger value) of the row.
Banana assign to every new row a unique id, this value is fix a will never change.
var uniqueId = tRow.uniqueId;
Methods
addMessage(msg [, columnName] [, idMsg])
Add the message msg to the document. The message is showed in the pane "Messages", and in a dialog if the application option "Show Messages" is turned on.
If idMsg is not empty, the help button calls an url with message's id (idMsg) as parameter.
If columnName is not empty, the message is connected to the column columnName. With a double click over message in the message pane, the cursor jump to the corresponding table, rowNr and columnName.
See also: Application.AddMessage, Table.AddMessage, Document.AddMessage.
var accountsTable = Banana.document.table("Accounts");
var tRow = accountsTable.row(4);
tRow.addMessage("Message text");
toJSON([columnNames])
Return the row as JSON string. If the parameter columnNames is defined, only the columns in the array are included in the file.
// Return all the columns of the row
var json = tRow.toJSON();

// Return only the defined columns of the row
var json = tRow.toJSON(["Account", "Description", "Balance"]);
value(columnName)
Return the value in column columnName. If the column is not found or the object is invalid it return the value undefined.
var accountsTable = Banana.document.table("Accounts");
var tRow = accountsTable.row(4);
tRow.value("Description");
Banana.Document.Table
Banana.Document.Table is the interface of a table.
Properties
name
Return the xml name of the table.
var table = Banana.document.table("Accounts");
var tName = table.name;
columnNames
Return the xml names of the table's columns as an array.
var table = Banana.document.table("Accounts");
var tColumnNames = table.columnNames;
listName
Return the xml name of the list that this table object references to. The default list is the 'Data' list.
var table = Banana.document.table("Accounts");
var tListName = table.listName;
listNames
Return the xml names of the available lists as an array. The default list is the 'Data' list.
var table = Banana.document.table("Accounts");
var tListNames = table.listNames;
rowCount
Return the number of rows in the table.
var table = Banana.document.table("Accounts");
var tRowCount = table.rowCount;
rows
Return the rows of the table as an array of Row objects.
var table = Banana.document.table("Accounts");
var tRows = table.rows;
Note: In a loop use the method table.row(rowNr) instead of table.rows[rowNr]. The property rows can be very expensive with large tables and slow down or block the execution of the script.
Methods
addMessage(msg, rowNr [, columnName] [, idMsg])
Add the message msg to the queue of the document. The message is showed in the pane "Messages", and in a dialog if the application option "Show Messages" is turned on.
If idMsg is not empty, the help button calls an url with message's id (idMsg) as parameter.
If rowNr is different than "-1" the message is connected to the row rowNr. if columnName is not empty, the message is connected to the column columnName. With a double click over message in the message pane, the cursor jump to the corresponding table, rowNr and columnName.
See also: Application.AddMessage, Row.AddMessage, Document.AddMessage.
var table = Banana.document.table("Accounts");
table.addMessage("Message string", 3, "description");
extractRows( function(rowObj, rowNr, table), tableTitle)
Return an array of rows filled with all row elements that pass a test (provided as a function) and show them in the table "Selections".
The title of the table is set to tableTitle.
function accountStartsWith201(rowObj,rowNr,table) {
   // Return true if account start with '201'
   return rowObj.value('Account').startsWith('201');
}
var tableAccount = Banana.document.table('Accounts');
// Show a table with all accounts that start with '201'
tableAccount.extractRows(accountStartsWith201, 'Accounts that start with 201');
findRows( function(rowObj, rowNr, table))
Return an array of Row objects that pass a test (provided as a function).
function accountStartsWith201(rowObj,rowNr,table) {
   // Return true if account start with '201'
   return rowObj.value('Account').startsWith('201');
}
var tableAccount = Banana.document.table('Accounts');
// Find rows of all accounts that start with '201'
var rows = tableAccount.findRows(accountStartsWith201);
findRowByValue(columnName, value)
Return the first row as Row object that contains the value in the the column columnName. Or undefined if any row is found.
var cashAccountRow = Banana.document.table('Accounts').findRowByValue('Account','1000');
if (!cashAccountRow)
   //Row not found
list(xmlListName)
Return a new table object with the rows of the list xmlListName, or undefined if the list xmlListName doesn't exist.
var recurringTransactions = Banana.document.table('Transactions').list('Examples');
var archivedProducts = Banana.document.table('Products').list('Archive');
row(rowNr)
Return the Row at index rowNr as Row Object, or undefined if rowNr is outside the valid range.
var table = Banana.document.table("Accounts");
var row = table.row(3);
toJSON([columnNames])
Return the table as JSON string. If the parameter columnNames is defined, only the columns in the array are included in the file.
var table = Banana.document.table("Accounts");
var json = table.toJSON();
toHtml([columnNames, formatValues])
Return the table as Html file. If the parameter columnNames is defined, only the columns in the array are included in the file. If formatValues is set to true, the values are converted to the locale format.
Example:
//Show the whole row content of the table Accounts
Banana.Ui.showText(Banana.document.table('Accounts').toHtml());

//Show some columns and format dates, amounts, ... as displayed in the program
Banana.Ui.showText(
   Banana.document.table('Accounts').toHtml(['Account','Group','Description','Balance'],true)
);
toTsv([columnNames])
Return the table as Tsv file (Tab separated values). If the parameter columnNames is defined, only the columns in the array are included in the file.
var table = Banana.document.table("Accounts");
var tsv = table.toTsv();
value(rowNr, columnName)
Return the value in row rowNr and column columnName as string. Or undefined if the row or column are not found.
var table = Banana.document.table("Accounts");
var account = table.value(3,'Account');
var description = table.value(3,'Description');
Banana.IO
The Banana.IO class is used to read and write to files.
Introduction
The API Banana.IO and Banana.IO.LocalFile allow a script to read or write to files in a secure way. The script can only read or write to files that are first selected by the user through the corresponding dialogs. The script has no direct access to files on the file system. After the script finishes, the permissions to write or read files are canceled.
For example to write the result of a script to a file:
var fileName = Banana.IO.getSaveFileName("Select save file", "", "Text file (*.txt);;All files (*)");
if (fileName.length) {
   var file = Banana.IO.getLocalFile(fileName)
   file.codecName = "latin1";  // Default is UTF-8
   file.write("Text to save ...");
   if (!file.errorString) {
      Banana.IO.openPath(fileContent);
   } else {
      Banana.Ui.showInformation("Write error", file.errorString);
   }
} else {
   Banana.Ui.showInformation("Info", "no file selected");
}
To read the content of a file:
var fileName = Banana.IO.getOpenFileName("Select open file", "", "Text file (*.txt);;All files (*)")
if (fileName.length) {
   var file = Banana.IO.getLocalFile(fileName)
   file.codecName = "latin1";  // Default is UTF-8
   var fileContent = file.read();
   if (!file.errorString) {
      Banana.IO.openPath(fileContent);
   } else {
      Banana.Ui.showInformation("Read error", file.errorString);
   }
} else {
   Banana.Ui.showInformation("Info", "no file selected");
}
Methods
getOpenFileName(caption, path, filter)
The method getOpenFileName returns an existing file selected by the user. If the user presses Cancel, it returns an empty string. The file selected by the user is then allowed to be read, but not written.
The parameter caption is the caption of the dialog.
The parameter path is path inclusive the file name to be selected. If the path is relative, the current open document path or the user's document path is used.
The parameter filter set the files types to be showed. If you want multiple filters, separate them with ';;', for example: "Text file (*.txt);;All files (*)".
var fileName = Banana.IO.getOpenFileName("Select file to read", "", "Text file (*.txt);;All files (*)")
Since: Banana Accounting 9.0.7, only in Banana Experimental
getSaveFileName(caption, path, filter)
The method getSaveFileName returns an existing file selected by the user. If the user presses Cancel, it returns an empty string. The file selected by the user is then allowed to be read and written.
The parameter caption is the caption of the dialog.
The parameter path is path inclusive the file name to be selected. If the path is relative, the current open document path or the user's document path is used.
The parameter filter set the files types to be showed. If you want multiple filters, separate them with ';;', for example: "Text file (*.txt);;All files (*)".
var fileName = Banana.IO.getSaveFileName("Select file to write", "", "Text file(*.txt);;All files (*)")
getLocalFile(path)
The method getLocalFile(path) returns an object of type Banana.IO.LocalFile that represents the requested file. This method always returns a valid Banana.IO.LocalFile object.
The parameter path to the file.
openUrl(path)
The method openUrl(path) opens the file referred by path in the system default application.
The parameter path to the file.
openPath(path)
The method openPath(path) shows the folder containing the file referred by path in the system file manager.
The parameter path to the file.
Banana.IO.LocalFile
The LocalFile class represents a file on the local file system. See Banana.IO for an example.
Properties
codecName
The name of the codec to be used for reading or writing the file. Default is 'UTF-8'.
errorString
Read only. The string of the last occured error. If no error occured it is empty.
Methods
read()
Returns the content of the file. This function has no way of reporting errors. Returning an empty string can mean either that the file is empty, or that an error occurred. Check the content of the property errorString to see if an error occured.
write(text [, append])
Write text to the file. If append is set to true, text is appended to the file. Returns true if the operation was succesfully, false otherwise.
Banana.Report
The class Banana.Report enables you to create reports, preview and print in Banana Accounting.
Introduction
The report logic is similar to the HTML / CSS logic:
- Create a Report object .
- A report contains a list of ReportElements (paragraphs, texts, tables and other)
- The element can contain other sub-elements
- For each element you can add a class that is used for rendering the element
- Create a StyleSheet
- A stylesheet is composed of StyleElements.
- You preview and print a report by passing the Report and the Stylesheet object.
Each report sturcture has:
- a Report Element list
- a Header Element list
- a Footer Element list
// Report
var report = Banana.Report.newReport("Report title");
report.addParagraph("Hello World !!!", "styleHelloWorld");

// Styles
var stylesheet = Banana.Report.newStyleSheet();
var style = stylesheet.addStyle(".styleHelloWorld");
style.setAttribute("font-size", "96pt");
style.setAttribute("text-align", "center");
style.setAttribute("margin-top", "50mm");

var style2 = stylesheet.addStyle("@page");
style2.setAttribute("size", "landscape");

// Print preview
Banana.Report.preview(report, stylesheet);
Methods
logoFormat(name)
Returns the logo format with 'name'. The returned object is of type Banana.Report.ReportLogo.
Returns null if no logo format with name 'name' exists.
Logo formats are defined through the dialog File → Logo Setup.
var headerLogoSection = report.addSection("");
var logoFormat = Banana.Report.logoFormat("Logo");
if (logoFormat) {
   var logoElement = logoFormat.createDocNode(headerLogoSection, reportStyle, "logo");
   report.getHeader().addChild(logoElement);
}
Since: Banana Accounting 9.0.4
logoFormatsNames()
Returns a list with the logo formats names.
Logo formats are defined through the dialog File → Logo Setup.
var logoNames = Banana.Report.logoFormatsNames();
// returns ["logo", "first_page_logo", "invoice_logo", ...]
Since: Banana Accounting 9.0.4
newReport(title)
Creates a report with title 'title'. The returned object is of type Banana.Report.ReportElement.
To the report you can then add the desired elements, like paragraphs, texts, tables, and so on that construct the structure of the report.
var report = Banana.Report.newReport("Report title");
newStyleSheet()
Creates an empty stylesheet. The returned object is of type Banana.Report.ReportStyleSheet.
To the stylesheet you can add the styles that format the report.
var stylesheet = Banana.Report.newStyleSheet();
newStyleSheet(fileName)
Creates a stylesheet from a file. The file has the same syntax as CSS stylesheets. The file path is relative to the script's path. The path can't contain a '..'' (parent directory).
The returned object is of type Banana.Report.ReportStyleSheet.
You can add further styles to the returned stylesheet.
var reportStyles = Banana.Report.newStyleSheet("styles.css");

*** Content of file styles.css ***
.helloWorldStyle
{
font-size: 96pt;
text-align: center;
margin-top: 50mm;
}

@page
{
size: landscape;
}
*** End of file styles.css ***
preview(report, stylesheet)
Opens a print preview Dialog and shows the report with the given stylesheet.
The param report is an object of type Banana.Report.ReportElement. The param stylesheet is an object of type Banana.Report.ReportStyle.
The page orientation is given by the stylesheet. The default size and orientation is taken from the default printer, or can be set through the stylesheet.
// Set landscape orientation
stylesheet.addStyle("@page {size: landscape}");

// Set page size and orientation
stylesheet.addStyle("@page {size: A5 lanscape}");

// Displays the report
Banana.Report.preview(report, stylesheet);
preview(title, reports, stylesheets)
Opens a print preview Dialog with title 'title' and shows the reports with the given stylesheets. This method allows you to print two or more distinct reports together.
The param report is an array of objects of type Banana.Report.ReportElement. The param stylesheet is an array of objects Banana.Report.ReportStylesheet.
Each report's title will appear in the index of the printed pdf. The numbering of pages will restart from 1 at the beginning of each printed report.
The page orientation is given by the stylesheet. The default size and orientation is taken from the default printer, or can be set through the stylesheet.
var docs = [];
var styles = [];

// Report
for (var i = 0; i < 10; i++) {
   var report = Banana.Report.newReport("Report title");
   report.addParagraph("Hello World #" + i + " !!!", "styleHelloWorld");
   report.setTitle("Document " + i); // The report's title will appear in the pdf's index
   report.getFooter().addFieldPageNr();
   docs.push(report);

   // Styles
   var stylesheet = Banana.Report.newStyleSheet();
   var style = stylesheet.addStyle(".styleHelloWorld");
   style.setAttribute("font-size", "24pt");
   style.setAttribute("text-align", "center");
   style.setAttribute("margin-top", "10mm");
   var style2 = stylesheet.addStyle("@page");
   style2.setAttribute("size", "landscape");
   styles.push(stylesheet);
}

// Print preview of 10 documents together
Banana.Report.preview("Multi documents printing example", docs, styles);
Since Banana Accounting 9.0.4
Example: Hello world
// Simple test script using Banana.Report
//
// @id = ch.banana.script.report.helloworld
// @api = 1.0
// @pubdate = 2017-01-02
// @publisher = Banana.ch SA
// @description = Report Hello world
// @task = app.command
// @doctype = *
// @inputdatasource = none
// @timeout = -1
//

function exec(string) {

   // Create the report
   var report = Banana.Report.newReport("Report title");

   // Add a paragraph to the report
   report.addParagraph("Hello World !!!", "helloWorldStyle");

   // Define some styles
   var stylesheet = Banana.Report.newStyleSheet();

   var style = stylesheet.addStyle(".helloWorldStyle");
   style.setAttribute("font-size", "96pt");
   style.setAttribute("text-align", "center");
   style.setAttribute("margin-top", "50mm");

   var style2 = stylesheet.addStyle("@page");
   style2.setAttribute("size", "landscape");

   // Open Preview
   Banana.Report.preview(report, stylesheet);
}
An example with tables, page breaks and differents styles
Result
Script
// Test script using Banana.Report
//
// @id = ch.banana.script.report.report
// @api = 1.0
// @pubdate = 2017-01-02
// @publisher = Banana.ch SA
// @description = Test report api
// @task = app.command
// @doctype = *
// @outputformat = none
// @inputdatasource = none
// @timeout = -1
//

function exec(string) {

   // Report
   var report = Banana.Report.newReport("Report title");

   var pageHeader = report.getHeader()
   pageHeader.addClass("header");
   pageHeader.addText("Page header");
   report.getFooter().addFieldPageNr();

   var watermark = report.getWatermark();
   watermark.addParagraph("Sample built with Script Report API");

   report.addParagraph("Report title", "titleStyle");
   report.addParagraph("1. Text", "chapterStyle").setOutline(1);

   report.addParagraph("Lorem ipsum dolor sit amet, consectetur adipisicing elit, sed do " +
    "eiusmod tempor incididunt ut labore et dolore magna aliqua. " +
    "Ut enim ad minim veniam, quis nostrud exercitation ullamco laboris nisi ut aliquip " +
    "ex ea commodo consequat. Duis aute irure dolor in reprehenderit in voluptate velit " +
    "esse cillum dolore eu fugiat nulla pariatur. Excepteur sint occaecat cupidatat non " +
    "proident, sunt in culpa qui officia deserunt mollit anim id est laborum.");

   var paragraph2 = report.addParagraph();
   paragraph2.addText("Lorem ipsum dolor sit amet, consectetur adipisicing elit, sed do ");
   paragraph2.addText("eiusmod tempor incididunt ut labore et dolore magna aliqua. ", "blueStyle");
   paragraph2.addText("Ut enim ad minim veniam, quis nostrud exercitation ullamco laboris nisi ut aliquip ", "boldStlyle");
   paragraph2.addText("ex ea commodo consequat. Duis aute irure dolor in reprehenderit in voluptate velit ", "underlineStyle boldStyle");
   paragraph2.addText("esse cillum dolore eu fugiat nulla pariatur.");
   paragraph2.addLineBreak();
   paragraph2.addText("Excepteur sint occaecat cupidatat non proident, sunt in culpa qui officia deserunt mollit anim id est laborum.", "italicStyle");

   report.addParagraph("2. Table", "chapterStyle").setOutline(1);

   var table = report.addTable();
   table.getCaption().addText("Table caption");

   var tableHeader = table.getHeader();
   var tableHeaderRow = tableHeader.addRow();
   tableHeaderRow.addCell("Description", "", 2);
   tableHeaderRow.addCell("Income");
   tableHeaderRow.addCell("Expense");
   tableHeaderRow.addCell("Balance");

   var tableRow = table.addRow();
   tableRow.addCell();
   tableRow.addCell("Initial balance");
   tableRow.addCell();
   tableRow.addCell();
   tableRow.addCell(Banana.Converter.toLocaleNumberFormat("157.00")).addClass("balanceStyle");

   var tableRow = table.addRow();
   tableRow.addCell(Banana.Converter.toLocaleDateFormat("2014-02-11"));
   tableRow.addCell("Transfer from post office account");
   tableRow.addCell(Banana.Converter.toLocaleNumberFormat("500.00"));
   tableRow.addCell();
   tableRow.addCell(Banana.Converter.toLocaleNumberFormat("657.00")).addClass("balanceStyle");

   var tableRow = table.addRow();
   tableRow.addCell(Banana.Converter.toLocaleDateFormat("2014-02-20"));
   tableRow.addCell("Various payments");
   tableRow.addCell();
   tableRow.addCell(Banana.Converter.toLocaleNumberFormat("7250.00"));
   tableRow.addCell(Banana.Converter.toLocaleNumberFormat("-6593.00")).addClass("balanceStyle negativeStyle");

   var tableRow = table.addRow("totalrowStyle");
   tableRow.addCell();
   tableRow.addCell("Total transactions");
   tableRow.addCell(Banana.Converter.toLocaleNumberFormat("500.00"));
   tableRow.addCell(Banana.Converter.toLocaleNumberFormat("7250.00"));
   tableRow.addCell(Banana.Converter.toLocaleNumberFormat("-6593.00")).addClass("balanceStyle negativeStyle");

   report.addParagraph("3. Bookmarks and links", "chapterStyle").setOutline(1);

   report.addParagraph("3.1 Internal links", "chapter2Style").setOutline(2);
   report.addParagraph("-> link to bookmark on page 2").setLink("bookmarkpage2");

   report.addParagraph("3.2 External links", "chapter2Style").setOutline(2);
   report.addParagraph("-> link to Banana.ch web page").setUrlLink("http://www.banana.ch");

   report.addPageBreak();

   var chapter4 = report.addParagraph("4. Pages", "chapterStyle");
   chapter4.setOutline(1);

   report.addParagraph("Bookmark on page 2").setBookmark("bookmarkpage2");


   // Styles
   var docStyles = Banana.Report.newStyleSheet();

   var pageStyle = docStyles.addStyle("@page");
   pageStyle.setAttribute("margin", "20mm 20mm 20mm 20mm");

   var headerStyle = docStyles.addStyle("phead");
   headerStyle.setAttribute("padding-bottom", "1em");
   headerStyle.setAttribute("margin-bottom", "1em");
   headerStyle.setAttribute("border-bottom", "solid black 1px");

   var footerStyle = docStyles.addStyle("pfoot");
   footerStyle.setAttribute("text-align", "right");

   var paragraphStyle = docStyles.addStyle("p");
   paragraphStyle.setAttribute("margin-top", "0.5em");

   var captionStyle = docStyles.addStyle("caption");
   captionStyle.setAttribute("margin-top", "1em");

   var titleStyle = docStyles.addStyle(".titleStyle");
   titleStyle.setAttribute("font-size", "24");
   titleStyle.setAttribute("text-align", "center");
   titleStyle.setAttribute("margin-bottom", "1.2em");

   docStyles.addStyle(".chapterStyle", "font-size:16; margin-top:2em; margin-bottom:0.2em");
   docStyles.addStyle(".chapter2Style", "font-size:12; margin-top:1.4em; margin-bottom:0.2em");

   var tableStyle = docStyles.addStyle("table");
   tableStyle.setAttribute("border", "2px solid red");

   docStyles.addStyle("td", "border: 1px dashed black; padding: 2px;");

   var tableColStyle = docStyles.addStyle(".balanceStyle");
   tableColStyle.setAttribute("background-color", "#E0EFF6");
   tableColStyle.setAttribute("text-align", "right");

   var totalRowStyle = docStyles.addStyle(".totalrowStyle");
   totalRowStyle.setAttribute("font-weight", "bold");

   var totalBalanceStyle = docStyles.addStyle(".totalrowStyle td.balanceStyle");
   totalBalanceStyle.setAttribute("text-decoration", "double-underline");

   docStyles.addStyle(".blueStyle", "color:blue");
   docStyles.addStyle(".underlineStyle", "text-decoration:underline;");
   docStyles.addStyle(".italicStyle", "font-style:italic;");
   docStyles.addStyle(".boldStyle", "font-weight:bold");

   // Open Preview
   Banana.Report.preview(report, docStyles);
}
Banana.Report.ReportElement
The class Banana.Report.ReportElement represents the report itself and every element in the report, such as sections, paragraphs, tables, texts and the report itself.
Once you create a new report through the method Banana.Report.newReport() you can start adding sections, paragraphs, texts, tables and so on.
When you add an element with one of the add methods, you get as return value an object of type
Elements as a container of other elements.
Banana.Report.ReportElement that represents the added element.
To this object you can add further elements and by this way construct the structure of the report.
Report
+ Paragraph
+ Table
+ Row
+ Cell
+ Cell
+ Row
+ Cell
+ Cell
...
Even if this interface allows you to add tables to text elements or columns to paragraphs, the result will be undefined.
Formatting text size, text color, margins, and so on are set separately through a Banana.Report.ReportStyleSheet object.
Methods
addClass(classes)
Add classes to the node. A class binds the element to the corresponding class style definend in Banana.Report.ReportStyleSheet as used in CSS Stylesheets.
var report = Banana.Report.newReport("Report title");
report.addParagraph("1250.00").addClass("balanceStyle");
addSection([classes])
Add a section and return the created section as a Banana.Report.ReportElement object.
You can add sections only to sections, cells, captions, headers or footers.
var report = Banana.Report.newReport("Report title");

//Add a section with a style
var section = report.addSection("sectionStyle");
section.addParagraph("First paragraph");
section.addParagraph("Second paragraph");
addParagraph([text, classes])
Add a paragraph and return the created paragraph as a Banana.Report.ReportElement object.
You can add paragraphs only to sections, cells, captions, headers or footers.
var report = Banana.Report.newReport("Report title");

//Add an empty paragraph
report.addParagraph(" ");

//Add a paragraph with a text
report.addParagraph("Hello World !!!");

//Add a paragraph with a text and a style
report.addParagraph("Hello World !!!", "styleHelloWorld");
addText(text [, classes])
Add a text node and return the created text node as a Banana.Report.ReportElement object.
You can add texts only to sections, paragraphs, cells, captions, headers or footers.
var report = Banana.Report.newReport("Report title");

//Add a text
report.addText("Hello world !!!");

//Add a text with a style
report.addText("Hello world !!!", "styleHelloWorld");
addTable([classes])
Add a table and return the created table as a Banana.Report.ReportElement object.
You can add tables only to the report or sections.
var report = Banana.Report.newReport("Report title");
var myTable = report.addTable("myTable");
addColumn([classes])
Add a column and return the created column as a Banana.Report.ReportElement object.
You can add columns only to tables.
var column1 = myTable.addColumn("column1");
var column2 = myTable.addColumn("column2");
var column3 = myTable.addColumn("column3");
addRow([classes])
Add a row and return the created row as a Banana.Report.ReportElement object.
You can add rows only to tables, table headers or table footers.
var tableRow = myTable.addRow();
...
addCell([span])
Add an empty cell and return the created cell as a Banana.Report.ReportElement object.
You can add cells only to rows. You can span cells over columns but not over rows.
tableRow.addCell();      //span empty cell over 1 column (default value)
tableRow.addCell("", 3); //span empty cell over 3 columns
...
addCell(text [,classes, span])
Add a cell to the node and return the created cell as a Banana.Report.ReportElement object.
You can add cells only to rows.You can span cells over columns but not over rows.
tableRow.addCell("Bank", "firstCellStyle", 3);      //span cell over 3 columns
tableRow.addCell("1200.65", "secondCellStyle, 1);   //span cell over 1 column
...
addLineBreak()
Add a line break and return the created line break as a Banana.Report.ReportElement object.
You can add line breaks only to paragraphs or cells.
// Add a line break to a paragraph
var p = report.addParagraph(" ");
p.addLineBreak();

// Add a line break to a cell
var c = tableRow.addCell();
c.addLineBreak();
addPageBreak()
Add a page break node and return the created page beak as a Banana.Report.ReportElement object.
You can add page breaks only to the report or sections.
var report = Banana.Report.newReport("Report title");
...
report.addPageBreak();
...
addImage(path [,classes])
Add an image and return the created image as a Banana.Report.ReportElement object. Supported formats are png and jpg.
The path can be relative to the script's folder, the document's folder, the name of a document attacched to the file or a data uri scheme (for images imbedded in the document).
- file:script/<relative_path_to_script_folder>/<image_name>
- file:document/<relative_path_to_file_folder>/<image_name>
- documents:<document_name>
- data:[<media type>][;charset=<character set>][;base64],<data>
You can add images only to sections, paragraphs, cells, captions, headers or footers.
The parameter path can be absolute or relative to the script path.
var report = Banana.Report.newReport("Report title");

// Add an image located in the script folder
report.addImage("file:script/logo_abc.jpg");

// Add an image located in the dcoument folder
report.addImage("file:document/logo_mnp.jpg");

// Add an image saved in the table documents
report.addImage("documents:logo_xyz.jpg");

// Add an image (a red dot) included in the document
report.addImage("data:image/png;base64,iVBORw0KGgoAAAANSUhEUgAAAAUA AAAFCAYAAACNbyblAAAAHElEQVQI12P4//8/w38GIAXDIBKE0DHxgljNBAAO 9TXL0Y4OHwAAAABJRU5ErkJggg==");

// Add a SVG base64 image
report.addImage("data:image/svg+xml;base64,iVBORw0KGgoAAAANSUhEUgAAAAUA AAAFCAYAAACNbyblAAAAHElEQVQI12P4//8/w38GIAXDIBKE0DHxgljNBAAO 9TXL0Y4OHwAAAABJRU5ErkJggg==");
addImage(path, widht, height [,classes])
Overloaded method to add an image and return the created image as a Banana.Report.ReportElement object.
The parameters width and height have the same syntax as css length values. They can be absolute (ex.: "30px", "3cm", ... ) or relative (ex.: "50%", "3em", ...).
var report = Banana.Report.newReport("Report title");
report.addImage("documents:image_logo", "3cm", "5cm");
addFieldPageNr([classes])
Add a field containg the page number and return the created field as a Banana.Report.ReportElement object.
You can add this field only to sections, paragraphs, cells, captions, headers or footers.
var report = Banana.Report.newReport("Report title");
...
// Add the page number to the paragraph
report.addParagraph("Page ").addFieldPageNr();

// Add a page number to the footer
var footer = report.getFooter();
footer.addText("Page ");
footer.addFieldPageNr();
excludeFromTest()
Mark the field to not be tested during a test case. The value is in any case outputed to the test results, it is just ignored during the comparison of the test results.
This is useful, for example, for text fields containing the current date.
var currentDate = Banana.Converter.toLocaleDateFormat(new Date());
var textfield = report.getFooter().addText(currentDate);
textfield.excludeFromTest();
getWatermark()
Return the watermark element.
Only the report has a watermak element.
var watermark = report.getWatermark();
watermark.addParagraph("Watermark text");
getHeader()
Return the header of the element.
Only tables and the report have an header element.
var report = Banana.Report.newReport("Report title");

//Report
var reportHeader = report.getHeader();
reportHeader.addClass("header");
reportHeader.addText("Header text");

//Table
var table = report.addTable("myTable");
var tableHeader = table.getHeader();
tableRow = tableHeader.addRow();
tableRow.addCell("Description");
tableRow.addCell("Amount");
getFooter()
Return the footer of the element.
Only tables and the report have a footer element.
//Report
var footer = report.getFooter();
footer.addText("Footer text");
getCaption()
Return the caption of the element.
Only tables have a caption element.
var table = report.addTable("MyTable");
var caption = table.getCaption();
caption.addText("Table caption text", "captionStyle");
getTag()
Return the tag of the element, like 'body', 'p', 'table', 'td' and so on.
var report = Banana.Report.newReport("Report title");
...
report.getTag(); // returns 'body'
footer.getTag(); // returns 'pfoot'
...
getTitle()
Return the title of the element.
Only a document element have a title.
var report = Banana.Report.newReport("My Report Title");
var title = report.getTitle(); // return 'My Report Title'
setOutline(level)
Set the outline level, this is used to create the index when exporting to pdf.
report.addParagraph("1. Text").setOutline(1);
setBookmark(bookmark)
Set a bookmark (or anchor), this is used in conjunction with setLink().
report.addParagraph("Bookmark on page 2").setBookmark("bookmarkpage2");
setLink(bookmark)
Set a link to a bookmark. See setBookmark().
report.addParagraph("-> link to bookmark on page 2").setLink("bookmarkpage2");
setPageBreakBefore()
Set to insert a page break before the element.
// Insert a page break before a paragraph
report.addParagraph("Hello world!!!").setPageBreakBefore();

// Insert a page break before a table
   /* first create a table then... */
myTable.setPageBreakBefore();
setSize(width, height)
Set the size of the element.
The parameters width and height have the same syntax as css length values. They can be absolute (ex.: "30px", "3cm", ... ) or relative (ex.: "50%", "3em", ...).
You can only set the size of an image element.
var image = report.addImage("C:/Documents/Images/img.jpg");
image.setSize("3cm", "6cm");
setStyleAttribute(attr_name, attr_value)
Set a style attribute to the element. Attributes ids and values follow the CSS specification. This attibute correspont to the inline styles in Css.
paragraph.setAttribute("font-size", "24pt");
setStyleAttributes(attributes)
Set style attributes to the element. Attributes ids and values follow the CSS specification. Those attributes correspond to the inline styles in Css.
paragraph.setAttribute("font-size:24pt;font-weight:bold;");
setTitle(title)
Set the title of the element.
Title can be only set to a document element.
document.setTitle("Annual report");
setUrlLink(link)
Set a link to an external file (file://...) or a web page (http://....).
To the element the class "link" is automatically added.
report.addParagraph("Link to Banana.ch web page").setUrlLink("http://www.banana.ch");
Banana.Report.ReportLogo
The class Banana.Report.ReportLogo represents the format of a logo's section.
With a Banana.Report.ReportLogo object you can create and insert a logo's section in the report document. The logo format is defined through the dialog File → Logo Setup.
With this class you don't have to rewrite your scripts to change the logo's section, you can just change the format in the dialog Logo Setup, and the script will apply the new format automatically.
Methods
createDocNode(textNode, stylesheet, disambiguosClass)
Create a new Report Element that represent the logo's section as defined in the dialog File → Logo Setup.
The param textNode is the text node to insert within in the logo section.
The param stylesheet is the stylesheet where the styles needed by the logo section are inserted.
The param disambiguosClass is a string used to prevent clashes with stylesheet class names.
// Get the logo format
var headerLogoSection = report.addSection("");
var logoFormat = Banana.Report.logoFormat("Logo");
if (logoFormat) {
    // Use the format as defined in the dialog File --> Logo Setup
    var logoElement = logoFormat.createDocNode(headerLogoSection, repStyleObj, "logo");
    report.getHeader().addChild(logoElement); }
else {
    // If the format 'logo' is not defined, insert an image
    report.addImage("documents:logo", "logoStyle");
}
Banana.Report.ReportStyle
The class Banana.Report.ReportStyle represents a single style in a stylesheet. It is used to set the style attributes.
Methods
setAttribute(attr_name, attr_value)
Set the attribute value. Attributes' ids and values follow the CSS specification.
style.setAttribute("font-size", "24pt");
setAttributes(attributes)
Set attributes values. Attributes' ids and values follow the CSS specification.
style.setAttributes("font-size:24pt;font-weight:bold;");
Supported attributes
font
font-family
font-size
font-style
font-weight
margin [top, right, bottom, left]
margin-top
margin-bottom
margin-left
margin-right
padding
padding-top
padding-bottom
padding-left
padding-right
hanging-ident
text-align
text-decoration
text-ellipsis
vertical-align
color
background-color
border
border-top
border-top-style
border-top-color
border-top-width
border-bottom
border-bottom-style
border-bottom-color
border-bottom-width
border-left
border-left-style
border-left-color
border-left-width
border-right
border-right-style
border-right-color
border-right-width
display
overflow
float
text-wrap
width
max-width
min-width
height
page-break-after
column-break-after
line-break-after
page-break-before
column-break-before
line-break-before
page-break-inside
line-break-inside
size
position
left
top
right
bottom
transform (matrix, translateX, translateY, translate, rotate, scaleX, scaleY, scale, skewX, skewY and skew)
transformOrigin
orphans
fill-empty-area
Non standard attributes and values
width-sym
This attribute contains a string. Columns with the same width-sym will be laid out with the same width.
layout-sym
This attribute is a string. Tables with the same layout-sym attribute will have the same layout for the width of the columns.
overflow
This attribute has the non standard value "shrink". The content of the node will be down scaled to fit given space.
style.setAttribute("overflow", "shrink");
overflow-shrink-max
This attibute the maximal down scaling factor (like 0.8).
style.setAttribute("overflow-shrink-max", "0.6");
text-decoration
This attribute can also contain the values "double-underline" or "double-strong-underline".
style.setAttribute("text-decoration", "underline");
border-style
This attribute can also contain the values "double" and "double-strong".
style.setAttribute("border-style", "double");
flexible-width
This attribute can contain the value "always" and is only used with columns. If, in a table, one or more columns have the attribute "flexible-widht", only those columns are enlarged to get the desired table width, untouching the others. Otherwise all columns are enlarged.
fill-empty-area
With this attribute you can fill the remaing space of your page with lines. Lines can be defined through the attribute, which is a string and contains the color, the style and the width of the line.
Style can be: solid, dash and dot.
Examples:
var style1 = stylesheet.addStyle("@page", "black solid 1");
var style2 = stylesheet.addStyle("@page", "green dash 0.5");
Banana.Report.ReportStyleSheet
The class Banana.Report.ReportStyleSheet is used to set the styles to format a report.
Page size and orientation
At this moment the report is rendered based on the page size defined in the default printer device.
You can't define a page size, but you can set the orientation with the Style @page.
Page orientation can't be set only once per report, you can't switch from potrait to landscape.
var stylesheet = Banana.Report.newStyleSheet();
stylesheet.addStyle("@page").setAttribute("size", "landscape");
Methods
addStyle(selector)
Create a new style with the given selector. The return object is of type Banana.Report.ReportStyle.
The syntax of selector follows the CSS specification.
- Style name without a preceding dot are reserved predefined tags like "td", "p", "table"
- Style name for new class need a preceding point ".myStyle" in the addStyle method.
The dot name is not used when adding the class name to the element
report.addParagraph("Text to print 24pt", "myStyle");
var style = stylesheet.addStyle(".myStyle");
myStyle.setAttribute("font-size", "24pt");
myStyle.setAttribute("text-align", "center");

report.addCell("Text to print");
var styleTd = stylesheet.addStyle("td");
styleTd.setAttribute("font-weight", "bold");
addStyle(selector, attributes)
Create a new style with the given selector and attributes. The return object is of type Banana.Report.ReportStyle.
The syntax of selector and attributes follow the CSS specification.
var style2 = stylesheet.addStyle(".style2", "font.size: 24pt; text-align: center");
parse(text)
Load the styles from the given text. The text follow the CSS specification.
stylesheet.parse(
  "p.style1 {font-size:24pt; text-align:center;}" +
  "@page {size:A4 landscape;}"
  );
The selector
The selector follows the css syntax, following you will find some examples:
| Selector | Selected elements |
| .xyz |
Select all elements with class xyz NB.: When you set the class to a ReportElement you enter the name without '.' |
| table | Select all tables |
| table.xyz | Select all tables with class xyz |
| table.xyz td | Select all cells in tables with class xyz |
| @page | page |
| body | content of the report |
| phead | page header |
| pfoot | page footer |
| div | section |
| p | paragraph |
| table | table |
| caption | table caption |
| thead | table header |
| tbody | table body |
| tfoot | table footer |
| tr | table row |
| td | table cell |
You can get the tag of an element through the method getTag();
Report FAQ
How can I set the orientation of the page and the margins
// Set landscape orientation
styleSheet.addStyle("@page", "size: landscape");

// Page margins top, right, bottom, left
styleSheet.addStyle("@page", "margin: 20mm 20mm 20mm 25mm");
How can I set the size of the page
// Set page size
styleSheet.addStyle("@page", "size: A5");
How can I set the margins of page header and footer
styleSheet.addStyle("phead", "margin-bottom:2em");
styleSheet.addStyle("pfoot", "margin-top:2em");
How can I print the page number on the right of the page footer
document.getFooter().addFieldPageNr("alignright");
stylesheet.addStyle("pfoot", "text-align:right");
Can I print the total number of pages
No
I like a style implemented in a report of Banana Accounting, where can I get the used stylesheet?
In print preview export the report as html and look at the code. You will find the used styles.
Banana.SDecimal
The Banana.SDecimal (String Decimal) provides functions to do decimal math calculation that
- use decimal string in the form of '10.00' or '-10' as argument and return value
- '.' is interpreted as the decimal separator
- thousand separator are not allowed
- have up to 34 digits of numeric precision
- do accurate decimal rounding
You can use these functions instead of the javascript Number that uses floating point arithmetic and are not very suitable for accounting calculations due to the rounding differences.
var r = Banana.SDecimal.add('6.50', '3.50');   // return '10.00'
var r = Banana.SDecimal.divide('10', '2');     // return '5.00'
var r = Banana.SDecimal.divide('10', '2', ''); // return '5'
var r = Banana.SDecimal.divide('10', '2');     // return '5.00000'
Rounding context
Functions can be passed a rounding context that specify the rounding properties:
- decimals is the number of decimal digits (default value is 2)
- null returns the value unrounded.
- '0' returns with no decimals.
- '1' to '33' returns the value with the indicated number of decimals.
- mode is the rounding mode (default value is HALF_UP)
- Banana.SDecimal.HALF_UP the amount is rounded to the nearest. The 0.5 are rounded up.
- Banana.SDecimal.HALF_EVEN the amount is rounded to the nearest. The 0.5 are rounded up or down based on the preceding digit.
If the rounding context is omitted no rounding is done.
Rounding context of the accounting file
All Banana document files have a rounding context that can be retrieved with the property Banana.document.rounding (see Banana.document).
Examples:
// no context
var r = Banana.SDecimal.divide('10', '3'); // return '3.3333333333333333333333333'

// with context
var context = {'decimals' : 4, 'mode' : Banana.SDecimal.HALF_UP};
var r = Banana.SDecimal.divide('10', '3', context);        // return '3.3333'
var r = Banana.SDecimal.divide('10', '3', {'decimals':0}); // return '3'

// use the rounding property (accunting file 2 decimals)
var r = Banana.SDecimal.divide('10', '3', Banana.document.rounding); // return '3.33'
Functions
abs(value1, [, rounding])
Returns the value1 without the sign and rounded as indicated
var r = Banana.SDecimal.abs('-10') // return '10.00'
add(value1, value2 [, rounding])
Returns the sum of value1 and value2.
var r = Banana.SDecimal.add('6.50', '3.50'); // return '10.00'
compare(value1, value2)
Returns an integer value
- 1 if value1 > value2
- 0 if value1 = value2
- -1 if value1 < value2
Banana.SDecimal.compare('3.50', '2'); // return '1'
Banana.SDecimal.compare('3.00', '3'); // return '0'
divide(value1, value2 [, rounding])
Returns value1 divided by value2.
var r = Banana.SDecimal.divide('6', '3'); // return '2.00'
isZero(value)
Returns a boolean
- true if value is zero
- false if value is not zero
var r = Banana.SDecimal.isZero('3.00'); // return 'false'
max(value1, value2 [, rounding])
Returns the max between value1 and value2.
var r = Banana.SDecimal.max('6', '3'); // return '6.00'
min(value1, value2 [, rounding])
Returns the min between value1 and value2.
var r = Banana.SDecimal.min('6', '3'); // return '3.00'
multiply(value1, value2 [, rounding])
Returns value1 multiplied by value2.
var r = Banana.SDecimal.multiply('6', '3'); // return '18.00'
remainder(value1, value2 [, rounding])
Divide value1 by value2 and returns the reminder.
var r = Banana.SDecimal.reminder('10', '3'); // return '1.00'
round(value1, [, rounding])
Returns value1 round to the spcified rounding context.
var r = Banana.SDecimal.round('6.123456'); // no context no rounding
r = Banana.SDecimal.round('6.123456', {'decimals':2}); // return '6.12'
roundNearest(value1, nearest, [, rounding])
Returns value1 round to the specified minimal amount.
var r = Banana.SDecimal.roundNearest('6.17', '0.1'); // return '6.1'
r = Banana.SDecimal.roundNearest('6.17', '0.05', {'decimals':2}); // return '6.15'
invert(value, [, rounding])
If positive returns a negative value, if negative returns a positive value.
var a = Banana.SDecimal.invert('5'); //return '-5'
var b = Banana.SDecimal.invert('-2.50'); //return '2.50'
sign(value)
Returns an integer value
- 1 if value > 0
- 0 if value = 0
- -1 if value < 0
var r = Banana.SDecimal.sign('-5'); // return '-1'
subtract(value1, value2 [, rounding])
Subtract value2 from value1 and returns the result.
var r = Banana.SDecimal.subtract('10', '3'); // return '7.00'
Locale conversion
To convert to and from the locale format use the Banana.Converter functions
-
Banana.Converter.toInternalNumberFormat(value [, decimals, convZero])
-
Banana.Converter.toLocaleNumberFormat(value [, decimalSeparator])
var sum = Banana.SDecimal.add('10000', '2000'); // return '12000.00'
var printValue = Banana.Converter.toLocaleNumberFormat(sum); // return "12'000.00"
Banana.Script
Banana.Script represents the interface to the script file and can be accessed through Banana.script. It is used to get the parameter values defined in the script. For example if you want to print out in a report the publishing date of the script.
Properties
Methods
getParamValue(paramName)
Return the value defined in the script file of the parameter paramName. Return an empty string or the internal default value if the parameter is not defined. Return the first found value, if the parameter is defined multiple times.
Banana.script.getParamValue('pubdate'); // returns for example '2016-05-11'
getParamValues(paramName)
Return all the values defined in the script file of the param paramName . Return an empty array if the parameter paramName is not defined.
// Script.js example:
// ...
// @authors = Pinco
// @authors = Pallino
// ...

Banana.script.getParamValues('authors'); // returns ['Pinco', 'Pallino']
getParamLocaleValue(paramName)
Return the localized value defined in the script file of the param paramName. Return an empty string the parameter is not defined.
// Script.js example:
// ...
// @description = English desciption
// @description.it = Descrizione italiana
// @description.de = German Beschreibung
 ...

Banana.script.getParamLocaleValue('description'); // returns 'Descrizione italiana' for a system running with the locale 'italian'.
Banana.Test
The Banana.Test class is used to run unit tests of BananaApps.
BananaApps TestFramework
The BananaApps Test Framework is like an usual Unit Test Framework.
Two methologies are available:
- Verify results
Through assert methods the user can verify some conditions, in case that a condition didn't meet the test fail and it is interrupted.
For example you verify that a method returns a determined value.
Ex.: Test.assertIsEqual(totalVatAmount(), "5000.00");
- Log results and compare them with previous results (expected results)
Through the Banana.Test.Logger methods, you can log test results. Test results are stored under the test/testresults folder. They will be compared at the end of the test with the expected results stored under the folder test/testexpected (results form previous tests), if any difference is found, the test is marked as failed and the differences showed to the user.
In this case you don't care about the exact value returned by a method, but you verify that the method returns the same value across differents versions of the BananaApp or Banana Accounting.
Ex.: Test.logger.addKeyValue("Total VAT amount", totalVatAmount());
Create a test case
To create a test case look at the example SampleTests/TestFramework.
Run a test case
You can run a test case in two ways (both available starting at Banana Accounting 9.0.4):
-
Through the Manage Apps dialog
- Open the Manage Apps dialog
- Select the BananaApp to test
- Click over 'Show details'
- Click on the button 'Run test case'
-
Through the Command line
- banana90.exe -cmd=runtestsapps -p1=path_to_testcase.js|folder
- As parameter p1 you can specify the path to a test case file, or the path of a folder
- In case of a folder all files in the folder and subfolders ending with test.js are run
Test case folder structure
This is the default test structure of a test case. All the files used for the test case are stored in a folder named test.
In the dialog Manage apps the button 'Run test case' button is showed only if the application find a file named test/<same_name_bananaapps>.test.js.
ch.banana.script.bananaapp.js                # BananaApps
ch.banana.script.bananaapp2.js
...
test/
  ch.banana.script.bananaapp.test.js         # BananaApps Test Cases
  ch.banana.script.bananaapp2.test.js
  ...
  testcases/
    *.ac2                                    # ac2 files for the test cases
    ...
  testexpected/                              # Expected test results used for verifying the current results
    ch.banana.script.bananaapp.test/
      *.txt
    ch.banana.script.bananaapp2.test/
      *.txt
    ...
  testresults/                               # Current test results
    ch.banana.script.bananaapp.test/
      *.txt
    ch.banana.script.bananaapp2.test/
      *.txt
    ...
Logger output format
The results are saved in .txt with the Latex format. Yes, it means that you can convert the output files in pdf, and look at the results without the log structure commands.
Short example
For a complete example look a SampleTests/SampleTest.
// @id = ch.banana.script.bananaapp.test
// @api = 1.0
// @pubdate = 2018-03-30
// @publisher = Banana.ch SA
// @description = Simple test case
// @task = app.command
// @doctype = *.*
// @docproperties =
// @outputformat = none
// @inputdataform = none
// @timeout = -1

// Register test case to be executed
Test.registerTestCase(new TestLoggerSimpleExample());

// Here we define the class, the name of the class is not important
function TestLoggerSimpleExample() {
}

// Test method, every method starting with 'test' will be automatically executed
TestLoggerSimpleExample.prototype.testOk = function() {
   Test.logger.addText("This test will pass :-)");
   Test.assert(true);
}
The Test object
When a script is run as a test case, a global object named Test is exposed to the script. This object defines properties and methods for executing the test case.
Test.logger.addKeyValue("count", 4);
Test.assert(true);
Properties
logger
The property logger returns an object of type Banana.Test.Logger that permits to log test results. If the script is not run though the Banana Apps functionality this object is null.
var testLogger = Test.logger;
testLogger.addKeyValue("count", 4);
Methods
assert(condition, message)
This method verifies if the condition is true. If the condition is true the test continues, else an exception is thrown and the message message is inserted in the test results.
Test.assert(true, "This test will pass");
assertEndsWidth(string, endString)
This method verifies if text string ends with the text endString. If the condition is true the test continues, else an exception is thrown and a fatal error is inserted in the test results.
Test.assertEndsWith("This string ends with the text", "the text");
assertIsEqual(actual, expected)
This method verifies if actual equal to expected. If the condition is true the test continues, else an exception is thrown and a fatal error is inserted in the test results.
Test.assertIsEqual("Those strings are equal", "Those strings are equal");
assertGreaterThan(actual, expected)
This method verifies if actual is greather than expected. If the condition is true the test continues, else an exception is thrown and a fatal error is inserted in the test results.
Test.assertGreaterThan(10, 8);
assertGreaterThanOrEqual(actual, expected)
This method verifies if actual is greather than or equal to expected. If the condition is true the test continues, else an exception is thrown and a fatal error is inserted in the test results.
Test.assertGreaterThanOrEqual(8, 8);
assertLessThan(actual, expected)
This method verifies if actual less than expected. If the condition is true the test continues, else an exception is thrown and a fatal error is inserted in the test results.
Test.assertLessThan(8, 10);
assertLessThanOrEqual(actual, expected)
This method verifies if actual less than or equal to expected. If the condition is true the test continues, else an exception is thrown and a fatal error is inserted in the test results.
Test.assertLessThanOrEqual(10, 10);
assertMatchRegExp(string, pattern)
This method verifies if string math the regula expression defined by pattern. If the condition is true the test continues, else an exception is thrown and a fatal error is inserted in the test results.
Test.assertMatchRegExp("This string match the regual expression", /match/);
assertStartsWith(string, startString)
This method verifies if text string starts with the text startString. If the condition is true the test continues, else an exception is thrown and a fatal error is inserted in the test results.
Test.assertStartsWith("This string start with the text", "This string");
registerTestCase(testCase)
This method register a testCase (an object) to be run as test.
// Register test case to be executed
Test.registerTestCase(new TestLoggerSimpleExample());
Banana.Test.Logger
The class Banana.Test.Logger contains methods to log test results.
Methods
addSection(key)
This method inserts a new section named key in the test results. A section is like a chapter 1. A section ends at the end of the test or when the method addSection is called again.
addSubSection(key)
This method inserts a new subsection named key in the test results. A section is like a chapter 1.1. A subsection ends at the end of the test or when the methods addSection or addSubSection are called again.
addSubSubSection(key)
This method inserts a new subsubsection named key in the test results. A section is like a chapter 1.1.1. A subsubsection ends at the end of the test or when the methods addSection, addSubSection or addSubSubSection are called again.
addComment(key)
This method inserts a comment in the test results. Test comments are discarded when comparing with the expected test results.
addCsv(key, table [, columns, separator, comment])
This method inserts the content of a csv text (comma separated values) in the test results.
The optional argument columns let you specify the subset of columns to output and in which order.
The optional argument separator if defined is used as the value's separator. If it is not defined the programm automatically determines the separator from one of '\t' (tabulator), ',' (comma) and ';' (semicolon).
// This output all columns
Test.logger.addTable("This is a table", Banana.document, columns);
// This output only the columns Date, Description and Amount
Test.logger.addTable("This is a table", Banana.document, ["Date", "Description", "Amount"]);
addInfo(key, value)
This method inserts an information in the test results. Test informations are discarded when comparing with the expected test results. Compared to addComment' the key/value information is printed in case you publish the latex result as a pdf.
Test.logger.addInfo("Current date", new Date().toLocaleDateString());
addFatalError(key)
This method inserts a fatal error in the test. If a fatal error is inserted, event in case the results are identical to the expected results, the test fails, and the error message reported to the test differences.
Test.logger.addFatalError("This is a fatal error message");
addJson(key, jsonString [, comment])
This method inserts a json string in the test results. The json string is formatted with identation and the formatted string outputted line by line. If the jsonString contains 'carriage return' characters, then it will be outputted as it is. If the string is not a valid json, the string is outputted as it is.
var obj = {
   'count': 100,
   'color': "yellow"
};
Test.logger.addJsonValue("Param", JSON.stringify(obj));
addKeyValue(key, value [, comment])
This method inserts a test value in form of key and value. The parameter value is of type string.
Test.logger.addKeyValue("Row count", Banana.document.table("Transactions").rowCount);
addPageBreak()
This method inserts a page break. Page Breaks are discarded when comparing with the expected test results. They are just useful when the output is converted to a pdf file for inspecting visually the results.
Since Banana 9.0.4
addRawText(text [, insertEndl])
This method inserts a raw string in the test results without any modification or cleaning.
The optional parameter insertEndl defaults to true. If true an endl in inserted after the text.
addReport(key, report [, comment])
This method inserts the content of a Banana.Report object in the test results. Only the text elements are inserted, not the element's styles.
var report = Banana.Report.newReport("Report title");
report.addParagraph("Hello World !!!", "styleHelloWorld");
Test.logger.addReport("This is a report", report);
addTable(key, table [, columns, comment])
This method inserts the content of a Banana.Table object in the test results.
The optional argument columns let you specify the subset of columns to output and in whitch order.
// This output all columns
Test.logger.addTable("This is a table", Banana.document, columns);
// This output only the columns Date, Description and Amount
Test.logger.addTable("This is a table", Banana.document, ["Date", "Description", "Amount"]);
addText(key)
This method inserts a simple string in the test results.
addXml(key, xmlString [, comment])
This method inserts an xml string in the test results. The xml string will be formatted with identation and the formatted string outputted line by line. If the xmlString contains 'carriage return' characters, then it will be outputted as it is. If the string is not a valid xml, the string is outputted as it is.
var xml =
   "<note>" +
      "<to>Pinco</to>" +
      "<from>Pallino</from>" +
      "<heading>Reminder</heading>" +
      "<body>Don't forget me this weekend!</body>" +
   "</note>";
Test.logger.addXmlValue("This is a xml value", xml);
getElapsedTime()
This method returns the elapsed test execution time in milliseconds.
newLogger(logname)
This method returns a new logger, results are written in a separated log file named logname. With this methods you can split test results over several files.
If you have a lot of test results it is advised to split the results over more folder and files. This makes it easy to verify the differences between tests.
As a generale rule, if you feed the test with two or more *.ac2 files, split the results in separate files.
Test.logger.addText("This test split the results over more files and folder");
// Write results in a new file called testresults
var testLogger = Test.logger.newLogger("testresults");
testLogger.addText("This text will be written in file testresults.txt");
testLogger.close();
// Write results in a new folder called testgroup
var groupLogger = Test.logger.newGroupLogger("testgroup");
// Write results in a new file called testgroup/testresults1
var test1Logger = groupLogger.newLogger("testresults1");
test1Logger.addText("This text will be written in file testgroup/testresults1.txt");
test1Logger.close();
// Write results in a new file called testgroup/testresults2
var test2Logger = groupLogger.newLogger("testresults2");
test1Logger.addText("This text will be written in file testgroup/testresults2.txt")
test2Logger.close();
groupLogger.close();
newGoupLogger(groupname)
This method returns a new logger, results are written in a separated folder named groupname. With this methods you can split test results over several folders.
If you have a lot of test resutls it is advised to split the results over more folder and files. This makes it easy to verify the differences between tests.
close()
Close the logger for writting and free the reserved system resources (handle, ,memory, ...). This method shold be called for every new logger created with the methods newLogger and newGroupLogger.
Reserved methods
Those methods are used by the BananaApps Test Framework, and should not be directly used.
addTestInfo(key, value)
This method is called automatically by the framework to insert in a test info value like the test name, the running date and time, ...
addTestBegin(key [, comment])
This method is called automatically by the framework to insert in the log file an indication when a test method is started.
addTestEnd()
This method is called automatically by the framework to insert in the log file an indication when a test method is finished. The framework will also automatically insert information about the elapsed time.
addTestCaseBegin(key [, comment])
This method is called automatically by the framework to insert in the log file an indication when a test case is started.
addTestCaseEnd()
This method is called automatically by the framework to insert in the log file an indication when a test case is finished. The framework will also automatically insert an information about the elapsed time.
Banana.Ui
This class Banana.Ui contains methods to interact with user interface.
Methods
createUi(uiFilePath)
Read the file uiFilepath and return an object representing the dialog. The uiFileName has to be in the same directory as the running script. You can also load a ui file from the table documents with the prefix 'documents:', ex.: 'documents:calculator.ui', For details and examples see Script dialogs or the tutorial JavaScript Tutorial 1.
Every widget defined in the ui file is exposed to the script environment and you can interact with them like in c++ code. You find further details under Banana.Ui.Widget.
If an error occurred undefined is returned.
Example:
@includejs = ch.banana.calculator.dialog.js; // Define the class Calculator
// that control the .ui file
...
var calculatorUi = Banana.Ui.createUi("ch.banana.calculator.dialog.ui");
var calcJs = new Calculator(calculatorUi);
calclatorUi.exec(); //Show the dialog
getDouble(title, label [, value , min, max, decimals])
Show the user a dialog asking to insert a double. Return the inserted double or undefined if the user clicked cancel.
var a = Banana.Ui.getDouble("Title text", "Label text");
var b = Banana.Ui.getDouble("Title text", "Label text", "10.0");
getInt(title, label [, value, min, max, steps])
Show the user a dialog asking to insert an integer. Return the inserted integer or undefined if the user clicked cancel.
var a = Banana.Ui.getInt("Title text", "Label text");
var b = Banana.Ui.getInt("Title text", "Label text", "5", "1", "10","1");
getItem(title, label, items [, current, editable])
Show the user a combo box dialog asking to select an item from a list. Return the selected item or undefined if the user clicked cancel.
var value = Banana.Ui.getItem("Input", "Choose a value", ["a","b","c","d","e"], 2, false);
getItems(title, label, items [, selectedItems])
Show the user a list dialog asking to select one or more items from a list. Return the selected items or undefined if the user clicked cancel.
var value = Banana.Ui.getItems("Input", "Choose one or more values", ["a","b","c","d","e"], ["b","c"]);
Since: Banana Experimental 9.1.0
getPeriod(title, startDate, endDate [, selectionStartDate, selectionEndDate, selectionChecked])
Show the user a dialog asking to select a period like the tab Period. Return an object with the atributes 'startDate', 'endDate' and 'hasSelection' or undefined if the user clicked cancel. Date values are in the format "YYYY-MM-DD".
var period = Banana.Ui.getPeriod("Title text", "2016-01-01", "2016-12-31");
if (period) {
var selectedStartDate = period.startDate; // return the start date of the selected period
var selectedEndDate = period.endDate; // return the end date of the selected period
}
getText(title, label [, text])
Show the user a dialog asking to insert a text. Return the inserted text or undefined if the user clicked cancel.
var text = Banana.Ui.getText("Title text","Label text");
openPropertyEditor(title, params, [dialogId])
Show the user a dialog asking to set given params. Return the modified params or undefined if the user clicked cancel.
Invoice Apps contains examples with this method (https://www.banana.ch/doc9/en/node/8381)
Param properties:
- name: param's key (unique id)
- title: param's title, which appears in the left column "property"
- parentObject (optional): parent's name if you define children
- type (optional): string, multilinestring, bool (default: string). if boolean a checkbox will appear, if multilinestring a textarea will appear
- value: the value, which appears in the right column "value". For type bool: true/false, for type string and multilinestring a text
- defaultvalue (optional): value used by Restore Defaults button. If the param has this property the button Restore Defaults will be available.
- collapse (optional): true/false. By default the dialog expand all items. If collapse is true the item will not be expanded.
- enabled (optional): true/false. If false the value will appears grey and the user cannot change the value (default: true)
- editable (optional): true/false. If false the user cannot change the value, available only for string and multilinestring types (default: true)
- tooltip (optional): text which appears over the item without clicking on the item
- errorId (optional): error id that identify an error. The error id is used to link the error to the corresponding help page
- errorMsg (optional): error string that describe an error. If a parameter has this property set, the label will be show in red and the error showed on the right of the name
var paramList = {};
paramList.version = '1.0';
paramList.data = [];
var param = {};
param.name = 'print_header';
param.title = 'print header';
//type: bool, string, number
param.type = 'bool';
param.value = true;
param.readValue = function() {
param.print_header = this.value;
}
paramList.data.push(param);
var dialogTitle = 'Settings';
var pageAnchor = 'dlgSettings';
Banana.Ui.openPropertyEditor(dialogTitle, paramList, pageAnchor))
for (var i = 0; i < paramList.data.length; i++) {
// Read values to param (through the readValue function)
paramList.data[i].readValue();
}
showHelp(uiFileName)
Show the help of a dialog. The help is loaded from the Banana.ch web site.
showInformation(title, msg)
Show the user an information dialog.
Banana.Ui.showInformation("Information", 'Insert here the text of the information.');
showQuestion(title, question)
Show the user a question dialog with Yes and No buttons. Return true if the user clicked Yes, otherwise false.
var answer = Banana.Ui.showQuestion("Question title", "Insert here the text of the question");
showText(text)
Show the given text in a dialog. The text can be plain text of html and span over multiple lines. If the text is in html the title is taken form the html. The dialog enables the user to save the content in the formats html, pdf, odf and txt.
The use of pixels to set the font sizes is not supported, the text is not rendered properly.
// Normal text
Banana.Ui.showText("Insert here the text.");
// Html text
Banana.Ui.showText('<html><header><title>This is title</title></header><body>Hello world</body></html>');
showText(title, text)
This is an overloaded function.
Show the given text in a dialog with the given title. The text can be plain text of html and span over multiple lines. The dialog enables the user to save the content in the formats html, pdf, odf and txt.
showText(title, text, options)
This is an overloaded function.
Show the given text in a dialog with the given title. The text can be plain text of html and span over multiple lines. The dialog enables the user to save the content in the formats html, pdf, odf and txt.
Through the object options it is possible to set the following additional parameters:
- codecName: the name of the codec to be used in case the content will be saved as txt file. Default is 'UTF-8'
- outputFileName: the file name without path to be used in case the content will be saved. The path is current open document path or the user's document path.
var options = {
'codecName' : "latin1", // Default is UTF-8
'outputFileName' : "prova.txt"
}
Banana.Ui.showText("Title", "some text...", options);
Banana.Ui.Widget
Every widget defined in a ui file is exposed to the script engine.
You can get a particular widget through it's name and the method findChild:
For every widget you have access to:
- properties
- public slots
- signals
If a method is not defined as public slot in c++ qt api, it will not be available to the script engine. Some widgets are wrapped so that you have access to additional methods, see next chapter Wrapped widgets.
For complete examples see the page Script dialogs or the tutorial JavaScript Tutorial 1 (documents 740 'QTableWidget interaction' and 742 'Find dialog').
Example:
// Load ui file
var dialog = Banana.Ui.createUi("ch.banana.scripts.find.ui");
// Get the label/widget through it's name
var statusLabel = dialog.findChild('statusLabel');
// Set the text of label/widget
statusLabel.setText('Hello!');
// Connect button box accepted signal to the dialog close method
var buttonBox = dialog.findChild("buttonBox");
buttonBox.accepted.connect(function() {dialog.close();});
Signals
You have three ways to connect signals to methods.
// Method1: Connect a signal to a function
function findNext() {
Banana.console.log('find next');
}
findNextButton.clicked.connect(findNext);
// Method2: Connect a signal to an object method
var object = {}
object.onClicked = function() {
Banana.console.log('clicked');
};
findNextButton.clicked.connect(object, object. onClicked);
// Method3: Connect a signal to an inline function
findNextButton.clicked.connect(
function(){Banana.console.log('clicked');}
);
Wrapped widgets
The widgets listed below have been wrapped to let you use additional methods that are not exposed to the script engine because they are not declared as public slots.
Hereby only the additional available methods are listed. Their usage and parameters correspond to the c++ counterpart.
QObject
Methods:
findChild(name)
QComboxBox
Methods:
addItem(text) addItems(texts) count() insertItem(index, text) insertItems(index, texts) removeItem(index)
QTableWidget
Since: Banana Experimental 9.1.0
Properties:
currentColumn currentRow
Methods:
currentItem() item(row, column) setColumnWidth(column, width) setEditTriggers(triggerFlag) setHorizontalHeaderLabels(labels) setColumnCount(columns) setCurrentCell(row, column) setRowCount(rows)
QTableWidgetItem
Properties:
background checkState flags foreground text
Banana.Xml
The Banana.Xml class is used to parse and access xml data.
Since: Banana Accounting 9.0.5
Introduction
The API Banana.Xml and Banana.Xml.XmlElement implement a subset of the DOM Document Object Model interface. The most used properties and methods are implemented.
For example the list of books in the following xml file:
<Library updated="2016-10-31"> <Book> <Title>Paths of colours</Title> <Author>Rosa Indaco</Author> </Book> <Book> <Title>Accounting exercises</Title> <Author>Su Zhang</Author> </Book> </Library>
Can be retrieved with the following code:
var xmlFile = Banana.Xml.parse(xml);
var xmlRoot = xmlFile.firstChildElement('Library');
var updateDate = xmlRoot.attribute('updated');
var bookNode = xmlRoot.firstChildElement('Book'); // First book
while (bookNode) {
// For each book in the library
var title = bookNode.firstChildElement('Title').text;
var authorNode = bookNode.firstChildElement('Author');
var author = authorNode ? authorNode.text : 'unknow';
bookNode = bookNode.nextSiblingElement('Book'); // Next book
}
Properties
errorString
Read only. The string of the last occured error. If no error occured it is empty.
Since Banana 9.0.4
Methods
newDocument(name)
The method newDocument(name) creates a new Xml document and returns it as a Banana.Xml.XmlElment object.
Since Banana 9.0.4
parse(xml)
The method parse(xml) parses a xml data and returns an object of type Banana.Xml.XmlElment that represents the parsed xml. If the xml data is not valid, this method returns null, the occured error can be retrieved through the property errorString.
var xmlFile = Banana.Xml.parse(xml);
var xmlRoot = xmlFile.firstChildElement('Bookshelf'); // The root element is named 'Bookshelf' in this example
save(xmlElement)
The method newDocument(name) returns a Banana.Xml.XmlElment as a string.
Since Banana 9.0.4
validate(xmlElement, schemaFilePath)
The method validate(xmlElement, schemaFilePath) validates a Banana.Xml.XmlElment against a shema. The schema is passed as a path relative to the script path. The method returns true if the validation passed, otherwise it returns false. The occured validation error can be retrieved though the property errorString.
// Create document
var xmlDocument = Banana.Xml.newDocument("eCH-0217:VATDeclaration");
var rootNode = xmlDocument.addElement("eCH-0217:VATDeclaration");
...
// Validate against schema (schema is passed as a file path relative to the script)
var schemaFileName = "eCH-0217-1-0.xsd";
if (Banana.Xml.validate(xmlDocument, schemaFileName)) {
Banana.Ui.showInformation("Validation result", "Xml document is valid against " + schemaFileName);
} else {
Banana.Ui.showInformation("Validation result", "Xml document is not valid againts " + schemaFileName + ": " + Banana.Xml.errorString);
}
Since Banana 9.0.4
Banana.Xml.XmlElement
The XmlElement class represents an Xml element. See Banana.Xml for an example.
Since: Banana Accounting 9.0.3
Properties
nodeName
The read only property nodeName returns the node name of the xml element.
parent
The read only property parent returns the parent of this Xml element as a Banana.Xml.XmlElment object. If this is the root element, it returns null.
text
The read only property text returns the text of this Xml element and their childs.
value
This is a synomin of the property text.
Methods
addProcessingInstruction(target, data)
Adds a new processing instruction to the document.
xmlDoc.addProcessingInstruction('xml-stylesheet', 'href="mycss.css" type="text/css"');
Since Banana 9.0.4
addElement(name)
Adds a new Banana.Xml.XmlElement with the specified name to the document and returns it.
Since Banana 9.0.4
addElementNs(ns, name)
Adds a new Banana.Xml.XmlElement with the specified name and namespace to the document and returns it.
Since Banana 9.0.4
addComment(text)
Adds a comment note to the document, and returns it as a Banana.Xml.XmlElement object.
Since Banana 9.0.4
addTextNode(text)
Adds a new Xml TextNode to the document and returns it as a Banana.Xml.XmlElement object.
Since Banana 9.0.4
attibute(name [, defaultValue])
Returns the value of the attribute with the specified name as a string. If no attibute with the specified name is found, the defaultValue or an empty string is returned.
attibuteNS(ns, name [, defaultValue])
Returns the value of the attribute with the specified name and namespace as a string. If no attibute with the specified name is found, the defaultValue or an empty string is returned.
elementsByTagName(name)
Returns an array containing all descendants of this element with the specified name.
firstChildElement([name])
Returns the first child element with the specified name if name is non-empty, otherwise it returns the first child element. Returns null if no such child exists.
var bookNode = xmlRoot.firstChildElement('Book'); // First book
while (bookNode) {
// For each book in the library
var title = xmlFile.firstChildElement('Title').text();
bookNode = bookNode.nextSiblingElement('Book'); // Next book
}
hasChildElements([name])
Returns true if this element contains one or mode elemets with the specified name.
hasAttribute(name)
Returns true is the attribute with the specified name exists.
hasAttributeNS(ns, name)
Returns true if the attribute with the specified name and namespace exists.
lastChildElement([name])
Returns the last child element with the specified name if name is non-empty, otherwise it returns the last child element. Returns null if no such child exists.
namespaceURI()
Returns the namespace URI of this node or an empty string if the node has no namespace URI.
Since Banana 9.0.4
nextSiblingElement([name])
Returns the next sibling element with the specified name if name is non-empty, otherwise returns any next sibling element. Returns null if no such sibling exists.
prefix()
Returns the namespace prefix of the node or an empty string if the node has no namespace prefix.
Since Banana 9.0.4
previousSiblingElement([name])
Returns the previous sibling element with the specified name if name is non-empty, otherwise returns any previous sibling element. Returns null if no such sibling exists.
setAttribute(name, value)
Adds an attribute with the qualified name name with the value value.
Since Banana 9.0.4
setAttributeNs(ns, name, value)
Adds an attribute with the qualified name name and the namespace URI ns with the value value.
Since Banana 9.0.4
setPrefix(value)
If the node has a namespace prefix, this function changes the namespace prefix of the node to pre. Otherwise this function does nothing.
Since Banana 9.0.4
Debugging
Output messages to the debug panel
For debugging you can use the methods in Banana.Console object to output useful information to the debug panel during the execution of the script. If you have to notify the user use instead the methods Banana.application.addMessage, Banana.document.addMessage, Banana.Document.Table.addMessage or Banana.Document.Row.addMessage
Example
Banana.console.log("An info message");
Banana.console.debug("A debug message");
Banana.console.warning("A warning message");
Banana.console.crtitcal("A critical message");
Debug panel
The debug panel when enabled is located on the bottom of the main window near the Info and Messages panels. To open the debug panel you have to enable the option "Display Debug output panel" under -> Program Options -> Developer options.
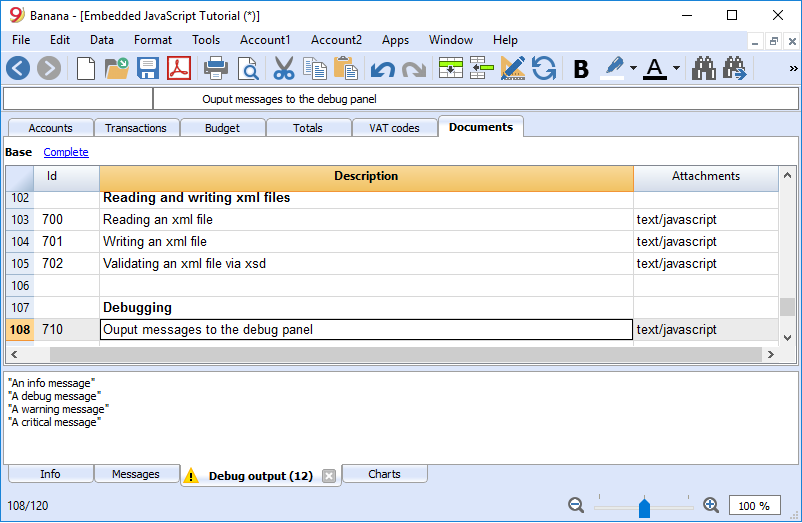
In the debug panel you can choose the type of message to shows (only warnings, debug or info messages), click on the panel with the right mouse key and select the desired level.
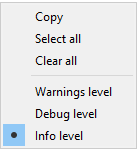
FAQ
Can I call an external program within a Extension?
For the moment, for security reason we do not allow Extensions to works directly on file and call external programs.
Can I create QML (QtQuick) apps?
With QML application have extensive access to the computer.
Fot the moment, for security reason we do not allow Extensions to use QML.
How can I get the start and end date of the accounting?
var openingDate = Banana.document.info("AccountingDataBase","OpeningDate");
var closureDate = Banana.document.info("AccountingDataBase","ClosureDate");
Note: the keywords "AccountingsDataBase", "OpeningDate" and "ClosureDate" correspond to the values in the columns "Section Xml" and ID Xml" of the table "Info file". See command "Info table" under the menu "Tools".
Can I save and recall in a script the values entered by the user?
Yes, use the functions Banana.Document.scriptSaveSettings and Banana.Document.scriptReadSettings.
Settings are saved and restored in the current accounting file under the script id, if you change the id your settings will not be retrieved.
// Initialise parameter
param = {
"searchText": "",
"matchCase": "false",
"wholeText": "false"
};
// Read script settings
var data = Banana.document.getScriptSettings();
if (data.length > 0) {
param = JSON.parse(data);
}
...
// Save script settings
var paramString = JSON.stringify(param);
var value = Banana.document.setScriptSettings(paramString);
Accented letters are displayed wrong
Save the script file in UTF-8.
Can I protect the app?
If you don't want to someone easily change the js file, you can package it in a rcc file.