How to Create Your First Banana Accounting Extensions
Here you can find very examples of extensions:
First Embedded Extension
This walkthrough provides step-by-step guidance for creating a simple Embedded Extension that uses JavaScript API to interact with Banana Accounting software.
How to create an embedded extension
The “Hello World!” program is a classic tradition in computer programming. It is a short and complete first program for beginners, and it is perfect as first embedded extension example.
There are three basic steps in order to create and run an embedded extension:
- Add the Documents table.
- Add the the JavaScript code to the Documents table.
- Run the embedded extension.
Add the Documents table
The embedded extension must be saved in the Documents table of the accounting file.
If it's not already present you need to add the Documents table in the accounting file with the menu command Tools > Add new features > Add document table.
Add the JavaScript code to Documents table
In the Documents table you can now add your embedded extension.
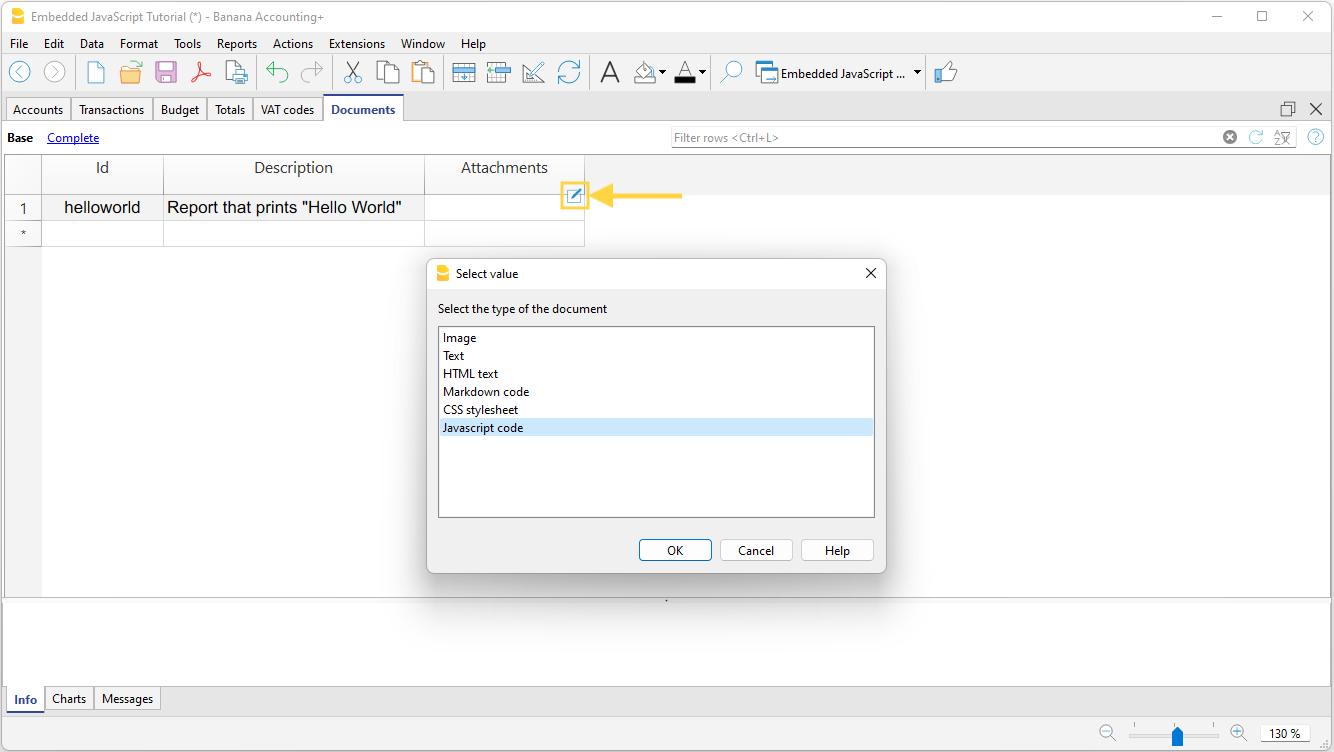
- In the ID column enter the file name (e.g. "helloworld").
- In the Description column enter a comment (optional).
- In the Attachments column you have to add the javascript code. Double click on the cell or select the edit symbol in the top right corner, then select Javascript code and confirm with OK.
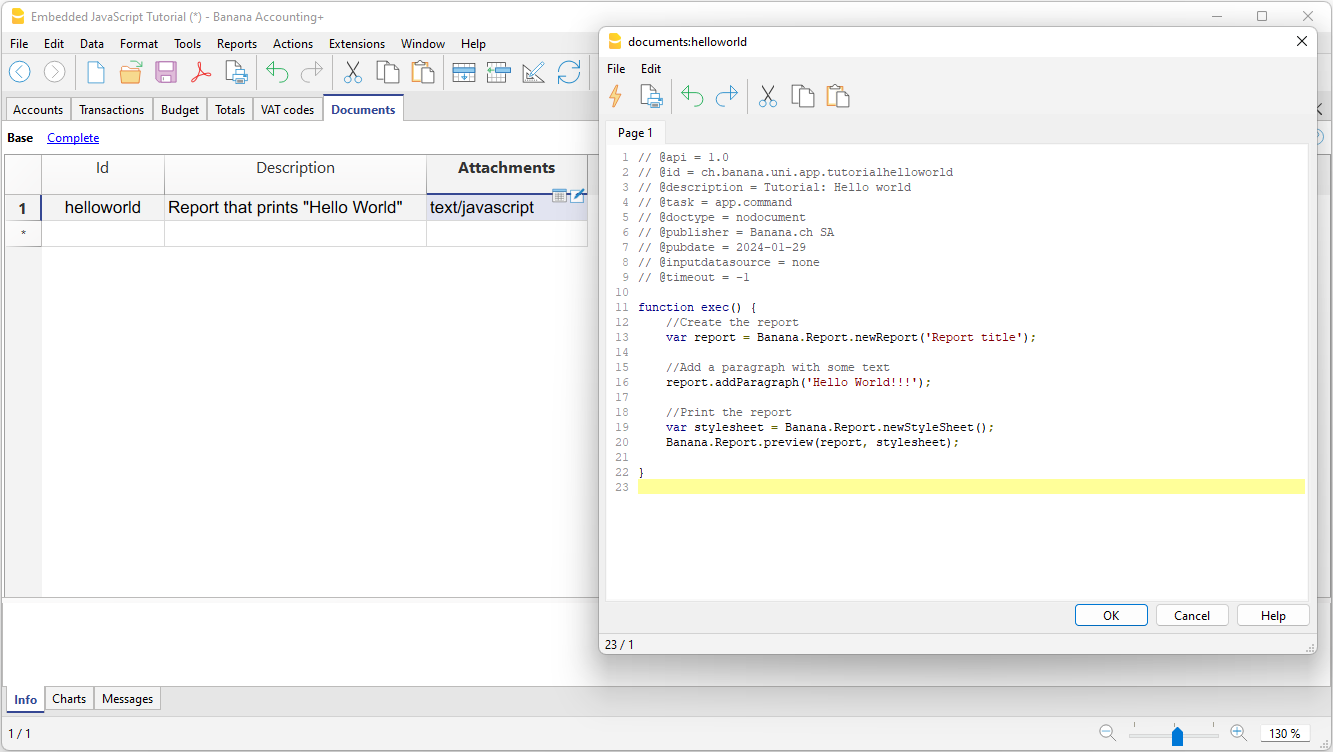
- An editor where you can write your javascript code opens.
- Copy the following javascript code and paste it in the editor.
// @api = 1.0
// @id = ch.banana.uni.app.tutorialhelloworld
// @description = Tutorial: Hello world
// @task = app.command
// @doctype = nodocument
// @publisher = Banana.ch SA
// @pubdate = 2019-01-25
// @inputdatasource = none
// @timeout = -1

function exec() {
    //Create the report
    var report = Banana.Report.newReport('Report title');

    //Add a paragraph with some text
    report.addParagraph('Hello World!!!');

    //Print the report
    var stylesheet = Banana.Report.newStyleSheet();
    Banana.Report.preview(report, stylesheet);

}
- Change the attributes of the extension (for more information, see Extension's attributes):
- @id = <your_script_id>
This is the identification of the script.
In order to avoid duplicates, it is important to assign a unique id for each embedded extension. - @description = <your_script_description>
This is the name of the extension. The text will be displayed in the Extensions menu.
- @id = <your_script_id>
- When you are finished, confirm with OK. You can edit the code at any time by reopening the editor.
- Save the accounting file.
When you save the accounting file, the extension is also saved. You can run or edit it whenever you want.
Run the embedded extension
There are two ways to run an embedded extension:
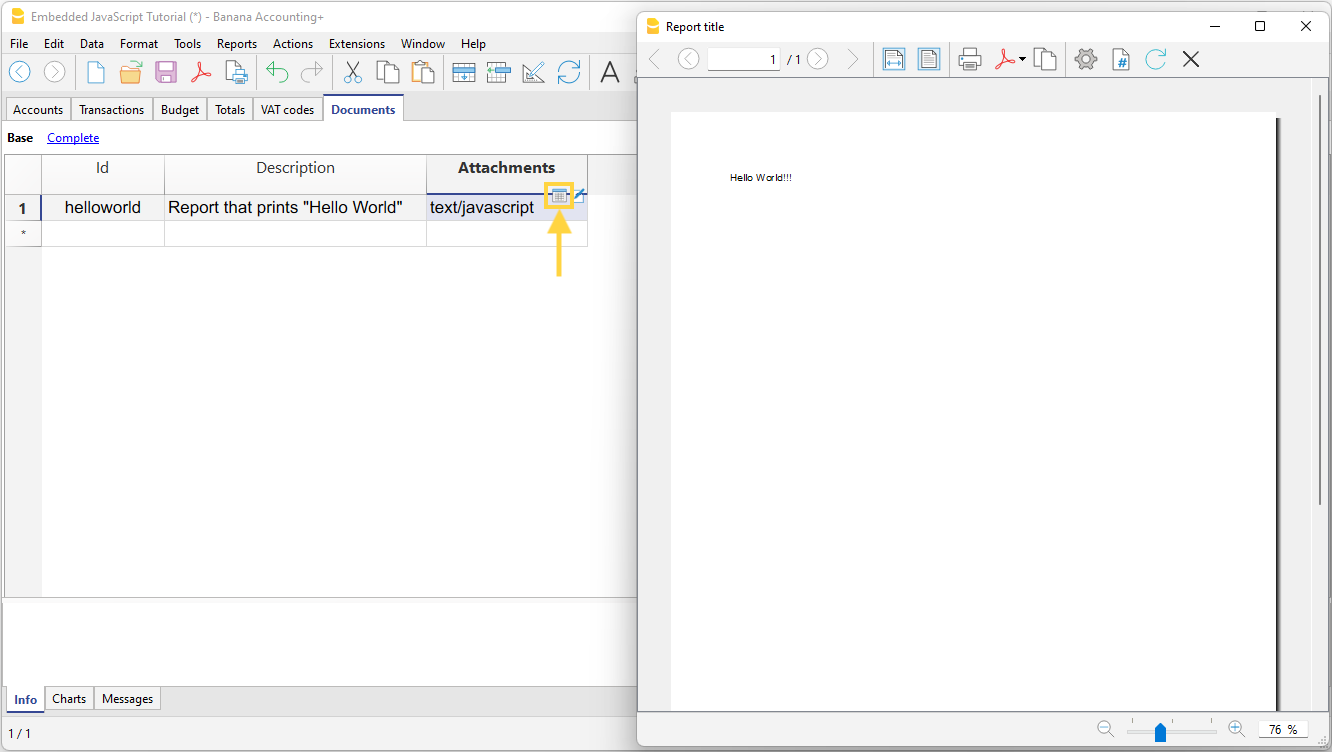
- Click the run symbol in the Attachments cell where your code is located.
- From the Extensions menu, select the extension you want to run.
Useful resources
We have prepared Tutorial files for embedded Extensions that include samples code for most API. You can see how the API works and experiment with it.
Build your first File Based Javascript Extension
Introduction
This walkthrough provides step-by-step guidance for creating a simple extension that uses JavaScript API to interact with Banana Accounting software.
The more powerful extensions in packaged format are used for the development of extensions. But it is also possible to create an extension that is composed of just a single Javascript file. We will use this simple approach to explain how extensions work.
The “Hello World!” program is a classic tradition in computer programming. It is a short and complete first program for beginners, and it is perfect as first extension example.
There are three basic steps in order to experiment with extensions:
- Create the JavaScript file
- Install the extension
- Run the extension
Create the JavaScript file
- Use a text editor. Download a text editor from your choice (Notepad++, Sublime Text, etc.) that will let you code in a simple way.
It is important to be sure you can save with the UTF-8 encoding. Copy the following JavaScript code and paste it on your text editor.
// @id = ch.banana.app.helloworldexample // @api = 1.0 // @pubdate = 2018-10-24 // @publisher = Banana.ch SA // @description = Extension example: Hello world // @task = app.command // @doctype = *.* // @docproperties = // @outputformat = none // @inputdataform = none // @timeout = -1 function exec() { //Create the report var report = Banana.Report.newReport("Report title"); //Add a paragraph with the "hello world" text report.addParagraph("Hello World!"); //Print the report var stylesheet = Banana.Report.newStyleSheet(); Banana.Report.preview(report, stylesheet); }- Change the attributes of the extension (for more information, see Extension's attributes):
- @id = <your_script_id>
This is the identification of the script.
In order to avoid duplicates, it is important to assign a unique id at avery script. - @description = <your_script_description>
This is the name of the extension. The text will be displayed in the dialogs.
- @id = <your_script_id>
- Save the file as helloworld.js.
You have now created your first extension!
Install the Extension
The next step is to install your Extension into the Banana Accounting software.
Before to use the Extension , and see the "Hello World!" text displayed as report in Banana, the App needs to be installed.
So, let's see how to install the "Hello World!" Extension.
- Open an accounting file in Banana Accounting
- In Banana select from the menu Extensions the command Manage Extensions...
- Click on Add from file...
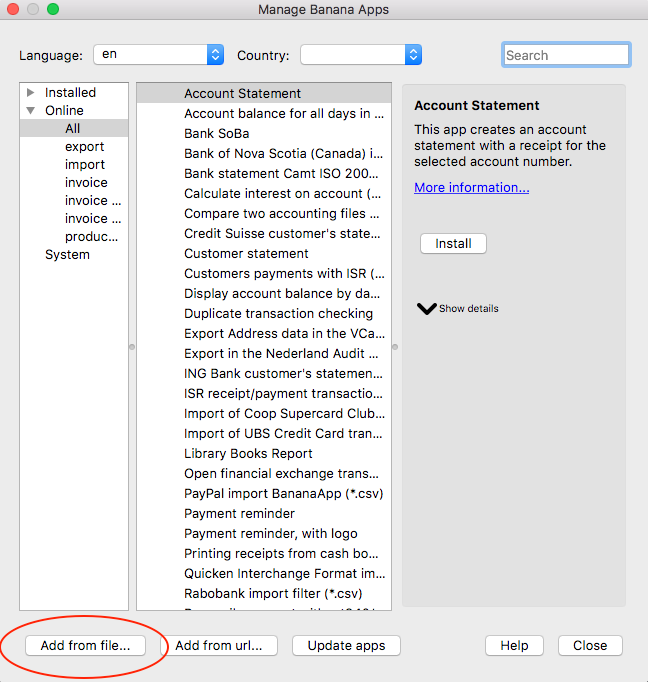
- Select the helloworld.js file.
- Click on Open to install the extension.
- The Extension is displayed in the dialog.
By Selecting Installed from the left, all the installed Extensions (both local and online apps) will be displayed.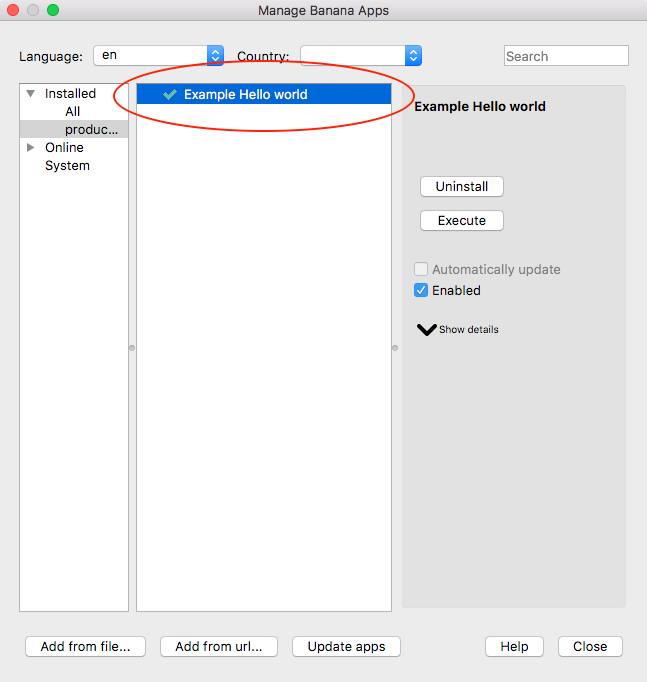
- Click on Close to close the Manage Banana Extensions dialog
You have now installed the Extension!
Important:
- Once installed, the JavaScript file needs to always remain in the same directory.
- If the JavaScript file is modified, the program will always use the last version.
Run the Extension
Finally, now it is possible to run the "Hello World!" extension and see the results.
To run the extension:
- In Banana select from the menu Extensions the Example Hello World Extension.
- The extension is executed and returns the following reports
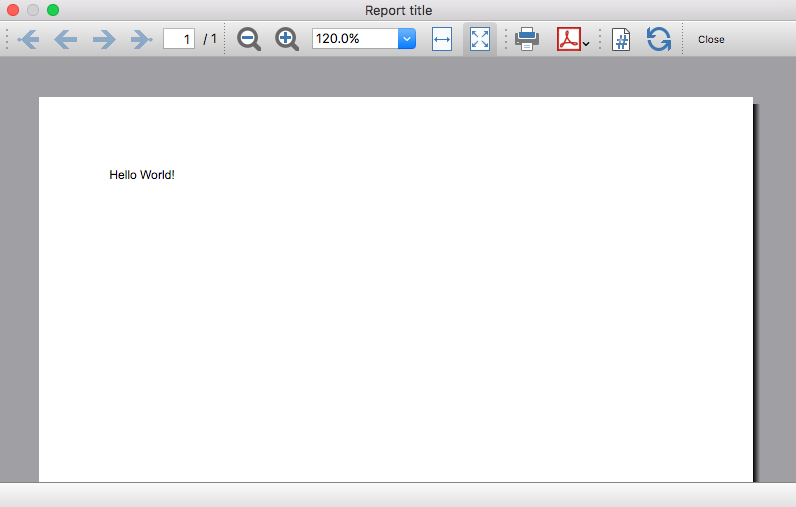
Congratulations, you have now created, installed and executed your own extension!
Uninstall the Extension
In case you don't need an installed extension anymore, it is also possible to remove it from Banana Accounting software using the uninstall command.
- In Banana select from the menu Extensions the command Manage Extensions...
- Select the Installed section on the left in order to display all the currently installed Extensions.
- Select the Extensions you want to remove and click Uninstall.
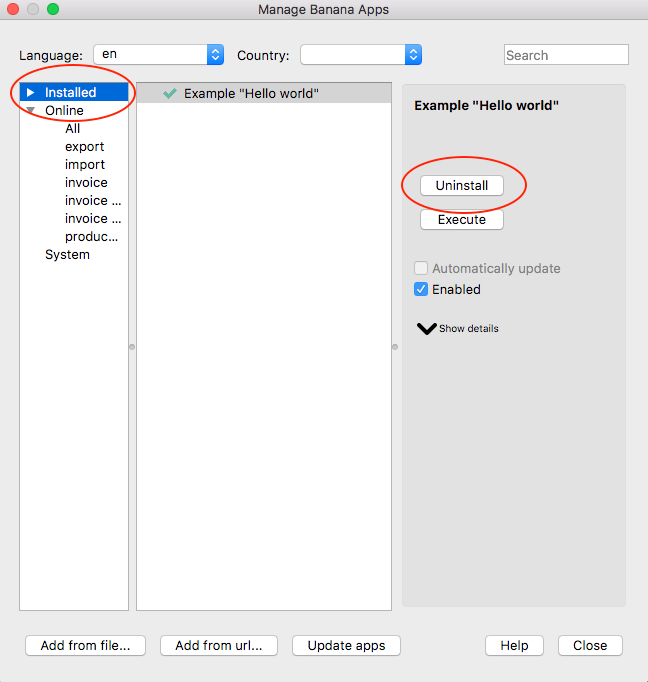
- Confirm with Ok to remove the extension from Banana Accounting software.
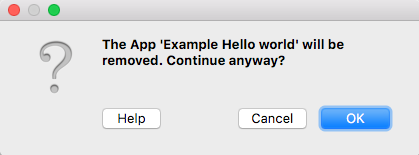
The Extension is now removed from Banana Accounting software, but the JavaScript file (i.e. helloworld.js) is not removed from you computer.
More about Extensions
Create a First package Extension
This document explains the steps and activities to carry out with Visual Studio Code to create the .sbaa package used to create and distribute the Banana Plus extension.
The requirements for creating a package
To create a package with Visual Studio Code you must have met the following requirements:
- Install Visual Studio Code;
- Install CMake application;
- Install specific CMake Extensions to Visual Studio Code;
- Install Compiler toolset;
- Create a minimum structure of files in your project;
- Configuring the files that compiles CMake;
- Compiling the project with CMake in Visual Studio Code;
- Build and create the file .sbaa.
Install Visual Studio Code
Download and install Visual Studio Code from https://code.visualstudio.com.
Install CMake application
Download and install CMake from https://cmake.org. Use the default installation configurations.
Verify that the installed version is in your PATH, if not open CMake go to Menu Tools -> "How to install CMake for command line use" and follow the instructions.
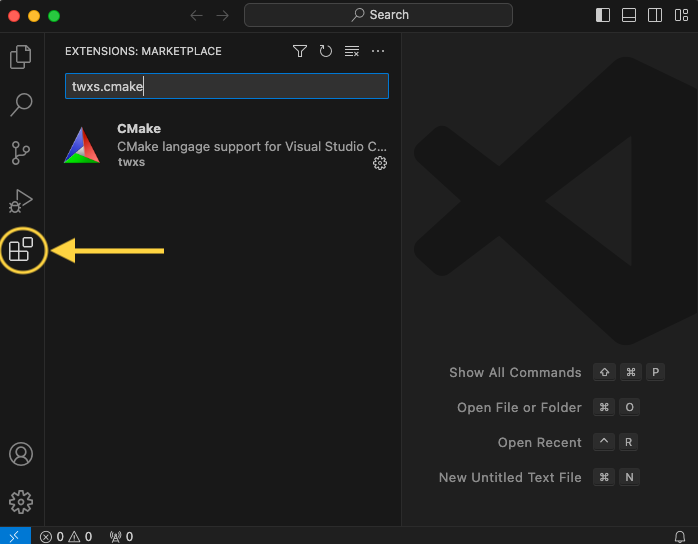
Install specific CMake Extensions to Visual Studio Code
Click on the Extensions button and install the following extensions:
- twxs.cmake
CMake language support for Visual Studio Code (twsx). This is used for syntax highligh - ms-vscode.cmake-tools
CMake Tools (microsoft). This is used for enabling the cmake pane, where you can build the targets
Install Compiler toolset
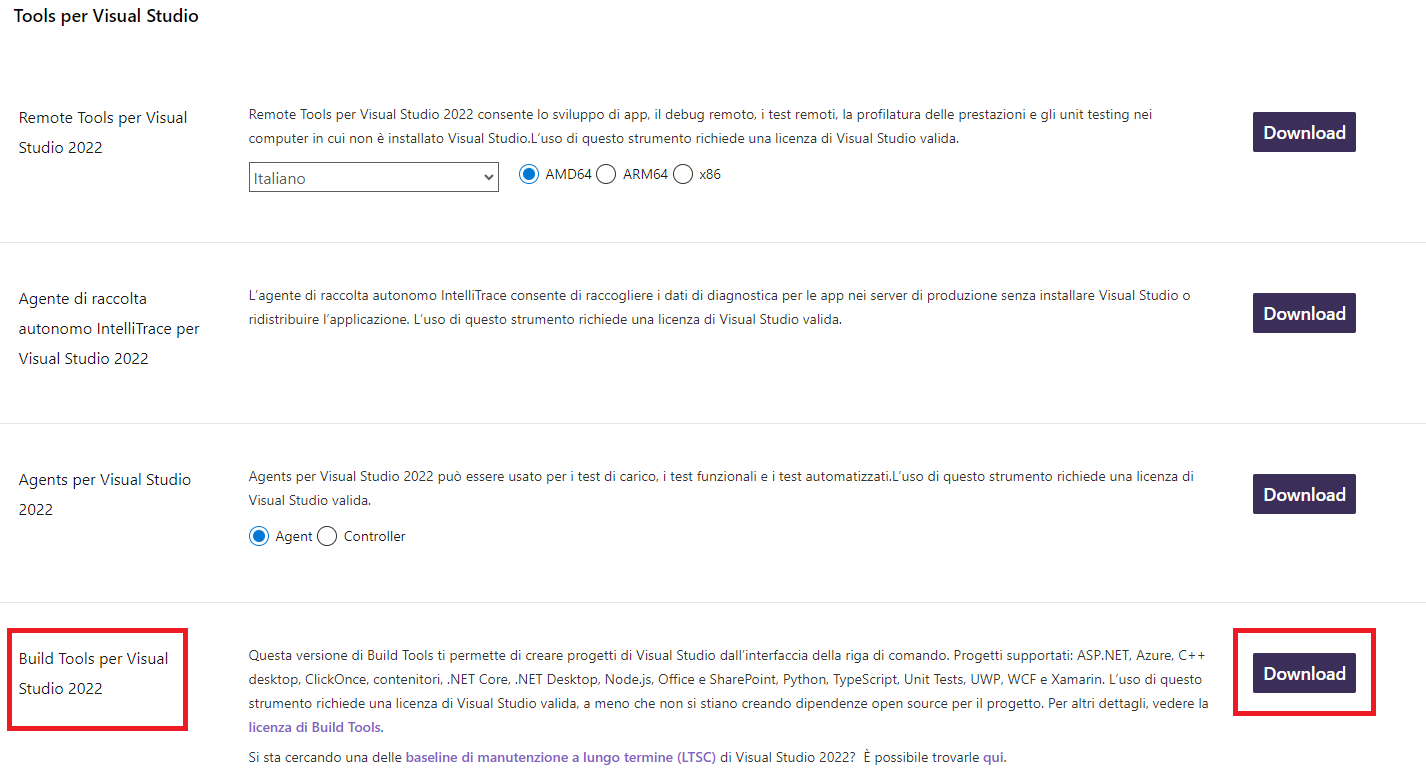
Install the Microsoft Visual C++ compiler toolset as indicated to website: https://code.visualstudio.com/docs/cpp/config-msvc.
The steps are:
- Go to website: https://visualstudio.microsoft.com/it/downloads/
At the bottom of the website, you need to download and install the Tools per Visual Studio: "Build Tools per Visual Studio 2022" as indicated in the image below
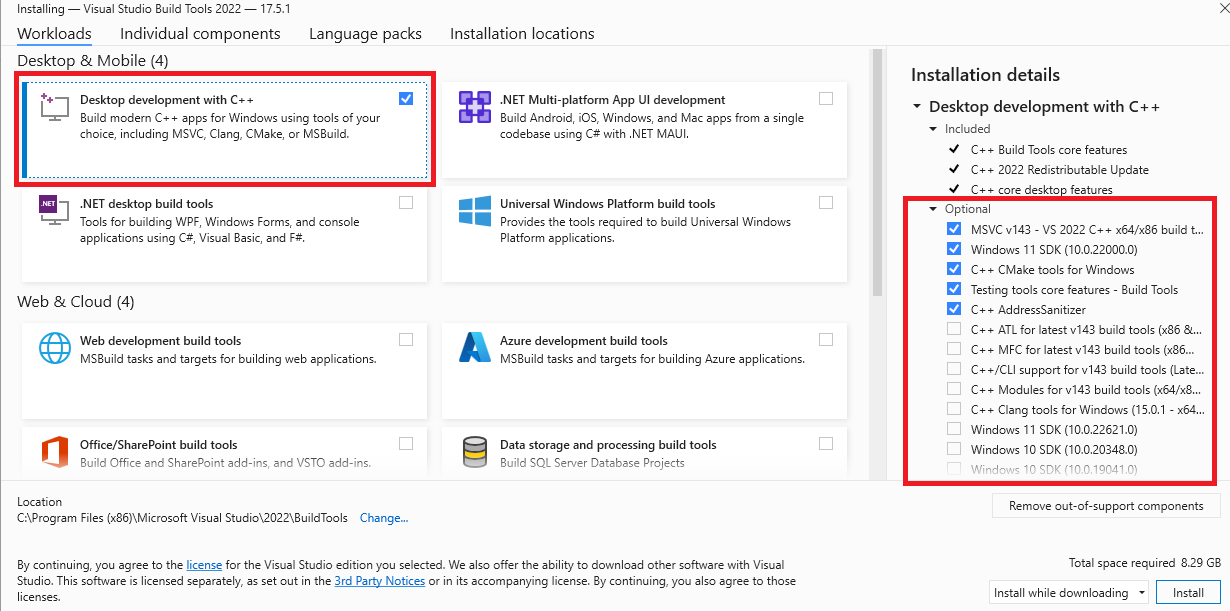
- On the installation screen you must select and install what is indicated in the image, "Desktop development with C++" and the Optional as selected by default.
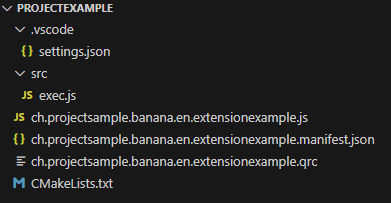
Create a minimum structure of files in your project
The minimum project structure to create the sbaa package file must have the following files:
- <extension_id>.js;
- <extension_id>.manifest.json;
- <extension_id>.qrc;
- /.vscode/settings.json;
- /test
- /testcases
- /testexpected
- /testresult
- <extension_id>.js;
- CMakeLists.txt;
- Readme.md;
- LICENCE.
An example of this structure you find in this repository: Simple project template.
Configuring the files that compiles CMake
extension_id.js
This file contain the main programm of extension. The name of this extension must be unique and follow the next rules:
country.developer.language.nameextension.js
Example:
ch.banana.en.extensionexample.js
To learn more about the contents of the file you can follow this link.
extension_id.manifest.json
The name of this file is the same of file extension_id.
Example name of file extension_id.js: ch.banana.en.extensionexample.js.
Example name of extension_id.manifest.json: ch.banana.en.extensionexample.manifest.json.
If you create a .sbaa file, also include a manifest file. The manifest.json file is a JSON-formatted file, which you can include in the .sbaa file through the .qrc file.
Using manifest.json, you specify basic metadata about your package such as the title, description and version.
The file name must end with the extension 'manifest.json'
The parameter about this file could be:
{
   "category": "productivity",
   "country":"universal",
   "countryCode":"un",
   "description": "Simple extension project",
   "description.en": "Simple extension project",
   "description.it": "Progetto semplice di estensione",
   "description.fr": "Projet d'extension simple",
   "description.de": "Einfaches Erweiterungsprojekt",
   "id": "ch.banana.sample.simpleproject",
   "language":"en",
   "publisher": "Banana.ch",
   "title": "Simple extension project",
   "title.en": "Simple extension project",
   "title.it": "Progetto semplice di estensione",
   "title.fr": "Projet d'extension simple",
   "title.de": "Einfaches Erweiterungsprojekt",
   "version": "1.0"
}
If you have only one language of your extesion, you can write one description and one title (e.g. description.en, title.en).
- Available categories: export, import, invoice, invoice reminder, invoice statement, productivity.
If you don't specify the category ("category": ""), the program will take the category from the first app included in the package. If you don't specify country or language, the app will be shown for any country or language; - All tags are optional.
extension_id.qrc
This file is used to locate the resources used to create the sbaa package. The list of this file contains icons, images used by the extension, manifest.js and others. All files that needed to create the extension of Banana is listed in this code. For more explanation of files Resource Collection Files (QRC) you see this link.
<!DOCTYPE RCC><RCC version="1.0">
<qresource prefix="/">
<file>manifest.json</file>
<file>ch.banana.sample.simpleproject.js</file>
<file>image.png</file>
<file>./src/exec.js</file>
</qresource>
</RCC>
/.vscode/settings.json
In Visual Studio Code, create under the extension's main folder a file named .vscode/settings.json and set the following CMake options:
- BAN_QT_RCC: path to the Qt rcc tool. The rcc Tool is used to compile the extension to a sbaa package.
- BAN_EXE_ PATH: path to the BananaPlus executable. The BananaPlus executable is used to run the tests defined in the project.
You can copy the content from the following example and modify the paths depending on your system and Qt's version you have installed on your system.
Example for Windows:
Replace "user_name" with the appropriate user name.
Example for macOS:
CMakeLists.txt
CMakeLists is a file that contain a series of directives and istruction that describe the source files, libraries about the project. This file is used to configure the process of compilation and generation of files necessary by Visual Studio Code. One important thing is that the file name is exactly CMakeLists.txt otherwise you will not see the "CMake: Select a Kit" command in the toolset of Visual Studio Code which allows the selection of which compiler to use for your CMake project.
The code of file:
cmake_minimum_required(VERSION 3.16)
project(simpleproject)
set(EXTENSION_ID "ch.banana.sample.simpleproject")
# CMake options
# Create a file .vscode/settings.json with the following content to set the options,
# adapt the path to your environment
# {
#     "cmake.configureSettings": {
#         "BAN_QT_RCC": "C:/users/user_name/AppData/Local/Programs/BananaPlusDev/rcc.exe",
#         "BAN_EXE_PATH": "C:/users/user_name/AppData/Local/Programs/BananaPlusDev/BananaPlusDev.exe",
#     }
# }
set(BAN_QT_RCC $ENV{BAN_QT_RCC} CACHE FILEPATH "Path to Qt rcc executable")
set(BAN_EXE_PATH $ENV{BAN_EXE_PATH} CACHE FILEPATH "Path to BananaPlus executable, used to run tests")
# This target is used to build the extension to a sbaa package
add_custom_target(${PROJECT_NAME}
    COMMAND ${BAN_QT_RCC} -o ${EXTENSION_ID}.sbaa --binary ${EXTENSION_ID}.qrc
    WORKING_DIRECTORY ${CMAKE_SOURCE_DIR}
    SOURCES ${EXTENSION_ID}.qrc
)
# This target is used to run the tests of the extension
add_custom_target(test
    COMMAND ${BAN_EXE_PATH} -cmd=runtestsapps -cmd_exit=1 -cmd_p1=${CMAKE_SOURCE_DIR}/${EXTENSION_ID}.sbaa -cmd_op=A
    WORKING_DIRECTORY ${CMAKE_SOURCE_DIR}
)
The parts of configurations in this code:
project(simpleproject) → Rename simpleproject of name of your project.
set(EXTENSION_ID "ch.banana.sample.simpleproject") → Rename "ch.banana.sample.simpleproject" of name of your id project.
set(BAN_QT_RCC $ENV{BAN_QT_RCC} CACHE FILEPATH "Path to Qt rcc executable") → Path example: "C:/users/user_name/AppData/Local/Programs/BananaPlusDev/rcc.exe", which usern_name is yours.
set(BAN_EXE_PATH $ENV{BAN_EXE_PATH} CACHE FILEPATH "Path to BananaPlus executable, used to run tests") → Path example: "C:/users/user_name/AppData/Local/Programs/BananaPlusDev/BananaPlusDev.exe", which usern_name is yours.
Readme.md
This file contain the explanation of the functionalities and the other detail about about your extension. Is the main file that contain the documentation of your extension.
LICENCE
A project's LICENSE file in CMake is a document that specifies the legal terms for using, modifying, and distributing the project's source code and binaries. The LICENSE file should contain the name of the license you choose, a brief description of its terms, and a full copy of the license text.
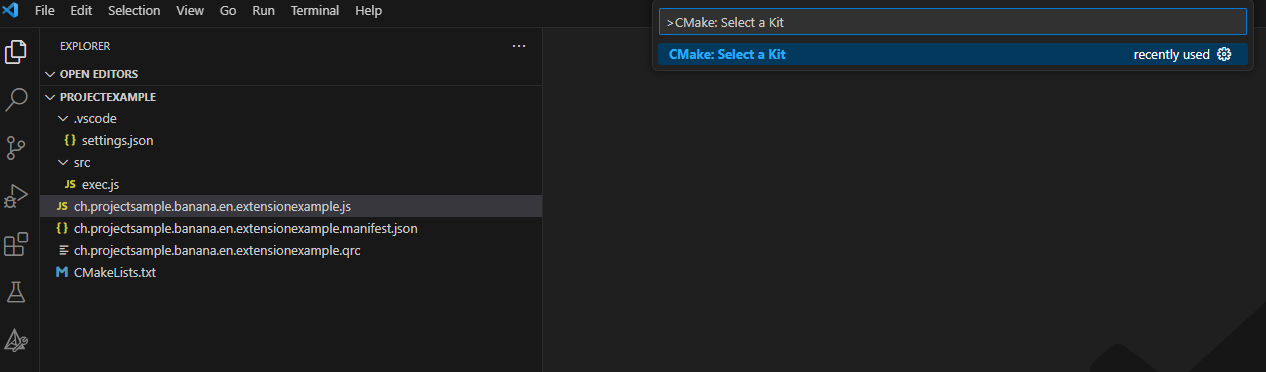
Compiling the project with CMake in Visual Studio Code
This section explain how do you compile your project in Visual Studio Code.
1. Open your folder of the project in Visual Studio Code;
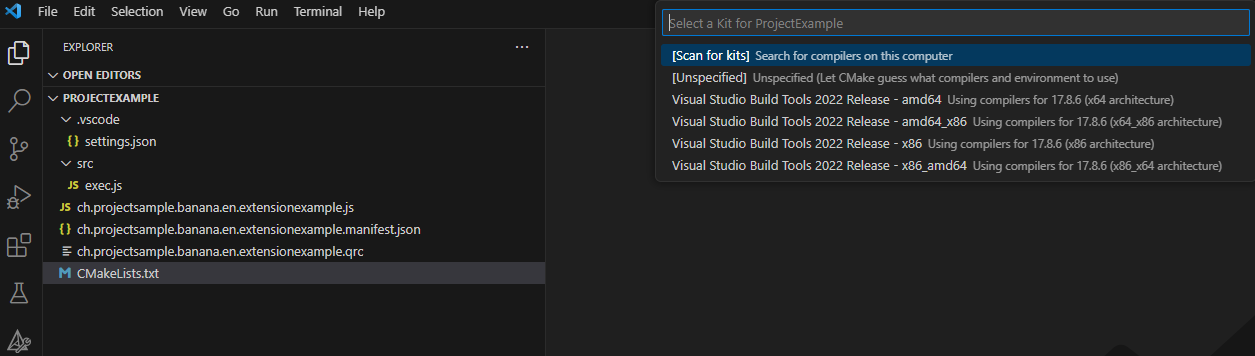
2. Press press Ctrl+Shift+P, enter "CMake: Select a Kit" and press return, select the kit you want to use. Do not select the "[Scan for kits]" or "[Unspecified]".
3. If your configuration is correct, you see the messagge "Configuring done" and "Generating done". You see the path of your file building in the output of terminal of Visual Studio Code;
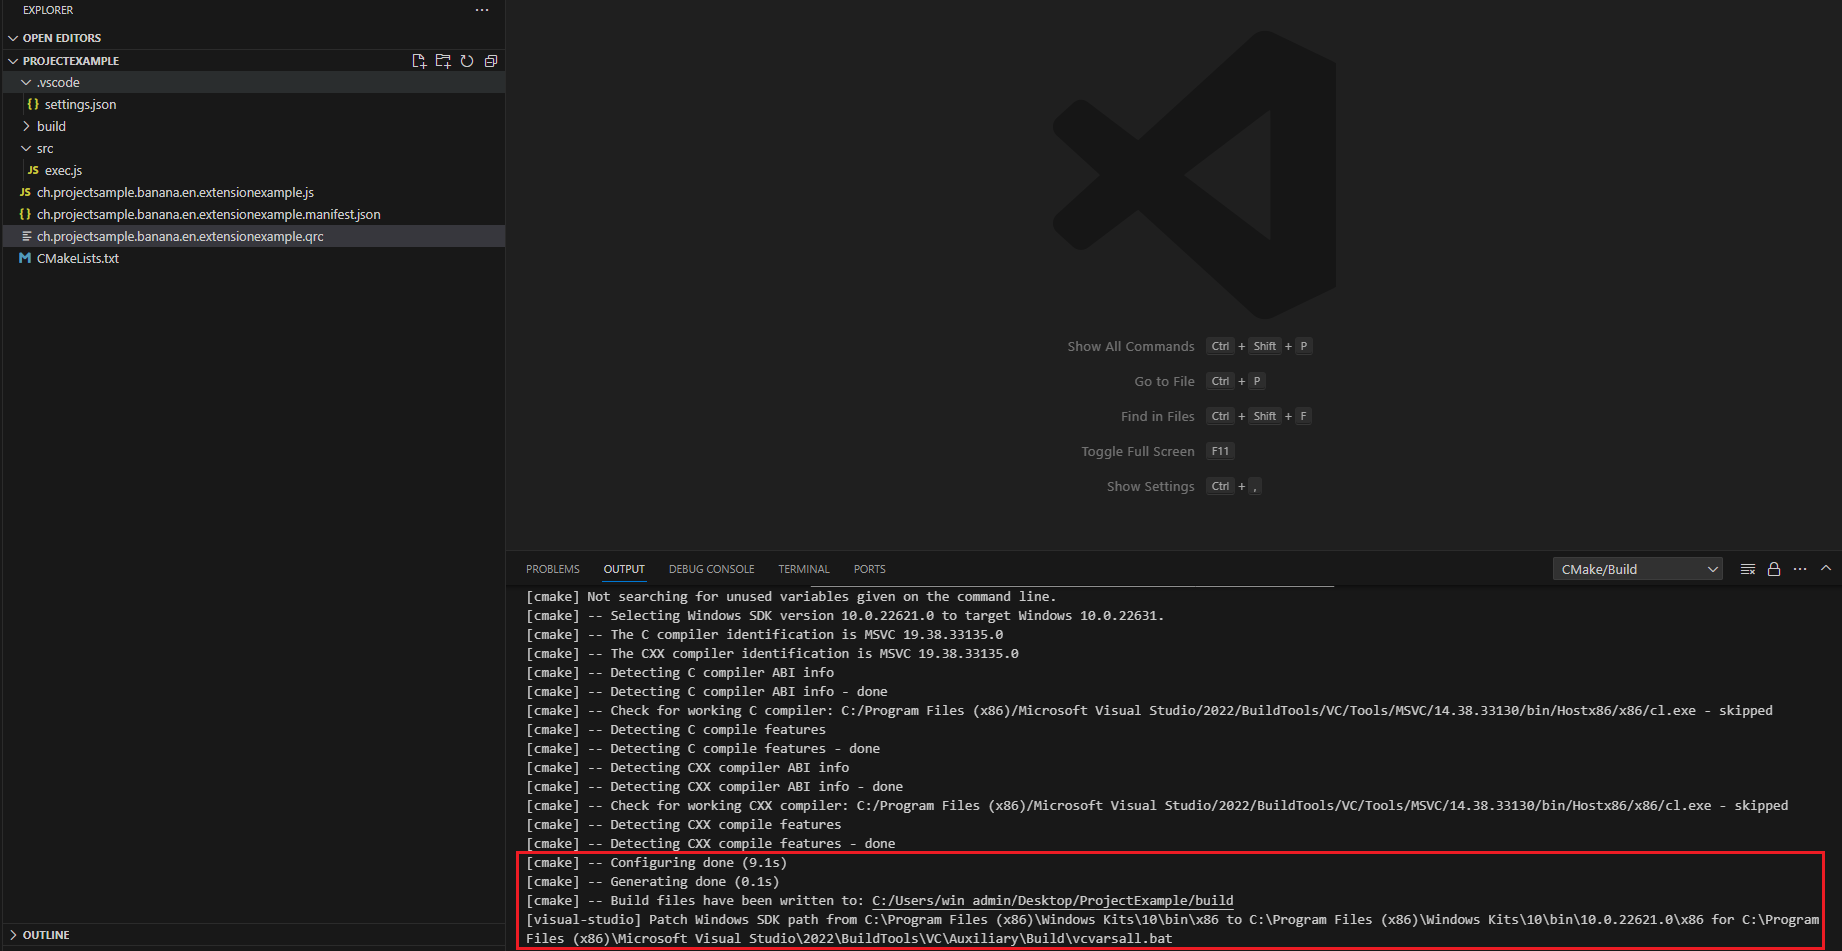
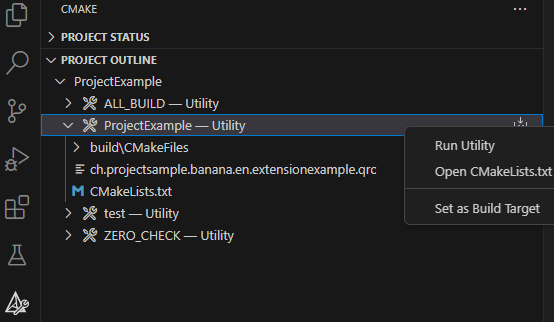
4. If the previous compilation was correct, appears in the Activity bar (on the left) the new icon that need to create building, press this icon and you see the main project.
![]()
5. Right click on the main project and select Run utility