Extensions as packaged file and project
This page gives a brief introduction of what CMake is and its implications with the Banana Plus software, beyond that it is explained how the project must be structured and how the files must be configured.
The chapters are:
- Extension Package Definition file (qrc file).
- Extension distribution package .sbaa.
- The reference of: How to generate the package file.
- The reference of: Installing and running the extension.
- Extension Project structure.
- Multiple extensions in the same package.
- The reference of: Unpack the package file.
Extension Package Definition file (qrc file)
The Definition file is a qrc file with a syntax of the Resource Collection Files (QRC) from the Qt Resource system.
The qrc file is an xml that list the content of the packaged file.
The rcc compiler will then read the qrc and compress and package the content in a sbaa file.
Example: ch.banana.script.report.jaml.qrc
<!DOCTYPE RCC><RCC version="1.0">
<qresource>
     <file>manifest.json</file>
     <file>ch.banana.script.report.jaml.js</file>
     <file>lib/jaml-all.js</file>
</qresource>
</RCC>
Minimum content of the qrc file
The Banana Extension Package should contains:
- A manifest file (see below).
The manifest contains metadata relative to the package, like name, publisher. - A valid javascript extension file.
Other content of qrc file
- Other javascript files (.js) used by the extension.
- Other javascript extension file.
A single package can contains several extensions, also of different type.
The package could contains one or more report extensions, import extensions and a general extensions. - stylesheets files (.css).
- image files (.png, or .jpg).
- qml files
- any other files you need for your extensions.
Alias keyword
If you want to name the manifest file in another way you can use the alias keyword, so that the program will find a manifest.json file.
The alias is necessary when you create multiple packages and the files are in the same folder, so you need to have different manifest.json.
<!DOCTYPE RCC><RCC version="1.0">
<qresource>
    <file alias="manifest.json">ch.banana.script.report.vat-ch.manifest.json</file>
    <file>ch.banana.script.report.vat-ch.js</file>
</qresource>
</RCC>
Extension distribution package .sbaa
In order to distribute the extension you need to compile the qrc extension file to a .sbaa file.
- To compile the qrc file the rcc utility is used.
- The rcc compiler is a utility provided within by the QT framework.
Banana Accounting include a copy of the rcc compiler. - The .sbaa file will contains all the files specified in the qrc, in a compressed form.
Installing the extension package:
- The .sbaa Extension needs to be installed through the Manage Extensions command.
- Once the Extension is installed, it appears in the menu Extensions.
- The Extension can be run from the menu Extensions.
How to generate the package file
When you generate a package .sbaa you can :
Installing and running the extension
Prior to run the extension you need to install it.
See: Installation & Execute Extensions
Manifest file
If you create a .sbaa file, also include a manifest file. The manifest.json file is a JSON-formatted file, which you can include in the .sbaa file through the .qrc file.
Using manifest.json, you specify basic metadata about your package such as the title, description and version.
The file name must end with the extension 'manifest.json'
Example: ch.banana.script.report.vat-ch.manifest.json
{
    "category": "import",
    "country":"switzerland",
    "countryCode":"ch",
    "description": "Postfinance Schweiz (Bewegungen importieren): ISO20022 und CSV Format",
    "description.en": "Swiss Postfinance (Import transactions): ISO20022 and CSV File Format",
    "language":"de",
    "publisher": "Banana.ch",
    "title": "Postfinance Schweiz (Bewegungen importieren)",
    "title.en": "Swiss Postfinance (Import transactions)",
    "version": "1.0"
}
Options for the files.
- All tags are optional.
- Categories
- Valid categories are:
export, import, invoice, invoice reminder, invoice statement, productivity. - The category is used to displayed information on the Manage extension Dialog.
You need to choose a categorization type even if the package contains multiple extensions of different type.
In case of doubt use productivity. - If you don't specify the category ("category": ""), the program will take the category from the first app included in the package.
- Valid categories are:
- description
- title
Is used in the Menu Extensions to run the extensions.- If you have multiple extensions it becomes the title of the submenu that will contains all other extensions.
- The extensions will be listed in alphabetic order.
If you want a specific order precede the description of the extension with a number.
- Country
- If you don't specify country or language, the app will be shown for any country or language;
- Language
You can specify more than one language. - Translations
You can add translation by using the "description" followed by a dot and the language code.
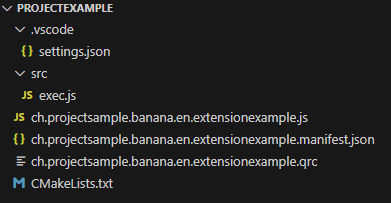
Extension Project structure
We advise to create a separate folder for each extension that you create. The folder will contains all the file needed by the project:
- The qrc file.
- The manifest file.
- The file necessary to build a package.
- CMakeLists.txt if you build the package with the CMake.
- Other files needed for the development
- File needed for Tests
- The level of repository test is the same of the level of extesion_id.js
- Other file needed for the documentation purpose.
Folder structure
Create this folder structure, and add source files, images or folder as needed.
We recommend to use as a file name the same as the extension's id. The extension's id is the unique identification of the script and is specified within the extension's attributes, and it is important that you avoid having duplicates.
Therefore replace <extension_id> with the desired extension's id.
You can start by using a Simple project template.
Or you can create the folder structure manually.
  CMakeList.txt                              CMake project file
  <extension_id>.js                          Extension's code
  <extension_id>.manifest.json               Metadata such title, description and version
  <extension_id>.qrc                         List of files included in the package
  <extension_id>.sbaa                        Builded package (created after the building project)
  changelog.md                               Change history
  /test                                      Test code
     /testcases                                 Test data (ac2 files, csv files, ...)
     /testexpected                              Expected test results
     /testresults                               Results of last runned test
     <extension_id>.test.js                     Test code
  LICENCE                                    Extension licence
  README.md                                  Repository main documentation page
Multiple extensions of the same project
When you have multiple extension and you want create a single package that content all your extension, you can structure as example below.
CMakeLists.txt                              CMake project file
/Extension1                                 Repository Extension 1
    extension_id_1.js                             Extension's code
    extension_id_1.manifest.json                  Metadata such title, description
/Extension2                                 Repository Extension 2
    extension_id_2.js                             Extension's code
    extension_id_2.manifest.json                  Metadata such title, description
extension_id.qrc                            List of files included in the package
extension_id.sbaa                           Builded package (created after the building project)
changelog.md                                Change history
/test                                       Test code
    /testcases                                     Test data (ac2 files, csv files,...)
    /testexpected                                  Expected test results
    /testresults                                   Results of last runned test
    extension_id_1.test.js                         Test code of Extension 1
    extension_id_2.test.js                         Test code of Extension 2
LICENCE                                     Extension licence
README.md                                   Repository main documentation page
Be careful that the repository test level is the same as the Extensions repositories, because if you don't define it in the same level you have problems running tests on the single extension. In the repository test you can create your test code of the specific extension.
The file .qrc must contain all the path file of extension's, for example:
<!DOCTYPE RCC><RCC version="1.0">
   <qresource prefix="/">
      <file>./Extension1/<extension_id_1>.js</file>
      <file>./Extension1/<extension_id_1>.manifest.json</file>
      <file>./Extension2/<extension_id_2>.js</file>
      <file>./Extension2/<extension_id_2>.manifest.json</file>
   </qresource>
 </RCC>
You need to rename the <extension_id>.js parameter to the name of the extension id.
You can use alias in this context for the purpose of including files without writing the relative path of the file.
An example:
QRC File:
<!DOCTYPE RCC><RCC version="1.0">
   <qresource prefix="/">
      <file alias="extension1">./Extension1/<extension_id_1>.js</file>
      <file alias="extension2">./Extension2/<extension_id_2>.js</file>
  </qresource>
 </RCC>
Now for including the function and properties of the extension1, you write in the file of the project (extension_id_2.js):
//@includejs = extension1;Before this configuration in the QRC file you use the relative path:
//includejs = ./Extension2/<extension_id_2>.jsLICENSE
A project's LICENSE file in CMake is a document that specifies the legal terms for using, modifying, and distributing the project's source code and binaries. The LICENSE file should contain the name of the license you choose, a brief description of its terms, and a full copy of the license text.
Readme.md
This file contain the explanation of the functionalities and the other detail about about your extension. Is the main file that contain the documentation of your extension.
Multiple extensions in the same package
The package file can contains multiple extensions. An extension is a Javascript file that has the extension attribute with the extension Id.
Depending on the extension @type and @visibility option the extension will be than available on the Extension's menu or in the specific dialog (for example import, invoice printing, etc.).
Unpack the package file
A project's that will unpack the package.
Create extension Package with Banana Accounting
Packaged extensions are QT resource files that are generated with the QT rcc command.
- The rcc utility is distribute with Banana Accounting.
- When you drag a .qrc file in Banana Accounting Windows the program will automatically call the rcc utility and compile the package and generate a .sbaa file.
Create a package extension file
For more information see Packaged extensions.
- Create a javascript extension file.
- Create a manifest.json file with the information regarding the extensions.
- Create a .qrc file with the list of the files to be included in the packages.
- Open Banana Accounting
- Drag the .qrc file in Banana Accounting to create a package:
- It will ask you if you want to compile the file.
- Banana Accounting is distributed with a rcc command, and the rcc wil be used to generate the a .sbaa file.
Once you have created the .sbaa file you can install the package.
Qrc file file can also be compiled directly with the QT command. We currently use cmake to automate the process of creating a packaged extensi
- You can use the free QT Creator application to develop and package Banana Accounting extensions.
- You can use the free Visual Studio Code application to develop and package Banana Accounting extensions.
Banana Extension Package with CMake
The CMake is a utility that allows to build the Extension package.
- It automatically call the rcc compiler and compile the .qrc description file and create an .sbaa file.
Introduction of CMake
CMake is a cross-platform build system that allows you to generate, configure and manage the compilation process of software written in various languages, such as C, C++ and others. CMake uses text files called CMakeLists.txt that contain the commands and instructions to define the project, its dependencies, its options and its build rules. CMake can produce native build files for different platforms, such as Visual Studio, Xcode and others. CMake is used by many open source and commercial projects.
CMake is a powerful and flexible build system that offers many advantages, such as:
- Portability: CMake can work on different operating systems, such as Windows, Linux, MacOS, and others;
- Modularity: CMake allows you to organize the project into subprojects, libraries, modules and packages;
- Configurability: CMake allows you to customize the project with variables, options, cache and scripts;
- Automatic generation: CMake can automatically generate the build files, the configuration files, the test files and the installation files, using the configure file, enable testing, add test and install commands.
CMake project file
A CMakeLists.txt project file is needed to extract all strings marked for translation from .js and .qml files and build the .sbaa extension's package.
The rcc compiler, needed to compile the qrc, is distributed with the Banana Accounting file. So you already have all the tools needed to build the qrc.
See also Build the package with Banana Accounting.
Below is a template of a project file for translating an extension, you can copy it and modify it:
- copy the example and save it as CMakeLists.txt in your project folder;
- add source files as needed to the main target by modifying the qrc file.
cmake_minimum_required(VERSION 3.16)
project(simpleproject)
set(EXTENSION_ID "ch.banana.sample.simpleproject")
# CMake options
# Create a file .vscode/settings.json with the following content to set the options,
# adapt the path to your environment
# {
#     "cmake.configureSettings": {
#         "BAN_QT_RCC": "C:/users/user_name/AppData/Local/Programs/BananaPlusDev/rcc.exe",
#         "BAN_EXE_PATH": "C:/users/user_name/AppData/Local/Programs/BananaPlusDev/BananaPlusDev.exe",
#     }
# }
set(BAN_QT_RCC $ENV{BAN_QT_RCC} CACHE FILEPATH "Path to Qt rcc executable")
set(BAN_EXE_PATH $ENV{BAN_EXE_PATH} CACHE FILEPATH "Path to BananaPlus executable, used to run tests")
# This target is used to build the extension to a sbaa package
add_custom_target(${PROJECT_NAME}
    COMMAND ${BAN_QT_RCC} -o ${EXTENSION_ID}.sbaa --binary ${EXTENSION_ID}.qrc
    WORKING_DIRECTORY ${CMAKE_SOURCE_DIR}
    SOURCES ${EXTENSION_ID}.qrc
)
# This target is used to run the tests of the extension
add_custom_target(test
    COMMAND ${BAN_EXE_PATH} -cmd=runtestsapps -cmd_exit=1 -cmd_p1=${CMAKE_SOURCE_DIR}/${EXTENSION_ID}.sbaa -cmd_op=A
    WORKING_DIRECTORY ${CMAKE_SOURCE_DIR}
)
Parts to configure
- project(simpleproject)
Rename simpleproject of name of your project. - set(EXTENSION_ID "ch.banana.sample.simpleproject")
Rename "ch.banana.sample.simpleproject" of name of your extension id. The name of extension id is the same name of .qrc file.
Environment Variables
In order to build cmake need the following variables.
- BAN_QT_RCC
path to the Qt rcc tool. The rcc Tool is used to compile the extension to a sbaa package.
The rcc tool is distributed also with Banana Accounting. - BAN_EXE_PATH
path to the BananaPlus executable. The BananaPlus executable is used to run the tests defined in the project.
But you can also enter the path directly in the cmake file
- set(BAN_QT_RCC $ENV{BAN_QT_RCC} CACHE FILEPATH "Path to Qt rcc executable")
C:/users/user_name/AppData/Local/Programs/BananaPlusDev/rcc.exe", rename usern_name with yours. set(BAN_EXE_PATH $ENV{BAN_EXE_PATH} CACHE FILEPATH "Path to BananaPlus executable, used to run tests")
Path example: "C:/users/user_name/AppData/Local/Programs/BananaPlusDev/BananaPlusDev.exe", rename usern_name with yours.
For VS Code you can set the environment variables in the file .vscode/settings.json :
{
   "cmake.configureSettings": {
       "BAN_QT_RCC": "C:\Programms\BananaPlusDev\rcc.exe",
       "BAN_EXE_PATH": "C:\Programms\BananaPlusDev\BananaPlusDev.exe",
   }
}
Cmake Project File With Translations
A CMakeLists.txt project file is needed to extract all strings marked for translation from .js and .qml files and build the .sbaa extension's package.
You also need the QT utilities Lupdate and Lrelease that not included in Banana Accounting. You need to download and install the free QT Creator from https://www.qt.io.
Below is a template of a project file for translating an extension, you can copy it and modify it:
- copy the example and save it as CMakeLists.txt in your project folder;
- rename the project name translations_project to your desired name;
- rename the extension id ch.banana.translations to your desired id;
- add the desired languages under the variable translations_files;
- add source files as needed to the main target;
cmake_minimum_required(VERSION 3.16)
project(translations_project)                      # <!-- CHANGE THE PROJECT'S NAME
set(EXTENSION_ID "ch.banana.translations")         # <!-- CHANGE THE EXTENSION'S ID
# CMake options
# For VS Code create a file .vscode/settings.json with the following content to set the options,
# adapt the path to your environment
# {
#     "cmake.configureSettings": {
#         "BAN_QT_RCC": "C:\users\user_name\AppData\Local\Programs\BananaPlusDev\rcc.exe",
#         "BAN_EXE_PATH": "C:\users\user_name\AppData\Local\Programs\BananaPlusDev\BananaPlusDev.exe",
#         "BAN_QT_LUPDATE": "C:\Qt\6.5.2\macos\bin\lupdate",
#         "BAN_QT_LRELEASE": "C:\Qt\6.5.2\macos\bin\lrelease"
#     }
# }
set(BAN_QT_RCC $ENV{BAN_QT_RCC} CACHE FILEPATH "Path to Qt rcc executable")
set(BAN_EXE_PATH $ENV{BAN_EXE_PATH} CACHE FILEPATH "Path to BananaPlus executable, used to run tests")
set(BAN_QT_LUPDATE $ENV{BAN_QT_LUPDATE} CACHE FILEPATH "Path to Qt lupdate executable")
set(BAN_QT_LRELEASE $ENV{BAN_QT_LRELEASE} CACHE FILEPATH "Path to Qt lrelease executable")
# This target is used to build the extension to a sbaa package
add_custom_target(translations_project ALL         # <!-- CHANGE THE PROJECT'S NAME
   COMMAND ${BAN_QT_RCC} -o ${EXTENSION_ID}.sbaa --binary ${EXTENSION_ID}.qrc
   WORKING_DIRECTORY ${CMAKE_SOURCE_DIR}
   SOURCES ${EXTENSION_ID}.qrc
)
add_dependencies(${PROJECT_NAME} lrelease) #build .qm files when building the sbaa package
# The variable translations_files contains the list of translations files
set(translations_files
   translations/translations_de.ts
   translations/translations_it.ts
   translations/translations_fr.ts
   #translations/translations_xx.ts               # <!-- ADD LANGUAGES AS NEEDED
)
# The target lupdate is used to update *.ts translations files
set(lupdate_commands)
foreach(tr_file ${translations_files})
 list(APPEND lupdate_commands
   COMMAND ${BAN_QT_LUPDATE} ${EXTENSION_ID}.qrc -ts ${tr_file})
endforeach()
add_custom_target(lupdate
   ${lupdate_commands}
   WORKING_DIRECTORY ${CMAKE_SOURCE_DIR}
)
# The target lrelease is used to compile *.ts files to *.qm files
set(lrelease_commands)
set(lrelease_files)
string(REPLACE ".ts" "" lrelease_files "${translations_files}") #remove file extension
foreach(tr_file ${lrelease_files})
 list(APPEND lrelease_commands
     COMMAND ${BAN_QT_LRELEASE} ${tr_file}.ts -qm ${tr_file}.qm)
endforeach()
add_custom_target(lrelease
   ${lrelease_commands}
   WORKING_DIRECTORY ${CMAKE_SOURCE_DIR}
)
Supplementary Environment Variables for Translation
In order to build cmake need the following variables.
- BAN_QT_LUPDATE
path to the Qt lupdate tool. The lupdate tool is used to update the translations, it will search for text to translate in the code and update the content of *.ts files. If you don't have translations, this options is not necessary. - BAN_QT_RELEASE
path to the Qt lrealease tool. The lrelease tool is used to compile the translations, the compiled translation are integrated in the package.If you don't have translations, this options is not necessary.
{
   "cmake.configureSettings": {
       "BAN_QT_RCC": "C:\Programms\BananaPlusDev\rcc.exe",
       "BAN_EXE_PATH": "C:\Programms\BananaPlusDev\BananaPlusDev.exe",
       "BAN_QT_LUPDATE": "C:\Qt\6.5.2\macos\bin\lupdate",
       "BAN_QT_LRELEASE": "C:\Qt\6.5.2\macos\bin\lrelease"
   }
}
Add translations to resource file
Add the *.qm files to the resource *.qrc file.
<!DOCTYPE RCC><RCC version="1.0">
<qresource prefix="/">
<file>manifest.json</file>
<file>translations/translations_de.qm</file>
<file>translations/translations_fr.qm</file>
<file>translations/translations_it.qm</file>
</qresource>
</RCC>
Using translation's files in the extension
Translations are automatically loaded by the application.
Translations are provided as *.qm binary files located in the extension's subfolder /translations.
sample_extention.js          // extension
translations/
   translations_de.qm.       // translation's files
   translations_it_CH.qm
   translations_it.qm
   ...
Translations files have the following naming convention:
translations_lang[_country].qm
Before the execution of the extension the application loads the translation corresponding to the application's language and country. For example if the application has the locale fr_FR the application looks for the following files, the first file found is taken.
translations_fr_FR.qm translations_fr.qm
Cmake Project File With Translations
Translate strings
- Create a folder /translations in your repository;
- Open the CMakeLists.txt project file with QtCreator;
- Build in QtCreator the target lupdate (figure 1);
- Open the generated translations/*.ts files with QtLinguist and enter the translations (figure 2)
Keep the generated translations/*.ts files in the repository, as they are needed for updating the translations after one or more strings are changed or modified in the code.

Add translations to resource file
Add the *.qm files to the resource *.qrc file.
<!DOCTYPE RCC><RCC version="1.0">
<qresource prefix="/">
<file>manifest.json</file>
<file>translations/translations_de.qm</file>
<file>translations/translations_fr.qm</file>
<file>translations/translations_it.qm</file>
</qresource>
</RCC>
Build and deploy
- Build the extension;
- The translations files *.qm are automatically released and included in the package;
- Copy the generated *.sbaa file to the destination folder;
- Add the extension in Banana AccountingPlus (see installing an'extension);
- Test it;

Implementation details
Loading of translation's files
Translations are automatically loaded by the application.
Translations are provided as *.qm binary files located in the extension's subfolder /translations.
sample_extention.js          // extension
translations/
   translations_de.qm.       // translation's files
   translations_it_CH.qm
   translations_it.qm
   ...
Translations files have the following naming convention:
translations_lang[_country].qm
Before the execution of the extension the application loads the translation corresponding to the application's language and country. For example if the application has the locale fr_FR the application looks for the following files, the first file found is taken.
translations_fr_FR.qm translations_fr.qm
Build extensions with VS Code and CMake without translation
This document describe how to set up the development environment and build a BananaPlus Extension in packaged format with Visual Studio Code and CMake. Visual Studio Code and CMake are the recommended tools to develop extensions for Banana Plus.
After reading this document you will be able to:
- Setup your development environment
- Create a CMake project
- Build and create the packaged extension
- Run tests
- Deploy the extension
You find a working example with the code on this page on our GitHub Repository at: Simple project template.
Set up development environment
To build the extension and run tests we need the following applications:
- Visual Studio Code;
- CMake;
- CMake Extensions for Visual Studio Code;
- Compiler toolset.
Install Visual Studio Code
Download and install Visual Studio Code from https://code.visualstudio.com.
Install CMake
Download and install CMake from https://cmake.org. Verify that the installed version is in your PATH, if not open CMake go to Menu Tools -> "How to install CMake for command line use" and follow the instructions.
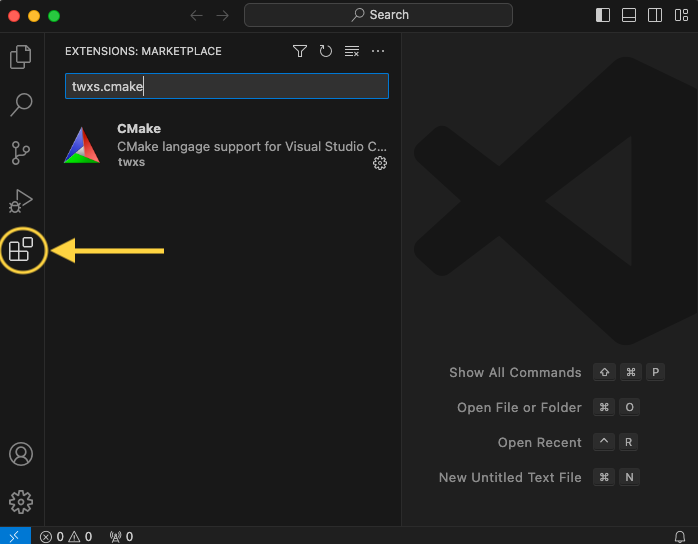
Install VS Code extensions for CMake
Click on the Extensions button and install the following extensions:
- twxs.cmake
CMake language support for Visual Studio Code (twsx). This is used for syntax highligh. - ms-vscode.cmake-tools
CMake Tools (microsoft). This is used for enabling the cmake pane, where you can build the targets.
Install compiler toolset
If you have already a compiler on your machine you can skip this step.
For Windows
You can see how to configure in this link: Configure VS Code for Microsoft C++.
The steps are:
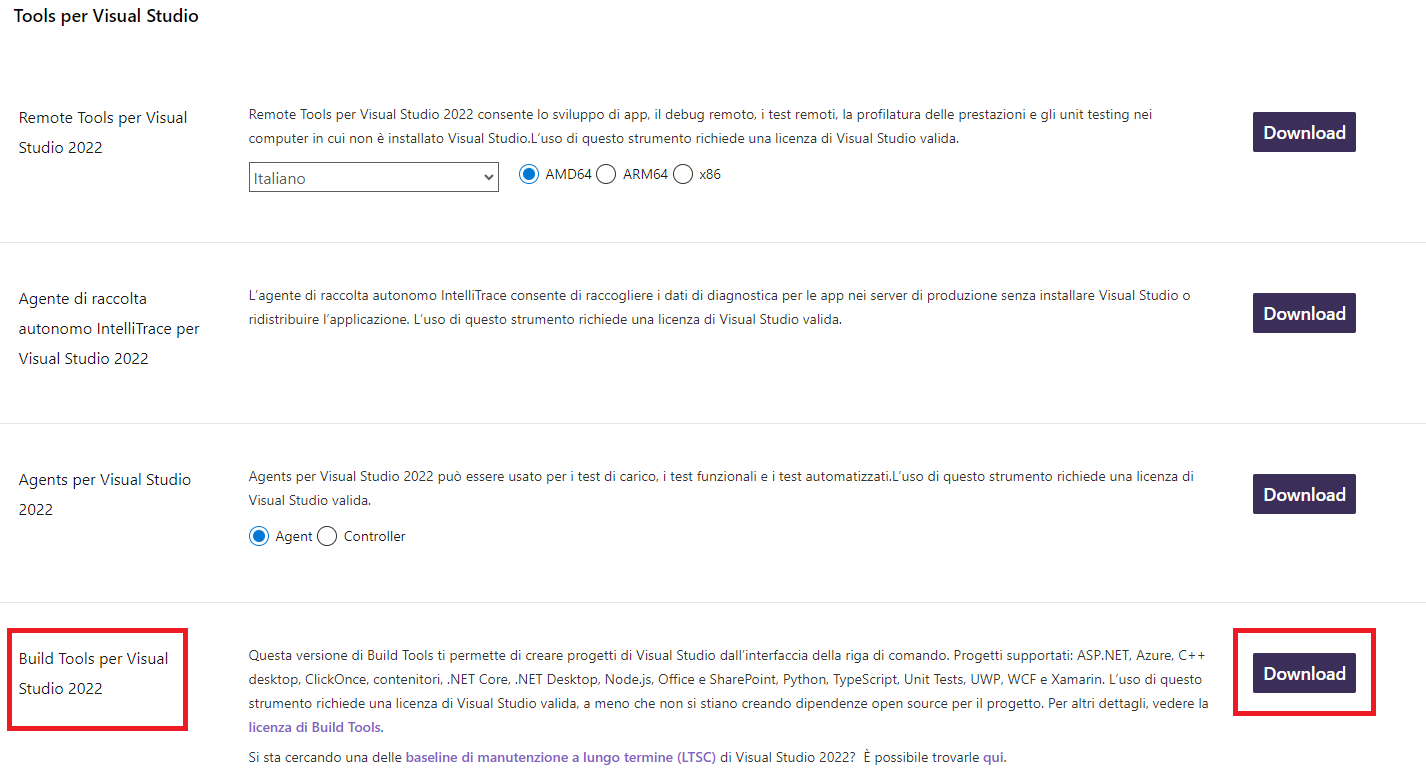
- Go to website: https://visualstudio.microsoft.com/it/downloads/
At the bottom of the website, you need to download and install the Tools per Visual Studio: "Build Tools per Visual Studio 2022" as indicated in the image below.
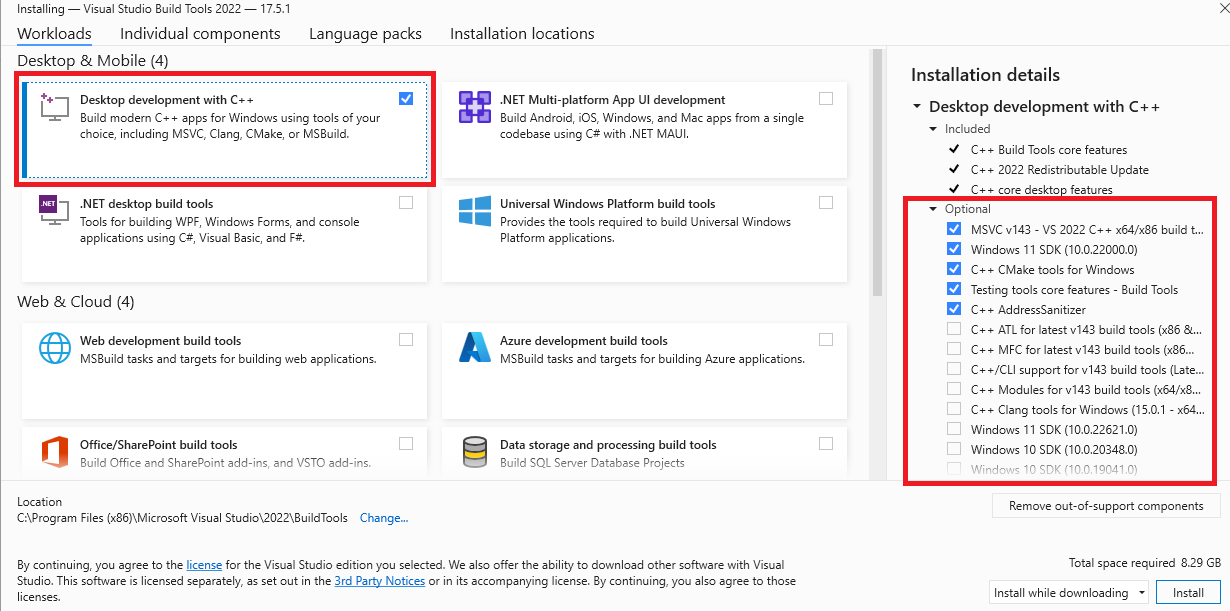
- On the installation screen you must select and install what is indicated in the image, "Desktop development with C++" and the Optional as selected by default.
For macOS
Install XCode from Apple Store.
For linux
Install a gcc or clang compiler.
Set paths to Qt tools and Banana Plus
In Visual Studio Code, create under the extension's main folder a file named .vscode/settings.json and set the following CMake options:
- BAN_QT_RCC: path to the Qt rcc tool. The rcc Tool is used to compile the extension to a sbaa package.
- BAN_EXE_ PATH: path to the BananaPlus executable. The BananaPlus executable is used to run the tests defined in the project.
You can copy the content from the following example and modify the paths depending on your system and Qt's version you have installed on your system.
Example for Windows:
{
     "cmake.configureSettings": {
         "BAN_QT_RCC": "C:/users/user_name/AppData/Local/Programs/BananaPlusDev/rcc.exe",
         "BAN_EXE_PATH": "C:/users/user_name/AppData/Local/Programs/BananaPlusDev/BananaPlusDev.exe",
     }
}
Replace "user_name" with the appropriate user name.
Example for macOS:
{
    "cmake.configureSettings": {
        "BAN_QT_RCC": "/Applications/BananaPlusDev.app/Contents/MacOS/rcc",
        "BAN_EXE_PATH": "/Applications/BananaPlusDev.app/Contents/MacOS/BananaPlusDev"
    }
}
Folder structure of CMake project file and configuring the files that compiles CMake
For creation the folder structure and the configuration of individual project files there is the following page that explains the topics Extension Package page.
Build the extension
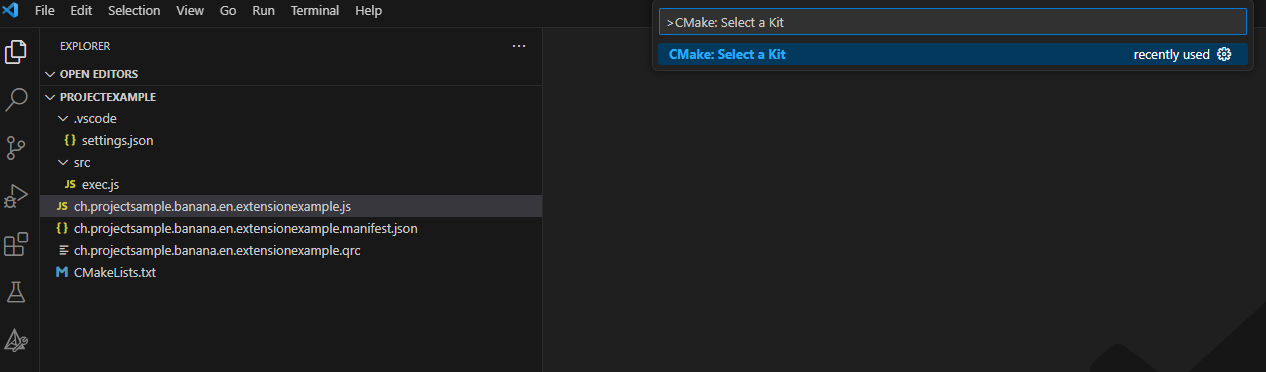
1. Open your folder of the project in Visual Studio Code;
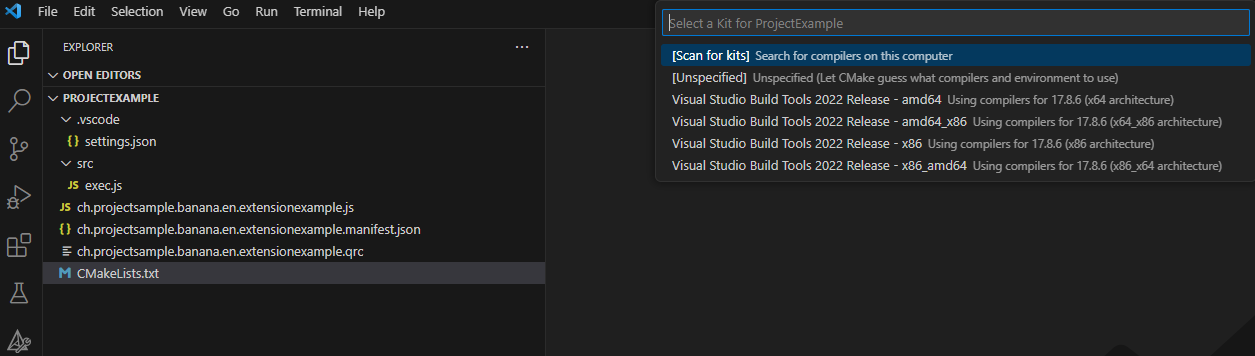
2. Press press Ctrl+Shift+P, enter "CMake: Select a Kit" and press return, select the kit you want to use. Do not select the "[Scan for kits]" or "[Unspecified]";
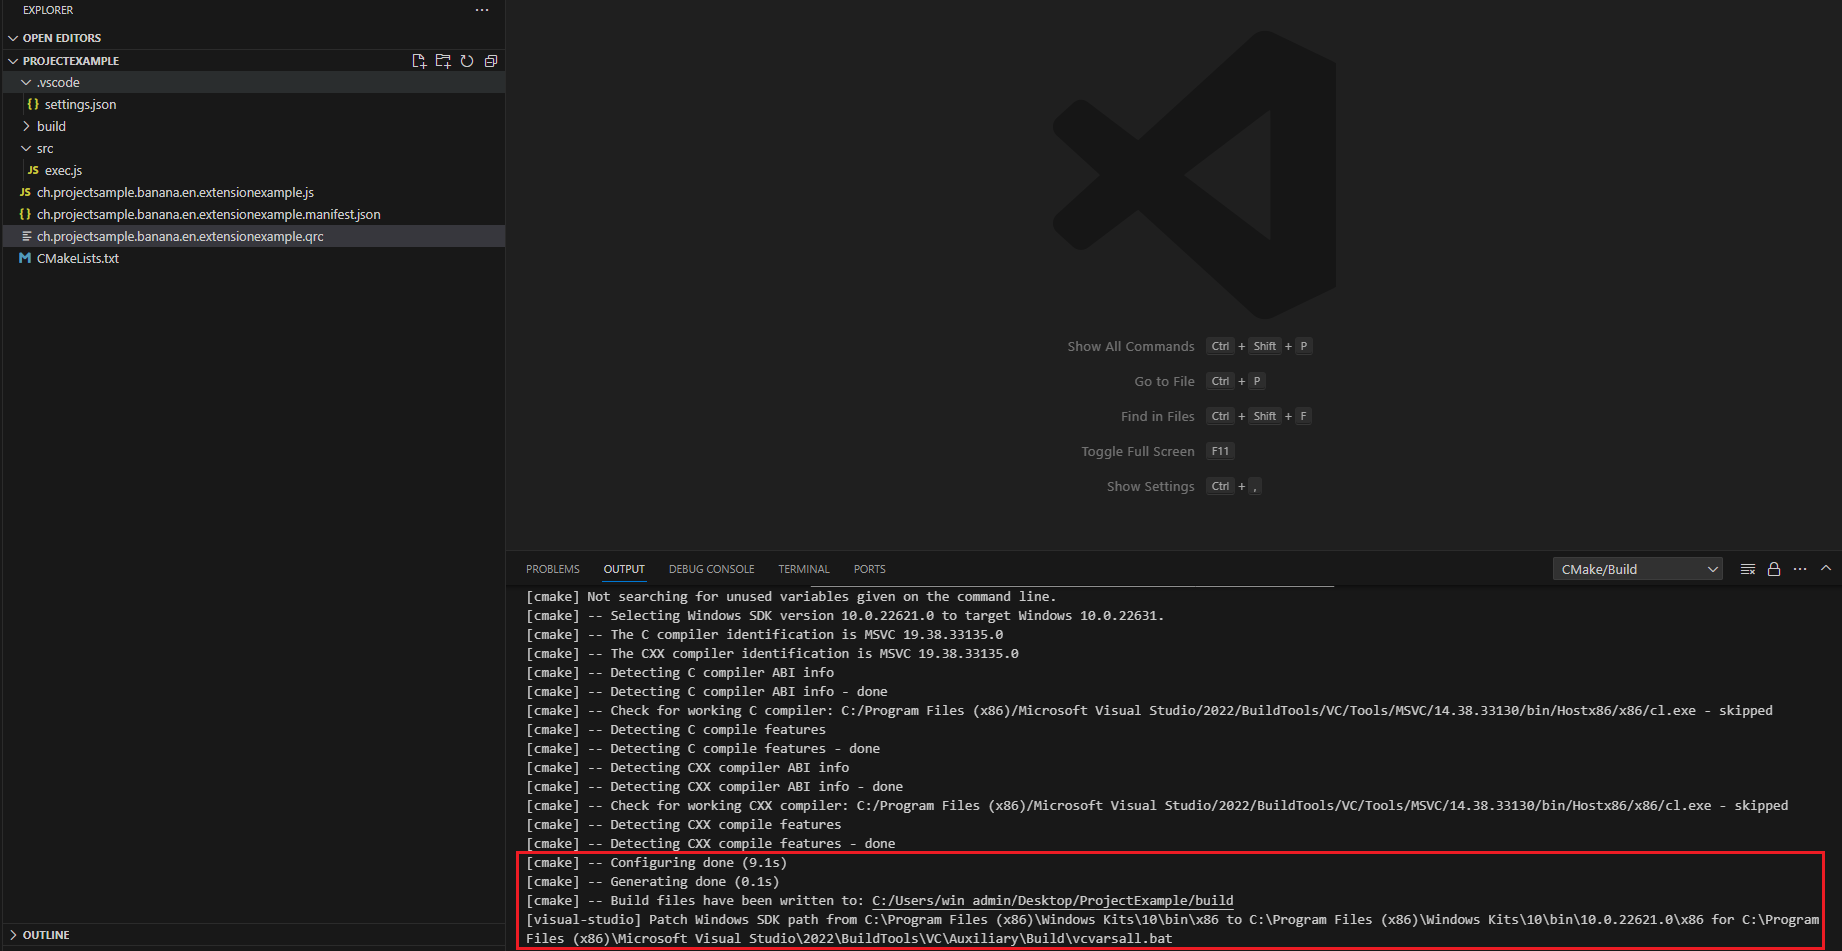
3. If your configuration is correct, you see the messagge "Configuring done" and "Generating done". You see the path of your file building in the output of terminal of Visual Studio Code;
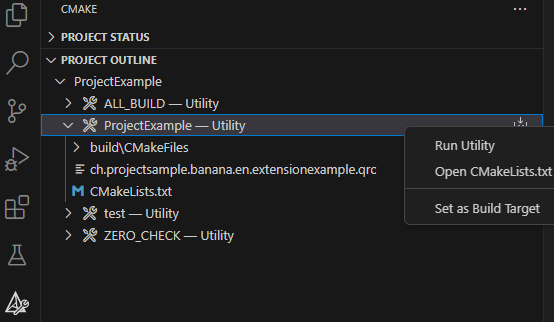
4. If the previous compilation was correct, appears in the Activity bar (on the left) the new icon that need to create building, press this icon and you see the main project;
![]()
5. Right click on the main project and select Run utility.
Possible solutions for "CMake: Select a Kit" command not available in Visual Studio Code
For Windows operating system:
- Check in the manifest file and QRC file that have listed all files necessary to create the extension's;
- Check that the CMake file name matches "CMakeLists.txt" in your project (the file name must be exactly as mentioned). If it's not the same, even with all the toolsets and extensions installed, Visual Studio Code won't recognize the command;
Correct icon:
![]()
Wrong icon (because the file name is wrong):
![]()
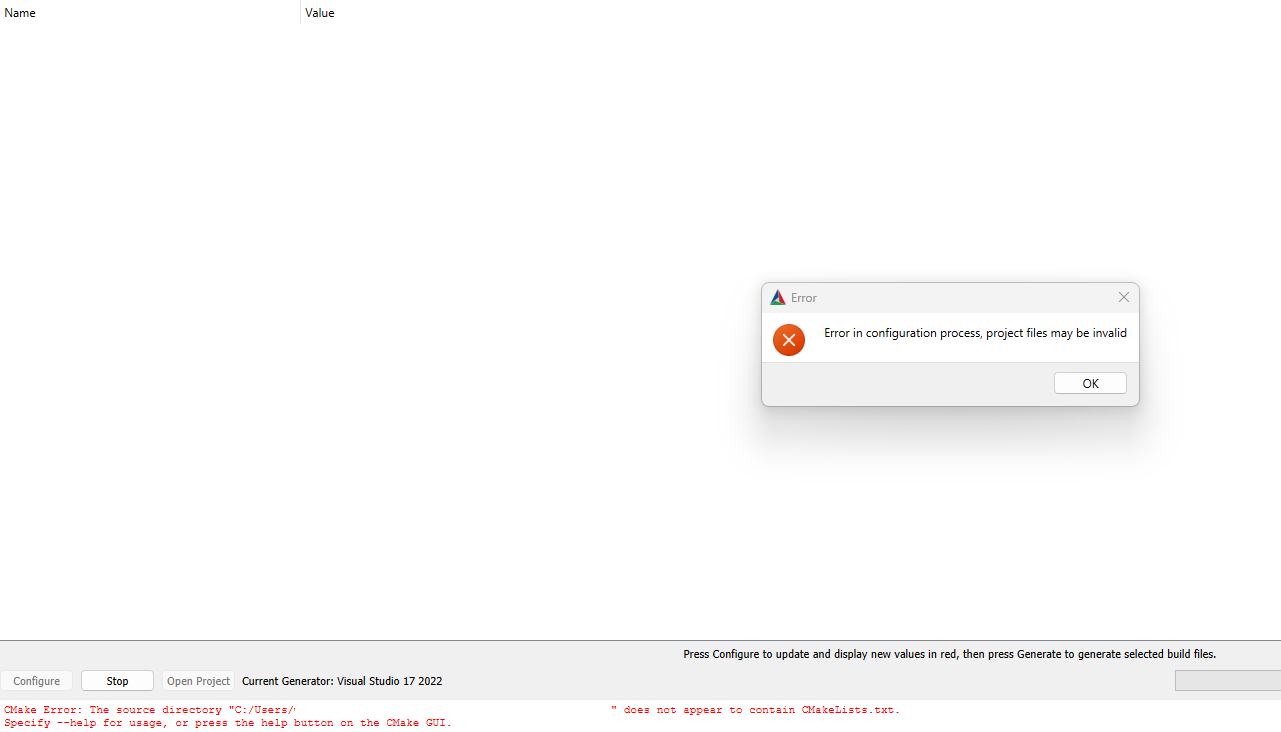
- If the issue persists and is hard to identify, you can try using the "CMake (CMake-gui)" program. Build binaries by selecting the source code folder, choosing the build location, clicking "Generate," specifying the Visual Studio version for the project, using default conditions, and clicking "Finish". If the operation fails, error messages will provide clues. If successful, the program will display the message "Generating done."
- Configure the paths of source code and build location and click generate:
![]()
2. Specifying the Visual Studio version for the project (use default conditions):
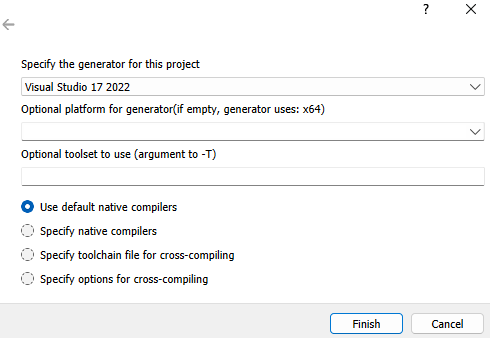
3. Verify the results of operations:
Successful operation:

Operation with errors:
Run the tests
- Select CMake from the Activity bar (on the left)
- Right click on the test project and select Run utility
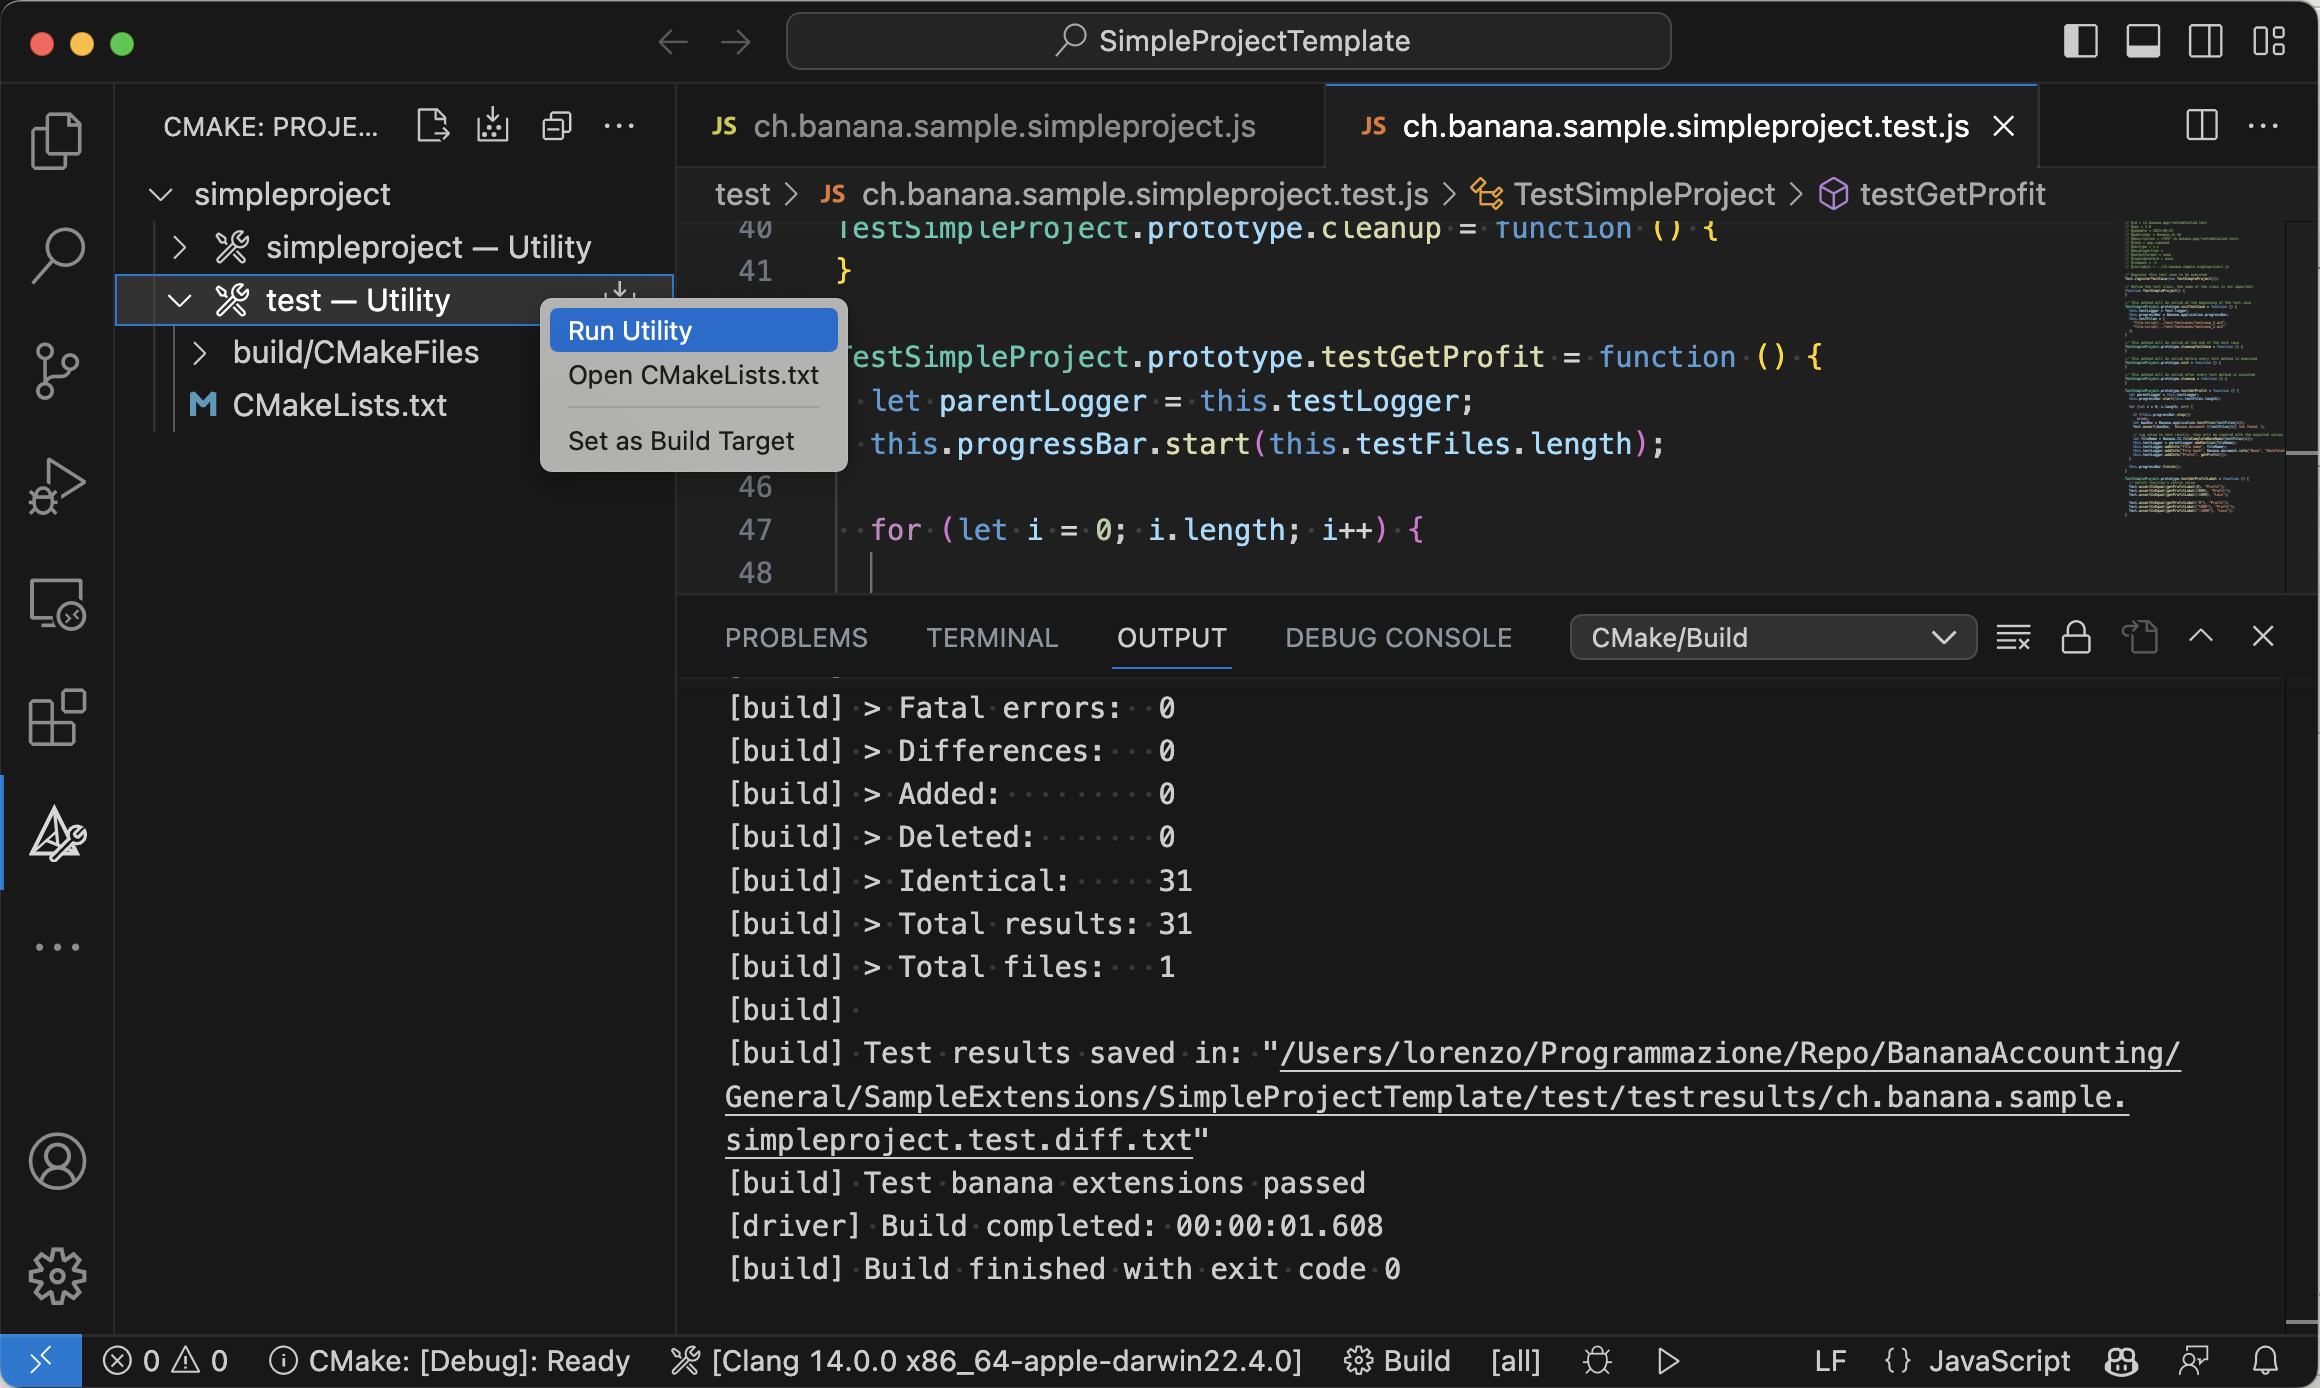
- Check the test results
NB.: to run tests you need BananaPlus Insider version
Deploy the extension
- Build the extension;
- The translations files *.qm are automatically released and included in the package;
- Copy the generated *.sbaa file to the destination folder;
- Add the extension in Banana AccountingPlus (see installing an'extension);
- Test it.
Build extensions with VS Code and CMake with translation
This document describe how to integrate translations in the CMake project.
First follow the instructions on the page Build with VS Code and CMake to set up your development environment and the CMake project.
Read also the page Extension's translation where we describe how to translate extensions.
You find a working complete example with the code on this page on our GitHub Repository at: Full project template.
Set up development environment
To build the translations we need the lpdate and lrelease utiltiy and therefore you need to install Qt and a third CMake extension.
Install Qt
Download and install Qt from https://www.qt.io. You need to install at least one Qt Version: Qt 6.4.3, 6.5.2, 6.60, ... it doesn't matter which one, if you are unsure install the latest one.
NB.: to download and install Qt you need to have or create a free qt.io account.
Set paths to lpudate and lrelease
Add the options BAN_QT_LUPDATE and BAN_QT_LRELEASE to the file .vscode/settings.json.
- BAN_QT_LUPDATE: path to the Qt lupdate tool. The lupdate tool is used to update the translations, it will search for text to translate in the code and update the content of *.ts files. If you don't have translations, this options is not necessary.
- BAN_QT_RELEASE: path to the Qt lrealease tool. The lrelease tool is used to compile the translations, the compiled translation are integrated in the package.If you don't have translations, this options is not necessary.
{
   "cmake.configureSettings": {
       "BAN_QT_RCC": C:/Programms/BananaPlusDev/rcc.exe",
       "BAN_EXE_PATH": "C:/Programms/BananaPlusDev/BananaPlusDev.exe",
       "BAN_QT_LUPDATE": "C:/Qt/6.5.2/macos/bin/lupdate",
       "BAN_QT_LRELEASE": "C:/Qt/6.5.2/macos/bin/lrelease"
   }
}
Set editor for *.ts files
Install the following CMake extension:
- fabiospampinato.vscode-open-in-application: Open in application extension
The installation of this extension is reccomended but not necessary. This extension let you open a file from VS Code in your preferred application, we use it to open *.ts in Qt Linguist.
Open vscode user setting file and add the editor for *.ts files
   "openInApplication.applications": {
       "*.ts": "QtLinguist"
   }
In the operating system assign the *.ts to QtLinquist application.
To open a *.ts file with QtLinguist right click on the file in the file explorer panel and select Open in Application.
Update folder structure and CMake project file
Folder structure
Add a folder /translations where the translations files .ts and *qm reside.
You don't need to create the files .ts and .qm, they are generated automatically.
/

  CMakeList.txt                              CMake project file

  <extension_id>.js                          Extension's code
  <extension_id>.lib.js
  <extension_id>.manifest.json               Metadata such title, description and version
  <extension_id>.qrc                         List of files included in the package
  <extension_id>.sbaa                        Buided package
  changelog.md                               Change history

  /translations
     translation_de.ts
     translation_qm.ts

  ...
CMake file
Add the targets lrelease and lupdate to update and compile translations.
cmake_minimum_required(VERSION 3.16)

project(fullproject)
set(EXTENSION_ID "ch.banana.sample.fullproject")

# CMake options
# Create a file .vscode/settings.json with the following content to set the options,
# adapt the path to your environment
# {
#     "cmake.configureSettings": {
#         "BAN_QT_RCC": "C:\users\user_name\AppData\Local\Programs\BananaPlusDev\rcc.exe",
#         "BAN_EXE_PATH": "C:\users\user_name\AppData\Local\Programs\BananaPlusDev\BananaPlusDev.exe",
#         "BAN_QT_LUPDATE": "C:\Qt\6.5.2\macos\bin\lupdate",
#         "BAN_QT_LRELEASE": "C:\Qt\6.5.2\macos\bin\lrelease"
#     }
# }
set(BAN_QT_RCC $ENV{BAN_QT_RCC} CACHE FILEPATH "Path to Qt rcc executable")
set(BAN_EXE_PATH $ENV{BAN_EXE_PATH} CACHE FILEPATH "Path to BananaPlus executable, used to run tests")
set(BAN_QT_LUPDATE $ENV{BAN_QT_LUPDATE} CACHE FILEPATH "Path to Qt lupdate executable")
set(BAN_QT_LRELEASE $ENV{BAN_QT_LRELEASE} CACHE FILEPATH "Path to Qt lrelease executable")

# This target is used to build the extension to a sbaa package
add_custom_target(${PROJECT_NAME}
    COMMAND ${BAN_QT_RCC} -o ${EXTENSION_ID}.sbaa --binary ${EXTENSION_ID}.qrc
    WORKING_DIRECTORY ${CMAKE_SOURCE_DIR}
    SOURCES ${EXTENSION_ID}.qrc
)

# This target is used to run the tests of the extension
add_custom_target(test
    COMMAND ${BAN_EXE_PATH} -cmd=runtestsapps -cmd_exit=1 -cmd_p1=${CMAKE_SOURCE_DIR}/${EXTENSION_ID}.sbaa -cmd_op=A
    WORKING_DIRECTORY ${CMAKE_SOURCE_DIR}
)

# The variable translations_files contains the list of translations files
set(translations_files
    translations/translations_de.ts
    translations/translations_it.ts
    translations/translations_fr.ts
)

# The target lupdate is used to update *.ts translations files
set(lupdate_commands)
foreach(tr_file ${translations_files})
  list(APPEND lupdate_commands
    COMMAND ${BAN_QT_LUPDATE} ${EXTENSION_ID}.qrc -ts ${tr_file})
endforeach()

add_custom_target(lupdate
    ${lupdate_commands}
    WORKING_DIRECTORY ${CMAKE_SOURCE_DIR}
)

# The target lrelease is used to compile *.ts files to *.qm files
set(lrelease_commands)
set(lrelease_files)
string(REPLACE ".ts" "" lrelease_files "${translations_files}") #remove file extension
foreach(tr_file ${lrelease_files})
  list(APPEND lrelease_commands
      COMMAND ${BAN_QT_LRELEASE} ${tr_file}.ts -qm ${tr_file}.qm)
endforeach()

add_custom_target(lrelease
    ${lrelease_commands}
    WORKING_DIRECTORY ${CMAKE_SOURCE_DIR}
)

add_dependencies(${PROJECT_NAME} lrelease) #build .qm files when building the sbaa package
QRC file
In the qrc file insert the translations files:
<!DOCTYPE RCC><RCC version="1.0">
<qresource prefix="/">
<file>ch.banana.sample.fullproject.js</file>
<file>ch.banana.sample.fullproject.lib.js</file>
<file>manifest.json</file>
<file>translations/translations_de.qm</file>
<file>translations/translations_fr.qm</file>
<file>translations/translations_it.qm</file>
</qresource>
</RCC>
Update translations
- Select CMake from the Activity bar (on the left)
- Right click on the lupdate project and select Run utility
This will update the translastions/translation_xx.ts files with the latest code changes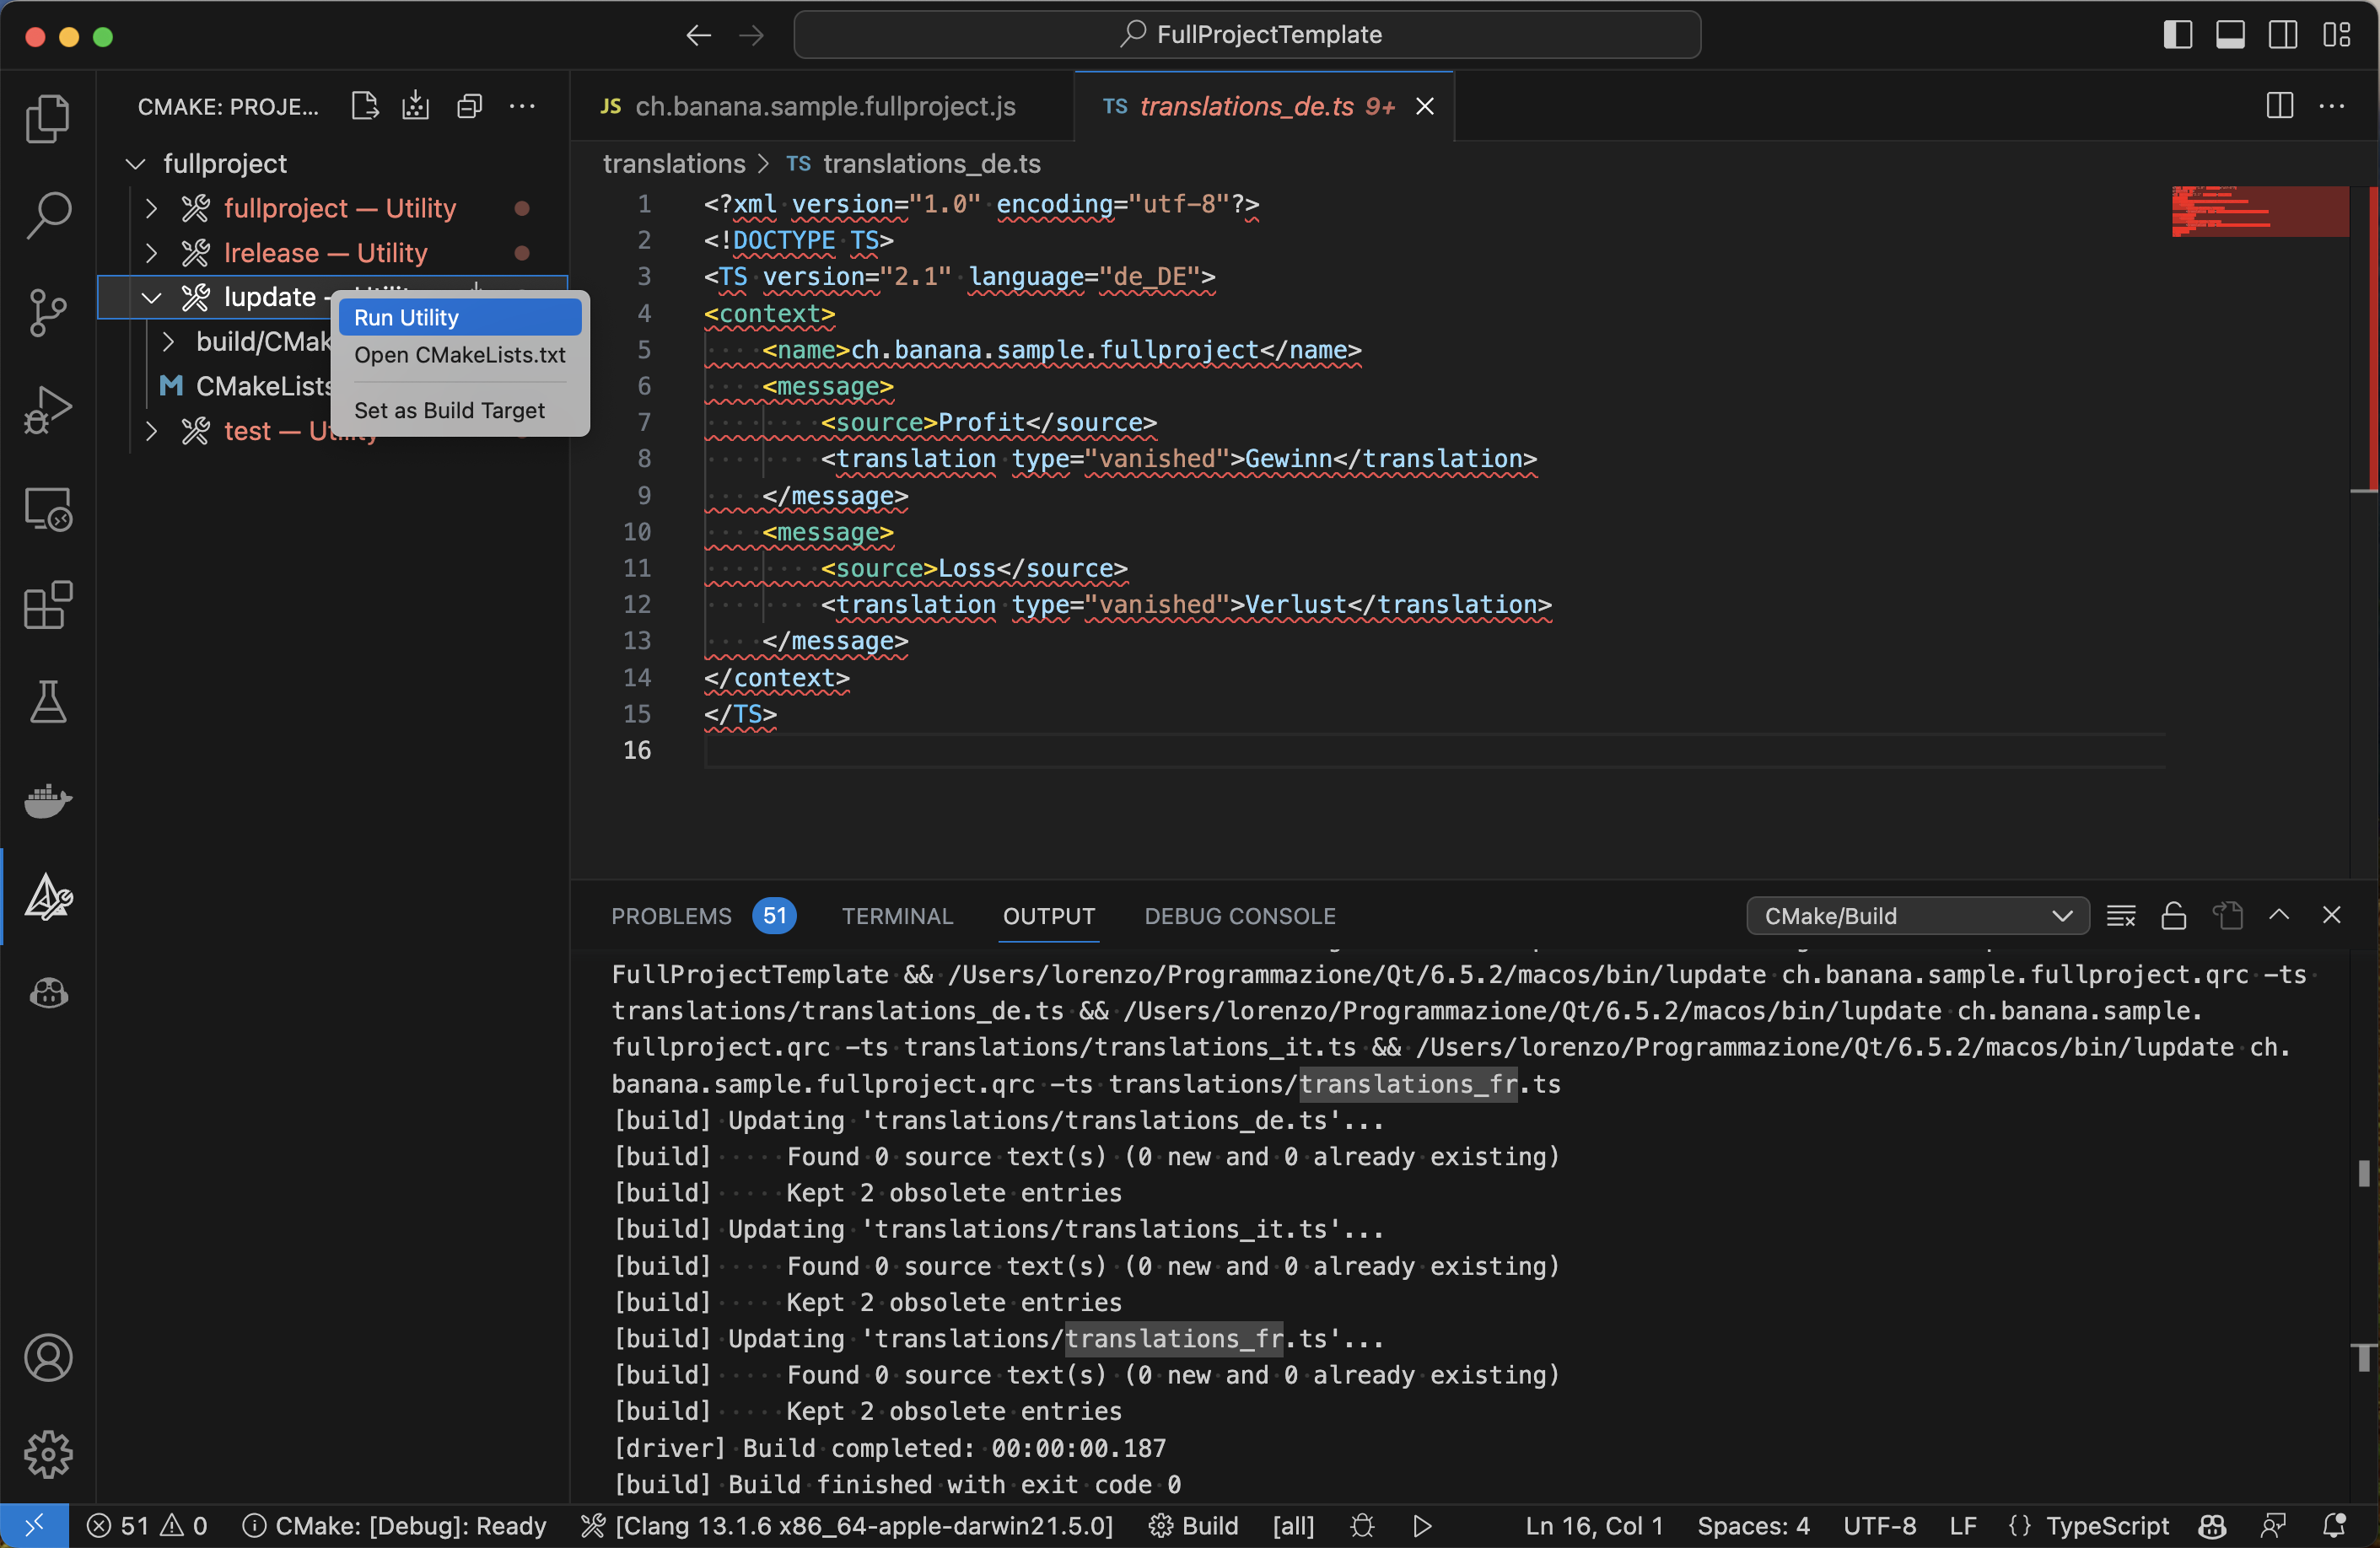
- Open the files translastions/translation_xx.ts with Qt Linguist
Update the translations and save the file - Build the extension
The new translations are automatically compiled and inserted in the .sbaa package