API Introduction
Retrieve Data
The Accounting files content can be accessed and be modified using specific API functions.
Retrieving data
The accounting file contains file properties and tables.
- Banana.Application
Information regarding the program, API version, messages. - Banana.Document (Base)
Is the main class that give access to the content of the accounting file.
Some properties and functions:- Banana.document.tableNames
Return a list of the tableNames in the file. - Banana.document.table(xmlTableName)
Return a table object of the specified table.
- Banana.document.tableNames
- Banana.Document (Accounting)
Additional properties and functions specific to accounting files.
For examples:- budgetBalance()
Calculate the balance of an account using the budget data. - currentBalance()
Calculate the balance of an account using the current data.
- budgetBalance()
- Banana.Document (Invoice & Estimate)
Additional properties and functions for Invoice & Estimates files.- calculateInvoice()
Calculate the invoice and return the filled Json. - printInvoice()
Call the dialog for printing and previewing Invoices.
- calculateInvoice()
- Banana.document
Is the object of the current open accounting file. - Banana.Document.Table
It the class that provide access to the table content.
Some properties and functions:- columnNames
A property with the list of columns. - column(columnName)
Return the Column with the given name in the given view as Column Object. - rows
Return the rows of the table as an array of Row objects.
- columnNames
- Banana.Document.Column
Provide information about the column.
Some properties are:- alignment
- header
- dataType
- Banana.Document.Row
Access to the content of the single row.- value(columnName)
Return the cell content of the specified column.
- value(columnName)
Extension setting
Data specific to the extension can be saved within the accounting file and later retrieved with the specific Banana.Document functions:
- Banana.document.getScriptSettings()
- Banana.document.setScriptSettings()
Math, Data conversion and XML
For manipulating data you can use the Javascript native functions.
Banana API makes available some function that make it easy to convert from and to Banana format:
- Banana.Converter
A collection of methods useful to convert various formats to and from data tables (array of arrays). - Banana.SDecimal
Provides functions to do precise decimal math calculation with up to 34 decimal.
It overcomes the rounding problem typical of Javasctipt float type. - Banana.Xml
A convenient class to access and create XML content.
Modify Data
The Accounting files content can be be modified using specific API functions.
Banana Accounting Extension can modify the data, but the user has full control of it:
- Changes to the file are first displayed to the user.
- The user must approve the changes.
- The user can undo the changes.
This approach put the user on full control. Once the changes are displayed, the user can decide whether to apply them or not. In addition, the user can also undo changes.
It's a different approach from Excel where scripts makes direct changes to the sheets and user cannot preview and undo them.
Extension for changing data
The process to change data is the following:
- The extension creates a DocumentChange JSON object that contains the information regarding the change:
- Add new rows with the possibility of also defining the style (colors, font size, ...).
- Modify existing rows with the possibility of also defining the style (colors, font size, ...).
- Delete rows.
- Modify File properties data.
- The exec() function of the extension returns the DocumentChange Object (see the Example of an Extension using a DocumentChange).
- When you run the extension, the program displays a dialog box where the user can see a preview of the data that will be changed.
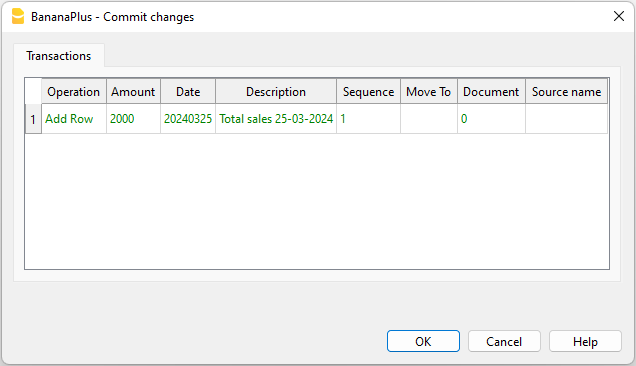
Preview example where a new row is added to the Transactions table
- The user need to confirm the changes.
- The changes will be added to the undo/redo mechanism.
The user can therefore undo and redo the change, similar to all other commands. - The changes are applied to the accounting file.
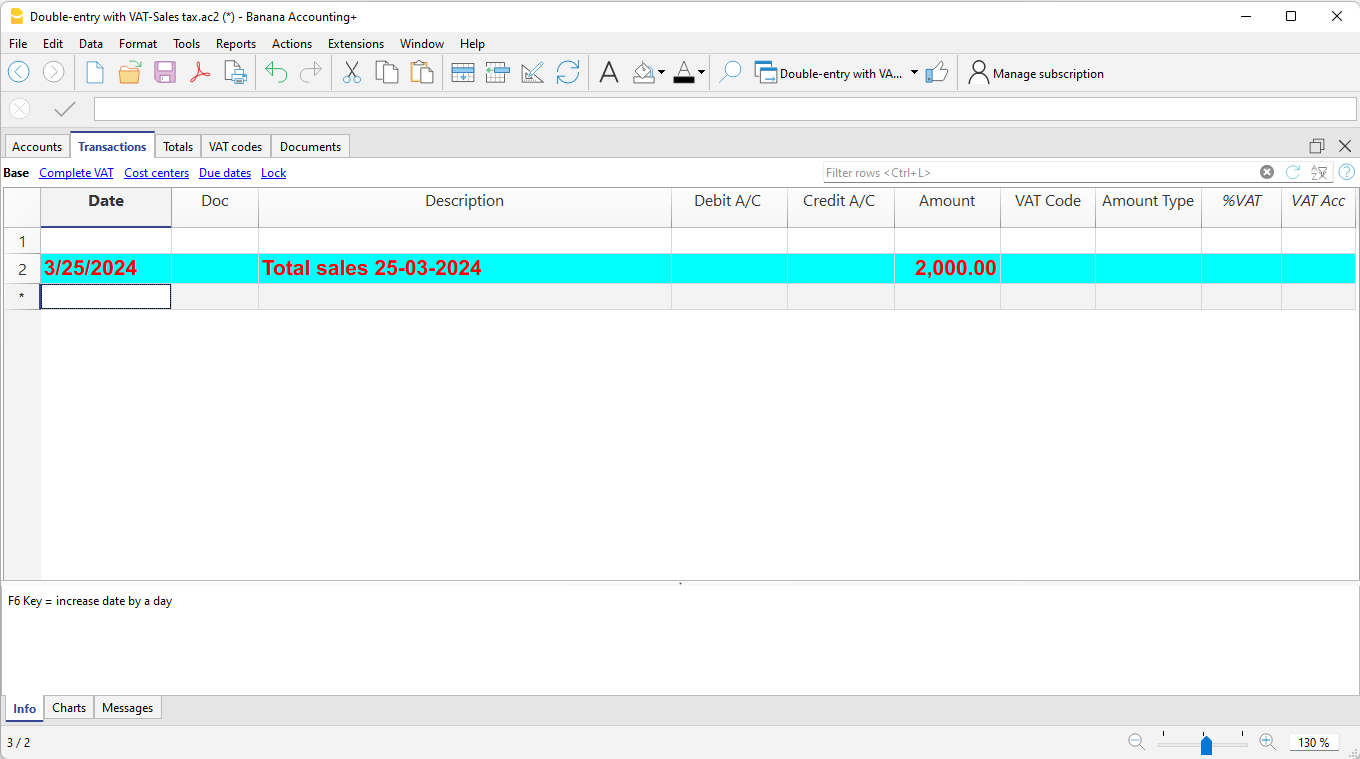
The row with the style is added to the Transactions table
Extensions: Display and Get Data from Users
Extension have different way to display and get data from users.
Displaying information
- addMessage functions
- This will display the information in the same pop-up dialog used in Banana Accounting.
- The message is also available in the Message window.
- The function is available from this objects types.
Application, Document, Table, Row.
- Banana.Console
- Let the developer output information to the Debug windows.
- See Debugging.
- The Banana.Ui method to display data, like:
- showText()
Show the given text in a dialog with the given title.
- showText()
- Banana.Report class
Let you create reports, preview, print and export to pdf or other formats.
Getting information from users
The Banana.Ui class offers methods to display get data from users.
- Questions
- showQuestion()
how the user a question dialog with Yes and No buttons.
- showQuestion()
- Getting simple data (for example):
- getText()
Show the user a dialog asking to insert a text. - getDouble()
Show the user a dialog asking to insert a double. - getItem()
Show the user a combo box dialog asking to select an item from a list.
- getText()
- Structured date entry dialog:
- The openPropertyEditor()
function create a structured dialog for entering data.
See: Dialog PropertyEditor Page.
- The openPropertyEditor()
- Custom Dialogs
Creating Widgets
With QT Creator you can design any kind of widget and use it in the extension to visualize o get data from the user.
For simple interactions with the user you can use the predefined dialogs of the class Banana.Ui. With those dialogs you can ask the user to insert a value, answer a question, or
Extensions: File access, Import and Export of Data
The extension mechanism to access local files, import and export data is focused on security, those giving the user full control of the process.
File Access
- Banana.IO
The Banana.IO class is used to read and write to files.- Banana.IO.LocalFile
The LocalFile class represents a file on the local file system.
- Banana.IO.LocalFile
- Banana.Application
- openDocument()
Opens the ac2 file located in filePath and returns an Object of type Banana.Document or undefined if the file is not found.
The path can be relative, in this case the base directory is the path of the current document.
- openDocument()
Import Data
You can create an extension specific for importing data.
- See: Import Extensions
Export Data
You can create an extension specific for exporting data.
- See: Export Extensions
Debugging
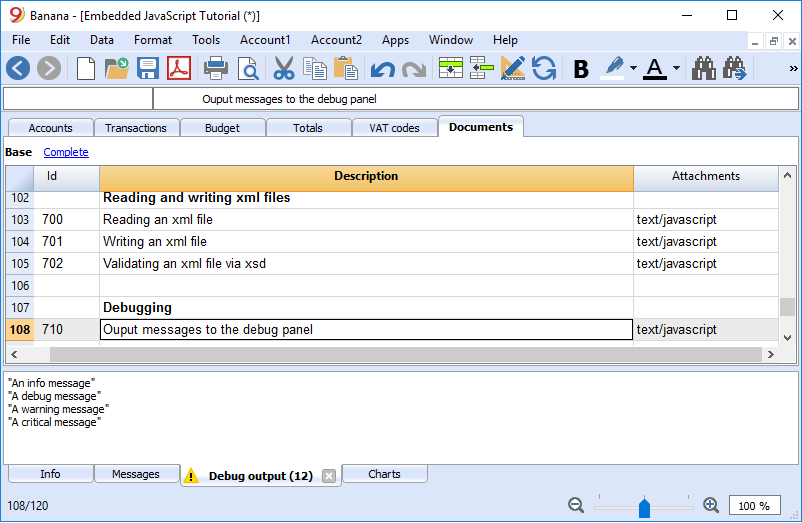
Output messages to the debug panel
For debugging you can use the methods in Banana.Console object to output useful information to the debug panel during the execution of the script.
If you have to notify the user use instead the methods
- Banana.application.addMessage
- Banana.document.addMessage
- Banana.Document.Table.addMessage
- Banana.Document.Row.addMessage
Example
Banana.console.log("An info message");
Banana.console.debug("A debug message");
Banana.console.warning("A warning message");
Banana.console.crtitcal("A critical message");
Debug panel
The debug panel when enabled is located on the bottom of the main window near the Info and Messages panels. To open the debug panel you have to enable the option:
- Menu > Window > Appearance > Show Developer Menu
- Menu > Developer > Show Debug Panel
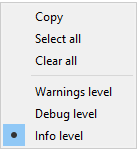
In the debug panel you can choose the type of message to shows (only warnings, debug or info messages), click on the panel with the right mouse key and select the desired level.
Extension Test Framework
When developing extension we strongly encourage to use the test functionalities and add testcase to you project so that when making change you can see if there have been regressions.
How tests works
The test framework operates similar as a typical testunit.
For example if you need to test an accounting report.
- Preparing the test:
- You create a test case in the sub-directory your extension (see extension package and project).
- For the report case in the test directory you will put a the accounting file with the data that is necessary for the test.
- You create a expected results directory.
In our case it will contain the expected report.
The first time you run a test, you will copy the results to the expected directory. - You write a test function that load the accounting data and call the extension function that generate a report.
The first time you run a test, you will check manually that the report is correct.
- Running the test.
- You start the test.
- The framework will run the test case.
- The result will be compared to the expected result and if the result is different the test will fail.
- You start the test.
Documentation and examples
- Banana.Test
Class used when creating unit tests. - How to for the Test Framework
Step-by-step guide for creating a simple test case example that uses Extensions Test Framework to run unit tests of Extensions.
Working with the TestFramework for extenstions
Introduction
This walkthrough provides step-by-step guidance for creating a simple test case example that uses Extensions Test Framework to run unit tests of Extensions.
The steps in order to experiment with Extensions Test Framework are the following:
- Download and use the Banana Experimental version
- Create a Extension to be tested
- Create a test case
- Run the test
- Verify the test results
Create an Extension to be tested
A test case is related to a working Extension.
For this example we use a modified version of "Hello World!" Extension example (see Build your first Extension).
Copy the code below, paste it on your text editor and save the file as helloworld2.js
// @id = ch.banana.app.helloworldexample
// @api = 1.0
// @pubdate = 2018-10-23
// @publisher = Banana.ch SA
// @description = Example Hello world 2
// @task = app.command
// @doctype = *.*
// @docproperties =
// @outputformat = none
// @inputdataform = none
// @timeout = -1
function exec() {
   //Call the function to create the report
   var report = createReport();

   //Print the report
   var stylesheet = Banana.Report.newStyleSheet();
   Banana.Report.preview(report, stylesheet);
}

function createReport() {
    //Create the report
    var report = Banana.Report.newReport("Report title");

    //Add a paragraph with the "hello world" text
    report.addParagraph("Hello World!");

    //Return the report
    return report;
}
Create a test case
Follow the instructions below to create a working test case:
- Create a folder test in the same folder where the Extension helloworld2.js is located.
Copy the following JavaScript code and paste it into a text editor.
// @id = ch.banana.app.helloworld2example.test // @api = 1.0 // @pubdate = 2018-10-30 // @publisher = Banana.ch SA // @description = [Test] Example Hello world 2 // @task = app.command // @doctype = *.* // @docproperties = // @outputformat = none // @inputdataform = none // @timeout = -1 // @includejs = ../helloworld2.js // Register this test case to be executed Test.registerTestCase(new TestFrameworkExample()); // Define the test class, the name of the class is not important function TestFrameworkExample() { } // This method will be called at the beginning of the test case TestFrameworkExample.prototype.initTestCase = function() { this.progressBar = Banana.application.progressBar; } // This method will be called at the end of the test case TestFrameworkExample.prototype.cleanupTestCase = function() { } // This method will be called before every test method is executed TestFrameworkExample.prototype.init = function() { } // This method will be called after every test method is executed TestFrameworkExample.prototype.cleanup = function() { } // Every method with the prefix 'test' are executed automatically as test method // You can defiend as many test methods as you need TestFrameworkExample.prototype.testVerifyMethods = function() { Test.logger.addText("The object Test defines methods to verify conditions."); // This method verify that the condition is true Test.assert(true); Test.assert(true, "message"); // You can specify a message to be logged in case of failure // This method verify that the two parameters are equals Test.assertIsEqual("Same text", "Same text"); } TestFrameworkExample.prototype.testBananaApps = function() { Test.logger.addText("This test will tests the BananaApp helloworld.js"); var document = Banana.application.openDocument("file:script/../test/testcases/accounting_file.ac2"); Test.assert(document, "File ac2 not found"); // Add the report content text to the result txt file var report = createReport(); Test.logger.addReport("ReportName", report); }- Modify the script: find the row "var document = Banana.application.openDocument("file:script/../test/testcases/accounting_file.ac2")" and replace "accounting_file.ac2" with the name of your Banana accounting file.
- Save the file into test folder as helloworld2.test.js (the file name must always be <same_name_bananaapp>.test.js).
- Create a folder test/testcases and copy there your file .ac2.
- Now you should have something like this:

- helloworld2.js: the BananaApp
- test: the test folder
- helloworld2.test.js: the test script for the Extension
- testcases: the folder for test ac2 files
- xxx.ac2: your Banana accounting file
Run the test case
Finally, now it is possible to run the test case and see the results.
To run the test:
- In Banana select from the menu Extensions the command Manage Extensions...
- Select from the Installed element the “Example Hello World 2” Extension
- Click on the button Run tests

Test case results
The test compare the current results with the expected results and checks if there are differences.
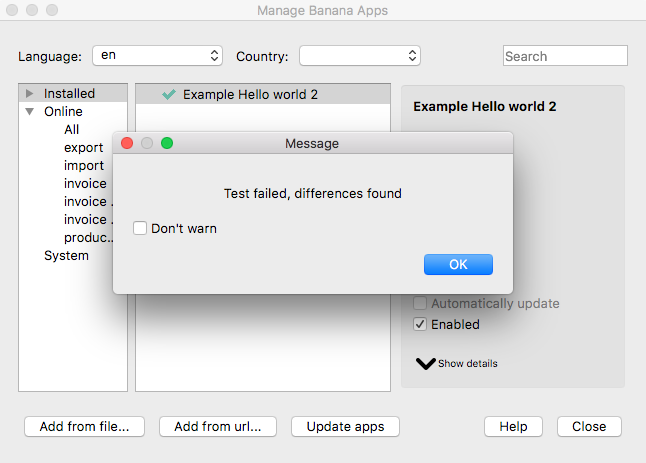
If differences are found a dialog message warn you. All the details can be found inside the .test.diff.txt file.
The first time you run a test probably you will see the following "Test failed" dialog message:
In your test folder you can see two new auto generated folders:
- test/testresults:
contains the helloworld2.test folder with a helloworld2.test.txt file with the results of the test.
When the test is run, the folder and the file are automatically generated. - test/testexpected:
contains the helloworld2.test folder that should contain a helloworld2.test.txt file with the expected results.
When the test is run, the folder is automatically generated, but the file NOT. The first time you run the test the folder is empty. This is why the test fails.
You now should have something like that:

Inside the test/testresults/helloworld2.test folder there is the helloworld2.test.txt file with all the results of the test, like the following one:

The file helloworld2.test.diff.txt is a resume of the results, with all the differences the test has found.
The image below shows an example of test summary with differences:
- with the sign "+" are indicated the rows added to the .txt file of the test/testresults folder (compared with the testexpected folder)
- with the sign "-" are indicated the rows removed from the .txt file of the test/testresults folder (compared with the testexpected folder)

As mentioned above, the folder test/testexpected is empty. This is why we can see a lot of added rows to the .txt file of the test/testresults folder.
If you have differences and and you know these differences are correct (like in this case):
- copy the test results .txt file from the folder test/testresults to the folder test/testexpected.
You should have a structure like this:

Note that the helloworld2.test.txt file is now located in both folders, in the test/testresults/helloworld2.test folder and in the test/testexpected/helloworld2.test folder.
If you run again the test, this time the result is different. You now should see a positive message from the dialog:

This means that the results .txt file generated from the test, is perfectly identical of the expected .txt file. So, the test is successfully passed.
You can also check the helloworld2.test.diff.txt file of the test/testresults/helloworld2.test folder to see the differences results, and there should not be differences found.

From that point, every time you do changes to the Extension you can test it and see if the changes you made works as you expected.
Remember: if you have differences and you know these differences are correct, you have to replace the expected .txt file.
More about Extensions Test
- Extension Test Framework
- TestFramework GitHub documentation
- JavaScript code example (ch.banana.script.testframework.test.js)
Test case Import
Test case import
The type of test that will be analyzed will be suitable for importing the data contained in a CSV file.
To create a test case for an import extension, a series of requirements are required:
- Developed a function that imports CSV file data into the Banana accounting software.
- You have created a couple of CSV files with the data inside structured according to a syntax explained on this page, to be used as a test for the method that will be illustrated for carrying out the tests.
- The creation of functions to do the test.
Functions that imports CSV file data into Banana
function exec(inText){

	// Convert a CSV file to an array of arrays.
	// The parameters are: text to convert, value separator, delimiter for text values
	var csvFile = Banana.Converter.csvToArray(inText, ',', '"');

	//Convert a table (array of arrays) to a tsv (tab separated values) file
	var tsvFile = Banana.Converter.arrayToTsv(csvFile);

    return tsvFile;
}
Structure data syntax of CSV file
This syntax permit to import the registration and the amount of registration in Banana accounting.
There are specific name of the columns in file CSV:
- Date.
- Description.
- Income.
- Expenses.
This is an example of what do you want obtain from CSV file:
| Date | Description | Income | Expenses |
| 2024-01-01 | Registration Income example | 900.00 | |
| 2024-01-31 | Registration Expense example | 100.00 |
The file CSV have to structured as this example:
"Date","Description","Income","Expenses"
"2024-01-01","Income example","900.00",""
"2024-01-31","Registration Expense example","","100.00"
Creation of function testing import data from CSV
Create your file in your folder project "test" with the name of your file of extension: "nameExtensionImport.test.js".
Write the metadata for creation your test, an example:
// @id = nameExtensionId.test.test
// @api = 1.0
// @pubdate = 2024-04-05
// @publisher = Banana.ch SA
// @description = <TEST nameExtensionId.test.test>
// @task = app.command
// @doctype = *.*
// @docproperties =
// @outputformat = none
// @inputdataform = none
// @timeout = -1
// @includejs = extensionImport.js
Write the functions and instance of your test:
Test.registerTestCase(new TestExtensionImport());
function TestExtensionImport() { }
// This method will be called at the beginning of the test case
TestExtensionImport.prototype.initTestCase = function () {
}
// This method will be called at the end of the test case
TestExtensionImport.prototype.cleanupTestCase = function () {
}
// This method will be called before every test method is executed
TestExtensionImport.prototype.init = function () {
}
// This method will be called after every test method is executed
TestExtensionImport.prototype.cleanup = function () {
}
TestExtensionImport.prototype.testImport = function(){
	//Path of your file csv to testing
    var fileName = "file:script/../test/testcases/csv_test_transaction.csv";

    //Returns an object of type Banana.IO.LocalFile that represents the requested file.
    //You get a reference to the specified CSV file.
    var file = Banana.IO.getLocalFile(fileName);

    // Verify that the file exists.
    Test.assert(file);
    var fileContent = file.read();
    // Verify that the contents of the file were read correctly.
    Test.assert(fileContent);

    // Run a function called 'exec' on the contents of the file.
    var transactions = exec(fileContent, true);
    //Add transactions to the CSV logger.
    this.testLogger.addCsv('', transactions);
}
Subsequently, having implemented and followed all these steps and after having built and installed the extension on Banana:
If you want to try the extension you created it will be able to import recordings in Banana, when you start the extension, you will be asked for the path to where the csv file is located and then to define the income and expense accounts.
To view the import function you must have opened a file where you want to import the recordings (you can also try a file created by default with double entry) click on the "Actions" menu at the top, choose Import: "Transactions" and from here you can select the developed extension and path.
To test the extension, you will have to access the Banana "Manage Extensions" menu, then select the developed extension in the Installed menu and click Run test.
Test case report example
To create a complete report, it is necessary to start with some operations that are integrated into the extension code.
This is a repository to begin your report example:
The operations are:
- Create the structure and the logic of your report.
- Create a structure of report (balance, profit-loss).
- Validate the groups of the accounting.
- Load your report values from the Balance Sheet.
- Calculate the totals of the amounts.
- Format amount values of the report.
- Print the results of your report.
- Create a function that contains all the tests you want to run.
- Save the content of your file about test case.
- Configure user parameters.
After these operations on the code side you can run your test as explained on this page.
Create a function for testing a report
In the javascript test file, you have to create a function that generates the report and adds it to the test results. Use the addReport() function defined in Banana.Test.Logger class.
You can see an example of how to create a test for a report:
Save the content of your file about test case
var bananaDocument = Banana.application.openDocument("file:script/../test/testcases/nameFileTestCases.ac2");In this variable you save the content of your test case ac2 file.
To learn more about the method openDocument and other methods:
Configure parameter of user
You can initialize the parameters to define some data like the period (start date and end date), the report title, and others.
The parameter column defines which column to use in order to create the report. By default is Gr1. In this column for each account is defined an ID used to regroup the accounts for the report sections.
Create structure of your report - Balance
For creation a base report, you can create an array that contain all information that you need as in example:
The information are:
- the group IDs.
- Description of account.
- Sum of the group of accounts.
- Type of account (asset, liabilitie , cost, revenue).
Parameter explanation
- id
Is the unique parameter of column in Banana, the column name of id corresponds to Gr1, you can decide what to put as the id, as long as the id is the same as what you configure in the Gr1 column of Banana. - type
Define what type of data is. The are three options: title, group and total.Title: Normally used when a title or a description text without amount must be displayed.
The "id" group starts with a "d" (description).
Example:
{"id":"dABI", "type":"title", "indent":"1", "description":"I - Intangible assets"}
Group: Used when a group with text and amount must be displayed.
Examples:
{"id":"ABI1", "type":"group", "indent":"2", "bclass":"1", "description":"1) Installation and expansion costs"}
{"id":"ABI2", "type":"group", "indent":"2", "bclass":"1", "description":"2) Development costs"}Total: Used for the total of a group with and amount. The amount is the sum groups amounts. Use the property "sum" to indicate the list of all "id" groups that must be summed together, separated by a semicolon ";". To subtract amounts use the minus sign "-" before the group "id".
Examples:
{"id":"TC", "type":"total", "indent":"1", "description":"Total Costs", "sum":"C1;C2"} → sum = C1 + C2
{"id":"AS", "type":"total", "indent":"1", "description":"Total Assets", "sum":"AS1;-C3"} → sum = AS1 - C3
- bclass
Corresponding of what is this account. In Banana bclass 1 is Assets, 2 is Liabilities, 3 Costs, 4 Revenues. - description
Used to define the description text used for the print. - note
This is used to provide more details in the report. - sum
This is used to define how to calculate the total.
In this example, you create a simply configuration for creation a report of Balance Sheet, where contains the assets and the liabilities of short term:
function createReportStructure(){
//create an array where do you pass your parameter for creation your structure of Balance
var reportStructureBalance = [];

//AN EXAMPLE OF STRUCTURE
//Assets
reportStructureBalance.push({ "id": "CashId", "type": "group", "note": "", "bclass": "1", "description": "Cash" });
reportStructureBalance.push({ "id": "BankId", "type": "group", "note": "", "bclass": "1", "description": "Bank" });
reportStructureBalance.push({ "id": "TotalLiquidityId", "type": "total", "note": "", "bclass": "1", "description": "Total liquidity", "sum":"CashId;BankId" });

//Liabilities
reportStructureBalance.push({ "id": "SuppliersId", "type": "group", "note": "", "bclass": "2", "description": "Suppliers" });
reportStructureBalance.push({ "id": "DueBanksShortTermId", "type": "group", "note": "", "bclass": "2", "description": "Due to banks short/term" });
reportStructureBalance.push({ "id": "ShortTermOnorousDebtsId", "type": "total", "note": "", "bclass": "1", "description": "Short-term onorous debts", "sum":"SuppliersId;DueBanksShortTermId" });
}
Loads your values of report from the Balance Sheet
Before load your values of report, you have to create the next functions in the exentension and invoke this functions in the test file:
- validateGroupsBalance.
- loadBalances.
- calculateTotals.
- formatValues.
- excludeEntries.
- printBalanceSheet.
Repository that content the functions of operations 1 to 5:
Repository that content the function of operation 6:
Functions
validateGroupsBalance(grColumn)
The input of this function grColumn: is a prameter of id group of column (Example: Gr1).
This function have to check if the groups defined by user is valid or not.
loadBalances()
This function load and calculate the current and previous balances of the report structure.
calculateTotals(fields)
Calculates all totals of the reportStructure for the given list of fields.
formatValues(fields)
Converts all the amounts to local format for the given list of field.
excludeEntries()
Entries preceded by Arabic numbers or lower case letters with zero amounts for two consecutive exercises, can be excluded from the print.