Accounting
Accounting with cryptocurrencies
Banana Accounting allows you to manage any currency, including the Bitcoin, Ethereum and any other cryptocurrency, even the ICO (Initial Coin Offering), using any abbreviation and allowing for up to 27 decimals and freely settable exchange rates. Precise values and account statements are generated. In Banana Accounting, you will always have the exact values for each individual currency.
Any currency can be selected as the base currency, EUR, US$, Bitcoin and any currency can be managed.
Single or multiple currencies
When you are keeping accounts, you must first decide whether you are doing so in one single currency or if multiple currencies are required.
The Cash book and Income & Expense accounting work with one single currency, whereas Double-entry accounting allows for you to keep accounts in several different currencies.
The base currency is defined in the File prpoerties of the accounting (of the File menu). The program displays a list of predefined currencies, but you may indicate any other currency code.
For Double-entry accounting, amounts are indicated in the account currency as well as the base currency. Amount in the base currency can be added up and are therefore used for the preparation of the Balance Sheet, the Profit & Loss statement, as well as the different reports.
When selecting Multi-currency accounting, the currencies that you require can be be set up in the Exchange rates table, indicating the exchange rates between the different currencies. National or cryptocurrencies can be managed without restrictions and any code can be used.
Changing decimal points for the accounting
Decimal points are implemented when the accounting file is created, in order to avoid rounding up differences. Amounts are rounded up according the same method, thus avoiding differences that sometimes occur in Excel.
When starting a new accounting, it is advised to use an existing template, which is usually set up with 2 decimal points.
If you need to manage your accounting or accounts with a higher number of decimal points, you need to "re-create the file" with the following command
- Tools Menu -> Convert to new file ...
The program will generate a copy of your file with the new Outline created for your new file, including the appropriate decimal points required. For Multi-currency accounting you will have to indicate:
- The decimal points in the base currency.
- The decimal points for accounts in foreign currencies.
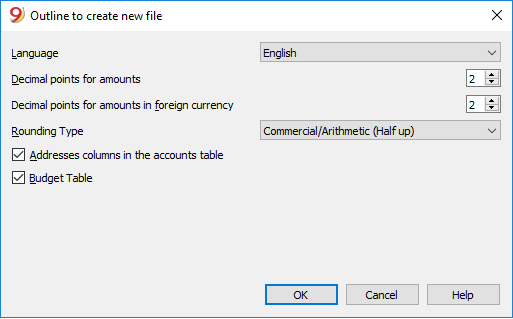
Setting up decimal points for foreign currencies
When using multi-currency accounting in Double-entry accounting, rounding up needs to be indicated for amounts in foreign currencies.
Decimal points for foreign currency should generally not be inferior to those in use for the base currency.
When managing cryptocurrencies such as ETH, you must indicate 18 as a value in the conversion file.
The different currency codes must be indicated in the Exchange rates table, with the related opening and current exchange rates.
The currency code must be indicated for each account in the Accounts table of the Chart of Accounts.
Currencies and decimal points
Currency codes are available and can be consulted in the relative Wikipedia page, with indication of decimal points commonly used.
- Currencies generally use 2 decimal points.
- Currencies with 0 decimal points are
- BIF Burundian Franc
- CLP Chilean peso
- DJF Djiboutian franc
- GNF Guinean franc
- ISK Icelandic króna
- JPY Japanese yen
- KRW South Korean won
- PYG Paraguayan guaraní
- RWF Rwandan franc
- UGX Ugandan shilling
- UYI Uruguay Peso en Unidades Indexadas
- VUV Vanuatu vatu
- XOF CFA franc BCEAO
- XPF CFP franc (franc Pacifique)
- Currencies with 3 decimal points are
- BHD Bahraini dinar
- IQD Iraqi dinar
- JOD Jordanian dinar
- KWD Kuwaiti dinar
- LYD Libyan dinar
- TND Tunisian dinar
- Currencies with 4 decimal points are
- UYW Unidad previsional
Cryptocurrencies
There is a multitude of cryptocurrencies, each carrying their own name and code.
There is no indication for their decimal points. For the best known they are
- BTN Bitcoin with 9 decimal points.
- ETH Ethereum with 18 decimal points.
Multiple other virtual currencies are based on the Ethereum blockchain and require 18 decimal points.
Indicate the appropriate decimal points for the required currency in the Outline create new file dialog.
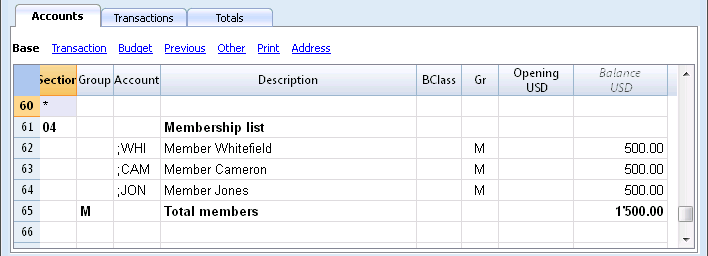
Membership list
In order to obtain the membership list with all the data that are useful for an association, the user needs to proceed as follows:
- In the Accounts table, at the end of the Chart of Accounts, the membership list can be created by using the CC3 cost center column.
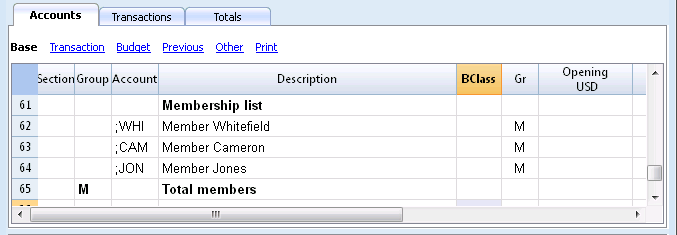
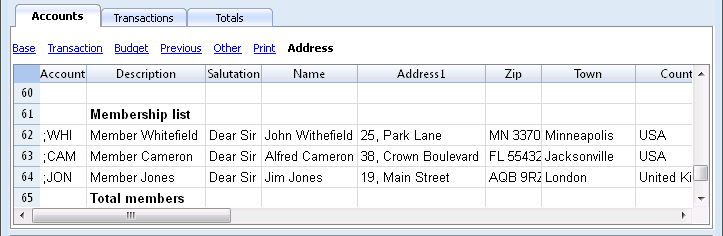
- Activate the Address view, selecting from the Tools menu, the Add new functionalities command
- In the window that appears, confirm the option Add addresses columns in Accounts table
- Insert the data of the members
- For a print-out: select the rows that need to be printed and activate the printing option only Selection.
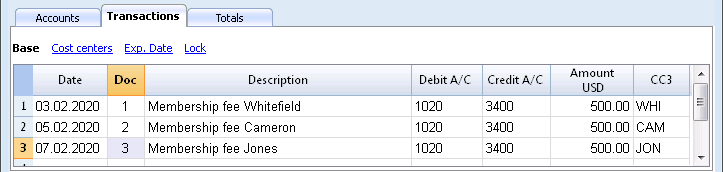
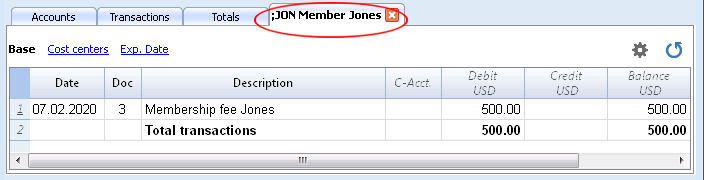
In order to record the transfers from every member in the Transactions table, insert the CC3 account for each member, using the CC3 column. In order to display the CC3 column, click on the Columns setup command of the Data menu; double click on CC3 and activate Visible check box.
In the Accounts table, the balance of the member's transactions is shown.
To see all of a member's transactions, double-click on the CC3 account number.
Related document:
- Cost and Profit centers
- Banana Accounting example files (Income & Expense accounting for Swiss associations or Double accounting for Swiss associations)
Transfer to a new accounting plan
Hereunder we explain how to proceed when:
- passing to a chart of accounts with a different numbering
- retrieve and convert the data of an existing accounting, including the transactions.
Converting for the new year
The program will convert the file for the choosen year. If you have already entered the year 2014 you can convert the 2014 file.
If you wish to start a new year with a new chart of accounts, there are two possibilities (for example considering the year 2015 as the new year):
- converting the previous year (2014) and then creating the new year (2015)
You will have two different files for the year 2014 (the one with the old chart of accounts, and the new one), and a single file for the year 2015, with the new chart of accounts. This procedure is useful when you need to have both years with the same chart of accounts - creating the new year's file (2015), and then converting it the new system.
In this case the year 2014 will remain unchanged. For the year 2015 you will have a transition file, with the old chart of accounts, but with the updated opening balances. The conversion of the 2015 file can be done right at the beginning, but also after some transactions have been entered.
Step 1: Creating a new accounting file
- Create a new accounting file, choosing the desidered type.
- Adapt the chart of accounting to your own needs
Step 2: Adding the matching accounts
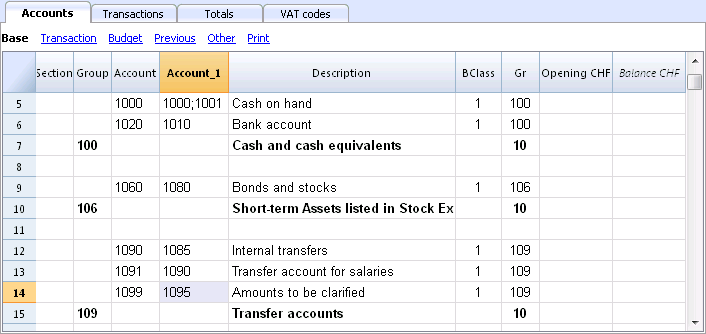
- Position yourself in the Accounts table and add a new column called Account_1 (Data menu; click on the Add button of the Columns Setup window and then enter the Account_1 description);
- For each new account, in the Account_1 column, enter the corresponding account in the old chart of accounts;
In case the account remains the same, you can also choose to not indicate it. - In case several accounts need to be grouped in one, enter the separated accounts with a semi-colon "1000;1001".
- In case one account needs to be subdivided on several accounts, you need to proceed manually, see herunder.
Step 3: Starting the import operation
For more information, please check the related pages Import to Accounting and Import File.
- From the Account1 menu, choose the Import to accounting and then Import File commands
- Using the Browse button, select the file of your old accounting plan
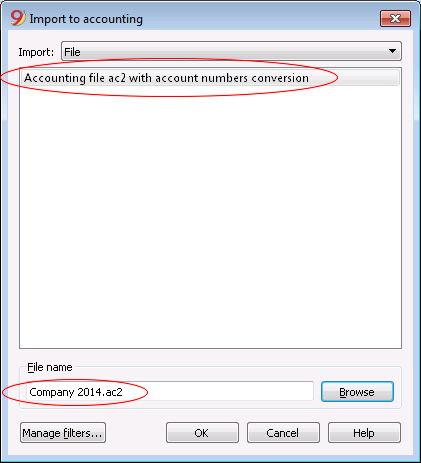
- Confirm by clicking on the OK button and pass on to the next window
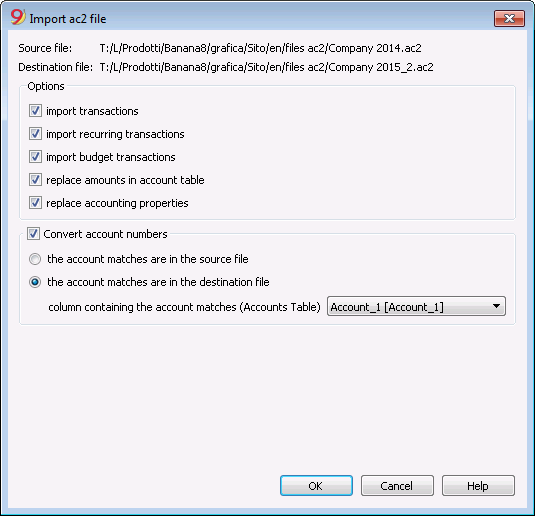
- Define the import options
- Activate the Activate account numbers option, indicating that the account matches are in the destination file.
Subdivision of one account into several accounts
When one transfers to a more detailed chart of accounts, it is probably necessary to subdivide one account into several accounts.
After the import operation, proceed manually in the following way:
- In the Chart of accounts, subdivide the opening amounts, budget amounts and previous amounts of one account into several accounts;
- Go over the transactions, one by one, of the account that needs to be subdivided and assign them to the more specific account, or create extra transactions if it is necessary to subdivide one amount into more detailed amounts;
- Proceed in the same way for the transactions of the Budget table.
Results and possible errors
In case the program reports mistakes (absence of accounts or others), the import operation probably needs to be cancelled and the matches need to be completed;then repeat the import operation.
The program, confronted with different charts of accounts, cannot automatically do extensive verifications and guarantee that all the data have been imported and grouped correctly.
It is therefore strongly advised to manually check the result, making sure that the totals of the Balance Sheet and the Profit & Loss Statement are correct.
Accounting with multiple languages
With Banana Accounting, you can make an accounting plan with different languages, and present the Balance Sheet and Profit & Loss Statement in the languages you need.
The different languages
- Program language.
The one used for the interface, dialogue menu, etc.
You can change it in the Program options.
(Check the image below red box 1 and 3) - Documentation in different languages.
You have a complete documentation in different languages, easily accessible by clicking on the help button. - Accounting file language.
(Check the image below red box 2)When you create an accounting file, the columns are set in the creation language.
- The language of the column and table header.
You can change it at your convenience. For example, instead of using the term VAT, you can use the abbreviation that best suits your country's requirement. - The content in any language.
In the cells you can enter texts in any language. - Additional columns for other languages.
You can add columns to have the Balance Sheet and the Profit & Loss Statement in different languages. You can create columns for other languages in the Transactions table and also in all other tables. - View in different languages.
Fast switch between different languages and you can just print the output in the desired language. - Balance Sheet and Profit & Loss Statement in different languages.
You can customize the printout, and just choose to show the required columns in the final reports.

Change the file creation language
Each document on Banana Accounting is a separate file. The language of the file is separate from that of the program and is defined when the file is created. (menu File → New).
Column names and headers are assigned at the time the file is created, the creation language is then used.

To change the language of the file and columns, you need to re-create a new file:
- from the Tools menu choose the Convert to new file command
- in the open dialog box, select the file type equivalent to your existing file and click OK
- in the next window choose the new language of the file and the type of rounding, then click OK
The program creates a new file identical to your previous one, with the new language settings. This new file must be saved with a name.
Change the current language of the file
The current language is the one the program uses to display the wordings, such as "Opening balance in the account card".
Normally, it will be the same as the creation language, but it may be changed in File properties - Other.
Change the column headings
You can change the column header with the Data menu command → Columns setup.
Add columns for different languages
In the Accounts table and also in the other tables (Transactions, VAT codes), you can add additional columns where you can enter the description in other languages.
- Use the Add column command (Data menu →Tables setup command)
- Use the name of the language (e.g. German, Chinese, etc.) as the column name.
- In the newly created columns, for each row, complete the description in the language that has been added.
Create Views for each language
Create a view for each language to have printout only with the desired language.
- Data menu → command in Tables setup
- Create a View for each language.
In each table you can have different views for different languages, or the views that include columns of different languages. - Customize your printout in the language you require. If you want to print in different languages you can create one Composition print for each language so you don't have to change the settings each time, but have them already set up.
Enhanced Balance Sheet for each language
Once you've added the language column to the Accounts table, you can have it appear in the Enhanced Balance Sheet report as well.
- Open the Enhanced Balance Sheet with groups.
- Choose the Composition you want to print.
- In the Composition section with the Duplicate command Create a new Composition for your language.
Like the name of the composition, give the name of the language. - Go to the Columns section.
- Advanced button for the Balance Sheet columns.
- Add buttons.
In the section of the Accounts table.- Make the column of the language you are interested in visible.
- Hide the Description column of the default language.
- Repeat the operation also for the Profit and Loss columns.
- Next time when you open the Enhanced balance sheet with groups, you will have your language already set.
- Enter the composition in the Favorites menu.
So you can access your report faster.
The predefined texts of the report (date etc.) are displayed in the current accounting language. It may be necessary to change the current language from time to time.
Extensions
If you have specific needs in different languages, they can be programmed as Extensions.