其它延展功能信息 (英文页面)
Excel 报告加载 (Beta版)
With this add-in there will no longer need to make "copy and paste" of the values each time you update your accounting file.
You create worksheets with formulas, charts, formatting and more in Excel, and the add-in will retrieve for you the data from the accounting file.
Just click on the update button and your Excel worksheet will be automatically filled with the new values from Banana Accounting, and the results of formulas and charts will be updated accordingly.
See Documentation Banana Accounting Excel Add-in.
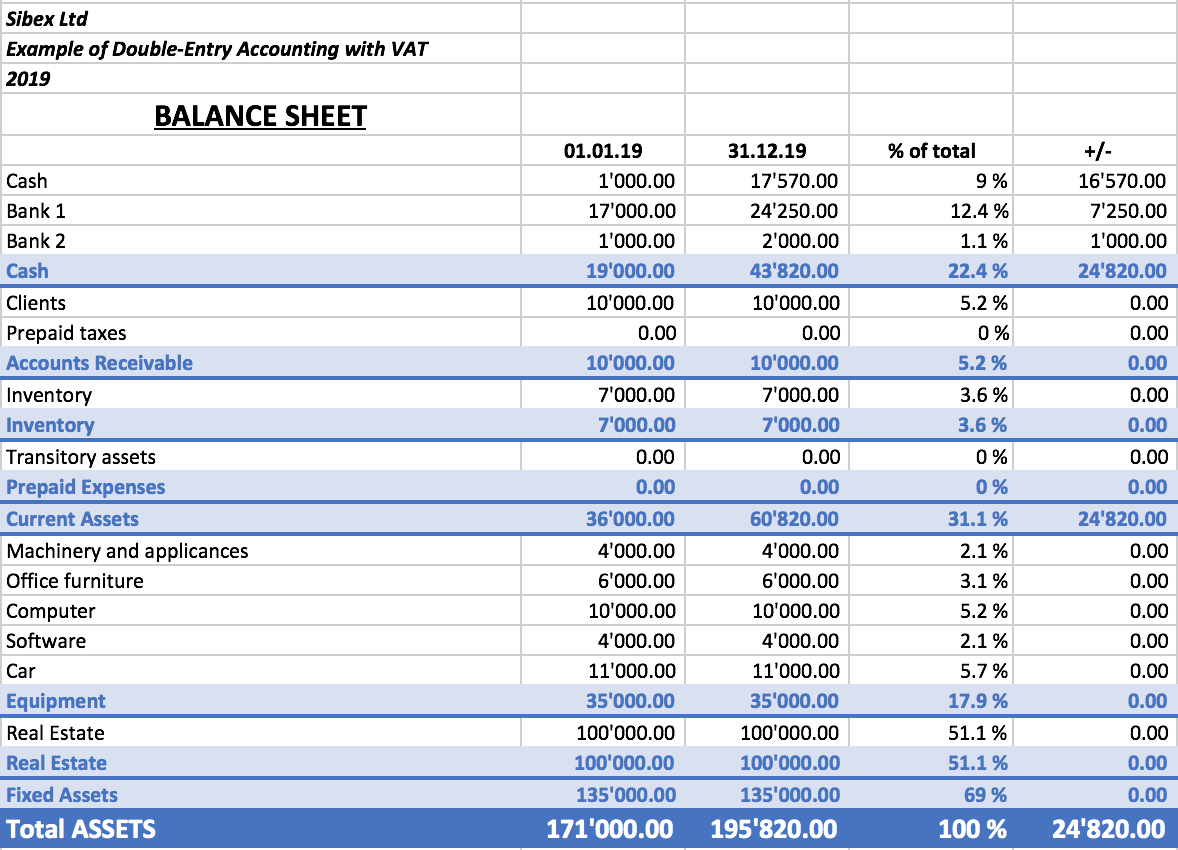
Example of a Balance sheet report created with the Excel Reports add-in
Example of a report with charts created with the Excel Reports add-in
Characteristics
- This add-in is hosted on our server.
Once you have installed the manifest on your computer, your will automatically use the last version. - The add-in are secure.
Unlike Excel-macros the Add-in are secure and cannot compromise your computer. - The add-in is currently in Beta Test.
- Please check everything and report any problem.
- You can use for free, but It is also possible that it will be made available with a cost.
安装
The steps below walk you through all the setup to run the Banana Office Add-ins for Microsoft Office 2016.
Minimum requirements: Microsoft Office 2016 (Word, Excel, PowerPoint, Outlook).
Get Banana Accounting 9
- Download Banana Accounting 9 for Windows or Mac.
- Install it on your pc.
Activate Banana Accounting web server
- Start Banana Accounting 9
- On Menu bar click Tools -> Program options… -> select the Interface tab
- Check the Start Web Server and Start Web Server with ssl options
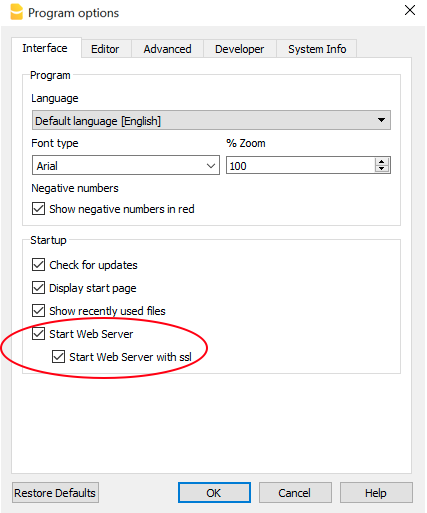
- Click Ok
Load the Add-in
- Open Microsoft Excel 2016
- Click on Insert tab
- Click on the Store icon to open the Office store

- In the Office store page search for Banana add-in
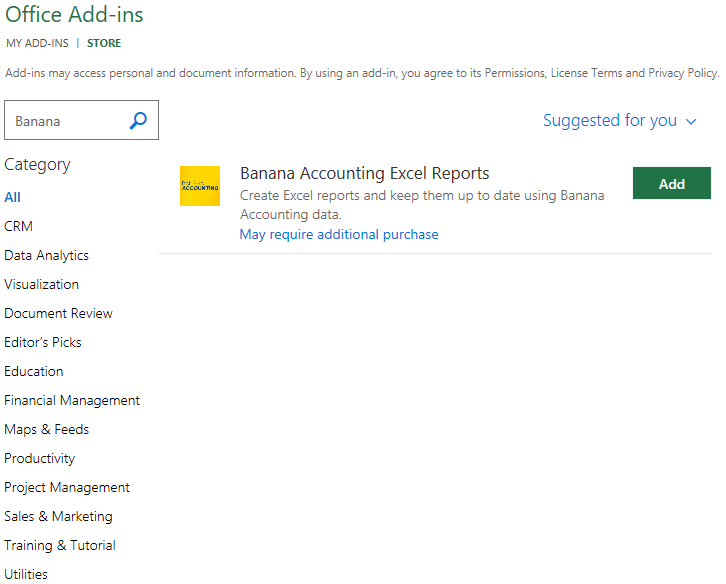
- Click on the Add button to add the Banana Accounting Excel Reports add-in
- As soon as the add-in is added in Excel, on the Home tab of the main ribbon is loaded the Banana Accounting add-in command.
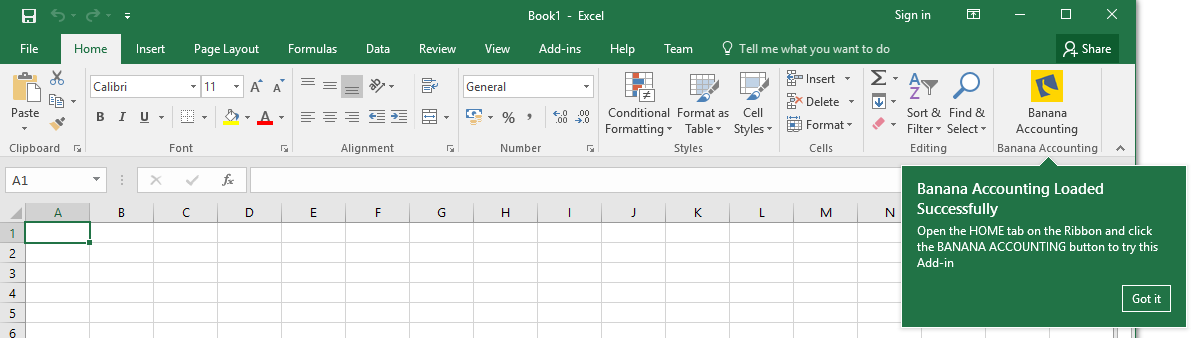
- Click on the Banana Accounting icon to use the add-in
Once the add-in has been added from the Office store it is saved into My Add-ins section.
To load an add-in previously added from the office store:
- Click on Insert tab
- Click on the My Add-ins icon

- Select the Banana Accounting add-in

- Click on the Add button
Troubleshooting Excel add-in for Windows
The guide below walk you through the Windows troubleshooting step by step.
- Download and install the latest version of Banana Accounting 9 for Windows.
- Update Windows and Excel.
- Open Excel and check you are logged in with your Microsoft account (File → Account → User Information).
- Start Banana Accounting web server:
- Open Banana Accounting.
- Click on menu Tools → Program Options.
- Select the tab Interface.
- Check the options Start Web Server.

- Add a local loopback exemption to Microsoft Edge Web Viewer (see Microsoft documentation for more information):
- In the search box enter cmd.

- On the right side select Run as administrator.

- Confirm with Yes.

- Copy and paste the following command:
CheckNetIsolation LoopbackExempt -a -n="microsoft.win32webviewhost_cw5n1h2txyewy"
- Press enter to run the command.
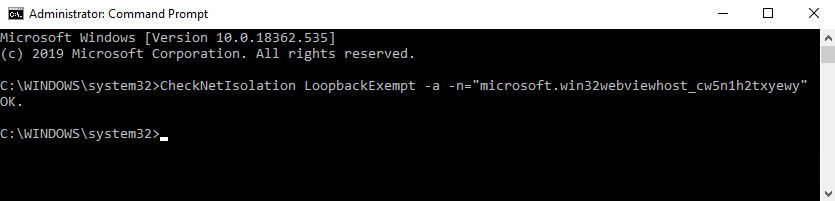
- Close the command prompt.
- In the search box enter cmd.
- Change the server URL on the Add-in settings:
- Start Excel and Banana Accounting Add-in.
- Click on the Options tab of the Add-in.
- Select Other as Server information.
- In the Server URL field enter http://localhost:8081.
- Click OK to confirm and save the changes.
- On the Setup tab of the add-in refresh the files list.

Note: in case you don't want to use the Excel add-in anymore, you can remove the local loopback exemption at any time with the command:
CheckNetIsolation LoopbackExempt -d -n="microsoft.win32webviewhost_cw5n1h2txyewy"
Messages
- Cannot connect to local web server. Incorrect URL server or Banana Accounting/web server are not running.
The connection between Banana Accounting and Excel add-in did not occur. Please follow step by step the Troubleshooting for Windows guide on this page. - No file is open in Banana Accounting.
Banana Accounting is working but no file is open. Open at least one file in Banana Accounting. - File not selected.
No file is selected from the files list. Refresh the files list and select one of them.
Troubleshooting Excel add-in for macOS
The guide below walk you through the macOS troubleshooting step by step.
- Download and install the latest version of Banana Accounting for Mac.
- Start Banana Accounting web servers:
- Open Banana Accounting.
- Click on menu Tools → Program Options.
- Select the tab Interface.
- Check the options Start Web Server and Start Web Server with ssl.
- Open Safari and insert the url https://127.0.0.1:8089
- When the dialog appears, insert your system password and click on always button.
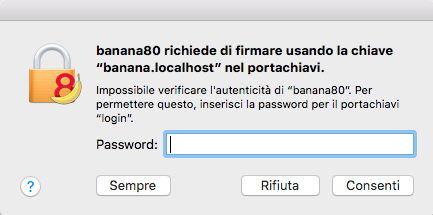
- Start Excel 2016 and load the Add-in.
- Click on the Refresh file list button.
- If a dialog window appears, click always allow button on the left.

Messages
- Cannot connect to local web server. Incorrect URL server or Banana Accounting/web server are not running.
The connection between Banana Accounting and Excel add-in did not occur. Please follow step by step the Troubleshooting for macOS guide on this page. - No file is open in Banana Accounting.
Banana Accounting is working but no file is open. Open at least one file in Banana Accounting. - File not selected.
No file is selected from the files list. Refresh the files list and select one of them.
Excel 文档加载项
Introduction
With this add-in you can create Excel sheet that are filled with Banana Accounting data. Once you have added transactions to the accounting file you just need to click on the Update Button of the add-in and your spreadsheet content will be updated with the new data.
Your existing formatting and formula will be preserved.
- Create an Excel sheet with headers information
This information allows the add-in to retrieve data from Banana Accounting.
There are information relative to the file, column and account or group to be retrieved.
The add-in help you add the necessary information to retrieve the data. -
Click on the Update button
The add-in will retrieve the values from Banana Accounting software.
It mantains the format or formula you enter.
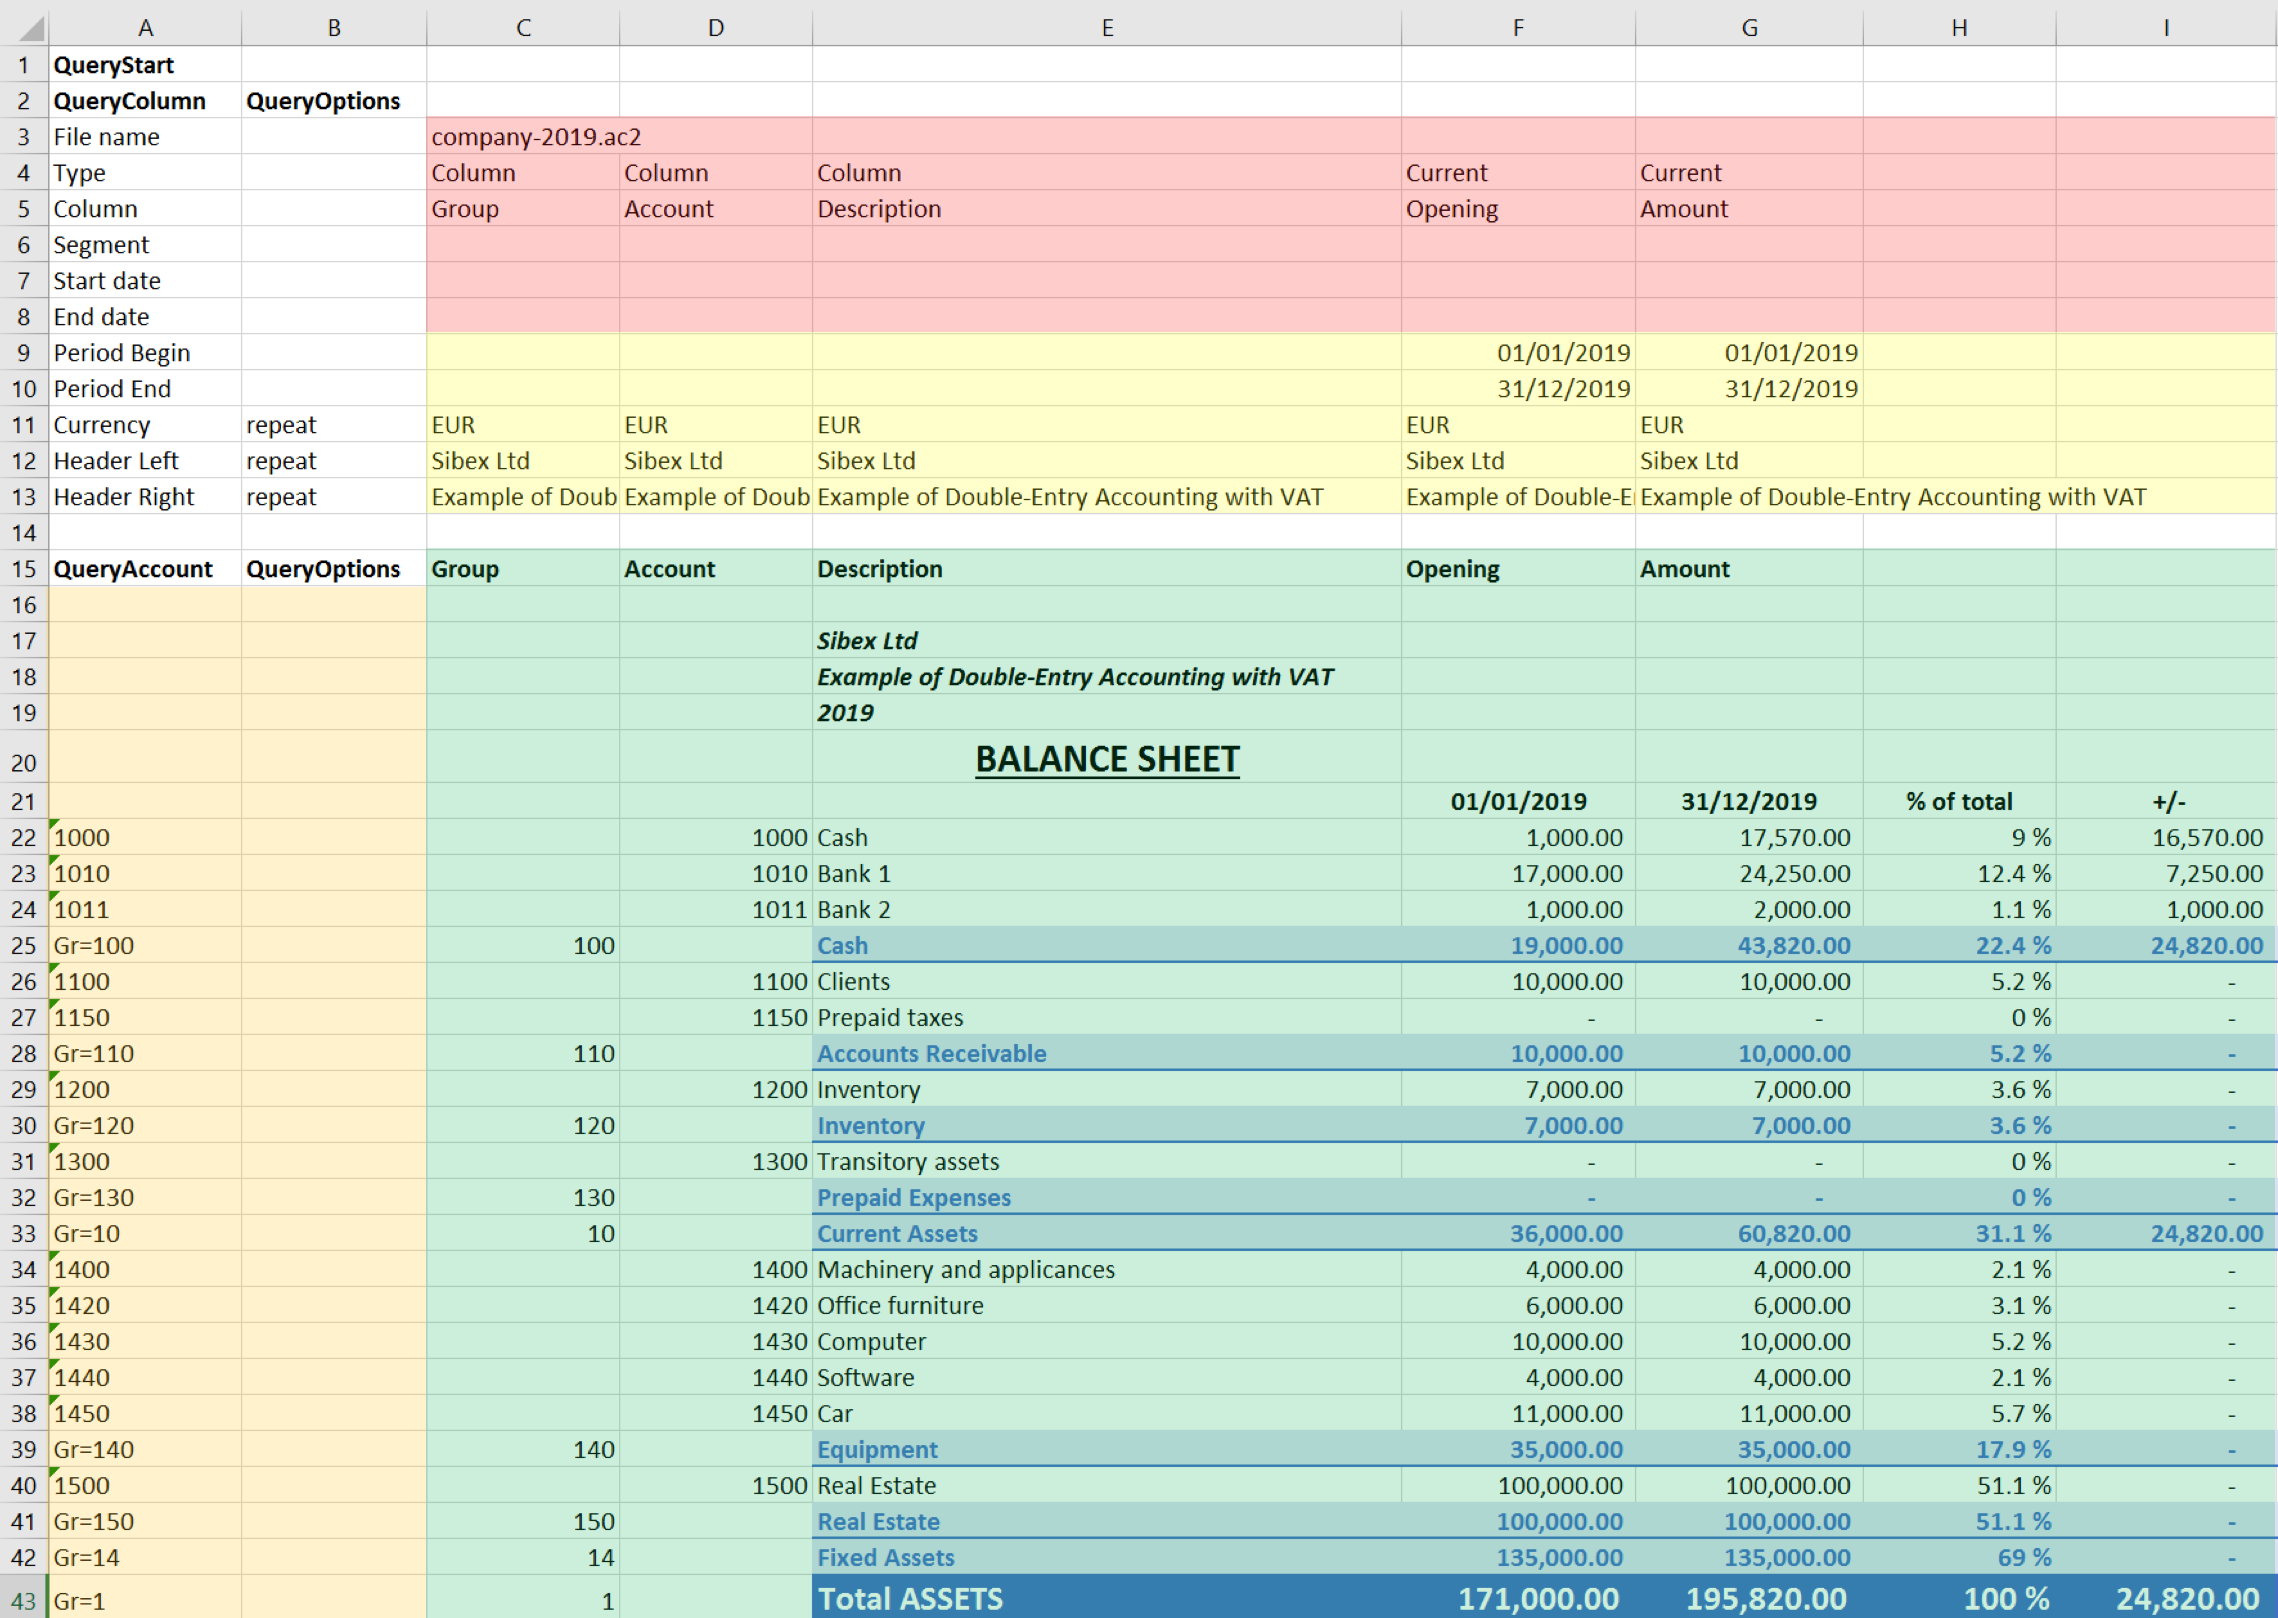
Example of a Balance sheet report created with the Banana Accounting Excel add-in
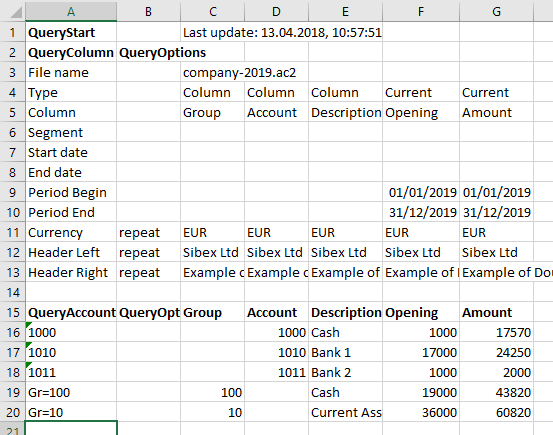
In the example above we can see:
- The data part
Here is where the data is synchronized, based on the QueryAccount and QueryColumns.- Accounting data (Green)
Filled with the information coming from Banana Accounting - Header data (Yellow)
- Accounting data (Green)
- QueryColumns (Red)
The file name, columns names and type to retrieve.
If the column is empty no data in this column will be retrieved. You can use the columns to enter formula. - QueryAccounts (Orange)
The accounts or groups to retrieve.
If the row is empty no data in this row will be retrieved. You can use the row for entering formula o text that is not overwritten.
By clicking on the update button the Data part is updated with the new data of the accounting file, and all the previously settings like fonts, colors, formulas will remain.
Download and installation
See documentation on how to Download and install the Add-in
Example files:
- File Excel already with columns setup.
- Banana Accounting file used for the example excel file.
Add-in Command
As soon as the add-in is added in Excel, on the Home tab of the main ribbon is loaded the Banana Accounting add-in command.
Banana Accounting Add-in command
When the Banana Accounting button is clicked, it loads the start screen of the add-in. The start screen provides additional information describing the functionalities of the add-in.
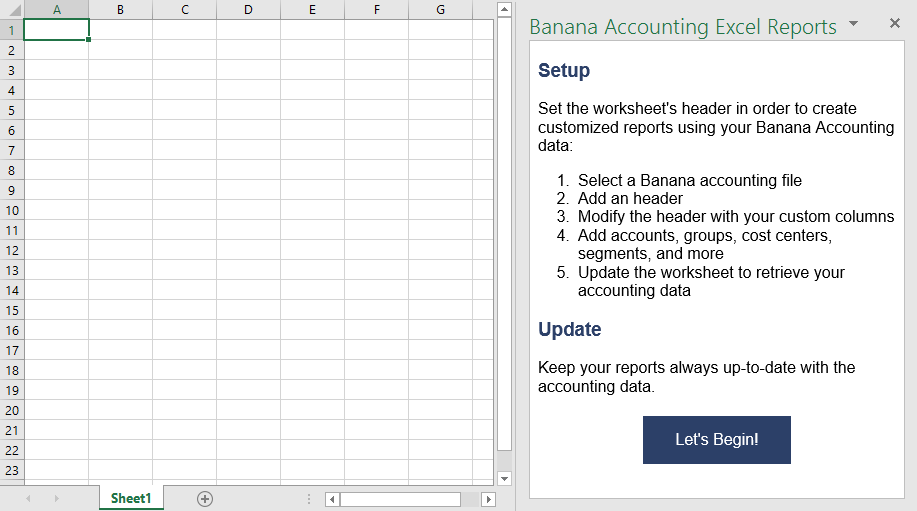
Banana Accounting Add-in start screen
Click on the Let's Begin! button to start using the Add-in.
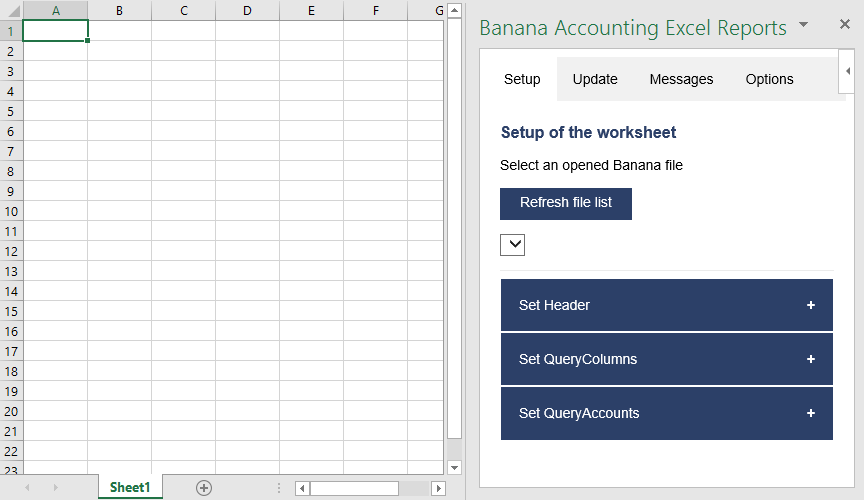
Banana Accounting Add-in setup screen
Security alert messages for Windows users
In order to properly establish a connection between the add-in and Banana Accounting web server, it is required to accept the Banana security certificate.
After the Refresh file list button has been clicked, securities alert dialogs like the following appear:
- The first security alert message is the following one, click on Yes to proceed:
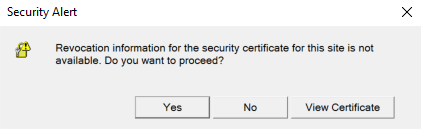
- The second security alert message is the following one, click on Yes to proceed:

If the user clicks Yes, a connection between the add-in and the Banana Accounting web server is estabilished, and then it is possible to use the add-in. Otherwise, if the user clicks No, the add-in is loaded but none connection is established, and the add-in will not work.
If for some reason the security alert messages above do not appear, try to see the troubleshooting documentation.
Add-in general overview
The add-in is a task pane add-in type. This means that the add-in is loaded in a pane on the right side of the Excel worksheet.
It is composed by three tabs, each of them has one specific task:
- The Setup tab contains all the tools needed to add information to your sheet so that the add-in can fill the data part with the accounting data. Typically it is used every time you want to create something new, like for example the very first time you use this add-in.
- The Update tab is used to update the content of the Excel worksheet with the accounting data. It is used after the header section and some accounts has been added.
- The Logs tab it’s just a place where are displayed some messages about the add-in and the operations it does. For example when you update the sheet a message is displayed telling you that the update is completed.
Banana Accounting task pane add-in
Update of the worksheet
The Update tab is composed only of one button: Update current worksheet.
When clicked, this will start the updating process of the current Excel worksheet. Combining the Header, QueryAccount and QueryOptions, the add-in retrieves all the data directly from the Banana Accounting and writes them in the Excel worksheet.
Retrieve data from Banana Accounting and update the worksheet
Setup of the worksheet
These features will add the information to the current worksheet necessary to retrieve data from Banana Accounting.
In the setup tab there are four sections:
- Accounting file selection
- Set Header
- Set QueryColumns
- Set QueryAccounts
Setup of the worksheet tab
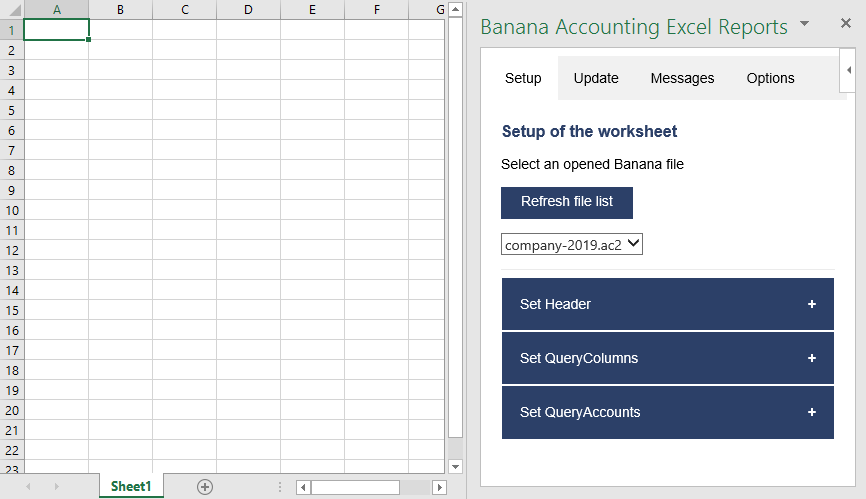
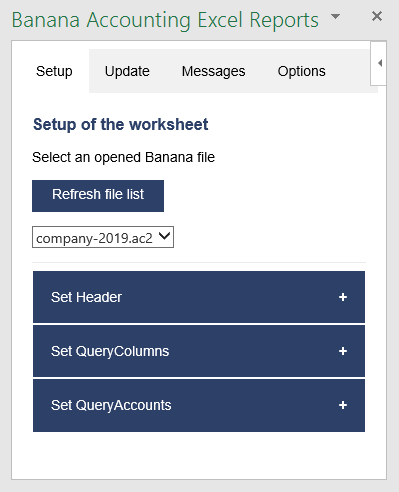
Select an opened Banana file
The first section of the setup page lists all the currently opened Banana Accounting file. Just select the needed one and go to the next setup section.
If for some reason an accounting file is opened in Banana Accounting after the add-in is loaded, then this file doesn’t appear in the list. In this case just click on Refresh list button in order to recheck all the opened documents and recreate the list.
Example of file selection
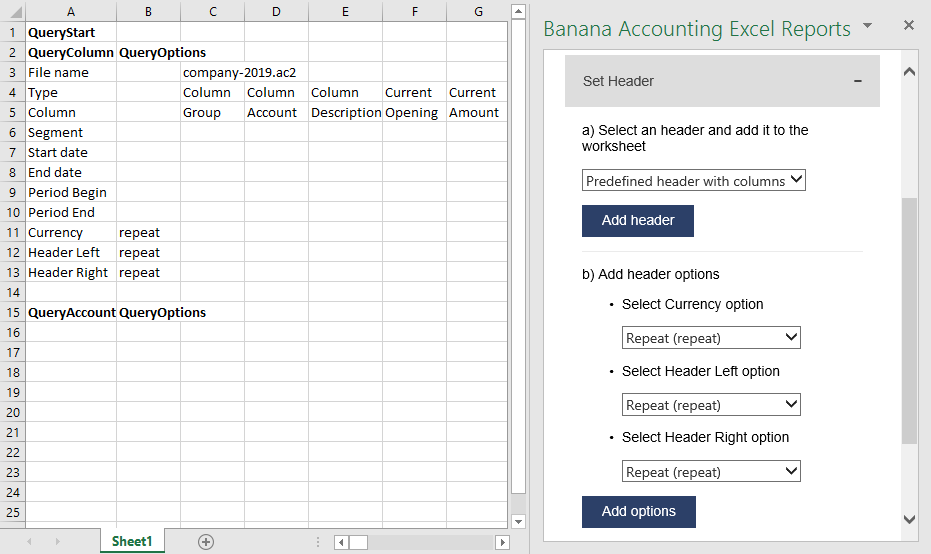
Set Header
The second section of the setup page inserts, on the top of the current worksheet, the header that allows the user to insert information that will be used by the add-in to retrieve data from the accounting file.
Add an header
The first step is to select from the list a type of header. There are two options:
- Predefined header with columns to insert an header with default values for columns and options
- Empty header to insert a blank header
When the button Add Header is clicked, the selected type of header is inserted in the worksheet. It is then possible to modify by setting the QueryColumns and changing QueryOptions.
Add header options
The second step is to define some options for the Currency, Header Left and Header Right values using the QueryOptions column. The options are:
- Repeat to repeat the values in each column
- Do not repeat to avoid repeated values. Only when the file name changes the values are inserted again.
When the button Add options is clicked, the selected options will be inserted in the respective cells.
Example of predefined header
Set QueryColumns
This section guides step by step the user to modify the header by adding QueryColumns to the worksheet.
The QueryColumns information allows the user to define exactly which data the add-in has to retrieve from the accounting file and in which column of the worksheet insert them.
Each QueryColumn consists of six information:
- The Column of the worksheet is used to define in which column of the worksheet all the QueryColumns values will be inserted.
- The Accounting filename is used to define the Accounting file to use when retrieving data.
- The Type value is used to define the type of data.
- The Column value is used to define the data for the given type.
- The Segments (OPTIONAL) is used to have a more detailed classification of the costs (this is optional, if not specified none segments will be added).
- The Periods (OPTIONAL) is used to define a period of the accounting (this is optional, if not specified all accounting period will be automatically used).
When the button Add values to column is clicked, all the information will be added automatically to the selected column of the worksheet.
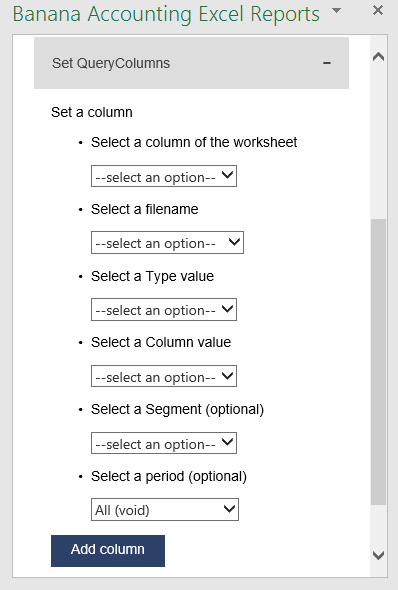
Set QueryColumns section
Select a column of the worksheet
Use this to define in which column of the worksheet all the values of the QueryColumns are inserted. Possible values are:
- Current selected to use the colum of the cell selected on the worksheet (ex. if the cell D8 is selected, D column will be used).
- C ... Z
Remember that it is possible to use the columns from C to AZ, even if not all appear in the list.
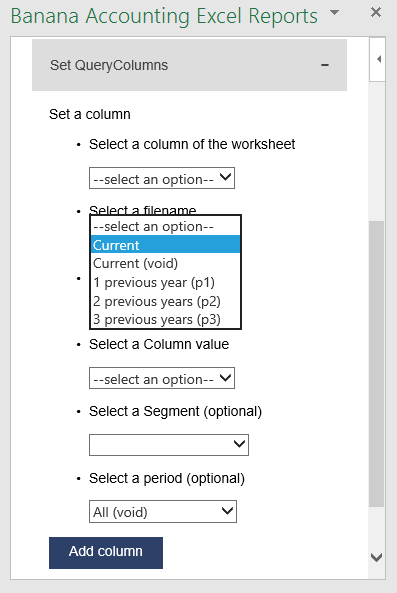
Select a filename
Use this to define the file name for a QueryColumn. When a file name is specified it is used until a new file name is inserted.
The possible values are:
- Current selected to use the selected file on the top of the add-in.
- Current (void) to use the previously inserted file but let the cell empty. It works only if in previous columns there is a specified file name.
- 1 previous year (p1) to use the previous year file of the last file inserted (example: if current year is "2019.ac2", p1 refers to "2018.ac2")
- 2 previous years (p2) to use two previous years file of the last file inserted(example: if current is "2019.ac2", p2 refers to "2017.ac2")
- 3 previous years (p3) to use three previous years file of the last file inserted(example: if current is "2019.ac2", p3 refers to "2016.ac2")
Filename selection
Notes:
- remember to always open in Banana Accounting all the files specified in the header
- the p1, p2 and p3 abbreviations always refer to the last file specified in the header
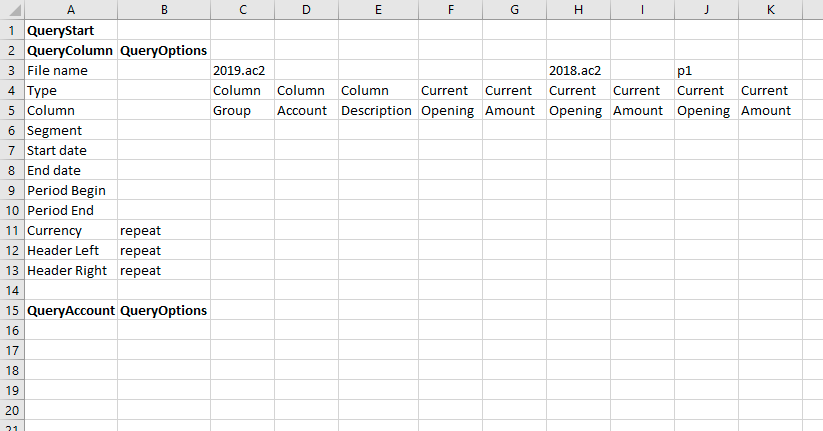
Example of more file insertion
On the image above we can see there are three different files defined, each of them using different columns.
- Columns from C to G refer to the 2019.ac2 file
- Columns from H to I refer to the 2018.ac2 file
- Coumns from J to K refer to the 2017.ac2 file (p1 is the previous file of the last file inserted, in this case the 2018.ac2)
Select a Type and a Column value
Use them to define the data you want to retrieve from the accounting file.
- Type specify the type of data.
- Column specify the data for the given type.
The table below indicates for each Type of data which Column can be specified and so retrieved from the accounting (Not Case-Sensitive).
| Type | Column |
|---|---|
| column |
Group, Account, Description, Disable, FiscalNumber, BClass, Gr, Gr1, Gr2, Opening, Debit, Credit, Balance, Budget, BudgetDifference, Prior, PriorDifference, BudgetPrior, PeriodBegin, PeriodDebit, PeriodCredit, PeriodTotal, PeriodEnd, NamePrefix, FirstName, FamilyName, OrganisationName, Street, AddressExtra, POBox, PostalCode, Locality, Region, Country, CountryCode, Language, PhoneMain, PhoneMobile, Fax, EmailWork, Website, DateOfBirth, PaymentTermInDays, CreditLimit, MemberFee, BankName, BankIban, BankAccount, BankClearing, Code1 |
|
current |
amount, amountcurrency, balance, balancecurrency, bclass, credit, creditcurrency, debit, debitcurrency, enddate, opening, openingcurrency, periodstring, rowcount, startdate, total, totalcurrency |
| budget | amount, amountcurrency, balance, balancecurrency, bclass, credit, creditcurrency, debit, debitcurrency, enddate, opening, openingcurrency, periodstring, rowcount, startdate, total, totalcurrency |
| columnvat | Group, VatCode, Description, Gr, Gr1, IsDue, AmountType, VatRate, VatRateOnGross, VatPercentNonDeductible, VatAccount |
| currentvat | taxable, amount, notdeductible, posted, rowcount |
In the table below there are some examples of queries that can be used in the header to retrieve data from Banana Accounting:
| Type | Column | Segment | Start date | End date |
RESULT |
|---|---|---|---|---|---|
| column | description | Return from the Accounts table the value of the column description for the account specified in the QueryAccount column | |||
| current | debit | Return the amount of debit transactions for all the accounting period for the account specified in the QueryAccount column | |||
| current | balance | :S1 | 01.01.2019 | 10.01.2019 | Return the opening + debit-credit from the 01.01.2019 to 10.01.2019 for the account and segment specified in the QueryAccount column |
| current | total | M6 | Return the difference between debit-credit for the 6th month for the account specified in the QueryAccount column | ||
| current | total | Q2 | Return the difference between debit-credit for the second quarter for the account specified in the QueryAccount column | ||
| budget | opening | M12 | Return the amount at the begining for the 12th month for the account specified in the QueryAccount column | ||
| columnvat | description | Return from the Vat Codes table the value of the column description for the vat code specified in the QueryAccount column | |||
| currentvat | taxable | Return the amount of the taxable column for the vat code specified in the QueryAccount column |
Select a Segment (optional)
If the selected file has segments they will appear in the list.
Use this to define a segment to have a more detailed classification of the costs.
Select a period (optional)
Use this to define the accounting period that will be used to retrieve data from the accounting file.
Possible values are:
- All (void) to use all the accounting period
- Custom date to specify a Start date and End date (example: Start date "04.02.2019", End date "12.03.2019").
- Month 1 (M1) ... Month 12 (M12) to specify a single month (example: M1 for 1st month, M2 for 2nd month, etc.)
- Quarter 1 (Q1) ... Quarter 4 (Q4) to specify a single quarter (example: Q1 for the 1st quarter, period from 01.01 to 31.03)
- Semester 1 (S1) ... Semester 2 (S2) to specify a single semester (example: S2 for the 2nd semester, period from 01.07 to 31.12)
- Year 1 (Y1) ... Year 10 (Y10) to specify a single year (example: Y1 for the 1st year)
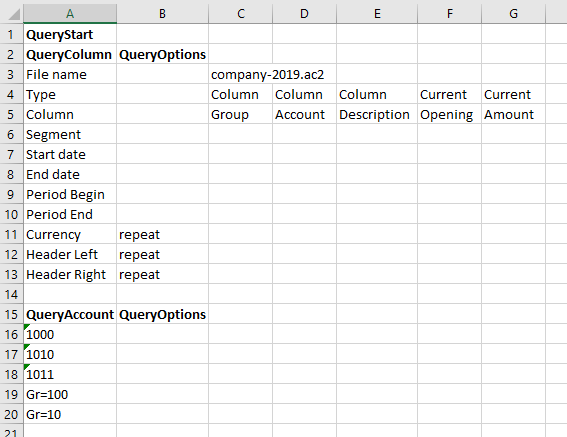
Set QueryAccounts
This section provides to insert:
- QueryAccounts to specify all the desired accounts, groups, cost centers, segments or vat codes that will be used with the data specified in the header to retrieve the accounting data.
- QueryOptions (OPTIONAL) to specify an option for a specific QueryAccount. Just select a cell next to the account and insert the option (this is optional, if not specified none options will be added).
Add accounts
When an option is selected, the add-in loads the appropriate check box list with all the elements taken from the selected accounting file. It is possible to choose between six options:
- Accounts to load a list of all the accounts/categories codes taken from the table Accounts/Category of the accounting
- Groups to load a list of all the groups codes taken from the table Accounts/Category of the accounting
- Cost centers to load a list of all the cost centers codes taken from the table Accounts/Category of the accounting
- Segments to load a list of all the segments codes taken from the table Accounts/Category of the accounting
- All to load a list of all the accounts/categories, groups, cost centers and segments codes taken from the table Accounts/Category of the accounting
- Vat codes to load a list of all the VAT codes taken from the table VAT codes of the accounting

Type of account selection
For example, choosing the All option, the add-in loads a list containing all the accounts, groups, cost centers and segments respecting the order in which they appear in the accounting file.
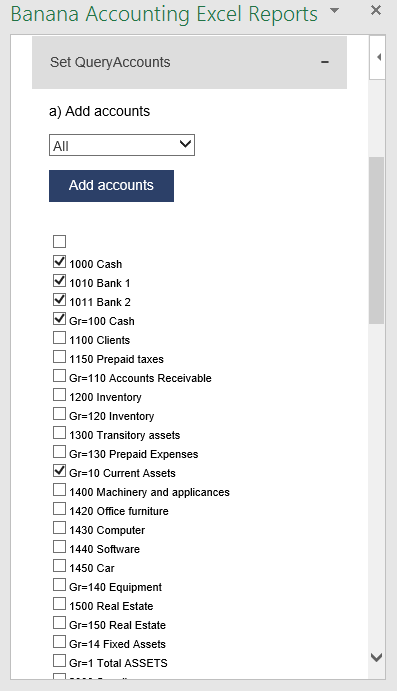
Example of accounts and groups selection
After all desired elements has been checked, by clicking the Add accounts button will add them to the Excel worksheet under the QueryAccount starting from the selected cell. By default the add-in starts the insertion immediately after the QueryAccount title (row 16).
Add the selected accounts and groups to the Excel worksheet
Add option
The QueryOptions column is designed to add some options to the query that will retrieve the data from Banana Accounting. It is optional. If not used no options will be used.
The possible values are:
- invert to invert the sign of the current or budget balances.
- budget to get the budget balances (even if in the header are specified to use current balances).
- budgetinvert to get the budget balances (even if in the header are specified to use current balances) and also to invert the sign.
QueryAccounts options selection
Header settings
- Do not add or delete rows in the header.
- Do not add or delete columns before the column B.
- From column C forward, it is possible to add or remove columns. Columns A (QueryColumn) and B (QueryOptions) must always exist.
- Added columns can also be empty.
- If columns from AA to AZ are used, plese re-enter the file name at least on the AA column, even if it is the same used in the previous column.
To better understand how exactly the header works and how to properly modify it, below there are some explanation about the most important things.

Editable header parts
On the image above we highlighted in yellow all the header's parts that can be modified by adding information when creating a report.
Everything else will be automatically filled by the add-in when the Update current worksheet button is clicked.
Period Begin
A conversion of the start date to be easily read.
This is automatically filled for each column by the add-in when the worksheet is updated.
Period End
A conversion of the end date to be easily read.
This is automatically filled for each column by the add-in when the worksheet is updated.
Currency
The accounting basic currency.
This is automatically filled for each column by the add-in when the worksheet is updated.
Header Left
One of the information property of the accounting.
This is automatically filled for each column by the add-in when the worksheet is updated.
Header Right
One of the information property of the accounting.
This is automatically filled for each column by the add-in when the worksheet is updated.
QueryAccount
As already said, in this column are listed all the chosen accounts, each on a different row.
Instead of insert an account, is also possible to add a custom regroup using a particular accounting column.
The custom regroup QueryAccount syntax is $column=value, where:
- $ indicates that a custom regroup is used.
- column is the Xml name of the column. It can be a user created column (for example "Abc") or a column that already exists in the accounting (for example the "Gr").
- value indicates the regroup.
If we insert something like "$Abc=1" in the QueryAccount cell, this means that the add-in takes and sums together all the accounts/groups balances that have the 1 value in the "Abc" column of the accounting.
Logs
The Logs tab it’s just a text area where are displayed some messages about the add-in and the operations that it does.
Example of logs messages
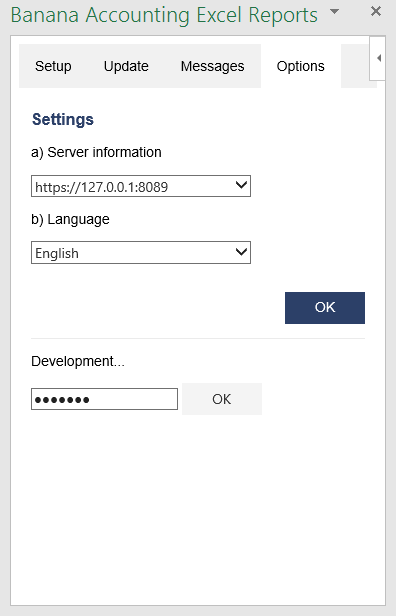
Settings
The Settings tab allows to change some settings of the add-in:
- the Server URL to define the url where Banana Accounting is hosted, to avoid to have Banana Accounting installed locally. By default it is defined the local Banana Accounting web server https://127.0.0.1:8089.
- the Connection token at the moment should be left empty.
- the Language to define the language of the Banana Excel Add-in. Available languages are english, french, german and italian.
- the Development is used only by developers for testing purposes, and users cannot access it.
Settings tab
Release History
- 2017-06-12 First release
- 2017-07-07
- Added Add-in Commands functionality.
- Added a start screen that provides additional information describing the functionalities of the add-in.
- Added the settings tab to allow the user to change the Port of the URL.
- 2017-09-29
- Changed the name of the add-in to "Banana Accounting Excel Reports".
- Changed some texts.
- New add-in design.
- Added new functionalities that allow the user to set and insert all the required information more easily.
- Added localization language for english, french, german and italian.
- 2017-11-24
- Added new functionality that allows to set the parameters for the connection.
为开发人员安装的
The steps below walk you through all the setup of the environment required to run the Banana Office Add-ins for Microsoft Office 2016.
Minimum requirements: Microsoft Office 2016 (Word, Excel, PowerPoint, Outlook).
Get Banana Accounting 9
- Download Banana Accounting 9 for Windows or Mac.
- Install it on your pc.
Activate Banana Accounting web server
- Start Banana Accounting 9 Experimental.
- On Menu bar click Tools -> Program options… -> select the Interface tab
- Check the Start Web Server and Start Web Server with ssl options
- Click Ok
Install the Manifest file
Each Office Add-in has its own manifest file. The manifest is an XML file that defines various settings, including description and links to all the add-in files.
Manifest file must be copied to a specific directory.
Manifest directory for Windows
On Windows you need to create a directory to save the manifest of the add-in.
The directory needs to be a shared directory.
- Create a folder for the add-ins manifests on a network share:
- Create a folder on your local drive (for example, C:\Manifests).
- Right click on the folder, select properties.
- Click on Sharing tab.
- Click on Advanced Sharing...
- Check the Share this folder box.
- Click Apply and then Ok.
- Tell Excel or Word to use the directory as trusted app catalog.
- Launch Excel and open a blank spreadsheet.
- Choose the File tab, and then choose Options.
- Choose Trust Center, and then choose the Trust Center Settings button.
- Choose Trusted Add-in Catalogs.
- In the Catalog URL box, enter the path to the network share you created, and then choose Add Catalog.
To see the path: right click on the shared folder -> Properties -> Sharing -> Network Path. - Select the Show in Menu check box, and then choose OK. A message appears to inform you that your settings will be applied the next time you start Office.
- Close Excel and restart it.
Manifest directory for macOS
On Mac you need to create a folder to save the manifest of the add-in.
Go to one of the following folders where you'll save your add-in's manifest file. If the wef folder doesn't exist on your computer, create it.
- For Excel:
/Users/<username>/Library/Containers/com.microsoft.Excel/Data/Documents/wef - For Word:
/Users/<username>/Library/Containers/com.microsoft.Word/Data/Documents/wef - For PowerPoint:
/Users/<username>/Library/Containers/com.microsoft.Powerpoint/Data/Documents/wef
where <username> is your name on the device.
Get the Office Add-in manifest
You can now download the manifest of the add-in you want to use.
- Download the XML BananaAccountingExcelManifest file.
- Copy the manifest to the manifest directory.
Load the Add-ins in Excel
Once all the setup and installations are done, it is possible to run and use the add-in.
- Open Microsoft Excel 2016
- Click on Insert tab
- Click on the Add-ins button
- Click on the Shared folder

- Select the Banana Accounting Add-in
- Click Add
Other Resources
For more and detailed information about the developing of the Office Add-ins, please visit https://github.com/BananaAccounting/General/tree/master/OfficeAddIns.
Introduction to Excel 2016 Add-ins
Office 2016 Add-ins are extentions of Word, Excel, PowerPoint, and Outlook.
Add-ins are composed of:
- Manifest file
An XML file that defines various settings, including description and links to all the add-in files.
It is used by Word, Excel, PowerPoint, and Outlook to locate the Add-in resources.
The manifest file can reside on a local directory or is published on the Office Store. - Webpage files
Files that compose the web app (HTML pages, JavaScript code and images).
All the files need to reside on a web server.
Add-in Examples
These examples have been made available for programmers that want to create specialized add-ins to retrieve information from Banana Accounting.
You need to insall the add-ins on a web server.
- for Excel:
- Account Card report to create an Excel worksheet with details of an account.
- Retrieve Table report to create an Excel worksheet with a full table taken from the accounting.
- for Word:
- Account Card report to create a Word document with details of an account.
Excel 同步功能
使用 Excel同步功能,使您的会计数据也同样可在 Excel 表格中被使用。不需要复制和粘贴或导出和导入。
在您添加了新的发生业务之后,在Excel表格中的数据也会同步进行更新和计算。此功能仅在Windows操作系统下可用,在Apple/Mac电脑上暂不可用。
成本分摊在共同所有者或客户之间
Excel 同步功能用来检索在 Excel中的Banana会计数据和当前账户余额。
费用由使用正常Excel公式的客户分摊。
您可以使用该示例来创建公寓费用的划分。
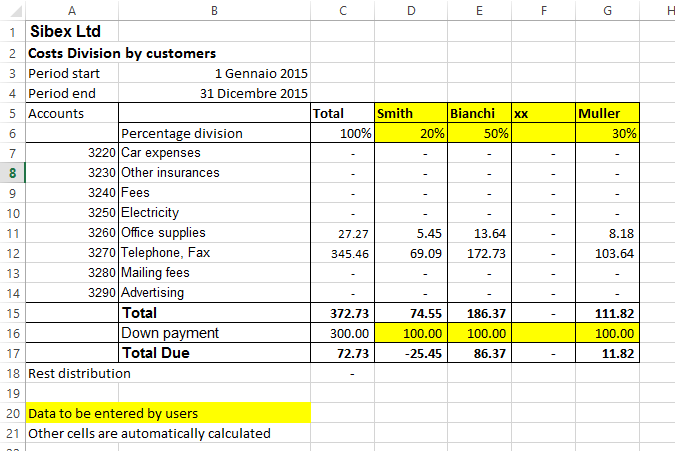
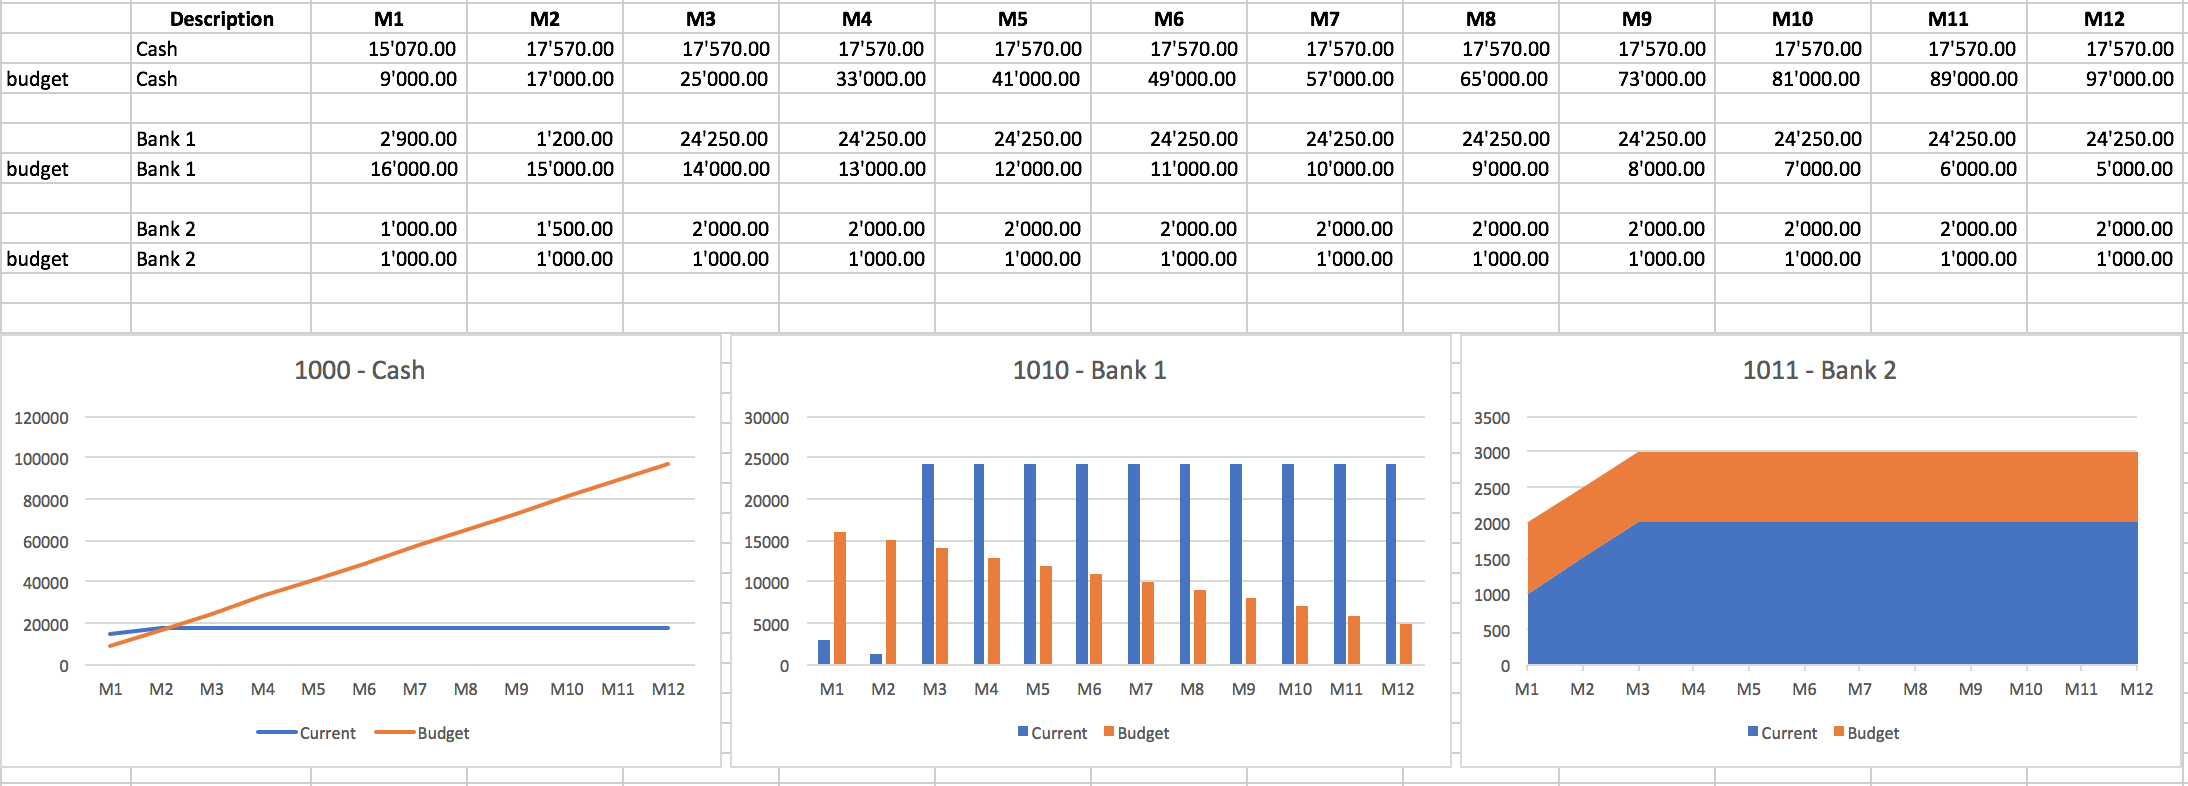
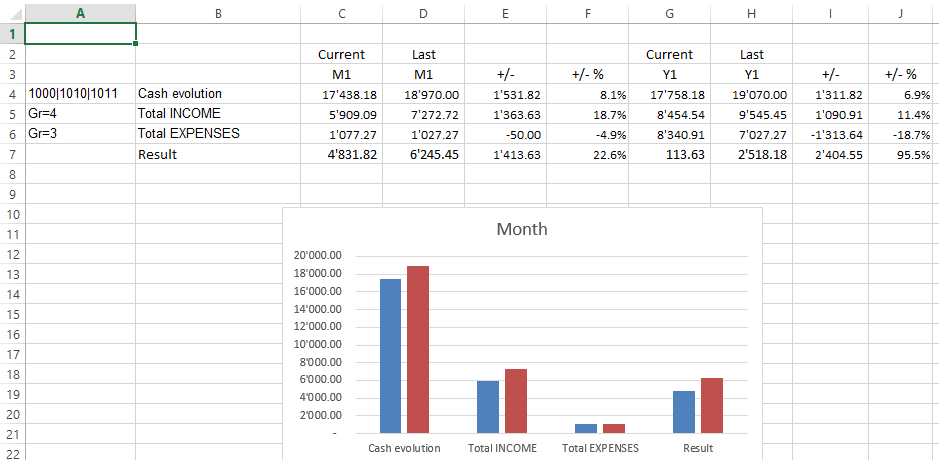
当年与去年差额的示例
在此示例中,我们从设定的两年中提取数据并创建了一个图形。
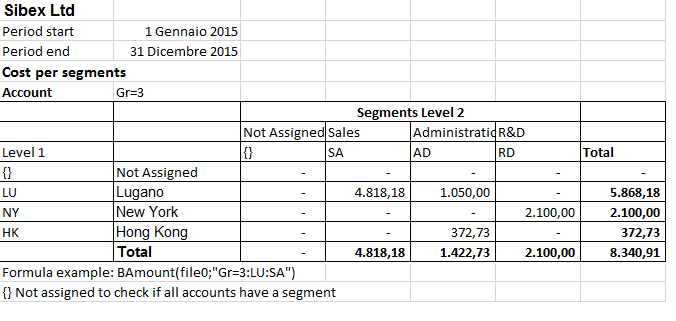
分部细分的示例
分部的金额也由分部来细分。
Banana财务会计软件Excel同步用户定义功能介绍
介绍
Excel同步是Excel用户定义的功能,其实现了在Banana财务会计软件内的数据与在Excel表格文件中的数据同步更新,计算的功能。
在Banana财务会计软件中,如果您更新了会计文件,添加了新的发生业务,那么在Excel表格中的数据也会同步进行更新和计算。
Excel能够整合通过互联网协议提供的文档和数据。 Banana 包含一个网络服务器, 和一个 RESTful API, 其可通过http协议进行访问。Excel同步功能使用Banana软件集成网络服务器实时检索数据。
使用Excel公式
Banana Excel 同步功能的名字是以 "B" 开头的, 您可以在单元格中使用来检索会计数据。
请看示例:
// return the opening balance of the account 1000 for all the period
=BOpening("1000")
// return the description of the account 1000
=BAccountDescription("1000")
// return the end balance of the group 10
=BBalance("Gr=10")
// return the opening of the account 5000 for the period 3. month
=BOpening("2000", "2017-03-01/2017-03-31")
// return the total debit minus credit of the account 5000 for 3. month of the year
=BTotal("5000", "M3")
// return the total debit minus credit of the group 50 for 3. quarter of the year
=BTotal("Gr=50", "Q3")
Excel 同步功能的优点:
- 您可以动态检索从Banana财务会计文件中提取的数据;
- 不需要在Excel中重新输入数据 (或者导入,复制和粘贴);
- 在会计文件数据发生变化的时候,Excel表格内的数据是与其同步更新的;
- 用于计算期间值的公式简便易使用,可以创建强大的电子表格来用于评估,呈现会计数据或创建图形。
技术方面的细节
Banana Excel同步是Excel用户定义的功能, 小的Visual Basic程序,其扩展Excel允许在单元格中插入公式。
- Banana Excel同步功能需要使用新版本的Excel,并且只适用于Windows版本。
- 为了能够使用Excel同步用户定义功能,您需要一个扩展名为 *.xlsm 的Excel文件。
- Banana Excel同步用户定义功能是根据Apache许可证来提供的 (开放资源软件。请您查看: /www.apache.org/licenses/LICENSE-2.0)。
- 查看最新版本的功能: github.com/BananaAccounting/General/。
- Banana Excel同步用户定义功能使用 Banana 网络服务器。
-
有关使用公式的更多信息,请您查看关于会计功能的Banana API。
使用示例
- 下载 Excel 电子表格示例文件
- 解压内容
- 开启 Banana财务会计软件
- 激活网络服务器 (工具栏 -> 基本设置 -> 界面 -> 启动web服务器)
- 打开Banana财务会计文件 "company_2019.ac2" 和 "company_2020.ac2"
- 打开“BananaSync.xlsm”文件并激活宏(Macro)
如果宏被Excel自动禁用,您应该更改宏安全设置
最后按照说明显示功能区中的开发人员选项卡 - 使用宏的"重新计算全部"来重新计算电子表格 (Ctrl+R)
Excel 没有反应
如果您打开了一个文件,Banana财务会计软件或Banana网络服务器没有运行的话,那么Excel将等待至联系到Banana网络服务器为止。
启动Banana财务会计软件和Banana网络服务器。
如何创建您的电子表格
- 以新的名字另存文件"BananaSync.xlsm"
- 在Banana财务会计软件中打开您的会计文件
- 在您的Excel电子表格中,用您的会计文件名替换该文件名(黄色突出显示的单元格)
- 根据您的需要更改电子表格
-
功能使用
参数文件名
作为第一个参数,大多数的Excel同步功能需要一个Banana财务会计文件的名称。
- 该文件必须是在Banana财务会计软件中被打开的。
- 您只使用没有目录的文件名。
不要在函数中直接使用文件名。请在单元格中使用包含文件名的参数。
- 您也可以在不同的年份使用相同的电子表格。 您只需要更改单元格中的文件名。
- 如果Banana财务会计软件没有打开Banana网络服务器,也没有激活的话,您无需等待。
- The file name of the current year is taken from the cell named "File0" .
- The cell File0 contains a function =BFileName(DisableConnection).
This function checks if the file is open in Banana.- If the file is not open the content of the cell is set to an empty string.
The other Banana Sync functions will not make any call to Banana, to retrive data. - If the file is open it will insert the name of the file.
- If the file is not open the content of the cell is set to an empty string.
- The cell B6 contain the name of the file to be used. Insert the file name in cell B6.
=BFileNameF(File0, DisableConnection). - The file name of the current year is taken from the cell named "File0" .
- The file name of the last year is taken from the cell named "File1" .
Argument period
Many functions use the optional argument period. This can be:
- An empty string. The start and end date of the accounting are used.
- A start date and end date in the form of yyyy-mm-dd/yyyy-mm-dd
example “2015-01-01/2015-01-31”
In order to create a period from two Excel dates use the function BCreatePeriod. - An abbreviation
With the abbreviation you can easily use the same spreadsheet for accounting file of different periods.
The start and the end date will be determined based on the date of the accounting file- M + the month number M1, M2, ..
- Q + the quarter number Q1, Q2,
- Y + the year number Y1, Y2, ....
BananaSync Functions description
Most function are available
- Without the parameter FileName.
In this case the File0 (Current Year) is used - With the paramenter FileName.
- The function is the same but end with "F"
BAccountDescription(account[, column]) and BAccountDescriptionF(fileName, account[, column])
Retrieve the account description of the specified account or group.
With argument column you can indicate to retrieve another column instead of the Description column.
Examples:
=BAccountDescription("1000")           // Description of account 1000 current year
=BAccountDescription("Gr=10")          // Description of Group 10 current year
=BAccountDescription("1000", "Gr1")    // Contet of column "Gr1" relative to the account 1000 current year
// Last year
=BAccountDescriptionF(File1, "1000") // Desctiption of account 1000
=BAccountDescriptionF(File1, "Gr=10")       // Description of Group 10
BAmount(account, [,period ]) and BAmountF(fileName, account, [,period ])
Retrieve the normalized amount based on the BClass.
Only work for double entry accounting only. For Income and expenses accounting use BBalance or BTotal.
- for accounts of BClass 1 or 2 it return the balance (value at a specific instant).
- for accounts of BClass 3 or 4 it return the total (value for the duration).
- For accounts of BClass 2 and 4 the amount is inverted.
You can use this functions also with groups provided you assign a BClass also to a group.
BBalance( account [, period]) and BBalanceF(fileName account [, period])
Retrieve the Balance at the end of the period of the indicate account, cost center, groups, segments
The BBalance result is the sum of the BOpening + BTotal
It is used for retrieving accounting data for the Balance Sheet accounts (Assets, Liabilities)
- Single account number ("1000")
- Several accounts summed toghether.
Enter the accounts numbers separated by the character “|” ("1000|1001). - You can specify normal accounts, cost centers or segments.
- You can also use wild cards and also use “Gr=” followed by the accounting group.
- For more information see the Javascript function description for currentBalance
- Example
BBalance( "1000")              // Balance of account 1000
BBalance( "1000|1010")         // Balance of account 1000 and 1010 are summed together
BBalance( "10*|20*")           // All account that start with 10 or with 20 are summed toghether
BBalance( "Gr=10")             // Group 10
BBalance( "Gr=10| Gr=20")      // Group 10 or  29
BBalance( ".P1")               // Cost center .P1
BBalance( ";C01|;C02")         // Cost center ;C01 and C2
BBalance( ":S1|S2")            // Segment :S1  and :S2
BBalance( "1000:S1:T1")        // Account 1000 with segment :S1 or ::T1
BBalance( "1000:{}")           // Account 1000 with segment not assigned
BBalance( "1000:S1|S2:T1|T2")  // Account 1000 with segment :S1 or ::S2 and ::T1 and ::T
BBalance( "1000&&JCC1=P1")     // Account 1000 and cost center .P1
// Last year
BBalanceF(File1, "1000")        // Balance of account 1000 (last year)
BBalanceF(File1, "1000|1010")   // Balance of account 1000 and 1010 are summed together (last year)
BBalanceGet( account, cmd, valueName [,period ]) and BBalanceGetF(fileName, account, cmd, valueName [,period ])
This function allows to easily access all other data made available by the REST API as “balance”, “budget”
Examples:
=BAmount( “1000”, “balance”, “currencyamount”)
=BAmount( “1000”, “balance”, “count”)
=BAmount( “1000”, “balance”, “debit”)
// Last year
=BAmount( File0, “1000”, “budget”, “debit”)
BBudgetAmount(account [, period]) and BBudgetAmountF(fileName account [, period])
Same as BAmount but use the budget data instead of the accounting data.
BBudgetBalance(account [, period]) and BBudgetBalanceF(fileName account [, period])
Same as BBalance but use the budget data instead of the accounting data.
BBudgetInterest( account, interestRate [, period]) and BBudgetInterestF(filename, account, interestRate [, period])
Same as BInterest but use the budget data instead of the accounting data.
BBudgetOpening(account [, period]) and BBudgetOpeningF(fileName account [, period])
Same as the BOpening but use the budget data instead of the accounting data.
BBudgetTotal(account [, period]) and BBudgetTotalF(fileName account [, period])
Same as the BTotal but use the budget data instead of the accounting data.
BCellAmount( table, rowColumn, column) and BCellAmountF(fileName, table, rowColumn, column)
Retrieve the content of a table cell as an amount.
Examples:
=BCellAmount(“Accounts”, 2, “Opening”)
=BCellAmount(“Accounts”, “Account=1000”, “Balance”)
=BCellAmount(“Accounts”, “Group=10”, “Balance”)
// Last year
=BCellAmountF(File1, “Accounts”, 2, “Opening”)
BCellValue( table, rowColumn, column) and BCellValueF(fileName, table, rowColumn, column)
Retrieve the content of a table cell as a text.
Examples:
=BCellValue(“Accounts”, 2, “Description”)
=BCellValue(“Accounts”, “Account=1000”, “Description”)
=BCellValue(“Accounts”, “Group=10”, “Description”)
// Last year
=BCellValueF(File1, “Accounts”, 2, “Description”)
BCreatePeriod( startDate, endDate)
Take two cell dates and create a string period
=BCreatePeriod(D4, D5)
BDate(isoDate)
Convert an Iso Date to an Excel date.
BFileName(fileName [, disable connection])
Return the FileName or an empty string if there is no connection with the web server or if the file is not correct.
If the value of disableConnection is not void the function returns an empty string.
Use the cells that contain the result of this function as the file name parameter when using the other functions. If Banana is not open only one query is made and Excel will not wait for a long time.
BFunctionsVersion()
Return the version of the function in the date format.
BInfo( sectionXml, idXml) and BInfoF(fileName, sectionXml, idXml)
Retrieve information regarding the file properties.
Examples:
=BInfo(“Base”, “HeaderLeft”)
=BInfo(“Base”, “DateLastSaved”)
=BInfo(“AccountingDataBase”, “OpeningDate”)
=BInfo(“AccountingDataBase”, “BasicCurrency”)
// Last year
=BInfoF( File1, “Base”, “HeaderLeft”)
BInterest( account, interestRate [, period]) and BInterestF(filename, account, interestRate [, period])
Calculate the interest for this account for the specified period
account can be any account as specified in BBalance
interestRate in percentage
- > 0 calculate the interest on the debit amounts
- < 0 calculate the interest on the credit amount
BOpening( account [period]) and BOpeningF(filename, account [period])
Retrieve the Balance for balance of period start for the indicated account.
BQuery(fileName, query)
Return the result of a free defined query.
Examples:
=BQuery(File0;"startperiod?M1”)
=BQuery(File0;"startperiod?M1”)
BTotal( account [,period]) and BTotalF(filename, account [,period])
Retrieve the movement for the period.
Should be used to retrieve the data for the Profit and Loss accounts (Cost and Revenues).
BVatBalance( vatCode, vatValue [, period]) and BVatBalanceF(filename, vatCode, vatValue [, period])
Return a value regarding the specified VatCode (or multiple VatCodes).
“vatValue” can be “taxable”, “amount”, “notdeductible”, “posted”
Examples:
=BVatBalance(“V10”, “taxable”)
=BVatBalance(“V10|V20”, “posted”)
//Last year
=BVatBalanceF( File0, “V10”, “taxable”)
Additional function explanation
The retrieve the exact content of the cells
If you wanto to retrive the content of a cell you can use:
- BCellValue
The content of a cell, useful for text. - BCellAmount
The content of a cell is converted to a number so that you can use it for calculation.
With this you will retrive the exact content of a column "Balance" for the row where Account is 1000.
If the Balance is credit the amount is negative.
=BCellAmount(File0, “Accounts”, “Account=1000”, “Balance”)
Accounting Period calculation
You have different formula that allow to retrieve the amount.
- BBalance.
This is equivalent to the above. It retrieve the Balance of the whole accounting period.
But BBalance allow you to use also a period.
As a period you can use the date being, date end of an abbreviation. M3 means the first month of the accounting period.
If you use abbreviation instead of date your sheet will automatically adapt to file of different year.
BBalance( "1000")  //Balance end of year
BBalance( "1000", "2017-03-01", "2017-03-31")  //Balance end of March
BBalance( "1000", M3);   // Balance and of March if accounting period start on 1. of January
- BTotal
It retrieve the total movement (Debit - Credit) for the period.
Use BTotal to the amount for income and expenss account.
Cedit amounts are retrieved as negative numbers.
BTotal( "1000")  //Total movement end of year
BBalance( "1000", "2017-03-01", "2017-03-31")  //Total end of March
BBalance( "1000", M3);   // Total and of March if accounting period start on 1. of January
- BAmount
BAmount put the sign in positive based on the BClass of the account.
The amount retrieved depend on the BClass of the account or the group.
For Balance accounts (bclass 1 and 1) retrieve the Balance.
For Income and expenses accounts (bclass 3 and 4) retrieve the Total.
It also invert the sign in case of BClass 2 and 4.
So if you use BAmount for the Account revenues (BClass 4) you will have the total sales for the period in positive.
Your are free to use the most appropriate function.
-
BAccountDescription.
It is the same as GetCellValue but it deal automatically with accounts or groups.
Is usefull to retrieve the description of an account or group, in combination with BBalance, BTotal or BAmount.
=BAccountDescription( "1000") //Retrieve the column Description of the account 1000
=BAccountDescription( "1000", "Notes") //Retrieve the column Notes of the account 1000
=BAccountDescription( "Gr=10") //Retrieve the column Descrition of the group 10
Recalculate
The automatic recalculation does not update the data from the accounting file.
In order to have the data updated it is necessary to call the macro RecalculateAll() that call the method Application.CalculateFullRebuild
The example files contain a button “Recalculate” that call the macro RecalculateAll.
Banana host name and port
Web server data is retrieved from “localhost:8081”
You can specify a different host by entering a value in a cell named “BananaHostName”
Modify the functions or add your owns
Functions are defined in the Visual Basic module “Banana”.
If you add your function it would be better to add to your module.
To access the Visual Basic Macro Functionalities you should activate the macro.
In order to see and edit the functions your nedd to show the Developer tab in the Excel ribbon.
Use a new version of the Banana functions
In order to see and edit the functions your nedd to show the Developer tab in the Excel ribbon.
- Download on your computer the latest version
- Open your file in Excel
- Open the file "BananaSync.xlsm" in Excel
- Go to the Developer Tab
- Click on "Visual Basic"
- Copy the content of the "BananaSync.xmls - Banana (Code)"
- Paste the content in the Modules->Banana of your file.
Compatibility
Banana ExcelSync functions have been tested with Excel 2013 and 2016 for Windows.
Excel for Mac is not ready yet.
In Excel for Mac is not possible to call the http.
Any contribute to solve this problem is welcome.
Release History
- 2014-07-24 First release
- 2015-02-28 Updated for new version with new functionalities
- 2015-05-12 Call to webserver now require v1
- 2015-05-12 Development moved to github
- 2015-05-25 Changed BAmoount function to use BClass
- 2015-10-04 Added BDate function
- 2015-11-12 Renamend ExcelSync
- 2015-11-28
- Added example for cost division
- Started working on Mac support
- 2016-04-26 Added BCellAmount
- 2016-04-28 Fixes in some case rounding amount to zero
- 2017-02-01 New Version 2 (Functions without the file parameters)
如何报告错误
罕见案例
How to retrieve the event log in Windows
If the application crashes (the application has stopped working or disappears) please send us an event log file to help the development team to troubleshoot the problems.
Follow the steps below to find and send us the event logs:
- Click Windows Start button > Type event in Search programs and files field.
- Select Event Viewer.
- Navigate to Windows Logs > Application, and then find the latest event with “Error” in the Level column and “Application Error” in the Source column.
- Copy the text on the General tab.
- Attach the text in the contact form or in a email.
Banana 9 under Mac OS 10.15 Catalina - adjustment of date
Problem
After updating to Mac OS 10.15 Catalina, the Banana 9 program displays dates as follows, everywhere a date is being used:
6/10/y ; 7/10/y ; 8/10/y - showing a "y" instead of the short indication for the year, such as "19" (2019), "20" (2020).
System
Mac OS 10.15 Catalina
Solution
- Click on the Apple symbol in the upper left corner of the screen
- System Preferences —> Language & Region —> Advanced -> Dates;
- In the "Short" field, change the setting for the year and reopen the Banana program.

Banana 9: The menu bar is hidden, the window of Banana is misplaced
Problem
The menu bar is hidden, the window of Banana is misplaced (similar to what is shown in this first image)

System
Affected OS: Windows 10
Solution
Update the driver of the Graphic Adapter
- Update driver using Windows Update
- click on start
- search for Computer Management
- click on "Run as Administrator"

- select "Device Manager"
- Expand "Display adapters"
- right click on every adapter and select "Update driver"

- Check your system with "Intel Driver & support Assistant"
https://www.intel.com/content/www/us/en/support/intel-driver-support-assistant.html - Visit the support page of the manufacturer of your computer to download the latest driver.
Banana9 hangs on startup on a system with two monitors
Banana9 hangs on startup on a system with two monitorsProblem
Banana 9 stops working on startup.
System
The computer has an ATI Display card with two attached monitors.
Affected OS: Windows 10, Windows 8, Windows 7
Solution
-
Remove (just an update is not enough) and install again the ATI driver;
-
Try to start the application on the AMD window / monitor.
-
Look for more solutions at: https://bugreports.qt.io/browse/QTBUG-50371
+
Resources
-
Qt bug reports: https://bugreports.qt.io/browse/QTBUG-50371
+
Banana9 hangs on startup with the message "LoadLibrary failed with error XX: Wrong parameter."
Problem
Banana 9 stops working on startup. After the crash the message "LoadLibrary failed with error XX: Wrong parameter." is displayed.
System
The system is an old notebook where windows 10 was installed afterwards.
The notebook's discrete graphic card is not officially supported by windows 10.
Affected OS: Windows 10
Solution
- Update the graphic card driver
or
- Rename in folder C:\Windows\System32 the file "atig6pxx.dll" to "atig6pxx.dll.bak"
Banana9 hangs on startup with the message "dll is missing" or "error 0xc000007b"
Problem
Banana Accounting 9 does not start and a message stating one of the following texts appears:
- The program can't start because a dll is missing from your computer.
- The application was unable to start correctly accompanied by an error code (0xc000007b)
System
Usually this error occurs on Computers running Windows 7 or Vista, sometimes it also occurs on Windows 8 and 8.1.
Cause
Probably your system is not up to date.
Solution
Run Windows update and reinstall Microsoft Visual C++ redistributable
- Run windows update
- Select Start > Control Panel > System and Security > Windows Update.
- Select "Check for updates." Wait as the Windows Update tool scans checks for updates that you have not installed
- If you see a message that says, "Updates are available for your computer" or "Install updates for your computer," click the button labeled "Install updates."
- Wait as the updates install. Restart your computer when prompted to complete the updating process.
- Reinstall Microsoft Visual C++
- Open Programs and Features
- Uninstall all items with the name of "Microsoft Visual C++ 2*** Redistributable"
- Download the latest Microsoft Visual C++ redistributable packages
- Run the file vcredist.exe that you just downloaded
- If the problem persists, force Windows Update to install missing components:
- Go to this Microsoft Support webpage
- Scroll down in the "Method 2" section.
- Download and install the package for your Operative System
Banana9 hangs some seconds after the main page of the program is showed
Problem
Banana 9 stops working a few seconds after the main page of the program is showed.
System
The system is running on a Acer notebook
Affected machines: Acer aspire es 17
Affected OS: Windows 10, Windows 8
Solution
-
Open in Explorer the folder C:\Program files\Banana90
-
Create a new folder 'backup_dll'
-
Move the files 'libeay32.dll' and 'ssleay32.dll' to the folder 'backup_dll'
-
Restart the application
Banana9 hangs when the Open File Dialog or the Save File Dialog is opened
Problem
Banana 9 stops working as soon an Open File Dialog or a Save File Dialog is opened.
System
The system is running on a Dell computer or notebook.
The software Dell Backup and Recovery (from Softthink) is installed and running on the system.
Affected OS: Windows 10, Windows 8, Windows 7
Affected systems: Dell computer
Solution A (recommended)
- Update Dell Backup and Recovery tools to version 1.9.2.8 or greather
- Check Dell User's Guides and Support pages on how to update your system
Solution B
-
Download the Autoruns for Windows - TechNet - Microsoft utility;
-
Expand the file Autoruns.zip;
-
Run the application Autoruns.exe as Administrator;
-
Select the "Explorer" tab;
-
Deselect all "DBRShellOverlay" entries from Softthinks SAS Publisher
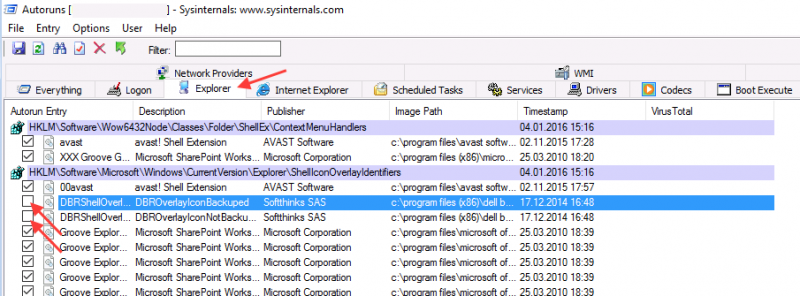
-
Close Autoruns;
-
Restart Banana 9.
Notes
- In one case, after the changes in the registry, the customer had some problems running Internet explorer.
Those problems could be resolved by restoring the changes in the registry. - The number of "DBRShellOverlay" entries to be disable can be on some systems more than two, those entries have to be searched in all sections listed in the tab Explorer.
Resources
-
Dell Forum page "Backup and Recovery causing applications using Qt5 DLLs to crash": http://en.community.dell.com/support-forums/software-os/f/3526/t/19634253
Banana9 hangs when trying to print
Problem
Banana 9 hangs the first or second time the print dialog is opened.
System
The 'Devices and Printers' configuration contains printers no longer attached to the system.
Affected OS: Windows 10, Windows 8, Windows 7
Solution
-
Open Start and select 'Devices and Printers'
-
Remove all printers no longer used or attached to the system