Altra documentazione (Inglese)
Following you find documentation that is only mantained in English:
- Developers
- Excel Reports Add-in (Beta)
- ExcelSync functions
- How to report a bug
- Rare Cases
- Translate Banana Software
Excel Reports Add-in (Beta)
With this add-in there will no longer need to make "copy and paste" of the values each time you update your accounting file.
You create worksheets with formulas, charts, formatting and more in Excel, and the add-in will retrieve for you the data from the accounting file.
Just click on the update button and your Excel worksheet will be automatically filled with the new values from Banana Accounting, and the results of formulas and charts will be updated accordingly.
See Documentation Banana Accounting Excel Add-in.
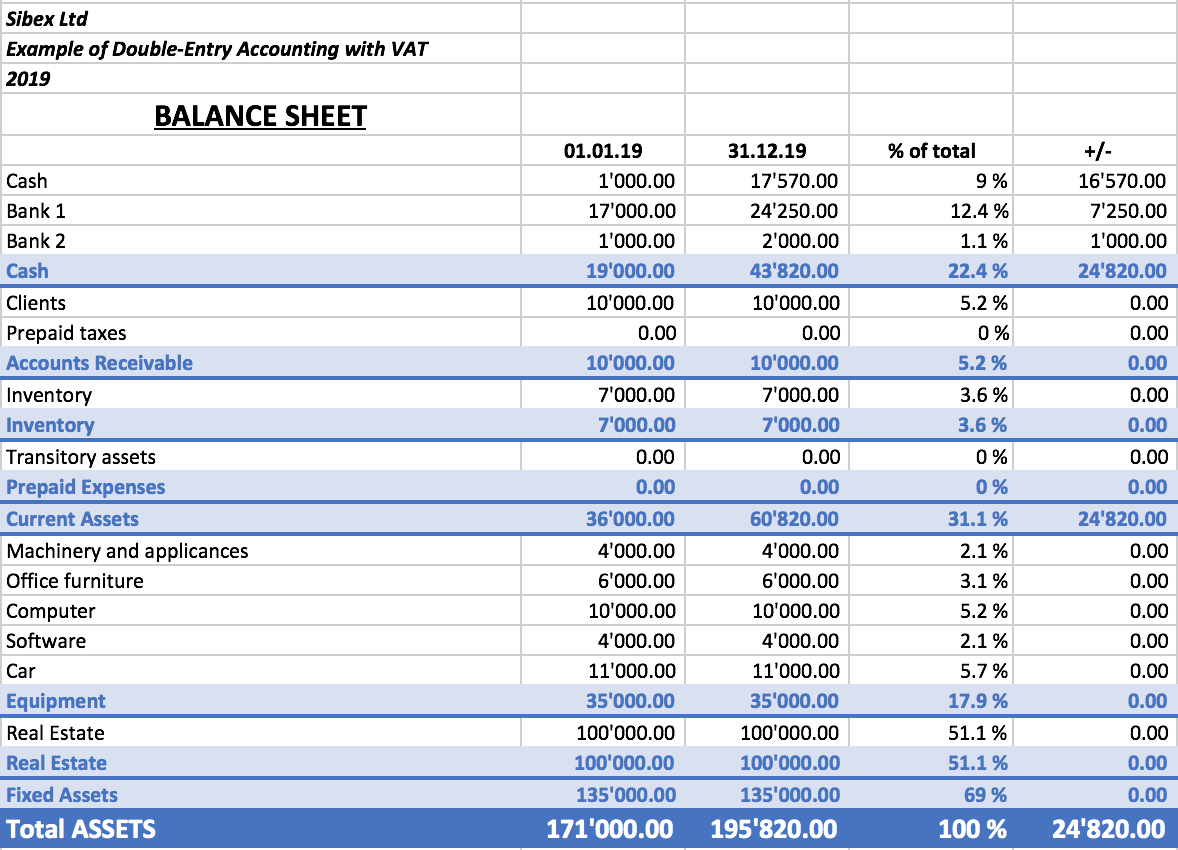
Example of a Balance sheet report created with the Excel Reports add-in
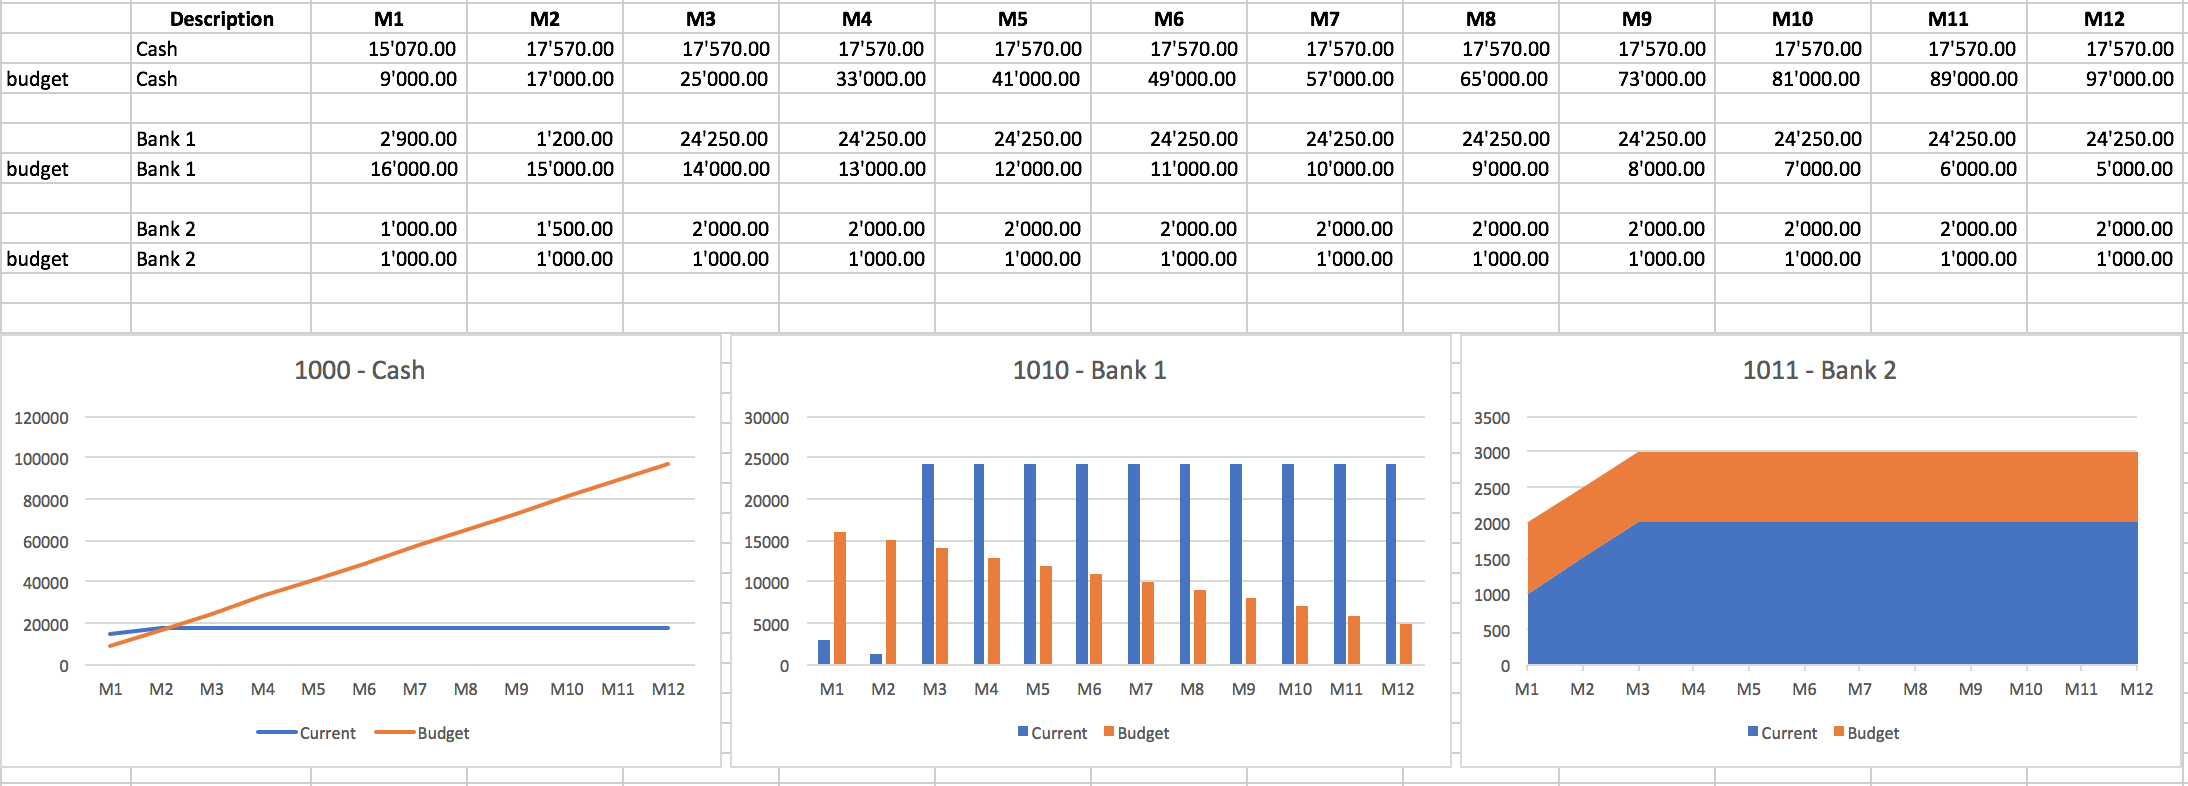
Example of a report with charts created with the Excel Reports add-in
Characteristics
- This add-in is hosted on our server.
Once you have installed the manifest on your computer, your will automatically use the last version. - The add-in are secure.
Unlike Excel-macros the Add-in are secure and cannot compromise your computer. - The add-in is currently in Beta Test.
- Please check everything and report any problem.
- You can use for free, but It is also possible that it will be made available with a cost.
Installation Banana Accounting Excel Add-In
The steps below walk you through all the setup to run the Banana Office Add-ins for Microsoft Office 2016.
Minimum requirements:
- Banana Accounting 9.
- Microsoft Office 2016 (Word, Excel, PowerPoint, Outlook).
Get Banana Accounting 9
- Download Banana Accounting for Windows or Mac.
- Install it on your pc.
Activate Banana Accounting web server
- Start Banana Accounting.
- On Menu bar click Tools → Program options and select the Interface tab
- Check the Start Web Server and Start Web Server with ssl options.
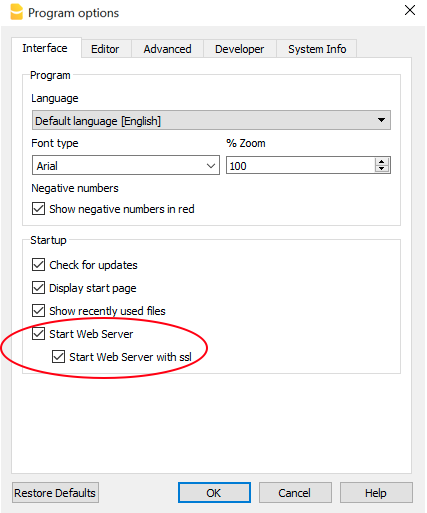
- Click OK.
Load the Add-in
- Open Microsoft Excel 2016.
- Click on Insert tab.
- Click on the Store icon to open the Office store.

- In the Office store page search for Banana add-in.
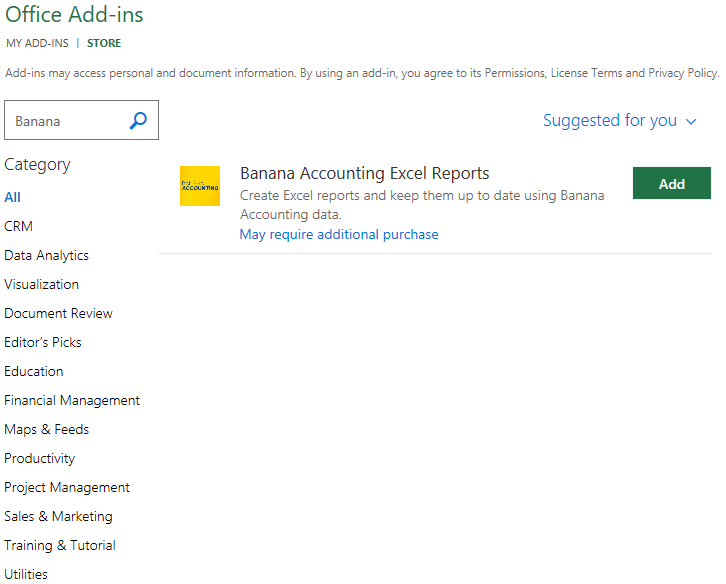
- Click on the Add button to add the Banana Accounting Excel Reports add-in.
- As soon as the add-in is added in Excel, on the Home tab of the main ribbon is loaded the Banana Accounting add-in command.

- Click on the Banana Accounting icon to use the add-in.
Once the add-in has been added from the Office store it is saved into My Add-ins section.
To load an add-in previously added from the office store:
- Click on Insert tab.
- Click on the My Add-ins icon.

- Select the Banana Accounting add-in.
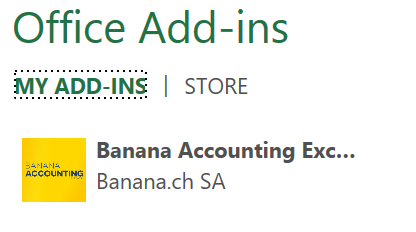
- Click on the Add button.
Windows users
For Windows users, please follow the Troubleshooting for Windows guide to complete the installation of the add-in.
macOS users
For macOS users, please follow the Troubleshooting for macOS guide to complete the installation of the add-in.
Troubleshooting Excel add-in for Windows
The guide below walk you through the Windows troubleshooting step by step.
- Download and install the latest version of Banana Accounting 9 for Windows.
- Update Windows and Excel.
- Open Excel and check you are logged in with your Microsoft account (File → Account → User Information).
- Start Banana Accounting web server:
- Open Banana Accounting.
- Click on menu Tools → Program Options.
- Select the tab Interface.
- Check the options Start Web Server.

- Add a local loopback exemption to Microsoft Edge Web Viewer (see Microsoft documentation for more information):
- In the search box enter cmd.

- On the right side select Run as administrator.

- Confirm with Yes.

- Copy and paste the following command:
CheckNetIsolation LoopbackExempt -a -n="microsoft.win32webviewhost_cw5n1h2txyewy"
- Press enter to run the command.

- Close the command prompt.
- In the search box enter cmd.
- Change the server URL on the Add-in settings:
- Start Excel and Banana Accounting Add-in.
- Click on the Options tab of the Add-in.
- Select Other as Server information.
- In the Server URL field enter http://localhost:8081.
- Click OK to confirm and save the changes.
- On the Setup tab of the add-in refresh the files list.

Note: in case you don't want to use the Excel add-in anymore, you can remove the local loopback exemption at any time with the command:
CheckNetIsolation LoopbackExempt -d -n="microsoft.win32webviewhost_cw5n1h2txyewy"
Messages
- Cannot connect to local web server. Incorrect URL server or Banana Accounting/web server are not running.
The connection between Banana Accounting and Excel add-in did not occur. Please follow step by step the Troubleshooting for Windows guide on this page. - No file is open in Banana Accounting.
Banana Accounting is working but no file is open. Open at least one file in Banana Accounting. - File not selected.
No file is selected from the files list. Refresh the files list and select one of them.
Troubleshooting Excel add-in for macOS
The guide below walk you through the macOS troubleshooting step by step.
- Download and install the latest version of Banana Accounting for Mac.
- Start Banana Accounting web servers:
- Open Banana Accounting.
- Click on menu Tools → Program Options.
- Select the tab Interface.
- Check the options Start Web Server and Start Web Server with ssl.
- Open Safari and insert the url https://127.0.0.1:8089
- When the dialog appears, insert your system password and click on always button.
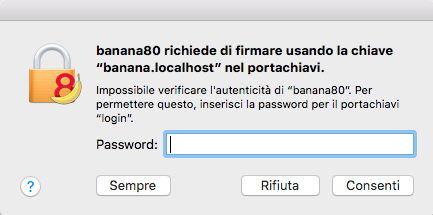
- Start Excel 2016 and load the Add-in.
- Click on the Refresh file list button.
- If a dialog window appears, click always allow button on the left.
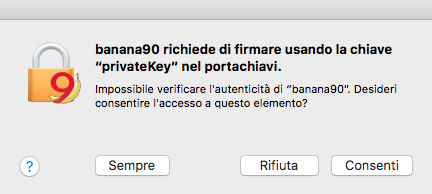
Messages
- Cannot connect to local web server. Incorrect URL server or Banana Accounting/web server are not running.
The connection between Banana Accounting and Excel add-in did not occur. Please follow step by step the Troubleshooting for macOS guide on this page. - No file is open in Banana Accounting.
Banana Accounting is working but no file is open. Open at least one file in Banana Accounting. - File not selected.
No file is selected from the files list. Refresh the files list and select one of them.
Documentation Excel Add-in
Introduction
With this add-in you can create Excel sheet that are filled with Banana Accounting data. Once you have added transactions to the accounting file you just need to click on the Update Button of the add-in and your spreadsheet content will be updated with the new data.
Your existing formatting and formula will be preserved.
- Create an Excel sheet with headers information
This information allows the add-in to retrieve data from Banana Accounting.
There are information relative to the file, column and account or group to be retrieved.
The add-in help you add the necessary information to retrieve the data. -
Click on the Update button
The add-in will retrieve the values from Banana Accounting software.
It mantains the format or formula you enter.
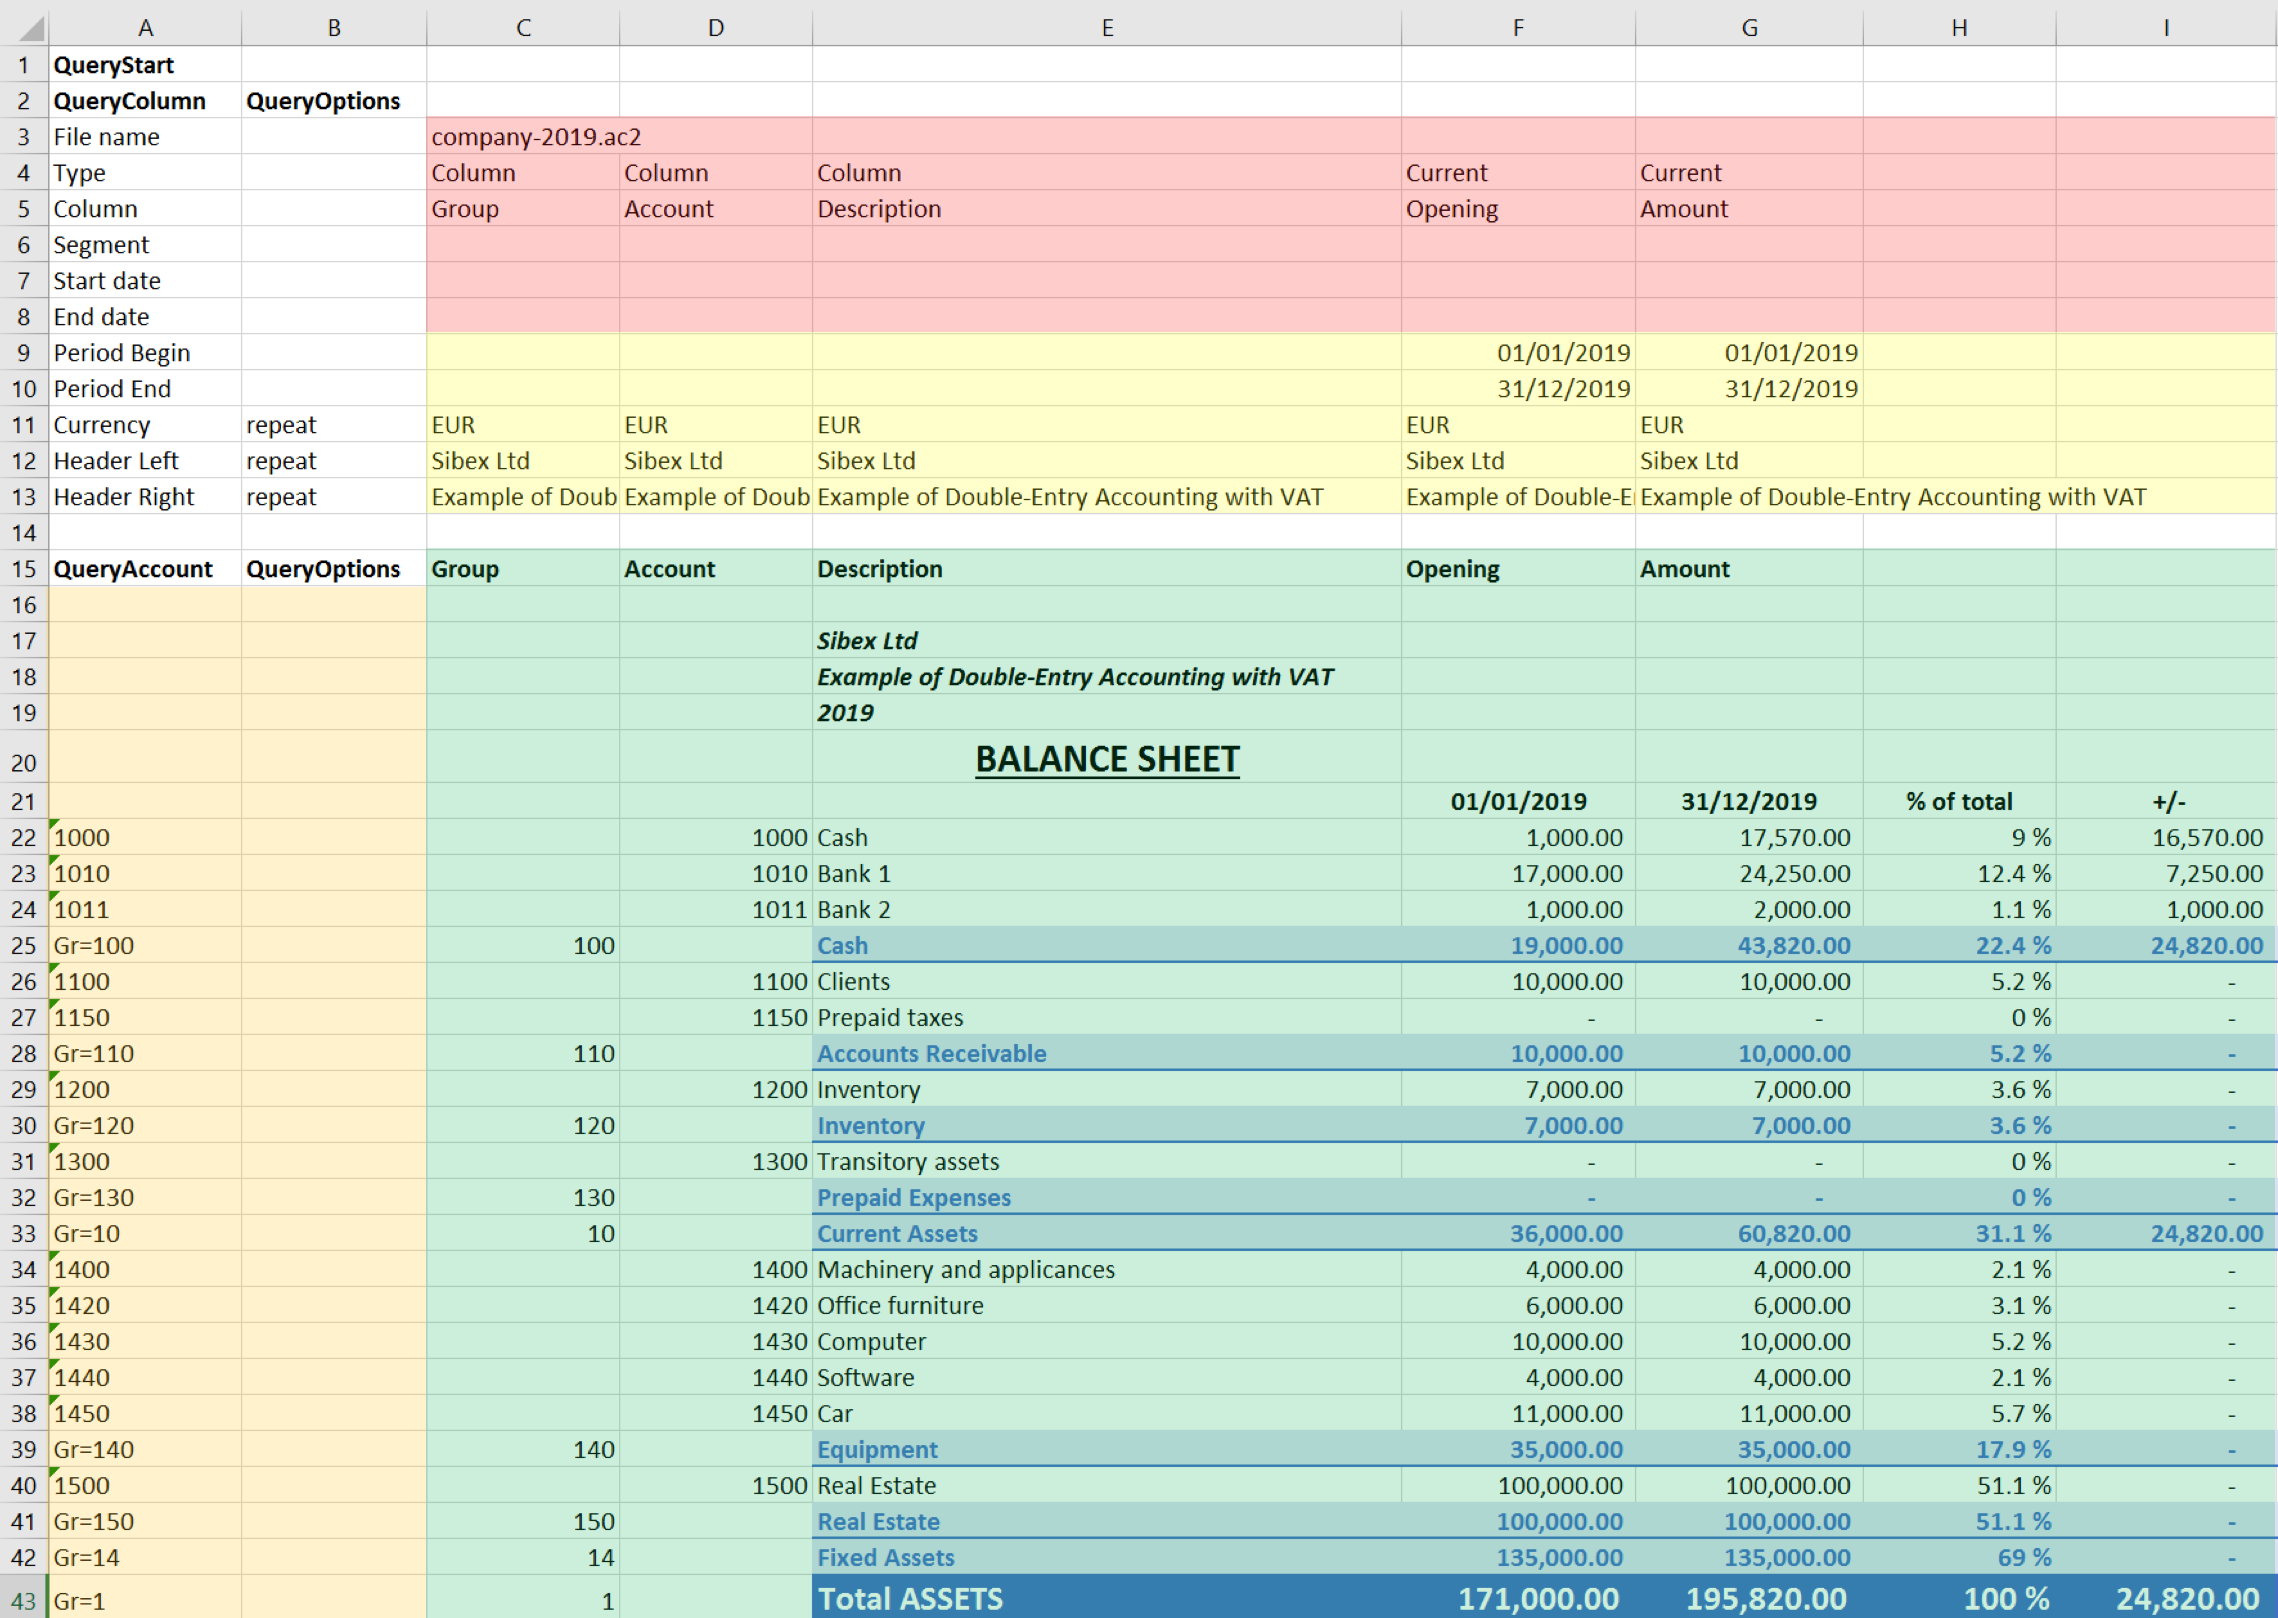
Example of a Balance sheet report created with the Banana Accounting Excel add-in
In the example above we can see:
- The data part
Here is where the data is synchronized, based on the QueryAccount and QueryColumns.- Accounting data (Green)
Filled with the information coming from Banana Accounting - Header data (Yellow)
- Accounting data (Green)
- QueryColumns (Red)
The file name, columns names and type to retrieve.
If the column is empty no data in this column will be retrieved. You can use the columns to enter formula. - QueryAccounts (Orange)
The accounts or groups to retrieve.
If the row is empty no data in this row will be retrieved. You can use the row for entering formula o text that is not overwritten.
By clicking on the update button the Data part is updated with the new data of the accounting file, and all the previously settings like fonts, colors, formulas will remain.
Download and installation
See documentation on how to Download and install the Add-in
Example files:
- File Excel already with columns setup.
- Banana Accounting file used for the example excel file.
Add-in Command
As soon as the add-in is added in Excel, on the Home tab of the main ribbon is loaded the Banana Accounting add-in command.

Banana Accounting Add-in command
When the Banana Accounting button is clicked, it loads the start screen of the add-in. The start screen provides additional information describing the functionalities of the add-in.
Click on the Let's Begin! button to start using the add-in.
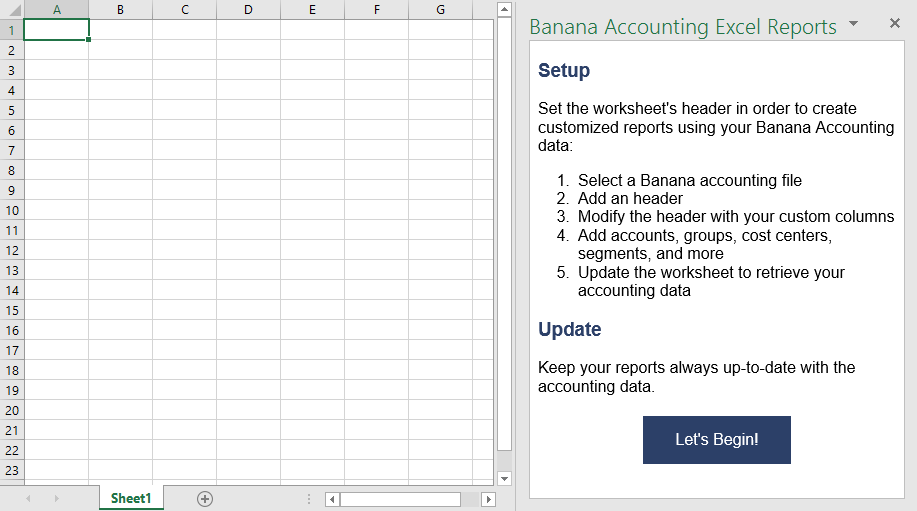
Banana Accounting Add-in start screen
Add-in general overview
The add-in is a task pane add-in type. This means that the add-in is loaded in a pane on the right side of the Excel worksheet.
It is composed by three tabs, each of them has one specific task:
- The Setup tab contains all the tools needed to add information to your sheet so that the add-in can fill the data part with the accounting data. Typically it is used every time you want to create something new, like for example the very first time you use this add-in.
- The Update tab is used to update the content of the Excel worksheet with the accounting data. It is used after the header section and some accounts/groups has been added.
- The Messages tab shows some messages about the add-in and the operations it does. For example when you update the sheet a message is displayed telling you that the update is completed.
- The Options tab is used to set some settings like the language and the server's Url.
Update of the worksheet
The Update tab is composed only of one button: Update current worksheet.
When clicked, this will start the updating process of the current Excel worksheet. Combining Header, QueryAccount and QueryOptions information, the add-in retrieves all the data directly from the Banana Accounting file and writes them in the Excel worksheet.
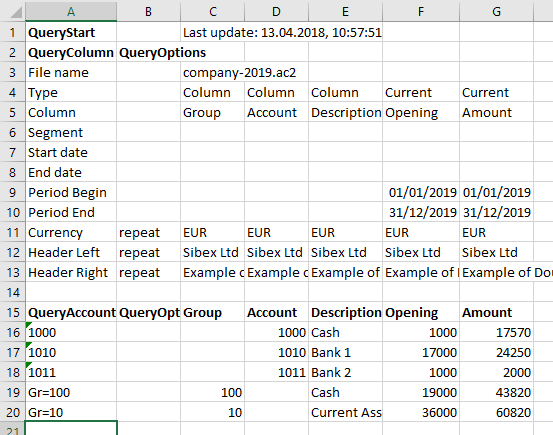
Retrieve data from Banana Accounting and update the worksheet
Setup of the worksheet
These features will add the necessary information to the current worksheet to retrieve data from Banana Accounting.
In the Setup tab there are four sections:
- Accounting file selection
- Set Header
- Set QueryColumns
- Set QueryAccounts
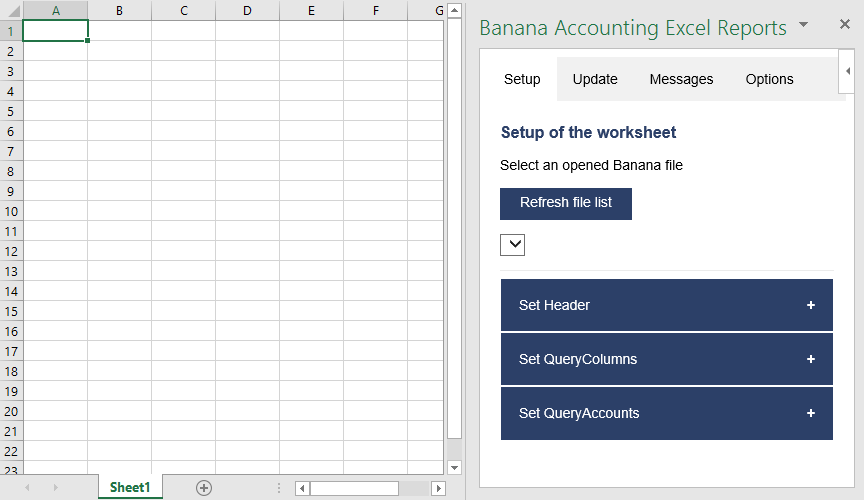
Setup of the worksheet tab
Select an opened Banana file
The first section of the setup page lists all the currently opened Banana Accounting files.
When the Refresh file list button is clicked, the add-in checks for all the opened Banana Accounting files and lists them.
Click the button, select a file, then go to the next setup section.
If you cannot see any file on the list and an error message is displayed, please follow the Troubleshooting for Windows or the Troubleshooting for macOS documentations.
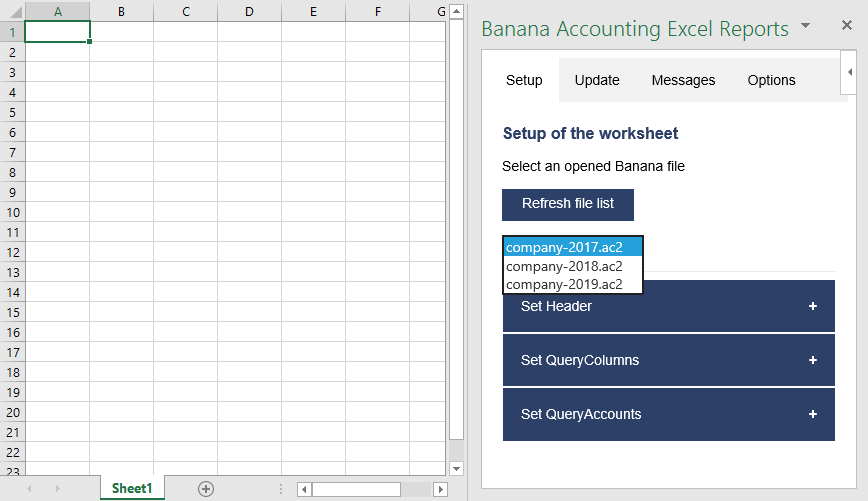
Example of file selection
Set Header
The second section of the setup page inserts, on the top of the current worksheet, the header that allows the user to insert information that will be used by the add-in to retrieve data from the accounting file.
Add an header
The first step is to select from the list a type of header. There are two options:
- Predefined header with columns to insert an header with default values for columns and options
- Empty header to insert a blank header. In this case you must manually add columns and options values.
When the button Add Header is clicked, the selected type of header is inserted in the worksheet. It is then possible to modify it by changing the values of QueryColumns and QueryOptions.
Add header options
The second step is to define some options for the Currency, Header Left and Header Right values using the QueryOptions column. The options are:
- Repeat to repeat the values in each column
- Do not repeat to avoid repeated values. Only when the file name changes the values are entered again.
When the button Add options is clicked, the selected options will be inserted in the related cells.
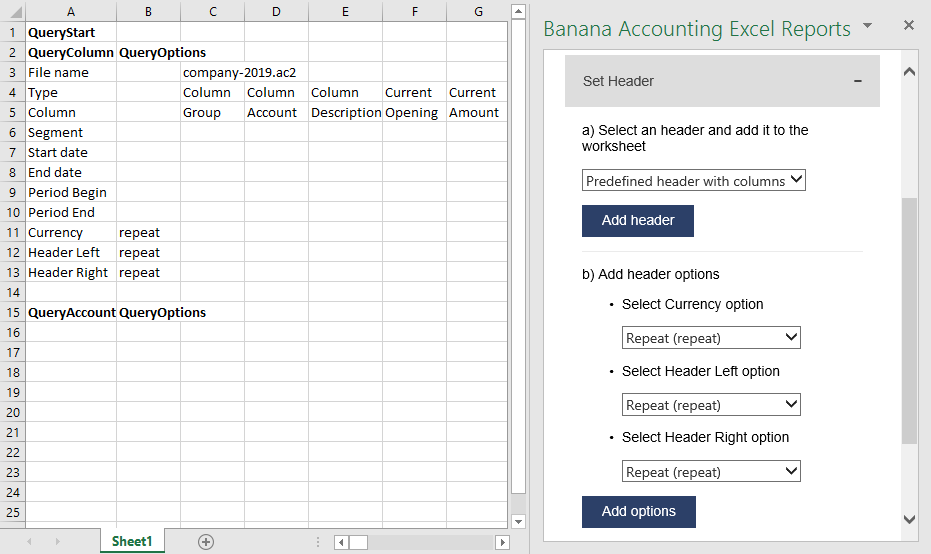
Example of predefined header
Set QueryColumns
This section guides step by step the user to modify the header by adding QueryColumns to the worksheet.
The QueryColumns information allows the user to define exactly which data the add-in has to retrieve from the accounting file and in which column of the worksheet insert them.
Each QueryColumn consists of six information:
- The Column of the worksheet is used to define in which column of the worksheet all the QueryColumns values will be inserted.
- The File name is used to define the accounting file to use when retrieving data.
- The Type value is used to define the type of data of the accounting file.
- The Column value is used to define the accounting file data for the given type.
- The Segments (OPTIONAL) is used to have a more detailed classification of the costs. It is optional, if not specified none segments are added.
- The Periods (OPTIONAL) is used to define a period of the accounting. It is optional, if not specified all accounting period is automatically used.
When the button Add values to column is clicked, all the information are automatically added to the selected column of the worksheet.
You must repeat this process for each column you want to add to the worksheet.
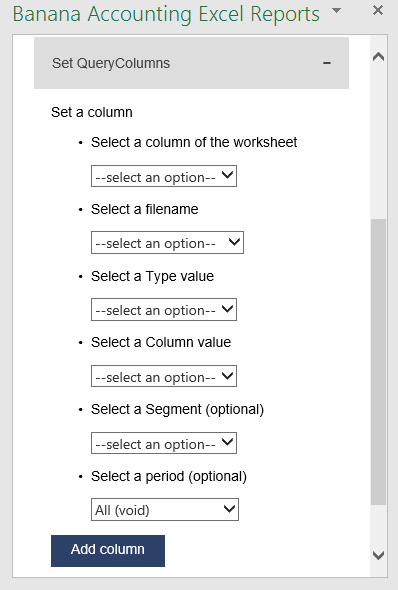
Set QueryColumns section
Select a column of the worksheet
Use this to define in which column of the worksheet all the values of the QueryColumns are inserted. Possible values are:
- Current selected to use the colum of the cell selected on the worksheet (ex. if the cell D8 is selected, D column will be used).
- From C to Z.
The list shows only columns from C to Z, but it is also possible to use columns until AZ by adding them manually.
Select a filename
Use this to define the file name for a QueryColumn. When a file name is specified it is used until a new file name is inserted.
The possible values are:
- Current to use the selected file from the list on the top.
- Current (void) to use the previously inserted file but let the cell empty. It works only if in previous columns there is a specified file name.
- 1 previous year (p1) to use the previous year file of the last file inserted (example: if current year is "2019.ac2", p1 refers to "2018.ac2").
- 2 previous years (p2) to use two previous years file of the last file inserted(example: if current is "2019.ac2", p2 refers to "2017.ac2").
- 3 previous years (p3) to use three previous years file of the last file inserted(example: if current is "2019.ac2", p3 refers to "2016.ac2").
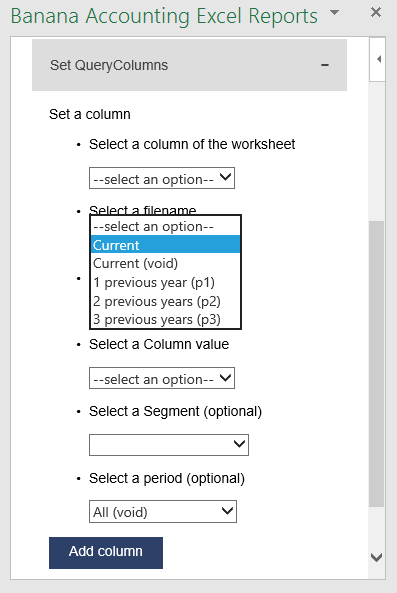
Filename selection
Notes:
- Remember to always open in Banana Accounting all the files specified in the header.
- The p1, p2 and p3 abbreviations always refer to the last file specified in the header.
- Use p1, p2 and p3 only if in the accounting file is used the File and accounting properties → Options → File from previous year.
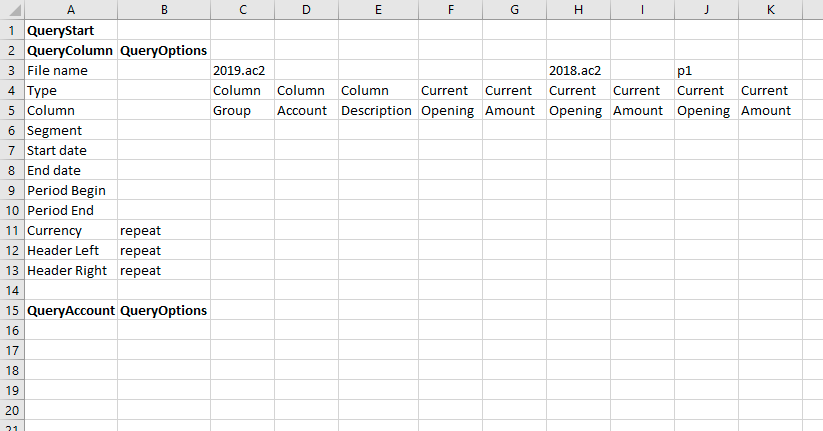
Example of more file insertion
On the image above we can see there are three different files defined, each of them using different columns.
- The columns from C to G refer to the 2019.ac2 file.
- The columns from H to I refer to the 2018.ac2 file.
- The coumns from J to K refer to the previous year file of the 2018.ac2 file. This file must be specified in the File and accounting properties → Options → File from previous year of the 2018.ac2 file.
Select a Type and a Column value
Use Type and Column rows to define the data you want to retrieve from the accounting file.
- Type specify the type of data of the accounting file.
- Column specify the data of the accounting file for the given Type.
Enter the values using the add-in or writing them directly into the worksheet cells.
List of possible Type-Columns combinations (not Case-Sensitive) you must enter into the related Type and Column rows of the header:
- column
- Group, Account, Description, Disable, FiscalNumber, BClass, Gr, Gr1, Gr2, Opening, Debit, Credit, Balance, Budget, BudgetDifference, Prior, PriorDifference, BudgetPrior, PeriodBegin, PeriodDebit, PeriodCredit, PeriodTotal, PeriodEnd, NamePrefix, FirstName, FamilyName, OrganisationName, Street, AddressExtra, POBox, PostalCode, Locality, Region, Country, CountryCode, Language, PhoneMain, PhoneMobile, Fax, EmailWork, Website, DateOfBirth, PaymentTermInDays, CreditLimit, MemberFee, BankName, BankIban, BankAccount, BankClearing, Code1
- current
- amount, amountcurrency, balance, balancecurrency, bclass, credit, creditcurrency, debit, debitcurrency, enddate, opening, openingcurrency, periodstring, rowcount, startdate, total, totalcurrency
- budget
- amount, amountcurrency, balance, balancecurrency, bclass, credit, creditcurrency, debit, debitcurrency, enddate, opening, openingcurrency, periodstring, rowcount, startdate, total, totalcurrency
- columnvat
- Group, VatCode, Description, Gr, Gr1, IsDue, AmountType, VatRate, VatRateOnGross, VatPercentNonDeductible, VatAccount
- currentvat
- taxable, amount, notdeductible, posted, rowcount
- taxable, amount, notdeductible, posted, rowcount
Below some examples of queries that can be entered in the header:
- Example 1: return from the Accounts table the value of the column description for the account specified in the QueryAccount column.
Type: column
Column: description
- Example2: return the amount of debit transactions for all the accounting period for the account specified in the QueryAccount column.
Type: current
Column: debit
- Example 3: return the opening + debit-credit from the 01.01 to 10.01.2022 for the account and segment specified in the QueryAccount column.
Type: current
Column: balance
Segment: :S1
Start date: 01.01.2022
End date: 10.01.2022
- Example 4: return the difference between debit-credit for the 6th month for the account specified in the QueryAccount colum.
Type: current
Column: total
Start date: M6
- Example 5: return the difference between debit-credit for the second quarter for the account specified in the QueryAccount column.
Type: current
Column: total
Start date: Q2
- Example 6: return from the Vat Codes table the value of the column description for the vat code specified in the QueryAccount column.
Type: columnvat
Column: description
- Example 7: return the amount of the taxable column for the vat code specified in the QueryAccount column.
Type: currentvat
Column: taxable
Select a Segment (optional)
If the selected file has segments they will appear in the list.
Use this to define a segment to have a more detailed classification of the costs.
Select a period (optional)
Use this to define the accounting period that will be used to retrieve data from the accounting file.
Possible values are:
- All (void) to use all the accounting period.
- Custom date to specify a custom period (example: Start date "04.02.2022", End date "12.03.2022").
- Month 1 (M1) ... Month 12 (M12) to specify a single month (example: M1 for 1st month, M2 for 2nd month, etc.).
- Quarter 1 (Q1) ... Quarter 4 (Q4) to specify a single quarter (example: Q1 for the 1st quarter, period from 01.01 to 31.03).
- Semester 1 (S1) ... Semester 2 (S2) to specify a single semester (example: S2 for the 2nd semester, period from 01.07 to 31.12).
- Year 1 (Y1) ... Year 10 (Y10) to specify a single year (example: Y1 for the 1st year).
Set QueryAccounts
This section provides to insert:
- QueryAccounts to specify all the desired accounts, groups, cost centers, segments or vat codes that will be used with the data specified in the header to retrieve the accounting data.
- QueryOptions (OPTIONAL) to specify an option for a specific QueryAccount. Just select a cell next to the account and insert the option. It is optional, if not specified none options are added.
Add accounts
When an option is selected, the add-in loads the appropriate check box list with all the elements taken from the selected accounting file. It is possible to choose between six options:
- Accounts to load a list of all the accounts/categories codes taken from the table Accounts/Category of the accounting file.
- Groups to load a list of all the groups codes taken from the table Accounts/Category of the accounting file.
- Cost centers to load a list of all the cost centers codes taken from the table Accounts/Category of the accounting file.
- Segments to load a list of all the segments codes taken from the table Accounts/Category of the accounting file.
- All to load a list of all the accounts/categories, groups, cost centers and segments codes taken from the table Accounts/Category of the accounting file.
- Vat codes to load a list of all the VAT codes taken from the table VAT codes of the accounting file.
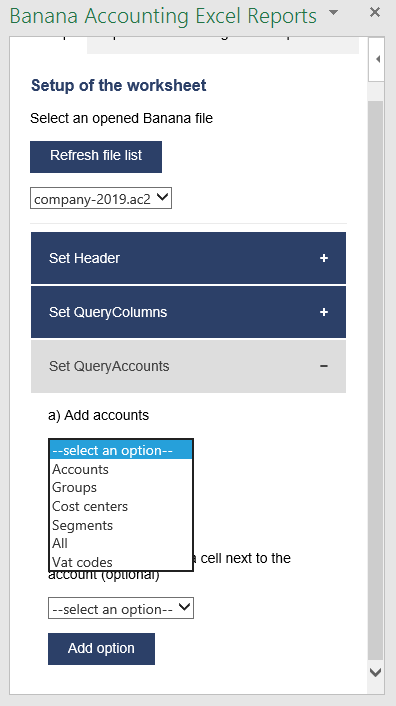
Type of account selection
For example, choosing the All option, the add-in loads a list containing all the accounts, groups, cost centers and segments respecting the order in which they appear in the accounting file.
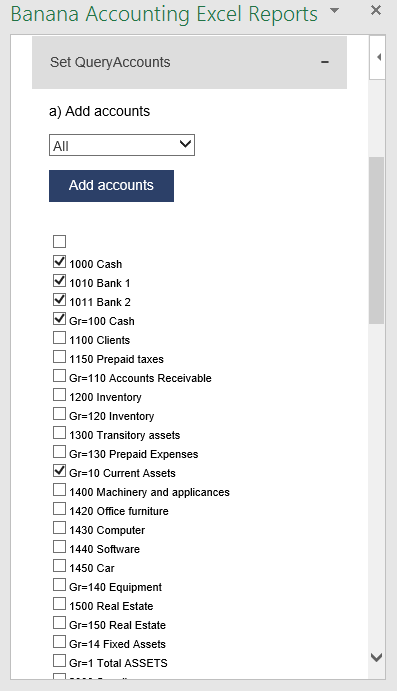
Example of accounts and groups selection
Select the desired elements and click the Add accounts button to add them to the worksheet under the QueryAccount (column A) starting from the selected cell. By default the add-in starts the insertion immediately after the QueryAccount title (row 16).
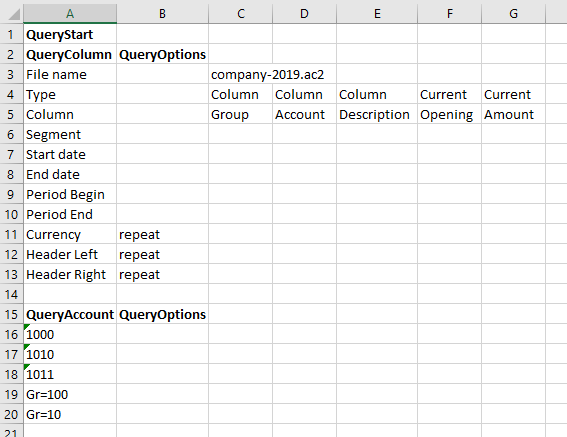
Add the selected accounts and groups to the Excel worksheet
Add option
The QueryOptions column is designed to add some options to the query. It is optional, if not specified no options are used.
The possible values are:
- invert to invert the sign of the current and budget balances.
- budget to get the budget balances of the selected QueryAccount.
- budgetinvert to get the budget balances of the selected QueryAccount and also to invert the sign.
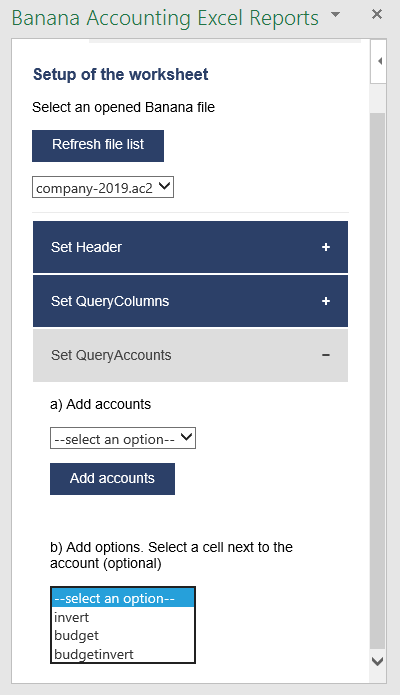
QueryAccounts options selection
Header settings
- Do not add or delete rows in the header.
- Do not add or delete columns before the column B.
- From column C forward, it is possible to add or remove columns. Columns A (QueryColumn) and B (QueryOptions) must always exist.
- Added columns can also be empty.
- If columns from AA to AZ are used, plese re-enter the file name at least on the AA column, even if it is the same used in the previous column.
To better understand how exactly the header works and how to properly modify it, below there are some explanation about the most important things.
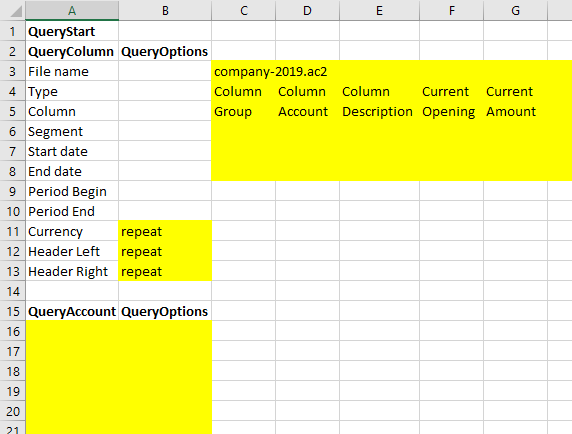
Editable header parts
On the image above we highlighted in yellow all the header's parts that can be modified by adding information when creating a report.
Everything else will be automatically filled by the add-in when the Update current worksheet button is clicked.
Period Begin
A conversion of the start date to be easily read.
This is automatically filled for each column by the add-in when the worksheet is updated.
Period End
A conversion of the end date to be easily read.
This is automatically filled for each column by the add-in when the worksheet is updated.
Currency
The accounting basic currency.
This is automatically filled for each column by the add-in when the worksheet is updated.
Header Left
One of the information property of the accounting.
This is automatically filled for each column by the add-in when the worksheet is updated.
Header Right
One of the information property of the accounting.
This is automatically filled for each column by the add-in when the worksheet is updated.
QueryAccount
As already said, in this column are listed all the chosen accounts, each on a different row.
Instead of insert an account, is also possible to add a custom regroup using a particular accounting column.
The custom regroup QueryAccount syntax is $column=value, where:
- $ indicates that a custom regroup is used.
- column is the Xml name of the column. It can be a user created column (for example "Abc") or a column that already exists in the accounting (for example the "Gr").
- value indicates the regroup.
If we insert something like "$Abc=1" in the QueryAccount cell, this means that the add-in takes and sums together all the accounts/groups balances that have the 1 value in the "Abc" column of the accounting.
Messages
The Messages tab shows some information about the add-in and the operations that it does.
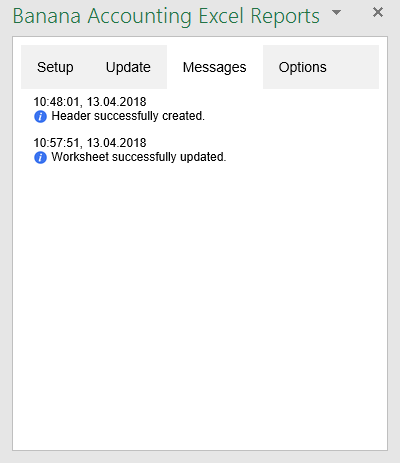
Example of messages
Settings
The Settings tab allows to change some settings of the add-in:
- the Server information allows to define the URL where Banana Accounting is hosted, to avoid to have Banana Accounting installed locally. By default it is defined the local Banana Accounting web server https://127.0.0.1:8089.
- the Connection token at the moment should be left empty.
- the Language to define the language of the Banana Excel Add-in. Available languages are english, french, german and italian.
- the Development is used only by developers for testing purposes, and users cannot access it.
Click on the Ok button and accept to reload the add-in in order to use the new settings. The settings are saved for future use of the add-in.
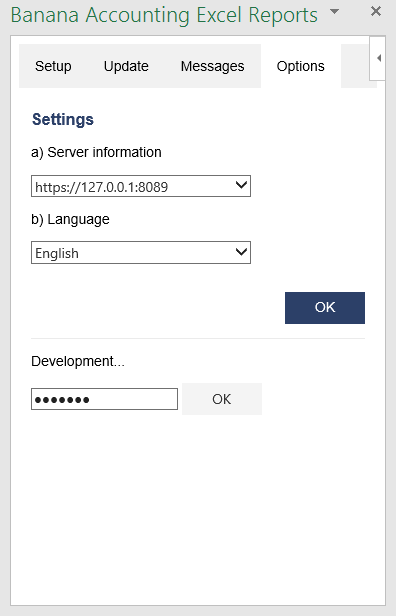
Settings tab
Release History
- 2017-06-12 First release
- 2017-07-07
- Added Add-in Commands functionality.
- Added a start screen that provides additional information describing the functionalities of the add-in.
- Added the settings tab to allow the user to change the Port of the URL.
- 2017-09-29
- Changed the name of the add-in to "Banana Accounting Excel Reports".
- Changed some texts.
- New add-in design.
- Added new functionalities that allow the user to set and insert all the required information more easily.
- Added localization language for english, french, german and italian.
- 2017-11-24
- Added new functionality that allows to set the parameters for the connection.
- 2018-04-04
- Settings options are now saved.
- Changed the appearance of the error messages.
- Changed some texts.
- Other minor changes.
Local installation
The steps below walk you through all the setup of the environment required to run the Banana Excel add-in from a local installation and not from the Office store.
In order to do that, you will have to:
- Download all the add-in files.
- Save them to specific folders on your computer.
- Add a trusted add-in catalog in Excel.
- Load the add-in in Excel.
- Set the server URL in the add-in.
Minimum requirements: Microsoft Excel 2016 for Windows or macOS.
Get Banana Accounting 9
Install Banana Accounting 9 for Windows or Mac on your pc.
Start Banana Accounting web server
In order to use the add-in you have to start the Banana web server first:
- Start Banana Accounting 9.
- On menu bar click Tools → Program options and select the Interface tab.
- Check the Start Web Server option. The web server with ssl is not needed.
- Click Ok.

Download the add-in files
The next step is to download all the required files of the add-in.
- Download the BananaAccountingExcelAddin.zip file.
- Extract the content:
- BananaAccountingExcelAddin: folder containing all the add-in files.
- BananaAccountingExcelManifest: manifest file of the add-in.

Install the add-in files
The files extracted from the zip must be copied to specific directories.
Add-in files for Windows
On Windows you need to copy the BananaAccountingExcelAddin folder in the directory C:\Users\{user_name}\AppData\Local\Banana.ch\Banana\9.0\WWW.
- In the search box insert %LocalAppData% and press enter. The AppData\Local folder will open.
- Navigate through the folders Banana.ch\Banana\9.0.
- If it doesn't exists yet, create a folder named WWW (all in capital letters).
- Copy in the WWW folder the BananaAccountingExcelAddin folder extracted from the zip file.

Add-in files for macOS
On macOS you need to copy the BananaAccountingExcelAddin folder in the directory /Users/{user_name}/Library/Application Support/Banana.ch/Banana/9.0/WWW.
- Open the Finder.
- From the menu select Go and then Go to folder.
- Insert here the path /Users/{user_name}/Library/Application Support/Banana.ch/Banana/9.0 and click Go.
- If it doesn't exists yet, create a folder named WWW (all in capital letters).
- Copy in the WWW folder the BananaAccountingExcelAddin folder extracted from the zip file.
Install the Manifest file
Each Office add-in has its own manifest file. The manifest is an XML file that defines various settings, including description and links to all the add-in files.
Manifest file must be copied to a specific directory.
Manifest directory for Windows
On Windows you need to create a directory to save the manifest of the add-in.
The directory needs to be a shared directory.
- Create a folder for the add-ins manifests on a network share:
- Create a folder on your local drive (for example, C:\Shared\OfficeManifest).
- Right click on the folder, select properties.
- Click on Sharing tab.
- Click on Advanced Sharing...
- Check the Share this folder box.
- Click Apply and then Ok.
- Copy here the BananaAccountingExcelManifest file extracted from the zip file.

- Tell Excel to use the Manifests directory as trusted app catalog:
- Launch Excel and open a blank spreadsheet.
- Choose the File tab, and then choose Options.
- Choose Trust Center, and then choose the Trust Center Settings button.

- Choose Trusted Add-in Catalogs.
- In the Catalog URL box, enter the path to the network share you created, and then choose Add Catalog.
To see the path of the network share folder: right click on the shared folder → Properties → Sharing → Network Path.
You can copy the path from here.

- Select the Show in Menu check box, and then choose OK.
A message appears to inform you that your settings will be applied the next time you start Office.

- Close Excel and restart it.
Manifest directory for macOS
On Mac you need to create a folder to save the manifest of the add-in.
Go to one of the following folders and copy here the BananaAccountingExcelManifest file extracted from the zip file.
If the wef folder doesn't exist on your computer, create it.
- For Excel:
/Users/<username>/Library/Containers/com.microsoft.Excel/Data/Documents/wef - For Word:
/Users/<username>/Library/Containers/com.microsoft.Word/Data/Documents/wef - For PowerPoint:
/Users/<username>/Library/Containers/com.microsoft.Powerpoint/Data/Documents/wef
Note: <username> is your name on the device.
Load the add-in in Excel
Once all the setup and installations are done, it is possible to run and use the add-in.
- Open Microsoft Excel 2016.
- Click on Insert tab.
- Click on the My Add-ins button.

- Click on the Shared folder.

- Select the Banana Accounting Excel add-in.
- Click Add.
The add-in is added
Set the server URL setting
In the add-in make sure to change the server URL to http://localhost:8081.
- Start Excel and the Banana Accounting add-in.
- Click on the Options tab of the Add-in.
- From the server information select Other.
- In the Server URL field, insert http://localhost:8081
- Click OK to confirm and save the changes.

Other Resources
For more and detailed information about the developing of the Office Add-ins, please visit https://github.com/BananaAccounting/General/tree/master/OfficeAddIns.
Introduction to Excel 2016 Add-ins
Office 2016 Add-ins are extentions of Word, Excel, PowerPoint, and Outlook.
Add-ins are composed of:
- Manifest file.
An XML file that defines various settings, including description and links to all the add-in files.
It is used by Word, Excel, PowerPoint, and Outlook to locate the Add-in resources.
The manifest file can reside on a local directory or is published on the Office Store. - Webpage files.
Files that compose the web app (HTML pages, JavaScript code and images).
All the files need to reside on a web server.
Add-in Examples
These examples have been made available for programmers that want to create specialized add-ins to retrieve information from Banana Accounting.
You need to insall the add-ins on a web server.
- for Excel:
- Account Card report to create an Excel worksheet with details of an account.
- Retrieve Table report to create an Excel worksheet with a full table taken from the accounting.
- for Word:
- Account Card report to create a Word document with details of an account.
Funzioni Excel
Alcune funzioni Excel definite dall'utente permettono di recuperare facilmente dati da Banana Contabilità in tempo reale.
Tu aggiorni la tua contabilità e immediatamente viene aggiornato anche il tuo file Excel. Questa funzione non è possibile su Mac.
Si prega di consultare la pagina in inglese per informazioni tecniche più aggiornate.
Esempio costi divisi per cliente
Con ExcelSync si usano delle formule che riprendono i saldi aggiornati direttamente dal software Banana Contabilità.
Il foglio di Excel si aggiorna in base agli ultimi dati inseririti in contabilità.
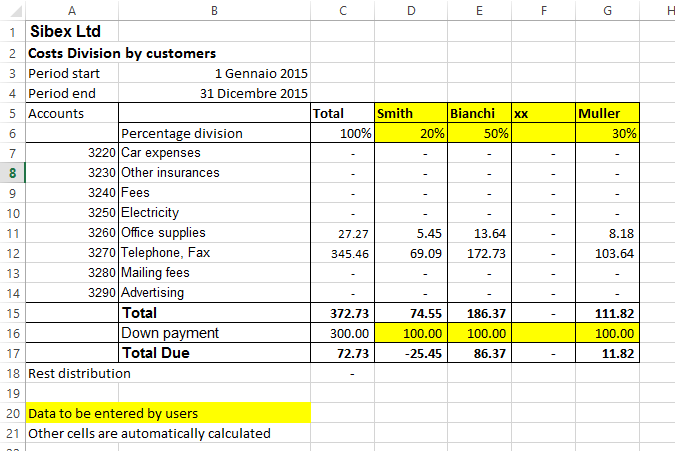
Funzioni Excel definite dall'utente
Le funzioni definite dall'utente (UDF = User defined funtions) sono piccoli programmi in Visual Basic (o macro) che espandono Excel, permettendo l'inserimento di formule all'interno delle celle.
- Per poter usare le UDF devi avere un file Excel che abbia l'estensione *.xlsm.
- Le UDF Banana sono fornite secondo la Licenza Apache (open source software - vedi: /www.apache.org/licenses/LICENSE-2.0)
- Sviluppo e ultima versione della funzione sono disponibili su github.com/BananaAccounting/General/
- Le UDF usano il Banana web server.
Grazie alle UDF potrai scrivere formule in Excel che riprendano dati direttamente da Banana Contabilità.
- Non c'é più bisogno di riscrivere i dati in Excel (o importare, copiare e incollare)
- Quando la contabilità viene cambiata, il foglio Excel é aggiornato con i nuovi valori
- Le formule sono facili da usare e permettono di calcolare valori per periodo e creare tabelle efficaci per valutare, presentare i dati o creare grafici.
Come vedere l'esempio
- Scarica il foglio Excel con i files di esempio
- Decomprimi (Unzip) il contenuto
- Avviare Banana contabilità.
- La prima volta attiva il Webserver di Banana
Strumenti -> Opzioni programma -> Interfaccia -> Avvia web server - Apri il file contabile Banana "company_2014.ac2" e "company_2015.ac2"
- Apri il file "BananaSync.xlsm" in Excel e attiva le Macro.
Se le macro sono disabilitate automaticamente da Excel devi cambiare le impostazioni di sicurezza delle macro.
Eventualmente segui le istruzioni Mostra scheda Sviluppo sulla barra multifunzione - Ricalcola il foglio Excel con la Macro "Recalculate" (Ctrl+R)
Come creare il tuo foglio
- Salva il file "BananaSync.xlsm" con un altro nome
- Apri i tuoi files contabili in Banana
- Nel file Excel cambia il nome del file (celle evidenziate in giallo) con il nome del tuo file contabile.
- Cambia il foglio di calcolo secondo le tue necessità.
- Ricalcola con il bottone "Recalculate" o con i tasti di scelta rapida "Ctrl+R"
Uso delle funzioni
Parametro nome file
Se il programma Banana o il Banana web server non sono aperti, Excel impiega del tempo per rispondere alla query http.
Per risolvere questo problema:
- La maggior parte delle funzioni usano il parametro nome file
Se il nome del file é vuoto non c'é alcuna chiamata http. - Invece che inserire il nome del file usare un riferimento alla cella che contenga la formula =BFileName(“myfile.ac2”).
- Nel caso in cui Banana non sia avviato, il BFileName risulterà in una string vuota, e nessuna query successiva verrà avviata.
Parametro periodo
Molte funzioni usano il parametro facoltativo periodo. Questo può essere:
- Una string vuota. Vengono usate le date iniziali e finali della contabilità.
- Una data iniziale e una data finale nel formato yyyy-mm-dd/yyyy-mm-dd
esempio “2015-01-01/2015-01-31”
Per creare un periodo tra due date Excel usa la funzione BCreatePeriod. - Un'abbreviazione (M1, M2, Q1, Q2, Y1) che indica il mese, il trimestre o l'anno della contabilità.
Puoi usare la funzione BCreatePeriod per cerare una string di periodo basata sulla data di due celle.
Descrizione delle funzioni
- BAccountDescription(account[, column])
Riprende la descrizione del conto o del gruppo specificato.
Con la colonna parametro puoi indicare di riprendere un'altra colonna invece che la colonna Descrizione.
Esempi:
=BAccountDescription('1000')
=BAccountDescription('1000', 'Gr1')
=BAccountDescription('Gr=10')
=BAccountDescription('1000', 'FiscalNumber') - BAmount(fileName, account, [,period ])
Retrieve the normalized amount based on the BClass. - BBalance(fileName account [, period])
Riprende il Saldo del conto indicato alla fine del periodo.
Il risultato del BBalance é la somma di BOpening + BTotal
È usato per riprendere i dati contabili dai conti del bilancio (Attivi, Passivi)- Il conto può essere un numero di conto o una string contenente diversi conti, separati dal carattere “|”.
Puoi specificare conti normali, centri di costo o segmenti.
Puoi anche usare wild cards e anche “Gr=” seguito dal gruppo contabile.
Per maggiori informazioni guarda la descrizione della funzione Javascript per currentBalance (in inglese) - Esempio
“1000” “1000|1001” “10*|20*” “Gr=10” “Gr=10|Gr=20” “Gr=1*”
".P1" ";C01|,C02",":S1|:S2"
"1000:S1"
- Il conto può essere un numero di conto o una string contenente diversi conti, separati dal carattere “|”.
- BBalanceGet(fileName, account, cmd, valueName [,period ])
Questa funzione permette di accedere facilmente a tutti gli altri dati resi disponibili dal REST API come “saldo”, “budget”
Esempi:
=BAmount( FName, “1000”, “balance”, “currencyamount”)
=BAmount( FName, “1000”, “balance”, “count”)
=BAmount( FName, “1000”, “balance”, “debit”)
=BAmount( FName, “1000”, “budget”, “debit”) - BBudgetAmount(fileName account [, period])
Uguale al BAmount ma usa i dati saldo invece dei dati contabili. - BBudgetBalance(fileName account [, period])
Uguale al BBalance ma usa i dati budget invece dei dati contabili. - BBudgetInterest(filename, account, interestRate [, period])
Uguale al BInterest ma usa i dati budget invece dei dati contabili. - BBudgetOpening(fileName account [, period])
Uguale al BOpening ma usa i dati budget invece dei dati contabili. - BBudgetTotal(fileName account [, period])
Uguale al BTotal ma usa i dati budget invece dei dati contabili. - BCellValue(fileName, table, rowColumn, column)
Riprende il contenuto di una cella della tabella.
Esempi:
=BCellValue(FName, “Accounts”, 2, “Description”)
=BCellValue(FName, “Accounts”, “Account=1000”, “Description”)
=BCellValue(FName, “Accounts”, “Group=10”, “Description”) - BCreatePeriod( startDate, endDate)
Prende le date di due celle e crea una string di periodo
=BCreatePeriod(D4, D5) - BDate(isoDate)
Converte una Iso Date in una data Excel. - BFileName(fileName [, disable connection])
Riprende il FileName o una string vuota, se non c'é collegamento con il web server o se il file non é corretto.
Se il valore del disableConnection non é vistato, la funzione dà una string vuota.
Usa le celle che contengono il risultato di questa funzione come parametro file name, quando usi le altre funzioni. Se il programma Banana non é aperto viene fatta solo una query e Excel non aspetterà molto tempo. - BFunctionsVersion()
Riprende la versione della funzione nel formato data. - BInfo(fileName, sectionXml, idXml)
Recupera le informazioni riguardanti le proprietà del file.
Esempi:
=BInfo( FName, “Base”, “HeaderLeft”)
=BInfo( FName, “Base”, “DateLastSaved”)
=BInfo( FName, “AccountingDataBase”, “OpeningDate”)
=BInfo( FName, “AccountingDataBase”, “BasicCurrency”)
- BInterest(filename, account, interestRate [, period])
Calcola gli interessi per questo conto per il periodo specificato.- il conto può essere qualsiasi conto, come specificato nel BBalance
- il calcolo degli interestRate in percentuale
- > 0 calcola l'interesse degli importi in Dare
- < 0 calcula l'interesse degli importi in Avere
- BOpening(filename, account [period])
Retrieve the Balance for balance of period start for the indicated account. - BQuery(fileName, query)
Riprende il risultato di una query definita liberalmente.
Esempi:
=BQuery(FName;"startperiod?M1”)
=BQuery(FName;"startperiod?M1”) - BTotal(filename, account [,period])
Riprende il movimento del periodo.
Dovrebbe essere usato per riprendere i dati dei conti del Conto Economico (Costi e Ricavi). - BVatBalance(filename, vatCode, vatValue [, period])
Riprende un valore rispetto ad un VatCode (=importo IVA) definito (o diversi VatCodes).
“vatValue” can be “taxable”, “amount”, “notdeductible”, “posted”
Esempi:
=BVatBalance( FName, “V10”, “taxable”)
=BVatBalance( FName, “V10|V20”, “posted”)
Ricalcolo
Il ricalcolo automatico non aggiorna i dati del file contabile.
Per ottenere un aggiornamento dei dati occorre chiamare la macro RecalculateAll() che chiama il metodo Application.CalculateFullRebuild
I files di esempio contengono il bottone “Recalculate” che chiama la macro RecalculateAll.
Banana host name and port
I dati del web server sono ripresi da “localhost:8081”
Puoi specificiare un host diverso inserendo un valore nella cella chiamata “BananaHostName”
Modifica le funzioni o aggiungine di nuove
Le funzioni sono definite nel modulo "Banana" del Visual Basic.
Potremmo aggiornare questo module e aggiungere nuove funzioni.
Se aggiungi delle funzioni tue sarebbe meglio aggiungerle al tuo modulo.
Per accedere alle funzionalità Macro del Visual Basic dovresti attivare le macro.
Per vedere e modficare le funzioni devi Mostrare la scheda Sviluppo sulla barra multifunzione
Cronologia delle versioni
- 2014-07-24 prima versione
- 2015-02-28 aggiornamento per la nuova versione con nuove funzioni
- 2015-05-12 chiamata al web server ora richiede v1
- 2015-05-12 sviluppo spostato su github
- 2015-05-25 cambiato la funzione BAmoount per usare la BClass
- 2015-10-04 aggiunta la funzione BDate
How to report a bug
Send us full details of the issue, giving as much detail as possible, this can include:
- For bugs:
- Steps to Reproduce:
Minimized, easy-to-follow steps that will trigger the described problem. Include any special setup steps; - Actual Results:
What the application did after performing the above steps; - Expected Results:
What the application should have done, if there was no bug; - The accounting file:
An example of an accounting file where the problem occur; - The system informations
The dialog system informations display the information to attach to the request; - The system event log
If he application has stopped working or disappears attach a copy of the system event log related to the crash;
- Steps to Reproduce:
- For feature requests:
- A description of what you would like to achieve, and why.
A user story is an effective way of conveying this;
- A description of what you would like to achieve, and why.
You can submit your issue through our contact form.
Rare Cases
Computers configurations can be quite different.
Banana Accounting is known to work seamleassy on most system, but in rare cases there may be some problems.
If you are experiencing a problem starting or using the application follow these steps:
- Install the latest version of the application
- Install the latest version of the graphics driver:
Visit the manufacturer website, download the driver file and install it - Install the latest version of the printer driver.
Visit the manufacturer website, download the driver file and install it
Bug reporting
Rare cases troubleshooting pages
How to retrieve the event log in Windows
If the application crashes (the application has stopped working or disappears) please send us an event log file to help the development team to troubleshoot the problems.
Follow the steps below to find and send us the event logs:
- Click Windows Start button > Type event in Search programs and files field.
- Select Event Viewer.
- Navigate to Windows Logs > Application, and then find the latest event with “Error” in the Level column and “Application Error” in the Source column.
- Copy the text on the General tab.
- Attach the text in the contact form or in a email.
Banana 9 under Mac OS 10.15 Catalina - adjustment of date
Problem
After updating to Mac OS 10.15 Catalina, the Banana 9 program displays dates as follows, everywhere a date is being used:
6/10/y ; 7/10/y ; 8/10/y - showing a "y" instead of the short indication for the year, such as "19" (2019), "20" (2020).
System
Mac OS 10.15 Catalina
Solution
- Click on the Apple symbol in the upper left corner of the screen
- System Preferences —> Language & Region —> Advanced -> Dates;
- In the "Short" field, change the setting for the year and reopen the Banana program.
Banana 9: The menu bar is hidden, the window of Banana is misplaced
Problem
The menu bar is hidden, the window of Banana is misplaced (similar to what is shown in this first image)

System
Affected OS: Windows 10
Solution
Update the driver of the Graphic Adapter
- Update driver using Windows Update
- click on start
- search for Computer Management
- click on "Run as Administrator"

- select "Device Manager"
- Expand "Display adapters"
- right click on every adapter and select "Update driver"

- Check your system with "Intel Driver & support Assistant"
https://www.intel.com/content/www/us/en/support/intel-driver-support-assistant.html - Visit the support page of the manufacturer of your computer to download the latest driver.
Banana9 hangs on startup on a system with two monitors
Banana9 hangs on startup on a system with two monitorsProblem
Banana 9 stops working on startup.
System
The computer has an ATI Display card with two attached monitors.
Affected OS: Windows 10, Windows 8, Windows 7
Solution
-
Remove (just an update is not enough) and install again the ATI driver;
-
Try to start the application on the AMD window / monitor.
-
Look for more solutions at: https://bugreports.qt.io/browse/QTBUG-50371
+
Resources
-
Qt bug reports: https://bugreports.qt.io/browse/QTBUG-50371
+
Banana9 hangs on startup with the message "LoadLibrary failed with error XX: Wrong parameter."
Problem
Banana 9 stops working on startup. After the crash the message "LoadLibrary failed with error XX: Wrong parameter." is displayed.
System
The system is an old notebook where windows 10 was installed afterwards.
The notebook's discrete graphic card is not officially supported by windows 10.
Affected OS: Windows 10
Solution
- Update the graphic card driver
or
- Rename in folder C:\Windows\System32 the file "atig6pxx.dll" to "atig6pxx.dll.bak"
Banana9 hangs on startup with the message "dll is missing" or "error 0xc000007b"
Problem
Banana Accounting 9 does not start and a message stating one of the following texts appears:
- The program can't start because a dll is missing from your computer.
- The application was unable to start correctly accompanied by an error code (0xc000007b)
System
Usually this error occurs on Computers running Windows 7 or Vista, sometimes it also occurs on Windows 8 and 8.1.
Cause
Probably your system is not up to date.
Solution
Run Windows update and reinstall Microsoft Visual C++ redistributable
- Run windows update
- Select Start > Control Panel > System and Security > Windows Update.
- Select "Check for updates." Wait as the Windows Update tool scans checks for updates that you have not installed
- If you see a message that says, "Updates are available for your computer" or "Install updates for your computer," click the button labeled "Install updates."
- Wait as the updates install. Restart your computer when prompted to complete the updating process.
- Reinstall Microsoft Visual C++
- Open Programs and Features
- Uninstall all items with the name of "Microsoft Visual C++ 2*** Redistributable"
- Download the latest Microsoft Visual C++ redistributable packages
- Run the file vcredist.exe that you just downloaded
- If the problem persists, force Windows Update to install missing components:
- Go to this Microsoft Support webpage
- Scroll down in the "Method 2" section.
- Download and install the package for your Operative System
Banana9 hangs some seconds after the main page of the program is showed
Problem
Banana 9 stops working a few seconds after the main page of the program is showed.
System
The system is running on a Acer notebook
Affected machines: Acer aspire es 17
Affected OS: Windows 10, Windows 8
Solution
-
Open in Explorer the folder C:\Program files\Banana90
-
Create a new folder 'backup_dll'
-
Move the files 'libeay32.dll' and 'ssleay32.dll' to the folder 'backup_dll'
-
Restart the application
Banana9 hangs when the Open File Dialog or the Save File Dialog is opened
Problem
Banana 9 stops working as soon an Open File Dialog or a Save File Dialog is opened.
System
The system is running on a Dell computer or notebook.
The software Dell Backup and Recovery (from Softthink) is installed and running on the system.
Affected OS: Windows 10, Windows 8, Windows 7
Affected systems: Dell computer
Solution A (recommended)
- Update Dell Backup and Recovery tools to version 1.9.2.8 or greather
- Check Dell User's Guides and Support pages on how to update your system
Solution B
-
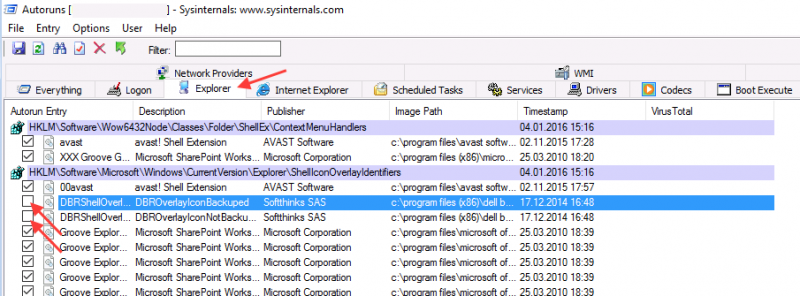
Download the Autoruns for Windows - TechNet - Microsoft utility;
-
Expand the file Autoruns.zip;
-
Run the application Autoruns.exe as Administrator;
-
Select the "Explorer" tab;
-
Deselect all "DBRShellOverlay" entries from Softthinks SAS Publisher
-
Close Autoruns;
-
Restart Banana 9.
Notes
- In one case, after the changes in the registry, the customer had some problems running Internet explorer.
Those problems could be resolved by restoring the changes in the registry. - The number of "DBRShellOverlay" entries to be disable can be on some systems more than two, those entries have to be searched in all sections listed in the tab Explorer.
Resources
-
Dell Forum page "Backup and Recovery causing applications using Qt5 DLLs to crash": http://en.community.dell.com/support-forums/software-os/f/3526/t/19634253
Banana9 hangs when trying to print
Problem
Banana 9 hangs the first or second time the print dialog is opened.
System
The 'Devices and Printers' configuration contains printers no longer attached to the system.
Affected OS: Windows 10, Windows 8, Windows 7
Solution
-
Open Start and select 'Devices and Printers'
-
Remove all printers no longer used or attached to the system