Income & Expense accounting
Introduction
Income & Expense accounting is the ideal tool to manage the accounts of small to medium size companies, associations, private enterprise or project planning. It can be configured with or without VAT. On the other hand, it does not have the multi-currency options, that you will find in the double-entry book keeping version.
It does include:
- Income & Expense - allows you to manage income and expense for several accounts.
- Cash book - used to keep track of the income and expenses of one single account .
Features
- Manages your balance sheet and income statement (assets, liabilities, income and expense)
- VAT option allows VAT calculations and VAT tax returns
- Process all your accounting records: accounting journal, account cards, periodical and annual reporting
- Lets you manage your Cost Centres and their Segments
- Multiple options to present your data
- Export to Excel, Html, Xml, Pdf
- Import various types of data files.
Tables and Properties files
Income & Expense accounting contains the following tables:
- Accounts
Where you find the Chart of Accounts, the opening balances and define your groupings. - Categories
Define the categories of Income & Expense here, the cost centres and segments. - Transactions
Record your transactions here. - VAT Codes
If you have selected the VAT option, enter your VAT codes here. By selecting one of the VAT templates, VAT codes will be allocated correctly, allowing you to have a facsimile of your official VAT statement. - File and accounting properties
- Manage the general settings of your accounting here.
Immediate information
The account balances will be displayed instantly in the Accounts and Categories tables, after the income and expense recordings. Balances will be adjusted automatically after each registration of a transaction and you will not need to require a specific report to have an overview of your accounts, which you can call up via the Accounts and Categories tabs.
Support
- Detailed information on the different functionalities of the program, with concrete examples and screenshots of the software, for your use
- Free support for one year included.
Topics similar to Double-entry accounting
Commands
Printouts
Getting started
In order to start working with your Income & Expense accounting, proceed as follows:
- Download the Banana Accounting 8 software
- Install Banana Accounting 8 software by entering your license key.
Creating a new accounting file
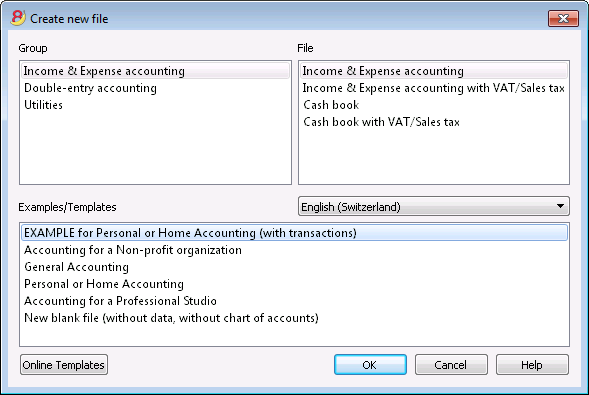
- From the File menu, activate the New command
- Select the Income & Expense accounting group and the Income & Expense accounting File (with or without VAT)
- Select the Examples/Templates according to your language and nation
Banana provides predefined templates.
You may download:
- from the program - select the language / country and choose the model that suits you
- Clicking the button Online Templates - you will access our Apps page internet site, where all existing accounting templates are available free of charge. You can run a detailed search by entering the language, country, and category of activity (company type, non-profit, independent ...).
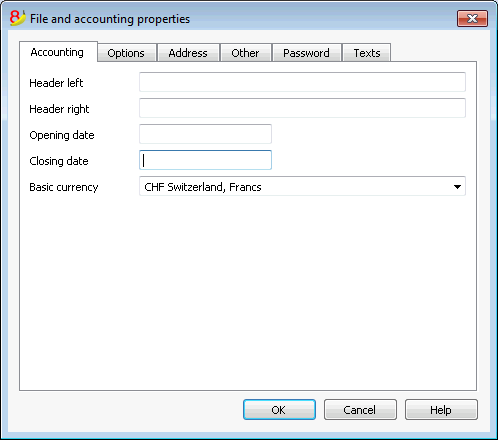
Setting up the File properties
Set up your own data from the File and Accounting properties command and save with your own file name.
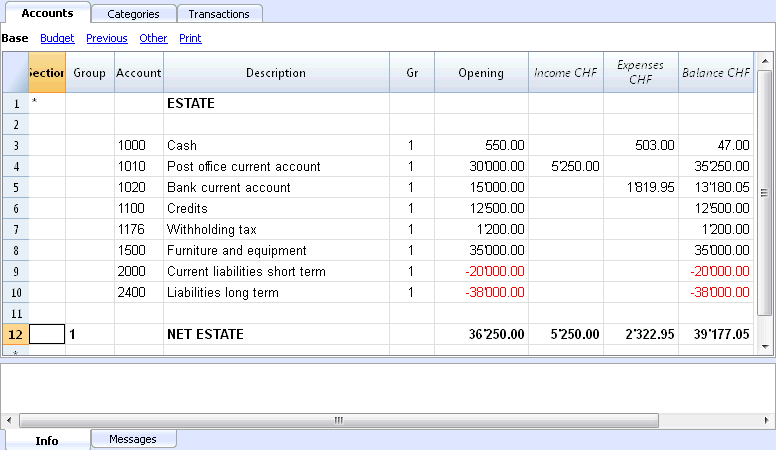
Customize the Accounts table
In the Accounts table, you can customize the estate accounts, according to your own needs:
- you can change the account numbers
- you can change the Description
- In the Opening column you need to enter your opening balances
Please remember, that for the Liabilities' accounts (f.ex. debts), the opening balance should be preceded by the minus (-) sign.
This operation needs to be executed only the first time using Banana Accounting, since from then on, every end of the year, when creating a New Year (Account2 menu, Create New Year command), the opening balance will be automatically transferred.
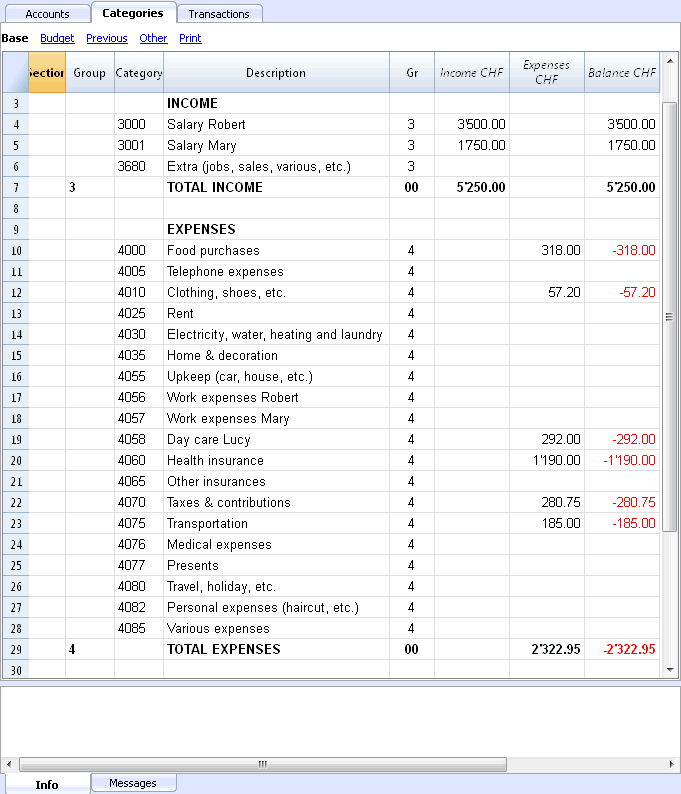
Customize the Categories table
In the Categories table, customize the income (earnings/revenue) and expense (expenses/costs) categories.
The Category numbers can be amended, as well as the Description.
The categories don't and must not contain an opening balance, in order to determine the result of the accounting year.
Transactions table
In the Transactions table, the daily income and expense transactions are entered, indicating the account, for which the transaction was made and the category to which the income or expense is attributed.
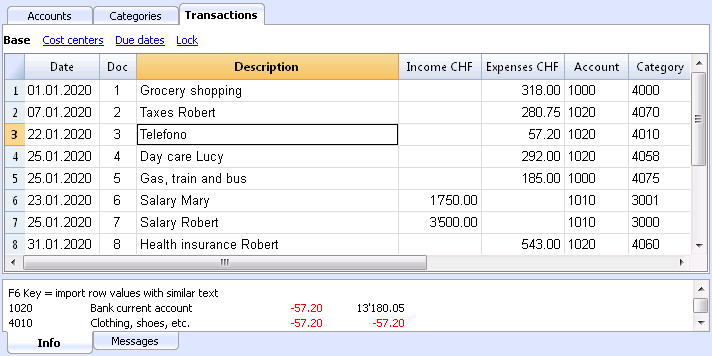
In the appropriate columns:
- Enter the date
- Enter the document number that is manually assigned to the paper document. This allows you to easily find documents, once the accounting transaction has been entered.
- Enter a description
- In the Income columns enter the income amount
- In the Expenses column, enter the expense amount
- In the Account column enter the account number (it has to be an existing account in the Accounts table, ex. Bank)
- In the Category column enter the expense or income category (it has to be an existing category in the Category table).
Speeding up the recording of the transactions
In order to speed up the recording of your transactions, you can use:
- the Smart fill function that allows the automatic autocomplete of data that have already been entered at an earlier date.
- the Recurring transactions function (Account2 menu), used to memorize recurring transactions into a separate table.
- import of your bank or post office statement.
Transactions with VAT
In order to enter transactions with VAT please proceed as follows:
- from the File menu, choose New command and choose Income /Expenses accounting with VAT/Sales taxes
- Choose one of the existing templates for your nation of the Income/expenses accounting with VAT type
In order to enter transactions with VAT, please refer to the Transactions page.
Transactions on multiple rows
Transactions on multiple rows, or Composed transactions are transactions involving more than two accounts and credits/debits on multiple accounts or categories (for example when you pay different invoices from the bank account). In this case you need to enter the transaction on multiple rows:
- in the first row enter the total amount of the income or expense and the account from which this amount is debited or credited
- in each subsequent row, enter the income or expense amount in the category column, and enter the appropriate category number.
Each individual amount is recorded on different row. When all the individual income and expenses rows are entered there shouldn't be any differences.
The Account card
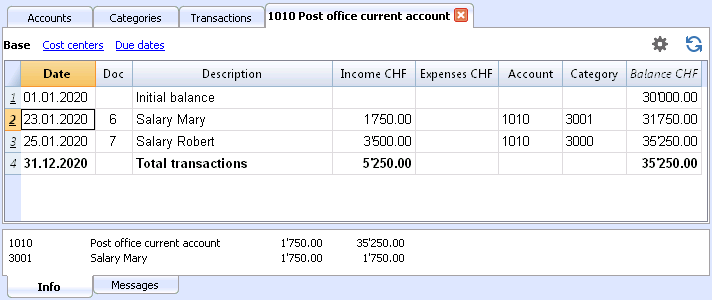
The Account card allows you to have a complete list of entries relating to the same account or the same group.
- To open an account card you click once on the account number cell and then click once on the small blue arrow appearing in the upper right corner of the cell.
- To open multiple account cards you must select the Account cards command from Account1 menu.
- To update the account cards, following changes in the Transactions table, you must click on the two circular arrows symbol, located at the top right of the account card.
The category card
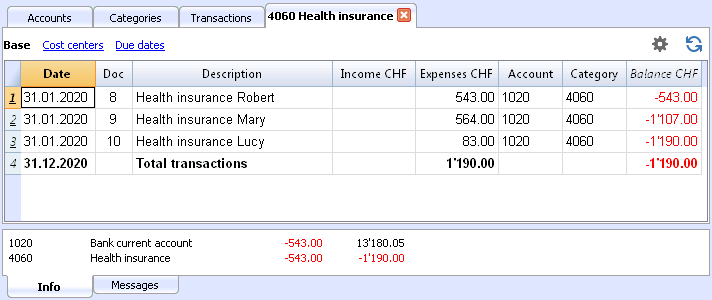
The Category card allows you to have a complete list of entries relating to the same category.
- To open a category card you click on the account number cell and then click once on the small blue arrow appearing in the upper right corner of the cell.
- To open multiple category cards you must select the Account cards command from Account1 menu.
- To update the category cards, following changes in the Transactions table, you must click on the two circular arrows symbol, located at the top right of the category card.
Account cards per period
To open an account card with account balances at predefined dates, click on Account1 in the menu, Account cards ... and click Period selected in the Period tab to insert your selected period.
Consult the Period page for further information.
Print the Account cards
To print an Account card, open it from any table (Accounts or Transactions) and start printing from the File menu.
To print out several or all the Account cards, click Account1 menu, select Account cards and select the Accounts you wish to print. The filter in the window allows you to select automatic selection of all accounts, cost centers, segments, groups etc ...
For further information refer to the Account Cards page.
Enhanced Statement
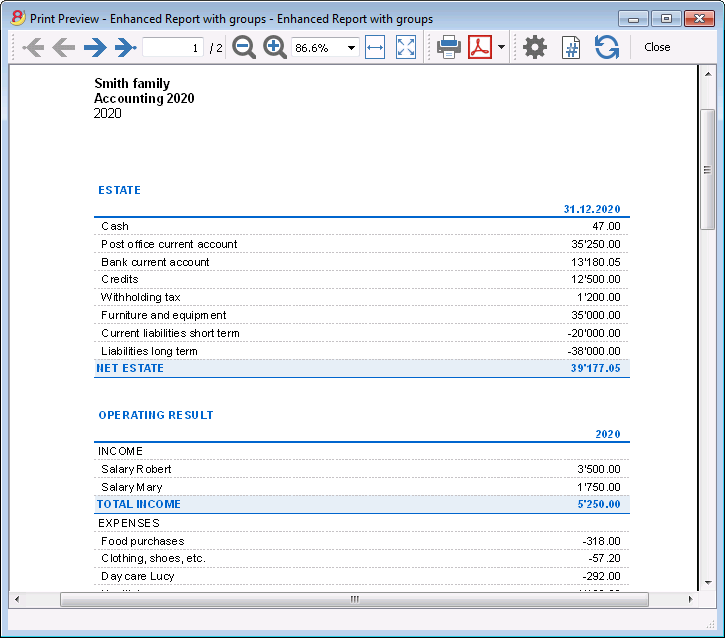
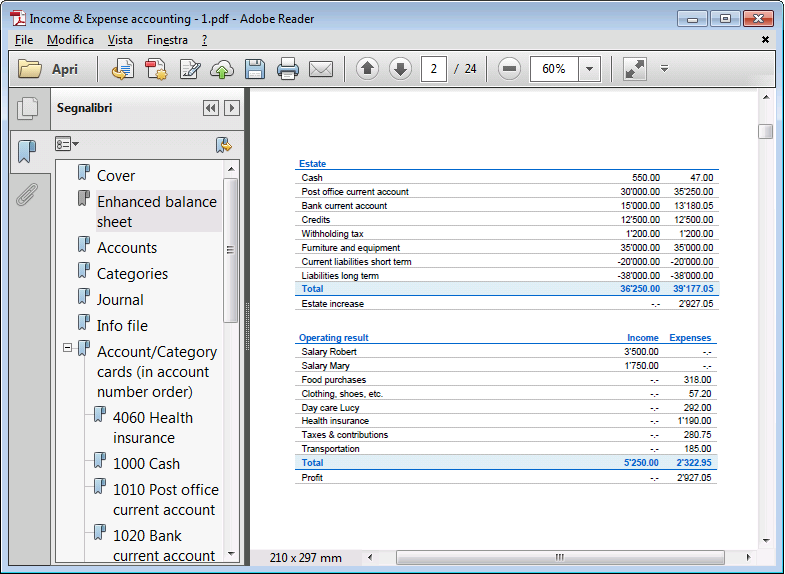
To view the Enhanced Statement and the Enhanced Statement with groups, choose the Account1 menu and then the Enhanced statement or Enhanced statement with groups command. You can also obtain statements by period.
- The Enhanced statements displays all accounts and categories without any subgroups
- The Enhanced statements with groups displays all accounts and categories also with subgroups
Archive data in PDF format
At the end of the year, when the accounting is done, corrected and revised, you can store all accounting data with the Create Pdf dossier command from the File menu.
The Budget
Before starting your accounting year, you can create a budget with your assumed expenses and revenue, in order to have control over the financial and economic situation of your company.
The budget can be set in two different ways:
- From the Budget column of the Categories table. For each account the yearly budget is indicated.
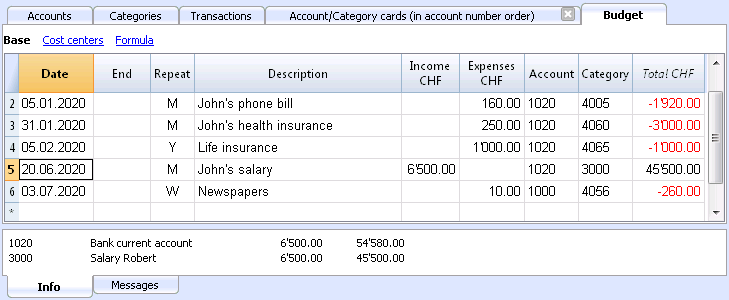
In this case, when you process the budget from the Account1 menu, Enhanced statement with groups command, the Budget column shows the amounts that relate to the entire year. - From the Budget table, that you need to manually activate using the Add new functionalities command from the Tools menu.
In this table all estimates are entered as budget transactions, either income or expenses. If you activate this table, the Budget column of the Accounts table is automatically deactivated.
In the Budget table you can setup a detailed budget that takes into account possible variations during the year and in different periods of the year.
Related document: Transactions, Enhanced statement.
Accounts
Estate accounts are entered in the Accounts table. Only one account is entered in the cash register (cash, bank, postal account ...); In Income/Expense accounting more accounts are entered (cash, customers, suppliers ...) and the accounts that refer to existing debt must have the opening amount with preceded by the minus sign (-).
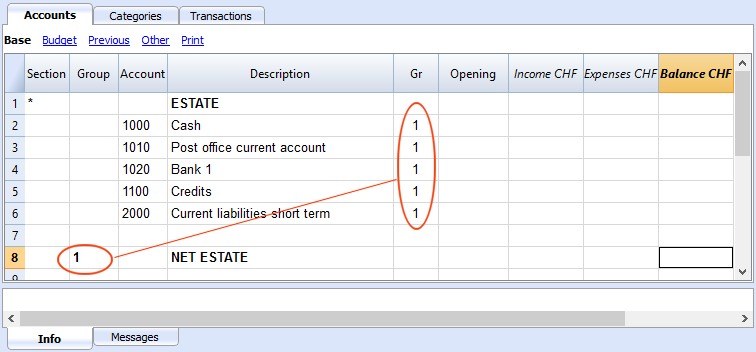
The columns of the Accounts table:
Section
Enter an asterisk to signal a section change. For example, to distinguish Total Assets from Cost Centers.
Values must be entered in the Sections table for presenting the enhanced Statement with groups.
Refer to the Sections page for further details and information.
Group
Values are added up for the categories that have the same GR. They are fundamental for totalization.
Account
Enter the number or initials of the account to be managed (cash, bank, post).
Description
Enter a description for the relative account.
Gr
Enter a value that identifies the category belonging to a specific group.
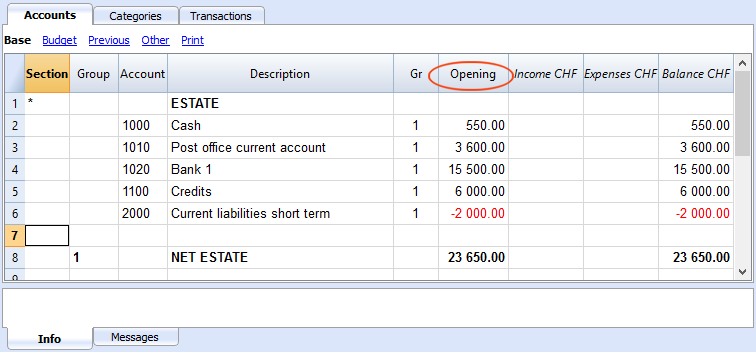
Opening
Entering an account balance is only necessary if a new file is opened or Banana Accounting 8 software is used for the first time. When creating a new accounting year, balances will be generated automatically.
Income
This locked column displays the balance of incoming entries. The balance will be updated automatically after each registration.
Expenses
This locked column displays the balance of expenses. The balance will be updated automatically after each registration.
Balance
This locked column displays the balance resulting after income and expenses. The balance will be updated automatically after each registration.
Opening balance
The first time Banana Accounting 8 software is used and new file is created, opening an account balances must be entered manually in the Accounts table Opening column.
Balances for Liabilites accounts must be entered preceeded by a minus (-) sign.
When creating a new accounting year, balances for the new year will be generated automatically.
Categories
The headings for Income and Expenses are entered in the Categories table via two principal groupings, which may - in their turn - contain subgroups. The set of categories will determine the profit or loss for the accounting period.
Groupings:
In the example below, there are three principal groupings:
- Group 3 - Total for Categories that have 3 in their Gr column (total Income)
- Group 4 - Total for Categories that have 4 in their Gr column (total Expenses)
- Group 00 - Total for groups 3 and 4 (Total Income and Expenses), which will determine the result for the accounting period.
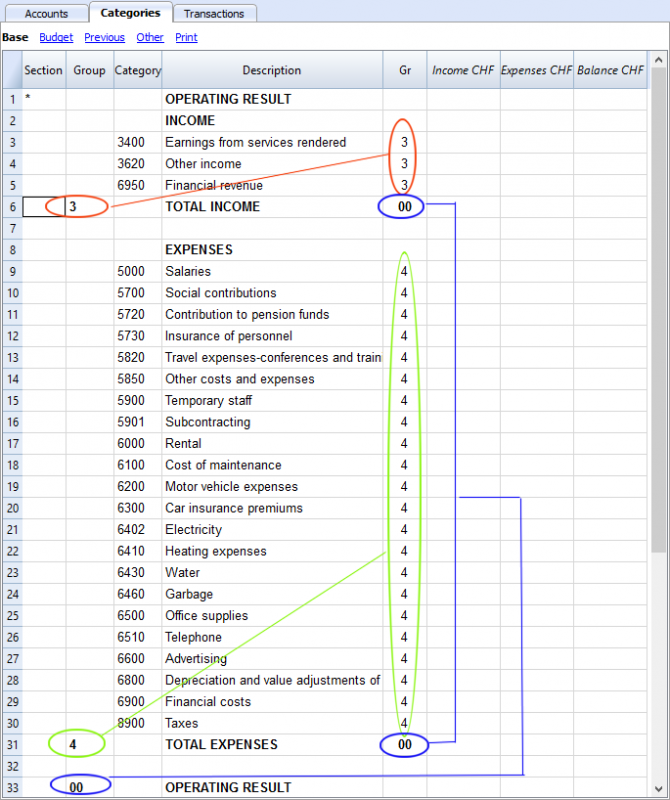
The columns of the Categories table:
Section
Enter an asterisk in the row that contains the title, to signal a section change, that will be displayed in the enhanced Statement with groups.
(the asterisk is inserted in the "Operating Result" title row in our example).
If different sections than Income and Expense are planned, such as Cost and Profit centers, another asterisk may be entered on the respective title row. Refer to the Sections page for further details and information.
Group
Enter an identifier (numerical or sign) identical to the one entered for each category in the GR column. The totals for each category belonging to the same GR will then be added up (in our example, Group 3 totals the Income Category and group 4 the Expenses category)
Description
Enter a description for the relative Income or Expense Category.
GR
Each Category has an identifier that allows the establishment of the totals for the relevant Group (in our example all categories of Income are GR3, because they will be total in Group 3, Total Income.
Income
This locked column displays the balance of incoming entries. The balance will be updated automatically after each registration.
Expenses
This locked column displays the balance of expenses. The balance will be updated automatically after each registration.
Balance
This locked column displays the balance resulting after income and expenses. The balance will be updated automatically after each registration.
Transactions
Avoid mistakes with Banana Accounting Plus
In order to facilitate checking your accounting work and to immediately find differences, in Banana Accounting Plus, our new version, we added the Balance column in the Transaction table. You can now see potential differences on each row and you can correct them right away. It is a very useful feature when closing the accounting period.
Many of our clients have already tried it and are enthusiastic about it. We advise you to switch now to Banana Accounting Plus and take advantage of the many new features.
The transactions are entered in the Transactions table.
For every transaction enter the date, document number, description, incoming or expense, the account and the category.
- Income/Expenses: enter the amount coming in or going out.
- Account: enter one of the Estate accounts (cash, bank, post, clients, suppliers...).
- Category: enter an income or expense category.
Speeding up the recording of the transactions
In order to accelerate the recording of the transactions, you can use
- the Smart fill function that allows the automatic autocomplete of data that have already been entered at an earlier date.
- the Recurring transactions function, used to memorize recurring transactions into an appropriate table.
- importing bank or post office statement.
Examples of transactions without VAT
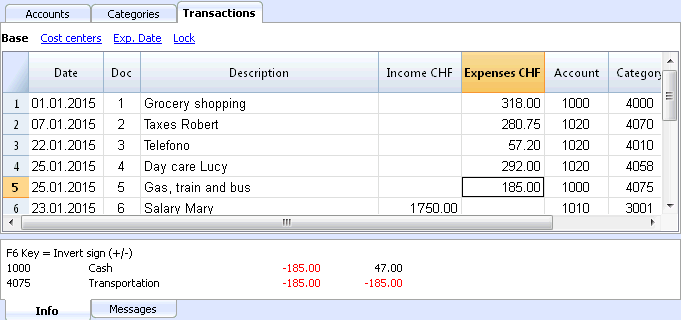
The columns of the Transactions table
Date
Enter the date for the transaction of Income or Expense
Doc
Enter Doc number. The number of the paper document is normally assigned here; this will facilitate retrieval of documents at later dates.
Description
Enter a description for the relative Income or Expense.
Income
Enter Income amount.
Expenses
Enter Expense amount.
Account
Enter the Estate account (cash, bank, Post, clients, suppliers..).
Category
Enter a category of Income or Expense, as defined in the Category table.
Examples of transactions with VAT
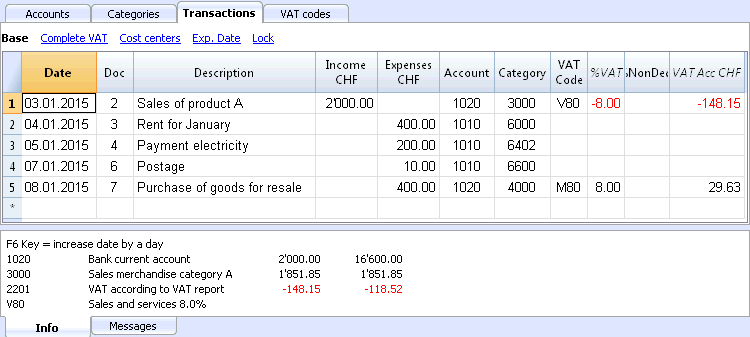
Additional columns
Depending on the type of Income / Expense accounts setup (with or without VAT) there are additional columns where VAT data is entered.
VAT Code
Enter the VAT code referring to a sale or a cost. There must be a code in the VAT Codes table.
Refer to the Transactions page for explanations of VAT codes and further information.
In the Account and Category columns, instead of entering the account and category number you can also write the text you wish to find.
The software will show you the list with all the accounts and categories containing the entered text. With the Arrow down key you can move directly in the list and select the desired account number by pressing the Enter key.
In order to display the movements of an account or a category, after entering the transactions, click on the small blue symbol in the account/category cell (top right corner of the selected cell).
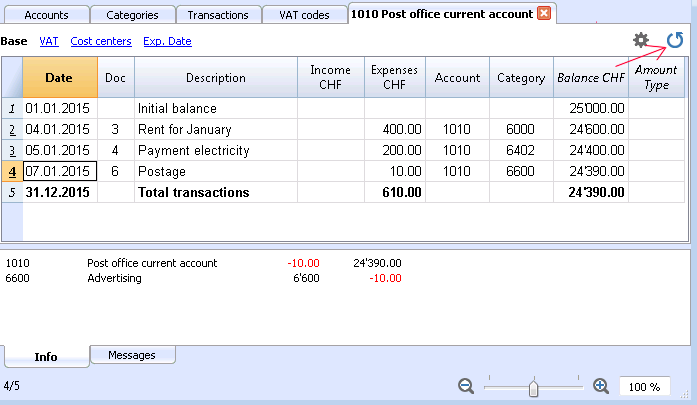
Account and category card
In the account or category card, the presentation of the transactions is very similar to the ones of the Transactions table. If you enter further transactions or make changes (always operated in the Transactions table), you can update the account/category card by clicking the Refresh icon on the right side of the screen.
Printouts
Instant information
Account balances, income and expense are on ready display in the Accounts and Category tables.
After each entry of a transaction, balances are adjusted automatically and there is no need to run a report, as you can simply display the Accounts or Categories tables.
Advanced printouts
All printing is run from the Account1 menu, where the different functions for prining are located:
-
Journal by period command. You can display and print the whole table or just a specified period.
-
Account/Category cards command. You may select all cards or define your selection.
Define the required period in the Period tab and click the required settings in the Options tab. Print settings can be saved in the Composition tab so they can be resumed without them to be having defined again. -
Enhanced statement command. You may also print a defined period and various options and compositions may be included.
-
Enhanced statement with groups command. You may also print a defined period and various options and compositions may be included.
-
Accounting report command. The required options are displayed in the Accounts table. Reports are possible for current, previous periods or previous years; each period may contain subdivisions and the compositions can be saved.
Example of printout of Enhanced statement with groups
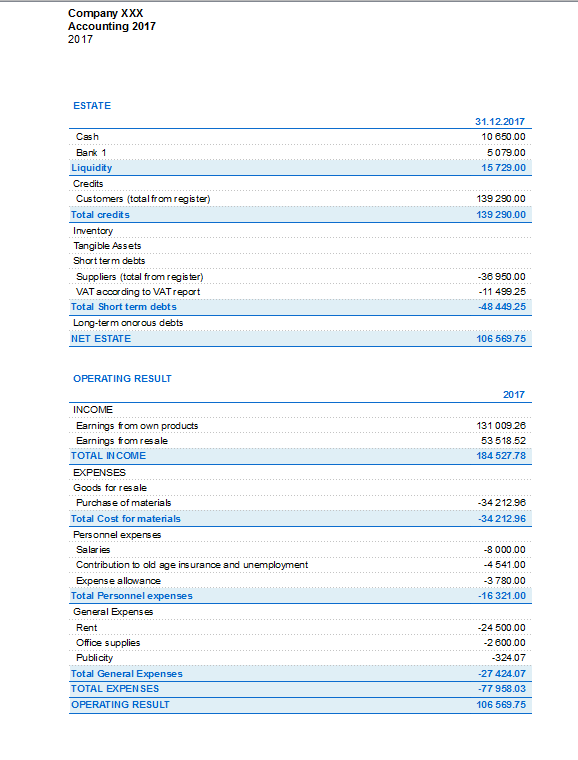
Enhanced statement with groups
This feature is only available in version 7.0.4 or higher. It allows the user to obtain the Enhanced statement with groups, with all the options that are available in the Double-entry accounting.
The Enhanced statement with groups makes it possible to:
- Include all the groups that are present in the Accounts- and the Categories tables nn the printout,
- Exclude groups or accounts individually
- Select a subdivision by period
(for example, in the first semester, one can select to have a subdivision by month or per quarter) - Select a subdivision by segment.
Sections
The sections present in the Accounts- and/or Categories table make it possible to define a set of accounts and categories to be printed with the 'Enhanced statement with groups' command from the 'Account1' menu.
- The sections are indicated in the Sections column of the Accounts- and the Categories table
- An * (asterisk) indicates the beginning of a section
- A ** (double asterisk) indicates the beginning of a subsection
- A # indicates the beginning of the Notes section
- A section ends once the next one begins
- Contrary to the Double-entry accounting, it is not possible to use numerical identications for the sections
- In case no section has been indicated, the program will enter them automatically when the command is used for the first time
- In the Accounts table "Estate"
- In the Categories table "Operating result"
- It is recommended to create separate sections if there are cost centers, segments or clients/suppliers registers.
In this way, it is possible to print reports with just the information that concerns the user.
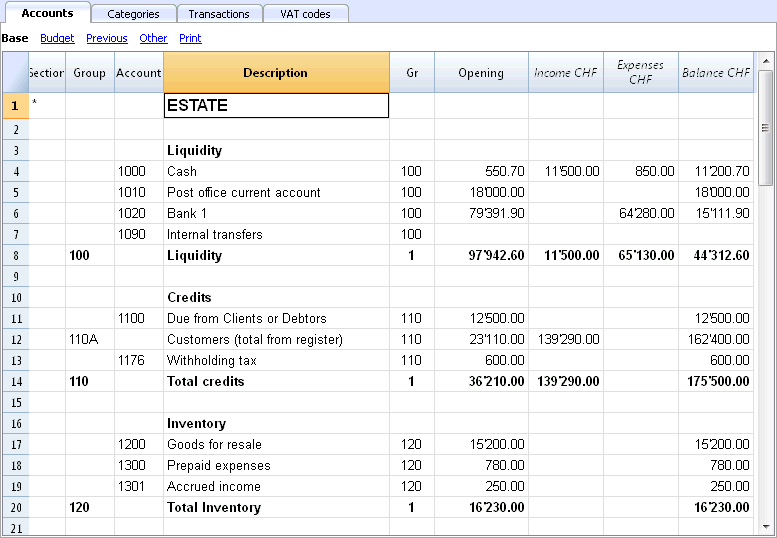
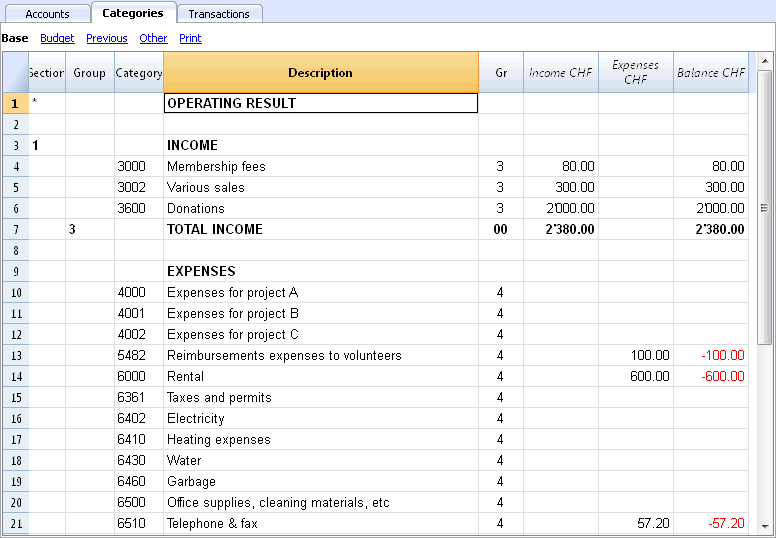
Configurations of Accounts & Categories
In the dialogue window, you can define how to print the accounts and the categories.
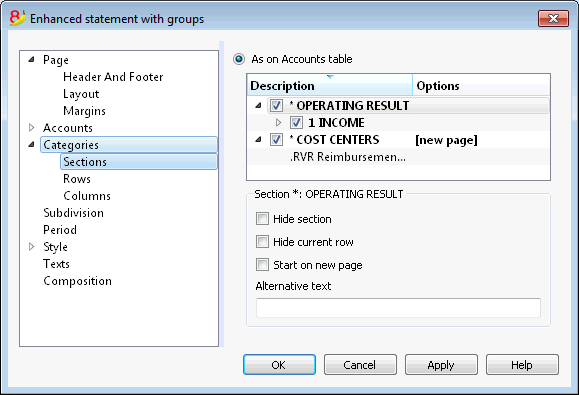
- The accounts, present in the Accounts table, will always be printed with the balances at the end of the indicated period.
- The categories will always be printed with the movements of the indicated period.
Enhanced Statement
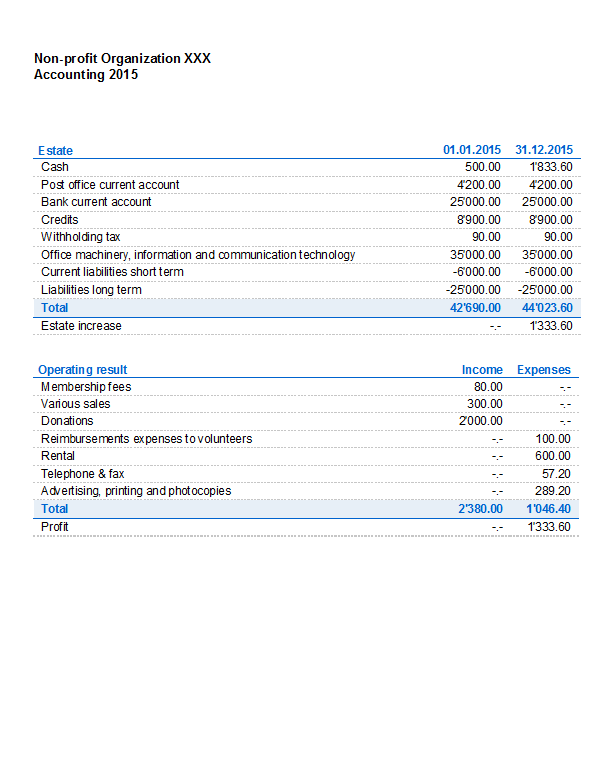
- The Enhanced Statement gives an overview of the progression of the Estate situation and the operating result of the year. This function is present in the Income & Expense accounting.
- The Enhanced Statement is calculated and displayed by means of the Enhanced Statement command, from the Account1 menu.
- In the window that pops up, you have the possibility to insert the header that will display on the first page of the Enhanced Statement; furthermore, a series of options can be selected in order to include further details in the printout.
- Transactions without date are being considered as opening transactions and will not appear in the printouts of the Profit & Loss Statement.
See also Print Example.
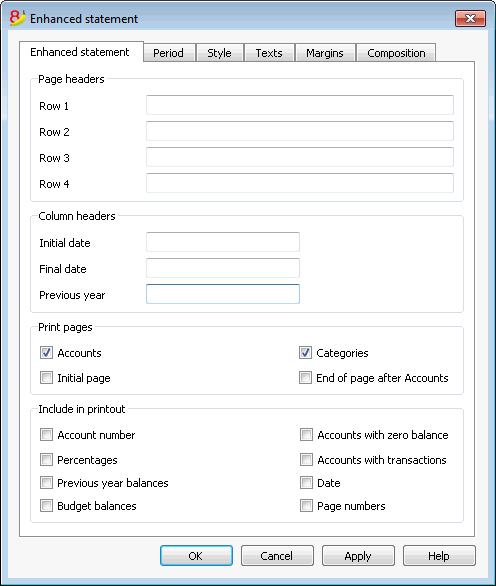
Page headers
Rows 1-4
These rows allow the definition of the Staement's headers.
Column heade
Initial date
Insert the initial date of the accounting.
Data finale
Insert the final date of the accounting.
Previous year
Insert the final date of the previous year's accounting.
Print pages
Checking the boxes you define the options you desire to appear in the statement printout:
Accounts
The accounts will be printed..
Initial page
The initial page of the document with the file headers will be printed.
Categories
The categories will be printed.
End of page after Accounts
The accounts and the categories will be printed on two different pages..
Include in printout
By selecting the boxes, you choose the options that must appear in the printout.
Other Tabs
The explanations for the other tabs are available at the following pages:
Accounting report
- This command displays the amounts of accounts according to a certain grouping, for a specified period or per subdivision.
- Transactions without date are being considered as opening transactions and will not appear in the printouts of the Profit & Loss Statement.
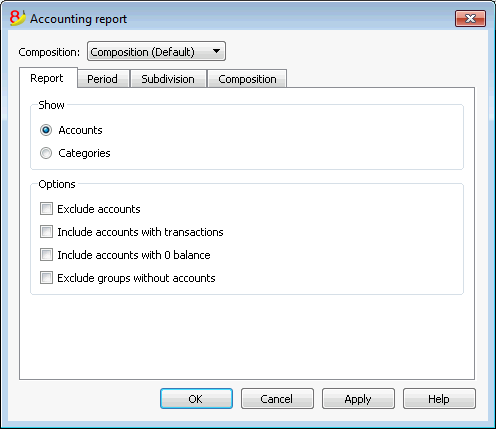
Display
You select the desired grouping scheme:
- Accounts - the Report will show a list of all accounts with the following columns: opening balance, income, expenses and account balance
- Categories - the Report will show a list of all categories with the following columns: opening balance, income, expenses and account balance.
Options
You select the accounts to be included or excluded:
- Exclude accounts - only the categories will be printed
- Include accounts with no transactions - accounts with no transactions will be printed as well
- Include accounts with 0 balance - accounts with zero balance will be printed as well
- Exclude groups without accounts - groups of accounts with zero balance will not be printed.
Other Tabs
The explanations for the other tabs are available at the following pages:
New Year
You can automatically transfer to the New Year in the following ways:
- Open the file of the terminated year and click on the Create New Year command from the Account2 menu.
- Confirm the basic data of the Accounting properties.
- Save the file under a new name.
The program will automatically carry forward :
- The accounts, the opening balances
- The categories will be carried forward without an opening balance, because you start from scratch, in order to determine the business result for the New Year.