Développeurs
Command line
Banana can be started by giving a series of command (for a list of command and examples file see below).
Example: open a file
banana80.exe c:\temp\example.ac2
Rule for command line command
- The arguments need to be preceded by a minus “-” sign. If an argument is missing of the “-” sign, it is interpreted as the name of the file to open.
- Include the whole argument within the delimiter “…” if the text include whitespace.
- Running import as command in the command line save the accounting file on exit
If a command fail, than a return code different than 0 is returned, and the error is inserted in the log file (only if the option –log_file was used).
Examples
Example: open a file:
banana80.exe c:\temp\example.ac2
Export to xml file
banana80.exe -cmd=export "-cmd_file=c:\temp\my example.ac2" "-cmd_p1=c:\temp\myexample.xml" -cmd_p2=xml -period_begin=2006-01-01 –period_end=2005-03-30
Example: import transactions (use the file name with the proper directory name)
Use also a log so that you know the error
banana80.exe -cmd=import -cmd_file="company.ac2" -cmd_table=Transactions -cmd_p1=import_mov.txt -cmd_exit=1 -log_file=log.txt
For detail information regarding the import of transaction see the page "Importing in txt format".
Available Command
The argument “–cmd=…” specifies the command to be executed. The other arguments specify the option for this command.
The command can be used as a command line or a DDE request.
|
Argument |
Description |
|
cmd= |
The command to execute file_open (cmd_p1=noshow) file_close (cmd_file) file_save (cmd_file) file_saveas (cmd_file, cmd_p1) file_show (cmd_file) get_tableinfo (cmd_file , cmd_table) get_getcell (cmd_file , cmd_table, cmd_column, cmd_row) get_getline (cmd_file , cmd_table, cmd_column, cmd_row) get_lasterror set_language(cmd_p1) calc_all (cmd_file) calc_simple (cmd_file) deleterows (…) *) export (…) fileinfo (…) import (…) *) acc_accountcard (…) acc_externalreport (…) acc_vatreport (…)
1) Running import in the command line save the file on exit;
|
List of arguments
|
Command |
Argument |
Description |
|
From command line |
cmd_exit=1 |
The program should exit and terminate |
|
nonetwork |
Turn off all connections to the network (i.e. to check for updates, integrated web-server, ...) |
|
|
For all commands |
cmd_file= |
the file to use or open |
|
cmd_pw= |
password to open the file |
|
|
cmd_names= |
A - Field name in XML (default on) a - Field name in original language |
|
|
log_file= |
set the log file name for writing messages (if no file name no log) |
|
|
deletelines |
cmd_p1= |
start of line to delete (number) |
|
cmd_p2= |
how many lines to delete (if not present = 1) |
|
|
cmd_table= |
The name of table |
|
|
|
|
|
|
set_language |
cmd_p1= |
The two letter ISO639 language code (de, fr, en, it) |
|
|
|
|
|
file_open |
cmd_p1= |
noshow – do not show the file |
|
|
|
|
|
file_saveas |
cmd_p1= |
file name of saved file |
|
|
|
|
|
get_tableinfo |
cmd_table= |
The name of the table to get info |
|
|
|
|
|
get_getcell |
cmd_table= |
The name of the table |
|
cmd_row= |
The number of the row, or an expression like “Account=1000:3” (In this ex. the third row where the field Account is equal to 1000 is used) |
|
|
cmd_column= |
The name of the column |
|
|
cmd_op= |
A – Format value (default on) |
|
|
get_getline |
cmd_table= |
The name of the table |
|
cmd_row= |
The number of the row, or an expression like “Account=1000:3” (In this ex. the third row where the field Account is equal to 1000 is used) |
|
|
cmd_op= |
A – Format value (default on) |
|
|
export |
export_use_param |
Instead of the default parameters use the last saved parameters (set with the dialog) and then applies the specified options with the other arguments |
|
cmd_p1= |
file name of the export file |
|
|
cmd_p2= |
Type: html, excel, xml |
|
|
cmd_table= |
The name of table to export (only the table is exported) |
|
|
export_include= |
Options: Upper case(A) = on; Lower Case(a) = off A - Recheck accounting (default on) B - Include statistics table (default on) C - Include transaction table (default on) D - Include account table (default on) E - Include category table (default on) F - Include total table (default on) G - Include Exchange rate table (default on) H - Inclue Vat code table and vat report (default on) I - Include Period Accounts (default on) L - Include Period VAT (default on) M - Create periods for the whole year (default off) N – Create accounts card |
|
|
export_include_ma= |
number of months for accounts period, for option I, (default 1) |
|
|
export_include_mv= |
number of months VAT period, for option L (default 3) |
|
|
export_include_mm= |
max numbers of periods (default 36) |
|
|
export_op_html= |
Options for html A - Use style sheet B - Use predefined style sheet (default on) C - Include style shett within html file (default on) D - Export visible fields only (default on) E - Table with borders (default on) F - Columns with headers (default on) G - Preserve page breaks within the table (default on)
|
|
|
export_op_excel= |
Options for Excel export A - Define cell name (default on) B - Define table name (default on) C - Use Xml names (default on) D - Protect tables (default on) |
|
|
export_op_xml= |
Upper case(A) = on; Lower Case(a) = off A – Visible field only (default off) B – Include view list (default off) |
|
|
period_all |
period All |
|
|
period_begin= |
Begin date (yyyy-mm-dd) |
|
|
period_end= |
period End date (yyyy-mm-dd) |
|
|
vat_use_param= |
Instead of the default parameters use the last saved parameters (set with the dialog) and then applies the options specified with vat_op |
|
|
vat_op= |
A - Include transactions B - Include total account C - Include total codes D - Include total percentage E - Use own group schema F - Only code specified G - Only group specified |
|
|
vat_sort= |
sort field |
|
|
vat_text= |
single code or groups (to use with –vat_op F and G) |
|
|
|
|
|
|
fileinfo |
cmd_op= |
A – Recalculate all (default off) |
|
import |
cmd_p1= |
File name of the file to import. Data have to be separated by tabulator, and the first row has to contain the name of the fields. |
|
cmd_p2= |
Insert al line number (0=Append to end) |
|
|
cmd_op= |
A - Complete imported raws |
|
|
cmd_table= |
The name of table where to insert the data |
|
|
|
|
|
|
acc_accountcard |
cmd_p1= |
account number |
|
cmd_p2= |
field name for sorting |
|
|
period_all |
period All (default) |
|
|
period_begin= |
Begin date (yyyy-mm-dd) |
|
|
period_end= |
period End date (yyyy-mm-dd) |
|
|
acc_externalreport |
cmd_p1= |
file name of the report |
|
cmd_p2= |
column name for grouping |
|
|
cmd_op= |
Upper case(A) = on; Lower Case(a) = off B - Include account with no transactions C - Include totals only D - Notify if an account is without a group |
|
|
|
|
|
|
acc_vatreport |
period_all |
period All (default) |
|
period_begin= |
Begin date (yyyy-mm-dd) |
|
|
period_end= |
period End date (yyyy-mm-dd) |
|
|
vat_use_param= |
use parameters from existing dialog + specified options like vat_op |
|
|
vat_op= |
Vat options Upper case(A) = on; Lower Case(a) = off A - Include transactions B - Include total account C - Include total codes D - Include total percentage E - Use own group schema F - Only code specified G - Only group specified H – Not used groups |
|
|
vat_sort= |
sort field |
|
|
vat_text= |
single code or groups (to use with –vat_op F and G) |
|
|
|
|
Excel Reports Add-in (Beta)
With this Add-in you will no longer need to make "copy and paste" of the values each time you update your accounting file.
You create worksheets with formulas, charts, formatting and more in Excel, and the Add-in will retrieve for you the data from your accounting file.
Just click on the Update button and your Excel worksheet will be automatically updated with the new values from Banana Accounting, and the results of formulas and charts will be updated accordingly.
See Documentation Banana Accounting Excel Add-in.

Example of a Balance sheet report created with the Excel Reports add-in

Example of a report with charts created with the Excel Reports Add-in
Characteristics
- This Add-in is hosted on our server.
Once you have installed the manifest on your computer, you will automatically use the last version. - The Add-in are secure.
Unlike Excel-macros the Add-in are secure and cannot compromise your computer. - The Add-in is currently in Beta Test.
- Please check everything and report any problem.
- You can use it for free now, but It is also possible that it will be made available for a cost.
Download and Installation
The steps below walk you through all the setup of the environment required to run the Banana Office Add-ins for Microsoft Office 2016.
Minimum requirements: Microsoft Office 2016 (Word, Excel, PowerPoint, Outlook).
Get Banana Accounting Experimental version
- Download Banana Accounting 9 for Windows or Mac (it is required the version 9.0.0.171128 or more recent).
- Install it on your computer.
Activate Banana Accounting web server
- Start Banana Accounting 8 Experimental.
- On Menu bar click Tools -> Program options… -> select the Interface tab
- Check the Start Web Server and Start Web Server with ssl options
- Click OK
Install the Manifest file
Each Office Add-in has its own manifest file. The manifest is an XML file that defines various settings, including description and links to all the add-in files.
Manifest file must be copied to a specific directory.
Manifest directory for Windows
On Windows you need to create a directory to save the manifest of the Add-in.
The directory needs to be a shared directory.
- Create a folder for the Add-ins manifests on a network share:
- Create a folder on your local drive (for example, C:\Manifests).
- Right click on the folder, select properties.
- Click on Sharing tab.
- Click on Advanced Sharing...
- Check the Share this folder box.
- Click Apply and then Ok.
- Tell Excel or Word to use the directory as trusted app catalog.
- Launch Excel and open a blank spreadsheet.
- Choose the File tab, and then choose Options.
- Choose Trust Center, and then choose the Trust Center Settings button.
- Choose Trusted Add-in Catalogs.
- In the Catalog URL box, enter the path to the network share you created, and then choose Add Catalog.
To see the path: right click on the shared folder -> Properties -> Sharing -> Network Path. - Select the Show in Menu check box, and then choose OK. A message appears to inform you that your settings will be applied the next time you start Office.
- Close Excel and restart it.
Manifest directory for Mac OS
On Mac you need to create a folder to save the manifest of the Add-in.
Go to one of the following folders where you'll save your Add-in's manifest file. If the wef folder doesn't exist on your computer, create it.
- For Excel:
/Users/<username>/Library/Containers/com.microsoft.Excel/Data/Documents/wef - For Word:
/Users/<username>/Library/Containers/com.microsoft.Word/Data/Documents/wef - For PowerPoint:
/Users/<username>/Library/Containers/com.microsoft.Powerpoint/Data/Documents/wef
where <username> is your name on the device.
Get the Office Add-in manifest
You can now download the manifest of the Add-in you want to use.
- Download the XML BananaAccountingExcelManifest file.
- Copy the manifest to the manifest directory.
Load the Add-ins in Excel
Once all the setup and installations are done, it is possible to run and use the Add-in.
- Open Microsoft Excel 2016
- Click on Insert tab
- Click on the Add-ins button
- Click on the Shared folder

- Select the Banana Accounting Add-in
- Click Add
Troubleshooting
- Download and install the last version of Banana Accounting 9 for Windows
- Open Banana Experimental
- Click on menu Tools -> Program Options
- Select the tab Interface
- Check the options Start Web Server and Start Web Server with ssl

- Select the tab System Info
- Click on Web server settings path

- Click on the button Open path… to open the directory
- From the directory, select and open the file httpconfig
- Right click on the file httpconfig
- Open with
- Select Notepad

- Delete the last two rows that begins with sslKeyFile=… and sslCertFile=…

- Save the file and close it

- Click OK to save the option changes
- Close and restart Banana Experimental
Documentation Excel Add-in
Introduction
With this Add-in you can create Excel sheets that are filled with Banana Accounting data. Once you have added transactions to the accounting file you just need to click on the Update button of the Add-in and your spreadsheet content will be updated with the new data.
Your existing formatting and formula will be preserved.
- Create an Excel sheet with headers information
This information allows the Add-in to retrieve data from Banana Accounting.
There are information relative to the file, column and account or group to be retrieved.
The Add-in helps you add the necessary information to retrieve the data. -
Click on the Update button
The Add-in will retrieve the values from Banana Accounting software.
It mantains the format or formula you enter.
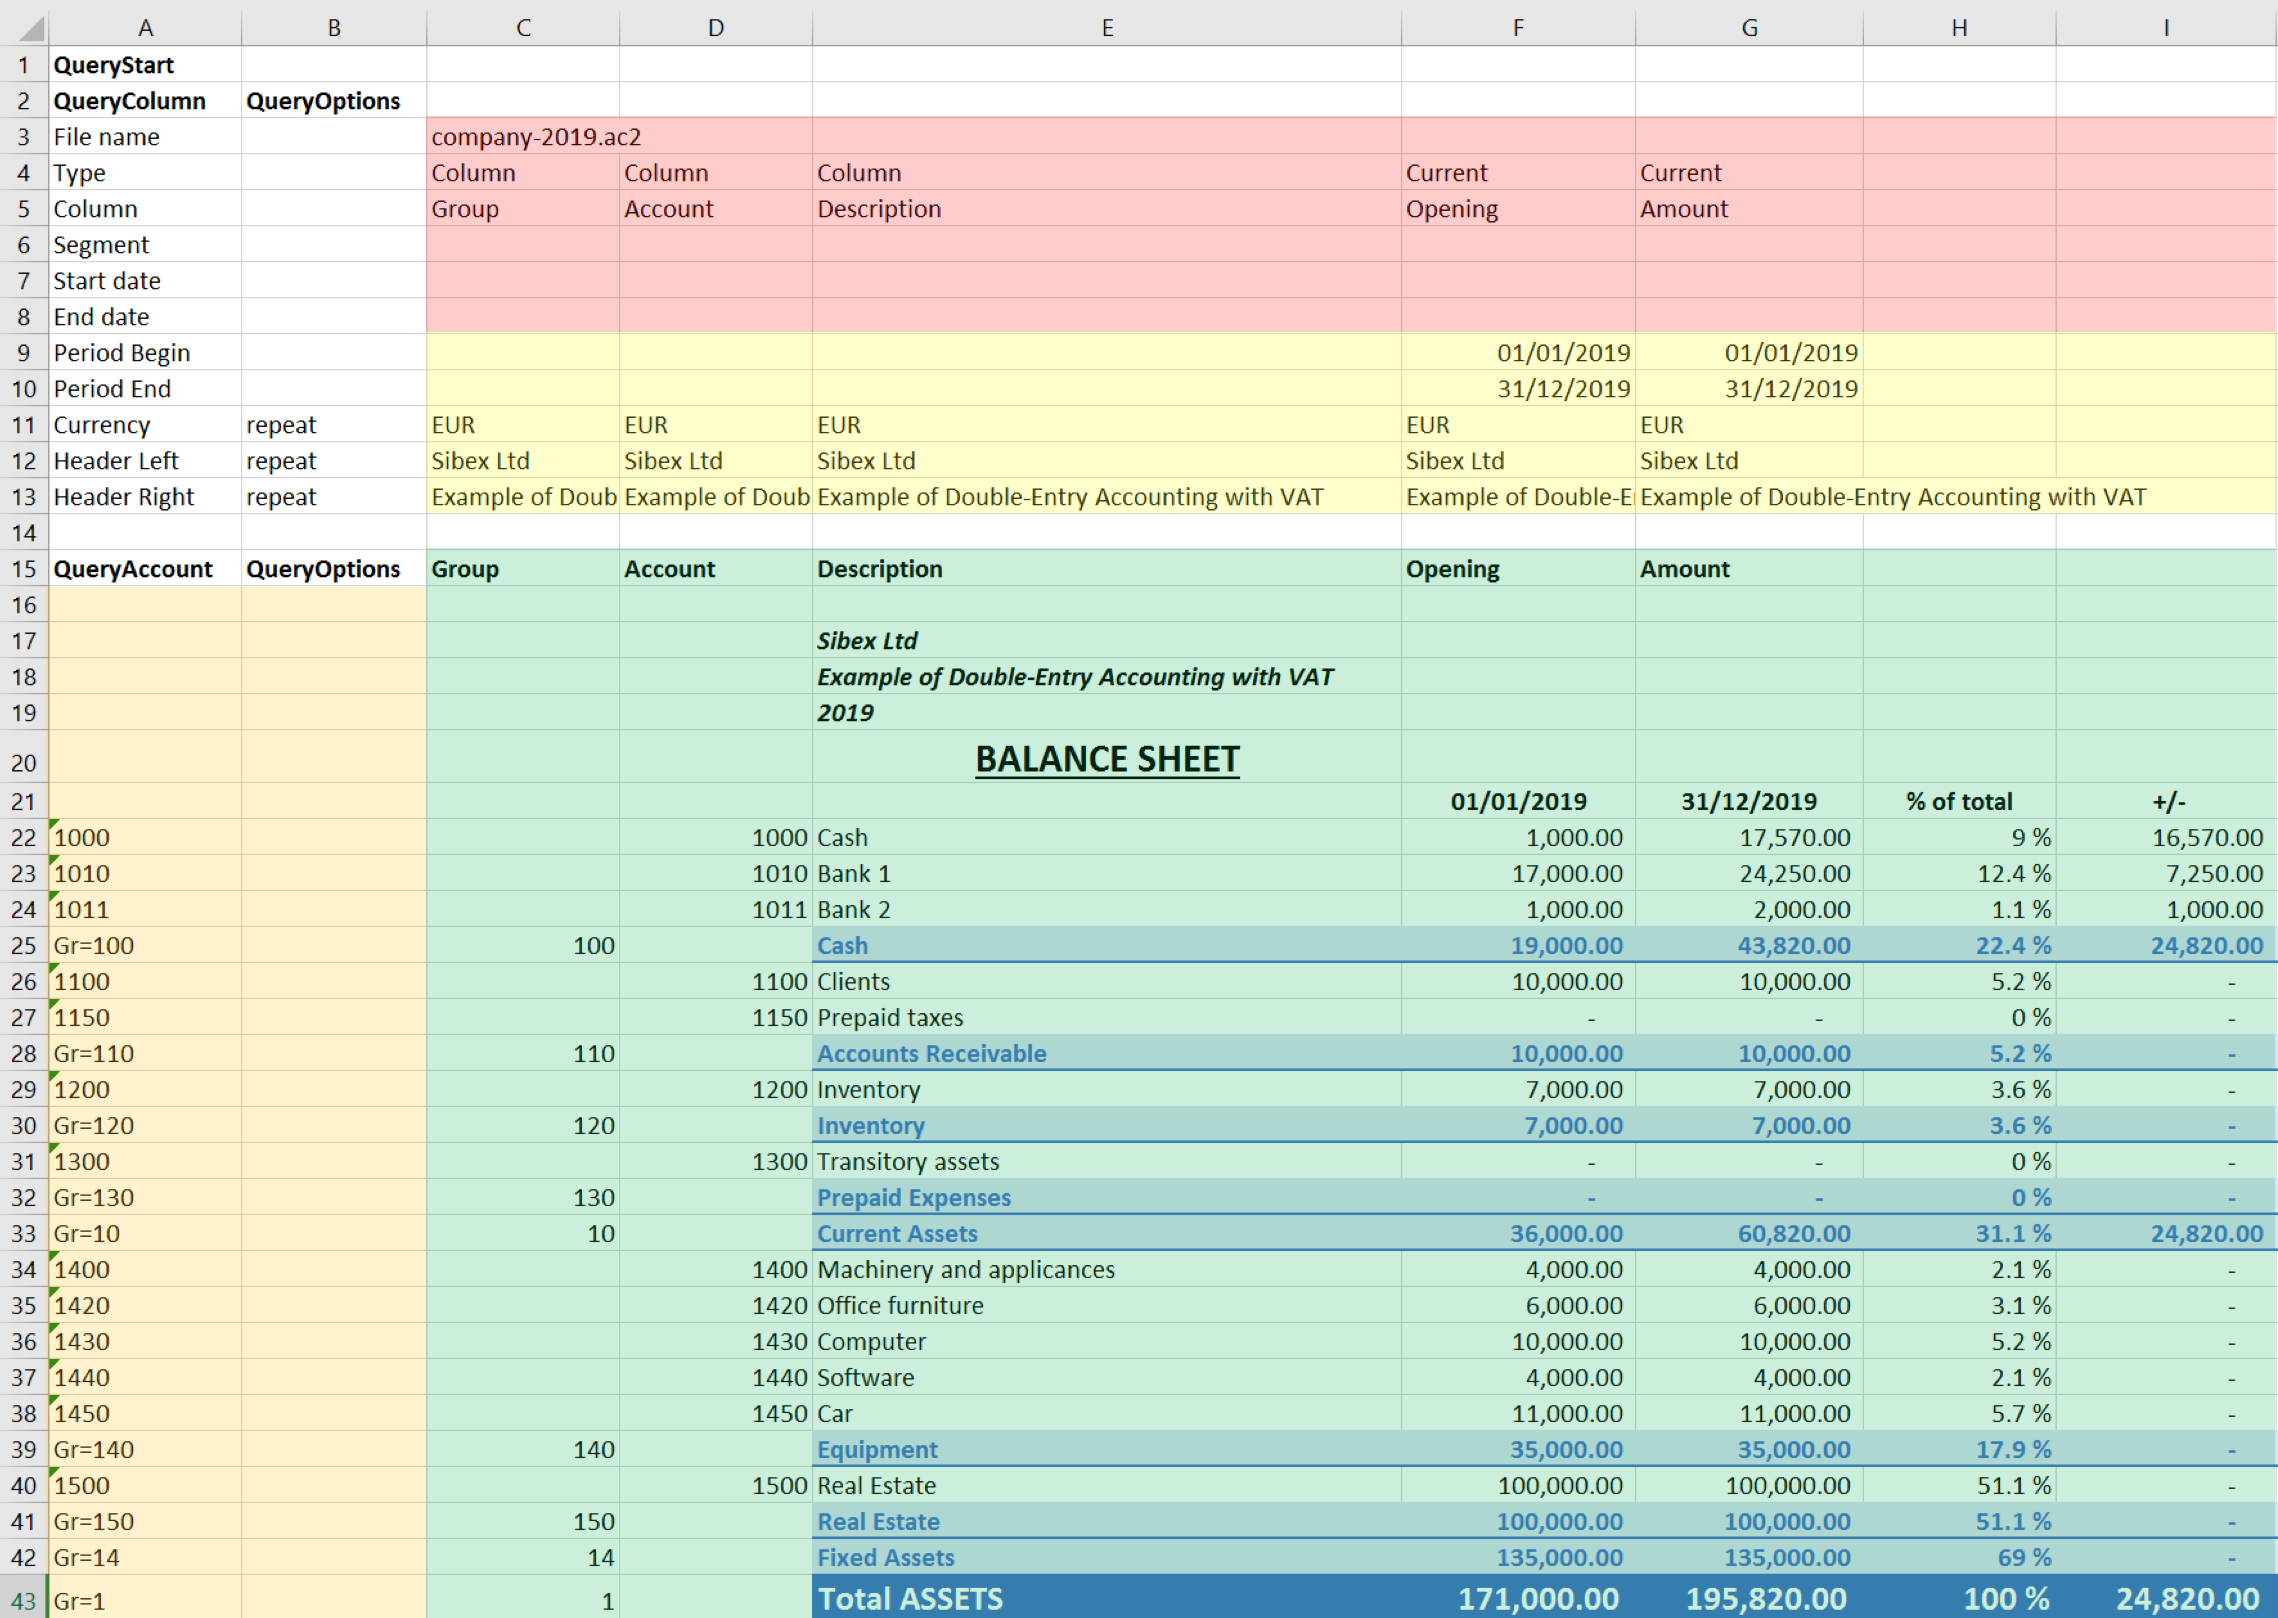
Example of a Balance sheet report created with the Banana Accounting Excel Add-in
In the example above we can see:
- The data part
Here is where the data is synchronized, based on the QueryAccount and QueryColumns.- Accounting data (Green)
Filled with the information coming from Banana Accounting - Header data (Yellow)
- Accounting data (Green)
- QueryColumns (Red)
The file name, columns names and type to retrieve.
If the column is empty no data in this column will be retrieved. You can use the columns to enter formula. - QueryAccounts (Orange)
The accounts or groups to retrieve.
If the row is empty no data in this row will be retrieved. You can use the row for entering formula o text that is not overwritten.
By clicking on the update button the Data part is updated with the new data of the accounting file, and all the previously settings like fonts, colors, formulas will remain.
Download and installation
See documentation on how to Download and install the Add-in
Example files:
- File Excel already with columns setup.
- Banana Accounting file used for the example excel file.
Add-in Command
As soon as the add-in is added in Excel, on the Home tab of the main ribbon is loaded the Banana Accounting Show Taskpane add-in command.
Banana Accounting Add-in command
When the Show Taskpane button is clicked, it loads the start screen of the add-in. The start screen provides additional information describing the functionalities of the add-in.
Click on the Let's Begin! button to start using the Add-in.

Banana Accounting Add-in start screen
Security alert messages for Windows users
In order to properly establish a connection between the add-in and Banana Accounting web server, it is required to accept the Banana security certificate.
After the Let's Begin! button has been clicked, securities alert dialogs like the following appear:
- The first security alert message is the following one, click on Yes to proceed:
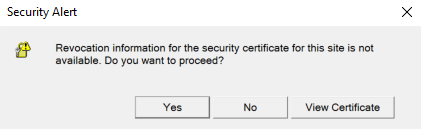
- The second security alert message is the following one, click on Yes to proceed:

If the user clicks Yes, a connection between the add-in and the Banana Accounting web server is estabilished, and then it is possible to use the add-in. Otherwise, if the user clicks No, the add-in is loaded but none connection is established, and the add-in will not work.
If for some reason the security alert messages above do not appear, try to see the troubleshooting documentation.
Add-in general overview
The add-in is a task pane add-in type. This means that the add-in is loaded in a pane on the right side of the Excel worksheet.
It is composed by three tabs, each of them has one specific task:
- The Setup tab contains all the tools needed to add information to your sheet so that the add-in can fill the data part with the accounting data. Typically it is used every time you want to create something new, like for example the very first time you use this add-in.
- The Update tab is used to update the content of the Excel worksheet with the accounting data. It is used after the header section and some accounts has been added.
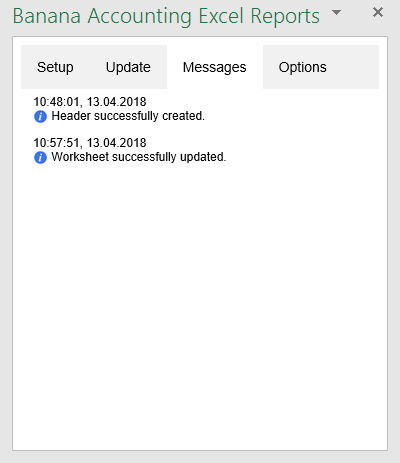
- The Logs tab it’s just a place where are displayed some messages about the add-in and the operations it does. For example when you update the sheet a message is displayed telling you that the update is completed.

Banana Accounting task pane add-in
Update of the worksheet
The Update tab is composed only of one button: Update current worksheet.
When clicked, this will start the updating process of the current Excel worksheet. Combining the Header, QueryAccount and QueryOptions, the add-in retrieves all the data directly from the Banana Accounting and writes them in the Excel worksheet.

Retrieve data from Banana Accounting and update the worksheet
Setup of the worksheet
These features will add the information to the current worksheet necessary to retrieve data from Banana Accounting.
In the setup tab there are four sections:
- Accounting file selection
- Set Header
- Set QueryColumns
- Set QueryAccounts

Setup of the worksheet tab
Select an opened Banana file
The first section of the setup page lists all the currently opened Banana Accounting file. Just select the needed one and go to the next setup section.
If for some reason an accounting file is opened in Banana Accounting after the add-in is loaded, then this file doesn’t appear in the list. In this case just click on Refresh list button in order to recheck all the opened documents and recreate the list.
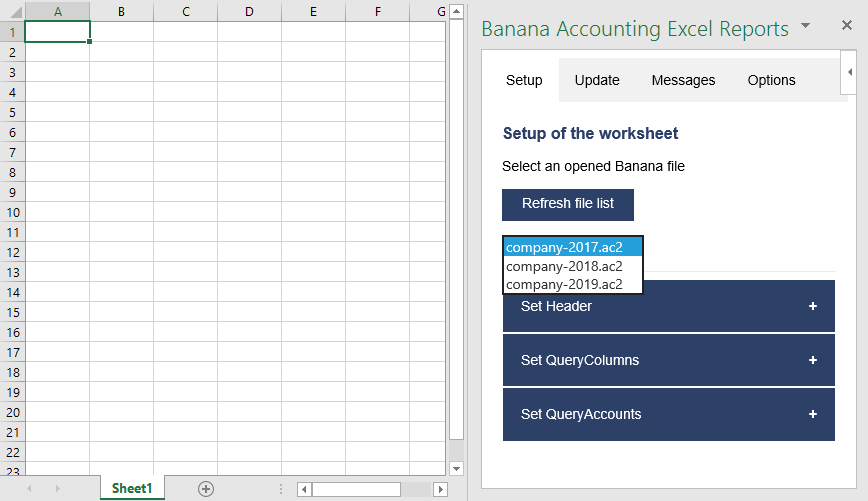
Example of file selection
Set Header
The second section of the setup page inserts, on the top of the current worksheet, the header that allows the user to insert information that will be used by the add-in to retrieve data from the accounting file.
Add an header
The first step is to select from the list a type of header. There are two options:
- Predefined header with columns to insert an header with default values for columns and options
- Empty header to insert a blank header
When the button Add Header is clicked, the selected type of header is inserted in the worksheet. It is then possible to modify by setting the QueryColumns and changing QueryOptions.
Add header options
The second step is to define some options for the Currency, Header Left and Header Right values using the QueryOptions column. The options are:
- Repeat to repeat the values in each column
- Do not repeat to avoid repeated values. Only when the file name changes the values are inserted again.
When the button Add options is clicked, the selected options will be inserted in the respective cells.

Example of predefined header
Set QueryColumns
This section guides step by step the user to modify the header by adding QueryColumns to the worksheet.
The QueryColumns information allows the user to define exactly which data the add-in has to retrieve from the accounting file and in which column of the worksheet insert them.
Each QueryColumn consists of six information:
- The Column of the worksheet is used to define in which column of the worksheet all the QueryColumns values will be inserted.
- The Accounting filename is used to define the Accounting file to use when retrieving data.
- The Type value is used to define the type of data.
- The Column value is used to define the data for the given type.
- The Segments (OPTIONAL) is used to have a more detailed classification of the costs (this is optional, if not specified none segments will be added).
- The Periods (OPTIONAL) is used to define a period of the accounting (this is optional, if not specified all accounting period will be automatically used).
When the button Add values to column is clicked, all the information will be added automatically to the selected column of the worksheet.

Set QueryColumns section
Select a column of the worksheet
Use this to define in which column of the worksheet all the values of the QueryColumns are inserted. Possible values are:
- Current selected to use the colum of the cell selected on the worksheet (ex. if the cell D8 is selected, D column will be used).
- C ... Z
Remember that it is possible to use the columns from C to ZZ, even if not all appear in the list.
Select a filename
Use this to define the file name for a QueryColumn. When a file name is specified it is used until a new file name is inserted.
The possible values are:
- Current selected to use the selected file on the top of the add-in.
- Current (void) to use the previously inserted file but let the cell empty. It works only if in previous columns there is a specified file name.
- 1 previous year (p1) to use the previous year file of the last file inserted (example: if current year is "2019.ac2", p1 refers to "2018.ac2")
- 2 previous years (p2) to use two previous years file of the last file inserted(example: if current is "2019.ac2", p2 refers to "2017.ac2")
- 3 previous years (p3) to use three previous years file of the last file inserted(example: if current is "2019.ac2", p3 refers to "2016.ac2")

Filename selection
Notes:
- remember to always open in Banana Accounting all the files specified in the header
- the p1, p2 and p3 abbreviations always refer to the last file specified in the header

Example of more file insertion
On the image above we can see there are three different files defined, each of them using different columns.
- Columns from C to G refer to the 2019.ac2 file
- Columns from H to I refer to the 2018.ac2 file
- Coumns from J to K refer to the 2017.ac2 file (p1 is the previous file of the last file inserted, in this case the 2018.ac2)
Select a Type and a Column value
Use them to define the data you want to retrieve from the accounting file.
- Type specify the type of data.
- Column specify the data for the given type.
The table below indicates for each Type of data which Column can be specified and so retrieved from the accounting (Not Case-Sensitive).
| Type | Column |
|---|---|
| column |
Group, Account, Description, Disable, FiscalNumber, BClass, Gr, Gr1, Gr2, Opening, Debit, Credit, Balance, Budget, BudgetDifference, Prior, PriorDifference, BudgetPrior, PeriodBegin, PeriodDebit, PeriodCredit, PeriodTotal, PeriodEnd, NamePrefix, FirstName, FamilyName, OrganisationName, Street, AddressExtra, POBox, PostalCode, Locality, Region, Country, CountryCode, Language, PhoneMain, PhoneMobile, Fax, EmailWork, Website, DateOfBirth, PaymentTermInDays, CreditLimit, MemberFee, BankName, BankIban, BankAccount, BankClearing, Code1 |
|
current |
amount, amountcurrency, balance, balancecurrency, bclass, credit, creditcurrency, debit, debitcurrency, enddate, opening, openingcurrency, periodstring, rowcount, startdate, total, totalcurrency |
| budget | amount, amountcurrency, balance, balancecurrency, bclass, credit, creditcurrency, debit, debitcurrency, enddate, opening, openingcurrency, periodstring, rowcount, startdate, total, totalcurrency |
| columnvat | Group, VatCode, Description, Gr, Gr1, IsDue, AmountType, VatRate, VatRateOnGross, VatPercentNonDeductible, VatAccount |
| currentvat | taxable, amount, notdeductible, posted, rowcount |
In the table below there are some examples of queries that can be used in the header to retrieve data from Banana Accounting:
| Type | Column | Segment | Start date | End date |
RESULT |
|---|---|---|---|---|---|
| column | description | Return from the Accounts table the value of the column description for the account specified in the QueryAccount column | |||
| current | debit | Return the amount of debit transactions for all the accounting period for the account specified in the QueryAccount column | |||
| current | balance | :S1 | 01.01.2019 | 10.01.2019 | Return the opening + debit-credit from the 01.01.2019 to 10.01.2019 for the account and segment specified in the QueryAccount column |
| current | total | M6 | Return the difference between debit-credit for the 6th month for the account specified in the QueryAccount column | ||
| current | total | Q2 | Return the difference between debit-credit for the second quarter for the account specified in the QueryAccount column | ||
| budget | opening | M12 | Return the amount at the begining for the 12th month for the account specified in the QueryAccount column | ||
| columnvat | description | Return from the Vat Codes table the value of the column description for the vat code specified in the QueryAccount column | |||
| currentvat | taxable | Return the amount of the taxable column for the vat code specified in the QueryAccount column |
Select a Segment (optional)
If the selected file has segments they will appear in the list.
Use this to define a segment to have a more detailed classification of the costs.
Select a period (optional)
Use this to define the accounting period that will be used to retrieve data from the accounting file.
Possible values are:
- All (void) to use all the accounting period
- Custom date to specify a Start date and End date (example: Start date "04.02.2019", End date "12.03.2019").
- Month 1 (M1) ... Month 12 (M12) to specify a single month (example: M1 for 1st month, M2 for 2nd month, etc.)
- Quarter 1 (Q1) ... Quarter 4 (Q4) to specify a single quarter (example: Q1 for the 1st quarter, period from 01.01 to 31.03)
- Semester 1 (S1) ... Semester 2 (S2) to specify a single semester (example: S2 for the 2nd semester, period from 01.07 to 31.12)
- Year 1 (Y1) ... Year 10 (Y10) to specify a single year (example: Y1 for the 1st year)
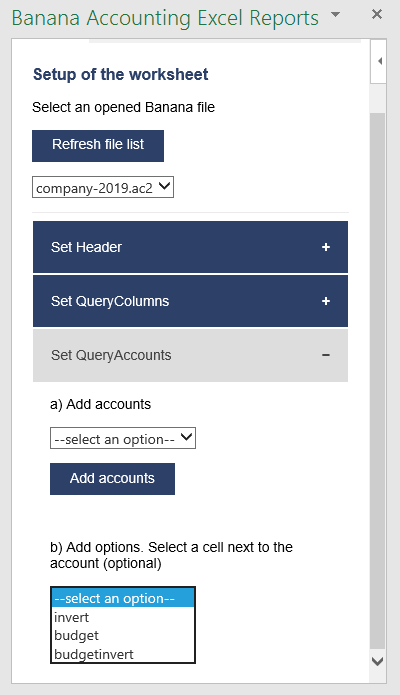
Set QueryAccounts
This section provides to insert:
- QueryAccounts to specify all the desired accounts, groups, cost centers, segments or vat codes that will be used with the data specified in the header to retrieve the accounting data.
- QueryOptions (OPTIONAL) to specify an option for a specific QueryAccount. Just select a cell next to the account and insert the option (this is optional, if not specified none options will be added).
Add accounts
When an option is selected, the add-in loads the appropriate check box list with all the elements taken from the selected accounting file. It is possible to choose between six options:
- Accounts to load a list of all the accounts/categories codes taken from the table Accounts/Category of the accounting
- Groups to load a list of all the groups codes taken from the table Accounts/Category of the accounting
- Cost centers to load a list of all the cost centers codes taken from the table Accounts/Category of the accounting
- Segments to load a list of all the segments codes taken from the table Accounts/Category of the accounting
- All to load a list of all the accounts/categories, groups, cost centers and segments codes taken from the table Accounts/Category of the accounting
- Vat codes to load a list of all the VAT codes taken from the table VAT codes of the accounting

Type of account selection
For example, choosing the All option, the add-in loads a list containing all the accounts, groups, cost centers and segments respecting the order in which they appear in the accounting file.

Example of accounts and groups selection
After all desired elements has been checked, by clicking the Add accounts button will add them to the Excel worksheet under the QueryAccount starting from the selected cell. By default the add-in starts the insertion immediately after the QueryAccount title (row 16).

Add the selected accounts and groups to the Excel worksheet
Add option
The QueryOptions column is designed to add some options to the query that will retrieve the data from Banana Accounting. It is optional. If not used no options will be used.
The possible values are:
- invert to invert the sign of the current or budget balances.
- budget to get the budget balances (even if in the header are specified to use current balances).
- budgetinvert to get the budget balances (even if in the header are specified to use current balances) and also to invert the sign.
QueryAccounts options selection
Header settings
- Do not add or delete rows in the header.
- Do not add or delete columns before the column B.
- From column C forward, it is possible to add or remove columns. Columns A (QueryColumn) and B (QueryOptions) must always exist.
- Added columns can also be empty.
- If columns from AA to AZ are used, plese re-enter the file name at least on the AA column, even if it is the same used in the previous column.
To better understand how exactly the header works and how to properly modify it, below there are some explanation about the most important things.

Editable header parts
On the image above we highlighted in yellow all the header's parts that can be modified by adding information when creating a report.
Everything else will be automatically filled by the add-in when the Update current worksheet button is clicked.
Period Begin
A conversion of the start date to be easily read.
This is automatically filled for each column by the add-in when the worksheet is updated.
Period End
A conversion of the end date to be easily read.
This is automatically filled for each column by the add-in when the worksheet is updated.
Currency
The accounting basic currency.
This is automatically filled for each column by the add-in when the worksheet is updated.
Header Left
One of the information property of the accounting.
This is automatically filled for each column by the add-in when the worksheet is updated.
Header Right
One of the information property of the accounting.
This is automatically filled for each column by the add-in when the worksheet is updated.
QueryAccount
As already said, in this column are listed all the chosen accounts, each on a different row.
Instead of insert an account, is also possible to add a custom regroup using a particular accounting column.
The custom regroup QueryAccount syntax is $column=value, where:
- $ indicates that a custom regroup is used.
- column is the Xml name of the column. It can be a user created column (for example "Abc") or a column that already exists in the accounting (for example the "Gr").
- value indicates the regroup.
If we insert something like "$Abc=1" in the QueryAccount cell, this means that the add-in takes and sums together all the accounts/groups balances that have the 1 value in the "Abc" column of the accounting.
Logs
The Logs tab it’s just a text area where are displayed some messages about the add-in and the operations that it does.
Example of logs messages
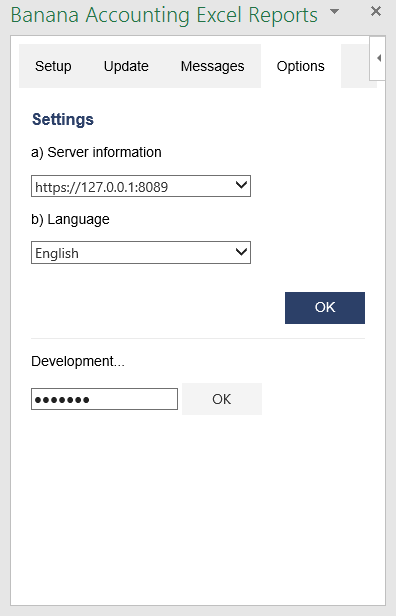
Settings
The Settings tab allows to change some settings of the add-in:
- the server URL to define the url where Banana Accounting is hosted, to avoid to have Banana Accounting installed locally. By default it is defined the local Banana Accounting web server https://127.0.0.1:8089.
- the language to define the language of the Banana Excel Add-in. Available languages are english, french, german and italian.
- the development is used only by developers for testing purposes, and users cannot access it.
Settings tab
Release History
- 2017-06-12 First release
- 2017-07-07
- Added Add-in Commands functionality.
- Added a start screen that provides additional information describing the functionalities of the add-in.
- Added the settings tab to allow the user to change the Port of the URL.
- 2017-09-29
- Changed the name of the add-in to "Banana Accounting Excel Reports".
- Changed some texts.
- New add-in design.
- Added new functionalities that allow the user to set and insert all the required information more easily.
- Added localization language for english, french, german and italian.
- 2017-11-24
- Added new functionality that allows to set the parameters for the connection.
Excelfunktionen
Benutzerdefinierte Excelfunktionen erlauben, auf einfachste Weise in Echtzeit (real-time) Werte aus Banana Buchhaltung zu übernehmen. Sie aktualisieren Ihre Buchhaltung und die Daten Ihrer Exceldatei werden sofort aktualisiert. Leider ist dies mit Mac NICHT möglich!
Bitte beachten Sie die englische Webseite für die aktuellsten technischen Informationen
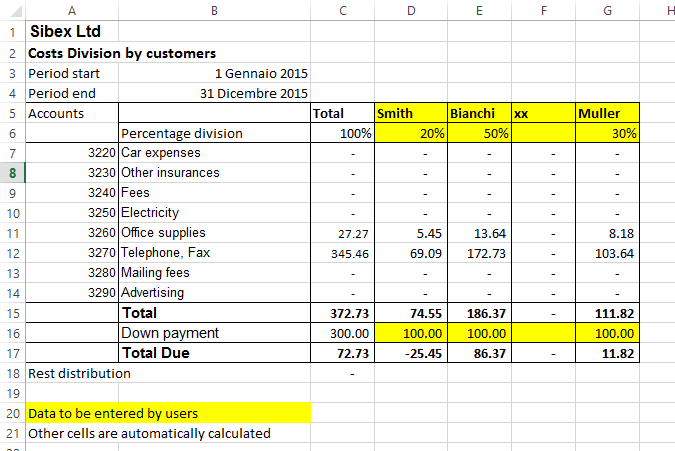
Beispiel Kosten auf Mieteigentümer oder Kunden aufgeteilt
Mit der Funktion ExcelSync werden Formeln verwendet, welche die aktualisierten Salden direkt aus Banana Buchhaltung übernehmen.
Die Excel-Tabelle wird gemäss den letzten, in die Buchhaltung registrierten Daten, aktualisiert.
Benutzerdefinierte Excelfunktionen
Benutzerdefinierte Funktionen (UDF - user-defined functions) sind kleine Visual-Basic-Programme (oder Makros) die Excel erweitern und ermöglichen, in den Zellen Formeln einzufügen.
- Um benutzerdefinierte Funktionen (UDF) verwenden zu können, wird eine Exceldatei mit *.xlsm-Erweiterung benötigt.
- Die benutzerdefinierten Bananafunktionen (Banana-UDF) werden laut der Apache-Lizenz (Open-Source-Software. Siehe: /www.apache.org/licenses/LICENSE-2.0 zur Verfügung gestellt.
- Entwicklung und aktuellste Version der Funktion sind unter github.com/BananaAccounting/General/ verfügbar
- UDF benutzen den Banana-Webserver (Webseite in englischer Sprache).
Dank den benutzerdefinierten Funktionen (UDF) werden Sie in Excel Formeln schreiben und bestimmte Daten direkt aus Banana Buchhaltung übernehmen können.
- Es ist somit nicht mehr Notwendigkeit, Daten in Excel erneut zu tippen, zu importieren oder mit Copy&Paste einzufügen.
- Wird die Buchhaltung geändert, wird das Excel-Spreadsheet mit den neuen Werten gefüllt.
- Bedienungsfreundliche Formeln, mit denen Werte für Zeiträume berechnet und mächtige Tabellenkalkulationen zur Bewertung und Präsentation von Buchhaltungsdaten oder Grafiken erstellt werden können.
Beispiel ansehen
- Excel-Spreadsheet mit Beispielsdateien herunterladen.
- Inhalt entpacken.
- Banana Buchhaltung starten.
- Das erste Mal Webserver aktivieren.
Menü Werkzeuge, Basiseinstellungen die Option 'Webserver starten' aktivieren. - Banana-Dateien 'company_2014.ac2' und 'company_2015.ac2' öffnen.
- Datei 'BananaSync.xlsm' öffnen und das Makro aktivieren.
Falls das Makro automatisch von Excel deaktiviert wird, sind Ihre Makro-Sicherheitseinstellungen zu ändern (Anleitung in englischer Sprache). Eventuell diese Anleitung in englischer Sprache befolgen, um die Entwicklerregisterkarte in der Funktionsleiste anzuzeigen. - Mit Makro 'RecalculateAll' (ctrl+r) Excel-Spreadsheet neu berechnen.
Ihr eigenes Spreadsheet erstellen
- Die Datei 'BananaSync.xlsm' unter einem anderen Namen speichern.
- Ihre Banana Buchhaltungsdatei öffnen.
- Im Spreadsheet den Namen (yallow) mit dem Namen Ihrer Buchhaltungsdatei ersetzen.
- Spreadsheet Ihren Bedürfnissen entsprechend ändern.
- Spreadsheet durch Klicken auf das Symbol 'Neu berechnen' der Werkzeugleiste oder durch Betätigung der Tastenkombination "Ctrl+R" neu berechnen.
Funktionen anwenden
Argument Dateiname
Wird Banana oder der Banana-Webserver nicht ausgeführt, braucht Excel etwas Zeit, um auf http-Anfragen zu antworten.
Um dieses Problem zu umgehen:
- Die meisten Funktionen benutzen den Argument-Dateinamen.
Bei leerem Dateinamen erfolgt keine http-Anfrage. - Anstatt den Dateinamen zu übernehmen, eine Referenz zu einer Zelle mit einer Formel (z.B. =BFileName(“myfile.ac2”) verwenden.
- 'BFileName' sendet eine leere Zeichenfolge, wenn Banana nicht gestartet wurde. In diesem Fall erfolgt keine erneute Anfrage.
Argument Periode
Viele Funktionen benutzen die Option Argument Periode. Dies kann sein:
- Eine leere Zeichenkette. Anfangs- und Enddatum der Buchführung werden benutzt.
- Ein Anfangs- und Enddatum in Form von yyyy-mm-dd/yyyy-mm-dd (z.B. “2015-01-01/2015-01-31”)
Um einen Zeitraum von zwei Exceldaten zu erstellen, die Funktion BCreatePeriod verwenden. - Eine Abkürzung (M1, M2, Q1, Q2, Y1), die Monat, Quartal oder Jahr der Buchführung angibt.
Die Funktion BCreatePeriod kann verwendet werden, um aus zwei Zelldaten eine Periodenzeichenkette zu erstellen.
Beschreibung der Funktionen
- BAccountDescription(account[, column])
Die Kontobeschreibung des angegebenen Kontos oder der angegebenen Gruppe aufrufen.
Mit Argument 'column' kann anstelle der Beschreibung eine andere Spalte für den Abruf angegeben werden.
Beispiele:
=BAccountDescription('1000')
=BAccountDescription('1000', 'Gr1')
=BAccountDescription('Gr=10')
=BAccountDescription('1000', 'FiscalNumber') - BAmount(fileName, account, [,period ])
Den normalisierten auf der 'BKlasse' basierenden Betrag aufrufen. - BBalance(fileName account [, period])
Für das angegebene Konto den Saldo per Ende der Periode aufrufen.
Das Ergebnis 'BBalance' ist die Summe von BOpening + BTotal.
Dient zum Aufrufen von Kontendaten für die Bilanz (Aktiva, Passiva).- Das Konto kann eine Kontonummer oder eine Zeichenkette mit mehreren durch das Schriftzeichen '|' getrennten Konten sein.
Es können normale Konten, Kostenstellen oder Segmente angeben werden.
- Es können auch Wildcards (Platzhalter) und 'Gr=' gefolgt von der Buchhaltungsgruppe verwendet werden.
Weitere Informationen finden Sie unter Javascript, Beschreibung Funktion für 'currentBalance'. - Beispiele:
“1000” “1000|1001” “10*|20*” “Gr=10” “Gr=10|Gr=20” “Gr=1*”
".P1" ";C01|,C02",":S1|:S2"
"1000:S1"
- Das Konto kann eine Kontonummer oder eine Zeichenkette mit mehreren durch das Schriftzeichen '|' getrennten Konten sein.
- BBalanceGet(fileName, account, cmd, valueName [,period ])
Mit dieser Funktion kann einfach auf alle übrigen von REST API zur Verfügung gestellten Daten wie 'Saldo' und 'Budget'' zugegriffen werden.
Beispiele:
=BAmount( FName, “1000”, “balance”, “currencyamount”)
=BAmount( FName, “1000”, “balance”, “count”)
=BAmount( FName, “1000”, “balance”, “debit”)
=BAmount( FName, “1000”, “budget”, “debit”) - BBudgetAmount(fileName account [, period])
Gleich wie 'BAmount', jedoch Budgetdaten anstelle der Buchhaltungsdaten verwenden. - BBudgetBalance(fileName account [, period])
Gleich wie 'BBalance', jedoch Budgetdaten anstelle der Buchhaltungsdaten verwenden. - BBudgetInterest(filename, account, interestRate [, period])
Gleich wie 'BInterest', jedoch Budgetdaten anstelle der Buchhaltungsdaten verwenden. - BBudgetOpening(fileName account [, period])
Gleich wie 'BOpening', jedoch Budgetdaten anstelle der Buchhaltungsdaten verwenden. - BBudgetTotal(fileName account [, period])
Gleich wie 'BTotal', jedoch Budgetdaten anstelle der Buchhaltungsdaten verwenden. - BCellValue(fileName, table, rowColumn, column)
Inhalt der Tabellenzelle aufrufen.
Beispiele:
=BCellValue(FName, “Accounts”, 2, “Description”)
=BCellValue(FName, “Accounts”, “Account=1000”, “Description”)
=BCellValue(FName, “Accounts”, “Group=10”, “Description”) - BCreatePeriod( startDate, endDate)
Zwei Zellendaten nehmen und eine Periodenzeichenkette erstellen.
=BCreatePeriod(D4, D5) - BDate(isoDate)
ISO-Datum in Excel-Datum umwandeln. - BFileName(fileName [, disable connection])
Den Dateinamen oder falls keine Verbingung zum Webserver besteht oder die Datei nicht stimmt einen leere Zeichenfolge zurücksenden.
Ist der Wert von 'disableConnection' nicht 'void', sendet die Funktion eine leere Zeichenfolge zurück.
Die Zellen die das Resultat dieser Funktion enthalten als Dateinamenparameter für die Anrwendung anderer Funktionen benutzen.Ist Banana nicht offen, wird nur ein Anruf gemacht und Excel wartet nicht für eine lange Zeit. - BFunctionsVersion()
Die Version der Funktion im Datumsformat zurücksenden. - BInfo(fileName, sectionXml, idXml)
Informationen betreffend Dateieigenschaften abrufen.
Beispiele:
=BInfo( FName, “Base”, “HeaderLeft”)
=BInfo( FName, “Base”, “DateLastSaved”)
=BInfo( FName, “AccountingDataBase”, “OpeningDate”)
=BInfo( FName, “AccountingDataBase”, “BasicCurrency”)
- BInterest(filename, account, interestRate [, period])
Den Zins für dieses Konto für die definierte Zeitspanne berechnen.- 'Account' kann jedes Konto wie in 'BBalance' angegeben sein.
- 'InterestRate' in Prozent.
- > 0 Zinsen auf Sollbeträgen berechnen
- < 0 Zinsen auf Habenbeträgen berechnen
- BOpening(filename, account [period])
Saldo für Saldo zu Beginn der Periode für angegebenes Konto abrufen. - BQuery(fileName, query)
Das Ergebnis einer frei definierten Abfrage zurücksenden.
Beispiele:
=BQuery(FName;"startperiod?M1”)
=BQuery(FName;"startperiod?M1”) - BTotal(filename, account [,period])
Bewegungen für die Periode abrufen.
Sollte verwendet werden, um die Daten für die Erfolgsrechnungskonten (Aufwand und Ertrag) abzurufen. - BVatBalance(filename, vatCode, vatValue [, period])
Die den angegebenen MwSt/USt-Code (oder mehrere angegebene MwSt/USt-Codes) betreffenden Wert zurücksenden.
'vatValue' kann 'taxable', 'amount', 'notdeductible' oder 'posted' sein.
Beispiele:
=BVatBalance( FName, “V10”, “taxable”)
=BVatBalance( FName, “V10|V20”, “posted”)
Neu berechnen
Die automatische Neuberechnung aktualisiert die aus der Buchhaltungsdatei stammenden Daten nicht.
Für aktualisierte Daten ist das Makro RecalculateAll() aufzurufen, welches die Application.CalculateFullRebuild-Methode aufruft.
Die Musterdateien enthalten eine Schaltfläche 'Recalculate', welche das Makro RecalculateAll aufruft.
Hostname und Portnummer von Banana
Web-Server-Daten werden von 'localhost:8081' abgerufen.
Es kann ein anderer Host angegeben werden, indem ein anderer Wert in die Zelle mit Namen 'BananaHostName' eingegeben wird.
Funktionen ändern oder eigene hinzufügen
Funktionen sind im Visual-Basis-Modul 'Banana' definiert.
Wir können dieses Modul aktualisieren und neue Funktionen hinzufügen.
Eigene Funktionen sind vorzugsweise in Ihrem Modul hinzuzufügen.
Für den Zugriff zum Visual-Basis-Makro 'Funktionen' ist das Makro zu aktivieren.
Um die Funktionen anzuzeigen und zu bearbeiten, muss man die Entwicklerregisterkarte in der Excel-Multifunktionsleiste anzeigen (Anleitung hierzu in englischer Sprache).
Versionsgeschichte
- 2014-07-24 erste Veröffentlichung
- 2015-02-28 Aktualisierung für neue Versionen mit neuen Funktionen
- 2015-05-12 Aufruf zum Webserver erfordert v1
- 2015-05-12 Entwickung auf GitHub verschoben
- 2015-05-25 Geänderte BAmoount-Funktion für die Verwendung von BClass
- 2015-10-04 BDate-Funktion hinzugefügt
Office Add-ins
Introduction to Excel 2016 Add-ins
Office 2016 Add-ins are extentions of Word, Excel, PowerPoint, and Outlook.
Add-ins are composed of:
- Manifest file
An XML file that defines various settings, including description and links to all the add-in files.
It is used by Word, Excel, PowerPoint, and Outlook to locate the Add-in resources.
The manifest file can reside on a local directory or is published on the Office Store. - Webpage files
Files that compose the web app (HTML pages, JavaScript code and images).
All the files need to reside on a web server.
Add-in Examples
These examples have been made available for programmers that want to create specialized add-ins to retrieve information from Banana Accounting.
You need to insall the add-ins on a web server.
- for Excel:
- Account Card report to create an Excel worksheet with details of an account.
- Retrieve Table report to create an Excel worksheet with a full table taken from the accounting.
- for Word:
- Account Card report to create a Word document with details of an account.
Resources
For more and detailed information about the developing of the Office Add-ins, please visit https://github.com/BananaAccounting/General/tree/master/OfficeAddIns.
Open source
Banana Accounting use this open source library:
- Qt Framework Libraries with LGPL 2.1 and LGPL 3.
- Libharu libraries (pdf writing) with zlib/libpng license.
-
QtWebApp HTTP Server with the LGPL license.
The exact version of the library is visible within the software under
- Info regarding Banana Accounting
- Patent and legal informations
Building the libraries
The above indicated libraries are dinamically linked.
If you want to use modified libraries:
- Qt Framework. Banana use the dll libraries build made available by the The Qt Company for each platform.
For building your own libraries simply follow the Qt instrunctions. - Libharu libraries are also build with the default builds scripts.
- QtWebApp are also build with the default builds scripts.
Replacing the libraries
Once you have re-build the library and created the dll:
- Replace the libraries/dll
- In Windows the libraries are in the program directory
- In Mac are under the directory frameworks
- In Android are in the lib directory
- In Linux are in the lib directory
Info
If you have question let us know.
Scripts
Dans Banana Comptabilité 7, il est possible d'étendre les fonctionnalités via des petits programmes javascript.
Pour plus d'informations, consulter la page BananaApps en anglais.
App File
Javascript compliant script
BananaApps are essentially Javascript compliant script files ( ECMA-262). People knowing Javascript can easily write BananaApps.
A BananaApp file contains the following two sections:
- Apps's attributes
The apps's attributes give information about the script, like it purpose, description and so on.
They are inserted at the beginning of the file through tags in comment's lines.
- The exec() function
The function exec() is the function that is called every time a BananaApps is executed.
It has one argument, the requested input data as a string or a Banana.Document object.
It return the result as a string.
The format of the returned string match the format defined by the tag @outputformat. Errors are notified through exceptions (clause throw), or just by returning a string beginning with "@Error:"
For a list of supported javascript functions, objects and properties see: Qt ECMAScript Reference.
BananaApps interact with Banana Accounting through some global objects made available by Banana Accounting, like for example 'Banana.document'. Those objects are described under the Banana Script API.
BananaApp "Hello World" example
Here an example that open a print preview windows, and show a document with the text "Hello world!!!". Other examples are found in the BananaApps tutorial.
// @id = ch.banana.report.helloworld
// @version = 1.0
// @doctype = nodocument
// @publisher = Banana.ch SA
// @description = Account balance for all days in a month
// @task = app.command
// @timeout = -1
function exec() {
   //Create the report
   var report =Banana.Report.newReport('Report title');
   //Add a paragraph with some text
   report.addParagraph('Hello World!!!');
   //Preview the report
   var stylesheet = Banana.Report.newStyleSheet();
   Banana.Report.preview(report, stylesheet);
}
BananaApps have a strong Security model
BananaApps are secure for the fact that are confined within Banana.
BananaApps are NOT ALLOWED to directly write or read file, web resource, change computer setting or execute programs.
BananaApps, contrary to Excel Macro, can be run with the confidence, they will not change any data and modify any file or computer settings.
To accesso or write to file you need to use the Banana Api that display a dialog box to the user.
- To write file you need to use the export functionality, that display a dialog where the user indicate the file name where to save.
- To import file you need to use the import functionality that display a dialog where the user specify the file name.
BananaApps file extention '.sbaa'
Since Banana Experimental 8.0.4.170127 the extention for BananaApps is '.sbaa'.
A .sbaa file can be either a text file containing java script code or a packaged qt resource file. The application determine automatically the type of the file. When Banana load a packaged .sbaa file, a file that can contains several apps, it look for all .js files contained in the package that have an attribute section. Those files are readen and a corresponding entry is inserted in the Apps menu.
Note: for previous versions than 8.0.4.170127 the extentions were .js for single file apps and .rcc for packaged apps.
BananaApps as a single javascript file
The script is all included in a file.
- BananaApp are saved in in UTF-8 file without BOOM.
- Prior to run the BananaApp you need to install it through the Manage Apps command or by drag and drop.
BananaApps as packaged file
It is possible to package one or more apps composed by one or more files (.js, .qml and other files) in one single .sbaa BananaApp file. This is very practical for distributing Apps composed by two or more files, or packages with two or mores BananaApps.
When Banana load a packaged .sbaa file, it look for all .js files contained in the package that have an attribute section. Those files are readen and a corresponding entry is inserted in the menu Apps.
Files in packages can include other files in the same package using the directive '@includejs' or the method 'Banana.include(fileName)'. It is not possibile to include files outside the package.
// Include a script via @includejs attribute
// @includejs = somescript.js"

// Include a script via Banana.include() method
Banana.include(somescript.js);
To create a packaged file edit a .qrc file and open it in Banana via the File Open command or drag and drop. The application will compile the qrc file and create a corresponding single .sbaa file.
It is also possibile to create package files with the 'rcc' tool from the Qt Resource system.
- Install the Qt Sdk
- Create a .qrc file with the list of the files to be included
Example: ch.banana.script.report.jaml.qrc
<!DOCTYPE RCC><RCC version="1.0">
 <qresource>
     <file>ch.banana.script.report.jaml.js</file>
     <file>lib/jaml-all.js</file>
 </qresource>
 </RCC>
- Compile the .qrc file
rcc -binary ch.banana.script.report.jaml.qrc -o ch.banana.script.report.jaml.rcc
Install BananaApps
Banana App can be installed with the Manage Apps command or by drag and drop in Banana windows.
Embedded BananaApps in documents
In the table Documents you can add script file.
On the BananaApps tutorial you will find different basic examples embedded in a document that you can run and edit.
Best way to distribute the App
- Single App file (Script file)
- Easier to edit, move and update.
- Can be included in the menu Apps
- Can be used by different accounting file
- Embedded apps
- Not available in the menu Apps
- Only relative to the file where it is included.
- More difficult to update
- Packaged App file
- Same as Script file but cannot be easily changed
- Protected from user modification
Apps Attributes
At the beginning at the script there should be a part that define the Apps Attribute.
// @api = 1.0
// @id = ch.banana.apps.example.docfilepath
// @description = Hello world
// @task = app.command
// @doctype = nodocument
// @publisher = Banana.ch SA
// @pubdate = 2015-05-12
// @inputdatasource = none
// @timeout = -1
The attribute is a commented text line
- Sart with //
- Followed by the attribute that start with @
- Fossowed by the " = " and the value
Tags defines the purpose (import, export, extract, ...), the name displayed in the dialogs, the kind of data it expect to receive, the kind of data it returns, and other information of the script. Tags are inserted at the beginning of the script in comment's lines though the following syntax: "// @tag-name = tag-value".
Attribute list
| Attribute name | Required |
Value 1) |
Description |
| @api | Yes |
The required API version. Available API versions: |
Define the required API to be executed in the form of MAIN_VERSION.SUB_VERSION The implemented API in the application have to be equal or newer. |
| @description[.lang] | Yes | The name or description of the script |
This text will be displayed in the dialogs. This tag is localisable. |
| @docproperties | any text | Define a property the script is writen for. With this attribute you can manually select for what document the script is visbile in the menu Add-ons and can be run. The property can be added to the document though the dialog Add-Ons. The property can be any text (ex.: "datev", "realestate", ...). Mulitple properties can be defined wiht a ';' as separator (ex.: "datev;skr03"). |
|
| @doctype | Yes | nodocument * XXX.* XXX.YYY !XXX.YYY ... |
Define the type of document the script is writen for. nodocument = doesn't require an open document, the add-on is always visible The sign ! is used to invert the definition. The above codes can be combined togheter like the following examples: 100.130 = for double entries with VAT and with foreign currencies100.120;100.130 = for double entry with foreign currencies 100.*;110.*;130.* = for all accounting files !130.* = for any filesexcept cash books |
| @exportfilename | A string defining the name of the file where to export the data. | If the string contains the text <Date>, it will be replaced by the current date in the format of yyyyMMdd-hhmm. | |
| @exportfiletype |
A string defining the type of data exported txt... |
This parameter is used for export scripts, it defines the type of exported data and it is used for the extension in the save file dialog. | |
| @id | Yes | An identification of the script | It is used when setting and reading the preferences. In order to avoid duplicate banana.ch use the following scheme. country.developper.app.domain.name for example: ch.banana.app.patriziato.consuntivopersubtotali |
| @includejs | Relative path to a javascript .js file to load before the execution of the script. | Include the javascript file. Every function and object defined in the file are then available to the current script. | |
| @inputdatasource | One of the following values: none openfiledialog fixedfilepath 2) |
With this attribute you can specify if you don't need to input data, if you want the user to select a file to import (openfiledialog), or if you want to get a file which path is defined in @inputfilepath. If you set fixedfilepath the program will ask the user the permission to open this file, the user's answer will be saved for the next execution. | |
| @inputencoding |
The encoding of the input data. One of the following values: |
The encoding used to read the input file (for import apps). If the attribute is empty or not defined, the application try to decode the input data with utf-8, if it fails, the application decode the input data with latin1. For a complete list see QTextCodec |
|
| @inputfilefilter[.lang] |
The file filter for the open file dialog Ex.: Text files (*.txt *.csv);;All files (*.*) |
This value describes the file filters you want to show in the input file dialog. If you need multiple filters, separate them with ';;' for instance. This tag is localizable. |
|
| @inputfilepath | The file to read for the input data | If the script has the value fixedfilepath as @inputdatasource, you can define here the path of the file to load. | |
| @inputformat | One of the following values: text ac2 |
If "text" the filter receive the selected file in inData as a text. If "ac2" the filter receive the selected file in inData as a Banana.Document object. | |
| @outputencoding |
The encoding of the input data. One of the following values: |
The encoding used to write the output file (for export apps). For a complete list see QTextCodec |
|
| @outputformat | One of the follwing values: tablewithheaders transactions.simple |
If the script has an import tasks this value define the format of the returned value. The format transaction.simple contains the transaction as income / expenses. For details of the formats see Import data from a txt file. | |
| @pubdate | Yes | The publication date in the format YYYY-MM-DD | This publication date is also used for scripts published by Banana.ch to check if newer version exist. |
| @publisher | The publisher of the script | ||
| @task | Yes |
One of following values: |
This value define the purpouse of the script, and determine in which dialog or menu the script is visible.
|
| @timeout | The timeout for the script in milliseconds, default is 2000 (2 seconds). If you set -1 the timeout is disabled and the application allow you to abort it though a progress bar. | If the script takes longer than this value to finish, it will be aborted and a message showed. If you have a script with a very long run time, you can increase the timeout or set it to -1. |
1) Default values are listed in bold.
2) Function not yet available
Example:
// @api = 1.0
// @id = ch.banana.apps.example.docfilepath
// @description = Hello world
// @task = app.command
// @doctype = nodocument
// @publisher = Banana.ch SA
// @pubdate = 2015-05-12
// @inputdatasource = none
// @timeout = -1

/**
 * Hello world example for Banana Accounting.
 */
function exec(inData) {
    Banana.Ui.showInformation("", "Hello World");

    if (Banana.document) {
       var fileName = Banana.document.info("Base","FileName");
       Banana.Ui.showInformation("Current document", fileName);
    }
}
Apps Parameters
Apps parameters allow to initialize and set parameters that are relative to a BananaApps, for example:
- Parameters for the printing.
- Header of a report that are set once only.
The script should provide a function settingDialog() that is called when the user click on the Set Parameters on the Manage Apps dialog.
The function settinDialog() should:
- Read the existing setting with the Banana.document.getScriptSettings();
- Request user to enter the information
- Set the modified values with the function Banana.document.setScriptSettings(paramToString);
The JSon text will be saved within the accounting file.
function settingsDialog() {
   var param = initParam();
   var savedParam = Banana.document.getScriptSettings();
   if (savedParam.length > 0) {
      param = JSON.parse(savedParam);
   }
   param = verifyParam(param);

   param.isr_bank_name = Banana.Ui.getText('Settings', texts.param_isr_bank_name, param.isr_bank_name);
   if (param.isr_bank_name === undefined)
      return;
   var paramToString = JSON.stringify(param);
   Banana.document.setScriptSettings(paramToString);
}
the function Exec() should then read the setting.
It is a good practice to check and verify if the setting are valid.
function printDocument(jsonInvoice, repDocObj, repStyleObj) {
  var param = initParam();
  var savedParam = Banana.document.getScriptSettings();
  if (savedParam.length > 0) {
    param = JSON.parse(savedParam);
    param = verifyParam(param);
  }
  printInvoice(jsonInvoice, repDocObj, repStyleObj, param);
}
API
The whole API (Application Program Interface) made available for Banana is under the namespace "Banana".
The are different objects and methods that belong to the name space Banana, that can be accessed by the javascript at run time:
Data formats
Date
Date values are in ISO 8601 format "YYYY-MM-DD".
Decimal
Decimal values have a '.' (dot) as decimal separator and doesn't have a group separator. For example: "12345.67".
Decimal values are rounded according to the accounting settings.
Text
Text values can contain any character supported by UTF-8.
Time
Time values are in ISO 8601 format "HH:MM:SS". The formats "HH:MM" and "HH:MM:SS.ZZZ" are also accepted.
API Versions
List of API Version made available by Banana Accounting.
| Banana Accounting Version | API Version |
| 7.0.6 | 1.0 |
| 8.0.4 or more recent | 1.0 |
Banana (Objects)
Banana is the namespace (object) through which all Banana script's methods, class and objects are accessible.
Banana.application
The object Banana.application represent the running application.
Banana.console
The object Banana.console is used to sent message to the debug the script.
Banana.Converter
The class Banana.Converter contains methods useful to convert data from and to various formats.
Banana.document
The object Banana.document represent the current document opened in the application. It contains base properties and methods, see Banana.Document (Base), and if the document represent an accounting document it contains additional accounting's properties and methods, see Banana.Document (Accounting). If any document is opened this object is of type Undefined.
Banana.IO
The class Banana.IO is used to read and write files.
Banana.Report
The class Banana.Report enable you to create reports, preview and print them in Banana Accounting.
Banana.script
The object Banana.script is used to get informations about the running script.
Banana.SDecimal
The class Banana.SDecimal contains methods useful to do decimal math calculation.
Banana.Ui
The class Banana.Ui contains predefined dialogs to interact with the user, and methods to load dialogs from .ui or .qml files.
Banana.Xml
The class Banana.Xml contains methods to parse and access Xml data.
Banana Methods
Banana.compareVersion(v1, v2)
Compare two version strings. Versions string are in the form of "x.y.w.z". Returns 0 if v1 and v2 are equal, -1 if v2 is later and 1 if v1 is later.
Since: Banana Accounting 8.0.5
var requiredVersion = "8.0.5";
if (Banana.compareVersion && Banana.compareVersion(Banana.application.version, requiredVersion) >= 0)
   Banana.Ui.showInformation("Message", "More recent or equal than version " + requiredVersion);
else
   Banana.Ui.showInformation("Message", "Older than version " + requiredVersion);
Banana.include(path)
The method Banana.include(path) include a javascript file evaluating it.
If an error occour, i.e. the file is not found or is not valid, the method throws an exception.
The path is relative to the current script being executed, if no protocol is specified. Otherwise depending on the protocol it can be relative to the main script's folder, the document's folder or the name of a document attacched to the current file.
- <relative_path_to_current_script>/<file_name>
- file:script/<relative_path_to_main_script>/<file_name>
- file:document/<relative_path_to_file>/<file_name>
- documents:<attachment_name>
Scripst included though the method Banana.include(path) can include other scripts trhough the method Banana.include(path), but not via the script's attibute @includejs. The method Banana.include(path) garantees that each distinct script is evaluated once, even if it is included more than one time from differents scripts. Path can contain ".." (parent folder), in the case the destination path is outside the main script's folder, the method will throw a security exception.
Since: Banana Accounting 8.0.5
Banana.include("cashflowlib.js");
Banana.include("folder/cashflowlib.js");
Banana.Application
Banana.Application represent the interface to the program and can be accessed through Banana.application.
Properties
isBeta
Return true if the application is a beta version.
var isBeta = Banana.application.isBeta;
Since Banana 8.0.7
isExperimental
Return true if the application is a beta version.
var isExperimental = Banana.application.isExperimental;
Since Banana 8.0.7
serial
Return the serial of the application in the form of "80006-170428".
var serial = Banana.application.serial;
Since Banana 8.0.7
version
Return the version of the application in the form of "8.0.4".
var version = Banana.application.version;
locale
Return the locale of the application in the form of "language_country", where language is a lowercase, two-letter ISO 639 language code, and country is an uppercase, two- or three-letter ISO 3166 country code.
var locale = Banana.application.locale;
progressBar
Return an object of type ProgressBar used to give the user an indication of the progress of an operation and the ability to cancel it.
var progerssBar = Banana.application.progressBar;
Methods
addMessage(msg [, idMsg])
Add the message msg to the application. The message is showed in the pane "Messages", and in a dialog if the application option "Show Messages" is turned on.
If idMsg is not empty, the help button calls an url with script's id and message's id (idMsg) as parameters.
Banana.application.addMessage("Hello World");
See also: Table.AddMessage, Row.AddMessage, Document.AddMessage.
clearMessages()
Clear all the messages showed in the pane "Messages".
Banana.application.clearMessages();
showMessages([show])
Enable or disable the notification of new messages through the message dialog.
Banana.application.showMessages(); // Next messages are showed to the user through the message dialog.
Banana.application.showMessages(false); // Next messages will not pop up the message dialog.
openDocument(ac2FilePath [, password] [, title])
Open the ac2 file located in filePath and return an Object of type Banana.Document or undefined if the file is not found. The path can be relative, in this case the base directory is the path of the current document.
If the path is empty or contains a "*" or a "?" an open file dialog is showed to the user, and the title is used in the caption of the file open dialog.
With this function you can also open ISO 20022 and MT940 files, in this case a cash book with the transactions of the file is returned.
var file1 = Banana.application.openDocument("*.*");
if (!file1)
   return;

var file2 = Banana.application.openDocument("c:/temp/accounting_2015.ac2");
if (!file2)
   return;
Banana.Application.ProgressBar
Banana.Application.ProgressBar is the interface to the program progress bar and can be accessed through Banana.application.progressBar. The progressBar object is used to give the user an indication of the progress of an operation and the possibility to interrupt the running process. The progress bar is showed in bottom left corner of the application windows.
Methods
finish()
Notify that the operation has been completed and close the progress bar.
progressBar.finish();
pause()
Notify that the operation has been paused, the cursor icon is set to the arrow cursor or poiting hand cursor. This is usually called before showing a dialog.
Banana.application.progressBar.pause();
var result = dialog.exec();
Banana.application.progressBar.resume();
resume()
Notify that the operation has been resumed, the cursor icon is set back to an hourglass or watch cursor. This is usually called after a dialog has been closed.
Banana.application.progressBar.pause();
var result = dialog.exec();
Banana.application.progressBar.resume();
start(maxSteps)
Start the progress indicator and define the number of steps this operation needs before being complete.
You can call several times this method to split the progress in main and sub steps. Every call of the method start() should be paired with a call of the method finish().
// Example use of a progress bar
var progressBar = Banana.application.progressBar;
progressBar.start(10);
for (var i = 0; i < 10; i++) {
    ...
    if (!progressBar.step(1)) {
       return; // Operation canceled by the user
    }
}
progressBar.finish();
step([stepCount])
Advance the progress indicator of stepCount steps. If stepCount is not defined it advance of one step.
Returns false if the user canceled the operation, otherwise true.
progressBar.step(1);
Example multiple steps inside a block
// Two blocks of progress bar inside a progressBar

var progressBar = Banana.application.progressBar;

progressBar.start(2);

// Block 1
progressBar.start(10)
for (i=0;i < 10; i++) {
     progressBar.step(1);
}
progressBar.finish();

// Block 2
progressBar.start(10)
for (i=0;i < 10; i++) {
     progressBar.step(1);
}
progressBar.finish();

progressBar.finish();
Banana.Console
The Banana.console object is used to display debug messages.
- Debug messages are displayed on the message window
- To see debug and log messages you should enable the option Show Debug Messages under Tools -> Program Options -> Developer
- To see critical and warning messages you should enable the option Show Developer Warnings and Messages under Tools -> Program Options -> Developer
console.critical(msg)
Display the msg in the message windows as a critical.
Banana.console.critical("critical message");
console.debug(msg)
Display the msg in the message windows.
Banana.console.debug("Debug message");
console.log(msg)
Display the msg in the message windows.
Banana.console.log("Log message");
console.warn(msg)
Display the msg in the message windows as warning.
Banana.console.warn("Warning message");
Banana.Converter
The class Banana.Converter is a collection of methods useful to convert various formats to and from data tables (array of array).
Methods
arrayToObject( headers, arrData, skipVoid)
Converts an array of array string to an array of objects
- headers is an array of strings that will become the properties of the objects.
- arrData is an array containing array of strings
- skipVoid if true skip void lines, if not present is set to false
    // read a CSV file
    var ppData = Banana.Converter.csvToArray(string, ',');
    // first line is header
    var headers = ppData[0];
    // remove first line
    ppData.splice(0, 1);
    // convert in array of objects
    var arraOfObjects = Banana.Converter.arrayToObject(fileData.headers, ppData, true);
csvToArray(string [, separator, textdelim])
Convert a csv file (coma separated values) to an array of array.
The parameter string contains the text to convert. The parameter separator specify the character that separates the values, default is a comma ','. The parameter textDelim specify the delimiter character for text values, default is a double quote '"'.
Example:
var text = "1, 2, 3\n4, 5, 6\n7, 8, 9";
var table = Banana.Converter.csvToArray(text);
var value = table[0][1];
value == '2'; // true
flvToArray(string, fieldLengths)
Convert a flv file (fixed length values) to an array of array.
The parameter string contains the text to convert. The parameter fieldLengths is an array with the lengths of the fields.
Example:
//               6                  20       8
var text = "120608Phone               00002345";
var table = Banana.Converter.flvToArray(text, [6,20,8]);
var value = table[0][2];
value == '00002345'; // true
mt940ToTable(string)
Converts mt940 file to a table (array of array).
naturalCompare(a, b [, caseSensitive])
Compare two string so that the string "2" is considered less then "100" as it would be with normal string compare.
This function can be passed to array.sort function.
- a first value to compare
- b second value to compare
- return value is -1 if a < b, 1 if a > b and 0 if a == b
Banana.Converter.naturalCompare(a,b);
objectArrayToCsv(headers, objArray, [separator])
Converts an array of objects (with identical schemas) into a CSV table.
- headers An array of strings with the list of properties to export
- objArray An array of objects. Each object in the array must have the same property list.
- separator The CSV column delimiter. Defaults to a comma (,) if omitted.
- return value a string containing the CSV text.
var csvText = Banana.Converter.objectArrayToCsv(headers, objArray, ";");
stringToCamelCase(string)
Converts a text to camel case, where only the first letter every word is upper case.
Banana.Converter.stringToCamelCase("this is an example");
// returns "This Is An Example"
stringToLines(string)
Convert a text in an array of lines. The end line character can be '\n', \r' or a combination of both.
Banana.Converter.stringToLines("this is\nan\nexample");
//returns ["this is", "an", "example"]
stringToTitleCase(string)
Converts a text to title case, where only the first letter of the text is upper case.
Banana.Converter.stringToTitleCase("this is an example");
// returns "This is an example"
arrayToTsv(table [, defaultChar])
Converts a table (array of array) to a tsv file (tabulator separated values). If a string contains a tab it will be replaced with defaultChar or a space if defaultChar is undefined.
Banana.Converter.arrayToTsv(table);
arrayToCsv(table)
Converts a table (array of array) to a csv file (coma separated values). Doubles quotes in text are replaced by apos. Texts containing comas are inserted in doubles quotes.
Banana.Converter.arrayToCsv(table);
toDate(date[, time])
Convert a date and/or time to a javascript date object.
The parameter date is a string in the formats YYYYMMDD or YYYY-MM-DD.
The time parameter is a string in the fromats HHMM[SSZZZ] or HH:MM[:SS.ZZZ].
Banana.Converter.toDate("2015-12-31");
Banana.Converter.toDate("20151231");
toInternalDateFormat(date [, inputFormat])
Converts a date to the internal format: YYYY-MM-DD.
The parameter date can be a string or a date object.
The parameter inputFormat specifies the date input format, if it is not specified the local date format is used.
Example:
Banana.Converter.toInternalDateFormat("31-12-13", "dd-mm-yy");
// returns "2013-12-31"
Banana.Converter.toInternalDateFormat(new Date());
// return current date in format "yyyy-mm-dd"
toInternalNumberFormat(value [, decimalSeparator])
Converts a number to the internal format: 123456.78.The internal number format use the character '.' as decimal separator, and doesn't contain a group separator.
The parameter value can be a string or a number object.
The parameter decimalSeparator specifies the character used to separate the decimals, if it is not specified the local decimal separator is used.
Example:
Banana.Converter.toInternalNumberFormat("1200,25", ",");
// returns "1200.25"
toInternalTimeFormat(string)
Converts a time to the internal format: HH:MM:SS.ZZZ.
Banana.Converter.toInternalTimeFormat("11:24");
// returns "11:24:00"
toLocaleDateFormat(date [, format])
Converts a date to the local format.
The parameter date can be a string or a date object.
The parameter format specifies the date ouptut format, if it is not specified the local date format is used.
Banana.Converter.toLocaleDateFormat("2014-02-24")
// returns "24.02.2014"
toLocaleNumberFormat(value [, decimals = 2, convZero = true])
Converts a number to the local format.
The parameter value can be a string or a number object.
The parameter decimals set the number of decimals.
The parameter convZero set the format returned for zero values. If false the method returns an empty string, if true it returns the zero value as string.
Example:
Banana.Converter.toLocaleNumberFormat("1200.25")
// returns "1'200,25"
toLocaleTimeFormat(string [, format])
Converts a time to the local format.
The parameter format specifies the time ouptut format, if it is not specified the local time format is used.
Banana.Converter.toLocaleTimeFormat("11:24:42");
// returns "11:24"
Banana.Document (Accounting)
Banana.Document is the interface to a document in Banana Accounting.
Banana.Document has base methods, that apply to all documents, see Banana.Document (Base), and method that are specific to the type of documents. This page describes the methods for the accounting files.
In the table documents of the example file there are also some example code.
Methods for accounting's files
This method are available only if the Document is of type Accounting
accountDescription(account [,column])
Return the Description of the specified account.
- Account can be an account or a Group (Gr=)
- Column can be an alternative column name to retrieve.
var descriptionAccount = Banana.document.accountDescription('1000');
var descriptionGroup = Banana.document.accountDescription('Gr=10');
var gr = Banana.document.accountDescription('1000','Gr');
accountsReport([startDate, endDate])
Return the account report for the specified period. Start and end date can be a string in form 'YYYY-MM-DD' or a date object.
var report = Banana.document.accountsReport();
var report = Banana.document.accountsReport('2017-01-01', '2017-03-31');
budgetBalance(account [, startDate, endDate, function(rowObj, rowNr, table)])
Sum the amounts of opening, debit, credit, total and balance for all budget transactions for this accounts .
var budget = Banana.document.budgetBalance('1000');
See for more detail the function currentBalance.
budgetCard(account [, startDate, endDate, function(rowObj, rowNr, table)])
Return for the given account and period a Table object with the budget account card.
var card = Banana.document.budgetCard('1000');
For more ditails see currentCard.
budgetExchangeDifference( account, [date, exchangeRate])
Return the unrealized exchange rate Profit or Loss fo the account at the specified date.
- account must be a valid account number not in base currency
- date
- a date that is used to calculate the balance
- if empty calculate up to the end of the period
- exchangeRate
- if empty use the historic exchange rate for the specified date or the current if not a valid exchange rate for the date are found.
- if "current" use the current exchange
- if number for example "1.95" use the specified exchange rate.
- Return value
- Positive number (debit) are exchange rate Loss.
- Negative number (credit) are exchange rate Profit.
- empty if no difference or if the account has not been found or not a multicurrency accounting file.
// unrealized exchange rate profit or loss for the account 1000
// last balance and current exchange rate
var exchangeRateDifference = Banana.document.budgetExchangeRateDifference('1000');

// at the end of Semptember and hystoric exchange rate
var exchangeRateDifference = Banana.document.budgetExchangeRateDifference('1000', "2017-09-31");

// at the end of Semptember and current exchange rate
var exchangeRateDifference = Banana.document.budgetExchangeRateDifference('1000', "2017-09-31", "current");

// at the end of Semptember and specified exchange rate
var exchangeRateDifference = Banana.document.budgetExchangeRateDifference('1000', "2017-09-31", "1.65");
Available from Banana version 8.05
budgetInterest( account, interestRate, [startDate, endDate, , function(rowObj, rowNr, table)])
Return the calculated interest for the budget transactions.
For more information see the currentInterest and current Balance
// calculate the interest debit for the whole period
var interestDebit = Banana.document.budgetInterest('1000','5.75');

// calculate the interest credit for the whole period
var interestDebit = Banana.document.budgetInterest('1000','-4.75');
currentBalance(account [, startDate, endDate, function(rowObj, rowNr, table) ])
Sum the amounts of opening, debit, credit, total and balance for all transactions for this accounts.
The calculations are perfermed by traversing by creating a journal (see journal() function) with all the transactions , and selecting the transctions with the parameters specified.
The computation is usually very fast. But if you have a file with many transactions especially the first query could take some time.
var currentBal = Banana.document.currentBalance('1000','','');
var openingBalance = currentBal.opening;
var endBalance = currentBal.balance;
- Return value
Is an object that has- opening the amount at the begining of the period (all transactions before)
- debit the amount of debit transactions for the period
- credit the amount of credit transactions for the period
- total the difference between debit-credit for the period
- balance opening + debit-credit for the period
- amount it the "normalized" amount based on the bclass of the account or group.
If there are multiple accounts or groups, takes the first BClass of the first.- for BClass 1 or 2 it return the balance (value at a specific instant).
- for BClass 3 or 4 it return the total (value for the duration).
- For BClass 2 and 4 the amount is inverted.
- openingCurrency the amount at the begining of the period in the account currency
- debitCurrency the amount of debit transactions for the period in the account currency
- creditCurrency the amount of credit transactions for the period in the account currency
- totalCurrency the difference between debit-credit for the period in the account currency
- balanceCurrency opening + debit-credit for the period in the account currency
- rowCount the number of lines that have bben found and used for this computation
- bclass (double entry accounting only) is the bclass of the account or group used to express the amount.
The bclass is the value entered in the columns bclass.
It is taken in consideration the first account or group specified. If for examble you query two account that first that has bclass 2 and the second that has bclass 1. The bclass would be 2.
The bclass is assigned by following this steps. :- The bclass of the specified account or group.
- The blcass of the partent group, for the same section.
- The blcass of the section.
- Account
- can be an account id, a cost center or a segment.
- can be a cobination of account and segments, separeted by the semicolon ":"
In this case it returns all the transactions that have the indicated account and segments- 1000:A1:B1
- can be differents accounts and multiple segments separated by the "|"
In this case it include all transactions that have the one of the specified accounts and one of the specified segments- 1000|1001
- 1000|1001:A1:B1
- 1000|1001:A1|A2:B1
- can be a wildCardMatching
Wildcards can be used for accounts, segments, Groups or BClass and in combination- ? Matches any single character.
- * Matches zero or more of any characters
- [...] Set of charachtes
- "100?" match "1001, 1002, 1003, 100A, ...)
- "100*" Matches all accounts starting with 100
- "100*|200*:A?" Matches all accounts starting with 100 or 200 and with segments with A and of two charachters.
- "[1234]000" Matches "1000 2000 3000 4000"
- Can be a group or a BClass.
It include all the transactions where the account used belong to a specified Group o r BClass.
It is also possible to use wildcards.
The program first create a list of accounts and then use the account list.
Do non mix mix groups relative to normal accounts, with groups relative to cost center or segments. Calculation could provide unexpected results.- BClass (for the double entry accounting only)
- BClass=1
- BClass=1|2
- Gr for groups that are in Accounts table.
- Gr=100
- Gr=10*
- Gr=100|101|102
- GrC for group that are in the Category table of the income and expenses accounting type.
- GrC=300
- GrC=300|301
- BClass (for the double entry accounting only)
- Contra Accounts or other fields selection
Transactions are included only if they have also a value corresponding
After the "&&" you can insert a field name of the table journal.- 1000&&JContraAccount=2000 return all transctions of the account 1000 that have a contra account 2000.
As per accounts you can specify multiple contra accounts, BClass=, Gr= with also wildcards. - 1000&&JCC1=P1|P2 will use only transactions on account 1000 and that also have the CC1=.P1 or .P2
- 1000&&JContraAccount=2000 return all transctions of the account 1000 that have a contra account 2000.
- StartDate
- is a string in form 'YYYY-MM-DD' or a date object.
- If startDate is empty the accounting start date is taken.
- End date:
- is a string in form 'YYYY-MM-DD' or a date object.
- If endDate is empty the accounting end date is taken.
- function(rowObj, rowNr, table)
This fuction will be called for each row of the selected account.
The function should return true if you want this row to be included in the calculation.
function exec( string) {
    // We retrive the total sales (account 4000) only for the cost center P1
    var balanceData = Banana.document.currentBalance('4000','', '', onlyCostCenter);
    // sales is a revenue so is negative and we invert the value
    var salesCC1 = -balanceData.total;
    // display the information
    Banana.Ui.showText("Sales of Project P1: " + salesCC1);
}

// this function return true only if the row has the cost center code  "P1"
function onlyCostCenter( row, rowNr, table){
   if(row.value('JCC1') === 'P1') {
      return true;
   }
   return false;
}
Examples
Banana.document.currentBalance("1000")              // Account 1000
Banana.document.currentBalance("1000|1010")         // Account 1000 or  1010
Banana.document.currentBalance("10*|20*")           // All account that start with 10 or with 20
Banana.document.currentBalance("Gr=10")             // Group 10
Banana.document.currentBalance("Gr=10| Gr=20")      // Group 10 or  29
Banana.document.currentBalance(".P1")               // Cost center .P1
Banana.document.currentBalance(";C01|;C02")         // Cost center ;C01 and C2
Banana.document.currentBalance(":S1|S2")            // Segment :S1  and :S2
Banana.document.currentBalance("1000:S1:T1")        // Account 1000 with segment :S1 or ::T1
Banana.document.currentBalance("1000:{}")           // Account 1000 with segment not assigned
Banana.document.currentBalance("1000:S1|S2:T1|T2")  // Account 1000 with segment :S1 or ::S2 and ::T1
                                                    //   or ::T
Banana.document.currentBalance("1000&&JCC1=P1")     // Account 1000 and cost center .P1
currentCard(account [, startDate, endDate, function(rowObj, rowNr, table)])
Return for the given account and period a Table object with the transactions for this account.
Row are sorted by JDate
parameters:
- account can be any accounts, cost center or segment as specifiend in currentBalance.
- startDate any date or symbol as specifiend in currentBalance.
- endDate any date or symbol as specifiend in currentBalance.
Return columns the same as for the Journal() function.
var transactions = Banana.document.currentCard('1000','2015-01-01','2015-12-31');
currentInterest( account, interestRate, [startDate, endDate, , function(rowObj, rowNr, table)])
Return the calculated interest on the specified account.
Interest is calculate on the effective number o days for 365 days in the years.
- account is the account or group (same as in the function currentBalance)
- interestRate. In percentage "5", "3.25". Decimal separator must be a "."
- If positive it calculate the interst on the debit amount.
- If negative it calculate the interest on the credit amounts.
- startDate, endDate, function see the currentBalance description.
If no parameters are specified it calculate the interest for the whole year.
// calculate the interest debit for the whole period
var interestDebit = Banana.document.currentInterest('1000','5.75');

// calculate the interest credit for the whole period
var interestDebit = Banana.document.currentInterest('1000','-4.75');
exchangeRate( currency, [date])
Return the exchange rate that convert the amount in currency in basic currency.
The exchange rate is retrieved from the Currency table, already considering the multiplier.
- If no date is specified the exchange rate without date is used.
- If a date is specified it retrieve the exchange rate with the date minor or equal the specified date.
invoicesCustomers()
Return a table with the customers invoices from the transaction table. A customer group must be defined and invoices must be numbered using the column DocInvoice.
invoicesSuppliers()
Return a table with the suppliers invoices from the transaction table. A supplier group must be defined and invoices must be numbered using the column DocInvoice.
journal([originType = ORIGINTYPE_NONE, int accountType = ACCOUNTTYPE_NONE])
Return for the given parameters a Table object with all the amount registered on the accounts.
The journal contain a row for each account used.
- originType specify the row to be filtered for
Can be on of- ORIGINTYPE_NONE no filter is applied and all rows are returned (current and budget)
- ORIGINTYPE_CURRENT only the normal transactions are returned
- ORIGINTYPE_BUDGET only the budget transactions are returned
- accountType specify the row to be filtered for
- ACCOUNTTYPE_NONE no filter is applyied and all rows are returned
- ACCOUNTTYPE_NORMAL only rows for normal accounts are returned
- ACCOUNTTYPE_CC1 only rows for Cost Center 1 are returned
- ACCOUNTTYPE_CC2 only rows for Cost Center 2 are returned
- ACCOUNTTYPE_CC3 only rows for Cost Center 1 are returned
- ACCOUNTTYPE_CC Cost Center rows are returned same as using (ACCOUNTTYPE_CC1 | ACCOUNTTYPE_CC2 | ACCOUNTTYPE_CC3)
// get all transactions for normal accounts
var journal = Banana.document.journal(Banana.document.ORIGINTYPE_CURRENT, Banana.document.ACCOUNTTYPE_NORMAL );
For each account used in the transaction table (AccountDebit, AccountCredit, CC1, CC2, CC3) the program generate a Journal row with the JAccount column set with the specific account.
For a double entry account transaction that use AccountDebit, AccountCredit, AccountVat, CC1, CC2, CC3 the Journal will contain 6 rows. If the transaction has only AccountDebit and AccountCredit only 2 rows will be generated.
The column JAmount contains the exact amount registered on the specific account.
The returned table has all the columns of the transaction's table plus the following columns.
The return columns are:
- JDate the date of the transction.
- JDescription the transaction's description.
- JRowOrigin the row number in the transaction's table (rows begin from 0).
- JTableOrigin the source table.
- JRepeatNumber the progressive number of the repetition of budget transactions.
- JAccount the account for this line.
There is one row for each account (AccountDebit, AccountCredit, AccountVat, CC1, CC2, CC3). - JAccountDescription the Description for this account.
- JAccountClass the BClass number for this account.
- JAccountGr the Gr for this account.
- JAccountGrDescription the Gr for this account.
- JAccountGrPath the whole Gr path.
- JAccountCurrency the currency of thi account.
- JAccountType as defined above (ACCOUNTTYPE_NORMAL, ACCOUNTTYPE_CC1, ...)
- JAmount the amount in basic currency registered on the account (positive is debit, negative is credit).
- JAmountAccountCurrency the amount in the account currency (positive i debit, regative is credit).
- JTransactionCurrency the transaction's currency.
- JAmountTransactionCurrency the amount in transaction's currency.
For account with currency not in tranasctions currency the exchange rate of the transaction is used. - JTransactionCurrencyConversionRate is the conversion rate to obtain amounts in transaction's currency.
Multiply the transcation's amount in basic currency with the JTransactionCurrencyConversionRate and you will have the amount converted in transaction's currency.
The conversion rate has 12 significant decimal so only by very large conversion should be have conversion differences. - JVatIsVatOperation true if this row has a Vat code.
- JVatCodeWithoutSign the Vat code without the evetually preceeding '-'. For example "-V10" becomomes "V10".
- JVatCodeDescription the Description for this Vat code.
- JVatCodeWithMinus true if the Vat code is preceeded by "-".
- JVatCodeNegative true if the Vat amount is negative (deductible).
- JVatTaxable the amount VatTaxable with the sign that follow the JVatCodeNegative
- VatTwinAccount the account where the net amount (without VAT) is being registered .
In case of a transaction where the Gross amount is CHF 1100, then the VAT is CHF 100 and the net amount is CHF 1000. The VatTwin account will be the account where the CHF 1000 is being registered.
We use the name Twin for the fact that the VatTwinAccount follows the sign of the VatAccount.
If the Vat amount is registered in debit, the VatTwinAccount will be the AccountDebit.
If the Vat amount is registered in credit, the VatTwinAccount will be the AccountCredit. - JContraAccount the contra account.
The contra account is deducted based on the other accounts and the sequence in the transactions table. - JContraAccountType one of the following value:
- CONTRAACCOUNTTYPE_NONE for no contra account
- CONTRAACCOUNTTYPE_DIRECT when there is on the same line credit and debit accounts.
- CONTRAACCOUNTTYPE_MULTIPLEFIRST the first line of a transaction on more accounts.
The first transactions after a line with debit and credit accounts or with a different date. - CONTRAACCOUNTTYPE_MULTIPLEFOLLOW the second or following line of a MULTIPLEFIRST with the same date.
- CONTRAACCOUNTTYPE_VAT the line for the Vat Account
- JContraAccountGroup the line number corresponding to the row number of the CONTRAACCOUNTTYPE_MULTIPLEFIRST
- JCC1 the CC1 without the preceeding sign
- JCC2 the CC2 without the preceeding sign
- JCC3 the CC3 without the preceeding sign
- JSegment1 .. JSegment10 the segment relative to the account
- JDebitAmount the amount debit in basic currency
- JCreditAmount the amount credit in basic currency
- JDebitAmountAccountCurrency the amount debit in account currency
- JCreditAmountAccountCurrency the amount credit in account currency
- JBalance the balance amount (for account card) in basic currency
- JBalanceAccountCurrency the balance amount (for account card) in account currency
- JOriginType as defined above
- ORIGINTYPE_CURRENT
- ORIGINTYPE_BUDGET
- JOperationType on of
- OPERATIONTYPE_NONE = 0
- OPERATIONTYPE_OPENING = 1
The row is generated from the opening balance - OPERATIONTYPE_CARRYFORWARD = 2
The row is used from the account card and is the balance of the account at this moment. - OPERATIONTYPE_TRANSACTION = 3
The row is generated from the Transactions table if it is ORIGINTYPE_CURRENT
or from the budget table if the row is ORIGINTYPE_BUDGET -
OPERATIONTYPE_INVOICESETTLEMENT = 21
journalCustomersSuppliers([originType = ORIGINTYPE_NONE, int accountType = ACCOUNTTYPE_NONE])
Same as journal with additional settlements rows for closing invoices and the following columns:
- JInvoiceDocType
- JInvoiceAccountId
- JInvoiceCurrency
- JInvoiceStatus
- JInvoiceDueDate
- JInvoiceDaysPastDue
- JInvoiceLastReminder
- JInvoiceLastReminderDate
- JInvoiceIssueDate
- JInvoiceExpectedDate
- JInvoicePaymentDate
- JInvoiceDuePeriod
- JInvoiceRowCustomer (1=Customer, 2=Supplier)
previousYear([nrYears])
Return the previous year as a Banana.Document object. If the previoius yeas is not defined or it is not foud it return null.
- nrYears is the number of years to go back, default is one.
var previousYearDoc = Banana.document.previousYear();
var previousTwoYearDoc = Banana.document.previousYear(2);
projectionBalance(account, projectionStartDate [, startDate, endDate, function(rowObj, rowNr, table) ])
Same as currentBalance but use the budget data starting from the projectionStartDate.
This functions calculate a projection of the end of year result (or specified period) combining the current data and the budget data for the period non yet booked.
if projectionStartDate is empty the result will be the same as currentBalance.
If you have already booked the 1. semester and would like to have a projection up to the end of the year
// We have booked the 1. semester and would like to have
// a projection up to the end of the yer
var cashProjection = Banana.document.projectionBalance('1000','2015-07-01');
var cashEnd = projection.balance;
var salesProjection = Banana.document.projectionBalance('3000','2015-07-01').total;
var salesForYear = -salesProjection.total;
projectionCard(account, projectionStartDate [, startDate, endDate, function(rowObj, rowNr, table) ])
Same as currentCard but use the budget data starting from the projectionStartDate.
If projectionStart date is empty result will be the same s currentCard.
var transactions = Banana.document.projectionCard('1000','2015-01-01','','');
endPeriod([period])
Return the end date in the form of 'YYYY-MM-DD'.
The endDate and startDate functions are used to retrieve the date of the accounting, so that you can create scripts that works on file of different years.
var dateEnd = Banana.document.endPeriod();
var dateStartFebruary = Banana.document.endPeriod('2M');
- Period:
- If period is not present the return value is the end date of the accounting.
- The period is added the starting account date, and than is returned the last date of the period..
- Period (for example 2M = 2 months) is a number followed by one of the following charachters
- D for days
- M for months
- Q for quarters
- S for semesters
- Y for years
- Assuming that the Start accounting date is 2015-01-01
- 1M return 2015-01-02
- 2M return 2015-02-28
- 2Q return 2015-06-30
- 2S return 2015-12-31
- 2Y return 2016-12-31
See also startDate.
startPeriod ([period])
Return the end date in the form of 'YYYY-MM-DD'.
The endPeriod and startPeriod functions are used to retrieve the date of the accounting, so that you can create scripts that works on file of different years.
var dateStart = Banana.document.endPeriod();
var dateStart3Q = Banana.document.endPeriod('3Q');
- Period:
If period is not present return the start date.- Period (for example 2M = 2 months) is a number followed by one of the following charachters
- D is for Days
- M for Months
- Q for Quorters
- S for Semester
- Y for year
- With 1 the starting date of the accounting is returned.
- Assuming that the Start accounting date is 2015-01-01
- 1M return 2015-01-01
- 2M return 2015-02-01
- 2Q return 2015-04-01
- 2S return 2015-07-01
- 2Y return 2016-01-01
- Period (for example 2M = 2 months) is a number followed by one of the following charachters
See also endDate.
vatBudgetBalance(vatCode[, startDate, endDate, function(rowObj, rowNr, table) ])
Sum the vat amounts for the specified vat code and period, using the Budget data.
var vatTotal = Banana.document.vatBudgetBalance('V15');
vatCurrentCard(vatCode[, startDate, endDate, function(rowObj, rowNr, table) ])
Retrieve the transactions relative to the specified VatCode.
var vatTransactions = Banana.document.vatCurrentCard('V15');
vatCurrentBalance(vatCode[, startDate, endDate, function(rowObj, rowNr, table) ])
Sum the vat amounts for the specified vat code and period.
For more info see :
- explanations of the function currentBalance.
- Case study BananaApp for VatReport.
Example:
var currentVat = Banana.document.vatCurrentBalance('V15','','');
var vatTaxable = currentVat.vatTaxable;
var vatPosted = currentVat.vatPosted;
- Return value:
Is an object that has- vatTaxable the amount of the taxable column
(the sign is the same as the vatAmount) - vatAmount the amount of vat
- vatNotDeductible the amount not deductible
- vatPosted VatAmount - VatNotDeductible
- rowCount the number of lines that have bben found and used for this computation
- vatTaxable the amount of the taxable column
- VatCode
One or more VatCode defined in the tabel Vat Codes.
Multiple vat code can be separated by "|" for example "V10|V20", or you can use vildcard "V*".
vatProjectionBalance(vatCode, projectionStartDate, [, startDate, endDate, function(rowObj, rowNr, table) ])
Same as vatCurrenBalance but use the budget data starting from the projectionStartDate.
var projectionVat = Banana.document.vatProjectionBalance('V15','','');
var vatTaxable = projectionVat.vatTaxable;
var vatPosted = projectionVat.vatPosted;
vatProjectiontCard(vatCode, projectionStartDate, [, startDate, endDate, function(rowObj, rowNr, table) ])
Same as vatCurrentCard but use the budget data starting from the projectionStartDate.
var vatTransactions = Banana.document.vatProjectiontCard('V15','2015-01-01','','');
vatReport([startDate, endDate])
Return the vat report for the specified period.
Start and end date are strings in form 'YYYY-MM-DD' or a date object. If startDate is empty the accounting start date is taken. If endDate is empty the accounting end date is taken.
var vatReport = Banana.document.vatReport('','');
Banana.Document (Base)
Banana.Document is the interface to a document in Banana Accounting. The current opened document can be accessed through the property Banana.document. A document can be also opened with the method Banana.application.openDocument.
Properties
cursor
Return a Cursor object with the current position of the cursor and the range of the selected rows.
var currentCursor = Banana.document.cursor;
locale
Return the locale of the document in the form of "language_country", where language is a lowercase, two-letter ISO 639 language code, and country is an uppercase, two- or three-letter ISO 3166 country code.
var locale = Banana.document.locale;
rounding
Return the rounding context of the current file that can be used with the SDecimal math functions.
var rounding = Banana.document.rounding;
tableNames
Return an array with the xml names of the tables in the document.
var tableNames = Banana.document.tableNames;
Methods
addMessage(msg[, idMsg])
Add the message msg to the document. The message is showed in the pane "Messages", and in a dialog if the application option "Show Messages" is turned on.
If idMsg is not empty, the help button calls an url with script's id and message's id (idMsg) as parameters.
See also: Application.AddMessage, Table.AddMessage, Row.AddMessage.
Banana.document.addMessage("Message text");
clearMessages()
Clear all the document's messages showed in the pane "Messages".
Banana.document.clearMessages();
getScriptSettings()
Get the settings of the script saved in the document. You use this method to get settings that are private to the running script. It is possible to save the settings of the script through the method "setScriptSettings".
With this method Settings are saved and restored under the script id, If you change the script's id you will lose the saved settings.
Example:
// Initialise parameter
param = {
   "searchText": "",
   "matchCase": "false",
   "wholeText": "false"
};

// Readscript settings
var strData = Banana.document.getScriptSettings();
if (strData.length > 0) {
   var objData = JSON.parse(strData);
   if (objData)
      param = objData;
}
Since Banana 8.0.8
getScriptSettings(id)
Return the settings saved in the document under the id 'id'.
You use this method to get settings that are shared between scripts. As id we recommend to use a substring of the script's id. For example if you have the scripts 'ch.banana.vat.montlyreport' and 'ch.banana.vat.endofyearreport', then you can use as id 'ch.banana.vat'.
Example:
// Initialise parameter
param = {
   "searchText": "",
   "matchCase": "false",
   "wholeText": "false"
};

// Readscript settings
var strData = Banana.document.getScriptSettings('ch.banana.vat');
if (strData.length > 0) {
   var objData = JSON.parse(strData);
   if (objData)
      param = objData;
}
Since Banana 8.0.8
info(section, id)
Return the info value of the document referenced by section and id. Section and Id correspond to the xml name listed in the Info table, see command File info in menu "Tools" and set the view to complete to see the XML columns. If the value referenced by section and id doesn't exist, an object of type undefined is returned.
Example:
// Get some value of the accounting file
var FileName = Banana.document.info("Base","FileName");
var DecimalsAmounts = Banana.document.info("Base","DecimalsAmounts");
var HeaderLeft = Banana.document.info("Base","HeaderLeft");
var HeaderRight = Banana.document.info("Base","HeaderRight");
var BasicCurrency = Banana.document.info("AccountingDataBase","BasicCurrency");

// For openingDate and closureDate use instead startDate and endDate
var openingDate = Banana.document.info("AccountingDataBase","OpeningDate");
var closureDate = Banana.document.info("AccountingDataBase","ClosureDate");

// For file accounting type
var FileType = Banana.document.info("Base","FileType");
var FileGroup = Banana.document.info("Base","FileTypeGroup");
var FileNumber = Banana.document.info("Base","FileTypeNumber");
FileTypeGroup / FileTypeNumber combinations:
- 100 Double entry accounting
- 100 No VAT
- 110 With VAT
- 120 Multi Currency
- 130 Multi Currency with VAT
- 110 Income and Expense accounting
- 100 No VAT
- 110 With VAT
- 130 Cash Book
- 100 No VAT
- 110 With VAT
- 400 Address / Labels
- 110 Labels
- 120 Address
scriptSaveSettings(string)
Save the settings of the script in the document. The next time the script is run, it si possible to read the saved settings with "scriptReadSettings".
With this method Settings are saved and restored under the script id, If you change the script's id you will lose the saved settings.
Example:
// Save script settings
var paramString = JSON.stringify(param);
var value = Banana.document.scriptSaveSettings(paramString);
Deprecated since Banana 8.0.8. Use setScriptSettings instead.
scriptReadSettings()
Return the saved settings of the script.
With this method Settings are saved and restored under the script id, If you change the script's id you will lose the saved settings.
Example:
// Initialise parameter
param = {
   "searchText": "",
   "matchCase": "false",
   "wholeText": "false"
};

// Readscript settings
var strData = Banana.document.scriptReadSettings();
if (strData.length > 0) {
   var objData = JSON.parse(strData);
   if (objData)
      param = objData;
}
Deprecated since Banana 8.0.8. Use getScriptSettings instead.
setScriptSettings(value)
Save the settings of the script in the document. It is possible to read the saved settings of the script with the method "getScriptSettings".
With this method Settings are saved and restored under the script id, If you change the script's id you will lose the saved settings.
Example:
// Save script settings
var paramString = JSON.stringify(param);
var value = Banana.document.setScriptSettings(paramString);
Since Banana 8.0.8.
setScriptSettings(id, value)
Save the settings in the document under the id 'id'. It is possible to read the saved settings with "getScriptSettings(id)".
You use this method to set settings that are shared between scripts. As id we recommend to use a substring of the script's id. For example if you have the scripts 'ch.banana.vat.montlyreport' and 'ch.banana.vat.endofyearreport', then you can use as id 'ch.banana.vat'.
Example:
// Save script settings
var paramString = JSON.stringify(param);
var value = Banana.document.setScriptSettings('ch.banana.vat', paramString);
Since Banana 8.0.8.
table(xmlTableName)
Return the table referenced by the name xmlTableName as a Table object, or undefined if it doesn't exist.
Banana.document.table("Accounts");
table(xmlTableName, xmlListName)
Return the table referenced by the name xmlTableName with the rows of the list xmlListName as a Table object, or undefined if the table or the list don't exist. The default list is the 'Data' list.
Banana.document.table("Transactions", "Examples");
Banana.document.table("Transactions").list("Examples");  // alternative way
See also: Table.list, Table.listNames.
Since Banana 8.0.5
value(tableName, rowNr, columnName)
Return the value in table tableName, row rowNr and column columnName as string. If the table, row or column are not founds it return an object of type undefined.
Banana.document.value("Accounts", 5, "Description")
Banana.Document.Cursor
Banana.Document.Cursor is the interface to the cursor and can be accessed through Banana.document.cursor.
Properties
tableName
Return the xml name of the current table.
var currentTable = Banana.document.cursor.tableName;
rowNr
Return the number of the current row.
var currentRow = Banana.document.cursor.rowNr;
columnName
Return the xml name of the current column.
var currentColumn = Banana.document.cursor.columnName;
selectionTop
Return the index of the top row of the current selection.
var currentSelectionTop = Banana.document.cursor.selectionTop;
selectionBottom
Return the index of the bottom row of the current selection.
var currentSelectionBottom = Banana.document.cursor.selectionBottom;
Banana.Document.Row
Banana.Document.Row is the interface of a row.
Properties
isEmpty
Return true if the row is completly empty.
var isEmpty = tRow.isEmpty;
rowNr
Return the index of the row.
var rowNr = tRow.rowNr;
uniqueId
Return the unique id (an interger value) of the row.
Banana assign to every new row a unique id, this value is fix a will never change.
var uniqueId = tRow.uniqueId;
Methods
addMessage(msg [, columnName] [, idMsg])
Add the message msg to the document. The message is showed in the pane "Messages", and in a dialog if the application option "Show Messages" is turned on.
If idMsg is not empty, the help button calls an url with message's id (idMsg) as parameter.
If columnName is not empty, the message is connected to the column columnName. With a double click over message in the message pane, the cursor jump to the corresponding table, rowNr and columnName.
See also: Application.AddMessage, Table.AddMessage, Document.AddMessage.
var accountsTable = Banana.document.table("Accounts");
var tRow = accountsTable.row(4);
tRow.addMessage("Message text");
toJSON([columnNames])
Return the row as JSON string. If the parameter columnNames is defined, only the columns in the array are included in the file.
// Return all the columns of the row
var json = tRow.toJSON();

// Return only the defined columns of the row
var json = tRow.toJSON(["Account", "Description", "Balance"]);
value(columnName)
Return the value in column columnName. If the column is not found or the object is invalid it return the value undefined.
var accountsTable = Banana.document.table("Accounts");
var tRow = accountsTable.row(4);
tRow.value("Description");
Banana.Document.Table
Banana.Document.Table is the interface of a table.
Properties
name
Return the xml name of the table.
var table = Banana.document.table("Accounts");
var tName = table.name;
columnNames
Return the xml names of the table's columns as an array.
var table = Banana.document.table("Accounts");
var tColumnNames = table.columnNames;
listName
Return the xml name of the list that this table object reference to. The default list is the 'Data' list.
Since Banana 8.0.5
var table = Banana.document.table("Accounts");
var tListName = table.listName;
listNames
Return the xml names of the available lists as an array. The default list is the 'Data' list.
Since Banana 8.0.5
var table = Banana.document.table("Accounts");
var tListNames = table.listNames;
rowCount
Return the number of rows in the table.
var table = Banana.document.table("Accounts");
var tRowCount = table.rowCount;
rows
Return the rows of the table as an array of Row objects.
var table = Banana.document.table("Accounts");
var tRows = table.rows;
Methods
addMessage(msg, rowNr [, columnName] [, idMsg])
Add the message msg to the queue of the document. The message is showed in the pane "Messages", and in a dialog if the application option "Show Messages" is turned on.
If idMsg is not empty, the help button calls an url with message's id (idMsg) as parameter.
If rowNr is different than "-1" the message is connected to the row rowNr. if columnName is not empty, the message is connected to the column columnName. With a double click over message in the message pane, the cursor jump to the corresponding table, rowNr and columnName.
See also: Application.AddMessage, Row.AddMessage, Document.AddMessage.
var table = Banana.document.table("Accounts");
table.addMessage("Message string", 3, "description");
extractRows( function(rowObj, rowNr, table), tableTitle)
Extract the rows that passed the test defined by function and show them in the table "Selections". The title of the table is set to tableTitle.
findRows( function(rowObj, rowNr, table))
Return an array of Row objects that pass the test defined in function.
findRowByValue(columnName, value)
Return the first row as Row object that contains the value in the the column columnName. Or undefined if any row is found.
var cashAccountRow = Banana.document.table('Accounts').findRowByValue('Account','1000');
if (!cashAccountRow)
   //Row not found
list(xmlListName)
Return a new table object with the rows of the list xmlListName, or undefined if the list xmlListName doesn't exist.
var recurringTransactions = Banana.document.table('Transactions').list('Examples');
var archivedProducts = Banana.document.table('Products').list('Archive');
Since Banana 8.0.5
row(rowNr)
Return the Row at index rownr as Row Object, or undefined if rowNr si outside the valid range.
var table = Banana.document.table("Accounts");
var row = table.row(3);
toJSON([columnNames])
Return the table as JSON string. If the parameter columnNames is defined, only the columns in the array are included in the file.
var table = Banana.document.table("Accounts");
var json = table.toJSON();
toHtml([columnNames, formatValues])
Return the table as Html file. If the parameter columnNames is defined, only the columns in the array are included in the file. If formatValues is set to true, the values are converted to the locale format.
Example:
//Show the whole row content of the table Accounts
Banana.Ui.showText(Banana.document.table('Accounts').toHtml());

//Show some columns and format dates, amounts, ... as displayed in the program
Banana.Ui.showText(
   Banana.document.table('Accounts').toHtml(['Account','Group','Description','Balance'],true)
);
toTsv([columnNames])
Return the table as Tsv file (Tab separated values). If the parameter columnNames is defined, only the columns in the array are included in the file.
var table = Banana.document.table("Accounts");
var tsv = table.toTsv();
value(rowNr, columnName)
Return the value in row rowNr and column columnName as string. Or undefined if the row or column are not found.
var table = Banana.document.table("Accounts");
var account = table.value(3,'Account');
var description = table.value(3,'Description');
Banana.IO
The Banana.IO class is used to read and write to files.
Since: Banana Accounting 8.0.7, only in Banana Experimental
Introduction
The API Banana.IO and Banana.IO.LocalFile allow a script to read or write to files in a secure way. The script can only read or writes to files that are first selected by the user though the corresponding dialogs. The script has no direct access to files on the file system. After the script finished, the permissions to write or read files are canceled.
For example to write the result of a script to a file:
var fileName = Banana.IO.getSaveFileName("Select save file", "", "Text file (*.txt);;All files (*)")
if (fileName.length) {
   var file = Banana.IO.getLocalFile(fileName)
   file.codecName = "latin1";  // Default is UTF-8
   file.write("Text to save ...");
   if (!file.errorString) {
      Banana.IO.openPath(fileContent);
   } else {
      Banana.Ui.showInformation("Write error", file.errorString);
   }
} else {
   Banana.Ui.showInformation("Info", "no file selected");
}
To read the content of a file:
var fileName = Banana.IO.getOpenFileName("Select open file", "", "Text file (*.txt);;All files (*)")
if (fileName.length) {
   var file = Banana.IO.getLocalFile(fileName)
   file.codecName = "latin1";  // Default is UTF-8
   var fileContent = file.read();
   if (!file.errorString) {
      Banana.IO.openPath(fileContent);
   } else {
      Banana.Ui.showInformation("Read error", file.errorString);
   }
} else {
   Banana.Ui.showInformation("Info", "no file selected");
}
Methods
getOpenFileName(caption, path, filter)
The method getOpenFileName returns an existing file selected by the user. If the user presses Cancel, it returns an empty string. The file selected by the user is then allowed to be readen, but not written.
The parameter caption is the caption of the dialog.
The parameter path is path inclusive the file name to be selected. If the path is relative, the current open document path or the user's document path is used.
The parameter filter set the files types to be showed. If you want multiple filters, separate them with ';;', for example: "Text file (*.txt);;All files (*)".
var fileName = Banana.IO.getOpenFileName("Select file to read", "", "Text file (*.txt);;All files (*)")
Since: Banana Accounting 8.0.7, only in Banana Experimental
getSaveFileName(caption, path, filter)
The method getSaveFileName returns an existing file selected by the user. If the user presses Cancel, it returns an empty string. The file selected by the user is then allowed to be readen and written.
The parameter caption is the caption of the dialog.
The parameter path is path inclusive the file name to be selected. If the path is relative, the current open document path or the user's document path is used.
The parameter filter set the files types to be showed. If you want multiple filters, separate them with ';;', for example: "Text file (*.txt);;All files (*)".
var fileName = Banana.IO.getSaveFileName("Select file to write", "", "Text file(*.txt);;All files (*)")
Since: Banana Accounting 8.0.7, only in Banana Experimental
getLocalFile(path)
The method getLocalFile(path) return an object of type Banana.IO.LocalFile that represent the requested file. This method always return a valid Banana.IO.LocalFile object.
The parameter path to the file.
Since: Banana Accounting 8.0.7, only in Banana Experimental
openUrl(path)
The method openUrl(path) open the file referred by path in the system default application.
The parameter path to the file.
Since: Banana Accounting 8.0.7, only in Banana Experimental
openPath(path)
The method openPath(path) show the folder containing the file referred by path in the system file manager.
The parameter path to the file.
Since: Banana Accounting 8.0.7, only in Banana Experimental
Banana.IO.LocalFile
The LocalFile class represent a file on the local file system. See Banana.IO for an example.
Since: Banana Accounting 8.0.7, only in Banana Experimental
Properties
codecName
The name of the codec to be used for reading or writing the file. Default is 'UTF-8'.
errorString
Read only. The string of the last occured error. If no error occured it is empty.
Methods
read()
Returns the content of the file. This function has no way of reporting errors. Returning an empty string can mean either that the file is empty, or that an error occurred. Check the content of the property errorString to see if an error occured.
write(text [, append])
Write text to the file. If append is set to true, text is appended to the file. Return true if the operation was succesfully, false otherwise.
Banana.Report
The class Banana.Report enable you to create reports, preview and print in Banana Accounting.
Introduction
The report logic is similar to the HTML / CSS logic:
- Create a Report object .
- A report contain a list of ReportEements (paragraphs, texts, tables and other)
- The element can contains other sub-elements
- For each element you can add a class that is used for rendering the element
- Create a StyleSheet
- A stylesheet is composed of StyleElements.
- You preview and print a report by passing the Report and the Stylesheet object.
Each report sturcture has:
- a ReportElement list
- a Header Element list
- a Footer Element list
// Report
var report = Banana.Report.newReport("Report title");
report.addParagraph("Hello World !!!", "styleHelloWorld");

// Styles
var stylesheet = Banana.Report.newStyleSheet();
var style = stylesheet.addStyle(".styleHelloWorld");
style.setAttribute("font-size", "96pt");
style.setAttribute("text-align", "center");
style.setAttribute("margin-top", "50mm");

var style2 = stylesheet.addStyle("@page");
style2.setAttribute("size", "landscape");

// Print preview
Banana.Report.preview(report, stylesheet);
Methods
newReport(title)
Creates a report with title 'title'. The returned object is of type Banana.Report.ReportElement.
To the report you can then add the desired elements, like paragraphs, texts, tables, and so on that construct the structure of the report.
var report = Banana.Report.newReport("Report title");
newStyleSheet()
Creates an empty stylesheet. The returned object is of type Banana.Report.ReportStyleSheet.
To the stylesheet you can add the styles that format the report.
var stylesheet = Banana.Report.newStyleSheet();
newStyleSheet(fileName)
Creates a stylesheet from a file. The file has the same syntax as CSS stylesheets. The file path is relative to the script's path. The path can't contain a '..'' (parent directory).
The returned object is of type Banana.Report.ReportStyleSheet.
You can add further styles to the returned stylesheet.
var reportStyles = Banana.Report.newStyleSheet("styles.css");

*** Content of file styles.css ***
.helloWorldStyle
{
font-size: 96pt;
text-align: center;
margin-top: 50mm;
}

@page
{
size: landscape;
}
*** End of file styles.css ***
preview(report, stylesheet)
Opens a print preview Dialog and shows the report with the given stylesheet.
The page orientation is given by the stylesheet. The default size and orientation is taken from the default printer, or can be set through the stylesheet.
// Set landscape orientation
stylesheet.addStyle("@page {size: landscape}");

// Set page size and orientation
stylesheet.addStyle("@page {size: A5 lanscape}");

// Displays the report
Banana.Report.preview(report, stylesheet);
Example: Hello world
// Simple test script using Banana.Report
//
// @id = ch.banana.script.report.helloworld
// @api = 1.0
// @pubdate = 2017-01-02
// @publisher = Banana.ch SA
// @description = Report Hello world
// @task = app.command
// @doctype = *
// @inputdatasource = none
// @timeout = -1
//

function exec(string) {

   // Create the report
   var report = Banana.Report.newReport("Report title");

   // Add a paragraph to the report
   report.addParagraph("Hello World !!!", "helloWorldStyle");

   // Define some styles
   var stylesheet = Banana.Report.newStyleSheet();

   var style = stylesheet.addStyle(".helloWorldStyle");
   style.setAttribute("font-size", "96pt");
   style.setAttribute("text-align", "center");
   style.setAttribute("margin-top", "50mm");

   var style2 = stylesheet.addStyle("@page");
   style2.setAttribute("size", "landscape");

   // Open Preview
   Banana.Report.preview(report, stylesheet);
}
Exemple: an example with tables, page breaks and differents styles
Result
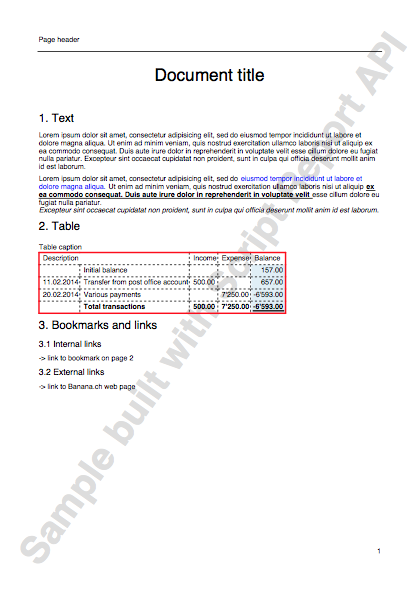
Script
// Test script using Banana.Report
//
// @id = ch.banana.script.report.report
// @api = 1.0
// @pubdate = 2017-01-02
// @publisher = Banana.ch SA
// @description = Test report api
// @task = app.command
// @doctype = *
// @outputformat = none
// @inputdatasource = none
// @timeout = -1
//

function exec(string) {

   // Report
   var report = Banana.Report.newReport("Report title");

   var pageHeader = report.getHeader()
   pageHeader.addClass("header");
   pageHeader.addText("Page header");
   report.getFooter().addFieldPageNr();

   var watermark = report.getWatermark();
   watermark.addParagraph("Sample built with Script Report API");

   report.addParagraph("Report title", "titleStyle");
   report.addParagraph("1. Text", "chapterStyle").setOutline(1);

   report.addParagraph("Lorem ipsum dolor sit amet, consectetur adipisicing elit, sed do " +
    "eiusmod tempor incididunt ut labore et dolore magna aliqua. " +
    "Ut enim ad minim veniam, quis nostrud exercitation ullamco laboris nisi ut aliquip " +
    "ex ea commodo consequat. Duis aute irure dolor in reprehenderit in voluptate velit " +
    "esse cillum dolore eu fugiat nulla pariatur. Excepteur sint occaecat cupidatat non " +
    "proident, sunt in culpa qui officia deserunt mollit anim id est laborum.");

   var paragraph2 = report.addParagraph();
   paragraph2.addText("Lorem ipsum dolor sit amet, consectetur adipisicing elit, sed do ");
   paragraph2.addText("eiusmod tempor incididunt ut labore et dolore magna aliqua. ", "blueStyle");
   paragraph2.addText("Ut enim ad minim veniam, quis nostrud exercitation ullamco laboris nisi ut aliquip ", "boldStlyle");
   paragraph2.addText("ex ea commodo consequat. Duis aute irure dolor in reprehenderit in voluptate velit ", "underlineStyle boldStyle");
   paragraph2.addText("esse cillum dolore eu fugiat nulla pariatur.");
   paragraph2.addLineBreak();
   paragraph2.addText("Excepteur sint occaecat cupidatat non proident, sunt in culpa qui officia deserunt mollit anim id est laborum.", "italicStyle");

   report.addParagraph("2. Table", "chapterStyle").setOutline(1);

   var table = report.addTable();
   table.getCaption().addText("Table caption");

   var tableHeader = table.getHeader();
   var tableHeaderRow = tableHeader.addRow();
   tableHeaderRow.addCell("Description", "", 2);
   tableHeaderRow.addCell("Income");
   tableHeaderRow.addCell("Expense");
   tableHeaderRow.addCell("Balance");

   var tableRow = table.addRow();
   tableRow.addCell();
   tableRow.addCell("Initial balance");
   tableRow.addCell();
   tableRow.addCell();
   tableRow.addCell(Banana.Converter.toLocaleNumberFormat("157.00")).addClass("balanceStyle");

   var tableRow = table.addRow();
   tableRow.addCell(Banana.Converter.toLocaleDateFormat("2014-02-11"));
   tableRow.addCell("Transfer from post office account");
   tableRow.addCell(Banana.Converter.toLocaleNumberFormat("500.00"));
   tableRow.addCell();
   tableRow.addCell(Banana.Converter.toLocaleNumberFormat("657.00")).addClass("balanceStyle");

   var tableRow = table.addRow();
   tableRow.addCell(Banana.Converter.toLocaleDateFormat("2014-02-20"));
   tableRow.addCell("Various payments");
   tableRow.addCell();
   tableRow.addCell(Banana.Converter.toLocaleNumberFormat("7250.00"));
   tableRow.addCell(Banana.Converter.toLocaleNumberFormat("-6593.00")).addClass("balanceStyle negativeStyle");

   var tableRow = table.addRow("totalrowStyle");
   tableRow.addCell();
   tableRow.addCell("Total transactions");
   tableRow.addCell(Banana.Converter.toLocaleNumberFormat("500.00"));
   tableRow.addCell(Banana.Converter.toLocaleNumberFormat("7250.00"));
   tableRow.addCell(Banana.Converter.toLocaleNumberFormat("-6593.00")).addClass("balanceStyle negativeStyle");

   report.addParagraph("3. Bookmarks and links", "chapterStyle").setOutline(1);

   report.addParagraph("3.1 Internal links", "chapter2Style").setOutline(2);
   report.addParagraph("-> link to bookmark on page 2").setLink("bookmarkpage2");

   report.addParagraph("3.2 External links", "chapter2Style").setOutline(2);
   report.addParagraph("-> link to Banana.ch web page").setUrlLink("http://www.banana.ch");

   report.addPageBreak();

   var chapter4 = report.addParagraph("4. Pages", "chapterStyle");
   chapter4.setOutline(1);

   report.addParagraph("Bookmark on page 2").setBookmark("bookmarkpage2");


   // Styles
   var docStyles = Banana.Report.newStyleSheet();

   var pageStyle = docStyles.addStyle("@page");
   pageStyle.setAttribute("margin", "20mm 20mm 20mm 20mm");

   var headerStyle = docStyles.addStyle("phead");
   headerStyle.setAttribute("padding-bottom", "1em");
   headerStyle.setAttribute("margin-bottom", "1em");
   headerStyle.setAttribute("border-bottom", "solid black 1px");

   var footerStyle = docStyles.addStyle("pfoot");
   footerStyle.setAttribute("text-align", "right");

   var paragraphStyle = docStyles.addStyle("p");
   paragraphStyle.setAttribute("margin-top", "0.5em");

   var captionStyle = docStyles.addStyle("caption");
   captionStyle.setAttribute("margin-top", "1em");

   var titleStyle = docStyles.addStyle(".titleStyle");
   titleStyle.setAttribute("font-size", "24");
   titleStyle.setAttribute("text-align", "center");
   titleStyle.setAttribute("margin-bottom", "1.2em");

   docStyles.addStyle(".chapterStyle", "font-size:16; margin-top:2em; margin-bottom:0.2em");
   docStyles.addStyle(".chapter2Style", "font-size:12; margin-top:1.4em; margin-bottom:0.2em");

   var tableStyle = docStyles.addStyle("table");
   tableStyle.setAttribute("border", "2px solid red");

   docStyles.addStyle("td", "border: 1px dashed black; padding: 2px;");

   var tableColStyle = docStyles.addStyle(".balanceStyle");
   tableColStyle.setAttribute("background-color", "#E0EFF6");
   tableColStyle.setAttribute("text-align", "right");

   var totalRowStyle = docStyles.addStyle(".totalrowStyle");
   totalRowStyle.setAttribute("font-weight", "bold");

   var totalBalanceStyle = docStyles.addStyle(".totalrowStyle td.balanceStyle");
   totalBalanceStyle.setAttribute("text-decoration", "double-underline");

   docStyles.addStyle(".blueStyle", "color:blue");
   docStyles.addStyle(".underlineStyle", "text-decoration:underline;");
   docStyles.addStyle(".italicStyle", "font-style:italic;");
   docStyles.addStyle(".boldStyle", "font-weight:bold");

   // Open Preview
   Banana.Report.preview(report, docStyles);
}
Banana.Report.ReportElement
The class Banana.Report.ReportElement represents the report itself and every element in the report, like sections, paragraphs, tables, texts and the report itself.
Once you create a new report through the method Banana.Report.newReport() you can start adding sections, paragraphs, texts, tables and so on.
When you add an element with one of the add methods, you get as return value an object of type
Elements as a container of other elements.
Banana.Report.ReportElement that represents the added element.
To this object you can add further elements and by this way construct the structure of the report.
Report
+ Paragraph
+ Table
+ Row
+ Cell
+ Cell
+ Row
+ Cell
+ Cell
...
Even if this interface enable you to add tables to text elements or columns to paragraphs, the result will be undefined.
Formatting like text size, text color, margins, and so on are set separately through a Banana.Report.ReportStyleSheet object.
Methods
addClass(classes)
Add classes to the node. A class binds the element to the corresponding class style definend in Banana.Report.ReportStyleSheet as used in CSS Stylesheets.
var report = Banana.Report.newReport("Report title");
report.addParagraph("1250.00").addClass("balanceStyle");
addSection([classes])
Add a section and return the created section as a Banana.Report.ReportElement object.
You can add sections only to sections, cells, captions, headers or footers.
var report = Banana.Report.newReport("Report title");

//Add a section with a style
var section = report.addSection("sectionStyle");
section.addParagraph("First paragraph");
section.addParagraph("Second paragraph");
addParagraph([text, classes])
Add a paragraph and return the created paragraph as a Banana.Report.ReportElement object.
You can add paragraphs only to sections, cells, captions, headers or footers.
var report = Banana.Report.newReport("Report title");

//Add an empty paragraph
report.addParagraph(" ");

//Add a paragraph with a text
report.addParagraph("Hello World !!!");

//Add a paragraph with a text and a style
report.addParagraph("Hello World !!!", "styleHelloWorld");
addText(text [, classes])
Add a text node and return the create text as a Banana.Report.ReportElement object.
You can add texts only to sections, paragraphs, cells, captions, headers or footers.
var report = Banana.Report.newReport("Report title");

//Add a text
report.addText("Hello world !!!");

//Add a text with a style
report.addText("Hello world !!!", "styleHelloWorld");
addTable([classes])
Add a table and return the created table as a Banana.Report.ReportElement object.
You can add tables only to the report or sections.
var report = Banana.Report.newReport("Report title");
var myTable = report.addTable("myTable");
addColumn([classes])
Add a column and return the created column as a Banana.Report.ReportElement object.
You can add columns only to tables.
var column1 = myTable.addColumn("column1");
var column2 = myTable.addColumn("column2");
var column3 = myTable.addColumn("column3");
addRow([classes])
Add a row and return the created row as a Banana.Report.ReportElement object.
You can add rows only to tables, table headers or table footers.
var tableRow = myTable.addRow();
...
addCell([span])
Add an empty cell and return the created cell as a Banana.Report.ReportElement object.
You can add cells only to rows. You can span cells over columns but not over rows.
tableRow.addCell();      //span empty cell over 1 column (default value)
tableRow.addCell("", 3); //span empty cell over 3 columns
...
addCell(text [,classes, span])
Add a cell to the node and return the created cell as a Banana.Report.ReportElement object.
You can add cells only to rows.You can span cells over columns but not over rows.
tableRow.addCell("Bank", "firstCellStyle", 3);      //span cell over 3 columns
tableRow.addCell("1200.65", "secondCellStyle, 1);   //span cell over 1 column
...
addLineBreak()
Add a line break and return the created line break as a Banana.Report.ReportElement object.
You can add line breaks only to paragraphs or cells.
// Add a line break to a paragraph
var p = report.addParagraph(" ");
p.addLineBreak();

// Add a line break to a cell
var c = tableRow.addCell();
c.addLineBreak();
addPageBreak()
Add a page break node and return the created page beak as a Banana.Report.ReportElement object.
You can add page breaks only to the report or sections.
var report = Banana.Report.newReport("Report title");
...
report.addPageBreak();
...
addImage(path [,classes])
Add an image and return the created image as a Banana.Report.ReportElement object. Supported formats are png and jpg.
The path can be relative to the script's folder, the document's folder, the name of a document attacched to the file or a data uri scheme (for images imbedded in the document).
- file:script/<relative_path_to_script_folder>/<image_name>
- file:document/<relative_path_to_file_folder>/<image_name>
- documents:<document_name>
- data:[<media type>][;charset=<character set>][;base64],<data>
You can add images only to sections, paragraphs, cells, captions, headers or footers.
The parameter path can be absolute or relative to the script path.
Since: Banana Accounting 8.0.5
var report = Banana.Report.newReport("Report title");

// Add an image located in the script folder
report.addImage("file:script/logo_abc.jpg");

// Add an image located in the dcoument folder
report.addImage("file:document/logo_mnp.jpg");

// Add an image saved in the table documents
report.addImage("documents:logo_xyz.jpg");

// Add an image (a red dot) included in the document
report.addImage("data:image/png;base64,iVBORw0KGgoAAAANSUhEUgAAAAUA AAAFCAYAAACNbyblAAAAHElEQVQI12P4//8/w38GIAXDIBKE0DHxgljNBAAO 9TXL0Y4OHwAAAABJRU5ErkJggg==");
addImage(path, widht, height [,classes])
Overloaded method to add an image and return the created image as a Banana.Report.ReportElement object.
The parameters widht and height have the same syntax as css lenhgt values. They can be absolute (ex.: "30px", "3cm", ... ) or relative (ex.: "50%", "3em", ...).
Since: Banana Accounting 8.0.5
var report = Banana.Report.newReport("Report title");
report.addImage("documents:image_logo", "3cm", "5cm");
addFieldPageNr([classes])
Add a field with containg the page number and return the created field as a Banana.Report.ReportElement object.
You can add this field only to sections, paragraphs, cells, captions, headers or footers.
var report = Banana.Report.newReport("Report title");
...
// Add the page number to the paragraph
report.addParagraph("Page ").addFieldPageNr();

// Add a page number to the footer
var footer = report.getFooter();
footer.addText("Page ");
footer.addFieldPageNr();
getWatermark()
Return the watermak element.
Only the report has a watermak element.
var watermark = report.getWatermark();
watermark.addParagraph("Watermark text");
getHeader()
Return the header of the element.
Only tables and the report have an header element.
var report = Banana.Report.newReport("Report title");

//Report
var reportHeader = report.getHeader();
reportHeader.addClass("header");
reportHeader.addText("Header text");

//Table
var table = report.addTable("myTable");
var tableHeader = table.getHeader();
tableRow = tableHeader.addRow();
tableRow.addCell("Description");
tableRow.addCell("Amount");
getFooter()
Return the footer of the element.
Only tables and the report have a footer element.
//Report
var footer = report.getFooter();
footer.addText("Footer text");
getCaption()
Return the caption of the element.
Only tables have a caption element.
var table = report.addTable("MyTable");
var caption = table.getCaption();
caption.addText("Table caption text", "captionStyle");
getTag()
Return the tag of the element, like 'body', 'p', 'table', 'td' and so on.
var report = Banana.Report.newReport("Report title");
...
report.getTag(); // returns 'body'
footer.getTag(); // returns 'pfoot'
...
getTitle()
Return the title of the element.
Only a document element have a title.
var report = Banana.Report.newReport("My Report Title");
var title = report.getTitle(); // return 'My Report Title'
Since: Banana Accounting 8.0.5
setOutline(level)
Set the outline level, this is used to create the index when exporting to pdf.
report.addParagraph("1. Text").setOutline(1);
setBookmark(bookmark)
Set a bookmark (or anchor), this is used in conjunction with setLink().
report.addParagraph("Bookmark on page 2").setBookmark("bookmarkpage2");
setLink(bookmark)
Set a link to a bookmark. See setBookmark().
report.addParagraph("-> link to bookmark on page 2").setLink("bookmarkpage2");
setPageBreakBefore()
Set to insert a page break before the element.
// Insert a page break before a paragraph
report.addParagraph("Hello world!!!").setPageBreakBefore();

// Insert a page break before a table
   /* first create a table then... */
myTable.setPageBreakBefore();
setSize(width, height)
Set the size of the element.
The parameters widht and height have the same syntax as css lenhgt values. They can be absolute (ex.: "30px", "3cm", ... ) or relative (ex.: "50%", "3em", ...).
You can only set the size of an image element.
Since: Banana Accounting 8.0.5
var image = report.addImage("C:/Documents/Images/img.jpg");
image.setSize("3cm", "6cm");
setStyleAttribute(attr_name, attr_value)
Set a style attribute to the element. Attributes ids and values follow the CSS specification. This attibute correspont to the inline styles in Css.
paragraph.setAttribute("font-size", "24pt");
setStyleAttributes(attributes)
Set style attributes to the element. Attributes ids and values follow the CSS specification. Those attributes correspond to the inline styles in Css.
paragraph.setAttribute("font-size:24pt;font-weight:bold;");
setTitle(title)
Set the title of the element.
Title can be only set to a document element.
Since: Banana Accounting 8.0.5
document.setTitle("Annual report");
setUrlLink(link)
Set a link to an external file (file://...) or a web page (http://....).
To the element the class "link" is automatically added.
report.addParagraph("Link to Banana.ch web page").setUrlLink("http://www.banana.ch");
Banana.Report.ReportStyle
The class Banana.Report.ReportStyle represent a single style in a stylesheet. It is used to set the style attributes.
Methods
setAttribute(attr_name, attr_value)
Set the attribute value. Attributes ids and values follow the CSS specification.
style.setAttribute("font-size", "24pt");
setAttributes(attributes)
Set attributes values. Attributes ids and values follow the CSS specification.
style.setAttributes("font-size:24pt;font-weight:bold;");
Supported attributes
font
font-family
font-size
font-style
font-weight
margin [top, right, bottom, left]
margin-top
margin-bottom
margin-left
margin-right
padding
padding-top
padding-bottom
padding-left
padding-right
hanging-ident
text-align
text-decoration
text-ellipsis
vertical-align
color
background-color
border
border-top
border-top-style
border-top-color
border-top-width
border-bottom
border-bottom-style
border-bottom-color
border-bottom-width
border-left
border-left-style
border-left-color
border-left-width
border-right
border-right-style
border-right-color
border-right-width
display
overflow
float
text-wrap
width
max-width
min-width
height
page-break-after
column-break-after
line-break-after
page-break-before
column-break-before
line-break-before
page-break-inside
line-break-inside
size
position
left
top
right
bottom
transform (matrix, translateX, translateY, translate, rotate, scaleX, scaleY, scale, skewX, skewY and skew)
transformOrigin
orphans
fill-empty-area
Non standard attributes and values
width-sym
This attribute contain a string. Columns with the same width-sym will be layouted with the same width.
layout-sym
This attribute is a string. Tables with the same layout-sym attribute will have the same layout for the width of the columns.
overflow
This attribute has the non standard value "shrink". The content of the node will be down scaled to fit given space.
style.setAttribute("overflow", "shrink");
overflow-shrink-max
This attibute the maximal down scaling factor (like 0.8).
style.setAttribute("overflow-shrink-max", "0.6");
text-decoration
This attribute can also contains the values "double-underline" or "double-strong-underline".
style.setAttribute("text-decoration", "underline");
border-style
This attribute can also contain the values "double" and "double-strong".
style.setAttribute("border-style", "double");
flexible-width
This attribute can contain the value "always" and is only used with columns. If in a table one or more columns have the attribute "flexible-widht", only those columns are enlarged to get the desired table widht, untouching the other. Otherwise all columns are enlarged.
fill-empty-area
With this attribute you can fill the remaing space of your page with lines. Lines can be defined through the attribute, which is a string and contains the color, the style and the width of the line.
Style can be: solid, dash and dot.
Examples:
var style1 = stylesheet.addStyle("@page", "black solid 1");
var style2 = stylesheet.addStyle("@page", "green dash 0.5");
Banana.Report.ReportStyleSheet
The class Banana.Report.ReportStyleSheet is used to set the styles to format a report.
Page size and orientation
At this moment the report is rendered based on the page size defined in the default printer device.
You can't define a page size, bu you can set the orientation with the Style @page.
Page orientation can't be set only once per report, you can't switch from potrait to landscape.
var stylesheet = Banana.Report.newStyleSheet();
stylesheet.addStyle("@page").setAttribute("size", "landscape");
Methods
addStyle(selector)
Create a new style with the given selector. The return object is of type Banana.Report.ReportStyle.
The syntax of selector follow the CSS specification.
- Style name without a preceding dot are reserved predefined tags like "td", "p", "table"
- Style name for new class need a preceding point ".myStyle" in the addStyle method.
The dot name is not used when adding the class name to the element
report.addParagraph("Text to print 24pt", "myStyle");
var style = stylesheet.addStyle(".myStyle");
myStyle.setAttribute("font-size", "24pt");
myStyle.setAttribute("text-align", "center");

report.addCell("Text to print");
var styleTd = stylesheet.addStyle("td");
styleTd.setAttribute("font-weight", "bold");
addStyle(selector, attributes)
Create a new style with the given selector and attributes. The return object is of type Banana.Report.ReportStyle.
The syntax of selector and attributes follow the CSS specification.
var style2 = stylesheet.addStyle(".style2", "font.size: 24pt; text-align: center");
parse(text)
Load the styles from the given text. The text follow the CSS specification.
stylesheet.parse(
  "p.style1 {font-size:24pt; text-align:center;}" +
  "@page {size:A4 landscape;}"
  );
The selector
The selector follow the css syntax, following you will find some examples:
| Selector | Selected elements |
| .xyz |
Select all elements with class xyz NB.: When you set the class to a ReportElement you enter the name without '.' |
| table | Select all tables |
| table.xyz | Select all tables with class xyz |
| table.xyz td | Select all cells in tables with class xyz |
| @page | page |
| body | content of the report |
| phead | page header |
| pfoot | page footer |
| div | section |
| p | paragraph |
| table | table |
| caption | table caption |
| thead | table header |
| tbody | table body |
| tfoot | table footer |
| tr | table row |
| td | table cell |
You can get the tag of an element through the method getTag();
Report FAQ
How can I set the orientation of the page and the margins
// Set landscape orientation
styleSheet.addStyle("@page", "size: landscape");

// Page margins top, right, bottom, left
styleSheet.addStyle("@page", "margin: 20mm 20mm 20mm 25mm");
How can I set the size of the page
// Set page size
styleSheet.addStyle("@page", "size: A5");
How can I set the margins of page header and footer
styleSheet.addStyle("phead", "margin-bottom:2em");
styleSheet.addStyle("pfoot", "margin-top:2em");
How can I print the page number on the right of the page footer
document.getFooter().addFieldPageNr("alignright");
stylesheet.addStyle("pfoot", "text-align:right");
Can I print the total number of pages
No
I like a style implemented in a report of Banana Accounting, where can I get the used stylesheet?
In print preview export the report as html and look at the code. You will find the used styles.
Banana.SDecimal
The Banana.SDecimal (String Decimal) provide functions to do decimal math calculation that
- use decimal string in the form of '10.00' or '-10' as argument and return value
- '.' is interpreted as the decimal separator
- thousand separator are not allowed
- has up to 34 digits of numeric precision
- do accurate decimal rounding
You can use this functions instead of the javascript Number that use floating point arithmetic and are not very suitable for accounting calculation do the rounding differences.
var r = Banana.SDecimal.add('6.50', '3.50');   // return '10.00'
var r = Banana.SDecimal.divide('10', '2');     // return '5.00'
var r = Banana.SDecimal.divide('10', '2', ''); // return '5'
var r = Banana.SDecimal.divide('10', '2');     // return '5.00000'
Rounding context
Functions can be passed a rounding context that specify the rounding properties:
- decimals is the number of decimal digits (default value is 2)
- null returns the value unrounded.
- '0' returns with no decimals.
- '1' to '33' returns the value with the indicated number o decimals.
- mode is the rounding mode (default value is HALF_UP)
- Banana.SDecimal.HALF_UP the amount are rounded to the nearest. The 0.5 are rounded up.
- Banana.SDecimal.HALF_EVEN the amount are rounded to the nearest. The 0.5 are rounded up or down based on the preceding digit.
If the rounding context is omitted no rounding is done.
Rounding context of the accounting file
All Banana document file have a rounding context that can be retrieved with the property Banana.document.rounding (see Banana.document).
Examples:
// no context
var r = Banana.SDecimal.divide('10', '3'); // return '3.3333333333333333333333333'

// with context
var context = {'decimals' : 4, 'mode' : Banana.SDecimal.HALF_UP};
var r = Banana.SDecimal.divide('10', '3', context);        // return '3.3333'
var r = Banana.SDecimal.divide('10', '3', {'decimals':0}); // return '3'

// use the rounding property (accunting file 2 decimals)
var r = Banana.SDecimal.divide('10', '3', Banana.document.rounding); // return '3.33'
Functions
abs(value1, [, rounding])
Returns the value1 without the sign and rounded as indicated
var r = Banana.SDecimal.abs('-10') // return '10.00'
add(value1, value2 [, rounding])
Returns the sum of value1 and value2.
var r = Banana.SDecimal.add('6.50', '3.50'); // return '10.00'
compare(value1, value2)
Returns an integer value
- 1 if value1 > value2
- 0 if value1 = value2
- -1 if value1 < value2
Banana.SDecimal.compare('3.50', '2'); // return '1'
Banana.SDecimal.compare('3.00', '3'); // return '0'
divide(value1, value2 [, rounding])
Returns value1 divided by value2.
var r = Banana.SDecimal.divide('6', '3'); // return '2.00'
isZero(value)
Returns a boolean
- true if value is zero
- false if value is not zero
var r = Banana.SDecimal.isZero('3.00'); // return 'false'
max(value1, value2 [, rounding])
Returns the max of value1 and value2.
var r = Banana.SDecimal.max('6', '3'); // return '6.00'
min(value1, value2 [, rounding])
Returns the min of value1 and value2.
var r = Banana.SDecimal.min('6', '3'); // return '3.00'
multiply(value1, value2 [, rounding])
Returns value1 multiplied by value2.
var r = Banana.SDecimal.multiply('6', '3'); // return '18.00'
remainder(value1, value2 [, rounding])
Divide value1 by value2 and returns the reminder.
var r = Banana.SDecimal.reminder('10', '3'); // return '1.00'
round(value1, [, rounding])
Returns value1 round to the spcified rounding context.
var r = Banana.SDecimal.round('6.123456'); // no context no rounding
r = Banana.SDecimal.round('6.123456', {'decimals':2}); // return '6.12'
roundNearest(value1, nearest, [, rounding])
Returns value1 round to the specified minimal amount.
var r = Banana.SDecimal.roundNearest('6.17', '0.1'); // return '6.1'
r = Banana.SDecimal.roundNearest('6.17', '0.05', {'decimals':2}); // return '6.15'
invert(value, [, rounding])
If positive returns a negative value, if negative returns a positive value.
var a = Banana.SDecimal.invert('5'); //return '-5'
var b = Banana.SDecimal.invert('-2.50'); //return '2.50'
sign(value)
Returns an integer value
- 1 if value > 0
- 0 if value = 0
- -1 if value < 0
var r = Banana.SDecimal.sign('-5'); // return '-1'
subtract(value1, value2 [, rounding])
Subtract value2 from value1 and returns the result.
var r = Banana.SDecimal.subtract('10', '3'); // return '7.00'
Locale conversion
To convert to and from the locale format use the Banana.Converter functions
-
Banana.Converter.toInternalNumberFormat(value [, decimals, convZero])
-
Banana.Converter.toLocaleNumberFormat(value [, decimalSeparator])
var sum = Banana.SDecimal.add('10000', '2000'); // return '12000.00'
var printValue = Banana.Converter.toLocaleNumberFormat(sum); // return "12'000.00"
Banana.Script
Banana.Script represent the interface to the script file and can be accessed through Banana.script. It is used to get the parameters values defined in the script. For example if you want to print out in a report the publishing date of the script.
Properties
Methods
getParamValue(paramName)
Return the value definend in the script file of the parameter paramName. Return an empty string or the internal default value if the parameter is not defined. Return the first found value, if the parameter is defined multiple times.
Banana.script.getParamValue('pubdate'); // returns for example '2016-05-11'
getParamValues(paramName)
Return all the values defined in the script file of the param paramName . Return an empty array if the parameter paramName is not defined.
// Script.js example:
// ...
// @authors = Pinco
// @authors = Pallino
// ...

Banana.script.getParamValues('authors'); // returns ['Pinco', 'Pallino']
getParamLocaleValue(paramName)
Return the localized value definend in the script file of the param paramName. Return an empty string the parameter is not defined.
// Script.js example:
// ...
// @description = English desciption
// @description.it = Descrizione italiana
// @description.de = German Beschreibung
 ...

Banana.script.getParamLocaleValue('description'); // returns 'Descrizione italiana' for a system running with the locale 'italian'.
Banana.Ui
This class Banana.Ui contains methods to interact with user interface.
Methods
createUi(uiFilePath)
Read the file uiFilepath and return an object representing the dialog. The uiFileName has to be in the same directory as the running script. For details and examples see Script dialogs.
If an error occurred undefiend is returned.
Example:
@includejs = ch.banana.calculator.dialog.js;  // Define the class Calculator
                                              // that control the .ui file
...
var calculatorUi = Banana.Ui.createUi("ch.banana.calculator.dialog.ui");
var calcJs = new Calculator(calculatorUi);
calclatorUi.exec();  //Show the dialog
getDouble(title, label [, value , min, max, decimals])
Show the user a dialog asking to insert a double. Return the inserted double or undefined if the user clicked cancel.
var a = Banana.Ui.getDouble("Title text", "Label text");
var b = Banana.Ui.getDouble("Title text", "Label text", "10.0");
getInt(title, label [, value, min, max, steps])
Show the user a dialog asking to insert a integer. Return the inserted integer or undefined if the user clicked cancel.
var a = Banana.Ui.getInt("Title text", "Label text");
var b = Banana.Ui.getInt("Title text", "Label text", "5", "1", "10","1");
getItem(title, label, items [, current, editable])
Show the user a dialog asking to select an intem from a list. Return the selected item or undefined if the user clicked cancel.
var value = Banana.Ui.getItem("Input", "Choose a value", ["a","b","c","d","e"], 2, false);
getPeriod(title, startDate, endDate [, selectionStartDate, selectionEndDate, selectionChecked])
Show the user a dialog asking to select a period like the tab Period. Return an object with the atributes 'startDate', 'endDate' and 'hasSelection' or undefined if the user clicked cancel. Date values are in the format "YYYY-MM-DD".
var period = Banana.Ui.getPeriod("Title text", "2016-01-01", "2016-12-31");
if (period) {
    var selectedStartDate = period.startDate; // return the start date of the selected period
    var selectedEndDate = period.endDate; // return the end date of the selected period
}
getText(title, label [, text])
Show the user a dialog asking to insert a text. Return the inserted text or undefined if the user clicked cancel.
var text = Banana.Ui.getText("Title text","Label text");
showHelp(uiFileName)
Show the help of a dialog. The help is loaded from the Banana.ch web site.
showInformation(title, msg)
Show the user an information dialog.
Banana.Ui.showInformation("Information", 'Insert here the text of the information.');
showQuestion(title, question)
Show the user a question dialog with Yes and No buttons. Return true if the user clicked Yes, otherwise false.
var answer = Banana.Ui.showQuestion("Question title", "Insert here the text of the question");
showText(text)
Show the given text in a dialog. The text can be plain text of html and span over multiple lines. If the text is in html the title is taken form the html. The dialog enable the user to save the content in the formats html, pdf, odf and txt.
The use of pixels to set the font sizes is not supported, the text is not rendered properly.
// Normal text
Banana.Ui.showText("Insert here the text.");

// Html text
Banana.Ui.showText('<html><header><title>This is title</title></header><body>Hello world</body></html>');
showText(title, text)
This is an overloaded function.
Show the given text in a dialog with the given title. The text can be plain text of html and span over multiple lines. The dialog enable the user to save the content in the formats html, pdf, odf and txt.
showText(title, text, options)
This is an overloaded function.
Show the given text in a dialog with the given title. The text can be plain text of html and span over multiple lines. The dialog enable the user to save the content in the formats html, pdf, odf and txt.
Through the object options it is possible to set the following additional parameters:
- codecName: the name of the codec to be used in case the content will be saved as txt file. Default is 'UTF-8'
- outputFileName: the file name without path to be used in case the content will be saved. The path is current open document path or the user's document path.
var options = {
   'codecName' : "latin1", // Default is UTF-8
   'outputFileName' : "prova.txt"
}
Banana.Ui.showText("Title", "some text...", options);
Since Banana 8.0.7
Banana.Xml
The Banana.Xml class is used to parse and access xml data.
Since: Banana Accounting 8.0.5
Introduction
The API Banana.Xml and Banana.Xml.XmlElement implement a subset of the DOM Document Object Model interface. The most used properties and methos are implemented.
For example the list of books in the following xml file:
<Library updated="2016-10-31">
   <Book>
      <Title>Paths of colours</Title>
      <Author>Rosa Indaco</Author>
   </Book>
   <Book>
      <Title>Accounting exercises</Title>
      <Author>Su Zhang</Author>
   </Book>
</Library>
Can be retrieved with the following code:
var xmlFile = Banana.Xml.parse(xml);
var xmlRoot = xmlFile.firstChildElement('Bookshelf');
var updateDate = xmlRoot.attribute('updated');
var bookNode = xmlRoot.firstChildElement('Book');  // First book
while (bookNode) {
   // For each book in the library
   var title = xmlFile.firstChildElement('Title').text();
   var authorNode = xmlFile.firstChildElement('Author');
   var author = authorNode ? authorNode.text() : 'unknow';
   bookNode = bookNode.nextSiblingElement('Book');  // Next book
}
Methods
parse(xml)
The method parse(xml) parses xml data and returns an object of type Banana.Xml.XmlElment that represents the parsed xml. If the xml data is not valid, this method returns null.
var xmlFile = Banana.Xml.parse(xml);
var xmlRoot = xmlFile.firstChildElement('Bookshelf'); // The root element is named 'Bookshelf' in this example
Banana.Xml.XmlElement
The XmlElement class represent an Xml element. See Banana.Xml for an example.
Since: Banana Accounting 8.0.5
Properties
nodeName
The read only property nodeName returns the node name of the xml element.
parent
The read only property parent returns the parent of this Xml element as a Banana.Xml.XmlElment object. If this is the root element, it return null.
text
The read only property text returns the text of this Xml element and their childs.
value
This is a synomin of the property text.
Methods
attibute(name [, defaultValue])
Returns the value of the attribute with the specified name as a string. If no attibute with the specified name is found, the defaultValue or an empty string is returned.
attibuteNS(ns, name [, defaultValue])
Returns the value of the attribute with the specified name and namespace as a string. If no attibute with the specified name is found, the defaultValue or an empty string is returned.
hasAttribute(name)
Returns true is the attribute with the specified name exists.
hasAttributeNS(ns, name)
Returns true is the attribute with the specified name and namespace exists.
firstChildElement([name])
Returns the first child element with the specified name if name is non-empty, otherwise it returns the first child element. Returns null if no such child exists.
var bookNode = xmlRoot.firstChildElement('Book');  // First book
while (bookNode) {
   // For each book in the library
   var title = xmlFile.firstChildElement('Title').text();
   bookNode = bookNode.nextSiblingElement('Book');  // Next book
}
hasChildElements([name])
Returns true if this element contains one or mode elemets with the specified name.
lastChildElement([name])
Returns the last child element with the specified name if name is non-empty, otherwise it returns the last child element. Returns null if no such child exists.
elementsByTagName(name)
Returns an array containing all descendants of this element with the specified name.
nextSiblingElement([name])
Returns the next sibling element with the specified name if name is non-empty, otherwise returns any next sibling element. Returns null if no such sibling exists.
previousSiblingElement([name])
Returns the previous sibling element with the specified name if name is non-empty, otherwise returns any previous sibling element. Returns null if no such sibling exists.
Import Apps
Import filters are import apps that read a custom format and convert in an import format suitable for using with the with the command "Import to accounting".
- For details of the formats see Import data from a txt file.
- For examples see the Github.com template page.
Import Apps
Imports apps are java-script program that read the data to import and trasform and return them as text, in a format comptatible with Banana.
Import Apps have the
- attribute @task defined as one of the import for example //@task = import.transactions
- The parameter in the function exec contains the import data (the content of the file specified in the input box)
- You can specify that the data is read from the file specified on the input box or that the user can select the file with "// @inputdatasource = openfiledialog"
- The import text is returned as a String in the function exec() with the retrun statement
// @api = 1.0
// @id = ch.banana.scripts.import.creditsuisse
// @description = Credit Suisse bank (*.csv)
// @task = import.transactions
// @doctype = nodocument
// @publisher = Banana.ch SA
// @pubdate = 2015-06-21
// @outputformat = transactions.simple
// @inputdatasource = openfiledialog
// @inputfilefilter = Text files (*.txt *.csv);;All files (*.*)
// @inputfilefilter.de = Text (*.txt *.csv);;Alle Dateien (*.*)
// @inputfilefilter.fr = Texte (*.txt *.csv);;Tous (*.*)
// @inputfilefilter.it = Testo (*.txt *.csv);;Tutti i files (*.*)

/**
* Parse the data and return the data to be imported as a tab separated file.
*/
function exec(inText) {
  // parse the inText and set to outText
  // int the return text the data is tab separated
  var outText = "Date\tDescription\tAmount\n";
  outText += "2015-01-31\tExpense text\t100.25\n";
  return outText;
}
Export Apps
Export apps are used to export data in a custom format.
-
Define attribute @task as export.file
// @task = export.file -
Define the extension of the file to be exported.
// @exportfiletype = xml -
The text to be written to the export file is the return value of the exec function and must be a return.
return "exported text". -
When the script terminate and if the return text is not null and does not start with "@Cancel ", the user will be promped with a dialog to choose a file name where to export.
Example
Export all the accounting with description and balance in a xml file.
// @id = ch.banana.apps.export
// @api = 1.0
// @pubdate = 2016-04-08
// @doctype = *.*
// @description = Export into a text file (.txt)
// @task = export.file
// @exportfiletype = txt
// @timeout = -1

function exec() {
var exportResult = '<accounts>';
    var tableAccounts = Banana.document.table('Accounts');
    if ( !tableAccounts) {
      return;
   }
   for (i=0;i<tableAccounts.rowCount;i++) {
        if (tableAccounts.row(i).value('Account')) {
            exportResult += '<account>';
            exportResult += '<accountnr>' + tableAccounts.row(i).value('Account') + '</accountnr>';
            exportResult += '<description>' + tableAccounts.row(i).value('Description') + '</description>';
            exportResult += '<balance>' + tableAccounts.row(i).value('Balance') + '</balance>';
            exportResult += '</account>';
        }
    }
    exportResult += '</accounts>';
    //return the string
    return exportResult;
}
Report Apps
Report apps are java-script programs that are used to customize printouts like invoice documents. The main function printDocument() receives the json object from Banana, writes the document and lunches the result in a print preview window.
Copies of some report apps that you can use as starting point are available at the following address: github.com/BananaAccounting
At the moment this feature is available only within Banana Accounting Experimental.
Important notes
- Banana Accounting uses Qt script engine to execute report apps.
- Mandatory functions: printDocument(jsonInvoice, repDocObj, repStyleObj) which is the main function and settingsDialog() which is called from user to set up parameters like colour or additional text.
- Available json objects: invoice json object, statement json object, reminder json object
- The extension of custom report apps should be .js and the script must contains the main attributes, see Apps Attributes.
- The attribute @id of the script should correspond to the file name.
- System report apps are downloaded to the folder /User/.../AppData/Local/Banana.ch/.../Apps
(Mac Users: /Users/.../Library/Application Support/Banana.ch/.../Apps) - Do not overwrite system report apps because updates will overwrite your changes.
- You can save your report app anywhere, Banana Accounting saves the path to your app in the configuration file /AppData/Local/Banana.ch/.../Apps/apps.cfg
Invoice
Create personalized invoice report apps
We have published our templates on github.com/BananaAccounting. In this section you will find different basic examples.
You can save a copy of one template in your computer and make the changes you wish. In order to use your custom template in Banana you have to:
- select the command Account2 - Customers - Print invoices...
- In the Print invoices dialog select Manage apps...
- In the Manage apps dialog select Add from file... and choose your invoice report file you just created
At the moment this function is available only within Banana Accounting Experimental.
Apps attributes
// @id = scriptfilename.js
// @api = 1.0
// @pubdate = yyyy-mm-dd
// @publisher = yourName
// @description = script description
// @task = report.customer.invoice
Report code
The main function is printDocument(jsonInvoice, repDocObj, repStyleObj). The parameter jsonInvoice object contains the data, repDocObj is the document object and repStyleObj is the stylesheet object where you can add styles.
function printDocument(jsonInvoice, repDocObj, repStyleObj) {
  var param = initParam();
  var savedParam = Banana.document.getScriptSettings();
  if (savedParam.length > 0) {
    param = JSON.parse(savedParam);
    param = verifyParam(param);
  }
  printInvoice(jsonInvoice, repDocObj, repStyleObj, param);
}
The function settingsDialog() is called from Banana when you select the button Params... from dialog Manage apps. You can write any code you need for your script.
/*Update script's parameters*/
function settingsDialog() {
   var param = initParam();
   var savedParam = Banana.document.getScriptSettings();
   if (savedParam.length > 0) {
      param = JSON.parse(savedParam);
   }
   param = verifyParam(param);
   ...
   var paramToString = JSON.stringify(param);
   var value = Banana.document.setScriptSettings(paramToString);
}
Printing custom data
You can add your own parameters in order to print specific data. For instance printing a reference order number or removing payments information if the invoice has already been paid.
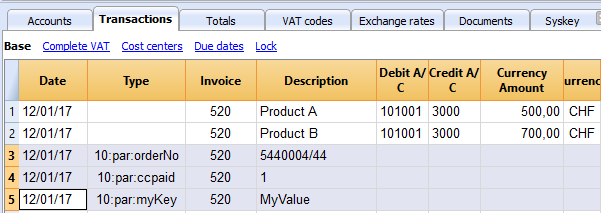
if (invoiceObj.parameters.orderNo) {
    cell1.addParagraph("Reference order: " + invoiceObj.parameters.orderNo);
  }
Printing images
With the command addImage it is possible to add images into the document. For instance
var reportObj = Banana.Report;
var repDocObj = reportObj.newReport();
repDocObj.addImage("documents:logo", "logoStyle");

var logoStyle = repStyleObj.addStyle(".logoStyle");
logoStyle.setAttribute("position", "absolute");
logoStyle.setAttribute("margin-top", "5mm");
logoStyle.setAttribute("margin-left", "20mm");
logoStyle.setAttribute("width", "120px");
If you set the width, the image will be resized to the given width. If the width is not specified the image will be printed with a 72dpi resolution.
Json Object
Invoice Json Object
Data structure you can access through the report:
{
    "billing_info": {
        "payment_term": "",
        "total_amount_vat_exclusive": "500.00",
        "total_amount_vat_exclusive_before_discount": "500.00",
        "total_amount_vat_inclusive": "540.00",
        "total_amount_vat_inclusive_before_discount": "540.00",
        "total_categories": [
        ],
        "total_discount_percent": "",
        "total_discount_vat_exclusive": "",
        "total_discount_vat_inclusive": "",
        "total_rounding_difference": "",
        "total_to_pay": "540.00",
        "total_vat_amount": "40.00",
        "total_vat_amount_before_discount": "40.00",
        "total_vat_codes": [
        ],
        "total_vat_rates": [
            {
                "total_amount_vat_exclusive": "500.00",
                "total_amount_vat_inclusive": "540.00",
                "total_vat_amount": "40.00",
                "vat_rate": "8.00"
            }
        ]
    },
    "customer_info": {
        "address1": "Viale Stazione 11",
        "address2": "",
        "address3": "",
        "balance": "102.60",
        "balance_base_currency": "102.60",
        "business_name": "Rossi SA",
        "city": "Bellinzona",
        "country": "Switzerland",
        "country_code": "CH",
        "courtesy": "Signor",
        "currency": "CHF",
        "date_birth": "1999-10-06",
        "email": "info@test.com",
        "first_name": "Andrea",
        "lang": "it",
        "last_name": "Rossi",
        "mobile": "0033608405",
        "number": "1100",
        "origin_row": "26",
        "origin_table": "Accounts",
        "postal_code": "6500",
        "vat_number": "1234"
    },
    "document_info": {
        "currency": "CHF",
        "date": "20160101",
        "decimals_amounts": 2,
        "description": "",
        "doc_type": "10",
        "locale": "it",
        "number": "201710",
        "origin_row": "1",
        "origin_table": "Transactions",
        "printed": "1",
        "rounding_total": "0.05",
        "type": "invoice"
    },
    "items": [
        {
            "account_assignment": "3000",
            "description": "Prodotto A",
            "details": "",
            "index": "0",
            "item_type": "item",
            "mesure_unit": "",
            "number": "",
            "origin_row": "1",
            "origin_table": "Transactions",
            "quantity": "1",
            "total_amount_vat_exclusive": "500.00",
            "total_amount_vat_inclusive": "540.00",
            "total_vat_amount": "40.00",
            "unit_price": {
                "amount_vat_inclusive": "540.00",
                "calculated_amount_vat_exclusive": "500.00",
                "calculated_amount_vat_inclusive": "540.00",
                "calculated_vat_amount": "40.00",
                "currency": "CHF",
                "vat_code": "V80",
                "vat_rate": "8.00"
            }
        }
    ],
    "note": [
            {
                "date": "2017-04-24",
                "description": "commande=AWO-003530",
                "origin_row": "968",
                "origin_table": "Transactions"
            }
    ],
    "parameters": {
        "ccpaid":"1",
        "orderNo":"5440004/44",
        "myKey":"MyValue"
    },
    "payment_info": {
        "date_expected": "2017-05-24",
        "due_date": "20160131",
        "due_days": "240",
        "due_period": "0_>90",
        "last_reminder": "",
        "last_reminder_date": "",
        "payment_date": ""
    },
    "shipping_info": {
         "address1": "26, lotissement Bellevue",
         "address2": "street2",
         "address3": "street3",
         "business_name": "Company",
         "city": "Clairac",
         "country": "FR",
         "different_shipping_address": true,
         "first_name": "Carla",
         "last_name": "Francine",
         "postal_code": "47320"
    },
    "supplier_info": {
        "address1": "Indirizzo 1",
        "address2": "Indirizzo 2",
        "business_name": "Società",
        "city": "Loc",
        "courtesy": "Signor",
        "email": "info@myweb",
        "fax": "+419100000",
        "first_name": "Nome",
        "fiscal_number": "222",
        "last_name": "Cognome",
        "phone": "+419100000",
        "postal_code": "CAP",
        "state": "Suisse",
        "vat_number": "1111",
        "web": "http://www.myweb"
    }
    "transactions": [
        {
            "balance": "-219.30",
            "balance_base_currency": "",
            "currency": "CHF",
            "date": "20170430",
            "description": "Paiement CERAT DES ALPES* 50 ml - Réf. AL07010",
            "origin_row": "1006",
            "origin_table": "Transactions"
        }
    ],
    "type": "invoice",
    "version": "1.0"
}
Source Data
Invoice Json Object Source Data
This list explains where the actual information on your invoice json object is coming from
| Invoice Object Property | Source |
|---|---|
| customer_info.address1 | Table: Accounts, View: Address, Column: Street |
| customer_info.address2 | Table: Accounts, View: Address, Column: AddressExtra |
| customer_info.address3 | Table: Accounts, View: Address, Column: POBox |
| customer_info.balance | Table: Accounts, View: Address, Column: Balance |
| customer_info.balance_base_currency | Table: Accounts, View: Address, Column: BalanceCurrency |
| customer_info.bank_account | Table: Accounts, View: Address, Column: BankAccount |
| customer_info.bank_clearing | Table: Accounts, View: Address, Column: BankClearing |
| customer_info.bank_name | Table: Accounts, View: Address, Column: BankName |
| customer_info.business_name | Table: Accounts, View: Address, Column: OrganisationName |
| customer_info.city | Table: Accounts, View: Address, Column: Locality |
| customer_info.country | Table: Accounts, View: Address, Column: Country |
| customer_info.country_code | Table: Accounts, View: Address, Column: CountryCode |
| customer_info.courtesy | Table: Accounts, View: Address, Column: NamePrefix |
| customer_info.credit_limit | Table: Accounts, View: Address, Column: CreditLimit |
| customer_info.currency | Table: Accounts, View: Address, Column: Currency |
| customer_info.date_birth | Table: Accounts, View: Address, Column: DateOfBirth |
| customer_info.email | Table: Accounts, View: Address, Column: EmailWork |
| customer_info.fax | Table: Accounts, View: Address, Column: Fax |
| customer_info.first_name | Table: Accounts, View: Address, Column: FirstName |
| customer_info.fiscal_number | Table: Accounts, View: Address, Column: FiscalNumber |
| customer_info.iban_number | Table: Accounts, View: Address, Column: BankIban |
| customer_info.lang | Table: Accounts, View: Address, Column: Language |
| customer_info.last_name | Table: Accounts, View: Address, Column: FamilyName |
| customer_info.member_fee | Table: Accounts, View: Address, Column: MemberFee |
| customer_info.mobile | Table: Accounts, View: Address, Column: PhoneMobile |
| customer_info.number | Table: Accounts, View: Address, Column: Account |
| customer_info.payment_term_days | Table: Accounts, View: Address, Column: PaymentTermInDays |
| customer_info.phone | Table: Accounts, View: Address, Column: PhoneMain |
| customer_info.postal_code | Table: Accounts, View: Address, Column: PostalCode |
| customer_info.state | Table: Accounts, View: Address, Column: Region |
| customer_info.vat_number | Table: Accounts, View: Address, Column: VatNumber |
| customer_info.web | Table: Accounts, View: Address, Column: Website |
| document_info.currency | Invoice currency which usually corresponds to the customer account currency |
| document_info.date | Table: Transactions, Column: DateDocument or Date |
| document_info.decimals_amounts | Decimals are the same as the decimals used in the accounting file |
| document_info.description | Not used |
| document_info.doc_type | Table: Transactions, Column: DocType |
| document_info.greetings |
Table: Transactions, Column: DocType |
| document_info.locale | Menu: File-File and accounting properties, Other, current Language |
| document_info.number | Table: Transactions, Column: DocInvoice |
| document_info.origin_row | Row index of source transaction |
| document_info.origin_table | Table name of source transaction |
| document_info.rounding_total |
Default value for CHF: 0.05 |
| document_info.type | invoice |
| items | Table: Transactions All rows with the same invoice number and transaction date are invoice's items (lines) |
| note | Table: Transactions, Column: DocType Transactions with DocType=10:not. More info... |
| parameters |
Table: Transactions, Column: DocType |
| payment_info | Calculated from journal |
| shipping_info |
Delivery address if different from the invoice address (customer_info) |
| supplier_info.address1 | Menu: File-File and accounting properties, Address, Address 1 |
| supplier_info.address2 | Menu: File-File and accounting properties, Address, Address 2 |
| supplier_info.business_name | Menu: File-File and accounting properties, Address, Company |
| supplier_info.city | Menu: File-File and accounting properties, Address, City |
| supplier_info.country | Menu: File-File and accounting properties, Address, Country |
| supplier_info.courtesy | Menu: File-File and accounting properties, Address, Courtesy |
| supplier_info.email | Menu: File-File and accounting properties, Address, Email |
| supplier_info.fax | Menu: File-File and accounting properties, Address, Fax |
| supplier_info.first_name | Menu: File-File and accounting properties, Address, Name |
| supplier_info.fiscal_number | Menu: File-File and accounting properties, Address, Fiscal Number |
| supplier_info.last_name | Menu: FilevFile and accounting properties, Address, Family Name |
| supplier_info.mobile | Menu: File-File and accounting properties, Address, Mobile |
| supplier_info.phone | Menu: File-File and accounting properties, Address, Phone |
| supplier_info.postal_code | Menu: File-File and accounting properties, Address, Zip |
| supplier_info.state | Menu: File-File and accounting properties, Address, Region |
| supplier_info.vat_number | Menu: File-File and accounting properties, Address, Vat Number |
| supplier_info.web | Menu: File-File and accounting properties, Address, Web |
| transactions | Table: Transactions All rows with the same invoice number and different transaction date, which are not considered invoice items, like payments transactions |
Statement
Create personalized statement report apps
We have published our templates on github.com/BananaAccounting. In this section you will find different basic examples.
You can save a copy of one template in your computer and make the changes you wish. In order to use your custom template in Banana you have to:
- select the command Account2 - Customers - Print statements...
- In the Print statements dialog select Manage apps...
- In the Manage apps dialog select Add from file... and choose your statement report file you just created
At the moment this function is available only within Banana Accounting Experimental.
Apps attributes
// @id = scriptfilename.js
// @api = 1.0
// @pubdate = yyyy-mm-dd
// @publisher = yourName
// @description = script description
// @task = report.customer.statement
Report code
The main function is printDocument(jsonStatement, repDocObj, repStyleObj). The parameter jsonStatement object contains the data, repDocObj is the document object and repStyleObj is the stylesheet object where you can add styles.
function printDocument(jsonStatement, repDocObj, repStyleObj) {
  var param = initParam();
  var savedParam = Banana.document.getScriptSettings();
  if (savedParam.length > 0) {
    param = JSON.parse(savedParam);
    param = verifyParam(param);
  }
  printInvoice(jsonInvoice, repDocObj, repStyleObj, param);
}
The function settingsDialog() is called from Banana when you select the button Params... from dialog Manage apps. You can write any code you need for your script.
/*Update script's parameters*/
function settingsDialog() {
   var param = initParam();
   var savedParam = Banana.document.getScriptSettings();
   if (savedParam.length > 0) {
      param = JSON.parse(savedParam);
   }
   param = verifyParam(param);
   ...
   var paramToString = JSON.stringify(param);
   var value = Banana.document.scriptSaveSettings(paramToString);
}
Json Object
Statement Json Object
Data structure you can access through the report:
{
    "customer_info": {
        "address1": "Viale Stazione 11",
        "business_name": "Rossi SA",
        "city": "Bellinzona",
        "first_name": "Andrea",
        "last_name": "Rossi",
        "number": "1100",
        "origin_row": "26",
        "origin_table": "Accounts",
        "postal_code": "6500"
    },
    "document_info": {
        "date": "20160927",
        "decimals_amounts": 2,
        "description": "",
        "locale": "it",
        "number": "",
        "type": "statement"
    },
    "items": [
        {
            "balance": "540.00",
            "credit": "",
            "currency": "CHF",
            "date": "20160101",
            "debit": "540.00",
            "due_date": "20160131",
            "due_days": "240",
            "item_type": "invoice",
            "last_reminder": "",
            "last_reminder_date": "",
            "number": "10",
            "payment_date": "",
            "status": "",
            "total_amount_vat_exclusive": "",
            "total_amount_vat_inclusive": "",
            "total_vat_amount": "",
            "unit_price": {
            }
        },
        {
            "balance": "540.00",
            "credit": "",
            "currency": "",
            "date": "",
            "debit": "540.00",
            "item_type": "total",
            "number": "",
            "status": "",
            "total_amount_vat_exclusive": "",
            "total_amount_vat_inclusive": "",
            "total_vat_amount": "",
            "unit_price": {
            }
        }
    ],
    "supplier_info": {
        "address1": "Indirizzo 1",
        "address2": "Indirizzo 2",
        "business_name": "Società",
        "city": "Loc",
        "email": "info@myweb",
        "first_name": "Nome",
        "fiscal_number": "numerofiscale",
        "last_name": "Cognome",
        "postal_code": "CAP",
        "web": "http://www.myweb"
    }
}
Reminder
Create personalized reminder report apps
We have published our templates on github.com/BananaAccounting. In this section you will find different basic examples.
You can save a copy of one template in your computer and make the changes you wish. In order to use your custom template in Banana you have to:
- select the command Account2 - Customers - Print reminders...
- In the Print payment reminders dialog select Manage apps...
- In the Manage apps dialog select Add from file... and choose your reminder report file you just created
At the moment this function is available only within Banana Accounting Experimental.
Apps attributes
// @id = scriptfilename.js
// @api = 1.0
// @pubdate = yyyy-mm-dd
// @publisher = yourName
// @description = script description
// @task = report.customer.reminder
Report code
The main function is printDocument(jsonReminder, repDocObj, repStyleObj). The parameter jsonReminder object contains the data, repDocObj is the document object and repStyleObj is the stylesheet object where you can add styles.
function printDocument(jsonReminder, repDocObj, repStyleObj) {
  var param = initParam();
  var savedParam = Banana.document.getScriptSettings();
  if (savedParam.length > 0) {
    param = JSON.parse(savedParam);
    param = verifyParam(param);
  }
  printReminder(jsonReminder, repDocObj, repStyleObj, param);
}
The function settingsDialog() is called from Banana when you select the button Params... from dialog Manage apps. You can write any code you need for your script.
/*Update script's parameters*/
function settingsDialog() {
   var param = initParam();
   var savedParam = Banana.document.getScriptSettings();
   if (savedParam.length > 0) {
      param = JSON.parse(savedParam);
   }
   param = verifyParam(param);
   ...
   var paramString = JSON.stringify(param);
   var value = Banana.document.setScriptSettings(paramString);
}
Json Object
Reminder Json Object
Data structure you can access through the report:
{
    "customer_info": {
        "address1": "Viale Stazione 11",
        "business_name": "Rossi SA",
        "city": "Bellinzona",
        "first_name": "Andrea",
        "last_name": "Rossi",
        "number": "1100",
        "origin_row": "26",
        "origin_table": "Accounts",
        "postal_code": "6500"
    },
    "document_info": {
        "date": "20160927",
        "decimals_amounts": 2,
        "description": "",
        "locale": "it",
        "number": "",
        "type": "reminder"
    },
    "items": [
        {
            "balance": "540.00",
            "balance_base_currency": "540.00",
            "base_currency": "CHF",
            "credit": "",
            "credit_base_currency": "",
            "currency": "CHF",
            "date": "20160101",
            "debit": "540.00",
            "debit_base_currency": "540.00",
            "item_type": "invoice",
            "number": "10",
            "status": "1. reminder",
            "total_amount_vat_exclusive": "",
            "total_amount_vat_inclusive": "",
            "total_vat_amount": "",
            "unit_price": {
            }
        },
        {
            "balance": "540.00",
            "balance_base_currency": "540.00",
            "base_currency": "",
            "credit": "",
            "credit_base_currency": "",
            "currency": "",
            "date": "",
            "debit": "540.00",
            "debit_base_currency": "540.00",
            "item_type": "total",
            "number": "",
            "status": "",
            "total_amount_vat_exclusive": "",
            "total_amount_vat_inclusive": "",
            "total_vat_amount": "",
            "unit_price": {
            }
        }
    ],
    "supplier_info": {
        "address1": "Indirizzo 1",
        "address2": "Indirizzo 2",
        "business_name": "Società",
        "city": "Loc",
        "email": "info@myweb",
        "first_name": "Nome",
        "fiscal_number": "numerofiscale",
        "last_name": "Cognome",
        "postal_code": "CAP",
        "web": "http://www.myweb"
    }
}
Debugging
Use the Debugger
You can debug the script using the internal debugger.
Banana Accounting use the Qt Script Debugger to debug the scripts. Qt is moving the script to a new system, and it is possible that the debugging function wil change or will not be available in the future.
To debug an app
- Menu App, Manage App
- Select the script you want to debug
- Button "Debug".
After the debugger is started click one or more times on the key Shift-F11 until you see the call of the function "exec(inData)", then click F11. At this point you are in the main function of the script.
Use Debugger messages
To see a value of a variable you can also insert a command
Banana.application.addMessage("Hello World");
Debugging import filter
You can debug import filter by istalling the filter as a normal app, and then using the debugging function.
Dialogs
For simple interactions with the user you can use the predefined dialogs of the class Banana.Ui. With those dialogs you can ask the user to insert a value, answer a question, or show to the user an information.
For a more complex dialog:
- Install Qt Creator
- Draw the dialog with Qt Creator
- Save the dialog in a .ui file,
- Load the .ui file in the script through the function Banana.Ui.createUi()
All the properties and public slots of the widgets in the dialogs will be accessible from the script.
Example: a script to search in the whole accounting a text.
The dialog:
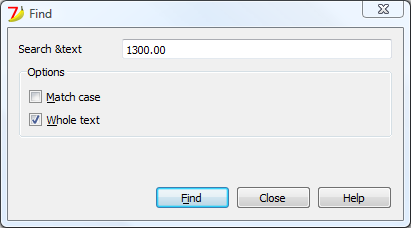
The script file ch.banana.scripts.find.js:
/**
* This example search a text in all the tables of the document,
* and show the matches in the messages pane.
*/
// @id = ch.banana.scripts.find
// @version = 1.2
// @date = 2014-08-29
// @publisher = Banana.ch SA
// @description = Find in whole accounting
// @description.it = Cerca in tutta la contabilità
// @description.de = Suchen in der gesamten Buchhaltung
// @description.fr = Chercher dans toute la comptabilité
// @task = app.command
// @inputdatasource = none
// @timeout = -1

/**
* param values are loaded from Banana.document, edited through dialog and saved to Banana.document
* This array object is like a map (associative array) i.e. "key":"value", see initParam()
* Examples of keys: searchText, wholeText, ...
*/
var param = {};

/** Dialog's functions declaration */
var dialog = Banana.Ui.createUi("ch.banana.scripts.find.ui");

dialog.checkdata = function () {
    var valid = true;

    if (dialog.searchTextLineEdit.text.length <= 0) {
        Banana.Ui.showInformation("Error", "Search text can't be empty");
        valid = false;
    }

    if (valid) {
        dialog.accept();
    }
}

dialog.showHelp = function () {
    Banana.Ui.showHelp("ch.banana.script.find");
}

/** Dialog's events declaration */
dialog.findNextButton.clicked.connect(dialog, "checkdata");
dialog.buttonBox.accepted.connect(dialog, "checkdata");
dialog.buttonBox.rejected.connect(dialog, "close");
dialog.buttonBox.helpRequested.connect(dialog, "showHelp");

/** Main function */
function exec(inData) {

    //calls dialog
    var rtnDialog = true;
    rtnDialog = dialogExec();

    //search text in the whole accounting
    if (rtnDialog && Banana.document) {
        Banana.document.clearMessages();
        searchInTables();
    }
}

/** Show the dialog and set the parameters */
function dialogExec() {

    // Read saved script settings
    initParam();
    if (Banana.document) {
        var data = Banana.document.getScriptSettings();
        if (data.length > 0) {
            param = JSON.parse(data);
        }
    }

    // Text at cursor position
    var cursor = Banana.document.cursor;
    param["searchText"] = Banana.document.value(cursor.table,cursor.row,cursor.column);

    // Set dialog parameters
    dialog.searchTextLineEdit.text = param["searchText"];
    if (param["matchCase"] == "true")
        dialog.groupBox.matchCaseCheckBox.checked = true;
    else
        dialog.groupBox.matchCaseCheckBox.checked = false;
    if (param["wholeText"] == "true")
        dialog.groupBox.wholeTextCheckBox.checked = true;
    else
        dialog.groupBox.wholeTextCheckBox.checked = false;

    Banana.application.progressBar.pause();
    var dlgResult = dialog.exec();
    Banana.application.progressBar.resume();

    if (dlgResult !== 1)
        return false;

    // Read dialog parameters
    param["searchText"] = dialog.searchTextLineEdit.text;
    if (dialog.groupBox.matchCaseCheckBox.checked)
        param["matchCase"] = "true";
    else
        param["matchCase"] = "false";
    if (dialog.groupBox.wholeTextCheckBox.checked)
        param["wholeText"] = "true";
    else
        param["wholeText"] = "false";

    // Save script settings
    var paramString = JSON.stringify(param);
    var value = Banana.document.setScriptSettings(paramString);

    return true;
}

/** Initialize dialog values with default values */
function initParam() {
    param = {
        "searchText": "",
        "matchCase": "false",
        "wholeText": "false"
    };
}

/** Search a text in the accounting's tables */
function searchInTables() {
    var searchText = param["searchText"];
    if (param["matchCase"] === "false")
        searchText = searchText.toLowerCase();
    var tables = Banana.document.tableNames;
    // Tables
    for (var t=0; t < tables.length; t++) {
        var table = Banana.document.table(tables[t]);
        var columns = table.columnNames;
        // Rows
        for (var r=0; r < table.rowCount; r++) {
            // Columns
            for (var c=0; c < columns.length; c++) {
                var textFound = false;
                var text = table.value(r, columns[c]);
                if (param["matchCase"] === "false")
                    text = text.toLowerCase();
                // Find text
                if (param["wholeText"] === "true") {
                    if (text === searchText)
                        textFound = true;
                } else {
                    if (text.indexOf(searchText) >= 0)
                        textFound = true;
                }
                // Show message
                if (textFound) {
                    table.addMessage("Text \"" + param["searchText"] +
                        "\" found in \"" + table.value(r, columns[c]) + "\"", r, columns[c]);
                }
            }
        }
    }
}
The .ui file: ch.banana.scripts.find.ui
<?xml version="1.0" encoding="UTF-8"?> <ui version="4.0"> <class>DlgFind</class> <widget class="QDialog" name="DlgFind"> <property name="geometry"> <rect> <x>0</x> <y>0</y> <width>395</width> <height>192</height> </rect> </property> <property name="windowTitle"> <string>Find</string> </property> <layout class="QVBoxLayout" name="verticalLayout_2"> <item> <layout class="QGridLayout" name="gridLayout"> <property name="horizontalSpacing"> <number>40</number> </property> <item row="0" column="0"> <widget class="QLabel" name="searchTextLabel"> <property name="text"> <string>Search &text</string> </property> </widget> </item> <item row="0" column="1"> <widget class="QLineEdit" name="searchTextLineEdit"/> </item> </layout> </item> <item> <widget class="QGroupBox" name="groupBox"> <property name="title"> <string>Options</string> </property> <property name="flat"> <bool>false</bool> </property> <property name="checkable"> <bool>false</bool> </property> <layout class="QVBoxLayout" name="verticalLayout"> <item> <widget class="QCheckBox" name="matchCaseCheckBox"> <property name="text"> <string>&Match case</string> </property> </widget> </item> <item> <widget class="QCheckBox" name="wholeTextCheckBox"> <property name="text"> <string>&Whole text</string> </property> </widget> </item> </layout> </widget> </item> <item> <spacer name="verticalSpacer"> <property name="orientation"> <enum>Qt::Vertical</enum> </property> <property name="sizeHint" stdset="0"> <size> <width>20</width> <height>15</height> </size> </property> </spacer> </item> <item> <layout class="QHBoxLayout" name="horizontalLayout"> <item> <spacer name="horizontalSpacer"> <property name="orientation"> <enum>Qt::Horizontal</enum> </property> <property name="sizeHint" stdset="0"> <size> <width>80</width> <height>20</height> </size> </property> </spacer> </item> <item> <widget class="QPushButton" name="findNextButton"> <property name="text"> <string>&Find</string> </property> </widget> </item> <item> <widget class="QDialogButtonBox" name="buttonBox"> <property name="sizePolicy"> <sizepolicy hsizetype="Minimum" vsizetype="Fixed"> <horstretch>0</horstretch> <verstretch>0</verstretch> </sizepolicy> </property> <property name="standardButtons"> <set>QDialogButtonBox::Close|QDialogButtonBox::Help</set> </property> </widget> </item> </layout> </item> </layout> </widget> <tabstops> <tabstop>matchCaseCheckBox</tabstop> <tabstop>findNextButton</tabstop> <tabstop>buttonBox</tabstop> </tabstops> <resources/> <connections/> </ui>
FAQ
Can I call an external program within a BananaApp?
For the moment, for security reason we do not allow BananaApps to works directly on file and call external programs.
Can I create QML (QtQuick) apps?
With QML application have extensive access to the computer.
Fot the moment, for security reason we do not allow BananaApps to use QML.
How can I get the start and end date of the accounting?
var openingDate = Banana.document.info("AccountingDataBase","OpeningDate");
var closureDate = Banana.document.info("AccountingDataBase","ClosureDate");
Note: the keywords "AccountingsDataBase", "OpeningDate" and "ClosureDate" correspond to the values in the columns "Section Xml" and ID Xml" of the table "Info file". See command "Info table" under the menu "Tools".
Can I save and recall in a script the values entered by the user?
Yes, use the functions Banana.Document.scriptSaveSettings and Banana.Document.scriptReadSettings.
Settings are saved and restored in the current accounting file under the script id, if you change the id your settings will not be retrieved.
// Initialise parameter
param = {
   "searchText": "",
   "matchCase": "false",
   "wholeText": "false"
};

// Read script settings
var data = Banana.document.getScriptSettings();
if (data.length > 0) {
   param = JSON.parse(data);
}

...

// Save script settings
var paramString = JSON.stringify(param);
var value = Banana.document.setScriptSettings(paramString);
Accented letters are displayed wrong
Save the script file in UTF-8.
Can I protect the app?
If you don't want to someone easily change the js file, you can package it in a rcc file.
Web Server
Dans Banana Comptabilité 7 il est integré un Serveur Web pour acceder aux données par http.
Pour plus d'informations, consulter la page correspondante en anglais.
Import data
See also:
- End user genaral import documentation.
- End user documentation for importing accounting data.
- If you are a developper and do want to test if the import file is correct. Download and install the Banana Software. In Starter Edition mode you can cCreate a new accounting file, use the import in to account function and make all tests you need.
ImportApp
An importApp is javascript program that is executed internally by Banana (when user want to import data) and usually convert data from a proprietary format to a Banana "Text file with columns header".
You can create an ImportApp that does more sofisticated things like:
- Appling an account number based on the content .
For example set the ContraAccount to "3000" if the amount is positive and the "Description" start with "Revenue from " - Use data contained in another banana table to complete the transactions.
- Create a table with (Tools->Add new functionalities->Add simple table) where you list text to look for in the transactions text and the corresponding account to use.
- Assume you invoice data use a customers number that is different from the account number in the Account table.
Add a new column in the Account table and then use the content to retrive the appropriate account number. - Adding a prefix to the supplier invoice number, so that you can easily distinguish incoming and outgoing invoices.
For more information see creating an ImportApp
Import and complete the data imported in Banana
Once the data is imported user can undo the operation or complete or modify the data.
By this way you can delegate to the user to check if the import is correct, if there are changes that need to be done.
Import "Text file with columns header"
The Banana import format is of type "Text file with column headers".
- Fields and column name separator is to be tab separated "\t"
- Each line (after a "\n") is a new record
- Charachter code preferably UTF8 or else the local one.
- The first line contains the columns header name
- You can use any column name existing on the table
- Names a case sensitive and must correspond to the Banana NameXml (English) of the column.
- Starting from line 2 it contains the data to be imported
- The format for the Date fields is yyyy-mm-dd
- The decimal separator is the decimal point "."
- Amount should not have any thousand separator
Two command for import
- Throught the Command in Menu Account1->Import in Accounting.
This is a specialized import for accounting data, with postprocessing of that suitable for the accounting data.- Import Accounts, VatCode, Exchange rate, Invoice number
It use the column name as in the transactions table - Transactions
You have two option:- Double entry account format (same as in the double entry transactions table)
- Income/Expense account (for bank statements)
- Import Accounts, VatCode, Exchange rate, Invoice number
- Throught the command Data import. Import from txt.
You can import data in any table. For accounting data prefer option 1.
Import double entry transactions in CSV format
For what is concerning the specific of the import of double entry see the explanations the Import Double-entry accounting transactions. The only difference is that the Complete transactions with section is active and allows the user to enter the initial document number and the destination account number. Once the import is done, the counterparty account will have to be entered manually.
Menu Account1->Import into account
The type of file to be used is a "Text file with column headers".
Main columns for import
For importing invoices the tab separated import file or translated file usually contains this columns:
- Date of the transaction (2014-12-31).
- DateDocument with the date of the invoice.
- DocInvoice the invoice number.
- Description a brief text.
- AccountDebit the account number of the customer or the general account for customers.
- AccountCredit the account number of the revenue account.
- Amount the amount of the accounting currency.
- VatCode the vat code that should be used.
- AmountCurrency if multi-currency the amount of the invoice in original currency and currency of the AccountDebit.
Example file double entry format
Fields are separated by the tab char (ASCII decimal 11, C language "\t").
In the example the tab charachter is not visible.
Date Doc Description AccountDebit AccountCredit Amount VatCode VatPercentNonDeductible

2018-01-03 Bank to Cash 1000 1020 350.00
2018-01-05 Office Supplies 6500 1000 32.50 E76
Options
- Import using clipboard data will use the content of the clipboard instead of the file
- Autocomplete values Some fields of the transactions are automatically completed (see "Importing transactions for multicurrency double entry accounting").
- Unicode (utf-8) The content of the file is in Unicode utf-8 (it support any character set).
Importing other transaction's columns
You can import any other field that is defined in the transactions table.
There are other alues that we suggest to import if available:
- DateDocument the date of the original document (for example the date of the invoice).
- DocOriginal the document number for example the invoice number.
- DocPayed the document number that has been payed.
- DocLink the address of the file that link to a scanned document (pdf, jpg, ..).
- DateExpiration due date of the invoice.
- ExternalReference a information that help to identify the transactions as unique.
It will be used in future implementation of Banana (in conjunction with the date) to warn a user that the transaction has already been imported.
This should be a externaReference generated by the software that create the transactions to be imported.
We suggest to use a name of the program and a number tha that is unique for the accounting period.
For example "invoice-2013-00001.001" with year, invoice number and a progressive number that is relative to the invoice in case it will be necessary to have more transactions lines for the same invoice.
Importing transactions for multicurrency double entry accounting
By importing multicurrency data there can be rounding or calculation differences due to different development tools used. To avoid such differences you should provide only certain fields and while importing the program will calculate the field values that are missing (with the option "Autocomplete values") .
- If you provide only "AmountCurrency" the program will use the default exchange rate and will calculate the "Amount".
- In order to avoid error provide always the "ExchangeCurrency"
- If you provide the "AmountCurrency" and the "ExchangeRate" and the "Amount" are 0 o not present the program will calculate the exchange rate based on the column "Amount" and "AmountCurrency".
Importing Invoice data
The data of your invoice software can be imported in Banana.
There are two way to do so:
- Let your invoice software generate a file for Banana a indicated in the "Import double entry transaction in txt format".
- Use the data of the export format of your existing invoicing software .
In order to import this data from a proprietary format in Banana you need to create a Javascript BananaApp that translate the data in the format accetable for Banana.
The script program take as input the content of a file and create an output that is a tab separeted text file with columns headers.
See also repository on github.
Invoices on more lines
Most invoices have different items that need to be registered in different revenues accounts or that have different VAT percentage.
In this case for each invoice you neet to have many import lines.
Date, DateDocument, DocInvoice have always the same values.
- The first line you have the
- AccountDebit the customer account number
- AccountCredit is void.
- Amount the total amount of the invoice. The amount due from Customer.
- VatCode is void
- For each item with different revenue accounts or Vat percentage you should have an additional lines
- AccountDebit is void
- AccountCredit the revenue account for this item
- Amount the total amount to be registered on this account.
If you have a VatCode it could be convenient to use the amount without VAT. - VatCode the VatCode that apply to this item.
If the Amount is Net of VAT you should define a VAT Code that is calculated on the net Value.
Group transactions by invoice number
Il the imported data contains the "DocInvoice" columns, when Banana display you a sedond DialogBox, you can choose to have Banana group the transactions by DocInvoice.
In this case Banana automatically create if necessary a transaction for rounding differences.
Use Cost center instead for customer account
If you do not want to keep track of the invoices registered but do not wan't them to be recorded on ordently account you can use the Cost center (CC3). See also Client/Suppliers register.
Import receipts/payment transactions in CSV format (Bank statements)
This format is suitable to import Bank statements in elctorinic format.
- For what is concerning the specific of the import of income/expenses transactions see the explanations Import Income & Expenses accounting transactions.
- The information for the Double Entry import are also partially applicable.
Menu Account1->Import into account
The type of file to be used is a "Receipt/Payment transactions".
- You can use any column name existing on the table
- Column with special meaning are
- Date of the transaction (2014-12-31)
- Description a brief text
- Income: The amount in credit (can also be negative a mount)
- Expenses: The amount in debit
- ContraAccount: the account nember (debit/credit) or category
- Account: If the file contains the movements of multiple accounts, the account of the transaction
- VatCode the vat code that should be used
- IsDetail for composed transactions a "S" identify a counterpart transaction and a "D" a detail transactions
- Fields header in the first line o the file Fields names a case sensitive and must correspond to the NameXml (English)
- Fields and column name separator is to be tab separated "\t"
- Each line (after a "\n") is a new record
- The format for the Date fields is yyyy-mm-dd
Example file Income/Expenses format
Fields are separated by the tab char (ASCII decimal 11, C language "\t").
In the example the tab charachter is not visible.
Date Description Income Expenses ContraAccount Account
2007-01-02 Paper  30.00
2007-01-06 material for photographic competition  259.2  3000
Options
- Import using clipboard data will use the content of the clipboard instead of the file
- Autocomplete values Some fields of the transactions are automatically completed (see "Importing transactions for multicurrency double entry accounting").
Once the import is done, the contra account will have to be entered manually. - Unicode (utf-8) The content of the file is in Unicode utf-8 (it support any character set).
Automated data importing
The import of transaction can be automated using the command.
For further information see "Command line"
Exporting data
Banana Accounting can export in different formats:
It is also possible to create Banana Apps that export the data in specific formats:
Banana software is also trying to improve the data interchange with a new JCSV file format that bring toghether the simplicity of CSV and the advanced data interchange capabilities of Json.
GitHub BananaAccounting
Contribute to BananaAccounting GitHub repository
In order to contribute to BananaAccounting GitHub repository and submit some changes it is necessary to follow some basic steps.
- Install GitHub Desktop
- Fork the repository
- Clone the repository
- Modify or add files to the repository
- Submit the changes
Install Github Desktop
Install GitHub Desktop on your computer, and if you don't have it create your own account.
Fork the repository
The first step is to fork your own copy of the repository you want to work on to your account:
- Go to the Banana Accounting's main page in github
- Click on the repository link
- Click the button Fork on top right of the page
- Select your Account
Clone the repository
The second step is to clone the forked repository:
- Click the green button Clone or download -> Open in Desktop -> Open link
- Click the button Clone and wait a moment while the forked repository is cloned on your local machine.
At this point, you have created on your computer your own copy of the repository, where you can work on the files, create directories etc, as you work as usual.
Modify or add files to the repository
To work with the repository:
- Start GitHub Desktop
- Choose the repository you like to work on
- Menu Repository -> Show in Explorer
- Work on the files, create directories etc, as you work as usual..
- Commit the changes to your own repository by clicking on Commit and then Pull buttons
Submit the changes
To submit changes with GitHub desktop:
- Start GitHub Desktop
- Choose the repository
- Click on Menu Branch -> Create Pull Request
- On the opened page of the browser set:
- base fork: select the BananaAccounting repository (example: BananaAccounting/Netherlands)
- base: select the master branch of the BananaAccounting repository
- head fork: select your own repository (example: YourAccountName/Netherlands)
- compare: select the master branch of the repository
- Click the button Create Pull Request
- Add a comment title and a comment text for the pull request
- Click the button Create Pull Request
Important: Do not click on the "Close Pull Request" button, or the pull request will be blocked!
The repository moderator will receive the pull request, evaluate and approve or refuse the contribution.
You will be automatically notified.