Tools Menu
File info
The File info command, from the Tools menu, displays the characteristics of a file.
Columns
By activating the Complete view also the Xml columns are displayed, through which it is possible to transfer the values automatically when exporting the table.
- Section: the Group name of the values
- ID: the specific and explicit identification of the value
- Description: contains an explanation of the value
- The rows in bold print are the section titles that group the different elements together
- Value: the formatted value
- Section XML: The name of the section in English
- ID XML: the identification in English
- Value Xml: the field contents in Xml format.
The Section XML and the ID Xml identify the value unambiguously.
Add new functionalities
The Add new functionalities command is in the Tools menu. ff
The available option may differ according to the file type.
Add a new simple table
It allows you to add tables completely manage by the user.
Once is added, the table cannot be removed anymore.
You need to indicate the table's name.
The table will have two predefined columns:
- Id column - to indicate a selection group
- Description column - to enter a text
Inside the table you can add new columns with the Columns setup command from the Data menu.
New Documents table
Information are available at the Documents Table page.
Add addresses columns in the Accounts table
For accounting files.
This functions allows you to add, in the Accounts table, specific columns to enter clients, suppliers, or members addresses.
The program will add in the Accounts table the following items:
- the Addresses view, where the addes columns are visible
- the columns that allow you to enter addresses data and other information
- In order to make one or more of these columns visible also in other views, you need to use the Columns setup command from the Data menu.
- In order to create views with specific columns, you need to use the Tables setup command from the Data menu.
Add Budget table
For accounting files.
This function adds a Budget table, where you can enter budget transactions.
The program will do the following operations:
- Add the budget table, that will show the budget data indicated in the Accounts table (if present)
- Lock the budget column in the Accounts table
From now on, the amounts contained in this column, will be calculated based on the budget transactions and on the period defined in the File and accounting properties.
More information are available at the Budget page.
Edit the VAT Amount type column in the transactions
For accounting files with VAT management.
This function allows you to edit the Amount type (VAT amount type) in the Transactions table.
This column allows you to enter, for each transactions, when it is necessary, one of the following VAT amount types:
0 (or empty cell) - it means VAT included (with VAT/taxes)
1 = VAT excluded - it means VAT excluded (without VAT/taxes)
2 = Tax amount - the transaction amount is considered 100% VAT/taxes amount
For each transaction, the programs automatically fills in the data as setup in the VAT Codes table (for each code). If however, exceptionally, this needs to be changed, you can manually enter 1 or 2 in the Amount type column.
Kopie Datei erstellen
Dank Befehl Kopie Datei erstellen aus Menü Werkzeuge wird sofort eine Kopie der geöffneten Datei erstellt.
Die neue Datei ist unter neuem Namen (Menü Datei → Befehl Speichern unter...) zu speichern.
Diese Funktion ist sehr nützlich, wenn man versuchen möchte, Änderungen an der aktuellen Datei vorzunehmen, jedoch jederzeit wieder auf die bestehende zurückkehren kann.
Kopieren oder verschieben von Buchhaltungsdateien
Banana Buchhaltung ist in der Lage, auf jedem beliebigen Laufwerk zu speichern, welches vom Betriebssystem als eine wiederbeschreibbare Disk anerkannt wird.
Von nicht beschreibbaren Datenträgern (CD oder DVD) kann Banana Buchhaltung Dateien ausschliesslich lesen.
*.ac2-Dateien können verschoben werden:
Von einem Verzeichnis (Ordner) in einen anderen:
- Mit Hilfe von Windows-Explorer oder Finder (für Mac) das Verzeichnis (Ordner) suchen, in dem die Dateien gespeichert sind
- Datei/en in das neue Zielverzeichnis (Zielordner) kopieren oder verschieben. Nach dem Einfügen können allenfalls nicht mehr benötigte Datein aus dem Ursprungsverzeichnis (Ursprungsordner) gelöscht werden.
Von einem Computer auf einen anderen:
- Auf einem Memorystick (USB-Speicherstick) oder externen Laufwerk speichern und dann auf dem neuen Computer speichern:
- zu speichernde Datei öffnen
- aus dem Menü Datei den Befehl Speichern unter ausführen und die Einheit mit dem Memorystick (USB-Speicherstick) oder externen Laufwerk auswählen.
- Die Kopie kann ebenfalls durch Starten von Windows-Explorer oder Finder (für Mac) und Ziehen der Datei mittels Maus in die Einheit des Memorysticks (USB-Speichersticks) oder externen Laufwerks erstellt werden.
- Durch Senden per Email (als Beilage/n) und Speichern auf dem neuen Computer.
Buchhaltungsdateien löschen oder umbenennen
Das Programm Banana Buchhaltung hat keine Funktion zum Löschen oder Umbenennen der Datei. Es ist die dafür entsprechende Funktion des Betriebssystems (Windows-Explorer oder Finder (für Mac) zu verwenden.
Dropbox, Google Drive und andere Synchronisierungssysteme
Banana Buchhaltung ist kompatibel mit Systemen zur Synchronisierung der Dateien mit Cloud-Speicher Diensten wie Dropbox und Google Drive.
Banana Buchhaltung überschreibt die *.ac2-Dateien und löscht die *.ac2.bak-Dateien. Im Verzeichnis der gelöschten Dateien können die vorhergehenden Versionen der *.ac2.bak-Dateien gefunden werden.
Die Änderungen anzeigen
Banana Android greift direkt auf dem Dropbox-Server zu. Werden Änderungen am eigenen PC angebracht, muss man in der Regel ein paar Sekunden warten, bis diese auf dem Server bzw. in Banana ersichtlich sind.
Um sicherzustellen, dass die Datei ordnungsgemäss mit dem Server synchronisiert ist, muss die Datei auf dem eigenen PC mit einem grünen Visum versehen sein.
Wenn keine (Sync) Synchronisierungs-Symbole (in grün, rot, blau) erscheinen, ist die auf dem PC installierte Dropbox-Anwendung zu aktualisieren.
Der Synchronisationsstatus auf dem eigenen PC kann auch überprüft werden, indem man unten in der Taskleiste das Dropbox-Symbol anklickt:
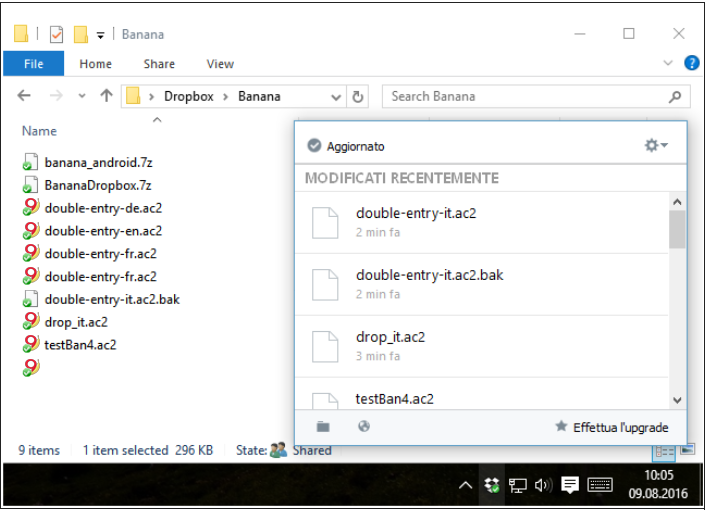
Ausserdem findet die Android-Synchronisation nicht statt, wenn die App geöffnet ist. In diesem Fall die Applikation schliessen und neu starten.
Achtung:
Banana Buchhaltung bemerkt nicht, wenn mit Synchronisierungssystemen verwaltete Dateien gleichzeitig auf mehreren Computern geöffnet und bearbeitet werden. So könnte zum Beispiel vorkommen, dass eine Person Daten löscht oder eine andere neue Daten hinzufügt und nur die zuletzt gespeicherte Version der Datei beibehalten wird bzw. die übrigen Änderungen verloren gehen.
Aus diesem Grunde ist höchste Aufmerksamkeit angebracht, um unbedingt zu vermeiden, dass dieselbe Datei gleichzeitig von mehreren Arbeitsplätzen aus bearbeitet wird.
Sicherheitskopie (Backup)
Wir raten unseren Benutzern, auf jeden Fall externe Sicherheitskopien (Backups) zu erstellen, um einen möglichen Datenverlust, infolge z.B. eines Computerabsturzes oder anderer Ursache, zu vermeiden.
- Auf Mac die Funktion "Time Machine" verwenden
- Auf Windows die Funktion "Datei-Chronik (History)" verwenden.
Im Handel sind auch andere Programme erhältlich, die erlauben, automatische Backups Ihrer Daten zu erstellen.
Speichern und *.bak-Datei
Wird gespeichert, so ersetzt Banana Buchhaltung den Inhalt der vorhandenen Datei mit den neuesten Buchhaltungsdaten; dies jedoch nur, wenn der Speichervorgang erfolgreich verläuft:
- Die Daten werden in einer temporären Datei gespeichert.
Nur wenn der Speichervorgang korrekt abgeschlossen wird werden die gespeicherten Daten mit den zuvor vorhandenen ersetzt. - Wird die Option Backup Datei (*.bak) erstellen (Menü Werkzeuge -> Basiseinstellungen -> Erweitert) aktiviert, benennt das Programm die vorhandene Datei mit dem gleichen Namen und fügt die Erweiterung ".bak" hinzu.
Dadurch wird eine neue Datei "Dateiname.ac2.bak" erstellt, die die Daten vor dem Speichern enthält.
Tritt während des Speichervorgangs ein Fehler auf, z.B. das Netzwerklaufwerk ist nicht mehr verfügbar, ist ein anderer Dateinamen anzugeben, unter welchem die Daten zu speichern sind.
Daten mittels *.bak-Datei wiederherstellen
Kann aus irgendwelchem Grund die Buchhaltungsdatei nicht mehr verwendet werden, so kann auf die Sicherheitskopie zurückgegriffen werden, welche das Programm automatisch erstellt.
So vorgehen:
- Verzeichnis (Ordner) auswählen, in welchem die Buchhaltungsdatei gespeichert worden ist.
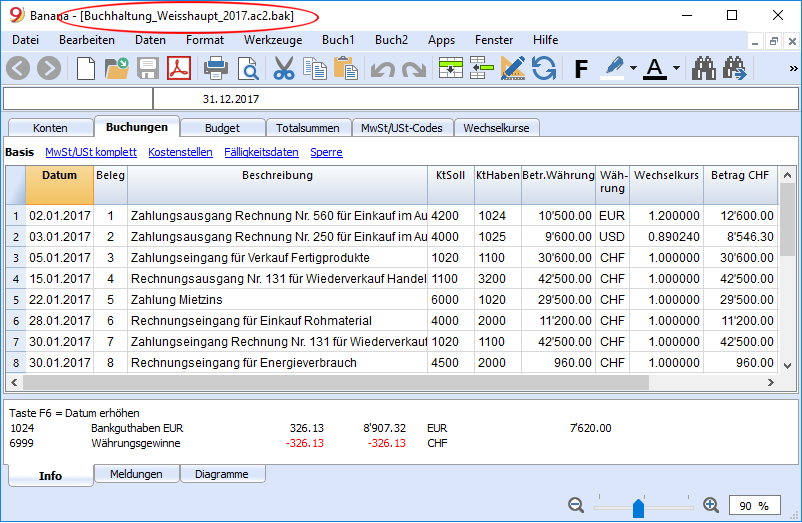
- Datei mit der Ausdehnung .bak öffnen. Falls die Datei nicht im Verzeichnis aufgeführt ist, ist unten im Fenster im Feld "Dateityp" Alle Dateien (*.*) auszuwählen.
- Die Datei nach dem Öffnen mit Namen speichern (Menü Datei, Befehl Speichern unter...), wobei die Ausdehnung .bak zu löschen ist.
- Normalerweise wird die Datei gleich wie die verlorene Datei genannt.
Beschädigte *.ac2-Dateien
Computer sind anfällig für Defekte aufgrund technischer Probleme oder Viren. Es kann ausserdem vorkommen, dass per E-Mail gesendete Dokumente beschädigt ankommen.
Deshalb ist es immer ratsam, Sicherheitskopien zu erstellen.
Wurden Ihre Dateien aufgrund eines technischen Fehlers beschädigt, kann unser technischer Support gegen Bezahlung gerne versuchen, die Daten wiederherzustellen. Bitte stellen Sie uns hierzu Ihre Datei oder Dateien per E-Mail zu und bestätigen Sie uns, dass Sie bei erfolgreicher Wiederherstellung bereit sind, den Unkostenbeitrag gemäss Preisliste zu übernehmen. Bitte vergessen Sie nicht, Ihre Adresse (für die Rechnung) zu vermerken.
Convert to new file
This command converts an existing file (which will not be modified) into another one with different characteristics:
- Change language
- Change the roundings
- Change the file type. For example:
- Pass from an accounting without VAT to one with VAT
- Pass from a Double-entry accounting to a Multi-currency accounting
It is as if you have created a new blank file and then have manually transferred the data.
The existing file characteristics can be consulted by executing the command Tools -> File Info
Creation and data transfer
The Convert to new file command, from the Tools menu:
- Creates a new file of the specified type with the predefined columns setup
- Transfers the data into the new file, proceding with the necessary conversions
- Saves and indicates the name of the new file.
When converting a file with more options into one with fewer options, part of the data will be lost during conversion. If, for example, an accounting file with VAT/Sales tax is converted into an accounting file without VAT/Sales tax, all data in the VAT columns will be lost during conversion.
Passing from a Double-entry accounting to a Multi-currency accounting file
- Make sure that in the File and accounting properties the currency symbol is being specified (which will become the basic currency)
- Choose the Multi-currency accounting as destination
- The program creates a Multi-currency accounting, recovering the existing data:
- The Transactions table includes the columns for managing the Multi-currency accounting, as a currency the basic currency and the exchange rate 1.000
- The existing accounts in the Accounts table are being completed with the basic currency symbol
- You have to add the predefined accounts for exchange rate profit & loss.
- In the File and accounting properties, you have to indicate the predefined accounts for exchange rate profit & loss.
- The Exchange rate table will be empty; it is therefore necessary to add the currencies and exchange rates used in the transactions
- In the Accounts table, the accounts in foreign currency have to be added.
In order to change the currency of an accounting file, see the Accounting tab of the File and accounting properties.
Passing from an accounting without VAT to one with VAT
- Choose the desired type of accounting with VAT as the destination
- The program creates an accounting with the VAT columns, recovering the existing data:
- Add the VAT accounts into the Chart of accounts
- The File properties regarding the VAT need to be completed, and the default acccount on which the VAT must be recorded needs to be indicated
- The VAT Codes table has to be completed with the necessary VAT Codes
With the Import to accounting command -> VAT codes, the VAT codes table of an existing accounting can be imported (for example it can be imported from a default VAT acccounting template).
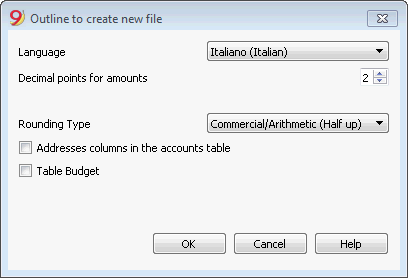
Dialog
- The file type, in which the user is working, is being indicated
- For more information on the language, roundings and decimals, go to the File and accounting properties (from the File menu)
- A list with different options appears
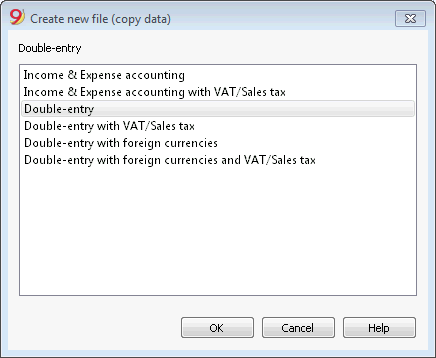
Outline to create new file
For more information, please consult the specific page.
Merge file
Il is possible to merge two files, but they have to belong to the same group (for example two double-entry accounting files). It is not possible to merge files belonging to different groups (for example one double-entry accounting file and one simple accounting file).
In order to successfully merge two files, it is crucial that they have the same accounts numbering. Proceed as follows:
- Open the file which will contain the data of both files
- Select the Merge File command from the Tools menu
- Select the path and the name of the file to be merged
- Confirm the merge operation
- If the files are not the same, even though they belong to the same group, (for example, accounting with VAT/Sales tax and accounting without VAT/Sales tax), a message will appear advising the probable loss of data.
Program options
In the Program options window, several technical options are possible for the accounting file.
In the following pages you will find more detailed information.
Interface
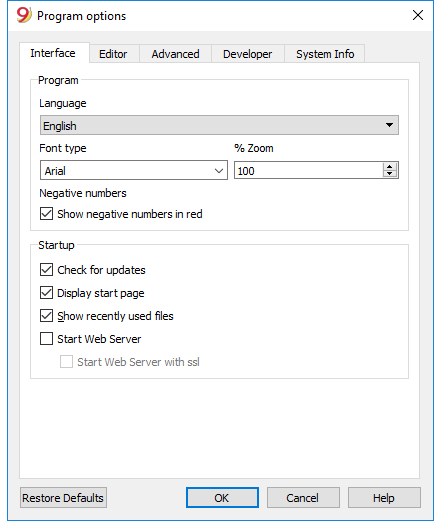
Program
Language
The Program Language is the language used by the program. Use this drop-down menu to select a language if the user wants to use a language different from the default or if the default is not available.
Font type
This drop-down menu allows the user to select the desired font.
%Zoom
If the user wants the data on the table to be shown in another size, adjust the percentage of Zoom here.
Show negative numbers in red
The negative numbers and amounts will be shown in red in the tables.
Startup
Check for updates
This option establishes a connection to the Banana.ch SA website and checks if there is an update compared to the version that is used.
Display start page
The news start page is shown.
Show recently used files
In the File menu, all the most recently used files are listed.
Start Web server
Makes it possible to access Banana Accounting data through external programs.
Editor
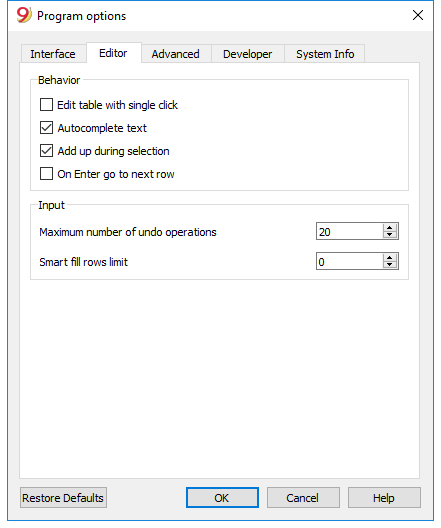
Behavior
Edit table with single click
By activating this option, a single click on the selected cell is sufficient to enter in the modification mode. If the function is not activated, you have to double-click on the cell in order to enter in the modification mode.
Autocomplete text (Smart fill)
By activating this option, the program automatically selects the first draft text in the drop down list and automatically fills it in the row where you are.
Add up during selection
By activating this option, the program will add up the selected amounts. Deactivate this function if this instantaneous addition slows certain operations down. One can select non-adjacent amounts by holding down the Ctrl key while selecting individual cells with the left mouse button.
On Enter go to the next row
By activating this option, the cursor will place itself on the next row when pressing the Enter key.
Input
Maximum number of undo operations
Insert the maximum number of undo operations (one at a time) when using the Undo command from the Edit menu.
Smart fill rows limit
When inserting data, the program reads the data that has already been entered and tries to suggest how to complete an entry. In cases where there are many rows, this function could slow down the process.
The user can define a limit for the number of rows, above which the smart fill will not be used. If there is no value entered or zero, smart fill will always be used.
Advanced
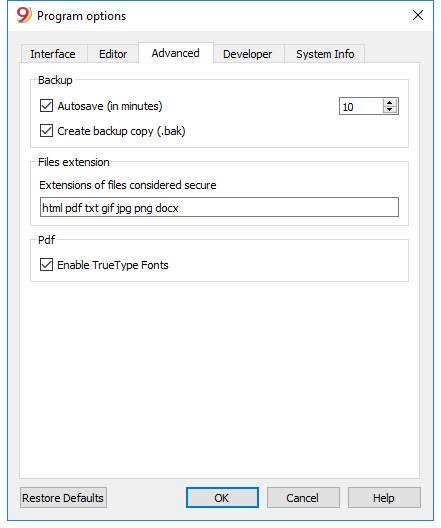
Backup
Autosave (in minutes)
This option allows saving the file automatically according to the desired frequency (in minutes). The program saves the data in a file called auto backup + file name. If the program or the computer crashes, the data can be recuperated by opening this file and saving it with a name (Save as...) from the File menu.
Create backup copy (.bak)
When the user saves to disk using the same name, the version of the file that already existed is renamed with a .BAK extension.
Files extension
Extensions of files considered secure
This option defines the file types (ex.: "pfd", "jpg", ...) or the url schemes (es.: "http:", "x-devonthink-item:", ...) that the software consents to open with a double click on the DocLink column of the Transactions table. This prevents from opening non-secure files by the program. Extensions should be inserted without the initial point '.', while the schemes must be inserted with a final double dot ':'.
Enable TrueType fonts
If this option is enabled, the font selected in the Interface tab is used when printing PDF files, otherwise a native PDF file type (Helvetica or Times New Roman) is used. This option must be disabled if in the generated PDF files the texts are unreadable.
Restore Defaults
If some settings have been altered, by using this button, the default settings will be restored.
Developer
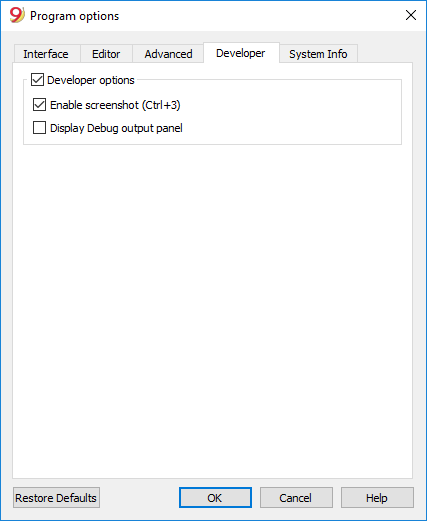
Developer options
This tab includes useful options fors cripts, apps and http pages developers for Banana Accounting.
Enable Screenshots (Ctrl+3)
If this option is activated, with the key combination Ctrl + 3 it will be possible to save screenshots of the program tables and dialog windows.
For more information please also check the Taking screenshots page.
Display Debug output panel
If this option is activated a 'Debug output' panel is shown on the bottom of the main window. In this panel all debug messages are shown to the user. Debug messages allow to check that the program is working properly during scripts or add-ons execution or during web server calls. This option is meant for scripts, add-ons or http sheets developers. For further documentation see the page Debugging.
Taking screenshots
This feature is available by using the key Ctrl+3. Facilitates the capture and saving of a program image.
In order to use this feature you need to activate it via the Tools menu -> Program options -> Develper tab -> Enable schrrenshot (Ctrl + 3)
It is useful for preparing documentation, as it only captures the part of the program windows that you are interested in.
Capturing the image
When capturing an image we advise you to use a 90% zoom, so more data will fit in the image but you still get readable texts.
- Capture all
It creates an image of the full Banana window. - Capture table and info window
It only captures the table and the info window below the table (without menus, toolbar and status bar). - Capture table
It only capture the table - Capture columns
It only captures the table, and only up to the maximum columns width (it doesn't include the white spaces).
Resize window (pixel)
It resizes the program window to a pre-defined size, so if you take multiple shots you always have the same size.
Hide / Show window's compontents
It allows you to see more table rows, by hiding the toolbar, the info window and the status bar.
Windows - How to remove the dialog windows shadow
Windows 8 e 10 "enhance" their dialog windows by adding a shadow to them. When capturing the window image you therefore also see the background.
In order to avoid this you can proceed as follows:
- From the Windows search box type Sysdm.cpl
- Go to the Advanced section
- Visual effects Settings
- Uncheck the option Show shadow
System Info
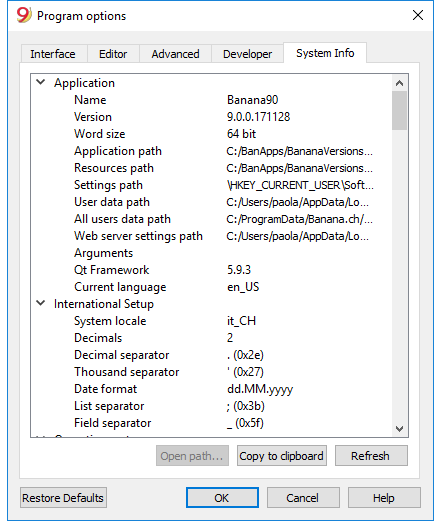
The System Info card displays information on the Operating System and the work environment. Our technical support might ask for this information. In this case, click on the "Copy to Clipboard" button and paste the data in the e-mail or the contact form.