Extensions Menu
These are extensions of the program's functionalities, for reporting, calculating, exporting, importing, establishing bills and reminders and other.
They need to be set up by the user by clicking the appropriate button in the Manage Extensions dialog from the Extensions menu.
Execution takes place via the Extensions menu or within the specific functionality (for example: Import into accounting).
The Extensions menu lists all the already installed Banana Extensions related to the file that is open at the moment. By selecting the command, the indicated Extension will be executed.

Manage Extensions
The Manage Extensions... command allows you to search for, install, alter your settings or uninstall Banana Extensions.
Installing a new Extension
For installing a new Extension, visit our Manage Extensions... page.
Technical information on Banana Extensions
Herewith some technical information on Banana Extensions
- They are programs in Javascript that make use of API's available in Banana Accounting.
- They are very secure and cannot perform functions that might an impact on the operating system.
- Single Extensions.
A text file with the .js extension, which contains a program in Javascript, indicating the characteristics to be a Banana Extensions. - Extension package
A compressed file with the .sbaa extension, which can contain several other files, necessary for the application, such as commands, images, dialogues. A package can contain several commands. The title of the package and the commands it contains are indicated in the Extensions menu.
If you disable a package, all Extensions will be disabled.
Prerequisites for running Extensions
The commands for running Banana Extensions are only made available if the current file (the one on which you are working) has the features required by the Extensions. If an app is not visible in the Extensions menu or is not executable, it will be because none of these features are present.
- Extensions are available in specific context:
- Productivity
Commands that can be recalled in the Extensions menu. - Import.
Available via the Import into accounting command. - Export.
Available in the Extensions menu. The user should define the file name at the end of the process. - Invoice report
Prepares the invoices to be printed. Available via the Print invoices... command (Account2 menu → Clients). - Reminder report
Prepares the reminders to be printed. Available via the Print reminders... command (Account2 menu → Clients). - Statements.
Prepares the statements to be printed. Available via the Print statements... command (Account2 menu → Clients).
- Productivity
- Association via a File Type.
This requires the current file to be - for example - an Accounting file, or the double entry file, or addresses. - Association via a property.
Some Apps will only be executable if the relevant word is specified in the File properties, Other section (from the File menu).
For example, the List of Administrators to be printed, that require specific fields, will require the word "Administrator".
Develop your own Extensions
Anyone can create Banana Extensions that extend the functionality of the program. However, programming fluency is required..
To develop a Banana Extension, it is recommended to set out from an existing project.
- Start from an example available on the github.com \ BananaAccounting site
- Please refer to the developer documentation.
- Install the application via the Manage extensions command (from the Extensions menu).
Manage Extensions
This dialog window allows you to install, modify settings and uninstall Banana Extensions.
Install an Extension in order to be able to use it.
Installing a new Extension
To install an Extention, proceed as follows:
- Choose the 'language' and 'country'
- From the left menu, select Online
- Select the Extension type (e.g. productivity)
- Look for the desired Extension among those listed; or in the Search box, type the name of the Extension you want
- Click on the Install button
- Click on the Close button
Below are the available Extensions :
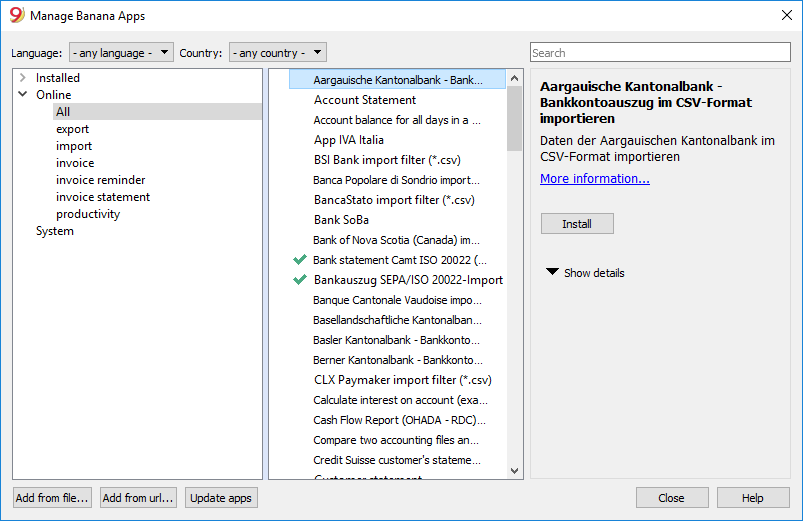
The installed Apps will be visible in the Extensions menu.
List of Extensions
This list shows the installed Banana Extensions and those available for installation.
- The check sign will indicate that the App is installed.
- The App denomination
- Information on the Banana Extension.
- Description
- Link for main information, will open the relative internet page
- Last update
Banana Extension date and hour
Local Banana Extension date and hour (as per imported file) - Category
Typology of the Banana Extension - Nation
Nation where Extension can be used. International will indicate that Extension can be used in several nations - Install button
Download Banana Extension for local use
- Information on installed Extensions
- The ">" symbol preceding a packet will designate a Banana Extensions packet, that contains several commands.
- Enable
If the enabled box is not checked, the Extension will not figure in the menu. For a packet, single commands may me deactivated. - Automatic update.
When a new version is made available, it will download automatically. - Required properties.
For an Extension to function properly, the Extension properties must be set up in the File and accounting properties (from the File menu - Other tab). - "Apply properties" button
Will apply new properties for your file - "Execute" button
Will execute the specific command.
This button will only highlight if the App is applicable in the context of your current file.
For example, a multi-currency function will only be applicable if the file has been created as a multi-currency accounting file. - "Settings" button
Certain Extensions allow you to set the settings for execution of your task. They will be related to your currently open file. If you use the same App with another file you must redefine the settings.
In the invoice reports, for instance, we indicate the elements necessary for printing. - "Uninstall"button
Will uninstall the App or the packet.
Search Extensions
Extensions are listed according to the following selection criteria:
- Language
- Nation
- Text
- Installed
Displays locally installed Apps. - Online
List of online available Apps. - System.
List of preinstalled Apps. You may enable or disable via the check box.
Help (bottom button)
It links to this page.
Add from file
Let's you add a Banana Apps from a local file. Indicated especially for development of new Apps..
- The file needs to always remain in the same directory.
- If the App is modified, the program will always use the last version.
Add fro URL
Allows you to install Apps present in the list of Apps available on the www.banana.ch website.
Update Extensions
Downloads the filter's most recent version from Banana Accounting's server.
The downloaded Extension should not be modified because they will be overwritten when updated.
If there are new Extensions , they will be added to the list. The imported filters will not be modified.
The Extensions will be installed in the user folder. Thus only the user who imported the new Extensions or updated the available ones will see them. To install Extensions for all users or at a system level, a manual procedure for installing the Extensions would need to be followed.
Erweiterungseinstellungen
Bei einigen Erweiterungen können Sie Einstellungen festlegen, die von der Erweiterung verwendet werden.
- Die Einstellungen können mit dem Dialog eingerichtet und geändert werden.
- Beim Start werden die Einstellungen mit den Standardwerten eingegeben.
- Die Parameter beziehen sich auf die Buchhaltungsdatei.
- Ein Erweiterungspaket kann mehrere Erweiterungen enthalten, weshalb es mehr Parameter pro Paket geben kann.
Einstellungendialog 'Erweiterungen'
Der Inhalt des Dialogs ist für jede Erweiterung unterschiedlich.
In der folgenden Abbildung wird das UNI10-Rechnungslayouts dargestellt.
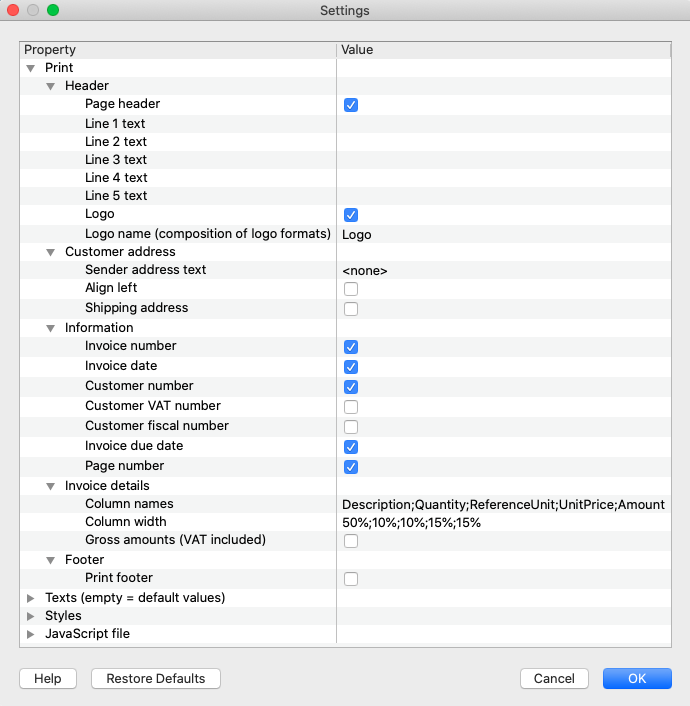
Wert-Eingabebereich
Der Einstellungsdialog ist als Elemente strukturiert, die jeweils Unterelemente enthalten:
- Spalte Eigenschaften.
- Hier sind die Optionen aufgeführt, mit denen Sie die verschiedenen Einstellungen in der Spalte Wert ändern können.
- Spalte Wert.
- Für jede Option gibt es einen zugehörigen Wert in der Spalte Wert. Durch Anklicken können Sie einen Wert eingeben, einen vordefinierten ändern oder einen bestehenden löschen.
Schaltflächen
Am Ende des Dialogs befinden sich die folgenden Schaltflächen:
- Hilfe.
- Die Hilfe-Schaltfläche verweist auf die Dokumentationsseite der von Ihnen verwendeten Erweiterung.
- Voreinstellungen.
- Durch Klicken auf diese Schaltfläche werden alle Standardwerte der Spalte 'Wert' wiederhergestellt.
- Abbrechen.
- Bricht den Dialog ab und schliesst ihn, ohne Änderungen vorzunehmen.
- OK.
- Bestätigt und speichert die eingegebenen Einstellungen.
Wurden diese versehentlich gespeichert, kann man durch Anklicken des Befehls Abbrechen zur vorherigen Situation zurückkehren.
- Bestätigt und speichert die eingegebenen Einstellungen.
Begeben Sie sich in den Einstellungendialog
Sie können auf folgende Weise auf die Dialog-Einstellungen zugreifen:
- Aus Menü Erweiterungen → Erweiterungen verwalten rechts auf die Schaltfläche Einstellungen klicken.
- Über die Schaltfläche Einstellungen in der Druckvorschau des von der Erweiterung generierten Berichts.
- Für Rechnungen über das Menü Buch2 → Kunden → Rechnungen ausdrucken, Bereich Layout, Schaltfläche Einstellungen.
Installing an App offline
In order to install an App in an offline mode proceed as follows:
- connect yourself to our Apps webpage, using a different computer connected to the internet
- download the App that you need (a .js or .sba file ) and save it on a USB key or other device
- copy the App on the computer without internet connection
- Open Banana Accounting from your computer without internet connection and open your accounting file
- from the Apps menu, choose the Manage Apps command
- click on the Add from file button and select the path were you saved the App
- the App will now be included in the installed Apps and in the Apps menu
Print label
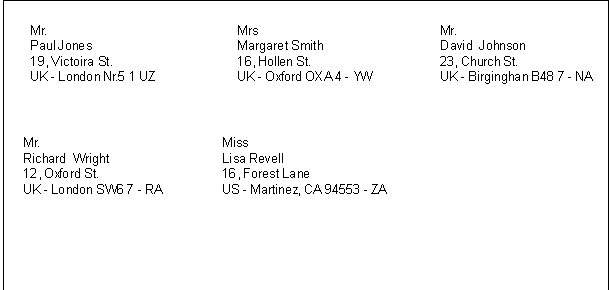
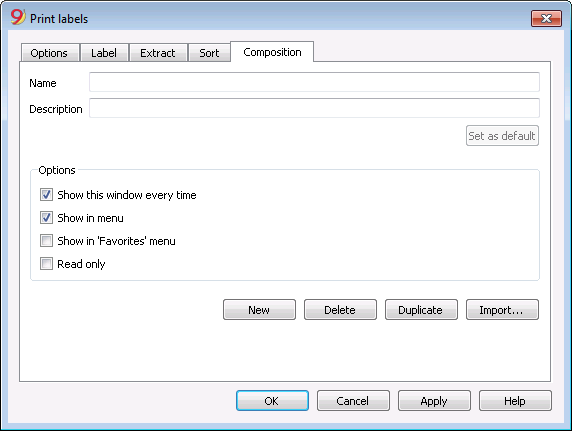
From the Labels -> Print command from the Apps menu, you can print the addresses. In the different tabs you can choose different settings, from the label format to le selection of the addresses to be sorted and printed. Each setting can be saved with the Compositions.
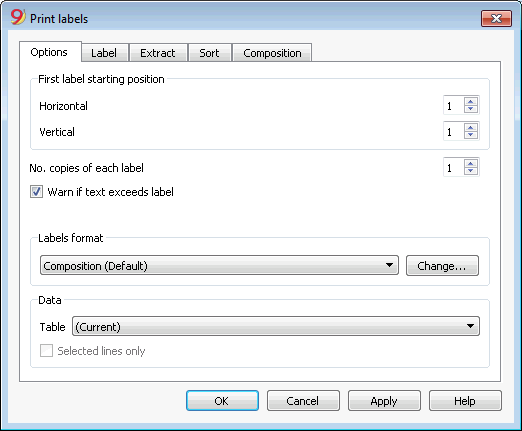
For the explanations of the different tabs, please consult the following pages.
Options
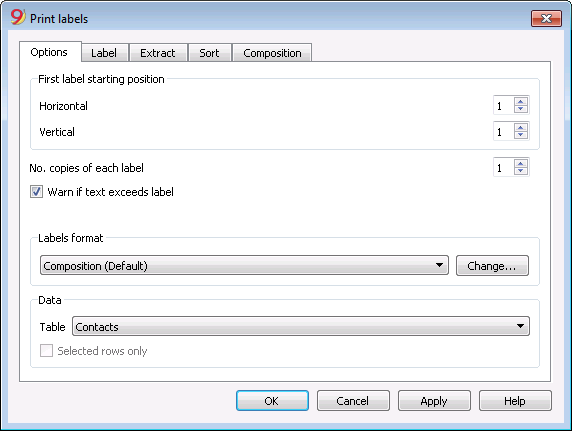
First label starting position
Decide on the position of the first label. For example, if 1 is entered in the horizontal and vertical fields, it refers to the upper left-hand corner of the page.
Number of copies for each label
The value of 1, in this field, means only one copy of each label is wanted.
Warn if text exceeds label
If the text goes beyond the margins for the label, the program will warn the user by sending an error message if this cell is activated.
Labels format
You can choose between the label formats available in the list.
If the list doesn't have the format you wish, through the Change button, you can access the Label format dialog windos where you can choose your desired settings.
Data
Indicate the data source for the labels to be printed:
- Table - the current table data will be printed. If a data extraction occurred, only the extracted data will be printed.
- Addresses - all table addresses will be printed
- Selected rows only - only the earlier selected addresses will be printed.
Label
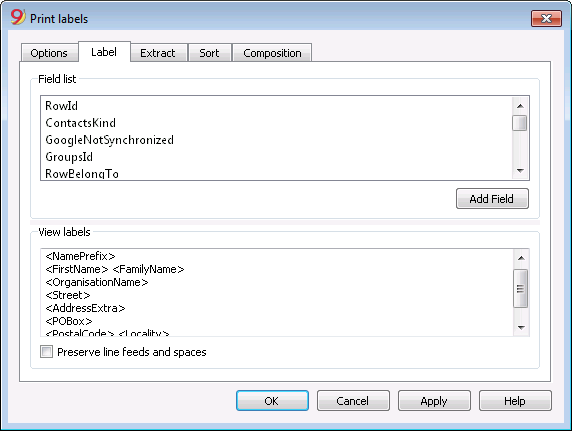
Field list
This is a list of all possible label fields; to insert a field, it is possible to work in two ways:
- Double-click on an element from the list
- Click on an element from the list, confirming with the Add Field key.
The field selected will be inserted at the position of the cursor in the View labels area. One can directly insert fields by writing the field name between the < Less and > Greater symbols.
View labels
Shows the disposition of the fields. The entries "<NAME FIELD>" will be replaced with the corresponding value of the table.
The symbols Greater and Less are considered field delimiters. In order to make them appear in the text
write "\<" for "<";
write "\>" for ">"
and write "\\" for "\"
Preserve line feeds and spaces.
In case this option is deactivated, the program does not take eventual spaces and empty rows in consideration.
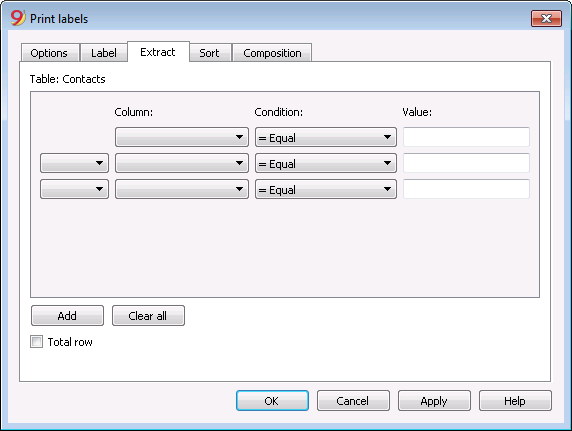
Extract
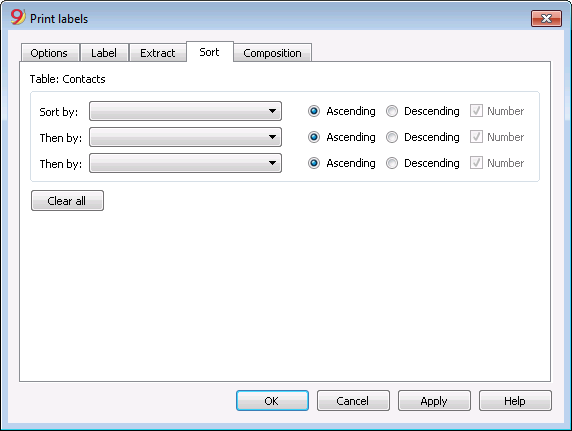
Sort
Composition
Labels format
From the Apps menu, Labels command, Formats option, you can access the labels setup.
The program already offers many predefined label formats; it is however possible to setup personalized parameters through the Default command.
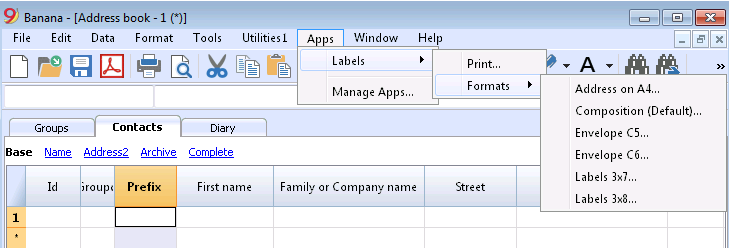
The program already offers many predefined label formats; it is however possible to setup or edit the default parameters, as well as your customized ones, through the Composition (Default) command.
Page settings - Options
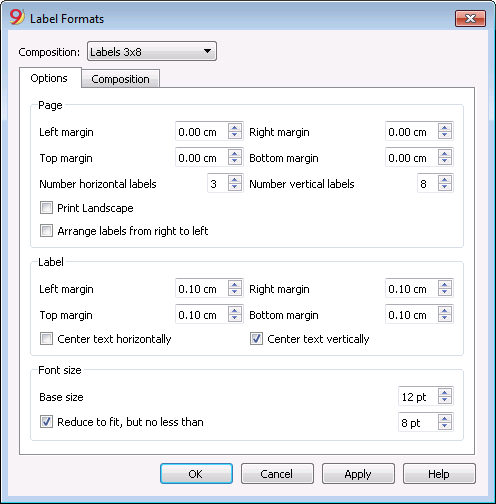
Page
Margins
Input the size in centimeters; if no size is entered, the margin sizes will be zero.
Number of horizontal labels
Input the number of horizontal labels there are on the page.
Number of vertical labels
Input the number of vertical labels there are on the page.
Print Landscape
The page will be printed horizontally if this cell is activated.
Arrange labels from right to left
The labels will be printed from right to left and from top to bottom.
Label
Margins
It is possible to input a margin for each label; the values for the label margins must be input in centimeters.
Center text horizontally
Select this option to horizontally center the text for each label in the cell.
Center text vertically
Select this option to vertically center the text for each label in the cell.
Font size
Base size
This field shows the default font size.
Reduce to fit, but no less than
The program calculates the maximum font size possible for a given label, starting from 14 points all the way down to 8 points. The calculation is made taking into account both the height and width of the label. If a label has a line that is too long (or has too many rows) to be printed, then an error message will appear in the message window. Even if it is incomplete, the label will still be printed.
Note:
the printers will not print on the whole surface of a page because they need minimum margins. The program tries to adapt the single labels to the margin values required by the printer.
Page settings - Composition
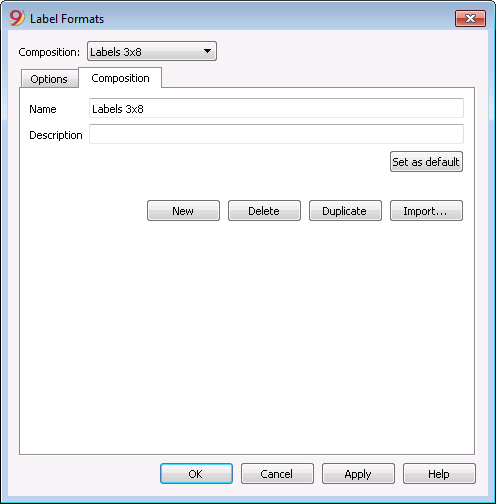
All the settings that have been activated in the "Options" tab can be saved by using the Compositions and can be displayed when needed.
For more information on this section, consult the Composition page.