How-to for Extension
Build your first Extension
Introduction
This walkthrough provides step-by-step guidance for creating a simple BananaApp that uses JavaScript API to interact with Banana Accounting software.
The “Hello World!” program is a classic tradition in computer programming. It is a short and complete first program for beginners, and it is perfect as first BananaApp example.
There are three basic steps in order to experiment with BananaApps:
- Create the JavaScript file
- Install the BananaApp
- Run the BananaApp
Create the JavaScript file
-
Use a text editor. Download a text editor from your choice (Notepad++, Sublime Text, etc.) that will let you code in a simple way.
It is important to be sure you can save with the UTF-8 encoding. -
Copy the following JavaScript code and paste it on your text editor.
// @id = ch.banana.app.helloworldexample // @api = 1.0 // @pubdate = 2018-10-24 // @publisher = Banana.ch SA // @description = BananaApp example: Hello world // @task = app.command // @doctype = *.* // @docproperties = // @outputformat = none // @inputdataform = none // @timeout = -1 function exec() { //Create the report var report = Banana.Report.newReport("Report title"); //Add a paragraph with the "hello world" text report.addParagraph("Hello World!"); //Print the report var stylesheet = Banana.Report.newStyleSheet(); Banana.Report.preview(report, stylesheet); } - Change the attributes of the BananaApp (for more information, see Apps attributes):
- @id = <your_script_id>
This is the identification of the script.
In order to avoid duplicates, it is important to assign a unique id at avery script. - @description = <your_script_description>
This is the name of the BananaApp. The text will be displayed in the dialogs.
- @id = <your_script_id>
- Save the file as helloworld.js.
You have now created your first BananaApp!
Install the Extension
What next? The next step is to install your Extension into the Banana Accounting software.
Before to use the Extension , and see the "Hello World!" text displayed as report in Banana, the App needs to be installed.
So, let's see how to install the "Hello World!" Extension.
- Open an accounting file in Banana Accounting
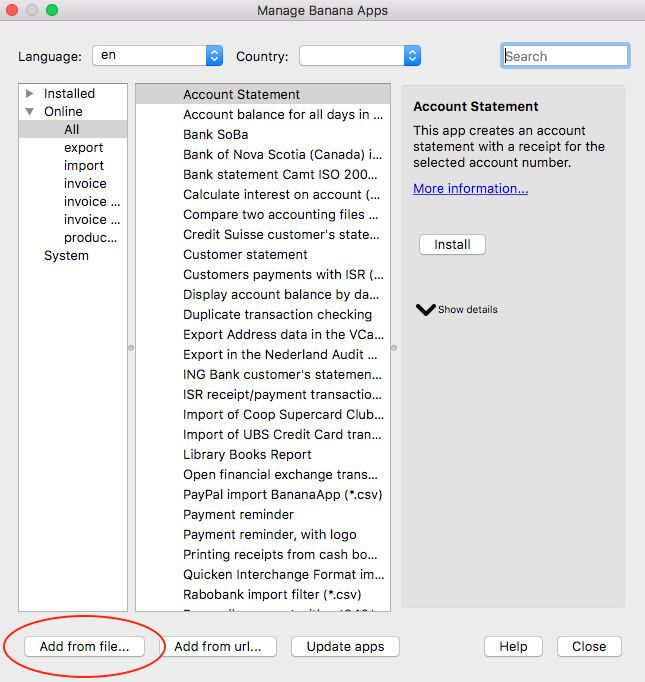
- In Banana select from the menu Apps the command Manage Apps...
- Click on Add from file...

- Select the helloworld.js file.
- Click on Open to install the App.
- The Extension is displayed in the dialog.
By Selecting Installed from the left, all the installed Extensions (both local and online apps) will be displayed.

- Click on Close to close the Manage Banana Apps dialog
You have now installed the Extension!
Important:
- Once installed, the JavaScript file needs to always remain in the same directory.
- If the JavaScript file is modified, the program will always use the last version.
Run the Extension
Finally, now it is possible to run the "Hello World!" Extension and see the results.
To run the app:
- In Banana select from the menu Apps the Example Hello World app.

- The app is executed and returns the following reports

Congratulations, you have now created, installed and executed your own BananaApp!
Uninstall the Extension
In case you don't need an installed Extension anymore, it is also possible to remove it from Banana Accounting software using the uninstall command.
- In Banana select from the menu Apps the command Manage Apps...
- Select the Installed section on the left in order to display all the currently installed Extensions.
- Select the Extensions you want to remove and click Uninstall.
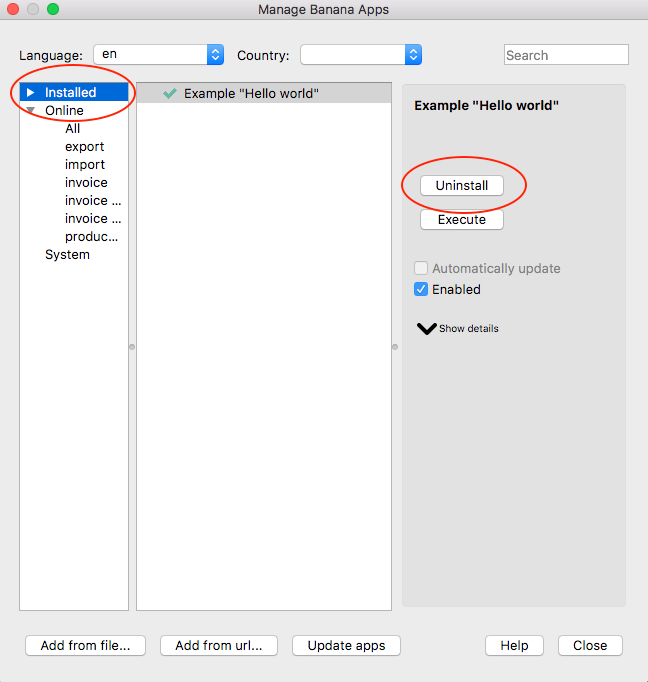
- Confirm with Ok to remove the App from Banana Accounting software.

The Extension is now removed from Banana Accounting software, but the JavaScript file (i.e. helloworld.js) is not removed from you computer.
More about Extensions
- JavaScript API
- Extensions documentation
- Working with Report Tables
- Experiment with embedded Extensions
Experiment with the API
Banana does allow to have Extensions that are embedded within a Banana File.
We have prepared tutorial files that include samples code for most API.
- You can see how the API works and experiment with it.
- Just download and open a tutorial file in Banana.
See explanation Embedded Extensions JavaScript Tutorial on Github.
Install an Extension
In Banana Accounting anyone can create Extensions to add new functionalities.
Install an Extension from a local file
- In Banana select from the menu Apps the command Manage Apps...
- Click on Add from file...
Manage Banana Apps dialog
- Choose your JavaScript (.js) file
- Click on Open to install the App
- Click on Close to close the Manage Banana Apps dialog
At this point, the BananaApp is installed and ready to be used.
Important information:
- Once installed, the file .js needs to always remain in the same directory.
- If the App is modified, the program will always use the last version.
Run the Extension
In Banana select from the menu Apps the App you have installed.
Uninstall the Extension
- In Banana select from the menu Apps the command Manage Apps...
- Select an App from the Installed section and click on Uninstall
Manage Banana Apps dialog
- Click on Close to close the Manage Banana Apps dialog
Create personal Invoice Layout
In Banana you can create your own Invoice Layout.
A Layout is an Extension that is specific for printing an Invoice.
The following steps describe how to create an invoice template starting from an existing one and adapting it to your needs.
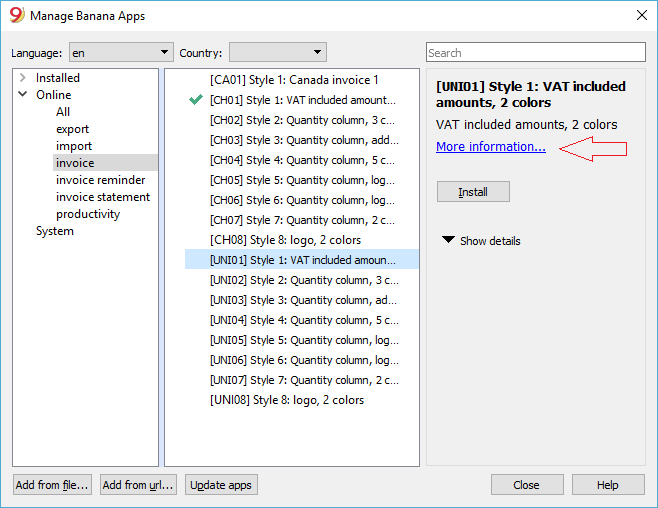
1. Choose your print style to start from.
- In Banana select from the menu Apps the command Manage Apps...
- Select Online, Invoice.
- Choose one of the existing template you want (i.e. [UNI01])
- Click on More information...
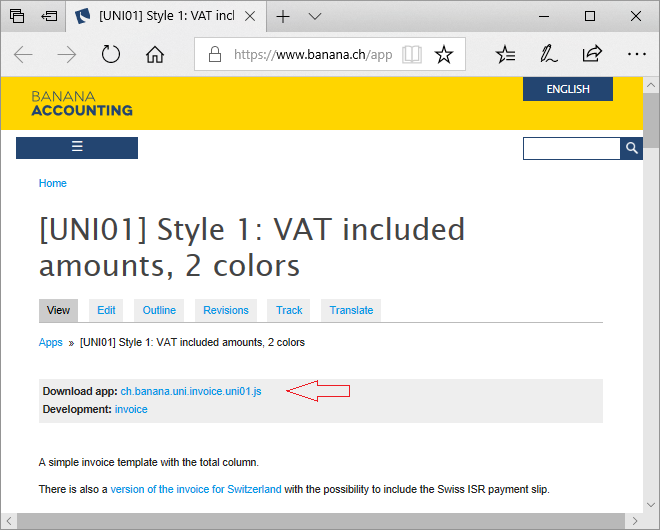
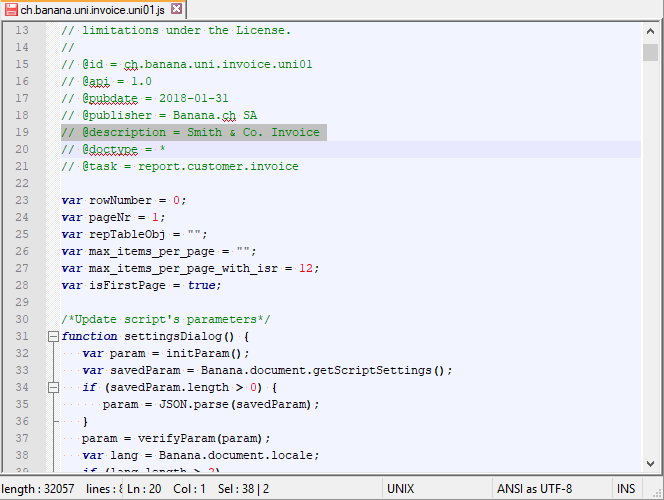
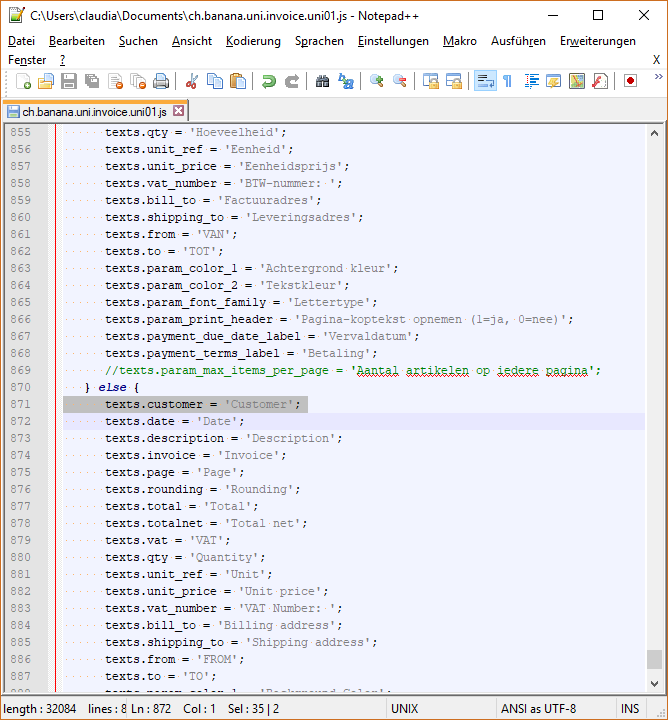
2. Click on the link ch.banana.uni.invoice.uni01.js and save the file to your documents folder (menu File -> Save Page As...).
3. Modify the template
- Open the local file with a text editor program
- Right click on the file
- Open with .... and select the text editor program
- Changing the @description and the @id.
- Save the file.
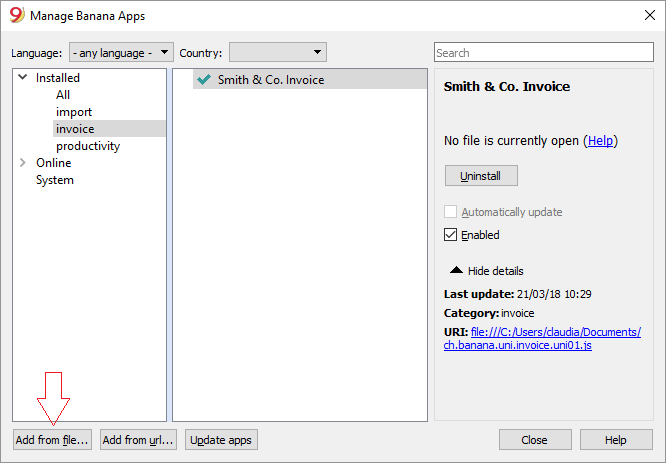
4. Add your template to the Banana Apps.
- In menu Apps from Banana select Manage Apps....
- Click on the button Add from file... and choose the file you just downloaded and modified.
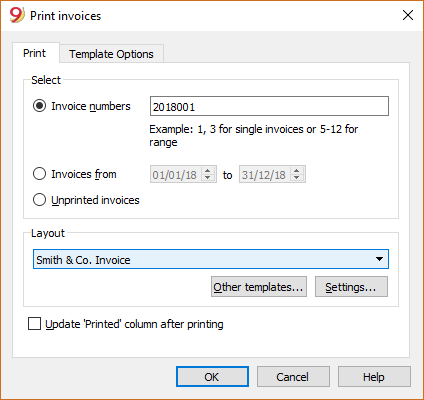
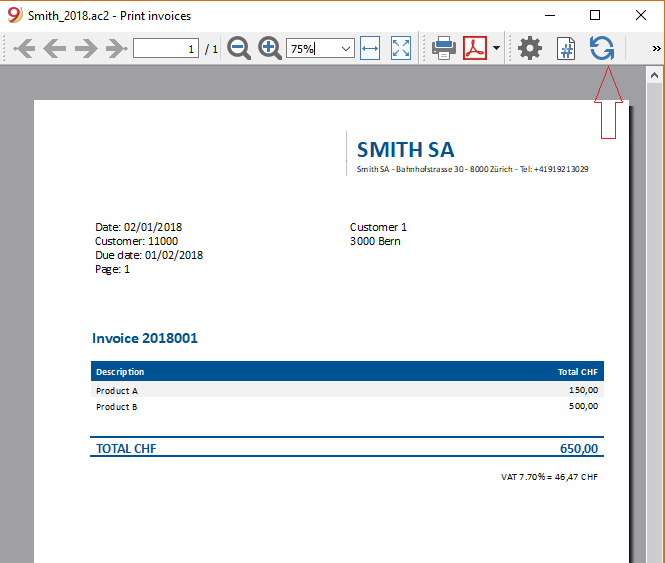
5 View an invoice with the custom template.
- In menu Account2 from Banana select Customers, Print Invoices... and select the layout Smith & Co. Invoice
- Click Ok
Here the previews

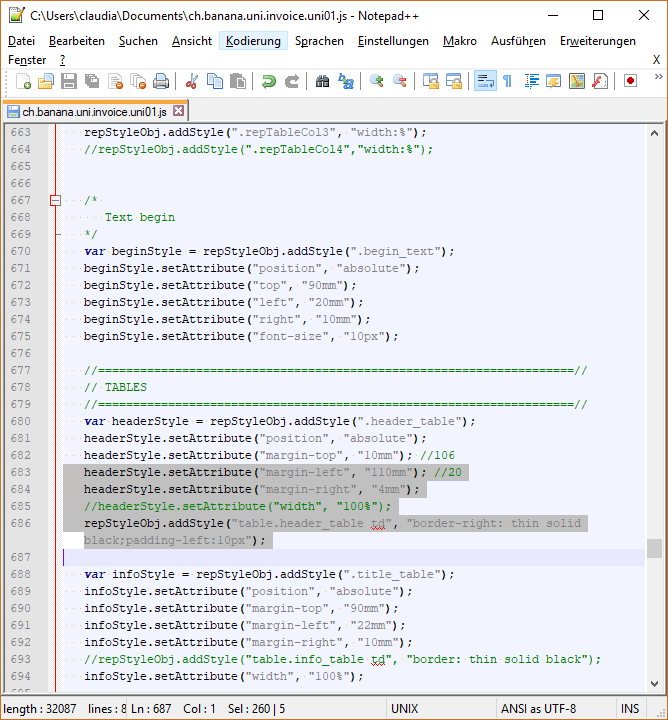
5. Makes more changes
- For example change the header position, we put it on the right.
- Modify the lines as described here.
- Save the changes
- Change the text "Customer No" to "Customer"
6. See your changes
Simply click on the refresh button
Working with Document Change
Introduction
In this page we will be going through all the possible operations that can be done using the Banana API Document Change in order to modify in any way our accounting document. Every time we are going to write Javascript code which will produce a JSON File containing all the changes we want to make on the Banana accounting file.
JSON File
A JSON (Javascript Object Notation) File is a particular type of file that let us store and transmit data objects, more in particular we are going to use them to describe which elements of the accounting file we want to change and in what the changes consists.
To have a more complete view on how JSON files are used in Banana and on their structure for various operations, you can always visit the following page: Banana Document Change.
Add Operation
In this section we are going to see how to add some transactions in Banana using the command add, the following function can be added to our code by simply changing the name "transactionRowOperation()" when it's invoked in our Main Program with "transactionRowAdd()".
Steps to add rows:
- Define row object
- choose which operation we are going to perform, in this case "add"
- Define the fields we are going to add in our row, in this case "Date" and "Description".
- Create an Array which will contain all the rows we want to add, and then push to the Array those rows.
- Define the table in which we are going to make changes in Banana.
- Initialise JSON document object.
- add changes to the object.
function transactionRowAdd(){
    //row operation
    var row = {};
    row.operation = {};
    row.operation.name = "add";

    //row fields
    row.fields = {};
    row.fields["Date"] = getCurrentDate();
    row.fields["Description"] = "This is the row you just added";

    //rows
    var rows = [];
    rows.push(row);

    //table
    var dataUnitTransactions = {};
    dataUnitTransactions.nameXml = "Transactions";
    dataUnitTransactions.data = {};
    dataUnitTransactions.data.rowLists = [];
    dataUnitTransactions.data.rowLists.push({"rows":rows});

    //document
    var jsonDoc = initDocument();
    jsonDoc.data.document.dataUnits.push(dataUnitTransactions);

    return jsonDoc;
}
It is worth mentioning that after have defined the row.operation.name = "add" if we also define row.operation.sequence = "n" we are going to perform an Insert Operation, adding the new row after the nth row in the Transactions table.
Delete Operation
In this section we are going to see how to delete some transactions in Banana using the command delete, the following function can be added to our code by simply changing the name "transactionRowOperation()" when it's invoked in our Main Program with "transactionRowDelete()".
Steps to delete rows:
- Define row object
- Choose which operation we are going to perform, in this case "delete"
- Define in row.operation.sequence = "n" where n is the row that we want to delete from the table.
- Create an Array which will contain all the rows we want to delete, and then push to the Array those rows.
- Define the table in which we are going to make changes in Banana.
- Initialise JSON document object.
- add changes to the object.
function transactionRowDelete(){
    //row operation
    var row = {};
    row.operation = {};
    row.operation.name = "delete";
    row.operation.sequence = "5";

    //rows
    var rows = [];
    rows.push(row);

    //table
    var dataUnitTransactions = {};
    dataUnitTransactions.nameXml = "Transactions";
    dataUnitTransactions.data = {};
    dataUnitTransactions.data.rowLists = [];
    dataUnitTransactions.data.rowLists.push({"rows":rows});

    //document
    var jsonDoc = initDocument();
    jsonDoc.data.document.dataUnits.push(dataUnitTransactions);

    return jsonDoc;
}
Modify Operation
In this section we are going to see how to modify some transactions in Banana using the command modify, the following function can be added to our code by simply changing the name "transactionRowOperation()" when it's invoked in our Main Program with "transactionRowModify()".
Steps to modify rows:
- Define row object
- Choose which operation we are going to perform, in this case "modify"
- Define in row.operation.sequence = "n" where n is the row that we want to modify from the table.
- Define the fields we are going to modify in our row, in this case "Description".
- Create an Array which will contain all the rows we want to modify, and then push to the Array those rows.
- Define the table in which we are going to make changes in Banana.
- Initialise JSON document object.
- add changes to the object.
function transactionRowModify(){ //row operation var row = {}; row.operation = {}; row.operation.name = "modify"; row.operation.sequence = "5"; //row fields row.fields = {}; row.fields["Description"] = "This description is edited using DocumentChange"; //rows var rows = []; rows.push(row); //table var dataUnitTransactions = {}; dataUnitTransactions.nameXml = "Transactions"; dataUnitTransactions.data = {}; dataUnitTransactions.data.rowLists = []; dataUnitTransactions.data.rowLists.push({"rows":rows}); //document var jsonDoc = initDocument(); jsonDoc.data.document.dataUnits.push(dataUnitTransactions); return jsonDoc; }
Replace Operation
In this section we are going to see how to replace some transactions in Banana using the command replace, the following function can be added to our code by simply changing the name "transactionRowOperation()" when it's invoked in our Main Program with "transactionRowReplace()".
Steps to replace rows:
- Define row object
- Choose which operation we are going to perform, in this case "replace"
- Define in row.operation.sequence = "n" where n is the row that we want to replace from the table.
- Define the fields we are going to modify in our row, in this case "Description".
- Create an Array which will contain all the rows we want to modify, and then push to the Array those rows.
- Define the table in which we are going to make changes in Banana.
- Initialise JSON document object.
- add changes to the object.
function transactionRowReplace(){
    //row operation
    var row = {};
    row.operation = {};
    row.operation.name = "replace";
    row.operation.sequence = "5";

    //row fields
    row.fields = {};
    row.fields["Description"] = "We have replaced the old transaction with this one";

    //rows
    var rows = [];
    rows.push(row);

    //table
    var dataUnitTransactions = {};
    dataUnitTransactions.nameXml = "Transactions";
    dataUnitTransactions.data = {};
    dataUnitTransactions.data.rowLists = [];
    dataUnitTransactions.data.rowLists.push({"rows":rows});

    //document
    var jsonDoc = initDocument();
    jsonDoc.data.document.dataUnits.push(dataUnitTransactions);

    return jsonDoc;
}
We can see how the structure for Replace and Modify operation is more or less the same, the difference is the fact that when we perform a Modify only the field we choose are modified and all the other parts of the row remain the same as before, instead while we perform a Replace, all the field are changed with the one we defined in the functions, and if we have not defined any value for some fields, those will be empty.
Move Operation
In this section we are going to see how to replace some transactions in Banana using the command replace, the following function can be added to our code by simply changing the name "transactionRowOperation()" when it's invoked in our Main Program with "transactionRowMove()".
Steps to move rows:
- Define row object
- Choose which operation we are going to perform, in this case "move"
- Define row.operation.sequence = "n" where n is the row that we want to move from the table.
- Define row.operation.moveTo = "n" where n is the row where we want to move in.
- Create an Array which will contain all the rows we want to modify, and then push to the Array those rows.
- Define the table in which we are going to make changes in Banana.
- Initialise JSON document object.
- add changes to the object.
function transactionRowMove(){
    //row operation
    var row = {};
    row.operation = {};
    row.operation.name = "move";
    row.operation.sequence = "5";
    row.operation.moveTo = "8";

    //row fields
    row.fields = {};

    //rows
    var rows = [];
    rows.push(row);

    //table
    var dataUnitTransactions = {};
    dataUnitTransactions.nameXml = "Transactions";
    dataUnitTransactions.data = {};
    dataUnitTransactions.data.rowLists = [];
    dataUnitTransactions.data.rowLists.push({"rows":rows});

    //document
    var jsonDoc = initDocument();
    jsonDoc.data.document.dataUnits.push(dataUnitTransactions);

    return jsonDoc;
}
Initialise Document
From the above functions that we are always returning a JSON document, in order to initialise it we have to define the following parameters for the object:
function initDocument() { var jsonDoc = {};jsonDoc.format = "documentpatch";jsonDoc.data.document = {}; jsonDoc.data.document.fileVersion = "1.0.0"; jsonDoc.data.document.dataUnits = []; jsonDoc.creator = {}; jsonDoc.creator.executionDate = getCurrentDate(); jsonDoc.creator.executionTime = getCurrentTime(); jsonDoc.creator.name = Banana.script.getParamValue('id'); jsonDoc.creator.version = "1.0"; return jsonDoc; }
Helper Functions
As we can see from the code above from the section Initialise Document, there are few undefined functions called getCurrentDate() and getCurrentTime(), we can proceed defining them in the program as:
function getCurrentDate() {
    var d = new Date();
    var datestring = d.getFullYear() + ("0" + (d.getMonth() + 1)).slice(-2) + ("0" + d.getDate()).slice(-2);
    return Banana.Converter.toInternalDateFormat(datestring, "yyyymmdd");
}

function getCurrentTime() {
    var d = new Date();
    var timestring = ("0" + d.getHours()).slice(-2) + ":" + ("0" + d.getMinutes()).slice(-2);
    return Banana.Converter.toInternalTimeFormat(timestring, "hh:mm");
}
Working with Report Tables
Introduction
All the following code samples are used in the embedded_javascript_tutorial1.ac2 file as embedded BananaApps. This file contains a list of complete and working examples that can be run.
Another complete and working example of BananaApp that use a table can be found here.
Table object
Tables are used in BananaApps to present tabular data as reports.
A Table object is defined using the addTable([classes]) function, and contains a number of table cells which are organized into table rows.
The process for creating a table is the following:
- Create the report object that willl contain the table
- Add a table object to the report
- Add a row object to the table using the addRow([classes]) method.
- Add cells objects to the row using the addCell([span]) or addCell(text [,classes, span]) methods.
- Repeat steps 3 and 4
Table Code Sample: Simple Table
var report = Banana.Report.newReport("Report title"); // create the report
var myTable = report.addTable("myTable");             // create and add a table to the report

var tableRow = myTable.addRow();                      // add a row to the table
tableRow.addCell("Cash");                             // add a first cell to the row
tableRow.addCell("500.00");                           // add a second cell to the row

var tableRow = myTable.addRow();                      // add a row to the table
tableRow.addCell("Bank");                             // add a first cell to the row
tableRow.addCell("1200.50");                          // add a second cell to the row
Output:

Column headers
Table cells may should act as column headers, in such cases it should be used the getHeader() function.
If the table goes over several pages, this would allow you to repeat at the beginning of each page the headers of the columns.
var report = Banana.Report.newReport("Report title");
var table = report.addTable("myTable");

// add the table header
var tableHeader = table.getHeader();
var tableRow = tableHeader.addRow();
tableRow.addCell("Description");
tableRow.addCell("Amount");

// add the first row of the table
tableRow = table.addRow();
tableRow.addCell('Cash');
tableRow.addCell('1200');
Output:

Caption
A caption, which is a descriptive text associated with the element, can be added to a table using the getCaption() function.
var table = report.addTable("MyTable");
var caption = table.getCaption();
caption.addText("Table caption text", "captionStyle");
Output:

Merge cells
Table cells can be merged using the span attribute of the addCell([span]) or addCell(text [,classes, span]) functions.
tableRow.addCell();                        // span empty cell over 1 column (default value)
tableRow.addCell("", 3);                   // span empty cell over 3 columns
tableRow.addCell("Cash", 2);               // span the cell over 2 columns
tableRow.addCell("Cash", "classStyle", 2); // span the cell over 2 columns
Columns and Cells attributes
Styles attributes can be defined to set, for example, the columns width and cells borders using the addColumn([classes]) and setStyleAttributes(attributes) functions.
- The width attribute (applied to a table) specifies the width of a table. If the width attribute is not set, a table takes up the space of the report page.
- The width attribute (applied to a column) specifies the width of a column. If the width attribute is not set, a column takes up the space it needs to display the data.
- The border attribute (applied to a cell) specifies the border of a cell. If the border attribute is not set, a cell will be displayed without borders.
var report = Banana.Report.newReport("Report Title");
var table = report.addTable("MyTable");
table.setStyleAttributes("width:100%;"); // specifies the width of the table

var column1 = table.addColumn("col1");
column1.setStyleAttributes("width:10%"); // specifies the width of the column1
var column2 = table.addColumn("col2");
column2.setStyleAttributes("width:55%"); // specifies the width of the column2
var column3 = table.addColumn("col3");
column3.setStyleAttributes("width:30%"); // specifies the width of the column3
var column4 = table.addColumn("col4");
column4.setStyleAttributes("width:5%");  // specifies the width of the column4

var tableRow = table.addRow();
tableRow.addCell("A", "", 1).setStyleAttributes("border:thin solid black"); // specifies the cell border
tableRow.addCell("B", "", 1).setStyleAttributes("border:thin solid black"); // specifies the cell border
tableRow.addCell("C", "", 1).setStyleAttributes("border:thin solid black"); // specifies the cell border
tableRow.addCell("D", "", 1).setStyleAttributes("border:thin solid black"); // specifies the cell border
Output:

Cell with multiple paragraphs
Table cells can contain multiple paragraphs of text or data. Use the addParagraph([text, classes]) function to add many paragraphs to a cell.
var report = Banana.Report.newReport("Report Title");
var table = report.addTable("MyTable");
table.setStyleAttributes("width:100%;");
tableRow = table.addRow();

// Add first cell with paragraphs
var cell1 = tableRow.addCell("", "", 1);
cell1.setStyleAttributes("border:thin solid black");
cell1.addParagraph("First paragraph...", "");
cell1.addParagraph("Second paragraph...", "");
cell1.addParagraph(" "); //empty paragraph
cell1.addParagraph("Fourth paragraph...", "");

// Add second cell without paragraphs
var cell2 = tableRow.addCell("Cell2...", "", 1).setStyleAttributes("border:thin solid black");
Output:

Table Code Sample: Complex Table
var report = Banana.Report.newReport("Report Title");
var table = report.addTable("MyTable");
table.setStyleAttributes("width:100%;");

var column1 = table.addColumn("col1");
column1.setStyleAttributes("width:25%");
var column2 = table.addColumn("col2");
column2.setStyleAttributes("width:25%");
var column3 = table.addColumn("col3");
column3.setStyleAttributes("width:25%");
var column4 = table.addColumn("col4");
column4.setStyleAttributes("width:25%");

// 1st row
tableRow = table.addRow();
tableRow.addCell("Row 1, Cell 1: span cell over 4 columns", "", 4).setStyleAttributes("border:thin solid black");

// 2nd row
tableRow = table.addRow();
tableRow.addCell("Row 2, Cell 1: span cell over 2 columns", "", 2).setStyleAttributes("border:thin solid black");
tableRow.addCell("Row 2, Cell 3: span cell over 2 columns", "", 2).setStyleAttributes("border:thin solid black");

// 3rd row
tableRow = table.addRow();
tableRow.addCell("Row 3, Cell 1", "", 1).setStyleAttributes("border:thin solid black");
tableRow.addCell("Row 3, Cell 2: span cell over 2 columns", "", 2).setStyleAttributes("border:thin solid black");
tableRow.addCell("Row 3, Cell 4", "", 1).setStyleAttributes("border:thin solid black");

// 4th row
tableRow = table.addRow();
tableRow.addCell("Row 4, Cell 1", "", 1).setStyleAttributes("border:thin solid black");
tableRow.addCell("Row 4, Cell 2", "", 1).setStyleAttributes("border:thin solid black");
tableRow.addCell("Row 4, Cell 3", "", 1).setStyleAttributes("border:thin solid black");
tableRow.addCell("Row 4, Cell 4", "", 1).setStyleAttributes("border:thin solid black");

// 5th row
tableRow = table.addRow();
tableRow.addCell("Row 5, Cell 1: span cell over 3 columns", "", 3).setStyleAttributes("border:thin solid black");
tableRow.addCell("Row 5, Cell 4", "", 1).setStyleAttributes("border:thin solid black");
Output:

Table within a Table
Tables can also be added within other tables, in particular to cells of "externals" tables. This might be useful when you need to create tables with more complex structures.
In these cases it is only necessary to add a tables to the cell object of the external tables instead of the report. These tables are treated as a separate table, with their own rows, cells and attributes.
var report = Banana.Report.newReport("Report Title");

/*  EXTERNAL TABLE */
var table = report.addTable("outTable");
// ... add style attributes, rows, cells, etc. for the first external table

/* INTERNAL TABLE */
row_out = table.addRow(); // add a new row and a cell
cell_out = row_out.addCell("", "", 1);

var insideTable = cell_out.addTable("inTable"); // add a second table within a cell of the first table

var row_in = insideTable.addRow();
var cell_in = row_in.addCell("1", "", 1);
cell_in = row_in.addCell("2", "", 1);

row_in = insideTable.addRow();
cell_in = row_in.addCell("3", "", 1);
cell_in = row_in.addCell("4", "", 1);

// add a second cell to the first table
cell_out = row_out.addCell("row 2, cell 2", "", 1);
Output example:

Working with XML
Introduction
This page contains some code examples of how to read, write and more in general how to work with XML files in Banana.
All the code reported above as example can be found in the following file: embedded_javascript_tutorial1.ac2
XML object
XML files are used to save a large amount of data in an organized way.
Using the Banana APIs is possible to retrieve data from XML files and also create new XML files.
Read XML
In order to read an XML string we have to follow the following steps:
- Create the XML parse object
- Take the root of the XML
- Find the data we want to retrieve from the file using firstChildElement([text]).
- Iterate all over the file as long as we always have something from step 3.
Read XML Code Sample: Simple XML
var xml =   '<Library updated="2018-09-03">' +                            //  To simplify,
              '<Book>' +                                                  //  the variable
                '<Title>Paths of colours</Title>' +                       //  xml contains
                '<Author>Rosa Indaco</Author>' +                          //  the xml string
              '</Book>' +
              '<Book>' +
                '<Title>Accounting exercises</Title>' +
                '<Author>Su Zhang</Author>' +
              '</Book>' +
            '</Library>';

var bookList = "";                                                        //  Create string for the output
var xmlFile = Banana.Xml.parse(xml);                                      //  Create XML Parse object
var xmlRoot = xmlFile.firstChildElement('Library');                       //  Find the first tag "Library" in the XML
var updateDate = xmlRoot.attribute('updated');                            //  Take attribute assigned to the tag
bookList += "Books in the library on " + updateDate + "\n\n";             //  Append to the output string

var bookNode = xmlRoot.firstChildElement('Book');                         //  Take the first Book
while (bookNode) {                                                        //  As long as there are books, repeat
    var title = bookNode.firstChildElement('Title').text;                 //  Find the first tag "Title" in the XML
    var authorNode = bookNode.firstChildElement('Author');                //  Find the first tag "Author" in the XML
    var author = authorNode ? authorNode.text : 'unknow';                 //  Check whether there is a tag "Author"
    bookList += title + " - " + author + "\n";                            //  Append to the output string
    bookNode = bookNode.nextSiblingElement('Book');                       //  Go to the next book
}

Banana.Ui.showText("List of books present in the xml file", bookList);    //  Output the results
Output:

Write XML
In order to write and create an XML file we have to follow the following steps:
- Create the XML document object.
- Create a root tag for the document using newDocument([text]).
- Add new tag using addElement([text]).
- Add text for the tag with addTextNode([text]).
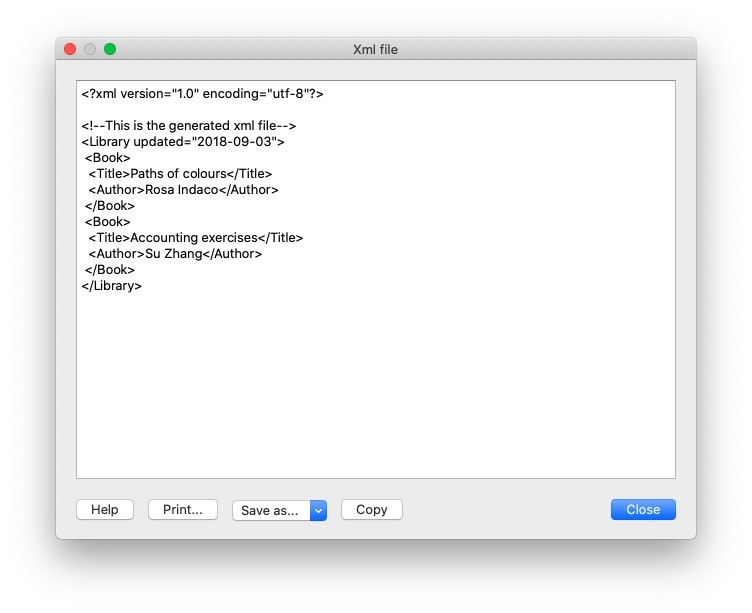
Write XML Code Sample: Simple XML
    var xmlDocument = Banana.Xml.newDocument("Library");                    //  Create XML file
    xmlDocument.addComment("This is the generated xml file");               //  Add comment to the file
    var rootNode = xmlDocument.addElement("Library");                       //  Set root tag "Library"
    rootNode.setAttribute("updated", "2018-09-03");                         //  Set attribute to the tag "Library"

    var bookNode = rootNode.addElement("Book");                             //  Create tag "Book" child of "Library"
    bookNode.addElement("Title").addTextNode("Paths of colours");           //  Create tag "Title" child of "Book"
    bookNode.addElement("Author").addTextNode("Rosa Indaco");               //  Create tag "Author" child of "Book"

    var bookNode = rootNode.addElement("Book");                             //  Create tag "Book" child of "Library"
    bookNode.addElement("Title").addTextNode("Accounting exercises");       //  Create tag "Title" child of "Book"
    bookNode.addElement("Author").addTextNode("Su Zhang");                  //  Create tag "Author" child of "Book"

    var xmlString = Banana.Xml.save(xmlDocument);                           //  Create output

    Banana.Ui.showText("Xml file", xmlString);                              //  Generate output
Output:
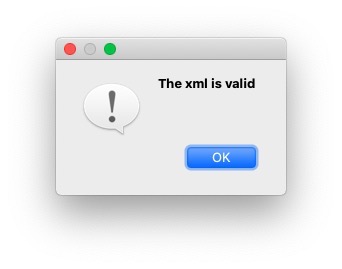
Validate
Is possible to validate if a file is in fact an XML which contains tag with the validate() function.
    var xmlFile = Banana.Xml.parse(xml);                                    //  Create the XML file

    var valid = Banana.Xml.validate(xmlFile, 'documents:xsd');              //  Validate the XML
    if (valid) {
        Banana.Ui.showInformation('Validation result', 'The xml is valid');
    } else  {
        Banana.Ui.showInformation('Validation result', 'The xml is not valid: ' + Banana.Xml.errorString);
    }
Output:
General examples with XML
In this section we are going to provide some examples of how to use API functions for XML files, here below there is the XML file used for the first example:
<solarSystem updated="2020-03-27">
<Planet>
<name>Sun</name>
<sizeOrder>1</sizeOrder>
</Planet>
<Planet>
<name>Earth</name>
<sizeOrder>6</sizeOrder>
<satellite>Moon</satellite>
</Planet>
<Planet>
<name>Jupiter</name>
<sizeOrder>2</sizeOrder>
<satellite>Callisto</satellite>
</Planet>
<Planet>
<name>Saturn</name>
<sizeOrder>3</sizeOrder>
<satellite>Cronus</satellite>
</Planet>
<Planet>
<name>Mars</name>
<sizeOrder>8</sizeOrder>
<satellite>Phobos</satellite>
</Planet>
<Planet>
<name>Neptune</name>
<sizeOrder>5</sizeOrder>
<satellite>Triton</satellite>
</Planet>
<Planet>
<name>Mercury</name>
<sizeOrder>9</sizeOrder>
</Planet>
<Planet>
<name>Venus</name>
<sizeOrder>7</sizeOrder>
</Planet>
<Planet>
<name>Uranus</name>
<sizeOrder>4</sizeOrder>
<satellite>Ariel</satellite>
</Planet>
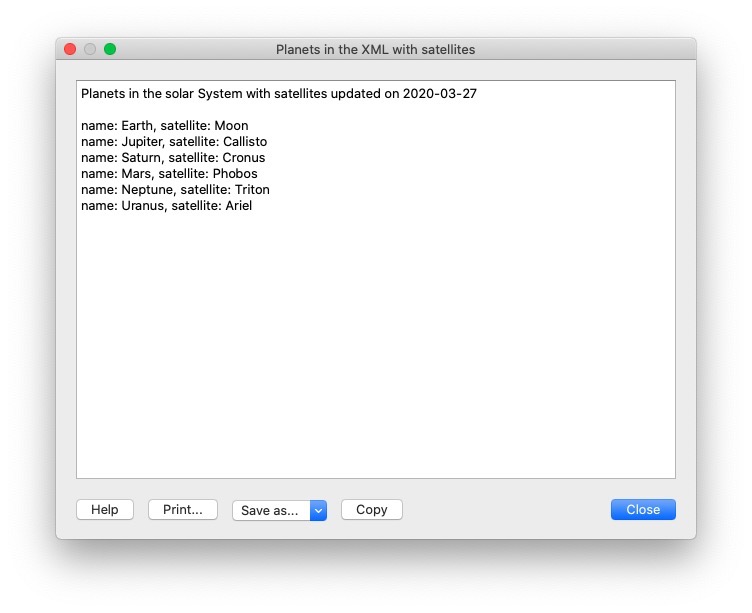
</solarSystem>Check if a tag has a specific Child tag
the following is a code example of how to return and print only planets with a satellite, the other will be excluded, therefore will be used the function hasChildElements([text]).
var outputString = "";
    var xmlFile = Banana.Xml.parse(xml);
    var xmlRoot = xmlFile.firstChildElement('solarSystem');
    var updateDate = xmlRoot.attribute('updated');
    outputString += "Planets in the solar System with satellites updated on " + updateDate + "\n\n";

    var planet = xmlRoot.firstChildElement('Planet');                                   //  Take the first tag "Planet"
    while (planet) {                                                                    //  As long as we have planets
        if (planet.hasChildElements('satellite')) {                                     //  Check if the planet has tag "satellite"
            var planetName = planet.firstChildElement('name').text;                     //  Save the planetName
            var planetSatellite = planet.firstChildElement('satellite').text;           //  Save the satelliteName
            outputString += "name: "+planetName+", satellite: "+planetSatellite+"\n";
        }
        planet = planet.nextSiblingElement('Planet');                                   //  Move to the next planet
    }
    Banana.Ui.showText("Planets in the XML with satellites", outputString);             //  Show the output
Output:
Export Transactions in XML format
Here there is an example of how to take various fields from the table Transactions in one of our .ac2 files and then print them in an xml files.
Naturally it is possible to change various parameter as for example the table we want to take the data. But also the number and type of fields we want to print in our file, in order to do so we have to follow the following steps:
- Decide which table we want to retrieve informations.
- Remember to handle the error for which the file doesn't have the desired table.
- Loop through the entire table taking only the desired fields.
- Decide the indentation for the file by appending to the strings special characters like '\t' (tab) or '\n' (new line).
// @id = ch.banana.apps.export
// @api = 1.0
// @pubdate = 2016-04-08
// @doctype = *.*
// @description = Export into an xml file (.xml)
// @task = export.file
// @exportfiletype = xml
// @timeout = -1

function exec() {
    var xmlDocument = Banana.Xml.newDocument("Transactions");
    xmlDocument.addComment("This is the generated xml file");
    var rootNode = xmlDocument.addElement("transactions");
    var tableTransactions = Banana.document.table('Transactions');
    if (!tableTransactions) {
        return;
    }
    for (i=0;i<tabletransactions.rowcount;i++) {
        if (tableTransactions.row(i).value('Amount')) {
            var transactionNode = rootNode.addElement("transaction");
            transactionNode.addElement("date").addTextNode(tableTransactions.row(i).value('Date'));
            transactionNode.addElement("description").addTextNode(tableTransactions.row(i).value('Description'));
            transactionNode.addElement("amount").addTextNode(tableTransactions.row(i).value('Amount'));
        }
    }
    var xmlString = Banana.Xml.save(xmlDocument);
    Banana.Ui.showText("Xml file", xmlString);
    return xmlString;
The code above and his explanation are available also here.
Import transactions from XML
The following is an example of how to add new transactions to a .ac2 file in Banana, below is possible to see the XML file used as example:
<transactions>
    <transaction>
        <date>2020-01-01</date>
        <description>Red car sale</description>
        <income>10000.50</income>
        <expenses></expenses>
    </transaction>
    <transaction>
        <date>2020-03-15</date>
        <description>ATM withdrawal</description>
        <income></income>
        <expenses>600.00</expenses>
    </transaction>
    <transaction>
        <date>2020-02-14</date>
        <description>Bought silver ring</description>
        <income></income>
        <expenses>2000.00</expenses>
    </transaction>
    <transaction>
        <date>2020-04-01</date>
        <description>Yellow rubber duck sale</description>
        <income>4200.00</income>
        <expenses></expenses>
    </transaction>
</transactions>
We can eventually modify the XML file above by adding new fields for our transactions and obviously add new transactions to the file, but in order to transfer data from the file into Banana we have to follow these instructions:
- We are going to transfer the data from XML to CSV and then from CSV to TSV which are Tab separated files.
- Create the CSV string we are going to append data from our file.
- As we did before in the Read XML example we have to iterate through the XML file we take in input and then append the values of the tags into our CSV string, this time we have to remember to format the string by adding special character like '\n' (new line), ',' (comma), ''' (apostrophe) or '"' (quotation mark).
- once this process is complete and we have our CSV String ready we have to convert it into an Array using csvToArray(string, [, separator, textdelim]) function and once again convert the resulting array into a TSV using arrayToTSV(table, [, defaultChar]) and return the TSV.
// @api = 1.0
// @pubdate = 2020-04-02
// @id = ch.banana.uni.app.tutorialretrieverowstablevalues
// @description = Import transactions
// @task = import.transactions
// @outputformat = transactions.simple
// @doctype = *
// @inputdatasource = openfiledialog
// @inputencoding = latin1
// @inputfilefilter = Text files (*.xml);;All files (*.*)
// @publisher = Banana.ch SA
// @timeout = -1

function exec(inputFile) {
    var CSV_String = "Date" + '","' + "Description" + '","' + "Income" + '","' + "Expenses" + '\n';
    var xmlFile = Banana.Xml.parse(inputFile);
    var xmlRoot = xmlFile.firstChildElement('transactions');
    var transactionNode = xmlRoot.firstChildElement('transaction');
    while (transactionNode) {
        var date = transactionNode.firstChildElement('date').text;
        var description = transactionNode.firstChildElement('description').text;
        var income = transactionNode.firstChildElement('income').text;
        var expenses = transactionNode.firstChildElement('expenses').text;
        CSV_String += ('"' + date + '","' + description + '","' + income + '","' + expenses + '"' + '\n');
        transactionNode = transactionNode.nextSiblingElement('transaction');
    }
    var csvFile = Banana.Converter.csvToArray(CSV_String, ',', '"');
    var tsvFile = Banana.Converter.arrayToTsv(csvFile);
    return tsvFile;
}
Create a Cash Flow Report
Introduction
This walkthrough provides step-by-step guidance for creating an Extension for printing a cash flow report.
As example we use the Cash Flow Report that is part of the Rapports comptables (OHADA - RDC) Extension, developed following the specifications for the OHADA-RDC in Africa (for more information, visit the GitHub documentation).
There are three basic steps in order to experiment with this Extension:
- Prepare for programming
- Create a JavaScript programming
- Install the Extension
- Run the Extension
Preparation work
Before you start programming, you need to define how the output should look like and how its calculations will be done.
With the following information the software developer will be able to program the software:
- Prepare an accounting file with:
- The accounting plan you will use as the base for the report.
The Cash flow report is related to a specific accounting plan, its accounting groups and its numbers. - The data that is necessary to test if the report is correct.
- Opening balances for all the accounts and groups that partecipate in the calculation.
Possibly use simple to understand amounts (10, 20, 100, 1000). - Transactions for all relevant accounts.
- Opening balances for all the accounts and groups that partecipate in the calculation.
- The accounting plan you will use as the base for the report.
- Decide how the report should look like.
If you aren't already in process of an example printout, use Excel and prepare an example of the desired printout.
On the left side ad a column with the name for each row.
See OHADA example. - Explain for each row how the calculation for the related row of the report should be done.
See OHADA example.- Specify the accounts or groups that will be summed
- Specify amounts that should be entered manually.
In case the information cannot be retrieved from the accounting data (lack of account), the programmer can easily create a dialog in order to enter the information manually.
How to specify calculations for programmers
In order to understand how to specify calculations for programmers, you need to know which amounts you can retrieve from the Accounts table of Banana Accounting.
You can retrieve amounts for both, accounts and groups, and specify the type of amount:
- opening: the amount at the beginning of the period (the Opening column of the Accounts table). Can be positive or negative.
- debit: the amount of debit transactions for the period (the Debit column of the Accounts table). Only positive values.
- credit: the amount of credit transactions for the period (the Credit column of the Accounts table). Only positive values.
- total: the difference between debit-credit for the period. Can be positive or negative.
- balance: the balance for the period (opening + total). Can be positive or negative.
The combination of account/group and amounts type can be used to specify the calculations for programmers:
- In case of accounts, indicate "account_number , amount_type" (i.e. "1000 , opening").
- In case of groups, indicate "Gr=group_number , amount_type" (i.e. "Gr=10 , total").
See the table below for more examples:
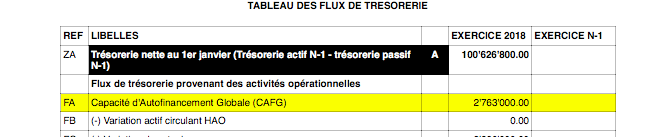
| Row name | Formula | Description |
|---|---|---|
| ZA | getAmount(Gr=BT, opening) | Takes the opening amount of the group BT |
| FA | + (-1) getAmount(Gr=134, total) + getAmount(6541, total) + getAmount(6542, total) - (-1)getAmount(7541, total) - (-1)getAmount(7542, total) + (-1)getAmount(Gr=136, total) + (-1)getAmount(Gr=TO, total) - getAmount(Gr=RP, total) - getAmount(Gr=RQ, total) - getAmount(Gr=RS, total) |
add (inverted) total amount of group 134 add total amount of account 6541 add total amount of account 6542 subtract (inverted) total amount of account 7541 subtract (inverted) total amount of account 7542 add (inverted) total amount of group 136 add (inverted) total amount of group TO subtract total amount of group RP subtract total amount of group RQ subtract total amount of group RS |
| FB | getAmount(488, total) | Takes the movement of the period (total) for the account 488 |
| FJ | + getAmount(826, credit) + getAmount(Gr=AS-1, credit) - getAmount(4856, debit) |
add credit amount of account 826 add credit amount of group AS-1 subtract debit amount of account 4856 |
Example of the "FA" row in the report with the sum of all the amounts:
Here is the Javascript code for the calculation of each line. For a better control there has been created a function for each row, that retrieves and sums the values for a specific period and then returns the amount to be printed.
function calculate_ZA(banDoc, startDate, endDate) {
   /*
      Gr=BT,opening - (- Gr=DT,opening)
   */
   var grBT = getAmount(banDoc,'Gr=BT','opening',startDate,endDate);
   var grDT = getAmount(banDoc,'Gr=DT','opening',startDate,endDate);
   return Banana.SDecimal.subtract(grBT, Banana.SDecimal.invert(grDT));
}

function calculate_FA(banDoc, startDate, endDate) {
   /*
      + (-Gr=134, total)
      + account 6541, total
      + account 6542, total
      - (-account 7541, total)
      - (-account 7542, total)
      + (-Gr=136, total)
      + (-Gr=TO, total)
      - Gr=RP, total
      - Gr=RQ, total
      - Gr=RS, total
   */
   var gr134 = getAmount(banDoc,'Gr=134','total',startDate,endDate);
   var acc6541 = getAmount(banDoc,'6541','total',startDate,endDate);
   var acc6542 = getAmount(banDoc,'6542','total',startDate,endDate);
   var acc7541 = getAmount(banDoc,'7541','total',startDate,endDate);
   var acc7542 = getAmount(banDoc,'7542','total',startDate,endDate);
   var gr136 = getAmount(banDoc,'Gr=136','total',startDate,endDate);
   var grTO = getAmount(banDoc,'Gr=TO','total',startDate,endDate);
   var grRP = getAmount(banDoc,'Gr=RP','total',startDate,endDate);
   var grRQ = getAmount(banDoc,'Gr=RQ','total',startDate,endDate);
   var grRS = getAmount(banDoc,'Gr=RS','total',startDate,endDate);
   var res = 0;
   res = Banana.SDecimal.add(res, Banana.SDecimal.invert(gr134));
   res = Banana.SDecimal.add(res,acc6541);
   res = Banana.SDecimal.add(res,acc6542);
   res = Banana.SDecimal.subtract(res, Banana.SDecimal.invert(acc7541));
   res = Banana.SDecimal.subtract(res, Banana.SDecimal.invert(acc7542));
   res = Banana.SDecimal.add(res, Banana.SDecimal.invert(gr136));
   res = Banana.SDecimal.add(res, Banana.SDecimal.invert(grTO));
   res = Banana.SDecimal.subtract(res,grRP);
   res = Banana.SDecimal.subtract(res,grRQ);
   res = Banana.SDecimal.subtract(res,grRS);
   return res;
}

function calculate_FB(banDoc, startDate, endDate) {
   /*
      account 488, total
   */
   return getAmount(banDoc,'488','total',startDate,endDate);
}

function calculate_FJ(banDoc, startDate, endDate) {
   /*
      + account 826, credit
      + Gr=AS-1, credit
      - 4856, debit
   */
   var acc826 = getAmount(banDoc,'826','credit',startDate,endDate);
   var grAS1 = getAmount(banDoc,'Gr=AS-1','credit',startDate,endDate);
   var acc4856 = getAmount(banDoc,'4856','debit',startDate,endDate);
   var res = 0;
   res = Banana.SDecimal.add(res,acc826);
   res = Banana.SDecimal.add(res,grAS1);
   res = Banana.SDecimal.subtract(res,acc4856);
   return res;
}
Create the JavaScript programming
The script retrieves all the required data from Banana Accounting files, makes some addition and subtraction operations, and presents the data in a table.
By looking a the source code for Cash Flow Report (OHADA - RDC) you will understand how the report is setup.
If you want to experiment with the script, copy and paste it on your text editor and save the file as .js (i.e. cashflow.js). Otherwise you can just install and run the app following the GitHub documentation.
Retrieve data from Banana
In order to build a cash flow it is required to get different data from the accounting. These data are values related to specific accounts or groups and to some columns of the table accounts.
But how to do that? How to retrieve a specific account value for a specific column of the accounts table and period?
Function currentBalance()
To retrieve the various amounts of the report, we use the currentBalance(account, startDate, endDate) function.
The function sums the amounts of opening, debit, credit, total and balance calculated based on the opening and all transactions for the given accounts/group and period.
To build the cash flow report we use this function for accounts and groups:
// example for account 1000
var currentBal = Banana.document.currentBalance('1000','2019-01-01','2019-12-31');

// example for group 10
var currentBal = Banana.document.currentBalance('Gr=10','2019-01-01','2019-12-31');
The parameters of the function are:
- account or group number (the group number is preceded by "Gr=")
- start date of the period we are intrested
- end date of the period we are intrested
The returned value of the currentBalance() function is an object, which has name:values pairs called properties. These properties are the values we need.
The object structure is like the following one:
{
   "amount":"17570.00",
   "amountCurrency":"",
   "bClass":"1",
   "balance":"17570.00",
   "balanceCurrency":"",
   "credit":"30.00",
   "creditCurrency":"",
   "debit":"16600.00",
   "debitCurrency":"",
   "opening":"1000.00",
   "openingCurrency":"1000.00",
   "rowCount":"6",
   "total":"16570.00",
   "totalCurrency":""
}
As you can see this object has many properties, but the cash flow report we want to build uses only four of them:
- opening the amount at the beginning of the period (the Opening column of the Accounts table). Can be positive or negative.
- debit the amount of debit transactions for the period (the Debit column of the Accounts table). Only positive values.
- credit the amount of credit transactions for the period (the Credit column of the Accounts table). Only positive values.
- total the difference between debit-credit for the period. Can be positive or negative.
- balance the balance for the period. (opening + total). Can be positive or negative.
For more information, see the documentation here.
Accessing Object Properties
Ok, now we have the object with all the properties. But how to get a single property value?
There are three methods for accessing the property of an object:
// method 1: objectName.property
var value = currentBal.debit; // returns 16600.00

// method 2: objectName["property"]
var value = currentBal["credit"]; // returns 30.00

// method 3: objectName[expression]
var x = "total";
var value = currentBal[x]; // returns 16570.00
It doesn't matter which method is used, the result does not change.
Calculate totals
The cash flow report requires to do addition and subtraction operations using some specific values retrieved from the accounting file.
To build all the various totals we encounter in the report we use the add(value1, value2) and the subtract(value1, value2) functions.
// example sum the amounts of accounts 6541 and 6542
var acc6541 = Banana.document.currentBalance('6541','2019-01-01','2019-12-31').total;
var acc6542 = Banana.document.currentBalance('6542','2019-01-01','2019-12-31').total;
var sum = Banana.SDecimal.add(acc6541, acc6542);
Previous year Banana document
To generate the report, the Extension retrieves data from the current year accounting file and from the previous year accounting file.
The current year accounting file is the one that is opened in Banana, the one that starts the execution of the Extension.
The previous year accounting file is not opened in Banana, it is just selected from the menu File -> File and accounting properties... -> Options tab -> File from previous year.
In order to retrieve data from the previous year we use the previousYear([nrYears]) function.
The function returns the previous year as a Banana.Document object. If the previous year is not defined or it is not found it returns null.
/* CURRENT year file: the opened document in Banana */
var current = Banana.document;

/* PREVIOUS year file: open a dialog window to select the previous year .ac2 file */
var previous = Banana.document.previousYear();
The object Banana.document represent the current document opened in the application.
The previous variable represent the defined previous year document.
Function getAmount()
We have added to the script a parameterized function that calls the currentBalance() and retrieves the value for the given parameters.
With this function it is possible to define which value to extract and from which Banana document file.
function getAmount(banDoc,account,property,startDate,endDate) {
   var currentBal = banDoc.currentBalance(account,startDate,endDate);
   var value = currentBal[property];
   return value;
}
The parameters are:
- banDoc: the Banana document from which retrieve the data (see Open Banana document);
- account: the account or group;
- property: the property of the returned currentBalance() object (i.e. opening, debit, credit, total);
- startDate: the opening date of the accounting period;
- endDate: the closing date of the accounting period;
// retrieve from the current year Banana document the 6541 account's total value
var current6541 = getAmount(current,'6541','total','2019-01-01','2019-12-31');

// retrieve from the previous year Banana document the 6541 account's total value
var previous6541 = getAmount(previous,'6541','total','2018-01-01','2018-12-31');
The use of the function is the same, but the returned values are different: one returns the value of the current year and the other the value of the previous year.
The Dates
Dates that we use in the script are taken from the accounting file using the info(section, id) function.
These dates are retrieved from the Opening and Closing dates of the accounting file (File properties > Accounting Tab).
// Accounting period for the current year file
var currentStartDate = current.info("AccountingDataBase","OpeningDate");
var currentEndDate = current.info("AccountingDataBase","ClosureDate");

// Accounting period for the previous year file
var previousStartDate = previous.info("AccountingDataBase","OpeningDate");
var previousEndDate = previous.info("AccountingDataBase","ClosureDate");
Function toLocaleNumberFormat()
The function toLocaleNumberFormat is used to convert all the amount numbers to the local format.
Banana.Converter.toLocaleNumberFormat('16570.00'); // returns 16'570.00
Install and run the Extension
Visit the Install your Extension documentation to install and run the app.
Report example:

Extension for Journal reporting
In the following we will explain what need to be considered when creating a new BananaApps for a journal reporting.
- Retrieving the transactions data.
- Creating specific reports using the functionalities offered by the Banana API.
Documentation
Example files
- The examples files are available on github/General/CaseStudies/JournalReport.
- Solutions making use of the journal api:
- China, Voucher report
- Netherlands, Auditfile
Transactions table
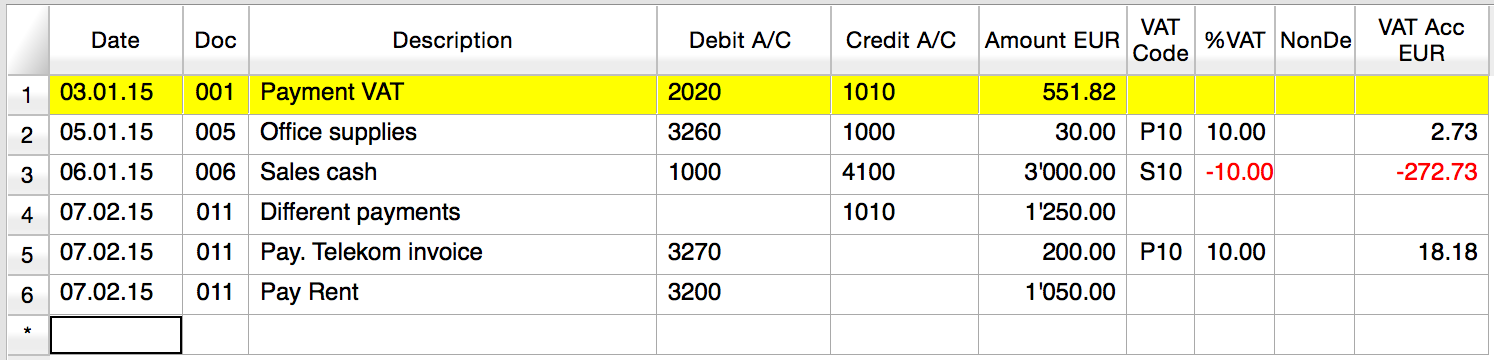
The following table is an example of transactions:
![]()
We see above different types of transactions. The transactions can be on a single line or over multiple lines, with or without VAT.
The idea here is to print a journal’s table that contains all the accounts and the transactions. The final result it’s the following one:
Javascript API equivalent
To retrieve a Table object with all the amount registered on the accounts, we use the Journal’s API:
var journal = Banana.document.journal(Banana.document.originType, Banana.document.accountType);
where
originType specifies the row to be filtered for. Can be one of:
- ORIGINTYPE_NONE no filter is applyied and all rows are returned (current and budget)
- ORIGINTYPE_CURRENT only the normal transactions are returned
- ORIGINTYPE_BUDGET only the budget transactions are returned
accountType specifies the row to be filtered for. Can be one of:
- ACCOUNTTYPE_NONE no filter is applied and all rows are returned.
- ACCOUNTTYPE_NORMAL only rows for normal accounts are returned
- ACCOUNTTYPE_CC1 only rows for Cost Center 1 are returned
- ACCOUNTTYPE_CC2 only rows for Cost Center 2 are returned
- ACCOUNTTYPE_CC3 only rows for Cost Center 1 are returned
- ACCOUNTTYPE_CC Cost Center rows are returned same as using (ACCOUNTTYPE_CC1 | ACCOUNTTYPE_CC2 | ACCOUNTTYPE_CC3)
The returned table has all the columns of the transaction's table plus many other (please, visit the Journal's API for more information).
Code example
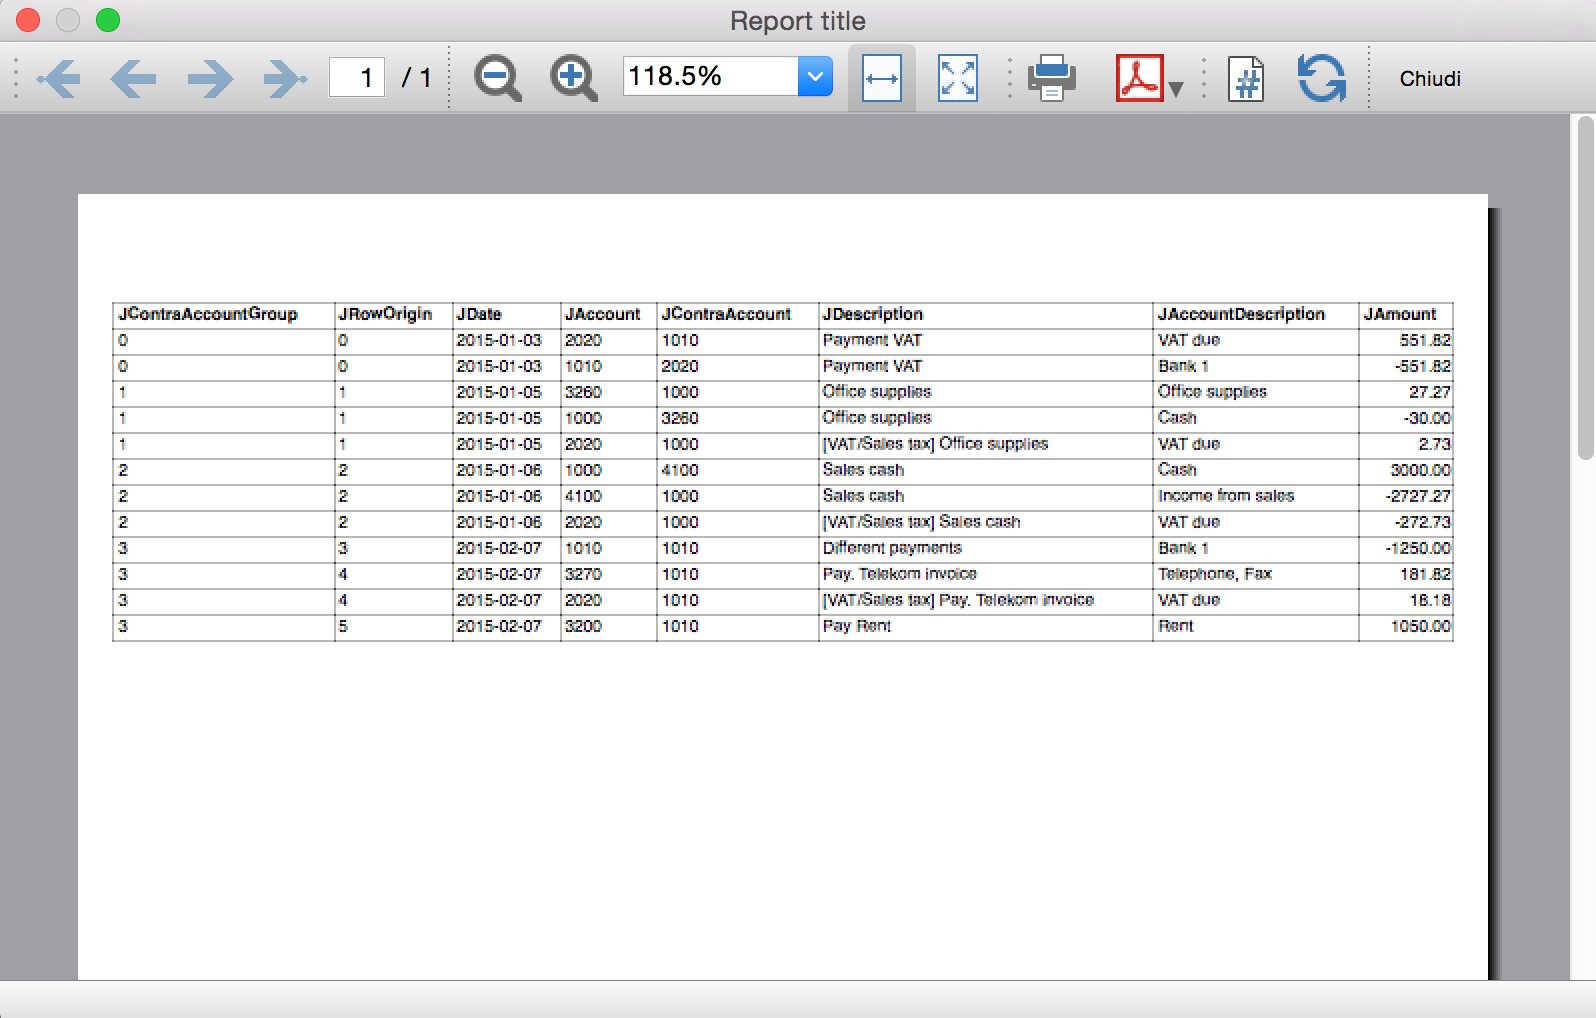
A common use to create and use a journal table to retrieve transactions data would be:
// Create the journal table
var journal = Banana.document.journal(Banana.document.ORIGINTYPE_CURRENT, Banana.document.ACCOUNTTYPE_NORMAL);

// Read the table row by row and save some values
for (var i = 0; i < journal.rowCount; i++) {
       var tRow = journal.row(i);

       // From the journal table we take only the transactions rows
       if (tRow.value('JOperationType') == Banana.document.OPERATIONTYPE_TRANSACTION) {

              // Save some column values
              var jContraAccountGroup = tRow.value('JContraAccountGroup');
              var jRowOrigin = tRow.value('JRowOrigin');
              var jDate = tRow.value('JDate');
              var jAccount = tRow.value('JAccount');
              var jContraAccount = tRow.value('JContraAccount');
              var jDescription = tRow.value('JDescription');
              var jAccountDescription = tRow.value('JAccountDescription');
              var jAmount = tRow.value('JAmount');
              //...
       }
}
Results of the Journal’s table for each transaction
The journal’s table above is useful to better understand exactly how the journal works.
In general:
- For each account used in the transaction table (AccountDebit, AccountCredit, CC1, CC2, CC3) the program generates a journal row with the JAccount column set with the specific account.
- For a double entry account transaction that use AccountDebit, AccountCredit, AccountVat, CC1, CC2, CC3 the Journal will contain six rows. If the transaction has only AccountDebit and AccountCredit, then two rows will be generated.
All transactions in specific:
- Doc 001 – Single line transaction without VAT
Journal:

One line for the 2020 JAccount
One line for the 1010 JAccount
- Doc 005 – Single line transaction with VAT
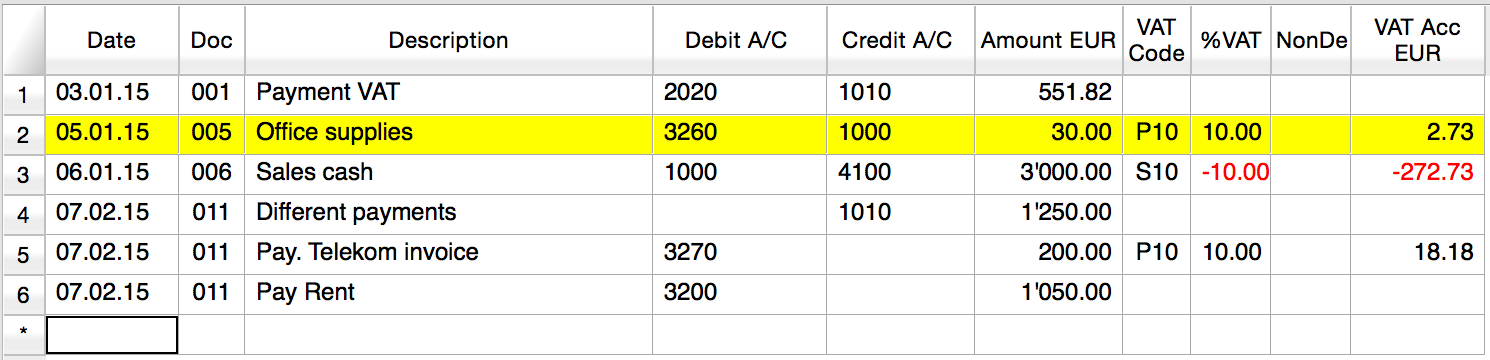
Journal:

One line for the 3260 JAccount
One line for the 1000 JAccount
One line for the 2020 JAccount
- Doc 006 – Single line transaction with negative VAT
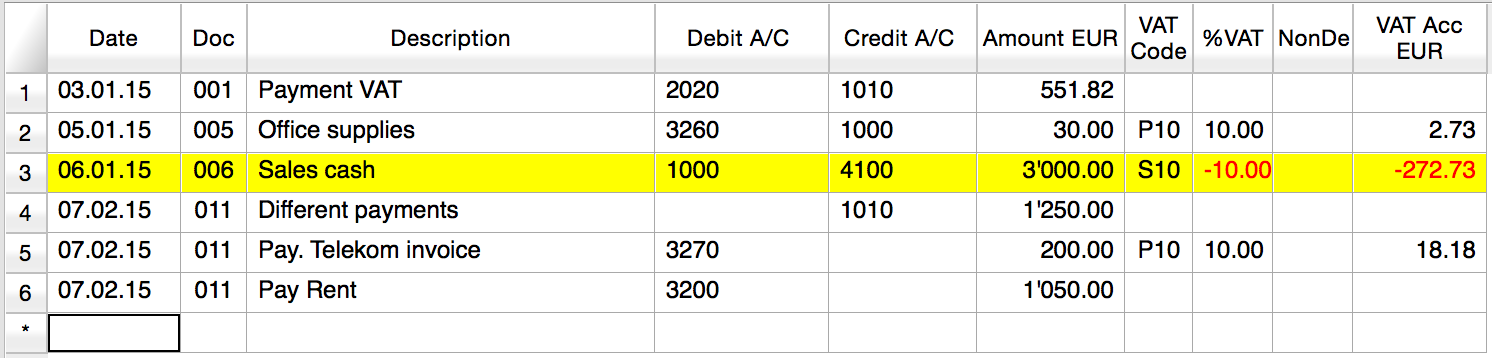
Journal:

One line for the 1000 JAccount
One line for the 4100 JAccount
One line for the 2020 JAccount. The VAT amount is in negative for the fact that the VAT amount is registered in credit, and therefore the amount must be pay to the tax authority
- Doc 011 – Multiple lines transaction with VAT
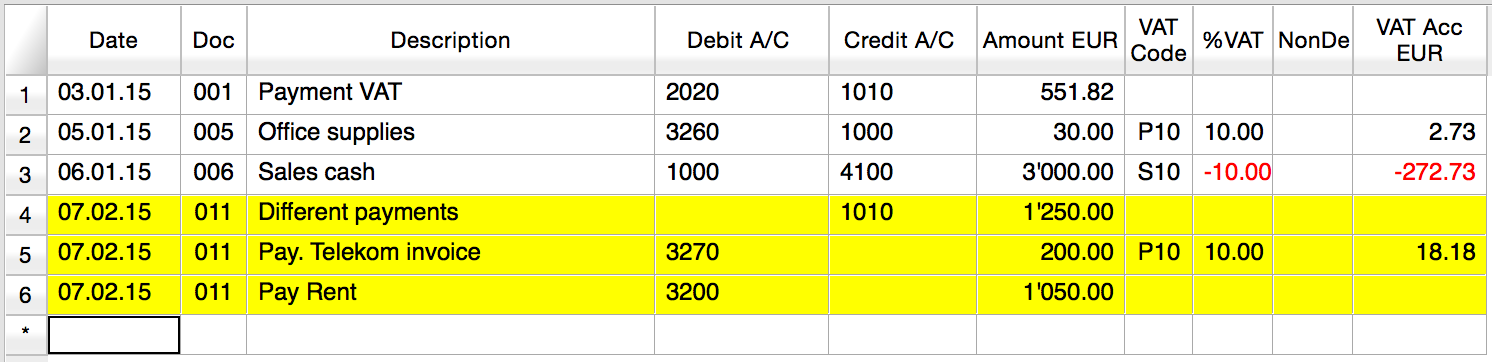
Journal:

One line for the 1010 JAccount
One line for the 3270 JAccount
One line for the 2020 JAccount
One line for the 3200 JAccount
Extensions for importing data in Banana Accounting
Introduction
This walkthrough provides step-by-step guidance for creating a simple BananaApp to import income & expenses transactions in CSV format, that reads the data to import from a CSV file, trasform and then return them in a format comptatible with Banana Accounting.
The steps in order to experiment with import BananaApps are the following:
- Create a CSV file example
- Create the import BananaApp
- Install the BananaApp
- Run the import BananaApp
Create the CSV file
First we need a data source in order to import them in Banana Accounting, and for this example we want to use a CSV file.
Copy the following CSV example, paste it on your text editor and save it as csv_example.csv:
"Date","Description","Income","Expenses"
"2019-01-01","Income transaction text","100.00",""
"2019-02-02","Expense transaction text","","200.00"
- First line is the fields header. Fields names are case sensitive and must correspond to the NameXml (English) of the columns in Banana Accounting.
- Fields names and data values are between double quotes.
- Fields and values are separated with a comma
- Each line is a new record
- The format for the Date fields is yyyy-mm-dd
Create the import BananaApp
Copy the following JavaScript code, paste it on your text editor and save it as import_transaction_example.js:
// @id = ch.banana.app.importtransactionexample
// @api = 1.0
// @pubdate = 2018-10-30
// @publisher = Banana.ch SA
// @description = Example Import Transactions (*.csv)
// @doctype = *
// @docproperties =
// @task = import.transactions
// @outputformat = transactions.simple
// @inputdatasource = openfiledialog
// @inputencoding = latin1
// @inputfilefilter = Text files (*.txt *.csv);;All files (*.*)

/* CSV file example:
"Date","Description","Income","Expenses"
"2019-01-01","Income transaction text","100.00",""
"2019-02-02","Expense transaction text","","200.00"
*/

// Parse the data and return the data to be imported as a tab separated file.
function exec(inText) {

   // Convert a csv file to an array of array.
   // Parameters are: text to convert, values separator, delimiter for text values
   var csvFile = Banana.Converter.csvToArray(inText, ',', '"');

   // Converts a table (array of array) to a tsv file (tabulator separated values)
   var tsvFile = Banana.Converter.arrayToTsv(csvFile);

   // Return the converted tsv file
   return tsvFile;

}
When it is used transaction.simple as @outputformat attribute in the script, it's important that CSV file includes "Income" and "Expenses" fields.
Install the BananaApp
For the installation of the BananaApp, see Install your BananaApp.
Run the import BananaApp
To run an import BananaApp follow the steps below:
- Open an accounting file in Banana Accounting.
- In Banana select from the menu Account1 the command Import to accounting...

- From the import type selection select Transactions.
- From the list select the Example Import Transactions (*.csv) BananaApp.
- Click on Browse and look for the csv_example.csv file, then click to Open.

- Click Ok to begin the import process.
- On the dialog window select a Destination account and click on Ok to terminate and import the data.

The data from the CSV file are imported into the Transactions table of your accounting file like the following examples.
- For a Double-Entry accounting:

You can now replace all the [CA] values with the appropriate contra-account, so that the Credit transactions will be balanced with the Debit transactions.
- For an Income & Expenses accounting:

For each transaction you can now enter an income or expense category, as defined in the Categories table.
More about Import BananaApps
Working with the TestFramework
Introduction
This walkthrough provides step-by-step guidance for creating a simple test case example that uses Extensions Test Framework to run unit tests of Extensions.
The steps in order to experiment with Extensions Test Framework are the following:
- Download and use the Banana Experimental version
- Create a Extension to be tested
- Create a test case
- Run the test
- Verify the test results
Create an Extension to be tested
A test case is related to a working Extension.
For this example we use a modified version of "Hello World!" Extension example (see Build your first Extension).
- Copy the code below, paste it on your text editor and save the file as helloworld2.js
// @id = ch.banana.app.helloworldexample
// @api = 1.0
// @pubdate = 2018-10-23
// @publisher = Banana.ch SA
// @description = Example Hello world 2
// @task = app.command
// @doctype = *.*
// @docproperties =
// @outputformat = none
// @inputdataform = none
// @timeout = -1
function exec() {
   //Call the function to create the report
   var report = createReport();

   //Print the report
   var stylesheet = Banana.Report.newStyleSheet();
   Banana.Report.preview(report, stylesheet);
}

function createReport() {
    //Create the report
    var report = Banana.Report.newReport("Report title");

    //Add a paragraph with the "hello world" text
    report.addParagraph("Hello World!");

    //Return the report
    return report;
}
Create a test case
Follow the instructions below to create a working test case:
- Create a folder test in the same folder where the Extension helloworld2.js is located.
- Copy the following JavaScript code and paste it into a text editor.
// @id = ch.banana.app.helloworld2example.test // @api = 1.0 // @pubdate = 2018-10-30 // @publisher = Banana.ch SA // @description = [Test] Example Hello world 2 // @task = app.command // @doctype = *.* // @docproperties = // @outputformat = none // @inputdataform = none // @timeout = -1 // @includejs = ../helloworld2.js // Register this test case to be executed Test.registerTestCase(new TestFrameworkExample()); // Define the test class, the name of the class is not important function TestFrameworkExample() { } // This method will be called at the beginning of the test case TestFrameworkExample.prototype.initTestCase = function() { this.progressBar = Banana.application.progressBar; } // This method will be called at the end of the test case TestFrameworkExample.prototype.cleanupTestCase = function() { } // This method will be called before every test method is executed TestFrameworkExample.prototype.init = function() { } // This method will be called after every test method is executed TestFrameworkExample.prototype.cleanup = function() { } // Every method with the prefix 'test' are executed automatically as test method // You can defiend as many test methods as you need TestFrameworkExample.prototype.testVerifyMethods = function() { Test.logger.addText("The object Test defines methods to verify conditions."); // This method verify that the condition is true Test.assert(true); Test.assert(true, "message"); // You can specify a message to be logged in case of failure // This method verify that the two parameters are equals Test.assertIsEqual("Same text", "Same text"); } TestFrameworkExample.prototype.testBananaApps = function() { Test.logger.addText("This test will tests the BananaApp helloworld.js"); var document = Banana.application.openDocument("file:script/../test/testcases/accounting_file.ac2"); Test.assert(document, "File ac2 not found"); // Add the report content text to the result txt file var report = createReport(); Test.logger.addReport("ReportName", report); } - Modify the script: find the row "var document = Banana.application.openDocument("file:script/../test/testcases/accounting_file.ac2")" and replace "accounting_file.ac2" with the name of your Banana accounting file.
- Save the file into test folder as helloworld2.test.js (the file name must always be <same_name_bananaapp>.test.js).
- Create a folder test/testcases and copy there your file .ac2.
- Now you should have something like this:

- helloworld2.js: the BananaApp
- test: the test folder
- helloworld2.test.js: the test script for the Extension
- testcases: the folder for test ac2 files
- xxx.ac2: your Banana accounting file
Run the test case
Finally, now it is possible to run the test case and see the results.
To run the test:
- In Banana select from the menu Apps the command Manage Apps...

- Select from the Installed element the “Example Hello World 2” Extension
- Click on the button Run tests

Test case results
The test compare the current results with the expected results and checks if there are differences.
If differences are found a dialog message warn you. All the details can be found inside the .test.diff.txt file.
The first time you run a test probably you will see the following "Test failed" dialog message:

In your test folder you can see two new auto generated folders:
- test/testresults:
contains the helloworld2.test folder with a helloworld2.test.txt file with the results of the test.
When the test is run, the folder and the file are automatically generated. - test/testexpected:
contains the helloworld2.test folder that should contain a helloworld2.test.txt file with the expected results.
When the test is run, the folder is automatically generated, but the file NOT. The first time you run the test the folder is empty. This is why the test fails.
You now should have something like that:

Inside the test/testresults/helloworld2.test folder there is the helloworld2.test.txt file with all the results of the test, like the following one:

The file helloworld2.test.diff.txt is a resume of the results, with all the differences the test has found.
The image below shows an example of test summary with differences:
- with the sign "+" are indicated the rows added to the .txt file of the test/testresults folder (compared with the testexpected folder)
- with the sign "-" are indicated the rows removed from the .txt file of the test/testresults folder (compared with the testexpected folder)

As mentioned above, the folder test/testexpected is empty. This is why we can see a lot of added rows to the .txt file of the test/testresults folder.
If you have differences and and you know these differences are correct (like in this case):
- copy the test results .txt file from the folder test/testresults to the folder test/testexpected.
You should have a structure like this:

Note that the helloworld2.test.txt file is now located in both folders, in the test/testresults/helloworld2.test folder and in the test/testexpected/helloworld2.test folder.
If you run again the test, this time the result is different. You now should see a positive message from the dialog:

This means that the results .txt file generated from the test, is perfectly identical of the expected .txt file. So, the test is successfully passed.
You can also check the helloworld2.test.diff.txt file of the test/testresults/helloworld2.test folder to see the differences results, and there should not be differences found.

From that point, every time you do changes to the Extension you can test it and see if the changes you made works as you expected.
Remember: if you have differences and you know these differences are correct, you have to replace the expected .txt file.
More about Extensions Test
- Extension Test Framework
- TestFramework GitHub documentation
- JavaScript code example (ch.banana.script.testframework.test.js)