Transactions | Double-entry accounting
Avoid mistakes with Banana Accounting Plus
In order to facilitate checking your accounting work and to immediately find differences, in Banana Accounting Plus, our new version, we added the Balance column in the Transaction table. You can now see potential differences on each row and you can correct them right away. It is a very useful feature when closing the accounting period.
Many of our clients have already tried it and are enthusiastic about it. We advise you to switch now to Banana Accounting Plus and take advantage of the many new features.
The Transactions table
Transactions must be entered in the Transactions table.
Info window
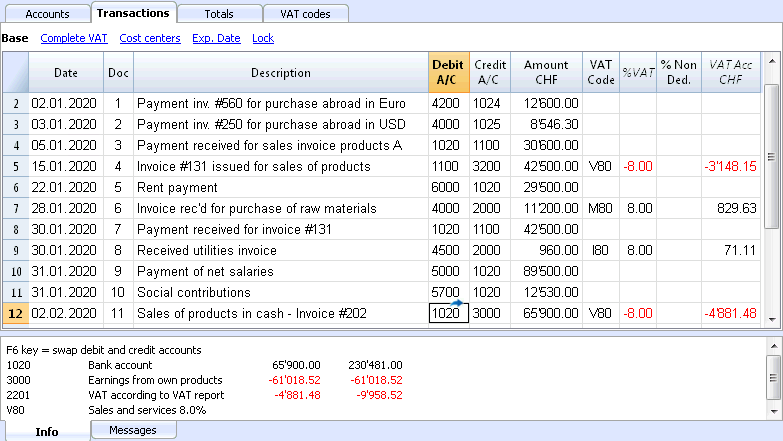
In the Information window at the bottom part of the screen, error messages and extra information about the used accounts and VAT codes are being displayed.
For the accounts, the Account number, the Description, the Amount of the transaction (debit or credit) and the Current balance of the account is being indicated.
The columns of the Transactions table - Double entry
The Transactions table has a series of columns and views already set.
The columns of the Transactions table
The columns listed hereunder and preceded by an * are usually not visible.
In order to make them visible, use the Columns setup command from the Data menu.
Date
The date the program uses to attribute the transaction to a certain time frame. The date should be within the limits of the accounting period defined in the Basic data of the accounting. In the Options tab, one can indicate whether the transaction date is required, if not this value can also be left empty.
If there are locked transactions, the program gives an error message when an equal or earlier date than the one of the lock is being entered.
*Date Document
The date of the document can be entered, for example the date of issue for an invoice.
*Date Value
The value date of the bank operation can be indicated. This value is being imported from an electronic bank statement.
Document
The number of the voucher that serves as a base for the accounting transaction. When entering transactions, it is advisable to indicate a progressive number on the document, so that the accounting document can be easily traced from the transaction.
The autocomplete feature proposes progressive values as well as transaction codes that have been defined earlier in the Recurring transactions table.
The program proposes the next document number, that can be resumed with the F6 key.
-
In case of a numeric numbering, the program simply increases the highest value found in the Doc column.
- Alphanumeric numbering: the program increases the final numeric part; this is useful when one would like to keep a separate numbering for cash and bank movements.
If earlier Doc number C-01 has been entered, and one starts to type C, the program proposes C-02.
If earlier Doc number B104 has been entered, and one starts to type B, the program proposes B-105.
If earlier Doc number D10-04 has been entered, and one starts to type D, the program proposes D10-05.
In the recurring transactions you can setup transactions groups that can be reloaded with a single code.
In order to add a large number of document numbers, you can also use Excel. You can create in Excel the desired quantity of document numbers and then copy and paste it into Banana, in the column of the Transactions Table.
*Document Protocol
An extra column in case an alternative numbering for the transactions or for the document is needed.
The autocomplete feature proposes progressive values that function in the same way as the ones in the Document column.
*Document Type
Contains a code that the program uses to identify a type of transaction. If you prefer to use your own codes, it is advisable to add a new column.
- 01 In the reports, this transaction is considered an opening transaction, so it doesn't show in the period but in the opening balances.
- from 10 to 19: codes for customers' invoices
- from 20 to 29: codes for suppliers' invoices
- from 30 to 1000: codes reserved for future purposes.
*Document Invoice
A number of an issued or paid invoice that will be used together with the invoice control feature for customers/suppliers
*Document Original
The reference number present on a document, to enter, for example, the number of a credit note.
*Link to external file
Serves to enter a link to an external file, usually the accounting voucher.
Pressing on the little arrow on the upper part of the cell, the program opens the document.
*External reference
Any reference number all allocated by a program that generated this operation. This value can be used to check whether a given task is imported twice.
Description
The text of the transaction.
The autocomplete feature proposes the text of an already entered transaction, or of one that has been entered in the preceding year when the appropriate option has been activated. When pressing the F6 key, the program retrieves the data of the preceding row with the same description and completes the columns of the active row.
In case the description begins with #CheckBalance, the transaction is being considered as one that serves to checkup the balance.
Please consult our page Check accounting for more information on the subject.
*Notes
Useful to add notes to the transaction.
Debit Account
The account that will be charged.
It is possible to also enter a segment in the Debit account column. These are usually separated by a ":" or a "-".
In the accounts list, pressing the key with the segment separator symbol, one goes immediately to the next segment.
If instead the Enter key is being pressed, the input finishes and one moves to the next column.
The autocomplete feature proposes the accounts and segments. One can also enter a search text and the program shows all the accounts that contain that text in one of the columns.
*Debit Account Description
The description of the entered account retrieved from the Chart of accounts.
Credit Account
The account that will be credited. We refer to the explanation under Debit account for the rest of the information.
*Credit Account Description
The description of the entered account retrieved from the Chart of accounts.
Amount
The amount that will be entered unto the debit- and credit account.
VAT columns
Information on the VAT columns can be found att the VAT columns in the Transactions table page
CC1
The Cost center account preceded by "."
*CC1 Description
The description of the Cost centre, retrieved from the Chart of accounts.
CC2
The Cost center account preceded by ","
*CC2 Description
The description of the Cost centre, retrieved from the Chart of accounts.
CC3
The Cost center account preceded by ";"
*CC3 Description
The description of the Cost centre, retrieved from the Chart of accounts.
*Expiry date
The date before which the invoice has to be paid.
*Payment date
Used in combination with the Show Expiry dates command.
When instead using the invoices customers/suppliers control feature in order to check on the payments, a transaction has to be entered for an issued invoice and another one for the payment thereof.
*Lock Number, Lock Amount, Lock Progressive, Lock Line
More information at the Lock Transactions page.
Additional columns
The following columns are added with the 'Tools' -> 'Add new functionality command, Add items columns in the Transactions table' (Refer to the Items columns in the Transactions table documentation for further information:
Item
Quantity
The quantity multiplied by the unit price will produce the total amount (can also be a negative number).
Unit
A description referring to the quantity, for example: mq, ton, pz.
Unit/Price
The unit price multiplied by the quantity, will produce the total amount (can also be a negative number).
If a value is entered in the Quantity or Unit Price columns, the amount is calculated on the basis of the contents in these two columns and converted to a positive value.
Adding new columns
With the Columns setup command, it is possible to display, hide or move the order of columns, add new ones, or indicate that a column should not be included in the printout.
- The added columns in the Transactions table will be added also in the Recurring transactions table, in the Account card and in the VAT report, without being made visible.
In order to display these columns in the other tables, use the Columns setup command. - If a column of the "amount" type is being added, the entered amounts will be added up in the Account card.
Views
When a new accounting is being created, the following views are being automatically created as well:
- Base: the main columns are being displayed
- Cost centres: the CC1, CC2 and CC3 columns are being displayed
- Expiry dates: the columns Expiry date and Payment date are being displayed
- Lock: the columns relative to the Lock function are being displayed.
With the Views setup command, the views can be customized and personal, added views can be created.
With the Page setup command, you can modify the print mode of the view.
Transaction types
Simple transactions
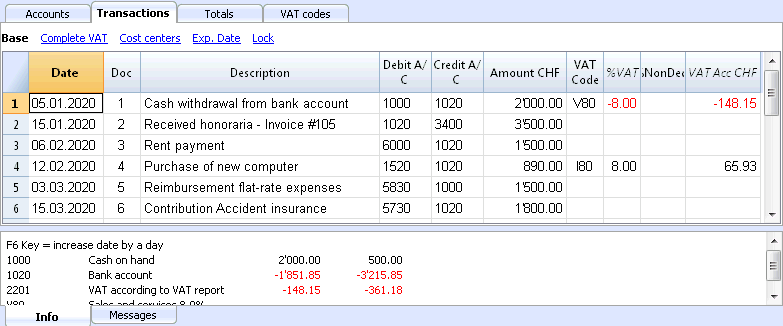
Simple transactions are the ones regarding two accounts (one Debit account and one Credit account) and entered in one single row. Each transaction has its own document number.
Composed transactions
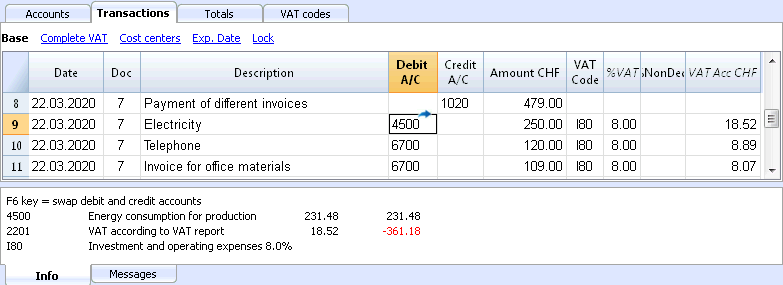
Composed transactions with more than two accounts involved, have to be entered on several rows. The user should enter one account per row. The counterpart account for the entire transaction has to be entered on the first row.
The document number, entered on the different rows, is the same because we are dealing with one and the same transaction.
Note:
In composed transactions, the dates of the transaction rows should be the same, otherwise, when doing calculations by period, there may be differences in the accounting.
Recurring Transactions
Recurring Transactions table
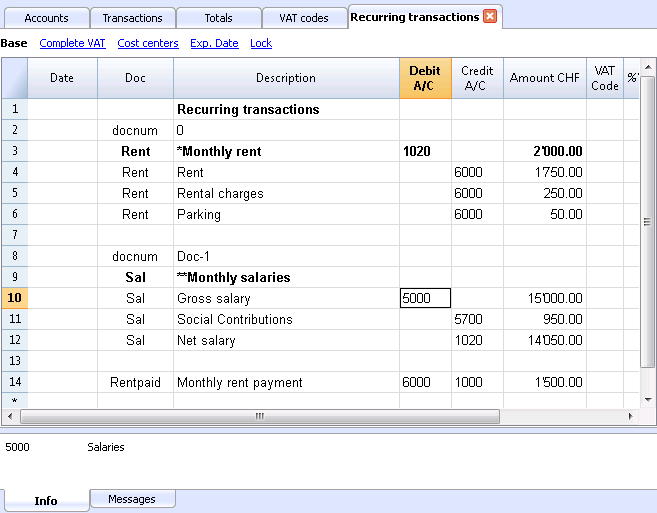
In order to avoid rewriting always the same texts, it is possible to store transaction groups in the Recurring transactions table (Account2 menu). These groups are identified with a code and can be retrieved and entered into the Transactions table just by entering the corresponding code.
When positioned on the Doc column of the Transactions table, the program proposes the list of the recurring transactions, grouped bycode. If one of these codes is selected:
- the program enters the recurring rows that have the same code
- the program completes the entered rows with the date and other values that have been entered earlier
- the program enters the progressive number in the Doc column (based on earlier entered values)
Entering recurring transactions
- You need to enter into the Recurring transactions table (or copy from the Transactions table) the transaction rows that should be retrieved regularly.
- Enter the code related to the recurring transactions group into the Doc column.
Rows with the same group code will be retrieved together (transaction on multiple rows).
- Progressive numbering of documents "docnum"
If, when retrieving recurring transactions, you wish to have a Doc number different from the automatic one, you need to create a row containing the code "docnum" in the Doc column, and your desired text in the Description column. For the following rows, the text specified in the Description column, will be applied in the Doc column when retrieving the transactions- "0" when no automatic numbering is desired
- "1" progressive numbering
- "cash-1" progressive numbering with the prefix "cash-" (cash-2, cash-3)
The program replaces the number indicated at the end of the text with the next progressive number.
- If you wish the program to suggest just one row per code, the description has to be preceded by:
- An "*": displays just this row and not the others with the same code.
- An "**" displays just this row, but don't retrieve this row (only title row).
- An "\*" allows the user to start the description with an asterisk, without it being interpreted as a command.
It is not possible to save customized setups in the Recurring transactions table; it uses the views and columns setup of the Transactions table.
Retrieving the recurring transactions into the Transactions table
- Enter the date and the information of the other columns that should not be modified
- In the Doc column, choose one of the codes defined in the Recurring Transactions table and press Enter.
- The program enters all the transactions with the same code, repeating the data column and other already entered values.
- In the Doc column, a progressive number is being inserted or one as specified in the docnum
- Or indicate the code in the Doc column and press F6
Copying transaction rows into the Recurring Transactions table
In order to copy rows from the Transactions table into the Recurring transactions table:
- In the Transactions table, select the rows that need to be copied;
- Edit menu -> Copy rows command;
- Go into the Recurring transactions table;
- Edit menu -> Insert copied rows command;
Formatting columns and views
The Recurring transactions table uses the same formats and views as the Transactions table.
It is not possible to have a separate format only for the Recurring transactions table.
It is however possible, from the Transactions table, to add a new View, setup a new columns format, and use this same view in the Recurring transactions table.
Bank checks
To enter issued bank checks, the user needs to insert an Issued checks account in the Liabilities.
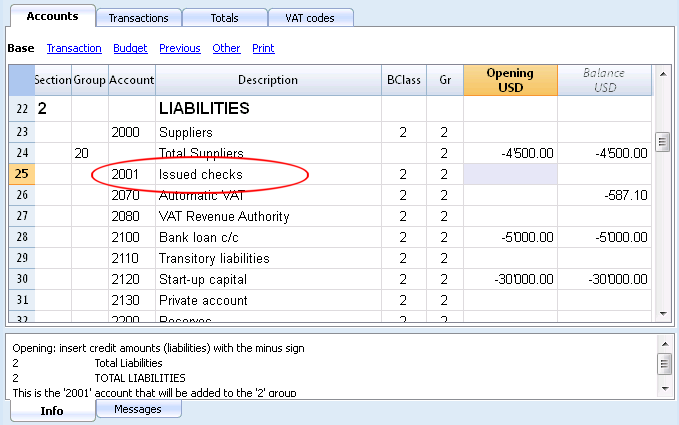
The check is issued at the moment of paying a supplier and later on is being debited from the Bank current account.
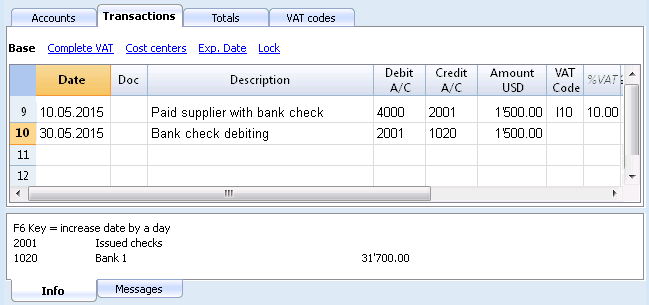
The Issued checks account card after the transactions.
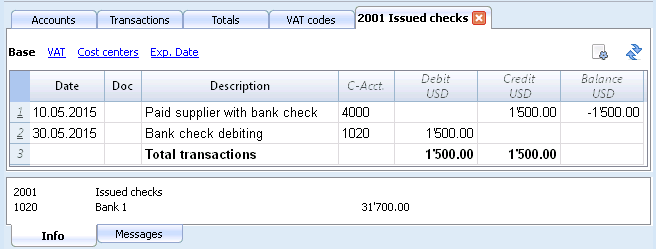
Credit card registration with advance payment
Advance payment on Credit cards
Before taking you through the procedure, check that an account for Credit card exists in the liabilites part of the Chart of Accounts. Create it if that is not the case.
The credit card account is added to the group or sub-group of short-term debts, as long as this is pre-requisite in the chosen Chart of Accounts.If there are no sub-groups, it must be listed in the liabilities section.
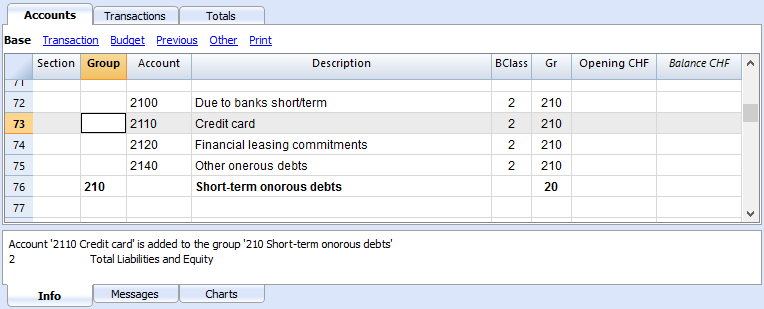
Example:
As per 10.01.2019 CHF 1'000.- are transferred from the bank account to the credit card.
- The bank account is credited and the Credit card account is debited.
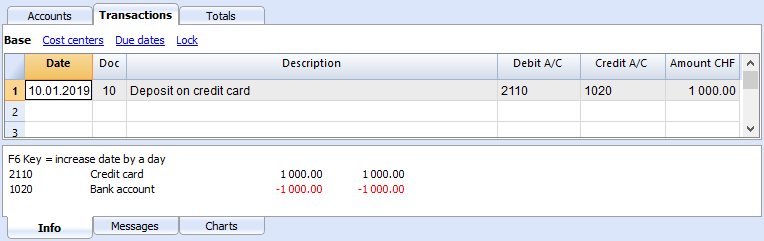
Register your credit card bill
Upon reception of the credit card bill, you must record all the costs listed on the credit card.
Example:
On 15.02.2019 we receive the January credit card bill for a total of CHF 790.- (details: CHF 560.- for computer purchases, CHF 150.- for hotel expenses, CHF 80.- purchase of office supplies) (Doc.25)
- It will be registered on several rows. All the costs relating to the expenses listed in the credit card are recorded in the Debit column; we register one expense per row; in Credit, the credit card account is registered (total of the bill).
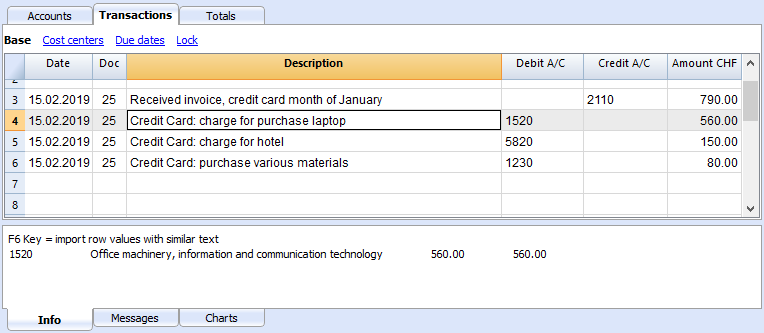
Check the credit card account balance
Each time you pay an advance towards the credit card and once all the costs listed on the credit card have been recorded, you must verify that the credit card balance matches the balance stated on the credit card.
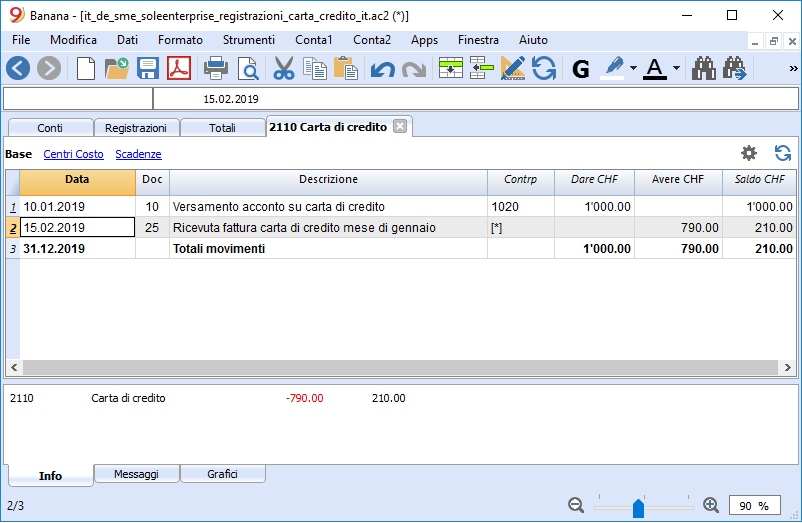
Register your credit card transactions
Credit Card with an accounting using the Cash principle
If no down payments are made on the credit card and the invoice is paid in full with the bank, you should record the credit card invoice at the time of payment when the costs also should be recorded.
You need to record in several rows:
- Enter the same date and document number for each movement on all rows that make up the registration.
- In the Debit A/C column enter the cost account, depending on the type of purchase (even those made abroad). One cost per row is recorded.
- In the Credit A/C column enter the bank or post account used to pay the invoice.
- In the Amount column enter the total amount of the credit card invoice.
After recording all movements, check your credit card balance by opening the credit card account card.
Credit Card with an accounting using the Accrual principle
If you have a turnover accounting, based on the accrual principle, all costs relating to credit card purchases are recorded when you receive the invoice:
- All costs are recorded in the Debit A/C column
- On the Credit A/C column you register the card debt, just like any other supplier
When the credit card invoice is paid, you need to register as follows:
- In the Debit A/C column you enter the credit card debit account
- Credit A/C column enter the bank account or post account used to pay the credit card invoice.
Importing transactions from your credit card
Banana Accounting allows the importation of movements from the credit card into the main accounting file.
A couple of requirements are necessary to perform the import:
- The giro account must have been set up in the Chart of Accounts.
- The format of data provided by the credit card issuing bank must be compatible with the formats provided by Banana Accounting.
To find and determine the formats you need to:
- Open BananaApps in the Account1 menu → Import to accounting ..., click on the Manage Apps... button, select Import.
- Select the bank that issued the credit card and click on the Install button. The format will be displayed in the Import to Accounting dialog.
When data from the credit card, and even bank transactions, are imported, the problem of recorded down payments needs to be addressed. In this case, two registrations are created on the credit card account:
- Presence of a credit card account as a counterpart to bank charges for credit card payments.
- Presence of the credit card account in the movements imported from the credit card.
To avoid any overlap, the giro account is used at the moment of import.
How to perform the import:
- From the Account 1 menu → Import to accounting... select Transactions.
- Select the type of format of the credit card issuing bank.
- Using the Browse button, select the file provided by the bank and confirm with OK.
-
Enter the period and indicate the giro account. Confirm with OK. All movements will be imported into the Transactions table.
- Indicate the cost account for each row.