Chart of accounts
Financial situation under control
You need to setup you chart of accounts in the Accounts table: setup the accounts and the groups where the accounts must be totalized. With this operation you create the accouts that will be used when entering the transactions. The chart of accounts structure is the same that will show in all Balanche sheet and Profit & Loss statement presentations.
In the Accounts table there are also the columns of the initial balances, movements and current balance, which are automatically updated by the program.
The chats of accounts therefore provides an immediate and complete view of your financial situation.
- Liquidity accounts
- Balance sheet
- Profit & Loss statement
- Result of the current year
- Clients and Suppliers register
- Cost and Profit Centers
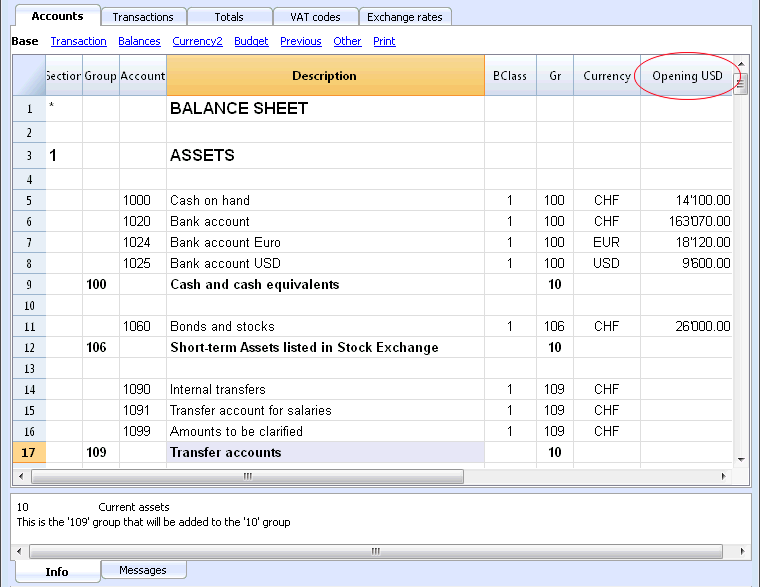
Different kinds of rows and sections
The Accounts table (charts of accounts) is both the setup tool and the viewing tool for the economic and financial situation.
In the chart of accounts (Accounts table) all data necerrary to group the mouvements are entered:
- Accounts
They indicate on what account (debit ore credit) the transactions must be registered.
Each account has a code or number (account number), a description, a class and a group to which it belongs; they also have an opening balance, the current balance, the budget, etc... - Costs and Profits centers
They are special accounts whose number is preceded by a full stop ".", a comma "," or by a semi-colon ";". Their purpose is to be able to assign some amounts to special accounts other than the basic accounting accounts. - Segments
They are a sort of sub-accounts who's number is preceded by a ":". Their purpose is to be able to assign some transactions to subcategories of the accounting plan. - Groups
Their purpose is to create rows where the program adds up the amounts of other rows. - Sections
They indicate the accounting plan divisions for the Balance Sheet and Profit and Loss Statement printouts, ...
The columns of the double-entry accounting charts of accounts
- Section
Codes are being entered that allow the user to only print determined parts of the Chart of accounts, when printing the Enhanced Balance sheet by groups. - Group
Contains the code that defines that this is a group row. The group code is then used in the GR column to indicate the totalization of an account or group.
- Account
The account number, cost center or segment is being entered. - Description
A text to indicate the name of the account, group, or section. - Disable (only visible in the Other view)
By entering 1, the account does not appear in the autocomplete list, but can be used in the Transactions table;
By entering 2, the account is disabled and can not be used. - BClass
It indicates whether the account is 1 = Assets, 2 = Liabilities, 3 = Expenses, 4 = Revenue, see the Accounts
- Gr (Totalize in)
It indicates a group so that the program can totalize this line in the group. - Gr1 and Gr2
Additional grouping codes to use with external accounting report files.
- Opening balance
Insert the account balance at the beginning of the year.The amounts in credit must be entered preceded by a minus sign. The total of the debit amounts (positive) and those in credit (negative) must balance and result in zero. If the opening balances do not balance a difference is shown in the information window.If you have added or pasted accounts and the difference is not correct, proceed with a Recheck of the accounting (Shift + F9)
- Movement Debit and Movement Credit (Protected columns)
The total of the debit and credit movements included in the Transactions table.
- Balance (Protected column)
The balance of the account includes the opening balance and the movements in debit and credit.The balance in debit is positive, while a credit balance is negative (minus sign). - Budget
The budget amount for the current year is being entered.The budget amount for the Expenses (debit) must be inserted in positive, the Revenue in negative (credit). -
Difference Budget (Protected column)
The difference between Balance and Budget amount. - Previous
The balance of the account at the end of the preceding year.
With the command "Create new year" or "Update opening balances", the values in the Balance column of the file of the preceding year are being carried forward.
When a new accounting is being created and the user wants to obtain printouts with the amounts of the preceding year, the values of that year have to be entered manually. - Prev. yr. Difference (Protected column)
The difference between the Balance and the amount of last year. - VATNumber
The VAT number in case this account is linked to a client or a supplier. - VATCode
The VAT code that needs to be applied automatically, when this account is being entered in the debit A/c or credit A/c column of the Transactions. - Adresses columns
It is possible to have the program add addresses columns in order to manage customers or suppliers data.
Adding or moving columns
- When an Amount column is being added in the Chart of accounts, the program composes the total of the amounts according to the selected grouping scheme
-
Added columns of the Number type, on the contrary, are not being totaled.
- With the Columns setup command, the columns can be made visible, the sequences can be altered and it is also possible to add other columns.
- With the Page setup command one can also define the layout of the print (portrait or landscape) and the zoom.
Accounts list ordered by description or other criteria
In you need to order your accounts in a different way, use the Extract and sort rows command from the Data menu.
Views
- Base Displayed are the principal columns, the grouping columns and the balances
- Transaction Displayed are the columns with the Debit and Credit transactions.
- Budget Displayed are the Budget column and the Difference Budget column.
- Previous Displayed are the Previous column and the Difference Prior columns regarding the previous year
- Other The Disable column, the VAT number and the Fiscal number column are being displayed.
- Print Just the Account column, the Description and the Balance is being displayed.
The views can be customized and others can be added with the command Views setup.
Trial Balance sheet
At any time, positioning yourself in the Accounts table and using the Print or Print preview commands (from the File menu), you can view and print the account plan or part of it.
Also from the Accounts table, if you select Movement view, you can view and print your trial balance sheet.
Advanced printouts
- Accounting report
It is possible to select just the accounts with transactions, to obtain temporary groupings or accounts grouped according to the BClass or an external grouping scheme. - Enhanced Balance sheet
Prints all the accounts of the accounting divided by Assets, Liabilities, Expenses and Revenue - Enhanced Balance sheet by groups
Allows the user to obtain customized printouts with groups - Specific advanced printouts are available using the BananaApps
Accounts
Bookkeeping accounts
In order to create an account, go to the Accounts table and enter a number or a code in the Account column.
This same number is then used in the Transactions table as Debit or Credit account.
- The account number can be composed by numbers, letter and separations characters.
- It is not possible to have more than one account with the same number.
- Each account must have a BClass and must belong to a group.
The BClasse
Each account must belong to one of the following BClasses:
- 1 for Assets
- 2 for Liabilities
- 3 for Expenses
- 4 for Income
The BClasse number must be as indicated, regardless the account or group code. It is also possible to create Off Balance Sheet accounts (for example for warranty down payments, e conditional committments), that must have the following BClass:
- 5 for Off Balance Sheet: Assets
- 6 for Off Balance Sheet: Liabilities
Opening balances
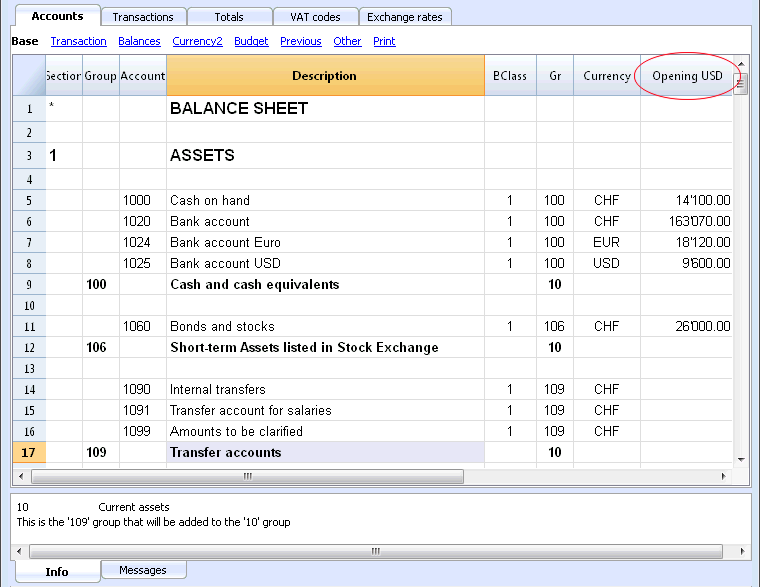
The opening balance of each account is entered in the Opening + currency symbol column.
- The Assets balances are shown normally
- The Liabilities balances are entered with the minus sign (negative)
- Usually only the Assets and Liabilities opening balances are entered.
In order to automatically transfer the opening balances for the following year, please visit the Create New Year lesson.
Opening balances differences
In a correct accounting file, the total of the Assets opening balance should be equal to the total of the Liabilities opening balance, so no differences are shown.
If the totals do not match, the program will show a warning message telling you that there is a opening balances difference (Information window).
If you have changed some account numbers and you think the error message is not correct, please Recheck the accounting.
When using Banana Accounting for the first time, the opening balances must be entered manually.
Accounts with addresses
It is possible to add a few columns in the chart of accounts, to include the addresses management:
Tools menu -> Add new functionalities command
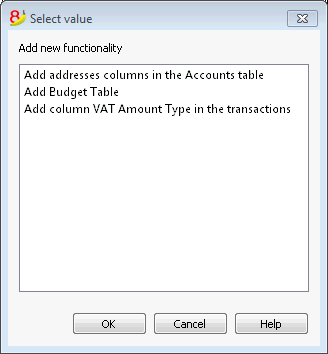
This command will add in the Chart of accounts the following things:
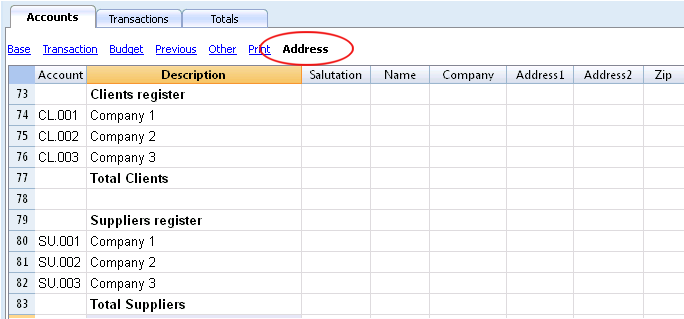
- several columns (name, last name, company, town, ...) where you can enter the client / supplier / member address and data
- the Address view where you can see the added columns (in order to change the view or the views organization please consult the Tables setup page)
Clients/supplier register
When in the accounting plan you need to manage a clients/supplier register, meaning a specific account list for all clients, you need to have complete data with address, phone number, email, VAT number, etc. in this case adding the columns of the Address view is very useful.
Groups
The grouping and totaling system
The Banana grouping and totaling system is based on the following columns:
- Group (TOTAL row)
When, in a row, a group identifier is being entered, the row becomes a TOTAL row.
In this row the amounts of the Gr column, that contain the same identifier, are being totaled.
When a group is present, there cannot be an account. . - Gr (Adds this row into the TOTAL row)
The number here must be one of the numbers defined in the Group column.
With this system, an account can be totaled in a group row, the group in another group and so on... in order to create different totaling levels.
This totaling system is very powerful and flexible, but it takes some "getting used" to it, in order to be able use it well.
Examples of the main groupes in the Double-entry accounting
Every Chart of accounts uses its own totaling system. Hereunder the main groupes of the Double-entry accounting are being explained.
In the Double-entry accounting, the total of the Debit balances (positive) together with the Credit balances (negative) have to result in 0 (zero).
- The 00 is the row where all the amounts are being added together.
It is the "Summa summarum" of all the Debit & Credit balances.
In case the Balances columns do not amount to zero, it means there is a Debit/Credit difference and thus most likely a mistake. In these cases it is useful to proceed with a checking of the accounting (see next point).
In the Debit and Credit columns of the Transactions view (Accounts table), there are only positive amounts, so also in the row of the 00 group, there will be the total of the transctions not equal to zero.
The calculation sequence to arrive at 00 is therefore as follows:
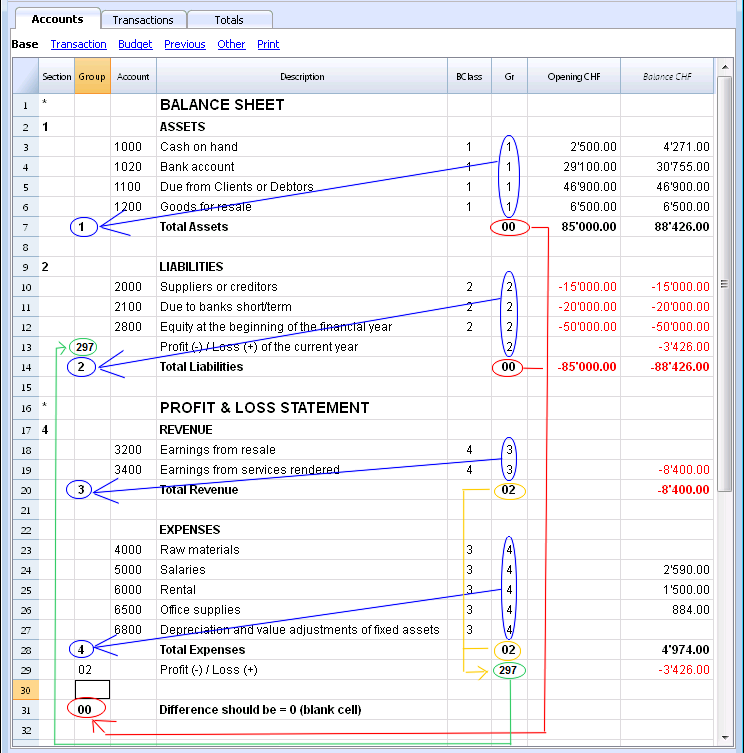
- The 1000 account -> group 1 (Total Assets)-> Group 00
- The 2000 account -> group 2 (Total Liabilities) -> Group 00
- The 3000 account -> group 3 (Total Revenue) -> Group 02 (result Profit & Loss Statement) -> Group 297 (Profit/Loss of the current year in the Balance Sheet) -> Group 2 (Total Liabilities) -> Group 00.
- The 4000 account -> group 4 (Total Expenses) -> Group 02 (result Profit & Loss Statement) -> Group 297 (Profit/Loss of the current year in the Balance Sheet) -> Group 2 (Total Liabilities) -> Group 00.
The result of profit & loss statement is added in equity
As you can see in the example, the Group 02 (Profit /Loss from Profit & Loss statement) is totalized in the 297 liabilities group (current year result).
With this group organization, we have several advantages:
- In current year operating result is displayed in the balance sheet
- The Total Liabilities will match the Total Assets (provided that there is no accounting error).
Adding or deleting subgroups
Adding a totaling level
With this system it is easy to add totaling levels.
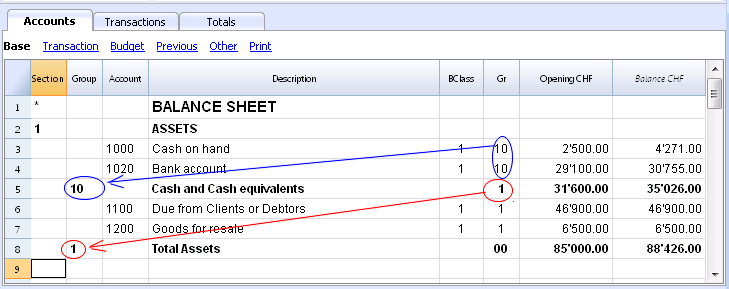
When we want to create a subgroup for the Cash & Cash equivalents accounts:
- Enter an empty row after the bank account
- Enter the value 10 into the Group column
- Enter the value 1 into the Gr column
- Indicate the Gr 10 in the accounts 1000 et 1020
- The sequence for the calculation becomes:
The 1000 account -> Group 10 (Cash & Cash equivalents) -> Group 1 (Total Assets) -> Group 00.
In case you want to insert another subgroup, "Current Assets", proceed in the same way.
- Add an empty row above the row of the Total Assets.
- In the new row:
- Indicate the number 11 in the Group column
- Indicate the number 1 in the Gr column
- In the Clients and Goods for resale (inventory) rows, indicate the Gr 11.
Deleting subgroups
In case the Chart of accounts shows subgroups that are no longer needed or not wanted, these can be deleted. Just delete the row of the subgroup and modify the Gr of every account that was part of that subgroup.
Checking of the structure
Once the Chart of accounts has been set up, execute the Check accounting command of the Account1 menu. In case there are errors, the program issues a warning.
Infinite loop error
This warning appears when a Group is being totaled in a Group of a lower level, reason for which an infinite error loop is being created.
There would be an infinite loop when, in the preceding example, the Assets Group (1) would be totaled in Group 10.
The program, after having calculated the Group 1, would total the amount in Group 10, which in turn would total the amount in Group 1, and then again in 10 without ending.
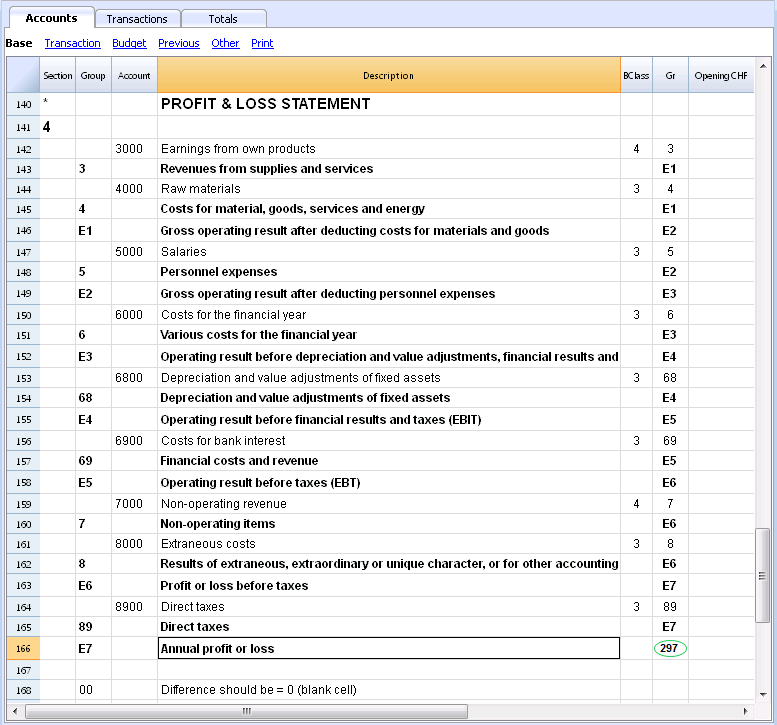
Profit & Loss Statement with Gross Profit
It is also possible to use a Profit & Loss Statement that starts with the total Business result and that subtracts the costs.
Hereunder the example of the Swiss PME Chart of Accounts is shown.
Extended use of the totaling system
The totaling system is very flexible:
- In one Group, it is possible to add Groups as well as Accounts
This can be seen in the earlier shown example where the Group Cash & cash equivalents (10) and the accounts (1100 and 1300) are being totaled in the Assets - You can use whatever kind of numbering
- You can create up to a hundred totaling levels
- The Total row can be after the rows
- The Total row can be before the rows
- The Total row can be completely elsewhere, in a separate position
This is being used to create registers (for example, a client register)
- The accounts and the Groups can be totaled in one single other Group.
It is not possible to total one and the same account at the same time in two groups. - This system is also being used to total the Cost centers and the Segments
Pay attention though to not use different groups for normal accounts and for cost centers, because the resulting amounts will not be correct.
Totaling of the Amount columns
The calculation procedure totals the amount columns
- The amount columns defined by the system are being totaled.
- The amount columns added by the user are being totaled.
The sequence of the calculation
The programme calculates the totals in the following manner:
- Sets the values of the Amount columns of the Groups rows on zero
- Totals the amounts of the Account rows into the Group rows (first calculation level)
- Adds the balance of the Group rows into the Group(s) of a superior level
Repeats the operation until all the levels have been calculated.
Related Documents
Sections
In order to create automatically an Enhanced Balance Sheet with groups, the chart of accounts needs to be configured with special codes that are to be entered in the Section column:
| * | Title 1 | the asterisk separates the sections and indicates the main headers |
| ** | Title 2 | to be entered for the secondary headers |
| 1 | Assets | to be entered in the row of the Assets title |
| 2 | Liabilities | to be entered in the row of the Liabilities title |
| 3 | Expenses | to be entered in the row of the Expenses title |
| 4 | Revenue | to be entered in the row of the Revenue title |
| 01 | Client's Register | to be entered in the row of the Client's Register title |
| 02 | Supplier's Register | to be entered in the row of the Supplier's Register title |
| 03 | Cost Centers | to be entered in the row of the Cost Centers title |
| 04 | Profit Centers | to be entered in the row of the Profit Centers title |
| # | Notes | to be entered in the row of the Notes title |
| #X | Hidden data |
to be entered in the row from whereon the data have to be hidden |
Sections in the Assets
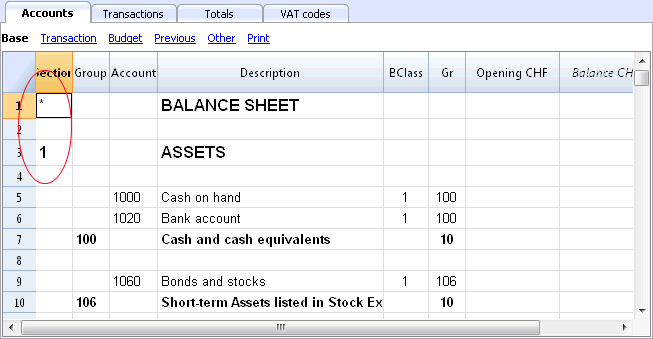
- Enter a * on the same row as the Balance Sheet title
- Enter 1 on the same row as the Assets title
Sections in the Liabilities
- Enter 2 on the same row as the Liabilities title
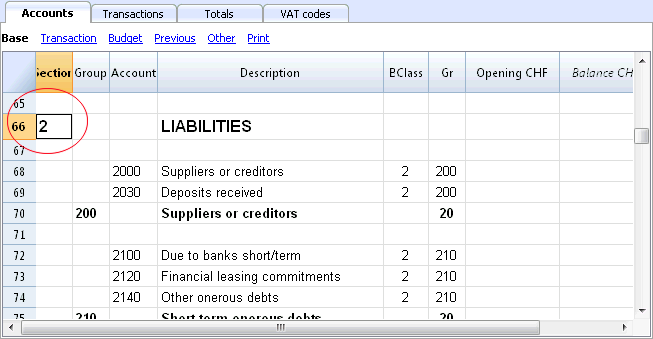
Sections in the Profit & Loss Statement
- Enter a * on the same row as the Profit/Loss Statement title
- Enter 4 on the empty row below the Profit/Loss Statement title
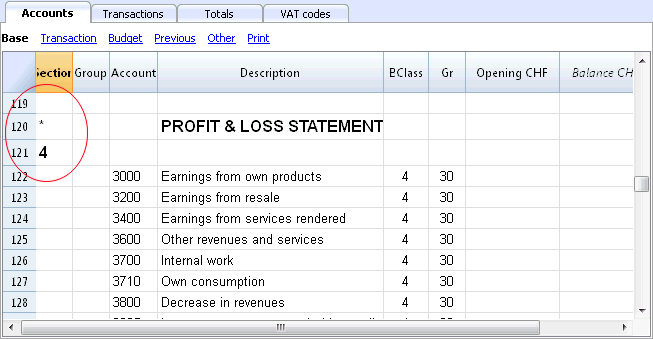
Note: when there is a clear distintion between Revenue and Expenses in the Chart of accounts, you need to:
- Enter 3 on the same row as the Expenses title
- Enter 4 on the same row as the Revenue (Income) title .
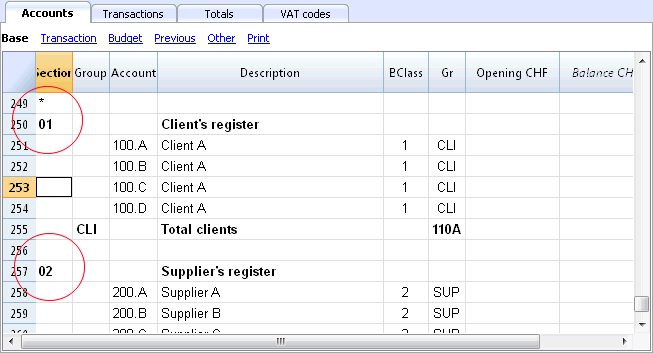
Sections in the clients/suppliers register
- Enter * in the same row as the Clients/Suppliers register title or on a empty row (as in the following example)
- Enter 01 on the same row as the Clients register title
- Enter 02 on the same row as the Suppliers register title
The amounts will be shown in the same way as for the Assets and the Liabilities.
This encoding is also valid when the clients and suppliers are configured as cost centers.
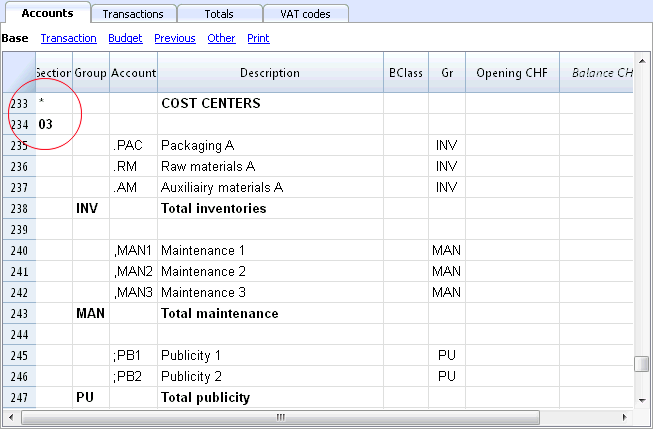
In case there are cost or profit centers configured, enter the following elements
- An * on the row of the Costs and Profit Centers title, or on a empty row
- 03 on the same row as the Cost centers title or on an empty row preceeding the Cost Centers
- 04 on the same row as the Profit centers title or on an empty row preceeding the Profit Centers
The Cost Centers amounts will be shown as positive (in black) like the expenses; the Profit Centers amounts will be shown in negative (in red) like the revenue;
For more information please vist the Sections logic page
Related document: Enhanced Balance Sheet with groups
The Sections logic
The sections different encoding entered in the Section column determines how the printout will come out.
Each section is printed as a separate table.
The directories
- * Title 1 creates a level 1 directory.
It can contain level 2 sections or directories.
It is useful to group sections that need to be printed together, such as the Balance sheet, which contains Assets and Liabilities. - ** Title 2 creates a level 2 directory.
The Base sections
The section number or code determines:
- how the amounts are printed; the amounts can be visualized just like in the Balance sheet or inverted.
If the Credit amounts (in negative) are inverted, they will be visualized in positive, and the positive amounts will be visualized in negative. - which amount columns will be used; the Balance column or the Period Movement column are used.
The Balance column indicates the account balance at a specific date (balance at Jun 30th).
The Total Period Movement column indicates the movement amount on the indicated period.
It is used for the Profit and Loss Statement and indicates the costs or the revenues for a certain period.
Here is the explanation of the different sections
- 1 Assets (amounts as in the accounting plan, balance column)
- 2 Liabilities (inverted amounts, balance column)
- 3 Costs (amounts as in the accounting plan, total movement column)
- 4 Revenues (inverted amounts, total movement column)
This section can be also used alone and it can include both costs and revenues (in case of a Profit & Loss Statement that starts with the total Business result and that subtracts the costs). In this case revenues would be displayed in positive and costs in negative.
These sections must be unique. Therefore there can only be one 1 Assets, or one 2 Liabilities section. For other sections, like clients/suppliers register or cost center similar sections can be used.
Derivatives Sections
Those are Sections that are similar to the Base Sections
- 01 Similar to Assets (amounts as in the accounting plan, balance column)
It is used for the clients register. - 02 Similar to Liabilities (inverted amounts, balance column)
It is used for the suppliers register. - 03 Similar to Costs (amounts as in the accounting plan, total movement column)
It is used for Cost Centers. - 04 Similar to Revenues (inverted amounts, total movement column)
It is used for Profit Centers.
Other Sections
There are other kinds of sections
- # Indicates a Notes Section (it prints only the Description column)
It is used for the Balance sheet attachments - #X Hidden Section. This section is not included in the sections selection and it is not printed.
It is used to indicate parts not to be printed.
Column width in printout
The columns width is automatically set by the program.
Sections 1, 2, 01, 02 have the same column width
Sections 3, 4, 03, 04 have the same column width.
Segments
Introduction
Segments are being used to have a more detailed classification of the costs, also to obtain calculations of components or departments of the company. By using the segments you can obtain a Profit & Loss Statement per unit, department or branch, without having to create specific accounts for each unit.
For example a museum can use the segments in order to know the income, the personnel expenses or the setting up expenses for each exhibit.
Segments are being used when a systematic attribution is necessary, that follows the transaction in debit or credit.
Cost centers, on the contrary, are normally being used for additional cataloging, less structured and when the account sign is not necessarily being followed.
Cost centers and segements can be used at the same time.
Characteristics of the segments
- Segments are accounts preceded by a colon ":".
- Segments codes can consist of numbers or letters.
- There may be up to 10 levels of segments.
- The number of colons preceding the symbol for the segment indicates the number of level.
- :LU segment of level 1
- ::P1 segment of level 2
- :::10 segment of level 3
- For each level there may be an illimited number of segments.
- The different levels of the segment are independent of each other.
- The segments do not have BClasses and do not have a currency symbol
- The calculations for segments are done in basic currency.
- In the transactions, the segment follows the debit and credit account.
It is not possible to record on a segment without having an account. - In the transactions, one can use a "-" as a separator instead of a ":" if on the File properties (Basic data) of the File menu the option Use the minus sign (-) as segments separator has been activated.
- Account cards of the transactions on single segments can be obtained.
Setting up segments
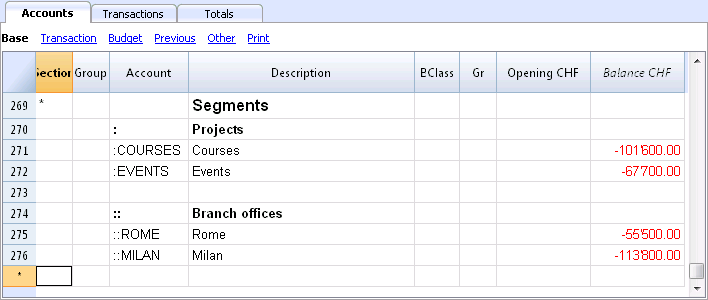
The segments have to be configured in the Accounts table, Account column, at the end of the chart of accounts.
- Insert an asterisk in the Section column in order to define the section relative to the segments
- In the Description column enter the Segments title
- Enter the description of the first-level segments, and in the Account column, insert ":"
- List the segments of the first level, entering an identification code for each one of them in the Account column, preceded by ":"
- Proceed by entering the segments of the second level (and, if necessary, those of the third), in the same way as those of the first level, with the only difference that the segment codes need to be preceded by "::" or by ":::", depending on their level.
Segment balance
The segment is a subdivision of what has been entered on an account. The segment amount is thus always relative to an account, and in order to have the segment total, you need to use an Accounting report (from the Account1 menu), with a subdivision by segment (Subdivision tab).
In the chart of accounts the segment balance is indicated. This balance will be zero if the segment is used in both Debit and Credit accounts, since the amounts compensate themselves). The segment balance will be visible only when using it with the Credit or the Debit account, associated with the Profit and Loss statement account.
Transactions
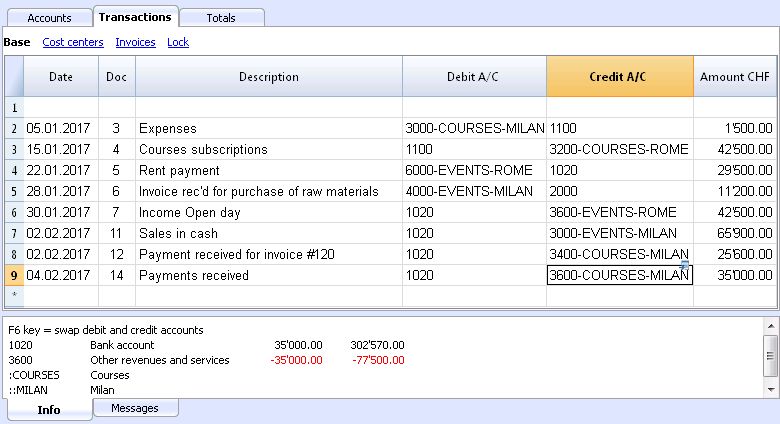
The segments are being entered in the Transactions table, followed by the main account from the account segment.
Each segment is preceded by the colon, or by the minus sign (-), in case the option Use the minus sign (-) as segments separator has been activated in the File and Accounting properties (File menu).
If the chart of accounts contains accounts with "-" or "_", as for example in the clients/suppliers register's accounts), you can't use the same symbols as segments separators; in this case you need to deactivate the corresponding option and use the ":" symbol.
When a segment that belongs to more than one level is being recorded, the segment of the first level needs to be entered right after the main account; then, continue with the code of the second level.
Report
Reports of the segments are obtained with:
- Enhanced balance sheet with groups
- Accounting report.
- Account card
- Multi-level report
In order to obtain reports that combine accounts and segments (for example, all the expenses of the LU Branch for P1), the features of the Banana applications need to be used.
Report subdivision by level
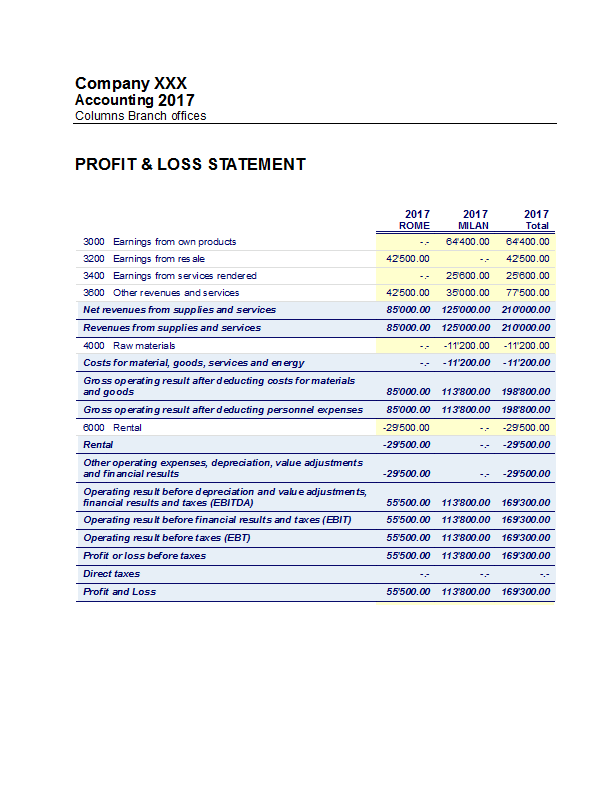
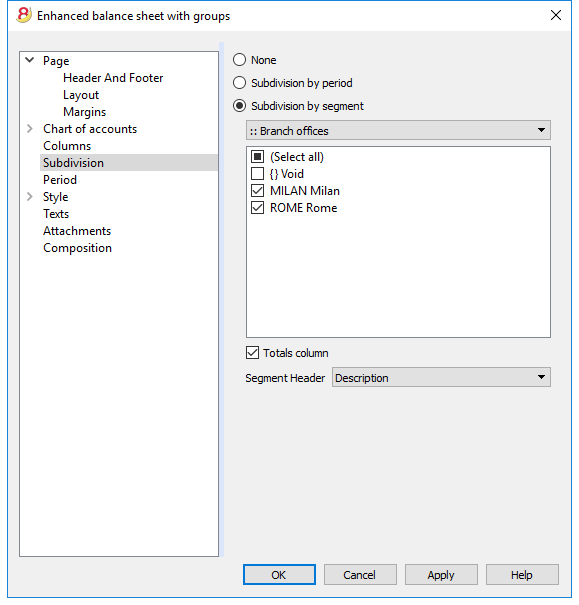
In the Enhanced Balance Sheet with groups, in the Subdivision tab, indicate the segment level to be used.
Summary Report
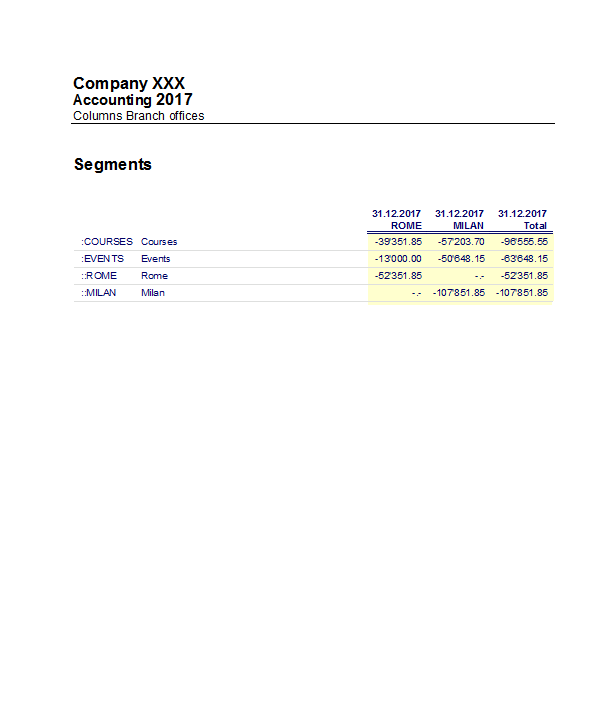
This is a summary with the segment that have been setup in the Accounting plan section, with a possible subdivsion (if desired) by period or by segment.
Segment non assigned
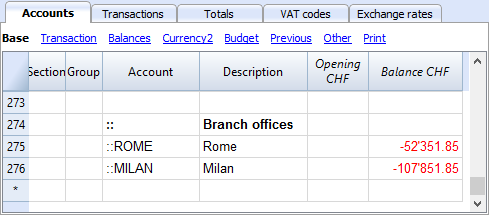
The "empy" segment gathers all the amounts that have been recorded without specifying a segment. It is possible to setup the title for this segment in the Accounts table. Please also select the Segment heather: Description option in the Subdivision section.
Related document: Managing different projects
Managing different projects
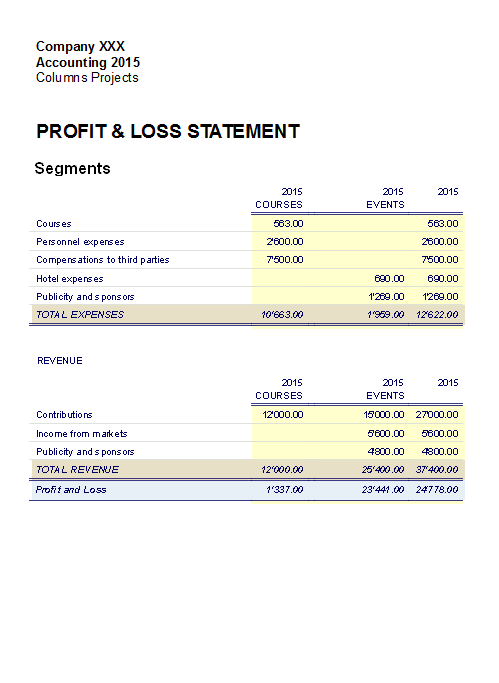
With the Segments feature, it is possible to manage different projects, obtaining balance sheets that determine the profit or the loss of each project.
Example
In an association, there are two projects that need to be managed:
- Courses
- Events
On top of that, there are different branch offices with the same projects to be managed:
- Rome
- Milan
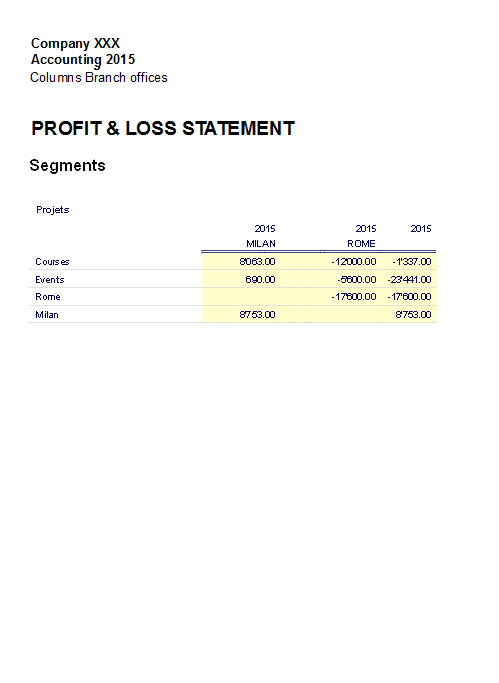
The user wishes to obtain a balance sheet which indicates the profit or the loss of each project and branch office.
How to proceed:
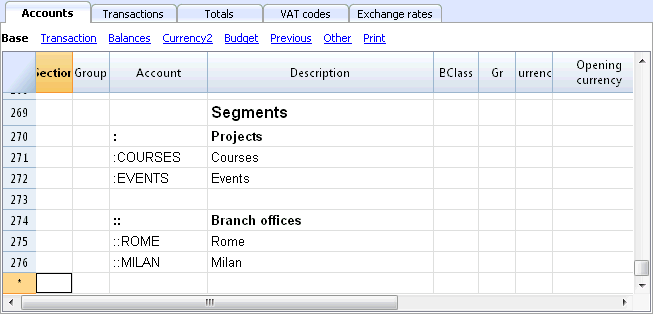
- Insert the segments at the end of the chart of accounts
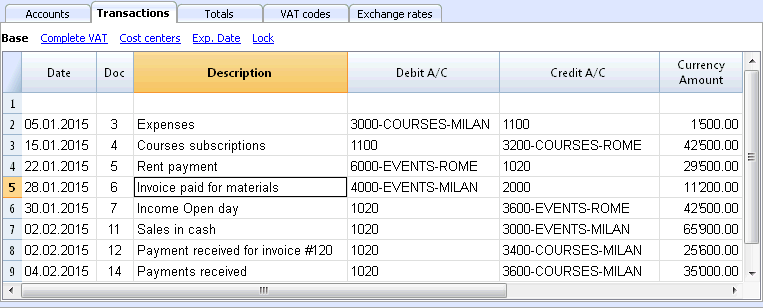
- Enter the transactions, and complete the debit and the credit accounts with the segments
- From the Account1 menu, activate the Enhanced balance sheet with groups command
- Select the available configurations in the different tabs; in the Sections tab in particular, deactivate the display of the Balance sheet accounts, the Client/Suppliers accounts and the Cost centers. The segments usually refer to the accounts of the Profit & Loss statement.
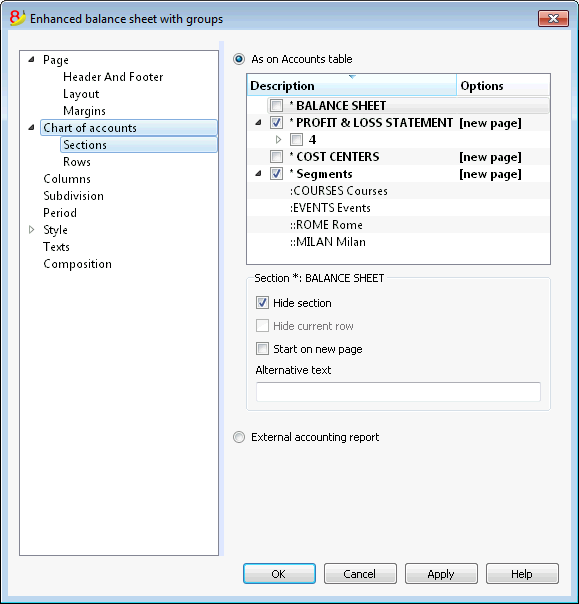
- In the Subdivision tab, activate the Subdivision by segment option
- Select the segment for which the balance sheet should be obtained (by project or by branch office)
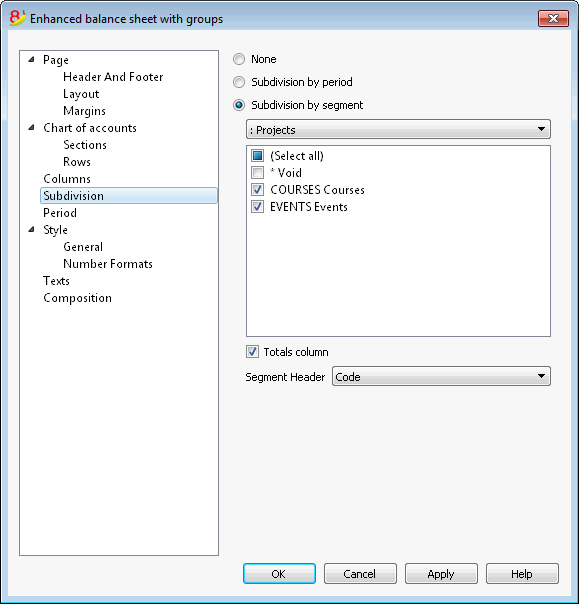
- Click on the OK button in order to display the report
Report by projects
Cost and Profit Centers
The Cost and Profit centers (hereunder being indicated as Cost centers) allow the user to catalog the transactions according to different criteria than the usual accounts.
Characteristics of Cost centers
- The Cost and Profit centers (CC) are accounts, preceded by the ".", "," and ";" signs
- There are three cost center levels:
- CC1 preceded by a period "."
- CC2 preceded by a comma ","
- CC3 preceded by a semicolon ";"
- Each level is independant of the other
- For each level, there can be an unlimited number of cost centers.
- A superior level can be used without using an inferior
- Cost center codes can be alphabetic or numeric
- Cost centers can have there own grouping, different than those of normal accounts. For the same level of cost centers, subgroups can be created. Be careful to not mix cost centers groups with other groups of a different level or with normal accounts or segments.
- Each cost and profit center has its own account card, complete with transactions and balance
- Recording on the cost center is independant of the account recorded in debit or credit. One can even record on a cost center without any account in the debit and credit column.
When to use cost centers
Cost centers are usually being used to catalog certain expenses to specific activities, that are not necessarily linked between each other.
- Projects, Events, Construction sites
- Clients and suppliers, Members, Sales agents
- Extra details for certain expenses
The segments, on the contrary, follow the debit and credit accounts, and are being used as further subdivisions for expenses and revenue.
It is possible to use cost centers and segments together at the same time.
Setting up cost centers in the Accounts table
Attention: If you work with a cash book, the cost and profit centers must be set up in the Categories table!
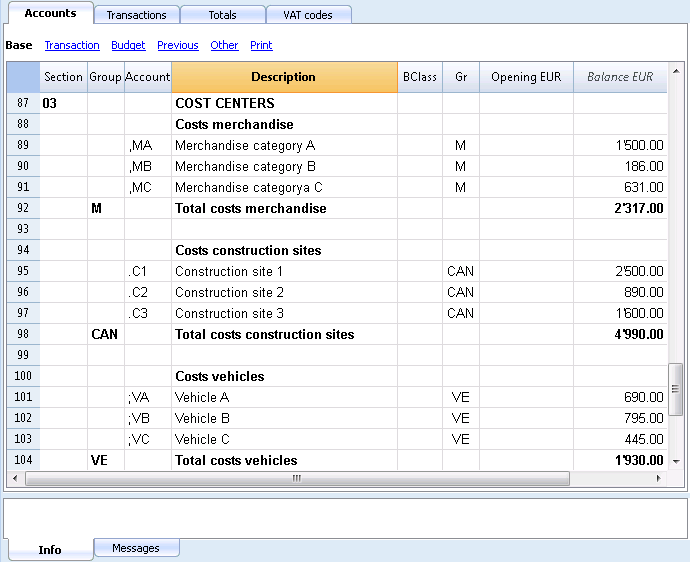
- Create a specific section for the cost centers.
This setup will be necessary for the presentation of the cost centers in the Enhanced Balance Sheet by groups.- Enter a section with an asterisk * for a section change
- In the next row, enter 03 (or 04 for a profit center).
- Add some empty rows for the cost center
- In the Group column, enter the group to which the cost center account belongs
- In the Account column, enter the cost center account precededs by a full stop "." for those to be registered in CC1 column (Transactions table), a comma "," for those to be registered in CC2 column and a semicolon ";" for the ones to be registered in the CC3 column.
- In the Gr column, indicate the group in which the amounts have to be totalized.
- In a Multi-currency accounting, the account currency is also specified.
- Add the cost center groups
- In one and the same group, totalize only one specific level.
- As for normal accounts, different levels can be created.
File Properties (VAT amount)
In the File and accounting properties command, in the VAT tab you can set the amount of cost centers with the following options:
- Use transaction amount - The amount of the cost center is registered according the registration amount
- Use amount excluding VAT - The amount of the cost center is registered net of VAT.
- Use amount including VAT - The amount of the cost center is registered inclusing the VAT.
Transactions
In order to register on the cost centers, it is assumed that the cost center accounts have already been entered into the Chart os accounts.
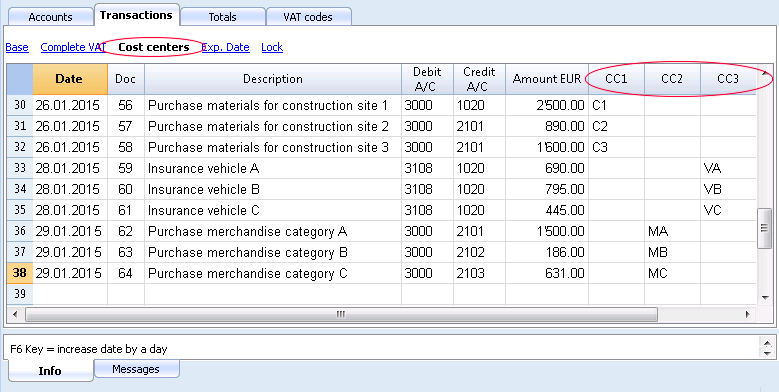
To proceed with the recordings, you need to be in the Transactions table, in the Cost centers view; in the CC1, CC2, CC3 columns, you need to enter the cost center account without the punctuation that precedes it.
- To record on the cost center in credit, the cost center needs to be entered preceded by the minus sign (-).
- For the Income & Expense accounting, in the File and accounting properties, you can define for the cost centers to follow the sign of the category.
- In order to record a global amount on more than one cost center of the same level, a different row needs to be created for each different cost center.
Cost center account card
The cost center is treated as any other account, so each cost center has its own account card with account balance and account transactions.
In order to view all cost center account cards, click on the command Account/Category cards in the Account1, and then on the Cost centers button (Filter option).
Related documents:
Membership list
In order to obtain the membership list with all the data that are useful for an association, the user needs to proceed as follows:
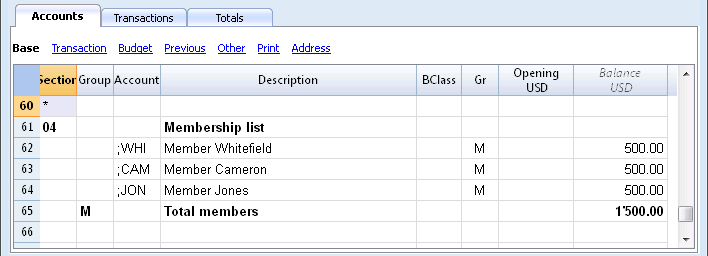
- In the Accounts table, at the end of the Chart of Accounts, the membership list can be created by using the CC3 cost center column.
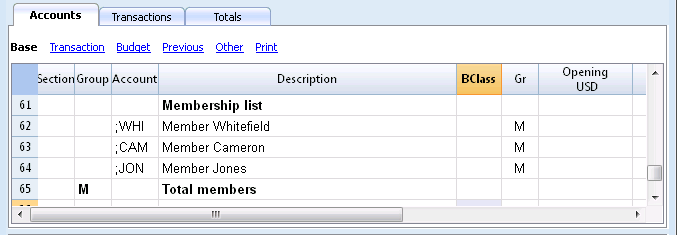
- Activate the Address view, selecting from the Tools menu, the Add new functionalities command
- In the window that appears, confirm the option Add addresses columns in Accounts table
- Insert the data of the members
- For a print-out: select the rows that need to be printed and activate the printing option only Selection.
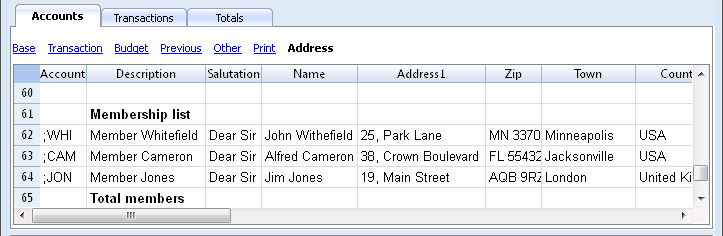
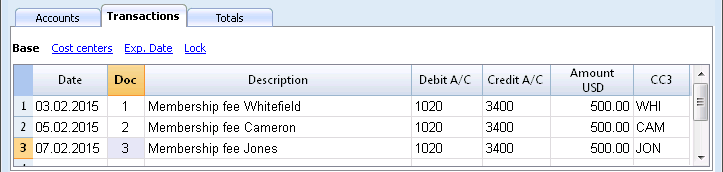
In order to record the transfers from every member in the Transactions table, insert the CC3 account for each member, using the CC3 column. In order to display the CC3 column, click on the Columns setup command of the Data menu; double click on CC3 and activate Visible check box.
In the Accounts table, the balance of the member's transactions is shown.
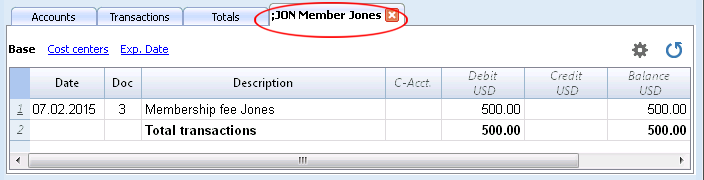
To see all of a member's transactions, double-click on the CC3 account number.
Related document: Cost and Profit centers
Add / Rename
Adding a new account or category
- Position yourself in the row above the one where you want to add the new account
- Add a new empty row with the command Add rows from the Edit menu
- In the columns, insert the account number, the description, the BClass (1 for the Assets, 2 for the Liabilities, 3 for the Expenses and 4 for the Revenue), and the Gr which needs to be the same as the one inserted for the accounts belonging to the same Group.
Note: If you first enter a transaction with a non existing account and later you create the new account in the accounting plan, you will first get an error message, that will go away only if you recheck the accounting with the Shift + F9 key, or the Recheck accounting command from the Account1 menu.
Adding a new group
- Position yourself in the row above the one where you want to add the new group
- Add a new empty row with the command Add rows from the Edit menu
- In the columns, insert the group number, the description and the Gr which needs to be the same as the group you wish this group to be totalized.
Renaming an account or a group
- Position yourself in the Account or Group column in the Accounts table, or in the Category column of the Categories table (or in the VAT code column in the VAT codes table)
- Choose the Rename command from the Data menu
- Enter the new account, group, category or code number
The program will automatically update the Transactions table with the new number or code.
Deleting an account or a group
- Position yourself on the row number that contains the account that is to be deleted
- From the Edit menu, click on the Delete rows command
- Enter the number of rows that you wish to delete
After deleting an account, a category or a group it is necessary to use the Recheck accounting command from the Account1 menu. The program will give you a warning message if the deleted account, category or group was used in the Transactions table.