Donation statement for Associations (Banana+)
Donation statement for Associations (Banana+)A donation statement certifies a voluntary donation to an association. Usually associations print out donation statements for their members and volunteers, as these are often tax deductible.
The extension presented below allows you to create a donation statement for donors registered in Banana Accounting (Accounts table) or in the Estimates and Invoices application (Contacts table).
If members/donors are defined within an accounting file, they must be set up as cost centres using CC3. However, when using the Estimates and Invoices extension, members or donors may remain unchanged in their current configuration.
Prerequisites
To use this extension you must:
- Download and install Banana Accounting+ (version 10.1.7 or later).
- Have the Professional plan or the Advanced plan of Banana Accounting Plus.
Beta Version
The extension is currently released as a beta version. This means that some details may change without notice.
Installing and using the extension
- Install Banana Accounting+.
- Install the extension Donation statement for Associations (Banana Plus). Visit the Manage Extensions documentation.
- Once installed, the extension will be visible in the Extensions menu where it can be executed.
Create a donation statement
- Enter the Association data in the Address tab of the accounting file or the Estimates and Invoices application.
- From the Extensions menu select the Donation statement for Associations (Banana Plus) extension.
- Enter the period in the dialogue box.
- Complete the fields in the Settings dialogue and click OK.
Settings dialogue
Run the extension from the Extensions menu > Donation statement for Associations (Banana Plus).
After selecting the period, the extension Settings dialogue will open. From here you can define the information required to create the print-out of the donation statement.
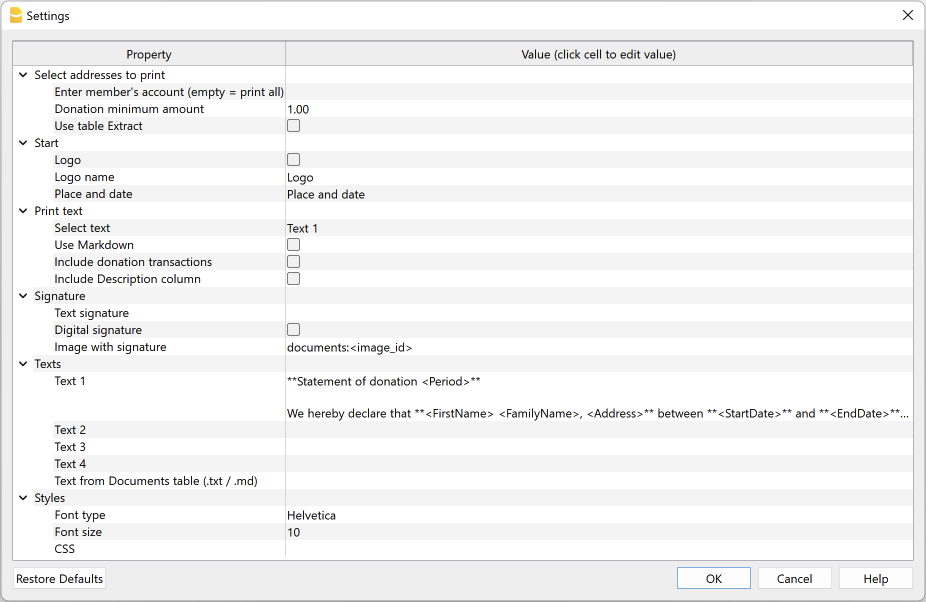
For data entry, click in the cell in the Value column.
The settings are divided into the following groups:
- Select addresses to print
- Define the member accounts for which the donation statement is to be created.
- Start
- Define logo for header, location and date.
- Print text
- Define which text to use and decide whether to include donation records.
- Signature
- Define text and image for signature.
- Texts
- Define up to four different texts or take a text from the Documents table.
- Styles
- Define font type and size for the letter texts.
The entered data are used to generate the report, which you can then save and print.
Select addresses to print
Here you can decide for which members, defined with CC3 cost centres, to create the donation statement.
- Enter member's account (empty = print all)
- Enter a single account (e.g. "10001").
- Enter several accounts divided by a "," (e.g. "10001,10002,10005").
- If you do not enter anything, statements will be printed for all registered members.
- Donation minimum amount
- Accounts with a balance below the indicated amount are not included. The default value is '1.00' (e.g. accounts with zero balance are excluded).
- Enter '0.00' to include accounts with zero balance.
- Use Extract table
- Use the extracted accounts in the Extract table.
- You must first use the command from the Data menu > Extract and sort rows to extract the rows with the accounts you want to use.
Header
Here you define the logo for the header, location and date.
- Logo
- Include a logo in the header. The logo is defined via the command in File → Logo setup.
- Logo name
- Enter the name of the logo to be used.
- Place and Date
- Enter the location and date of issue of the statement.
Print text
Here you can decide which text to use from the ones you have entered and whether to also include donation records.
- Select text
- Select the text you wish to use from the list.
- See below for inserting text.
- Use Markdown
- The selected text is interpreted as Markdown text (requires the Advanced plan of Banana Accounting Plus).
- Include donations transactions
- By checking the box you can include a summary table with details of donations taken from the Transactions table.
- Include Description column
- If you have previously activated the option 'Include donation transactions', it will then be possible, by checking this option, to also include the column with the description of the transaction in the statement.
Signature
Here you define the text and image for the signature of the donation statement.
- Text signature
- Enter the first and last name of the person issuing the statement.
- Digital signature
- Use an image as a signature.
- Image with signature
- Enter the image to be used. You have two ways to do this:
- documents:<nome_id>: to use an image saved in the Documents table, where <name_id> represents the name entered in the ID column of the table (e.g. "documents:signature").
- file:document/<immagine>: to use an image saved externally to Banana, but in the same folder as the .ac2 file. Also indicate the extension of the .png or .jpg image (e.g. "file:document/signature.png").
- Enter the image to be used. You have two ways to do this:
Texts
Here you define the texts of the donation statement. You can enter up to four different texts or take a text from the Documents table.
- Text 1, Text 2, Text 3, Text 4
- Enter the text you wish to display in the printout. The text can also be on several rows.
- Texts can be of text type and Markdown type.
- You can enter up to four different texts, and then choose which one to use..
- The field Text 1 contains the default text. It is possible to change it.
- Text from Documents table (.txt / .md)
- You can use the texts entered in the Documents table.
- Enter the document Id (e.g. 'Letter.txt', 'Letter', 'Letter.md', etc.).
- Texts can be of text type and Markdown type.
- For Markdown-type texts, the Id in the Documents table must end with ".md" and the full name, including the final ".md" (e.g. "Letter.md"), must be entered here.
Styles
Here you define the font type and size for the letter texts.
- Font Type:
- Define the font type.
- The default font is 'Helvetica'.
- Font size:
- Define the font size.
- The default font size is '10'.
- CSS
- Optional.
- You can change the appearance of the print (text formatting, address positioning, etc.) by entering CSS code to customise the style. (requires the Advanced plan of Banana Accounting Plus).
Predefined CSS
/* Donation Statement (Banana+) predefined CSS */

@page {
   margin-top: 0.0cm;
   margin-bottom: 0.0cm;
   margin-left: 0.0cm;
   margin-right: 0.0cm;
}

body {
   font-family: $font_family;
   font-size: $font_size;
}

.bold {
   font-weight: bold;
}

.right {
   text-align: right;
}

.center {
   text-align: center;
}

.header_address_row_1 {
   font-family: $font_family;
   font-size: $font_size_header;
}

.header_address_row_2_to_5 {
   font-family: $font_family;
   font-size: $font_size;
}

.header_text {
  margin-top: 1.2cm;
  margin-left: 1.2cm;
  margin-right: 1.2cm;
  text-align: right;
  position: absolute;
}

.logo {
  margin-top: 1.2cm;
  margin-left: 1.34cm;
  margin-right: 1.2cm;
  position: absolute;
}

.address {
  top: 4.5cm;
  left: 12.3cm;
  width: 7.5cm;
  position: absolute;
}

.date {
   margin-top: 4.6cm;
   margin-left: 1.5cm;
   position: absolute;
}

.text {
   margin-top: 8.5cm;
   margin-left: 1.5cm;
   margin-right: 1.0cm;
}

.transactions_details {
   margin-top: 0.5cm;
   margin-left: 1.65cm;
}

.transactions_rows {
   border-bottom:thin solid black;
}

.transactions_total {
   font-weight: bold;
   border-top:thin solid black;
   border-bottom:thin solid black;
}

.signature {
   margin-top: 1.5cm;
   margin-left: 12.3cm;
}

.image-signature {
   height: 15mm;
   margin-left: 12.3cm;
}
Extract table (Extract rows command)
The Extract and Sort rows feature can be used to select member accounts for which to create the statement. This is useful when, for example, you only want to print the donation statement for certain members, without having to enter the list of accounts directly into the extension settings.
For example, by allocating members into several groups (Accounts table), the command from the Data menu > Extract and sort rows can then be used to extract the rows of members belonging only to certain groups (in the example, members belonging to groups S1 and S3).
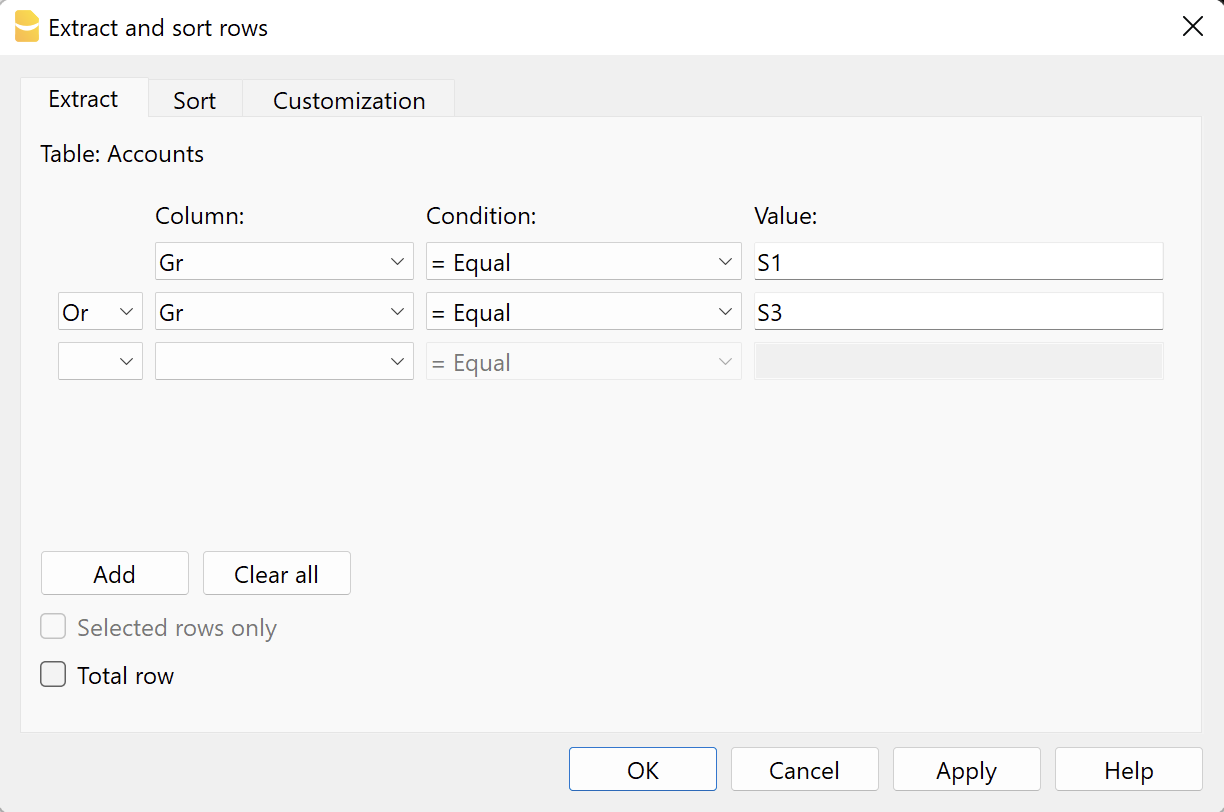
To use the extracted rows:
- Extract rows with the command from the Data menu > Extract and sort rows.
- Run the extension and in the settings dialogue, section Select addresses to print, check the box Use Extract table.
- If the rows were not extracted before printing was started, a warning message will be displayed and all registered member accounts will be used.
Donation statement text (plain text)
There are two possibilities for entering and using a plain text:
- Enter the text in the settings dialogue.
- Enter text in the fields Text 1, Text 2, Text 3 or Text 4.
Up to four texts can be added. - Under Print Text > Select Text, select the text to be used.
- Under Print Text, do NOT select the option Use Markdown.
- Enter text in the fields Text 1, Text 2, Text 3 or Text 4.
- Enter text in the Documents table.
- Add a document by selecting the type Plain text (text/plain).
There is no limit, you can add as much text as you want.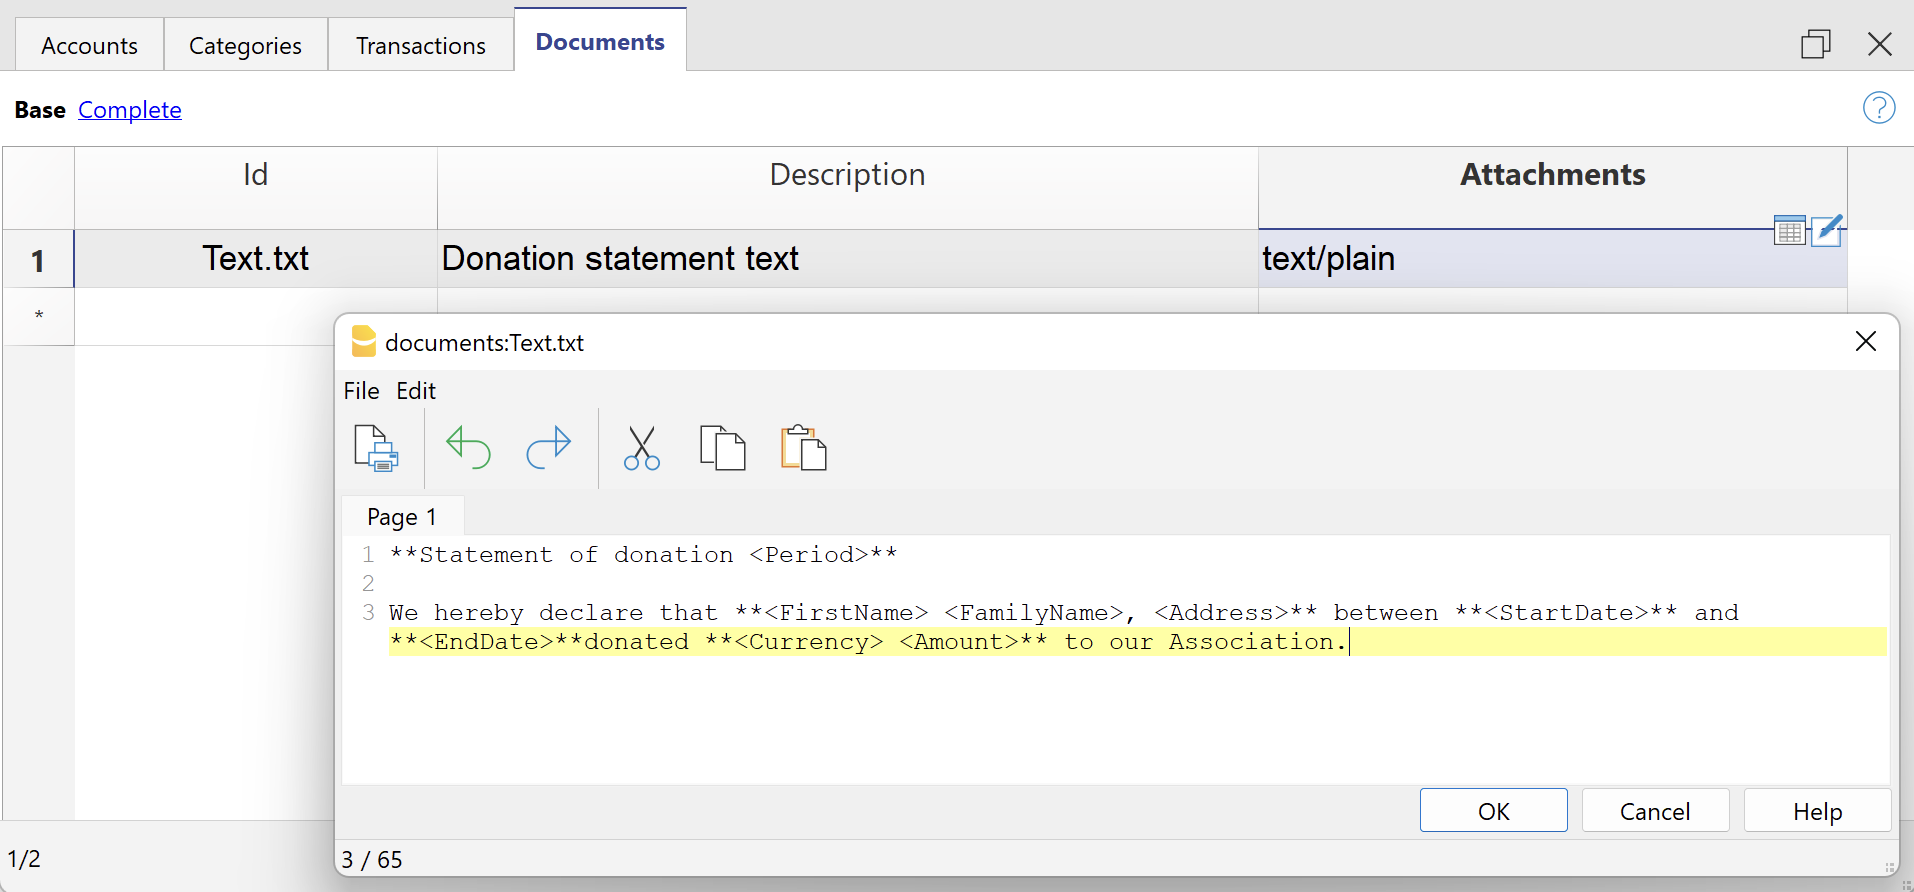
- In the Settings dialogue:
- Under Print Text > Select Text, select the option Text from Documents table (.txt / .md).
- Under Texts > Text from Documents table (.txt / .md), enter the Id of the text entered in the Documents table (e.g. 'text.txt').
- Add a document by selecting the type Plain text (text/plain).
For all texts:
- With a specific annotation you can apply the bold style to texts. To do so, include the desired texts between double asterisks ** .
Examples:- **text** = text
- **textA textB** textC = textA textB textC
- If the following values are entered in the text rows, they will be replaced by the corresponding values:
- <Period> : selected period
- <Account> : member account
- <NamePrefix> : member prefix
- <FirstName> : member's first name
- <FamilyName> : member's last name
- <OrganisationName> : member's organisation
- <Address> : member's address
- <AddressExtra> : extra address
- <Region> : region/state or province
- <Country> : country
- <StartDate> : start date of the selected period
- <EndDate> : end date of the selected period
- <Currency> : currency
- <Amount> : total amount of donations
Donation statement text (Markdown text)
Markdown is a language that allows formatted text to be created using a standard text editor and a syntax that is easy to write and read.
To use Markdown, the Banana Accounting Plus Advanced plan is required.
There are two ways to enter and use Markdown text:
- Enter the text in the Settings dialogue.
- Enter the text in fields Text 1, Text 2, Text 3 or Text 4.
Up to four texts can be added. - Under Print Text > Select Text, select the text to be used.
- Under Print Text, view the option Use Markdown.
- Enter the text in fields Text 1, Text 2, Text 3 or Text 4.
- Enter text in the Documents table.
- Use the Markdown Editor to add a document, selecting the type Markdown-formatted text (text/markdown).
There are no limits, you can add as much text as you want. - The file name in the Id column must end with '.md' (e.g. 'text.md').
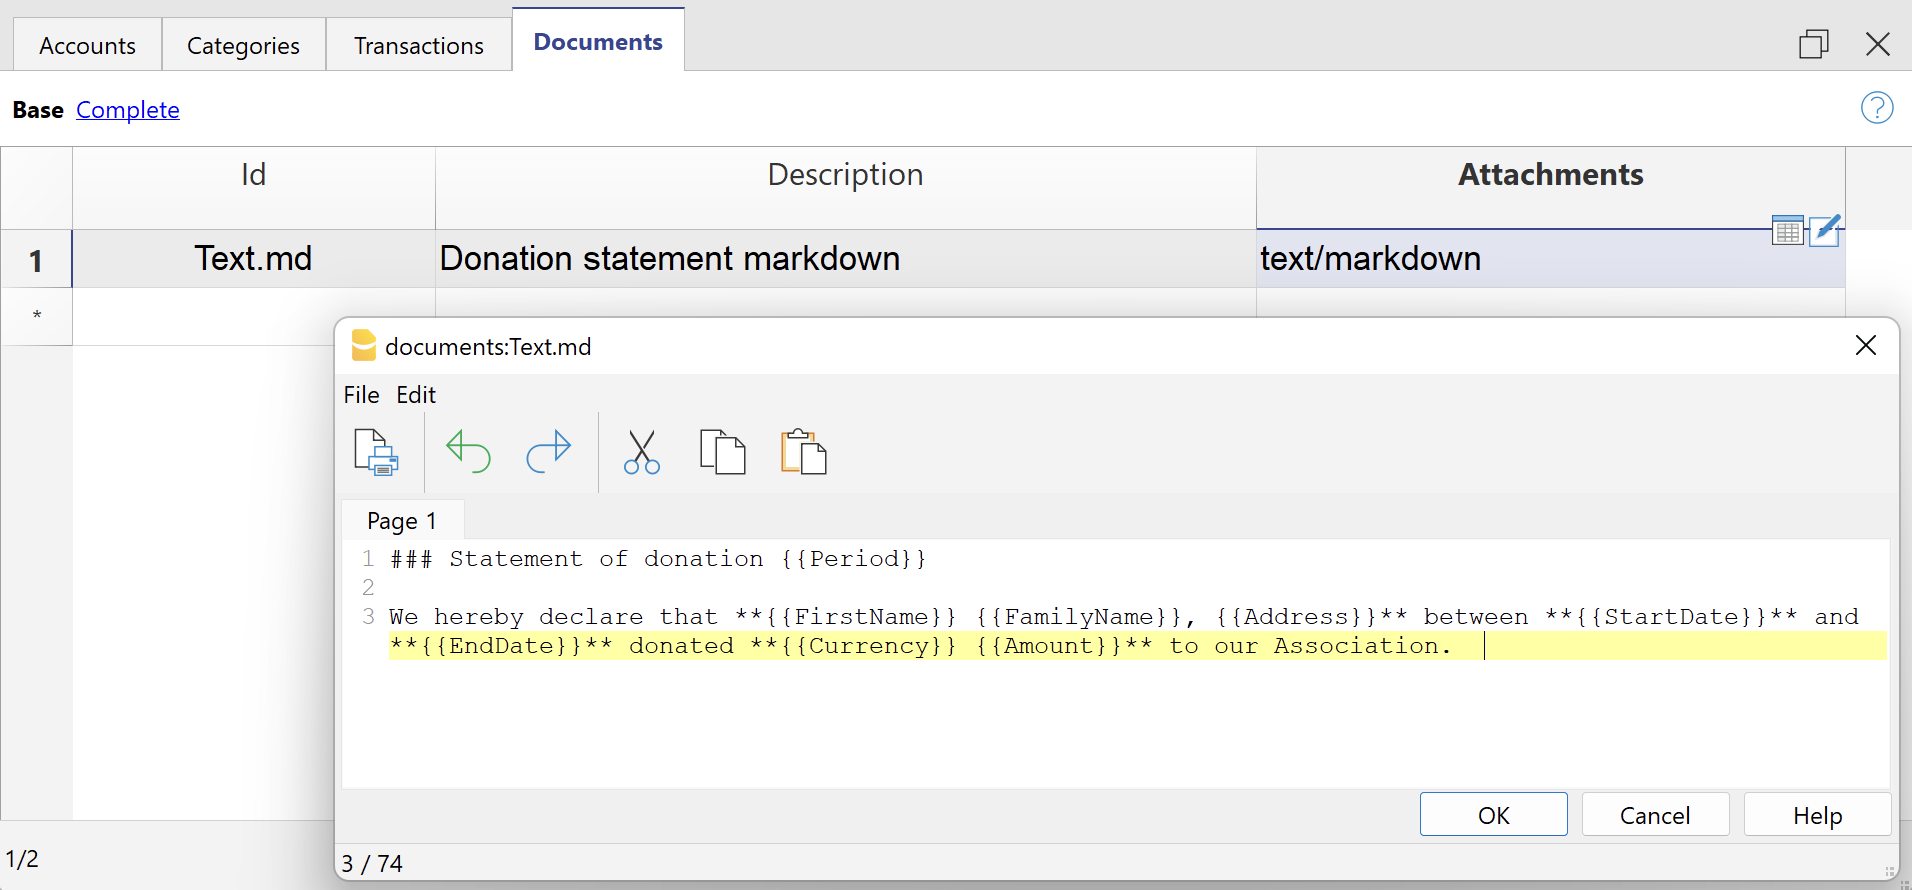
- In the Settings dialogue:
- Under Print Text > Select Text, select the option Text from Documents table (.txt / .md).
- Under Texts > Text from Documents table (.txt / .md), enter the Id of the text entered in the Documents table (e.g. 'text.txt').
- Use the Markdown Editor to add a document, selecting the type Markdown-formatted text (text/markdown).
For all texts:
- If the following values are entered in the text lines, they will be replaced by the corresponding values:
- {{Period}} : selected period
- {{Account}} : member's account
- {{NamePrefix}} : member's prefix
- {{FirstName}} : member's name
- {{FamilyName}} : member's surname
- {{OrganisationName}} : member's organisation
- {{Address}} : member's address
- {{AddressExtra}} : extra address
- {{Region}} : region/state/province
- {{Country}} : country
- {{StartDate}} : start date of the selected period
- {{EndDate}} : end date of the selected period
- {{Currency}} : currency
- {{Amount}} :total amount of donations
Print example
Donation statement with registration details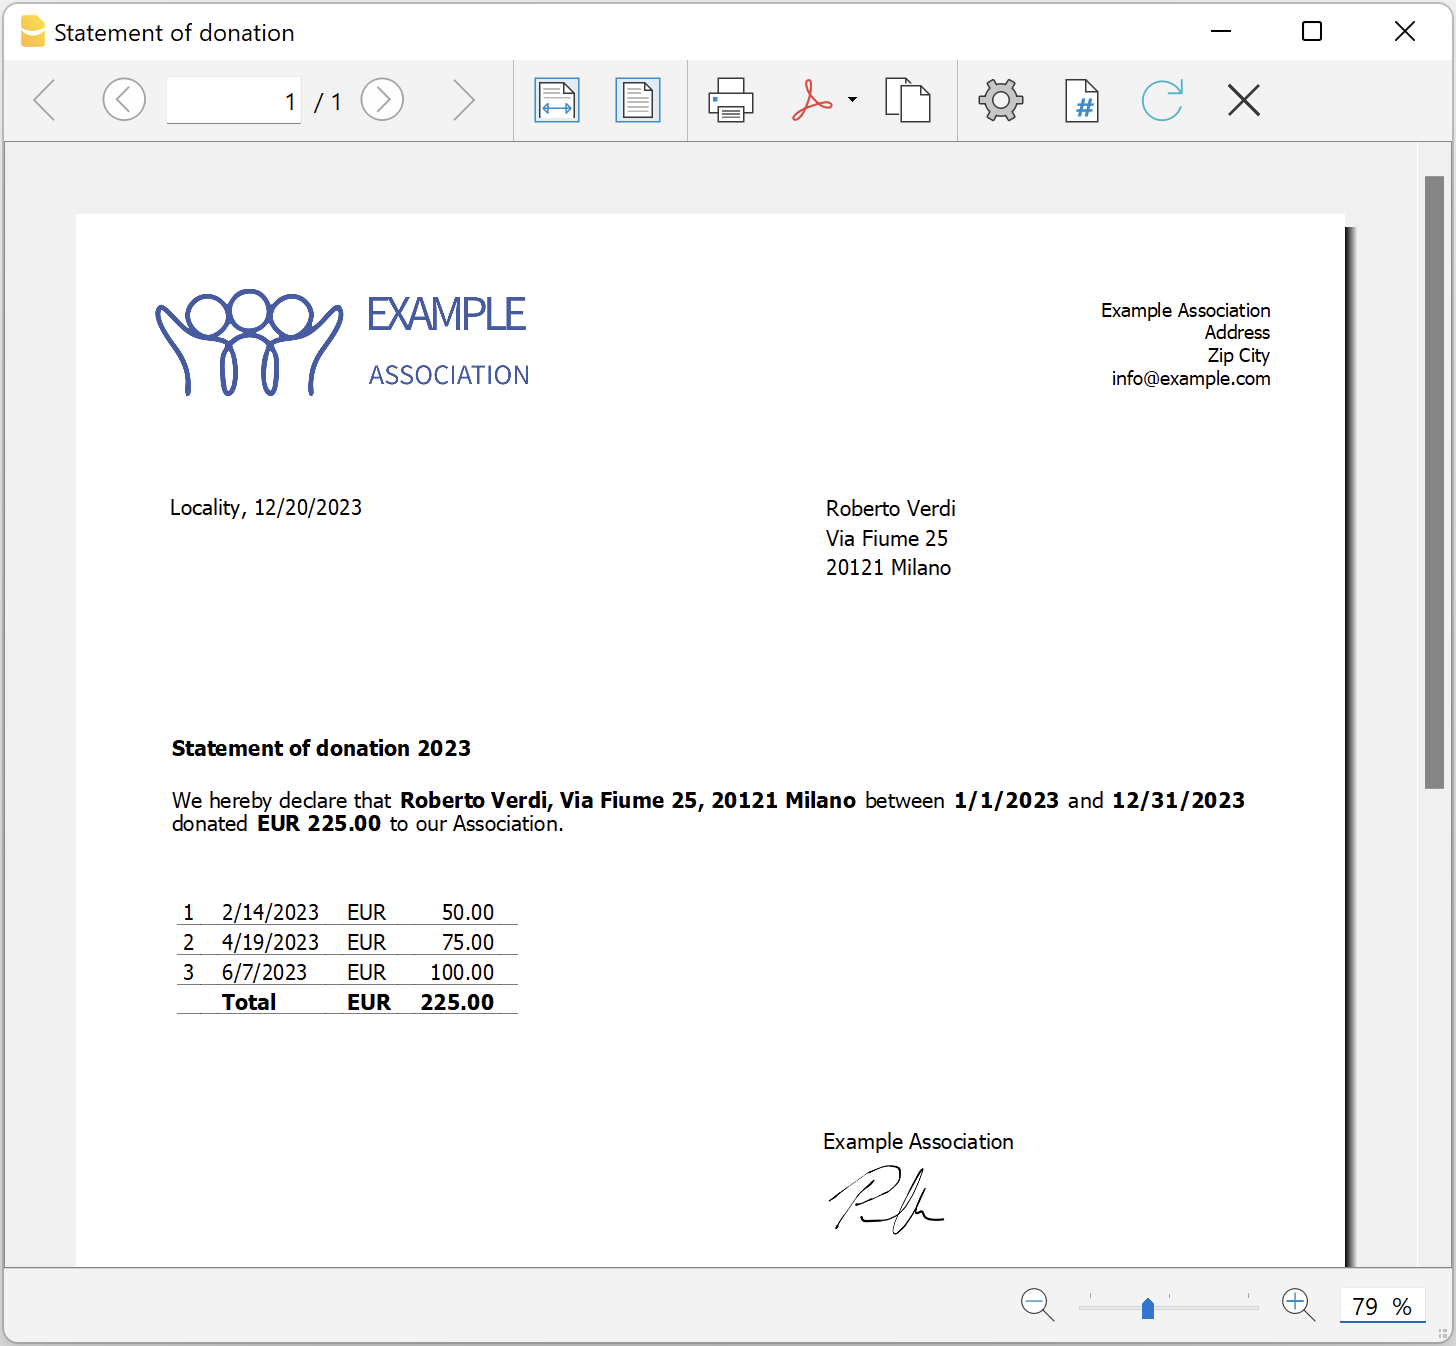
Certificado de doação para Associações (Banana 9)
Certificado de doação para Associações (Banana 9)Un attestato di donazione è la prova di una donazione che viene volontariamente donata ad un'associazione. Questa associazione deve rilasciare un attestato che certifica la ricevuta della donazione.
Con questa BananaApp è possibile creare un attestato di donazione per i donatori registrati in Banana Contabilità (utilizzando il centro di costo CC3).
Questa BananaApp funziona attualmente solo con la versione di Banana Experimental.
Sono disponibili i seguenti file di esempio da cui partire:
Installazione e utilizzo dell'App
- Installare la versione di Banana Experimental 9.
- Installare la BananaApp Attestato di donazione per Associazioni (visitare la documentazione Gestione Apps).
- Una volta installata, l'App sarà visibile nel menu Apps dove potrà essere eseguita.
Creare un attestato di donazione
- Inserire i dati dell'Associazione nella scheda indirizzo del file contabile.
- Dal Menu Apps selezionare l'App Attestato di donazione per Associazioni.
- Inserire il periodo nella finestra di dialogo
- Completare i campi del dialogo impostazioni e cliccare su Ok
Dialogo impostazioni
Per l'inserimento dei dati fare doppio clicc nel campo della colonna 'Valore'.
- Indicare il conto del membro (vuoto = stampa tutti)
- Inserire un conto singolo (ad es. "10001").
- Inserire più conti suddivisi da una "," (ad es. "10001,10002,10005").
- Se non viene inserito nulla verranno stampati gli attestati per tutti i membri registrati.
- Importo minimo della donazione: i conti con saldo inferiore all'importo indicato non sono inclusi. Il valore predefinito è "1.00" (es. i conti con saldo zero sono esclusi). Inserire "0.00" per includere anche i conti con saldo zero.
- Testi
- Usa testi standard: vistare la casella per utilizzare i testi predefiniti (eventuali testi personali verranno sovrascritti).
- Titolo (opzionale): inserire l'oggetto della lettera.
- Testo 1 (opzionale): inserire il testo del primo paragrafo.
- Testo 2 (opzionale): inserire il testo del secondo paragrafo.
- Testo 3 (opzionale): inserire il testo del terzo paragrafo.
- Testo 4 (opzionale): inserire il testo del quarto paragrafo.
- Includi dettagli donazioni: vistare la casella per includere una tabella riassuntiva delle donazioni.
Per tutti i testi:È possibile contrassegnare una o più parole o anche il testo completo in grassetto.
Per ottenere la parola desiderata in grassetto, inserirla tra doppi asterischi (es. **parola**).
Per ottenere il testo completo in grassetto, inserire due asterischi all'inizio del testo (es. **testo...).Se nelle righe di testo vengono inseriti i seguenti valori (in inglese), essi saranno sostituiti dai valori corrispondenti (es. <Account> viene sostituito con 10001):
<Period>: periodo selezionato
<Account>: conto del socio
<FirstName>: nome del socio
<FamilyName>: cognome del socio
<Address>: indirizzo del socio
<StartDate>: data iniziale del periodo selezionato
<EndDate>: data finale del periodo selezionato
<Currency>: moneta
<Amount>: importo totale delle donazioni.
- Firma: inserire nome e cognome di chi rilascia l'attestato.
- Località e data: inserire la località e la data di rilascio dell'attestato.
- Firma con immagine: vistare la casella per utilizzare un'immagine come firma.
- Immagine: inserire l'immagine da utilizzare.
- documents:<nome_id>: per utilizzare un'immagine salvata nella Tabella documenti, dove <nome_id> rappresenta il nome inserito nella colonna ID della tabella (es. "documents:firma").
- file:document/<immagine>: per utilizzare un'immagine salvata esternamente a Banana, ma nella stessa cartella del file .ac2. Indicare anche l'estensione dell'immagine .png oppure .jpg (es. "file:document/firma.png").
- Altezza immagine (mm): cambiare l'altezza dell'immagine per ridimensionare la sua grandezza. L'altezza è in millimetri.
- Stili
- Tipo di carattere: definisce il tipo di carattere. Il tipo predefinito è "Helvetica".
- Dimensione carattere: definisce la dimensione del carattere. La dimensione predefinita è "10".
I dati inseriti vengono utilizzati per generare il report, che sarà poi possibile salvare e stampare.
Esempio di dialogo:

Esempio di attestato:

Esempio di attestato con dettagli:
