Entering the invoice data
Invoice Data is entered in the Transactions table. Use a new row for each new invoice.
- Enter the Date for your transaction.
- The Invoice number.
- The text entered in the Description column (product, services, consulting ...) will appear on the invoice to your client.
- Insert the client number in the Debit column.
- Insert the counterpart in the Credit column (Sales account, Consulting fees etc).
- Enter the Amount.
- If your subject to VAT, enter your VAT code with the respective applicable VAT rate.
Invoices on multiple rows
If there are several elements to your invoice (different items or services, or both) you will have to enter them on separate line (one element per row):
- Use a new row for entering each item you wish to appear when printing your invoice.In
- Use equal dates and invoice number for each row.

Basic columns for Invoices in the Transactions table
Date
The invoices's data is reported in this column. All rows appertaining to the document must report the same date.
Invoice
In order to manage the invoices, it is mandatory that you enter an invoice number in the Invoice column and an account belonging to the customers register.
Extra Columns
Type
In the Type column, you can define detailed rows, such as totalization rows or a specific payment term for an invoice. This column is not visible by default, but must be displayed via the Data menu → command Columns setup and by checking the DocType column.
Quantity
The quantity of goods and services provided is entered in this column. To add the Quantity column use the menu Tools → Add new functionalities→ Add Items Columns in Transactions table.
Unity
Insert unity type (for example 'pz', 'h', 'm', 'kg').
Unit Price
Insert Unit Price for the goods or services. The program will automatically calculate the resulting amount for your input into the Quantity column.
Discounts and rebates
To enter a discount or rebate in an invoice, add a new row and enter:
- Invoice date.
- Invoice number.
- Description of the discount or rebate
- Accounts in the Debit and Credit columns. It is important to invert the accounts compared to the sales transaction.
- In case of VAT, indicate the VAT code with the minus sign, so that the VAT is deducted, or, if present use the VAT code for discount and rebates.

Set customer language
The default layouts include the following languages: Italian, German, English, French, Dutch.
Invoice texts are printed in the customer's language, provided that this is set in the Language column (Accounts table, Address view).
The language is an ISO code generally of 2 lowercase letters (it=italian, de=german, en=english, fr=french, nl=dutch).
In acse no language has been indicated for the customer account, the language of the accounting is used, defined in the File menu→ File and accounting properties (basic data) → Other.

Due dates and payment terms
The due date of an invoice can be set up in different ways:
- Generalized due date - identical due date for all invoices
Select menu Account2 → Customers → Settings → General → Invoices are due, indicate the period (in days) after which the invoice is considered due. As an example, if the date of your document is the 10th of May and you enter a value of 10 days, the due date will be the 20th of May. - Due dates per customer - specific for each customer
In the Accounts table, a DateExpiration column is available (if not on display set up via Data → Columns setup ...). The period (in days) after which the invoice is considered to be due can be set up in this column. - Specific dates per invoice
In the Transactions table a Due dates option allows you to display the Date Exp. column. -
Alternative text for the expiration date
It is possible to define a text of your choice as a payment term for each invoice. This will replace the text of the expiration date. Revert to Advanced input -Type column for detailed information.
Printing invoices in other currencies
You can print invoices in different currencies as well
- You must use a multi-currency accounting file.
- Invoices are printed in the currency of the customer's account.
If you want to send invoices in different currencies to the same customer, you must create accounts in different currencies for the same customer.
Advanced input -Type column
Advanced input -Type columnThe Type column in the Transactions table can be used to define the commands that are relevant to the display for printing data specific to your Invoice.
Check the DocType via menu Data → Columns setup ..., to display the column.
Entering data
Once the column is displayed, you may proceed by entering your data. You will need to:
- Add an empty row after the Date of the Invoice.
- Enter the date of the Invoice in the Date column.
- Enter the required parameter in the Type column (refer to table below)
- Enter the Invoice number in the Invoice column.
- Enter the data relevant to appear on the Invoice in the Description column.
Invoice to the customer
Typing 10: the Type column will list all possible options available to customize the data of your invoice.
| Invoice data | Column Type | Description column |
|---|---|---|
|
Client address If an address different to the one defined in the Accounts table (Address view) is required, it may be specified using the appropriate options. Indicate elements of the address in each row (name, surname, address...). |
10:adr 10:adr:fna |
Enter name |
|
Greetings After the invoice details, you may add a line of text for your final greetings. |
10:gre | Enter your greetings |
|
Final notes One or several rows of notes can be inserted after the details of the invoice and before the greetings. |
10:not | Enter your notes |
|
Parameters (advanced) When wanting to print personalized data on the invoice, you can use the appropriate command. This option is aimed at users with JavaScript programming knowledge, and allows you to change the invoice layout, so as to use the parameters indicated via this command. For further information please revert to Printing custom data. |
10:par | Enter your customized parameters |
|
Payment term Should you want to indicate an alternative text as a payment term, enter the desired text. This will be displayed on the invoice. |
10:ter | Enter the alternative text for the payment term |
|
Title If you do not wish to use the default invoice title, you can choose a different title. |
10:tit | Enter your text to appear as the invoice title |
|
Items subtotals It is possible to enter intermediate totals for your invoice in the table with the details of the invoice. |
10:tot 10:tot:0 |
Enter level 0 subtotal |
Intermediate Totals
In order to insert intermediate totals, you will need to add additional rows in the Transactions table:
- Enter 10 in the Type column: select :tot from the drop down menu, 10:tot will display. Select and enter :1
- Enter the appropriate description in the Description column (ex. Total goods)
- Enter the Invoice number (in the absence of number, the total will not be printed).
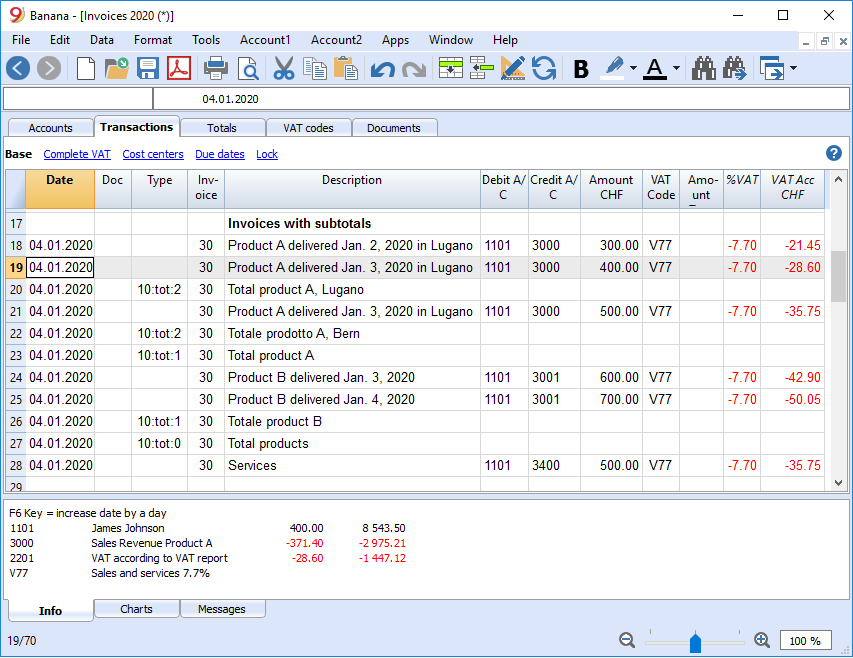
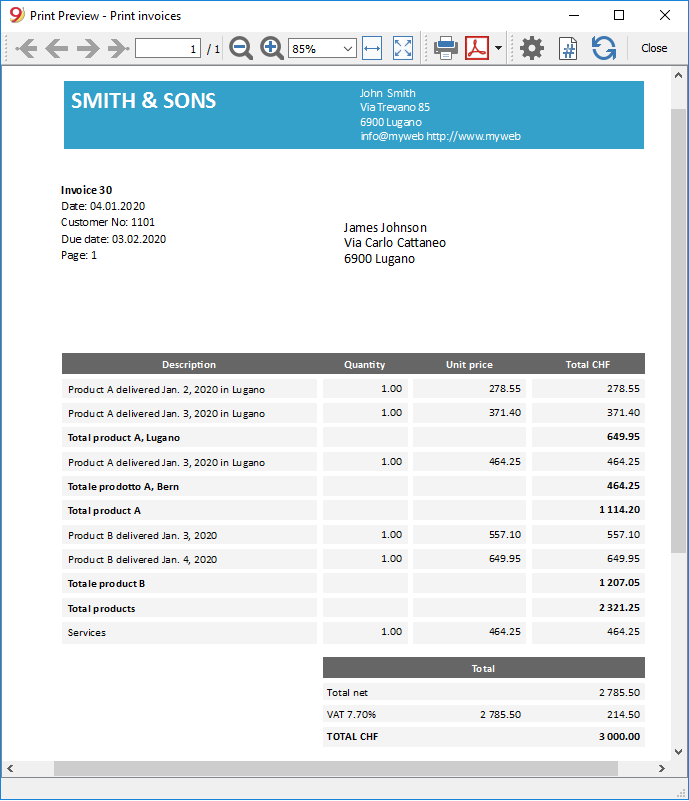
Example of Invoice with intermediate totals.
Alternative text for payment terms
It is possible to define your own wording as a payment term for each invoice and this will replace the existing text for the expiry date.
- Enter an additional line with the same invoice number in the Transactions table.
- You will need to enter 10: in the Type column and select :ter from the drop-down menu, select> 10:ter
- In the Description column, enter your text (ex 30 days net, 60 days etc ..).
When the invoice is printed, the value assigned as a payment term will be displayed.