Create new file
There are different ways to create a new file:
- from one of the templates included in the program
- from one of the online templates available on our website
- from an existing file or template (without editing it):
- copying the file with your operating system
- using the Save as command from the File menu
- using the Create file copy command from the Tools menu, that allows you to choose what data to keep.
- using the Convert to new file command from the Tools menu; this command will reate a new file with different characteristics but keeping the existing data.
This command is usually userd to add the VAT management or the multicurrency feature to an existing accounting file, or to change a file language.
- creating a new empty file
- creating a new file and loading the data froma an accounting file, but with a different chart of accounts.
Transfering to a new year
When transfering to a new year, there is a specific procedure to follow, in order to create a new year's file and automatically carry forward the opening balances.
New file settings
When creating a new file with new characteristics, you need to setup the outline of the new file.
Create new
Related documents
- Start a new Income and expenses accounting and Cashbook file
- Start a new Double-entry accounting file
- Start a new Double-entry accounting with multicurrency file
- Utilities documents
Choose the initial model
This procedure creates a new accounting file, starting from an existing template (New command from the File menu)
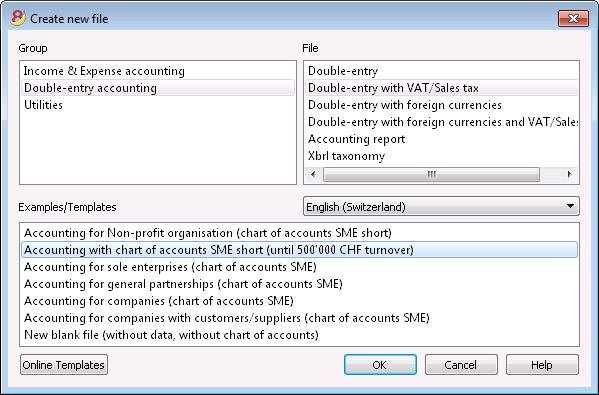
Group
In the Group section all the different applications are listed. Choose the one that meets your needs.
File
In this section you can select the characteristics of the chosen application. You can choose between the plain version, with the VAT management, with a second currency or with more than one currency.
Examples/Templates
By selecting the language you will see predefined example/models that you can use to start and that can be personalized. All the template data and settings (language, decimal rounding, ..) will be used.
Once you have personalized the template you need to save the file with a new name.
Online Templates
Clicking on the Online Templates button you can access our website where we published all templates available for free.
Create file copy
Create a new file from an existing one
- Open the source file
This file will not be changed or edited. - Use the Create file copy from the Tools menu
- Choose the data that you want to keep.
For accounting files choose if you want to keep the existing amounts.
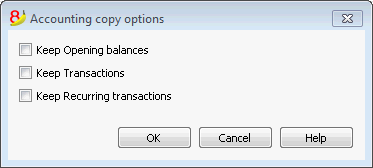
- Save the file in the folder where you wish to keep the data (normally in the documents folder)
- Enter the company name and the accounting year as file name, for example smith_company_2017.
New file from an internet template
Download and open the file with Banana
There are different ways to download the file, depending of what internet browser you are using.
- Click on the file link
- With the mouse right click choose the Save file command from the menu that appears
- Open Banana and drag the file or the file link into it.
Save the file with a name
Once you have opend the template with Banana you need to use the Save as command from the File menu
- Chose the destination folder
- It can be useful to create a separate folder for each year so you can also store there other documents related to that year.
- Chose a file name containing the company name and the accounting year, for example smith_company_2017
- The software will add the .ac2 extention, typical for the Banana files
Adapt the template
- Edit the File properties
- Enter the headings and the accounting period
- Enter the address
- You can now adapt your chart of accounts
- Enter your bank accounts
- Enter or edit the chart of account to fit it to your needs
You will still be able to add or edit it as you work, if new needs arise.
- If you are taking over an existing accounting file, you will also need to enter the opening balances in the Opening column.
- If you are working in a multicurrency file, you need to update the opening exchange rates.
Convert to new file
This command converts an existing file (which will not be modified) into another one with different characteristics:
- Change language
- Change the roundings
- Change the file type. For example:
- Pass from an accounting without VAT to one with VAT
- Pass from a Double-entry accounting to a Multi-currency accounting
It is as if you have created a new blank file and then have manually transferred the data.
The existing file characteristics can be consulted by executing the command Tools -> File Info
Creation and data transfer
The Convert to new file command, from the Tools menu:
- Creates a new file of the specified type with the predefined columns setup
- Transfers the data into the new file, proceding with the necessary conversions
- Saves and indicates the name of the new file.
When converting a file with more options into one with fewer options, part of the data will be lost during conversion. If, for example, an accounting file with VAT/Sales tax is converted into an accounting file without VAT/Sales tax, all data in the VAT columns will be lost during conversion.
Passing from a Double-entry accounting to a Multi-currency accounting file
- Make sure that in the File and accounting properties the currency symbol is being specified (which will become the basic currency)
- Choose the Multi-currency accounting as destination
- The program creates a Multi-currency accounting, recovering the existing data:
- The Transactions table includes the columns for managing the Multi-currency accounting, as a currency the basic currency and the exchange rate 1.000
- The existing accounts in the Accounts table are being completed with the basic currency symbol
- You have to add the predefined accounts for exchange rate profit & loss.
- In the File and accounting properties, you have to indicate the predefined accounts for exchange rate profit & loss.
- The Exchange rate table will be empty; it is therefore necessary to add the currencies and exchange rates used in the transactions
- In the Accounts table, the accounts in foreign currency have to be added.
In order to change the currency of an accounting file, see the Accounting tab of the File and accounting properties.
Passing from an accounting without VAT to one with VAT
- Choose the desired type of accounting with VAT as the destination
- The program creates an accounting with the VAT columns, recovering the existing data:
- Add the VAT accounts into the Chart of accounts
- The File properties regarding the VAT need to be completed, and the default acccount on which the VAT must be recorded needs to be indicated
- The VAT Codes table has to be completed with the necessary VAT Codes
With the Import to accounting command -> VAT codes, the VAT codes table of an existing accounting can be imported (for example it can be imported from a default VAT acccounting template).
Dialog
- The file type, in which the user is working, is being indicated
- For more information on the language, roundings and decimals, go to the File and accounting properties (from the File menu)
- A list with different options appears
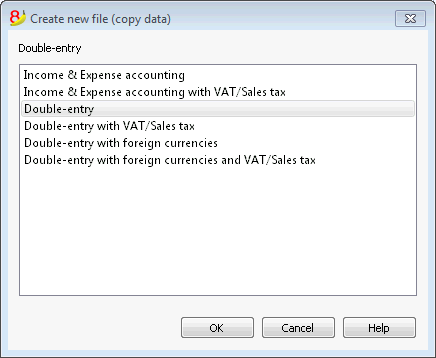
Outline to create new file
For more information, please consult the specific page.
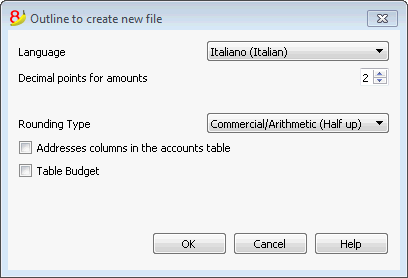
Transfer to a new accounting plan
Hereunder we explain how to proceed when:
- passing to a chart of accounts with a different numbering
- retrieve and convert the data of an existing accounting, including the transactions.
Converting for the new year
The program will convert the file for the choosen year. If you have already entered the year 2014 you can convert the 2014 file.
If you wish to start a new year with a new chart of accounts, there are two possibilities (for example considering the year 2015 as the new year):
- converting the previous year (2014) and then creating the new year (2015)
You will have two different files for the year 2014 (the one with the old chart of accounts, and the new one), and a single file for the year 2015, with the new chart of accounts. This procedure is useful when you need to have both years with the same chart of accounts - creating the new year's file (2015), and then converting it the new system.
In this case the year 2014 will remain unchanged. For the year 2015 you will have a transition file, with the old chart of accounts, but with the updated opening balances. The conversion of the 2015 file can be done right at the beginning, but also after some transactions have been entered.
Step 1: Creating a new accounting file
- Create a new accounting file, choosing the desidered type.
- Adapt the chart of accounting to your own needs
Step 2: Adding the matching accounts
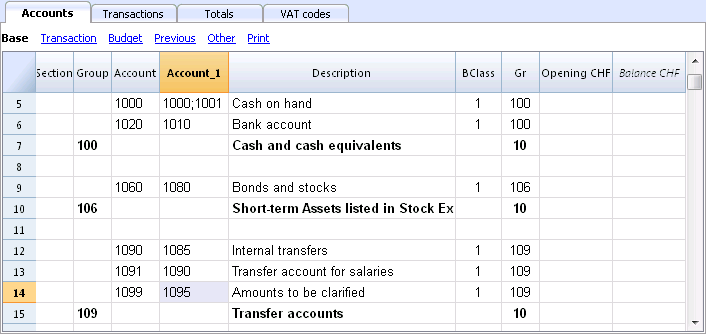
- Position yourself in the Accounts table and add a new column called Account_1 (Data menu; click on the Add button of the Columns Setup window and then enter the Account_1 description);
- For each new account, in the Account_1 column, enter the corresponding account in the old chart of accounts;
In case the account remains the same, you can also choose to not indicate it. - In case several accounts need to be grouped in one, enter the separated accounts with a semi-colon "1000;1001".
- In case one account needs to be subdivided on several accounts, you need to proceed manually, see herunder.
Step 3: Starting the import operation
For more information, please check the related pages Import to Accounting and Import File.
- From the Account1 menu, choose the Import to accounting and then Import File commands
- Using the Browse button, select the file of your old accounting plan
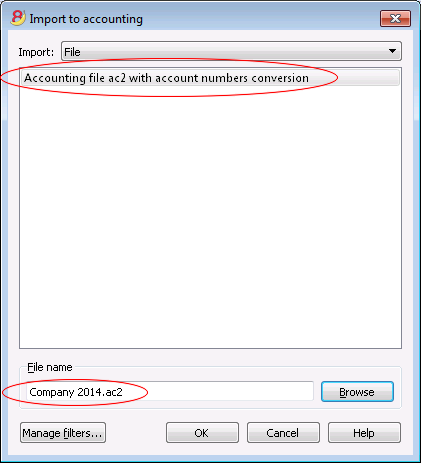
- Confirm by clicking on the OK button and pass on to the next window
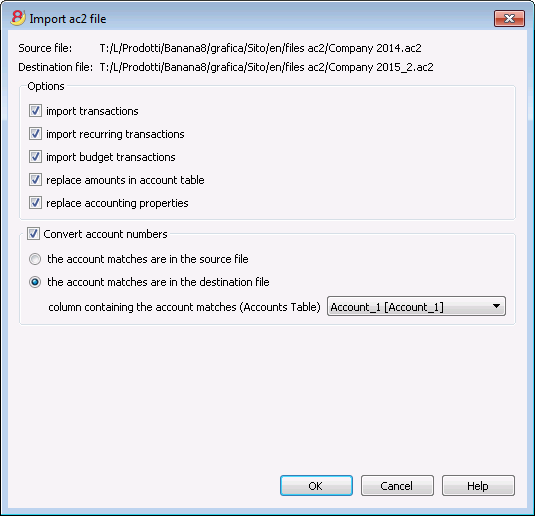
- Define the import options
- Activate the Activate account numbers option, indicating that the account matches are in the destination file.
Subdivision of one account into several accounts
When one transfers to a more detailed chart of accounts, it is probably necessary to subdivide one account into several accounts.
After the import operation, proceed manually in the following way:
- In the Chart of accounts, subdivide the opening amounts, budget amounts and previous amounts of one account into several accounts;
- Go over the transactions, one by one, of the account that needs to be subdivided and assign them to the more specific account, or create extra transactions if it is necessary to subdivide one amount into more detailed amounts;
- Proceed in the same way for the transactions of the Budget table.
Results and possible errors
In case the program reports mistakes (absence of accounts or others), the import operation probably needs to be cancelled and the matches need to be completed;then repeat the import operation.
The program, confronted with different charts of accounts, cannot automatically do extensive verifications and guarantee that all the data have been imported and grouped correctly.
It is therefore strongly advised to manually check the result, making sure that the totals of the Balance Sheet and the Profit & Loss Statement are correct.
Create new empty file
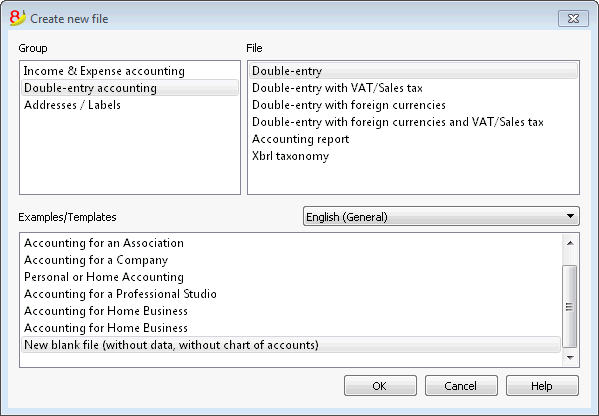
In the Examples/Templates section, choose the language/nation and select the New blank file (without data, without chart of accounts)
In this case the file doesn't contain any data. You will need to create a new accounting file starting from zero.
Outline to create new file
Language
The language used for the columns headers of the various tables.
Decimal points for amounts
In order to avoid accounting differences, the number of decimal points for the amounts is fixed for each file. Two decimal points are normally used, but there are currencies where decimal points are not required so 0 needs to be inserted.
Decimal points for amounts in foreign currency
If using multi-currency accounting, then it is necessary to define the number of decimal points for the amounts in the foreign currency as well.
Rounding type
The amounts are rounded up or down to the closest whole number. In the case of exactly half (for example: 100.5 / 101.5 / 102.5 / 103.5) the following systems are being used:
- Banking (Half at even) is being rounded up or down towards the nearest even number (100 / 102 / 102 / 104).
- Commercial/Arithmetic (Half up) is being rounded up to the next whole number (101 / 102 / 103 / 104). In accounting, this is the system most used.
- Compatible version 4. A minor precision is being used, which in very special cases, can bring forth a different rounding.
Address fields in accounts table
When this option is activated, the Address view is created in the Accounts table. In this view, the user can enter the addresses of clients, suppliers and members.
Budget Table
When this option is activated a Budget Table is created, where the user can enter his budget transactions.
The user can thus create different accounting files, in different languages, and with different decimal points. In order to change the language or the decimal points once the accounting file has been created, the accounting type must be converted by selecting Convert to new file from the Tools menu.