Export
With Banana accounting you can export in different formats, either the data of a single table of the whole file:
Export rows
Choose the Export rows command from the Data menu in order to export the content of a single table.
If you select some rows before launching the command, then the Export selection only option will be activated.
Export file
Chose the Export file command from the File menu in order to export more than one table. In the dialog windows that appears you will find the following tabs:
- Specific tabs of the exporting format
- Include tab, to define the tables and the reports that must be included in the export
- Period (Accounting) tab, to define the period
- VAT tab (in the accounting files with VAT management)
- Composition tab
Export formats
There are different formats available, each with its own specific options:
- Pdf
This format allows to export all accounting file content in a unique pdf file. - Excel
This format allows to create Excel spread sheets, comparisons, budgets, index calculations, Balance Sheet analysis, charts directly linked to accounting values. - HTML
With this format the data and accounting statements can be easily accessed with an Internet browser (Explorer, Mozilla, Opera).
This format fully complies with the legal requirements related to long-term archiving of accounting data. - XML
This format is the standard used for exchanging data. The accounting data can be easily read and reused with other programs or with XSLT style sheets. - Export rows in TXT
This format allows to export the table rows in a text format.
Export in Excel

Export selection only
When activating this option, the program exports only the selected area.
File Name
In this area it is necessary to insert the name of the new file that the program will create to export the data. If, however, an existing file is selected by using the Browse button, the program will overwrite it with the new data.
Display file immediately
As soon as the MS Excel file has been created, the software to view it will be launched. In this way, the result of the export can be seen immediately.
Options
Create cell names
This option will automatically give a name to each cell as the file is exported. For example, the cell that contains the balance for account 1000 will receive the name: "Accounts_1000_Balance" in Excel. This means the user can univocally identify each cell independently from its position on the sheet and thus create Excel reports that don't have to be corrected if the account plan is changed. The user thus saves having to manually carry forward any accounting data to Excel. However, inserting the names of the cells does slow down the opening of the Excel file.
Create table names
With this option, the program will automatically give a name to the whole area of the cells belonging to a table, at the moment the file is exported. For example, the area formed by the cells belonging to the Accounts table will be identified by the name DB_Accounts. This option is necessary if, when creating reports in Excel, database functions are used.
Use names Xml (English)
The cell names can either be defined in their original accounting language, or with their English name. In the original language, the names will be understandable to someone who speaks that language, but they will not be universally understood like a name in English would be. By selecting this option the user would have, for example, "Accounts_1000_Balance" instead of "Conti_1000_Saldo".
Protect tables
The entire content of cells is locked when selecting this option so that it is only possible to edit the format. This prevents the possibility of making any unintentional changes to the exported data. The user can remove this protection at any time by using the appropriate command in Excel.
Export selection only
If this cell if activated, only the selected area is exported.
Other Tabs
For the explanations of the other tabs, please visit the following pages:
Export result
Each accounting table is displayed in a different sheet in the Excel file
Use the cell names instead of the row/column references:
- The names return the desired value even when a new row or column is being entered.
- The names are easy to use and understand
"Accounts_1000_Balance" refers to the balance of the 1000 account
"Accounts_1000_Description" returns the value of the cell that contains the description of the 1000 account - The names can be used in the formulas
"=Accounts_1000_Balance" returns the value of the cell that contains the balance of the 1000 account
"=Accounts_1000_Balance/1000" divides the balance of the 1000 account by 1000 - By using the names, it is possible to create links to various files.
A link to a cell is being composed of:
- File name
- Table name
- Cell name

Include Tab
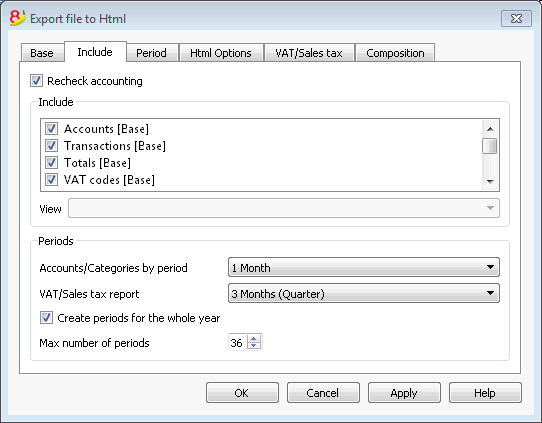
Recheck accounting
By ticking this box, the accounting will be rechecked before it is exported.
Include
By ticking the different boxes, the user can export in MS Excel Xml the various tables and/or all the account cards and the VAT/Sales tax Report.
View
It is possible to select the view where the data are to be imported. This option is available for the export in PDF, Html and Xml format.
Periods
This function lets the user export the accounting data subdivided by period.
Accounts/Categories by period
This option allows to export the accounts and categories balances according to the selected period.
VAT/Sales tax report
This option allows to export the VAT/Sales tax report according to the selected period.
Create periods for the whole year
By selecting this function, the partial balances for the whole year will be exported, and not only the ones of the specified accounting period or the selected export period.
Max number of periods
The maximum possible number of periods.
Export in Html
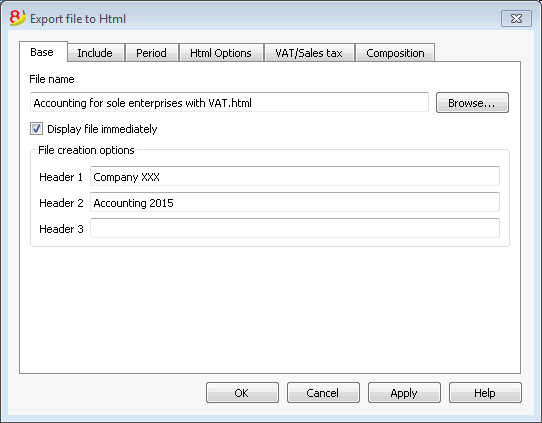
File Name
In this area, the user must insert the name of the new Html file that the program will create to export the data. If however the user selects an existing file through the Browse button, the program will overwrite it with the new data.
Display file immediately
As soon as the Html file has been created, the software to view it will be launched. In this way, the result of the export can be seen immediately. It is best to remember that browsers like Mozilla and MS Explorer use a cache mechanism for files. When the export is made for a second time, it is possible that the user will see the previous version until the browser Reload button is pressed.
File creation options
Headers 1, 2 and 3
These are the file headers.
Other Tabs
For the explanations of the other tabs, please visit the following pages:
Html Options Tab
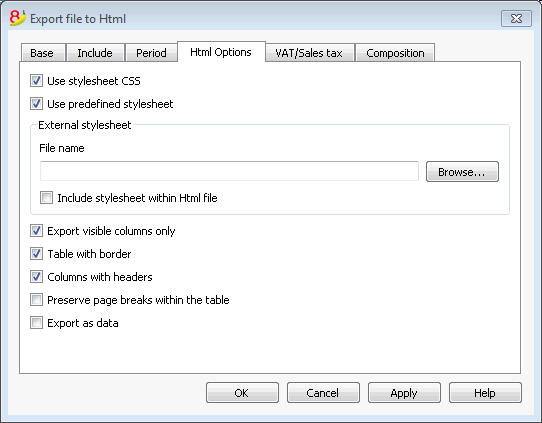
Use style sheet CSS
Selecting this cell will allow the user to connect a style sheet to the exported file. By default the program will automatically use its own style sheets and incorporate it into the document.
Use predefined style sheet
The program's default style sheet will be used.
Deactivating the cell will automatically activate the External style sheet option. The user can then select the name of a personal style sheet.
External style sheet
File name
In case an external style sheet is being used, select the file name of the style sheet with the Browse button.
Include style sheet within html file
When data is sent in Html format, the style sheet file must also be sent. To avoid sending two separate files the user can incorporate the style sheet to the Html accounting file by activating this cell.
Selecting the cells will allow the program to file the data with various graphic options:
- Export visible columns only
- Table with border
- Columns with headers
- Preserve page breaks within the table
If there are page breaks on the original accounting file, these will be carried over in the export as well. - Export as data - data will be exported without any formatting
Export in Xml
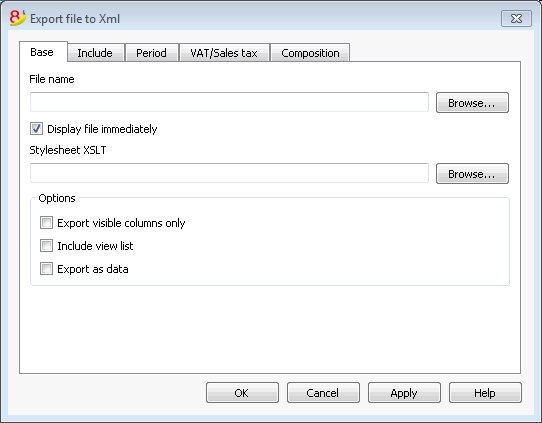
File Name
In this area it is necessary to insert the name of the new file that the program will create to export the data. If, however, an existing file is selected by using the Browse button, the program will overwrite it with the new data.
Display file immediately
As soon as the file has been created, the software to view it will be launched. In this way, the result of the export can be seen immediately.
Style sheet XSLT
In this area, the user can select the style sheet according to which the program should organize the graphic display of the accounting data. Thanks to the style sheets, the user can input his/her own data and conform to the print-outs required by the authorities. On the www.banana.ch various examples and further information on style sheets are available.
Options
It is possible to choose between the following options:
- Export visible columns only
- Include view list
Export selection only
If this option is activated, only the selected area will be exported.
Other Tabs
For the explanations of the other tabs, please visit the following pages:
Export rows in txt
In order to export rows, please select the Export rows command from the Data menu. Different options are available:
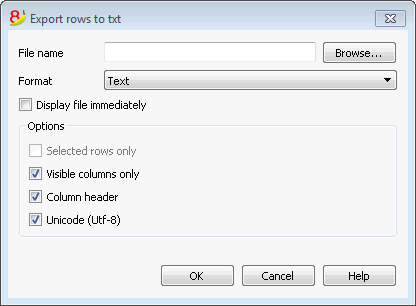
File name
Enter the file name or select an existing one using the Browse button
Format
Select the desired format.
Display file immediately
As soon as the file has been created, the software to view it will be launched. In this way, the result of the export can be seen immediately. Please notice that browsers such as Mozilla or MS-Explorer have a documents cache mechanism. It is then possible that, when exporting a second time, you will still see the previous version if you don't use the Refresh browser's button.
Options
If activated, different options will allow the export of:
- selected rows only
- visible columns only
- columns header
- unicode (Utf-8)
Save
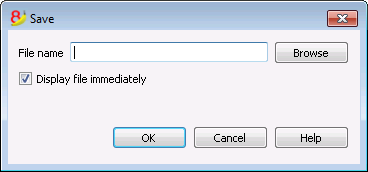
This window is shown when you need to create a PDF file, export in Html or Excel format, or copy into the clipboard.
File Name
In this area it is necessary to insert the name of the new file that the program will create to export the data. If, however, an existing file is selected by using the Browse button, the program will overwrite it with the new data.
Display file immediately
As soon as the file has been created, the software to view it will be launched. In this way, the result of the export can be seen immediately.