General Reports Extensions
Extensions are used to create reports.
Report Extensions are General Extensions that use the Report functionality. They have the following structured:
- Have the attribute "app.command".
- Contain the function exec() tha
- create ReportObject
and populate with data. - create a Banana.Report.ReportStylesheet
use the function Banana.Report.newStyleSheet() - call a function Banana.Report.preview(reportObject, stylesheet)
The program will then open the preview window and visualize the content.
- create ReportObject
Specific Report Extensions
Specific report extensions are for:
Example Extension for Creating a Report with a Table
Introduction
All the following code samples are used in the embedded_javascript_tutorial1.ac2 file as embedded BananaApps. This file contains a list of complete and working examples that can be run.
Another complete and working example of BananaApp that use a table can be found here.
Table object
Tables are used in BananaApps to present tabular data as reports.
A Table object is defined using the addTable([classes]) function, and contains a number of table cells which are organized into table rows.
The process for creating a table is the following:
- Create the report object that willl contain the table
- Add a table object to the report
- Add a row object to the table using the addRow([classes]) method.
- Add cells objects to the row using the addCell([span]) or addCell(text [,classes, span]) methods.
- Repeat steps 3 and 4
Table Code Sample: Simple Table
// @api = 1.0
// @id = ch.banana.uni.app.tablereport
// @description = Tutorial: Table example report
// @task = app.command
// @doctype = nodocument
// @publisher = Banana.ch SA
// @pubdate = 2019-01-25
// @inputdatasource = none
// @timeout = -1

function exec() {
	var report = Banana.Report.newReport("Report title"); // create the report
	var myTable = report.addTable("myTable");             // create and add a table to the report

	var tableRow = myTable.addRow();                      // add a row to the table
	tableRow.addCell("Cash");                             // add a first cell to the row
	tableRow.addCell("500.00");                           // add a second cell to the row

	var tableRow = myTable.addRow();                      // add a row to the table
	tableRow.addCell("Bank");                             // add a first cell to the row
	tableRow.addCell("1200.50");                          // add a second cell to the row
    var stylesheet = Banana.Report.newStyleSheet();
    Banana.Report.preview(report, stylesheet);
}
Output: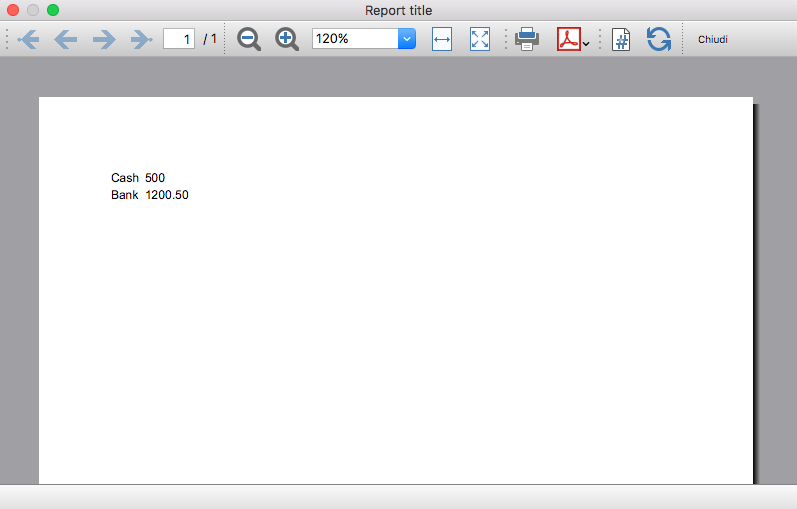
Column headers
Table cells may should act as column headers, in such cases it should be used the getHeader() function.
If the table goes over several pages, this would allow you to repeat at the beginning of each page the headers of the columns.
var report = Banana.Report.newReport("Report title");
var table = report.addTable("myTable");

// add the table header
var tableHeader = table.getHeader();
var tableRow = tableHeader.addRow();
tableRow.addCell("Description");
tableRow.addCell("Amount");

// add the first row of the table
tableRow = table.addRow();
tableRow.addCell('Cash');
tableRow.addCell('1200');
Output: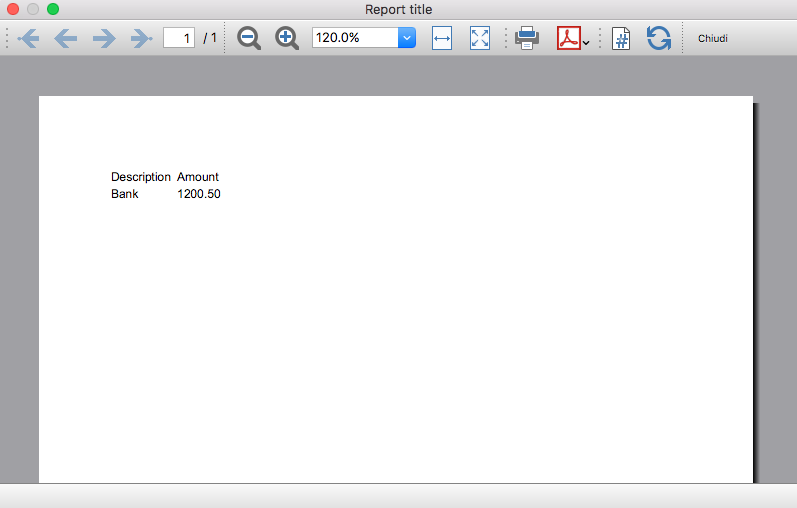
Caption
A caption, which is a descriptive text associated with the element, can be added to a table using the getCaption() function.
var table = report.addTable("MyTable");
var caption = table.getCaption();
caption.addText("Table caption text", "captionStyle");
Output: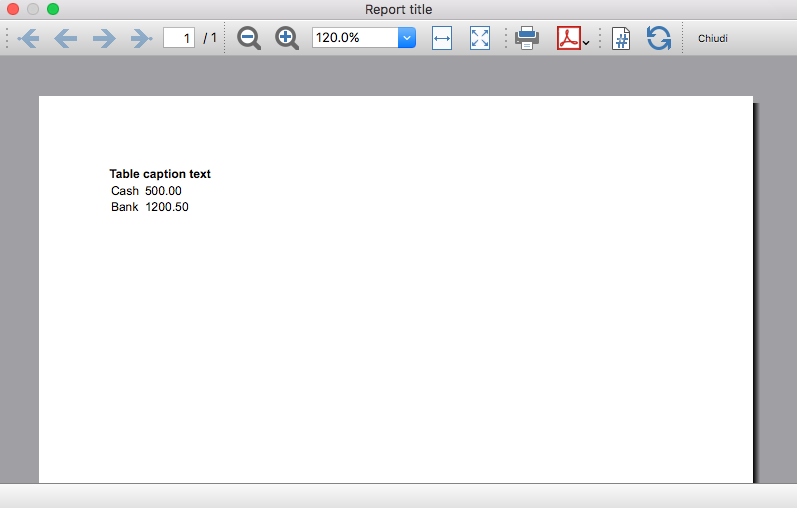
Merge cells
Table cells can be merged using the span attribute of the addCell([span]) or addCell(text [,classes, span]) functions.
tableRow.addCell();                        // span empty cell over 1 column (default value)
tableRow.addCell("", 3);                   // span empty cell over 3 columns
tableRow.addCell("Cash", 2);               // span the cell over 2 columns
tableRow.addCell("Cash", "classStyle", 2); // span the cell over 2 columns
Columns and Cells attributes
Styles attributes can be defined to set, for example, the columns width and cells borders using the addColumn([classes]) and setStyleAttributes(attributes) functions.
- The width attribute (applied to a table) specifies the width of a table. If the width attribute is not set, a table takes up the space of the report page.
- The width attribute (applied to a column) specifies the width of a column. If the width attribute is not set, a column takes up the space it needs to display the data.
- The border attribute (applied to a cell) specifies the border of a cell. If the border attribute is not set, a cell will be displayed without borders.
var report = Banana.Report.newReport("Report Title");
var table = report.addTable("MyTable");
table.setStyleAttributes("width:100%;"); // specifies the width of the table

var column1 = table.addColumn("col1");
column1.setStyleAttributes("width:10%"); // specifies the width of the column1
var column2 = table.addColumn("col2");
column2.setStyleAttributes("width:55%"); // specifies the width of the column2
var column3 = table.addColumn("col3");
column3.setStyleAttributes("width:30%"); // specifies the width of the column3
var column4 = table.addColumn("col4");
column4.setStyleAttributes("width:5%");  // specifies the width of the column4

var tableRow = table.addRow();
tableRow.addCell("A", "", 1).setStyleAttributes("border:thin solid black"); // specifies the cell border
tableRow.addCell("B", "", 1).setStyleAttributes("border:thin solid black"); // specifies the cell border
tableRow.addCell("C", "", 1).setStyleAttributes("border:thin solid black"); // specifies the cell border
tableRow.addCell("D", "", 1).setStyleAttributes("border:thin solid black"); // specifies the cell border
Output: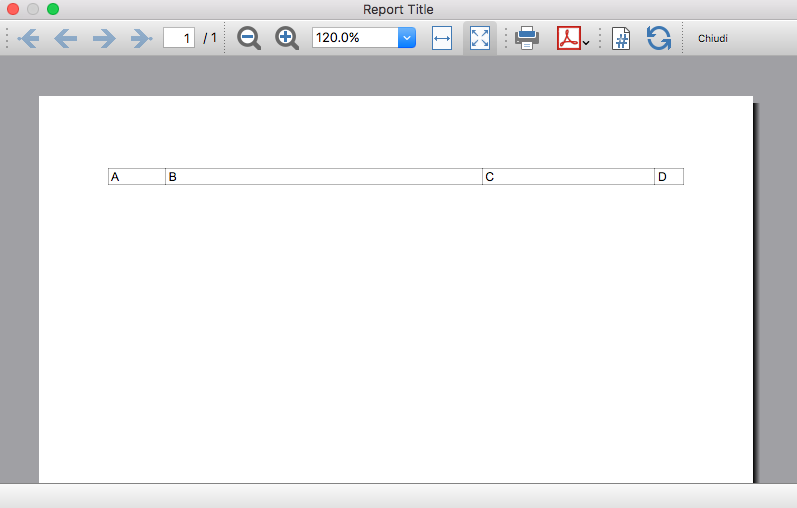
Cell with multiple paragraphs
Table cells can contain multiple paragraphs of text or data. Use the addParagraph([text, classes]) function to add many paragraphs to a cell.
var report = Banana.Report.newReport("Report Title");
var table = report.addTable("MyTable");
table.setStyleAttributes("width:100%;");
tableRow = table.addRow();

// Add first cell with paragraphs
var cell1 = tableRow.addCell("", "", 1);
cell1.setStyleAttributes("border:thin solid black");
cell1.addParagraph("First paragraph...", "");
cell1.addParagraph("Second paragraph...", "");
cell1.addParagraph(" "); //empty paragraph
cell1.addParagraph("Fourth paragraph...", "");

// Add second cell without paragraphs
var cell2 = tableRow.addCell("Cell2...", "", 1).setStyleAttributes("border:thin solid black");
Output: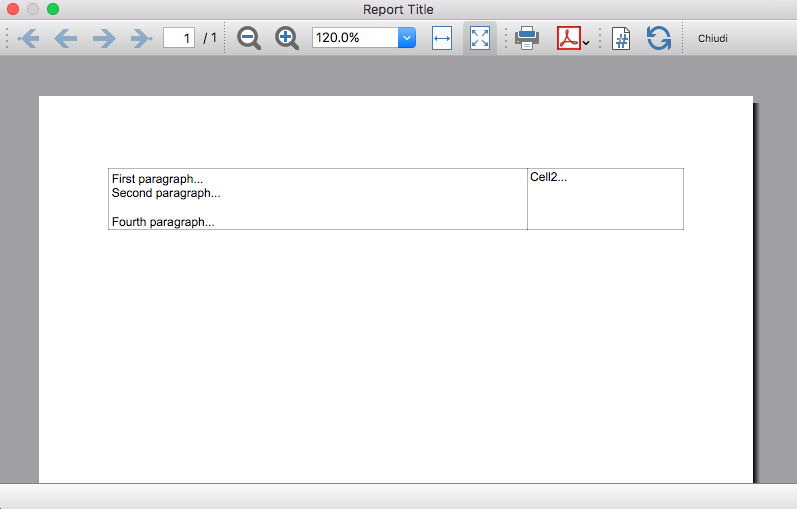
Table Code Sample: Complex Table
var report = Banana.Report.newReport("Report Title");
var table = report.addTable("MyTable");
table.setStyleAttributes("width:100%;");

var column1 = table.addColumn("col1");
column1.setStyleAttributes("width:25%");
var column2 = table.addColumn("col2");
column2.setStyleAttributes("width:25%");
var column3 = table.addColumn("col3");
column3.setStyleAttributes("width:25%");
var column4 = table.addColumn("col4");
column4.setStyleAttributes("width:25%");

// 1st row
tableRow = table.addRow();
tableRow.addCell("Row 1, Cell 1: span cell over 4 columns", "", 4).setStyleAttributes("border:thin solid black");

// 2nd row
tableRow = table.addRow();
tableRow.addCell("Row 2, Cell 1: span cell over 2 columns", "", 2).setStyleAttributes("border:thin solid black");
tableRow.addCell("Row 2, Cell 3: span cell over 2 columns", "", 2).setStyleAttributes("border:thin solid black");

// 3rd row
tableRow = table.addRow();
tableRow.addCell("Row 3, Cell 1", "", 1).setStyleAttributes("border:thin solid black");
tableRow.addCell("Row 3, Cell 2: span cell over 2 columns", "", 2).setStyleAttributes("border:thin solid black");
tableRow.addCell("Row 3, Cell 4", "", 1).setStyleAttributes("border:thin solid black");

// 4th row
tableRow = table.addRow();
tableRow.addCell("Row 4, Cell 1", "", 1).setStyleAttributes("border:thin solid black");
tableRow.addCell("Row 4, Cell 2", "", 1).setStyleAttributes("border:thin solid black");
tableRow.addCell("Row 4, Cell 3", "", 1).setStyleAttributes("border:thin solid black");
tableRow.addCell("Row 4, Cell 4", "", 1).setStyleAttributes("border:thin solid black");

// 5th row
tableRow = table.addRow();
tableRow.addCell("Row 5, Cell 1: span cell over 3 columns", "", 3).setStyleAttributes("border:thin solid black");
tableRow.addCell("Row 5, Cell 4", "", 1).setStyleAttributes("border:thin solid black");
Output:
Table within a Table
Tables can also be added within other tables, in particular to cells of "externals" tables. This might be useful when you need to create tables with more complex structures.
In these cases it is only necessary to add a tables to the cell object of the external tables instead of the report. These tables are treated as a separate table, with their own rows, cells and attributes.
var report = Banana.Report.newReport("Report Title");

/*  EXTERNAL TABLE */
var table = report.addTable("outTable");
// ... add style attributes, rows, cells, etc. for the first external table

/* INTERNAL TABLE */
row_out = table.addRow(); // add a new row and a cell
cell_out = row_out.addCell("", "", 1);

var insideTable = cell_out.addTable("inTable"); // add a second table within a cell of the first table

var row_in = insideTable.addRow();
var cell_in = row_in.addCell("1", "", 1);
cell_in = row_in.addCell("2", "", 1);

row_in = insideTable.addRow();
cell_in = row_in.addCell("3", "", 1);
cell_in = row_in.addCell("4", "", 1);

// add a second cell to the first table
cell_out = row_out.addCell("row 2, cell 2", "", 1);
Output example: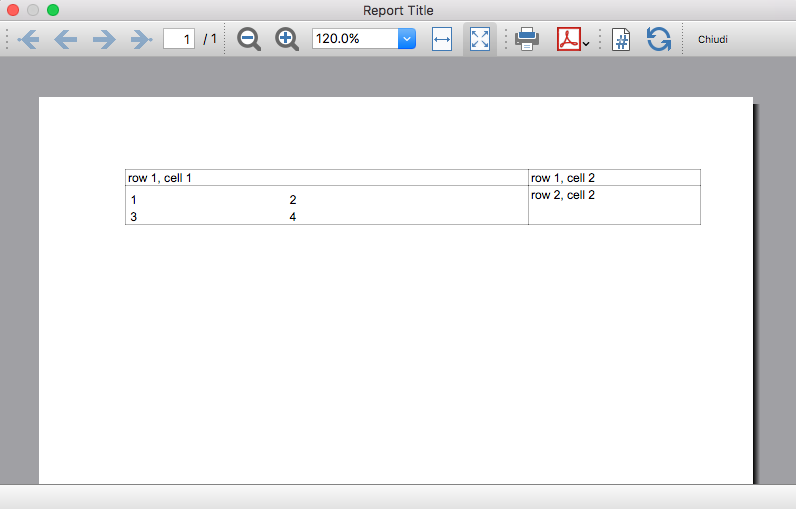
日记账报表
下面我们来解释为了在BananaApps(应用程序)上创建一个日记账报表时所需考虑的问题。
- 检索交易数据。
- 使用Banana APIC提供的功能创建特定的报告。
文档
示例文件
- 示例文件在 github/General/CaseStudies/JournalReport 是可用的。
- 使用日记账 API 的解决方案:
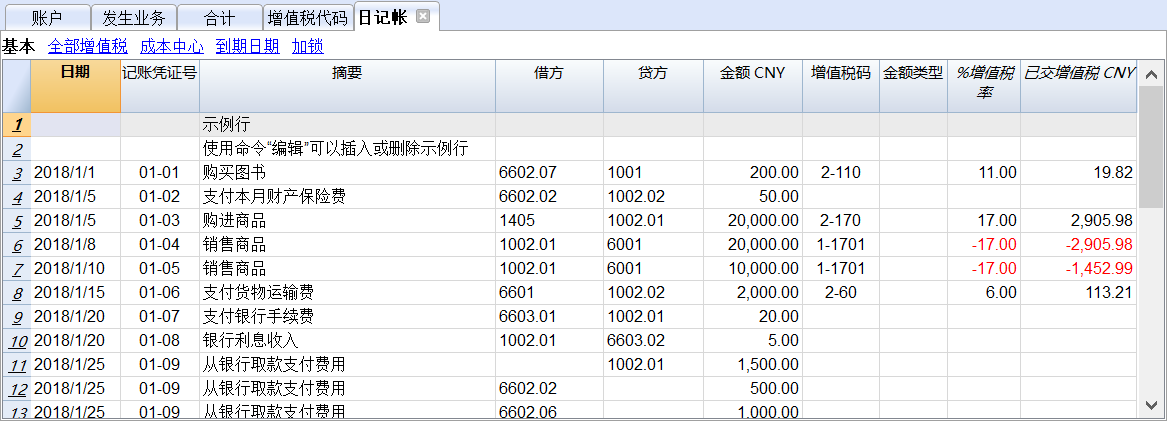
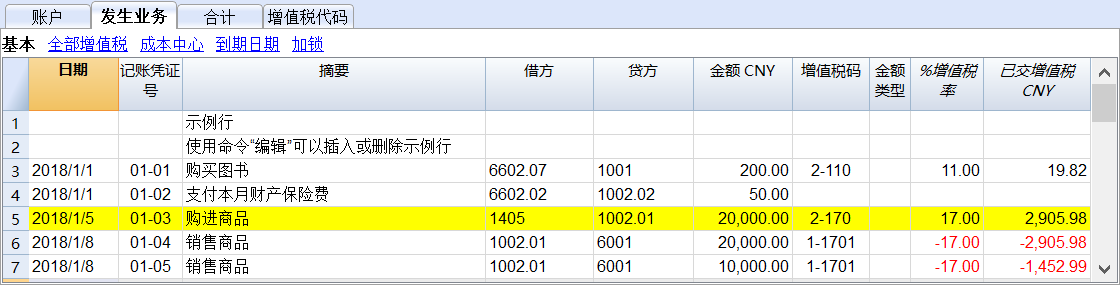
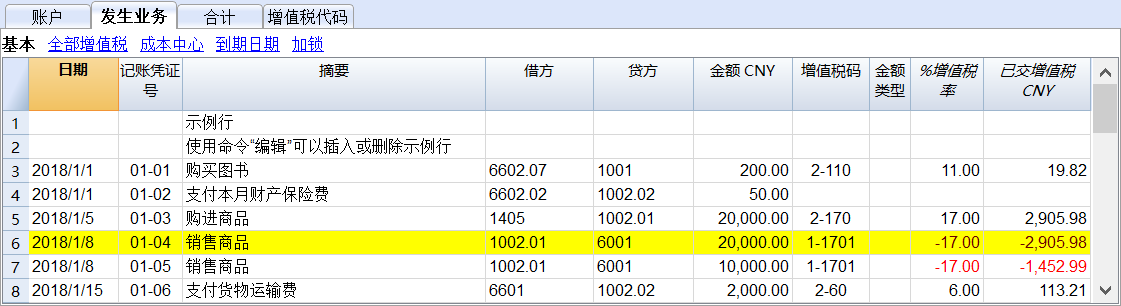
发生业务表
下表是一个发生业务的例子:
![]()
我们看到以上不同类型的发生业务。发生业务可以发生在单独的一行或者多行上,可以含也可以不含增值税。
要打印含有所有账户和发生业务的日记账报表,如下所示:
Javascript API 等效
要检索一个包含账户表中所有金额的 目标表格 , 我们使用 日记账 API:
var journal = Banana.document.journal(Banana.document.originType, Banana.document.accountType);
在这里
原始类别 指定要过滤的行。可以是以下之一:
- ORIGINTYPE_NONE 不应用过滤器并返回所有的行 (当前和预算)
- ORIGINTYPE_CURRENT 只返回正常发生业务
- ORIGINTYPE_BUDGET 只返回预算发生业务
账户类别 指定要过滤的行。可以是以下之一:
- ACCOUNTTYPE_NONE 不应用过滤器并返回所有的行
- ACCOUNTTYPE_NORMAL 仅返回一般账户的行
- ACCOUNTTYPE_CC1 仅返回成本中心 1 的行
- ACCOUNTTYPE_CC2 仅返回成本中心 2 的行
- ACCOUNTTYPE_CC3 仅返回成本中心 3 的行
- ACCOUNTTYPE_CC 成本中心的行与使用 (ACCOUNTTYPE_CC1 | ACCOUNTTYPE_CC2 | ACCOUNTTYPE_CC3) 相同返回
返回的表格包含 发生业务表 的所有列,以及其他许多列 (请访问 日记账 API 以获取更多信息)。
代码示例
通常用以下方法来创建和使用日记账表检索发生业务数据:
// Create the journal table
var journal = Banana.document.journal(Banana.document.ORIGINTYPE_CURRENT, Banana.document.ACCOUNTTYPE_NORMAL);

// Read the table row by row and save some values
for (var i = 0; i < journal.rowCount; i++) {
       var tRow = journal.row(i);

       // From the journal table we take only the transactions rows
       if (tRow.value('JOperationType') == Banana.document.OPERATIONTYPE_TRANSACTION) {

              // Save some column values
              var jContraAccountGroup = tRow.value('JContraAccountGroup');
              var jRowOrigin = tRow.value('JRowOrigin');
              var jDate = tRow.value('JDate');
              var jAccount = tRow.value('JAccount');
              var jContraAccount = tRow.value('JContraAccount');
              var jDescription = tRow.value('JDescription');
              var jAccountDescription = tRow.value('JAccountDescription');
              var jAmount = tRow.value('JAmount');
              //...
       }
}
每个发生业务在日记账表中的结果
以上的日记账表对于更好的理解日记账工作原理是非常有用的。
一般来说:
- 对于发生业务表中使用的每个账户 (借方,贷方,成本中心1, 成本中心2, 成本中心3) ,程序会生成一个日记账行,其中日记账账户列设置了特定账户。
- 对于使用借方,贷方,增值税账户,成本中心1,成本中心2,成本中心3 的复式记账发生业务,日记账将包含六行。如果发生业务只有借方和贷方,则会生成两行。
所有特定的发生业务:
- 记账凭证号01-02 – 不含增值税的单行发生业务
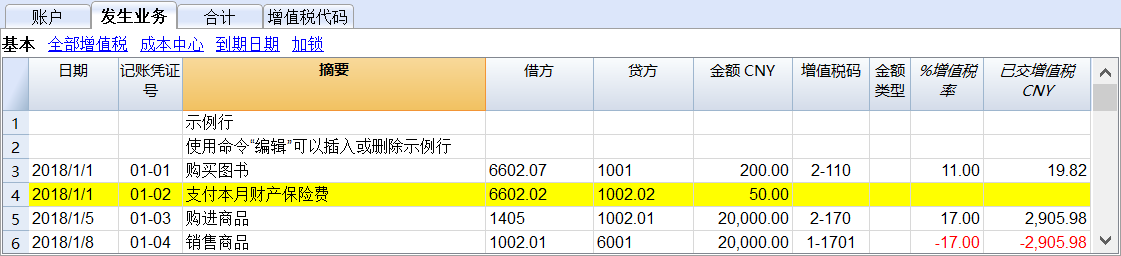
分期日记账:

一行日记账账户为 6602.02
一行日记账账户为 1002.02
- 记账凭证号 01-03 – 含增值税的单行发生业务
分期日记账:

一行日记账账户为 1405
- 记账凭证号码 01-04 – 含负增值税的发生业务
分期日记账:

一行日记账账户为 1002.01
一行日记账账户为 6001。由于增值税金额在贷方,因此为负值,是必须向税务机关缴纳的。
- 记账凭证号 01-09 – 含增值税的多行发生业务
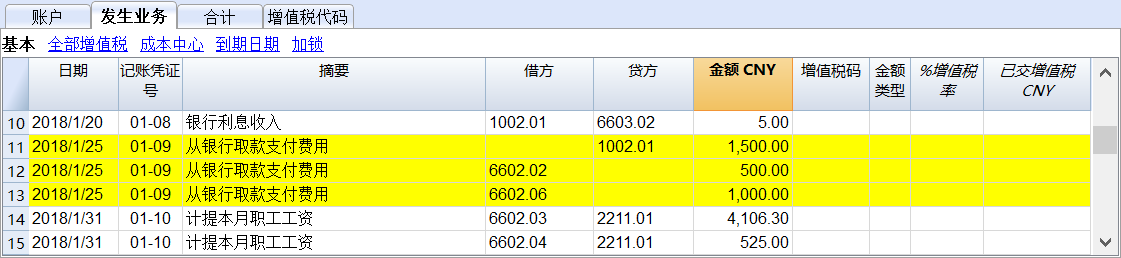
分期日记账:

一行日记账账户为 1002.01
一行日记账账户为 6602.02
一行日记账账户为 6602.06
Example Extension for Cash Flow Report
Introduction
This walkthrough provides step-by-step guidance for creating an Extension for printing a cash flow report.
As example we use the Cash Flow Report that is part of the Rapports comptables (OHADA - RDC) Extension, developed following the specifications for the OHADA-RDC in Africa (for more information, visit the GitHub documentation).
There are three basic steps in order to experiment with this Extension:
- Prepare for programming
- Create a JavaScript programming
- Install the Extension
- Run the Extension
Preparation work
Before you start programming, you need to define how the output should look like and how its calculations will be done.
With the following information the software developer will be able to program the software:
- Prepare an accounting file with:
- The accounting plan you will use as the base for the report.
The Cash flow report is related to a specific accounting plan, its accounting groups and its numbers. - The data that is necessary to test if the report is correct.
- Opening balances for all the accounts and groups that partecipate in the calculation.
Possibly use simple to understand amounts (10, 20, 100, 1000). - Transactions for all relevant accounts.
- Opening balances for all the accounts and groups that partecipate in the calculation.
- The accounting plan you will use as the base for the report.
- Decide how the report should look like.
If you aren't already in process of an example printout, use Excel and prepare an example of the desired printout.
On the left side ad a column with the name for each row.
See OHADA example. - Explain for each row how the calculation for the related row of the report should be done.
See OHADA example.- Specify the accounts or groups that will be summed
- Specify amounts that should be entered manually.
In case the information cannot be retrieved from the accounting data (lack of account), the programmer can easily create a dialog in order to enter the information manually.
How to specify calculations for programmers
In order to understand how to specify calculations for programmers, you need to know which amounts you can retrieve from the Accounts table of Banana Accounting.
You can retrieve amounts for both, accounts and groups, and specify the type of amount:
- opening: the amount at the beginning of the period (the Opening column of the Accounts table). Can be positive or negative.
- debit: the amount of debit transactions for the period (the Debit column of the Accounts table). Only positive values.
- credit: the amount of credit transactions for the period (the Credit column of the Accounts table). Only positive values.
- total: the difference between debit-credit for the period. Can be positive or negative.
- balance: the balance for the period (opening + total). Can be positive or negative.
The combination of account/group and amounts type can be used to specify the calculations for programmers:
- In case of accounts, indicate "account_number , amount_type" (i.e. "1000 , opening").
- In case of groups, indicate "Gr=group_number , amount_type" (i.e. "Gr=10 , total").
See the table below for more examples:
| Row name | Formula | Description |
|---|---|---|
| ZA | getAmount(Gr=BT, opening) | Takes the opening amount of the group BT |
| FA | + (-1) getAmount(Gr=134, total) + getAmount(6541, total) + getAmount(6542, total) - (-1)getAmount(7541, total) - (-1)getAmount(7542, total) + (-1)getAmount(Gr=136, total) + (-1)getAmount(Gr=TO, total) - getAmount(Gr=RP, total) - getAmount(Gr=RQ, total) - getAmount(Gr=RS, total) | add (inverted) total amount of group 134 add total amount of account 6541 add total amount of account 6542 subtract (inverted) total amount of account 7541 subtract (inverted) total amount of account 7542 add (inverted) total amount of group 136 add (inverted) total amount of group TO subtract total amount of group RP subtract total amount of group RQ subtract total amount of group RS |
| FB | getAmount(488, total) | Takes the movement of the period (total) for the account 488 |
| FJ | + getAmount(826, credit) + getAmount(Gr=AS-1, credit) - getAmount(4856, debit) | add credit amount of account 826 add credit amount of group AS-1 subtract debit amount of account 4856 |
Example of the "FA" row in the report with the sum of all the amounts: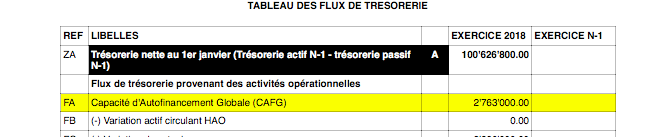
Here is the Javascript code for the calculation of each line. For a better control there has been created a function for each row, that retrieves and sums the values for a specific period and then returns the amount to be printed.
function calculate_ZA(banDoc, startDate, endDate) {
   /*
      Gr=BT,opening - (- Gr=DT,opening)
   */
   var grBT = getAmount(banDoc,'Gr=BT','opening',startDate,endDate);
   var grDT = getAmount(banDoc,'Gr=DT','opening',startDate,endDate);
   return Banana.SDecimal.subtract(grBT, Banana.SDecimal.invert(grDT));
}
function calculate_FA(banDoc, startDate, endDate) {
   /*
      + (-Gr=134, total)
      + account 6541, total
      + account 6542, total
      - (-account 7541, total)
      - (-account 7542, total)
      + (-Gr=136, total)
      + (-Gr=TO, total)
      - Gr=RP, total
      - Gr=RQ, total
      - Gr=RS, total
   */
   var gr134 = getAmount(banDoc,'Gr=134','total',startDate,endDate);
   var acc6541 = getAmount(banDoc,'6541','total',startDate,endDate);
   var acc6542 = getAmount(banDoc,'6542','total',startDate,endDate);
   var acc7541 = getAmount(banDoc,'7541','total',startDate,endDate);
   var acc7542 = getAmount(banDoc,'7542','total',startDate,endDate);
   var gr136 = getAmount(banDoc,'Gr=136','total',startDate,endDate);
   var grTO = getAmount(banDoc,'Gr=TO','total',startDate,endDate);
   var grRP = getAmount(banDoc,'Gr=RP','total',startDate,endDate);
   var grRQ = getAmount(banDoc,'Gr=RQ','total',startDate,endDate);
   var grRS = getAmount(banDoc,'Gr=RS','total',startDate,endDate);
   var res = 0;
   res = Banana.SDecimal.add(res, Banana.SDecimal.invert(gr134));
   res = Banana.SDecimal.add(res,acc6541);
   res = Banana.SDecimal.add(res,acc6542);
   res = Banana.SDecimal.subtract(res, Banana.SDecimal.invert(acc7541));
   res = Banana.SDecimal.subtract(res, Banana.SDecimal.invert(acc7542));
   res = Banana.SDecimal.add(res, Banana.SDecimal.invert(gr136));
   res = Banana.SDecimal.add(res, Banana.SDecimal.invert(grTO));
   res = Banana.SDecimal.subtract(res,grRP);
   res = Banana.SDecimal.subtract(res,grRQ);
   res = Banana.SDecimal.subtract(res,grRS);
   return res;
}
function calculate_FB(banDoc, startDate, endDate) {
   /*
      account 488, total
   */
   return getAmount(banDoc,'488','total',startDate,endDate);
}
function calculate_FJ(banDoc, startDate, endDate) {
   /*
      + account 826, credit
      + Gr=AS-1, credit
      - 4856, debit
   */
   var acc826 = getAmount(banDoc,'826','credit',startDate,endDate);
   var grAS1 = getAmount(banDoc,'Gr=AS-1','credit',startDate,endDate);
   var acc4856 = getAmount(banDoc,'4856','debit',startDate,endDate);
   var res = 0;
   res = Banana.SDecimal.add(res,acc826);
   res = Banana.SDecimal.add(res,grAS1);
   res = Banana.SDecimal.subtract(res,acc4856);
   return res;
}
Create the JavaScript programming
The script retrieves all the required data from Banana Accounting files, makes some addition and subtraction operations, and presents the data in a table.
By looking a the source code for Cash Flow Report (OHADA - RDC) you will understand how the report is setup.
If you want to experiment with the script, copy and paste it on your text editor and save the file as .js (i.e. cashflow.js). Otherwise you can just install and run the app following the GitHub documentation.
Retrieve data from Banana
In order to build a cash flow it is required to get different data from the accounting. These data are values related to specific accounts or groups and to some columns of the table accounts.
But how to do that? How to retrieve a specific account value for a specific column of the accounts table and period?
Function currentBalance()
To retrieve the various amounts of the report, we use the currentBalance(account, startDate, endDate) function.
The function sums the amounts of opening, debit, credit, total and balance calculated based on the opening and all transactions for the given accounts/group and period.
To build the cash flow report we use this function for accounts and groups:
// example for account 1000
var currentBal = Banana.document.currentBalance('1000','2019-01-01','2019-12-31');
// example for group 10
var currentBal = Banana.document.currentBalance('Gr=10','2019-01-01','2019-12-31');
The parameters of the function are:
- account or group number (the group number is preceded by "Gr=")
- start date of the period we are intrested
- end date of the period we are intrested
The returned value of the currentBalance() function is an object, which has name:values pairs called properties. These properties are the values we need.
The object structure is like the following one:
{
   "amount":"17570.00",
   "amountCurrency":"",
   "bClass":"1",
   "balance":"17570.00",
   "balanceCurrency":"",
   "credit":"30.00",
   "creditCurrency":"",
   "debit":"16600.00",
   "debitCurrency":"",
   "opening":"1000.00",
   "openingCurrency":"1000.00",
   "rowCount":"6",
   "total":"16570.00",
   "totalCurrency":""
}
As you can see this object has many properties, but the cash flow report we want to build uses only four of them:
- opening the amount at the beginning of the period (the Opening column of the Accounts table). Can be positive or negative.
- debit the amount of debit transactions for the period (the Debit column of the Accounts table). Only positive values.
- credit the amount of credit transactions for the period (the Credit column of the Accounts table). Only positive values.
- total the difference between debit-credit for the period. Can be positive or negative.
- balance the balance for the period. (opening + total). Can be positive or negative.
For more information, see the documentation here.
Accessing Object Properties
Ok, now we have the object with all the properties. But how to get a single property value?
There are three methods for accessing the property of an object:
// method 1: objectName.property
var value = currentBal.debit; // returns 16600.00
// method 2: objectName["property"]
var value = currentBal["credit"]; // returns 30.00
// method 3: objectName[expression]
var x = "total";
var value = currentBal[x]; // returns 16570.00
It doesn't matter which method is used, the result does not change.
Calculate totals
The cash flow report requires to do addition and subtraction operations using some specific values retrieved from the accounting file.
To build all the various totals we encounter in the report we use the add(value1, value2) and the subtract(value1, value2) functions.
// example sum the amounts of accounts 6541 and 6542
var acc6541 = Banana.document.currentBalance('6541','2019-01-01','2019-12-31').total;
var acc6542 = Banana.document.currentBalance('6542','2019-01-01','2019-12-31').total;
var sum = Banana.SDecimal.add(acc6541, acc6542);
Previous year Banana document
To generate the report, the Extension retrieves data from the current year accounting file and from the previous year accounting file.
The current year accounting file is the one that is opened in Banana, the one that starts the execution of the Extension.
The previous year accounting file is not opened in Banana, it is just selected from the menu File -> File and accounting properties... -> Options tab -> File from previous year.
In order to retrieve data from the previous year we use the previousYear([nrYears]) function.
The function returns the previous year as a Banana.Document object. If the previous year is not defined or it is not found it returns null.
/* CURRENT year file: the opened document in Banana */
var current = Banana.document;
/* PREVIOUS year file: open a dialog window to select the previous year .ac2 file */
var previous = Banana.document.previousYear();
The object Banana.document represent the current document opened in the application.
The previous variable represent the defined previous year document.
Function getAmount()
We have added to the script a parameterized function that calls the currentBalance() and retrieves the value for the given parameters.
With this function it is possible to define which value to extract and from which Banana document file.
function getAmount(banDoc,account,property,startDate,endDate) {
   var currentBal = banDoc.currentBalance(account,startDate,endDate);
   var value = currentBal[property];
   return value;
}
The parameters are:
- banDoc: the Banana document from which retrieve the data (see Open Banana document);
- account: the account or group;
- property: the property of the returned currentBalance() object (i.e. opening, debit, credit, total);
- startDate: the opening date of the accounting period;
- endDate: the closing date of the accounting period;
// retrieve from the current year Banana document the 6541 account's total value
var current6541 = getAmount(current,'6541','total','2019-01-01','2019-12-31');
// retrieve from the previous year Banana document the 6541 account's total value
var previous6541 = getAmount(previous,'6541','total','2018-01-01','2018-12-31');
The use of the function is the same, but the returned values are different: one returns the value of the current year and the other the value of the previous year.
The Dates
Dates that we use in the script are taken from the accounting file using the info(section, id) function.
These dates are retrieved from the Opening and Closing dates of the accounting file (File properties > Accounting Tab).
// Accounting period for the current year file
var currentStartDate = current.info("AccountingDataBase","OpeningDate");
var currentEndDate = current.info("AccountingDataBase","ClosureDate");
// Accounting period for the previous year file
var previousStartDate = previous.info("AccountingDataBase","OpeningDate");
var previousEndDate = previous.info("AccountingDataBase","ClosureDate");
Function toLocaleNumberFormat()
The function toLocaleNumberFormat is used to convert all the amount numbers to the local format.
Banana.Converter.toLocaleNumberFormat('16570.00'); // returns 16'570.00
Install and run the Extension
Visit the Install your Extension documentation to install and run the app.
Report example:
Example Extenstion for a Country Specific VAT Report
Following, we will explain what needs to be considered when creating a Banana Accounting Extension for VAT reporting suitable for a specific country.
- Creating the Vat code for the specific country.
- Creating the country specific reports or export files, using the functionalities offered by the Banana API .
Documentation
Banana Accounting manage all kinds of VAT, thanks to the use of customizable VAT Code. For more information on how it managed and recorded VAT see:
Vat Table
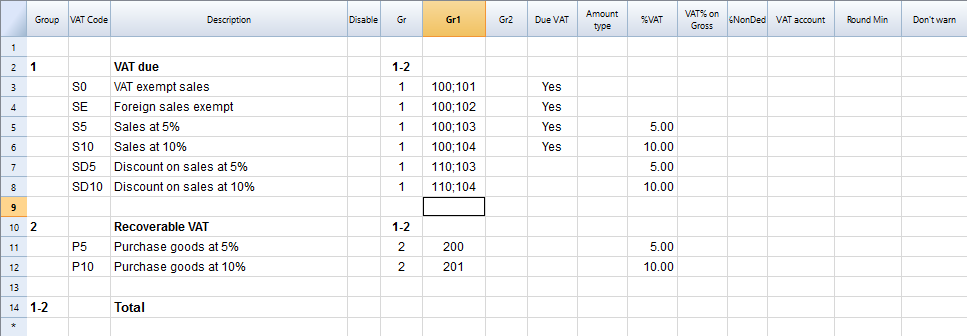
Countries require to fill a form with the VAT grouped by different percentages and criterias. In order to achieve this goals it is necessary to create a specific VAT code for each type of VAT that need to be reported.
There are two main groups:
- Vat due to the tax authority.
- Vat recoverable
Creating the VatCode for a specific country
When you use Banana Accounting in a new country, you need to adapt the VatCode table to your country needs. Basically you should procede as described here:
- The starting point is the Vat reporting form of the country.
- You need to create a VAT Code in the VAT Code Table.
- The user, for each transaction that is related to the VAT, will specify the VAT code so that similar transactions can be grouped and summed together, based on the form requirements.
- For each case there should be a specific VAT Codes. The parameters will vary base on:
- VAT recoverable and payable
- Percentage of VAT.
- Tax reporting requirements.
There should be a different VAT Code for export of goods and goods that are exempt.
Tax authorities requires the amounts to be reported sepately even if the percentage applicable is always zero.
Example, for a country that has a VAT percentage of 0% and 5%.
- For the 0% you need to report both the sales exempt and the export:
- Create a Vat code S0 for Vat Exempt (Vat due Yes even if percentage is 0)
- Create a Vat code SE for Vat Export. (Vat due Yes even if percentage is 0)
- For the 5%
- Create a Vat code S5 for sales at 5% (Vat due Yes)
- Create a Vat code P5 for purchase. (Vat due void, means recoverable)
- If you need to show separatly on the tax form the discounts, create a Vat code SD5 for discount on sales at 5%.
If it is not necessary to show separatly the discounts, when entering the transactions for discounts we precede the VAT code with the "-S5" so the amount will be reversed.
There are countries where the are many VAT percentages and a complex tax reporting form. In this case, you will end up having a VAT table with many codes.
Use the Gr1 to groups VAT Code together
If the VAT amounts for different VAT code need to be grouped together, you can use the Gr1 to enter to witch field the VAT code belong.
- When creating a Banana Extension to groups the amounts together, you can use this groups to report the amounts.
- In case the user need to add a new VatCode that fit in a form, he can do it and get it correctly summed in the tax form.
Specify in the Gr1 the field number of the VAT form, separating the number with ";" if the same goes in more than one group. For example:
- The field 100 of the tax form require to declare all sales amounts.
- The different sales need also to be indicated in the specific tax field, so we specify also the other tax field.
- Discount need to be indicate separately so we specify for a discount the specific field. The same for purchases.
Give the full VAT code table
It is possible that you will end up with a very complex VAT table.
Some user will probably use only few VAT code, the one that are necessary for their actitivity.
It is better not to give to the user a stripped down Vat table, for the fact that it may need one specific Vat code.
In this case enter the 1 in the Disable columns. The user will be able to use the code but this will not appear in the list of available VatCode when entering it in the Transactions table.
Assigning vat code to the accounts table
For each account you can assign a default Vat Code (column Vat code).
When you enter or import transactions the Vat code will be retrieved, but you can change it.
Vat Transactions
When entering transactions you also specify the VAT code, so that:
- The VAT code parameters are retrieved.
- The VAT Amounts are calculated.
- The VAT is recorded on the appropriate accounts.
- You will have all the information necessary to prepare a summary report.
![]()
We see above different examples of VAT transactions.
- Doc 10-11.
We record cash sale using different Amount type.
We see that the transaction amount is different but the Taxable amount and VAT amount are always the same.
VAT amount is in negative for the fact that the VAT amount is registered in credit, and therefore the amount must be payed to the tax authority. - Doc 20.
Return of goods from customer.
We use the same VAT code, but preceeded by the minus sing. The taxable amount and VAT amout sign is inverted.
Vat Amount is positive (debit), meaning we recover the VAT from the tax authoriy. - Doc 100-102.
Purchase the VAT amount is positive (debit) meaning we recover the VAT from the tax authortity. - Doc 130.
Return of good to suppliers the VAT code is inverted, and we owe the taxt to the authority.
VAT documentation
For each country there should be a documentation that explain the VAT theme with:
- Page for the VAT codes.
Explaining the single VAT code and grouping. - Page for the transactions with examples and explanations
In one or more pages all possible transactions case should be explained. The page is a reference that allows user to understand how a specific case should be recorded.- Create a file with transactions examples.
- Create header and sub header for the different cases, user should be able to find the case by going through the page or an index. Typical:
- VAT Due
- Normal
- Credit notes
- Reverse charge
- VAT Recoverable
- Normal
- Credit note
- VAT not fully deductible.
- VAT Exempt
- VAT 0 %
- Adjustments
- Corrections
- End of period transactions.
- VAT Due
- Create images of the Transaction's table.
- Use the column Doc to number each transaction group.
- When you write explanations you will precede the explanation with the doc number of the tranasaction.
- Use bullet paragraph when explaining single transactions.
- End of period
Explain what procedure do to at the and of period.- Check accounting.
- Account1 -> VAT report
- Country specific report
- Transaction to move the automatic VAT amount to the VAT due or recoverable.
- Transaction to pay the VAT
Banana Extension for VAT country summary report
Before creating a country specific VAT report you should have created a file containing:
- Account plan for the country.
- VAT code table with all the necessary VAT codes for the country, with the GR1 set with the group.
- Test Transactions for all the cases and VAT codes. Including also che reversal transactions (like discounts or credit notes).
This transactions will allow the programmer to immediately test the results.
Examples files
- The examples files are available on github/General/CaseStudies.
- Solutions making use of the VAT API.
Javascipt API to use for VAT Calculation
The API to retrieve the values above would be:
//get the description of the vat code
Banana.document.vatDescription("S10");
// use the vatCurrent Balance to retrieve the different values
Banana.document.vatCurrentBalance("S10").vatTaxable;
Banana.document.vatCurrentBalance("S10").vatAmount;
Banana.document.vatCurrentBalance("S102").vatNotDeductible;
Banana.document.vatCurrentBalance("S10").vatPosted;
Banana.document.vatCurrentBalance("S10").rowCount;
- vatTaxable is the net amount, the one that usually must figure on the vat report as the amount of revenue to declare.
- vatAmount is the VAT amount.
- vatTaxable + vatAmount is the gross amount or inclusive Vat..
- vatNotDeductible is the amount of vat that cannot be fiscally deducted. In case you have an expense where the VAT cannot be totally deducted.
- vatPosted (vatAmount - vatNotDeductible) is the amount that has been posted on tha VAT account.
- count is the number of row that have been found to use the vatCode.
Grouping VAT Codes
The VAT call can only be made for one or more VAT Codes.
If more VAT code need to be grouped together, you should have a Javascript function that take as parameter the GR1.
The function should iterate the VAT table and return the VAT code that have the the corresponding GR1.
The sign of the vatAmount
The sign of the vatAmount follows the accounting convention.
- If the sign of the vatAmount is negative (debit), it means that the vat is due.
- If the sign of the vatAmount is positive, it means that the vat is recoverable.
The sign of the vatTaxable follow the sign of the vatAmount. In case the vatAmount is zero the vatTaxable sign is negative if the isDue of the vatCode is true.
If you use the vatAmount to create a tax form you should take care to invert the amount.
vatAmount sign and isDue flag:
- Vat code that have the isDue to true (1) normally have the vatAmount in negative, but the vatAmount could also be positive in case the user has used the vatCode with the minus sign "-S10".
The minus sign before the vatCode is used in case of reversal transaction (correction of an incorrect transactions). In this case, the vatAmount would be recorded in the positive. - Vat code that have the isDue to false (void) normally have the vatAmount in positive, but the vatAmount could also be negative in case the user has used the vatCode with the minus sign "-P10".
In this case the vatAmount would be recorded in negative.
Amount used in the vat report for the tax authorities
Vat due
The amounts are usually in negative,so they must be inverted.
Banana.document.vatCurrentBalance("S10").vatTaxable * (-1);
Banana.document.vatCurrentBalance("S10").vatAmount * (-1);
They could be positive in the case that there have been a good returned from clients that exceeds the amount of sales.
Vat recoverable
The amounts are usually in negative,so they must be inverted.
Banana.document.vatCurrentBalance("P10").vatTaxable;
Banana.document.vatCurrentBalance("P10").vatAmount;
They could be negative in the case that there have been a good returned to suppliers that exceed the amount of sales.
Combination of sign and typology (VAT Class)
Combining sign and typology we have the different case that come up in the VAT reporting:
- "1" Recoverable VAT Taxable (VAT netto)
- "2" Due VAT Taxable (VAT netto)
- "3" Recoverable VAT posted (VAT Amount)
- "4" Due VAT posted (VAT Amount)
- "5" Recoverable VAT gross amount (VAT taxable + VAT amount)
- "6" Due VAT gross amount (VAT taxable + VAT amount)
The VAT class is used in a function to automate the calculation and reporting with the correct sign.
Period
VAT report are usually done for a period (month, quarter or semester).
You should use the vatCurrentBalance with tha startDate and endDate
//vat report for January 2018
var startDate = "2018-01-01";
var endDate = "2018-01-31
Banana.document.vatCurrentBalance("S10", startDate, endDate).vatTaxable;
Banana.document.vatCurrentBalance("P10", startDate, endDate).vatTaxable;
Summing many VAT codes
You can have the total of different code by separating the VAT code with the sign "|"
//vat report for January 2018
var startDate = "2018-01-01";
var endDate = "2018-01-31
// The taxable amount
Banana.document.vatCurrentBalance("S0|S5|S10|SD5|SD10", startDate, endDate).vatTaxable * (-1);
// The vat due
Banana.document.vatCurrentBalance("S0|S5|S10|SD5|SD10", startDate, endDate).vatAmount * (-1);
// The vat taxable vat recoverable
Banana.document.vatCurrentBalance("P0|P5|P10|PD5|PD10", startDate, endDate).vatTaxable;
// The vat vat recoverable
Banana.document.vatCurrentBalance("P0|P5|P10|PD5|PD10", startDate, endDate).vatAmount;
VAT Extra Info
There are some case where for appropriate reporting the VAT code alone is not sufficient. The VAT Extra info allows to define an extra code and enter in the Transactions to further specify the case. The VAT Extra code allows to limit the number of VAT codes needed, but also to track exceptions.
Printing the VAT transactions list
To print the transactions with VAT or doing VAT calculations, use the function Banana.document.journal().
// use the data from the transactions and only normal accounts (exclude cost centers)
var journal = Banana.document.journal(Banana.document.ORIGINTYPE_CURRENT, Banana.document.ACCOUNTTYPE_NORMAL);
for (i = 0; i < journal.rowCount; i++) {
  var tRow = journal.row(i);
  // we get the vat values
  var vatTaxable = tRow.value('JVatTaxable');
  var vatAmount = tRow.value('VatAmount');
  var vatPosted = tRow.value('VatPosted');
}
Within the samples apps repository you find two examples of transactions list:
- List of transactions with vatTaxable, vatAmount and vatPosted.
- List of transctions with vatTaxable, vatAmount and vatPosted also converted in the transaction's currency.