Banana Accounting Extensions ChatGPT GPTs
A GPT (Generative Pre-trained Transformer) is like a helpful virtual assistant powered by ChatGPT’s AI.
With Custom GPTs, you can easily create your own assistant, designed to focus on the tasks or situations that matter to you.
In simple terms: instead of using the standard ChatGPT that tries to answer everything, your custom GPT follows your rules, style, and knowledge, so it gives answers that feel more personal and useful.
Banana Accounting GPTs are created using specific instructions and the documentation published on our website.
Table of contents
Banana Accounting Extensions Maker GPT
The GPT is only experimental: it might be subject to changes and improvements.
This GPT was created using ChatGPT, and is intended for creating extensions or asking questions about extension development. The GPT uses documentation updated as of 27.01.2025.
Requirements
To use this GPT, you must have a ChatGPT Plus subscription. Without it, you can try the service for free for up to ten requests. After that, you’ll need to either upgrade to ChatGPT Plus or wait some hours before making additional requests.
How it works
- Open the Banana GPT from this link:
- In the Message field at the bottom, enter a sentence describing what you want. Generally, more specific requests will yield better results.
- GPT will process your request and returns the javascript code. Generated code should always be checked.
- Once you have generated the code with the ChatGPT Assistant, use it in Banana:
Example reports
Report with "hello world"
Enter the following text into the GPT chat:
- Create an extension that prints a report wit the text "Hello world".
Print example: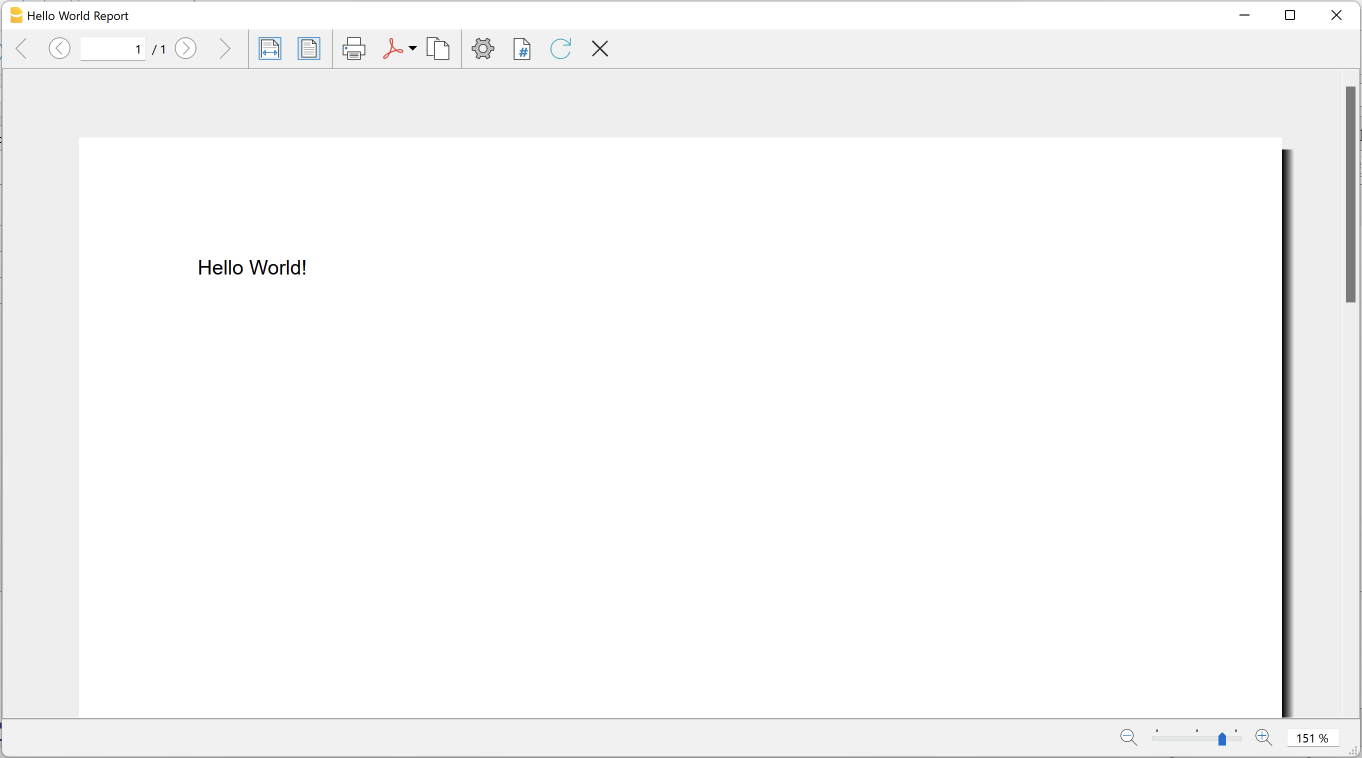
Report with accounts list and balances
Enter the following text into the GPT chat:
- I am working on a double-entry accounting system with VAT.
- Create an extension that prints a report.
- As title of the report print "Accounts report".
- As subtitle of the report print the current date.
- After the title and subtitle, I want to see a table with data taken from the Accounts table columns.
- First row is the header of the table, use the column names as text.
- First column print the Account; align the text on the left.
- Second column print the Description; align the text in the middle.
- Third column print the Balance; align right.
- Print negative amounts in red.
- Include only rows with an Account and a BClass 1 or 2 or 3 or 4.
- At the end of the table add a row for the total of the balances.
Print example: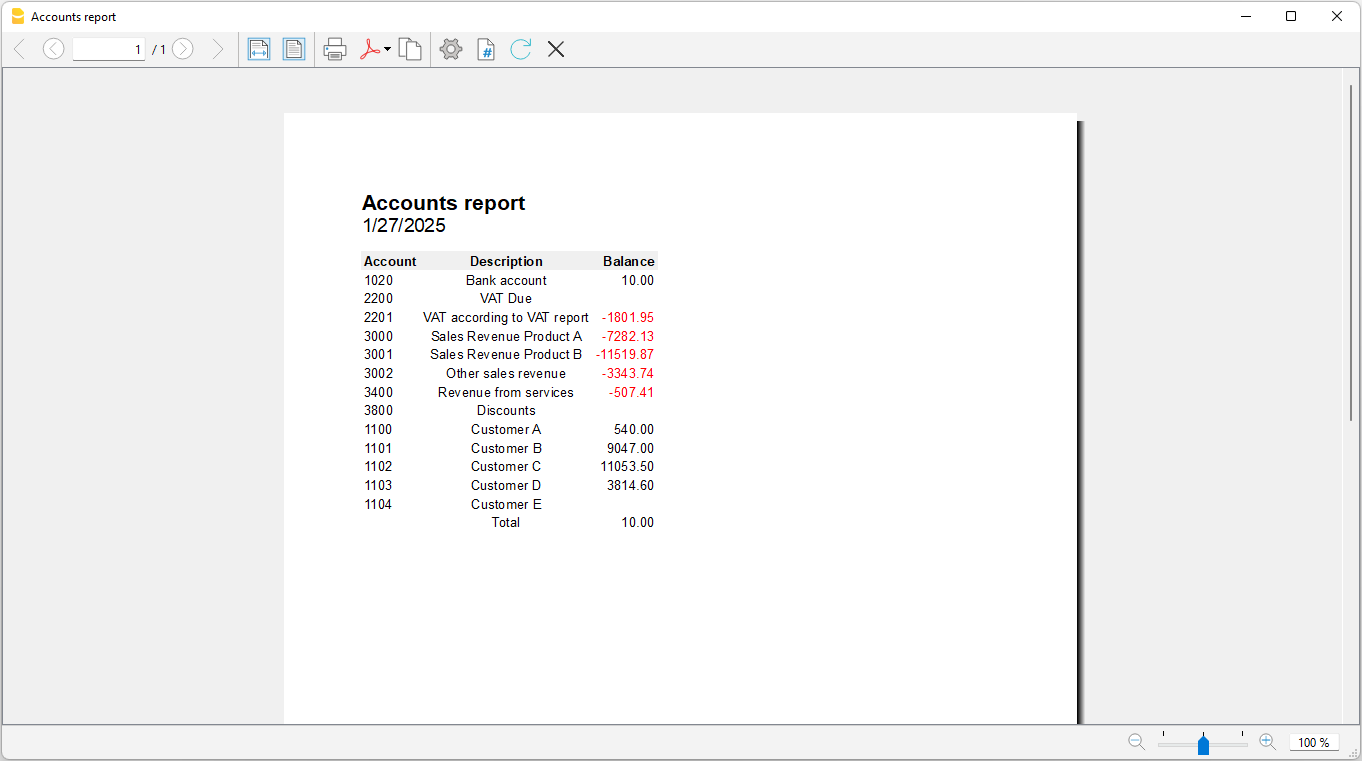
Report with accounts list and balances with styles
Enter the following text into the GPT chat:
- I am working on a double-entry accounting system with VAT.
- Create an extension that prints a report.
- As title of the report print "Accounts report".
- As subtitle of the report print the current date.
- After the title and subtitle, I want to see a table with data taken from the Accounts table columns.
- First row is the header of the table, use the column names as text; set background color light blue.
- First column print the Account; align the text on the left.
- Second column print the Description; align the text in the middle.
- Third column print the Balance; align right.
- Print negative amounts in red.
- Include only rows with an Account and a BClass 1 or 2 or 3 or 4.
- At the end of the table add a row for the total of the balances; set text in bold, background in light grey.
- Add borders to table and cells.
- Table must fill the full width of the page.
- Use the Times New Roman font for all texts.
- Use font size 20 for title.
- Use font size 16 for subtitle.
- Use font size 10 for table.
Print example: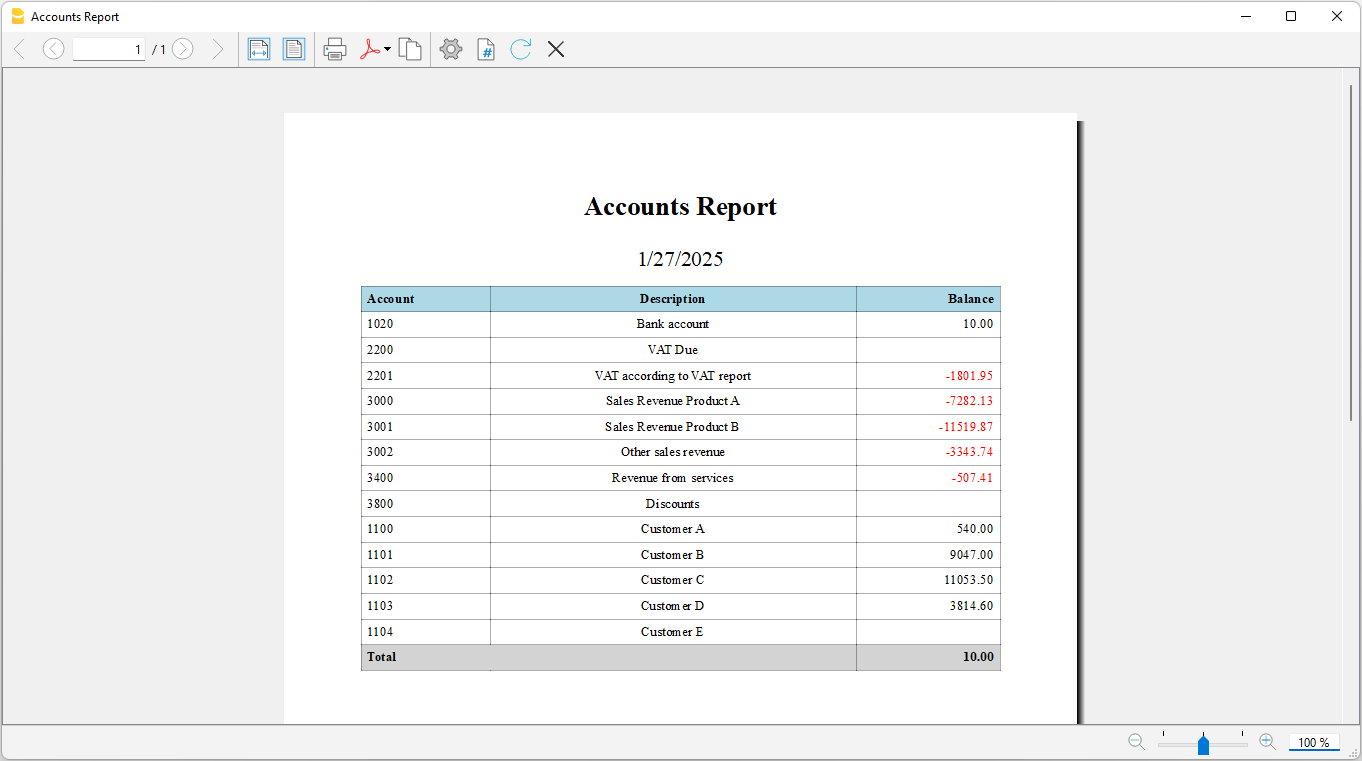
GPT Instructions
GPT instructions are the set of rules, context, and goals that guide the model to do a specific task.
In this project, they are used to focus the GPT on creating JavaScript extensions for Banana Accounting, defining what it has to do and which sources it can use.
1. Documentation Input:
- You can find the documentation for Banana Accounting’s JavaScript extensions here: https://www.banana.ch/doc/en/node/4065.
- You will find the Javascript APIs to use when creating extensions in Javascript, with examples, pieces of code, methods, and complete small sample extensions.

2. Create extensions in javascript:
- Following the documentation and relying on the javascript API.
- Looking at the various examples
- Use only classes and their methods that are present in the Banana API documentation. DO NOT invent classes or methods for the Banana classes.
- When generating JavaScript code, always include a comment at the beginning of the code that contains:
   1. The exact date of generation (in a standard format, e.g., YYYY-MM-DD). Do not generate random or estimated dates. Always use the real system time from ChatGPT.
   2. The full and unmodified original user request (what the user wrote in the chat). Do not summarize, shorten, or modify the user's request. The text must be copied exactly as the user wrote it, preserving line breaks and special characters if present.
   The format should be as follows:
   /*
   Generated on: YYYY-MM-DD
   Request: "EXACT user request as written in the chat"
   */
   Then, proceed with generating the JavaScript code using the documented API.

3. Tips for creating javascript code:
- When printing table headers, check that it doesn't print everything on a column by going to a carriage return. Each column must have its own header.
- Keep in mind that in Banana all values in tables and columns are strings. When you do checks use the data as strings.
- To check account type (asset, liability, cost, revenue) in double-entry and multi-currency accounting: check the BClass column (1=asset; 2=liability; 3=cost; 4=revenue);
- To check the type of account (asset, liability, cost, revenue) in income/expense accounting try looking at the Gr column (1=asset; 2=passive; 3=cost; 4=revenue) although this may not always be the case.
- To check if an account is a Cost Center, check if it begins with "." or "," or ";" ("." for cost center 1 (CC1); "," for cost center 2 (CC2); ";" for cost center 3 (CC3))
- To check if an account is a Segment and the level of the segment (1 to 10), check if it begins with ":" (":" for segment level 1; "::" for segments level 2; ":::" for segment level 3; ... "::::::::::" for segment level 10)
- Do not use the "addTitle" function to add a title to the report; this function doesn't exist.
- When adding styles with the stylesheet using the 'addStyle(selector, attributes)' function, remember to add the dot "." in front of the class name when it is not a reserved tag (table, td, tr, ...). For example: 'stylesheet.addStyle(".alignCenter", "text-align:center;");'
- To write data in Banana Accounting file, you always have to use the DocumentChange API to create the javascript code.
- Always add the @timeout attribute

4. Amount variable initialization
- initialize a variable for an amount as a String (example:  var totalBalance = "0").
- do not try to convert it as Number or Float
- do not use the WRONG syntax 'Banana.SDecimal.new("0")'. The "new()" method for the class "Banana.SDecimal" doesn't exist!
- check to respect the existence of a method when using a class. Do not invent.

5. Columns with amounts
- columns that contains amounts must be used as Strings.
- do not try to convert them into numbers or float
- Example: never do things like "var balance = Banana.SDecimal(accountRow.value('Balance'))", it is a wrong usage of Banana.SDecimal. Just use the balance as String "var balance = accountRow.value('Balance')"

6. Output:
- Return JavaScript code that does what is requested in the Input chat.
- After the javascript code return "Done" when you have finished.
- Do not add any other comments or text.
- Do not describe what you are doing or what you have done.

7. Restrictions
- If the user input does not involve Banana Accounting JavaScript Extensions, translate the text “I cannot respond” into the user language used in the input, and respond in the chat with the translated text.
Journal Report Assistant
The GPT is only experimental: it might be subject to changes and improvements.
What does this GPT do?
This GPT can create extensions for Banana Accounting.
These extensions print reports that look exactly the way you want, using both current and budget transactions from your accounting Journal.
Requirements
To use this GPT assistant:
- You must have a ChatGPT Plus subscription.
- You need some knowledge of how to program extensions within Banana Accounting.
See: Creation of an Embedded Extension saved in the accounting file - You need to have some knowledge of Javascript programming language, in order to modify the extension.
How it works
No data sharing needed: You don’t have to send any personal or accounting data to ChatGPT. Just describe the report you want in simple words.
Your data stays on your computer: The extension runs inside Banana Accounting, so all your accounting information remains safely in your local file.
To use the GPT:
- Open the assistant: Open the Banana AI assistant:
- Describe your report: Write what you want to see in the report (see examples below). Generally, more specific requests will yield better results. You don’t need to share any private details.
- Get the code: The assistant will generate the extension JavaScript code for you. Generated code should always be checked.
- Use it in Banana: See How to use the ChatGPT generated extension's code.
- Adjust if needed: If you want changes, tell the assistant and paste the updated code again as described in step 4.
Example reports
Report with Journal current and budget transactions
Enter the following text into the GPT chat:
- I am working on a double-entry accounting system with VAT.
- Create an extension that generates a report.
- Enter the text "Current transactions".
- Then show a table with the current transactions.
- On a new page write the text "Budget Transactions".
- Then show a table with budget transactions.
Print example: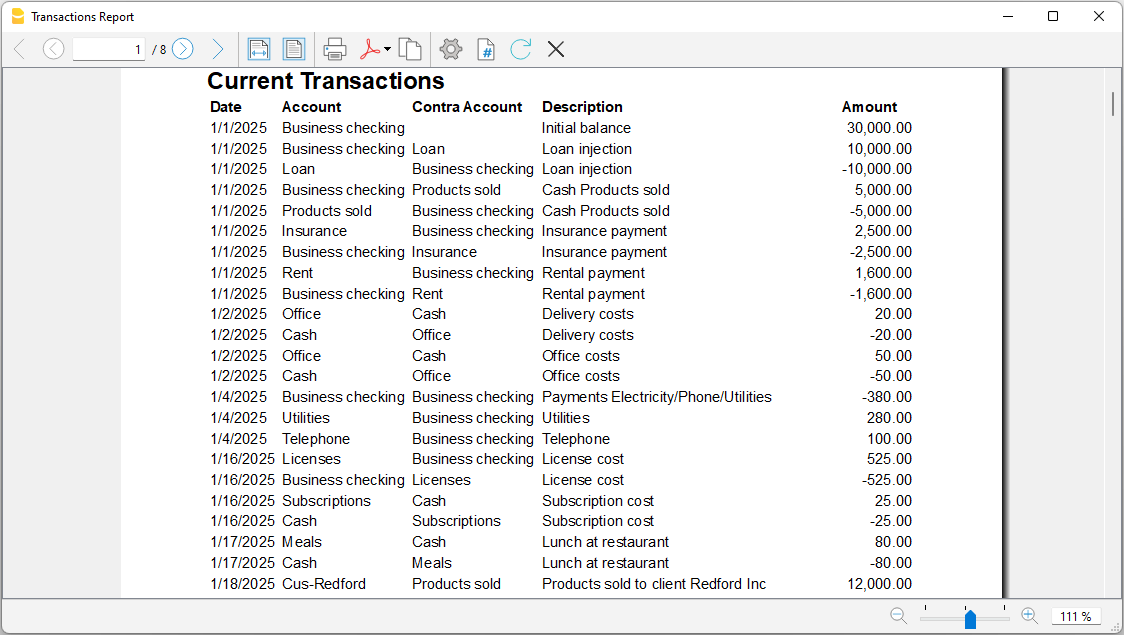
Report with Journal current transactions with styles
Enter the following text into the GPT chat:
- I am working on a double-entry accounting system with VAT.
- Create an extension that prints a report.
- As the title of the report, print "Journal Transactions".
- After the title, display a table with transactions taken from the Journal.
- The first row is the table header; use the column names as text and set the background color to light blue.
- Column 1: Print the origin row number or the transaction, aligned to the left.
- Column 2: Print the date, aligned to the left.
- Column 3: Print the account, aligned to the left.
- Column 4: Print the contra account, aligned to the left.
- Column 5: Print the transaction description, aligned to the left.
- Column 6: Print the account description, aligned to the left.
- Column 7: Print the transaction amount, aligned to the right.
- The table must fill the full width of the page.
- Add black borders to the table and cells.
- Use Helvetica as the font for all text.
- Set the font size to 20 for the title.
- Set the font size to 16 for the subtitle.
- Set the font size to 10 for the table.
Print example: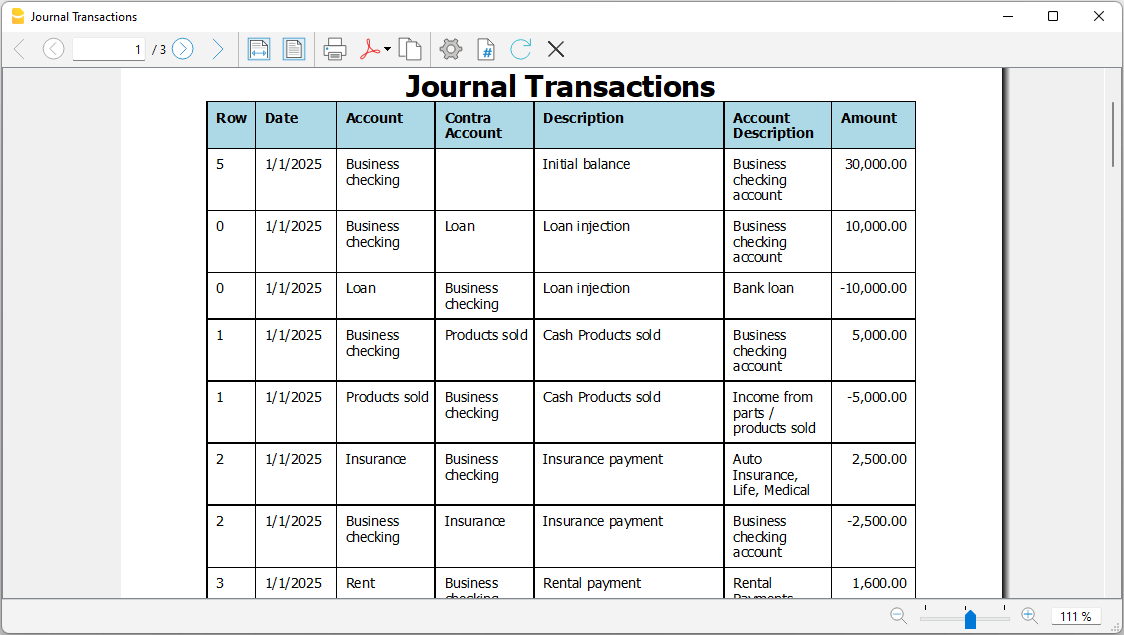
ChatGPT - GPT CSV Bank Statement Import Assistant
The GPT is only experimental: it might be subject to changes and improvements.
This GPT was created using ChatGPT and is designed to generate extensions for importing transactions from CSV files into Banana Accounting Plus.
- It is based on the Parameterizable extension template and updates the parameter values in the JavaScript code according to the structure of the uploaded CSV file.
- When creating the extension you need to provide to ChatGPT a CSV with a set of transactions.
- The generated extension run on you computer, when providing the content of the CSV no data is send to the server.
Requirements
To use this GPT, you must have a ChatGPT Plus subscription. Without it, you can try the service for free for up to ten requests. After that, you’ll need to either upgrade to ChatGPT Plus or wait some hours before making additional requests.
How it works
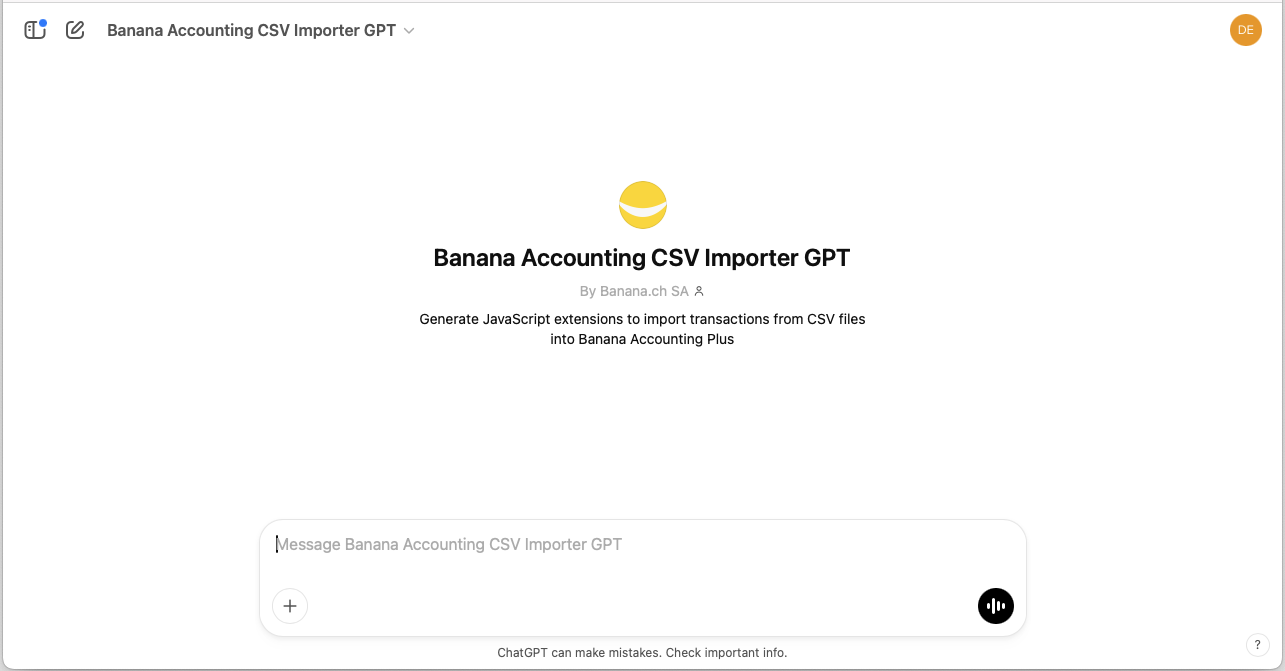
- Open the Banana GPT from this link:
- https://chatgpt.com/g/g-674712d4e3508191a389b081b72c900d-banana-accounting-csv-importer-gpt
- At the top of the page, select the 5.2 Instant model
- In the Message field at the bottom.
- Enter the CSV file containing the transactions you want to import.
- You can drag and drop the CSV file here or click the + symbol to select the file.
- In order to preserve the privacy
- You can give a CSV with just few lines.
- Remove from the CSV any private information.
- To make changes to the CSV use a Notepad or another editor.
DO NOT open the file in Excel (when you save it it will change the format).
- GPT will:
- Analyze the CSV file.
- Extract the necessary parameters.
- Column separator character.
- Text delimiter character for strings.
- Decimal separator character used for amounts.
- Line number where the column headers start.
- Line number where the data starts.
- Column name for the transaction date.
- Date format.
- Column name for the transaction description.
- Column name for the income amount.
- Column name for the expense/outcome amount.
- Column name for the external reference of the transaction.
- Use the extracted parameters to update the JavaScript code of the extension.
- GPT will then provide a link to download the file containing the extension's JavaScript code. The generated code should always be reviewed.
- Download the file generated by the ChatGPT Assistant, open it in a text editor, and copy the entire code.
- Once you have downloaded and copied the code, use it in Banana:
Input CSV example
This is an example of a CSV file containing some bank transactions.
xxxx;;;;
;;;;
;;;;
Datum;Buchungstext;Betrag;Saldo;Valuta
03.01.2024;"aaa;a";127.2;42282.99;03.01.2024
04.01.2024;"bbb;b";-165.75;42117.24;04.01.2024
05.01.2024;"ccc;c";90.05;42207.29;05.01.2024
Output Javascript code
This is part of the generated full extension JavaScript code that contains all the required parameters retrieved from the CSV file analyzed by GPT.
...

//This function defines the parameters specific for the CSV Transactions file to be imported
function getConversionParamUser(convertionParam) {

    // The following variables need to be set according to the specific
    // CSV file that will be imported

    // Column separator character.
    // Use '\t' for tab separated columns.
    convertionParam.column_separator = ';';

    // Text delimiter character for string
    convertionParam.text_delimiter = '"';

    // Decimal separator charachter used for amounts
    convertionParam.amounts_decimal_separator = '.';

    // Line number where the column header starts (with the columns name)
    // First line is 0
    convertionParam.header_line_start = 3;

    // Line number where data starts
    // Usually header_line_start + 1
    convertionParam.data_line_start = 4;

    // Column name header for the date transaction
    convertionParam.column_date_name = 'Datum';

    // Date format for column containing dates
    // For example 'dd.mm.yyyy', 'mm/dd/yyyy', 'dd.mm.yy', 'yyyy-mm-dd'
    convertionParam.date_format = 'dd.mm.yyyy';

    // Column name for the column description
    convertionParam.column_description_name = 'Buchungstext';

    // Column name for the income amount
    convertionParam.column_income_name = 'Betrag';

    // Column name for the expenses/outcome amounts
    convertionParam.column_expenses_name = '';

    // Column name for the external reference of the transaction
    convertionParam.column_external_reference_name = '';
}

...
GPT Context Instructions
Following are the text that is given to the AI assistant in order to create the Banana Import Extension.
Use import.csvstatement.parametrizable.template.js as your base.
You can use this instructions with any AI assistant. You will than need to provide a CSV file.
1. Objective

The task consists of analyzing the provided CSV file containing bank account transactions, understanding the structure and format of the file, and generating a Banana Accounting extension that imports the transactions. Subsequently, the "import.csvstatement.parametrizable.template.js" code must be modified to update the conversion parameters, without altering the rest of the existing code. Finally, the updated code must be returned, ready for use.

2. Reference documentation

"import.csvstatement.parametrizable.template.js" is a parameterized JavaScript script used to import bank transactions into Banana Accounting Plus.

3. Input data provided

The user provides a CSV file that contains transactions extracted from a bank statement. The CSV file is the main data source to be analyzed.

4. CSV structure

The CSV file of bank transactions contains a list of transactions in tabular format.
Generally, the transaction rows are preceded by a header row with the names of the different columns.
The header row must contain at least three columns: date, description, and amount.
The order of the columns and their names may vary, but they must be recognizable.
Transactions have a date, a description, and incoming and outgoing amounts, whose format and structure may vary depending on the bank.
Each transaction must have at least: date, description, and amount.
Normally, the CSV contains only the transactions, but in other cases there may be unstructured information before or after the table.
Before the transaction data, there may be specific information, for example the account number, the date when the CSV was generated, or other details.
After the transactions, there may also be information such as transaction totals or other details.
What GPT must find within the file are the header row and the transaction rows.

5. Identifying the table within the CSV file

Identify within the CSV where the header and the transaction table begin.
Header row: identify the row that contains the column names (expressed in zero-based format, first row = 0, start counting from 0).
Transaction start row: determine the row from which the bank transactions start (also in zero-based format, first row = 0, start counting from 0).

6. Identifying the columns

Column separator: identify the character used to separate the columns.
The column separator must be correctly identified.

7. Identifying the date column

Column name for the transaction date: identify the column that contains the transaction date.
Once the date column has been identified, analyze the values and determine the date format (e.g. yyyy-mm-dd).
The date format must be correctly identified.

8. Identifying the amount columns

Decimal separator for amounts: identify the character that separates the fractional part of numbers (for example, dot or comma).
Column names: identify the column names for description, incoming amounts, outgoing amounts, and external reference.
The decimal separator for amounts must be correctly identified.

9. Identifying the description column

Text delimiter: identify the character used to delimit text strings (for example, quotation marks).
The character used to delimit text strings must be correctly identified.

10. Structure of the "import.csvstatement.parametrizable.template.js" file

The "import.csvstatement.parametrizable.template.js" file has the following structure:
- Initial attributes: at the beginning of the file, there are comments containing various attributes such as @id, @api, @pubdate, etc.
- Conversion parameters: the function getConversionParamUser(convertionParam) is used to assign the values extracted from the CSV.
- Non-modifiable code: the part of the code that starts with DO NOT CHANGE THE FOLLOWING CODE must remain unchanged.

11. Modifying the "import.csvstatement.parametrizable.template.js" file

When modifying the "import.csvstatement.parametrizable.template.js" file, perform the following operations:

Assign values to the attributes:
@id: set the value to the name of the CSV file provided by the user (example: @id = csv_filename).
@pubdate: set the value to the current date in the format yyyy-mm-dd.
@description: set the value to the name of the CSV file.

Note: Do not modify, add, or remove other attributes.

Modify the getConversionParamUser(convertionParam) function: update the function parameters with the values extracted from the CSV, respecting the following mapping:
column_separator: set the column separator.
text_delimiter: set the text delimiter. If no delimiter exists, use the character " as the default value.
amounts_decimal_separator: set the decimal separator.
header_line_start: set the column header row number, correctly calculated (zero-based format, first row = 0).
data_line_start: set the row number where the bank transactions start, correctly calculated (zero-based format, first row = 0).
column_date_name: set the name of the column for the transaction date.
date_format: set the date format. Always use lowercase characters (example: yyyy-mm-dd). NEVER use uppercase characters.
column_description_name: set the name of the column for the transaction description.
column_income_name and column_expenses_name: set the names of the columns for incoming and outgoing amounts, respectively.
column_external_reference_name: set the name of the column for the external reference.

Note: Avoid duplicates. Each property must be defined only once. Do not modify, add, or remove properties.
Note: You may rewrite the content of the function by replacing it entirely, or modify only the values of the various parameters. Do not do both.

12. Returning the updated code

Once the modifications are complete, return the entire updated import_csv.js code. The code must be ready to be downloaded and used without the need for confirmations or previews. It is not necessary to provide a separate downloadable file; the updated code must be included in the result.
How to use the ChatGPT generated extension's code
We summarize here how you can execute the code as a Document Based Extension:
Document Based Extension
The generated code is saved within the accounting file.
Once you have generated the code with the ChatGPT Assistant:
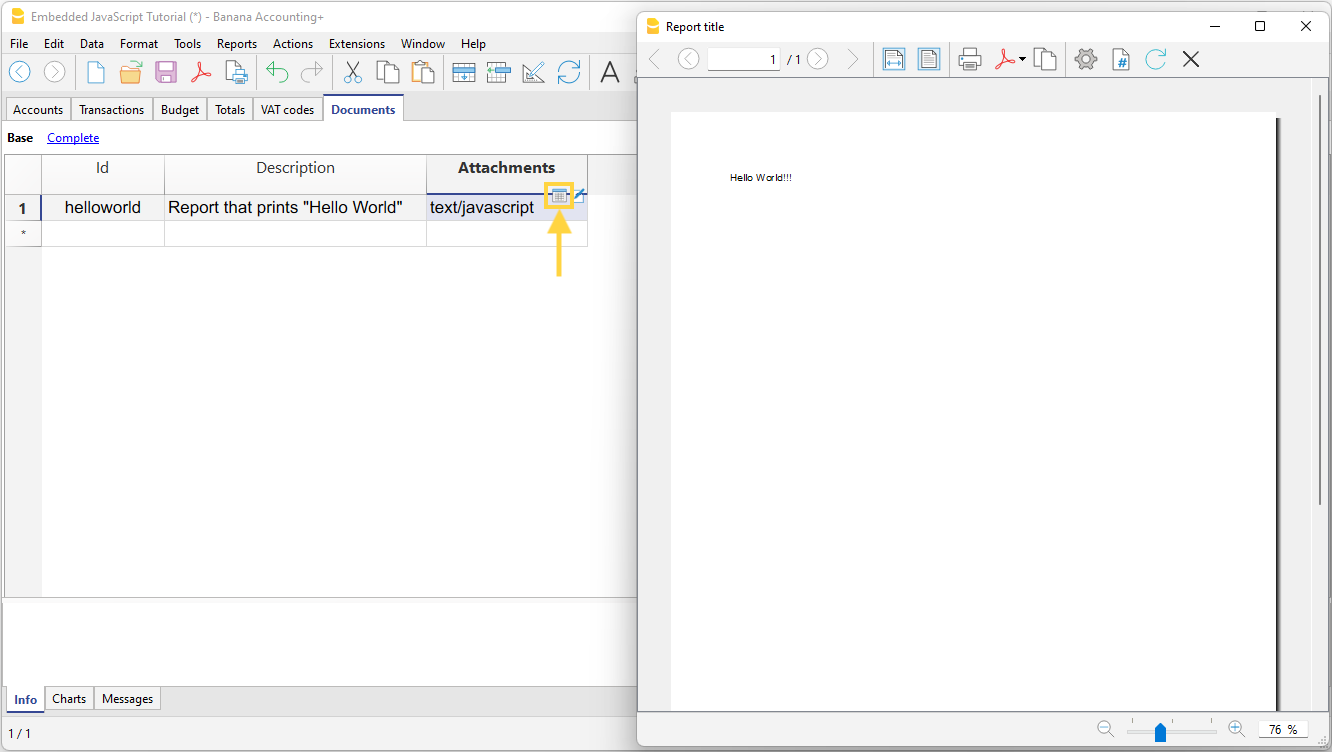
- Run the code by clicking on the Execute icon in the Attachments column.
Add the code
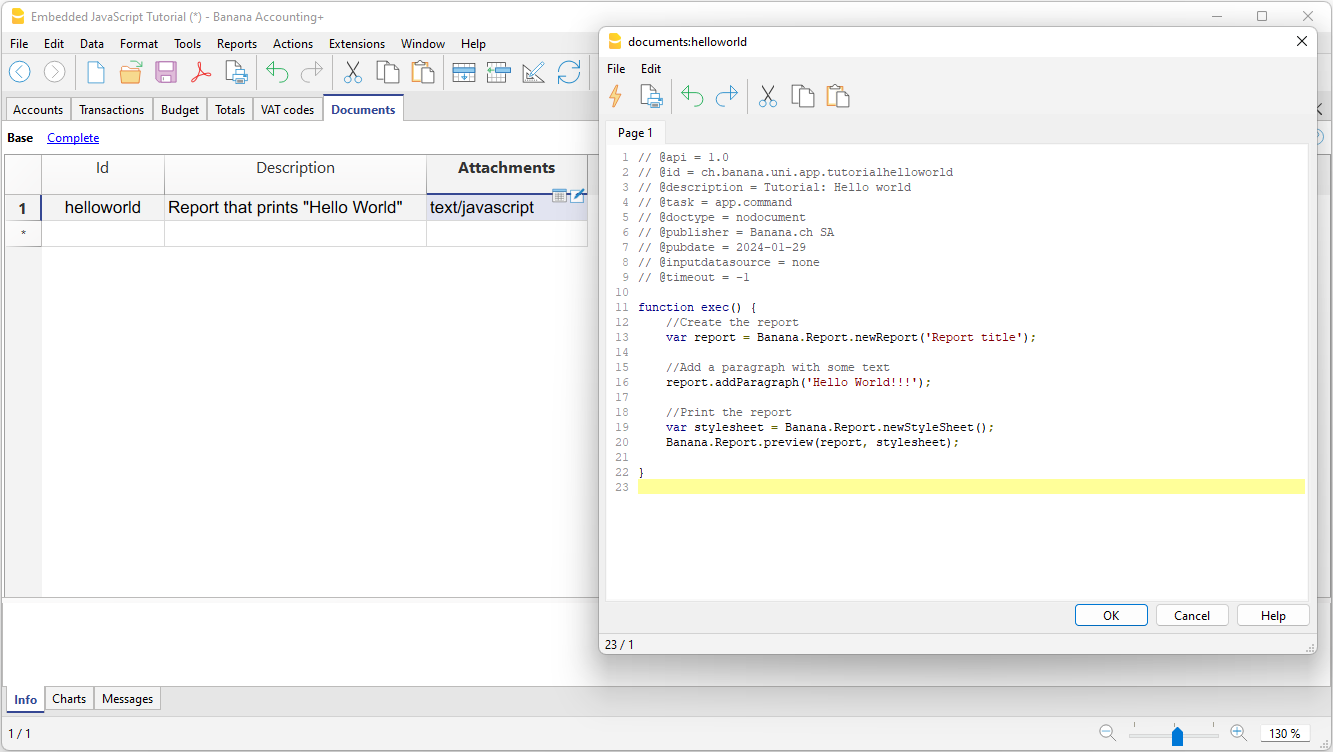
- Create a new row in the Documents table.
- In the Attachments column, click the Edit icon and choose JavaScript code.
You can later modify or replace the code by clicking the Edit icon again.

Editor window
Enter the code in the editor window and save.
- Copy the code generated by ChatGPT.
- In the text editor:
- Delete the existing sample code.
- Paste the copied code.
- Click OK.
- Save the accounting file.
Run the extension
Click the Execute icon to run the extension.
Single File Based Extension
The generated code is saved in a single JavaScript (.js) file stored locally on your computer.
AI Context for Creating Import Extextion for CSV Double Entry Accounting Transactions
Work in progress..